iOS Core Animation: Advanced Techniques (2014)
Part II. Setting Things in Motion
Chapter 7. Implicit Animations
Do what I mean, not what I say.
Edna Krabappel, The Simpsons
Part I covered just about everything that Core Animation can do, apart from animation. Animation is a pretty significant part of the Core Animation framework. In this chapter, we take a look at how it works. Specifically, we explore implicit animations, which are animations that the framework performs automatically (unless you tell it not to).
Transactions
Core Animation is built on the assumption that everything you do onscreen will (or at least may) be animated. Animation is not something that you enable in Core Animation. Animations have to be explicitly turned off; otherwise, they happen all the time.
Whenever you change an animatable property of a CALayer, the change is not reflected immediately onscreen. Instead, the layer property animates smoothly from the previous value to the new one. You don’t have to do anything to make this happen; it’s the default behavior.
This might seem a bit too good to be true, so let’s demonstrate it with an example: We’ll take the blue square project from Chapter 1, “The Layer Tree,” and add a button that will set the layer to a random color. Listing 7.1 shows the code for this. Tap the button and you will see that the color changes smoothly instead of jumping to its new value (see Figure 7.1).
Listing 7.1 Randomizing the Layer Color
@interface ViewController ()
@property (nonatomic, weak) IBOutlet UIView *layerView;
@property (nonatomic, weak) IBOutlet CALayer *colorLayer;
@end
@implementation ViewController
- (void)viewDidLoad
{
[super viewDidLoad];
//create sublayer
self.colorLayer = [CALayer layer];
self.colorLayer.frame = CGRectMake(50.0f, 50.0f, 100.0f, 100.0f);
self.colorLayer.backgroundColor = [UIColor blueColor].CGColor;
//add it to our view
[self.layerView.layer addSublayer:self.colorLayer];
}
- (IBAction)changeColor
{
//randomize the layer background color
CGFloat red = arc4random() / (CGFloat)INT_MAX;
CGFloat green = arc4random() / (CGFloat)INT_MAX;
CGFloat blue = arc4random() / (CGFloat)INT_MAX;
self.colorLayer.backgroundColor = [UIColor colorWithRed:red
green:green
blue:blue
alpha:1.0].CGColor;
}
@end
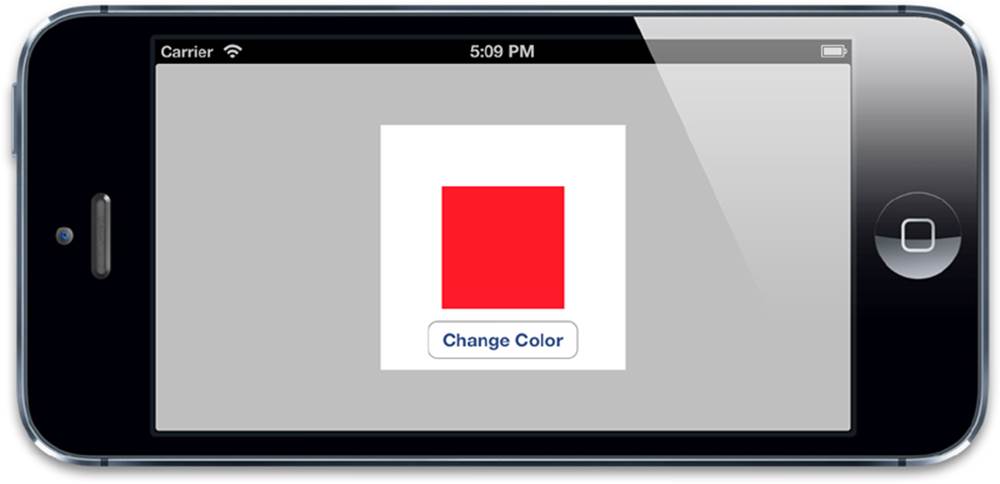
Figure 7.1 Adding a button to change the layer color
This kind of animation is known as implicit animation. It is implicit because we are not specifying what kind of animation we want to happen; we just change a property, and Core Animation decides how and when to animate it. Core Animation also supports explicit animation, which is covered in the next chapter.
When you change a property, how does Core Animation determine the type and duration of the animation that it will perform? The duration of the animation is specified by the settings for the current transaction, and the animation type is controlled by layer actions.
Transactions are the mechanism that Core Animation uses to encapsulate a particular set of property animations. Any animatable layer properties that are changed within a given transaction will not change immediately, but instead will begin to animate to their new value as soon as that transaction is committed.
Transactions are managed using the CATransaction class. The CATransaction class has a peculiar design in that it does not represent a single transaction as you might expect from the name, but rather it manages a stack of transactions without giving you direct access to them.CATransaction has no properties or instance methods, and you can’t create a transaction using +alloc and -init as normal. Instead, you use the class methods +begin and +commit to push a new transaction onto the stack or pop the current one, respectively.
Any layer property change that can be animated will be added to the topmost transaction in the stack. You can set the duration of the current transaction’s animations by using the +setAnimationDuration: method, or you can find out the current duration using the+animationDuration method. (The default is 0.25 seconds.)
Core Animation automatically begins a new transaction with each iteration of the run loop. (The run loop is where iOS gathers user input, handles any outstanding timer or network events, and then eventually redraws the screen.) Even if you do not explicitly begin a transaction using[CATransaction begin], any property changes that you make within a given run loop iteration will be grouped together and then animated over a 0.25-second period.
Armed with this knowledge, we can easily change the duration of our color animation. It would be sufficient to change the animation duration of the current (default) transaction by using the +setAnimationDuration: method, but we will start a new transaction first so that changing the duration doesn’t have any unexpected side effects. Changing the duration of the current transaction might possibly affect other animations that are incidentally happening at the same time (such as screen rotation), so it is always a good idea to push a new transaction explicitly before adjusting the animation settings.
Listing 7.2 shows the modified code. If you run the app, you will notice that the color fade happens much more slowly than before.
Listing 7.2 Controlling Animation Duration Using CATransaction
- (IBAction)changeColor
{
//begin a new transaction
[CATransaction begin];
//set the animation duration to 1 second
[CATransaction setAnimationDuration:1.0];
//randomize the layer background color
CGFloat red = arc4random() / (CGFloat)INT_MAX;
CGFloat green = arc4random() / (CGFloat)INT_MAX;
CGFloat blue = arc4random() / (CGFloat)INT_MAX;
self.colorLayer.backgroundColor = [UIColor colorWithRed:red
green:green
blue:blue
alpha:1.0].CGColor;
//commit the transaction
[CATransaction commit];
}
If you’ve ever done any animation work using the UIView animation methods, this pattern should look familiar. UIView has two methods, +beginAnimations:context: and +commitAnimations, that work in a similar way to the +begin and +commit methods onCATransaction. Any view or layer properties you change between calls to +beginAnimations:context: and +commitAnimations will be animated automatically because what those UIView animation methods are actually doing is setting up a CATransaction.
In iOS 4, Apple added a new block-based animation method to UIView, +animateWithDuration:animations:. This is syntactically a bit cleaner than having separate methods to begin and end a block of property animations, but really it’s just doing the same thing behind the scenes.
The CATransaction +begin and +commit methods are called internally by the +animateWithDuration:animations: method, with the body of the animations block executed in between them so that any property changes that you make inside the block will be encapsulated by the transaction. This has the benefit of avoiding any risk of mismatched +begin and +commit calls due to developer error.
Completion Blocks
The UIView block-based animation allows you to supply a completion block to be called when the animation has finished. This same feature is available when using the CATransaction interface by calling the +setCompletionBlock: method. Let’s adapt our example again so that it performs an action when the color change has completed. We’ll attach a completion block and use it to trigger a second animation that spins the layer 90 degrees each time the color has changed. Listing 7.3 shows the code, and Figure 7.2 shows the result.
Listing 7.3 Adding a Callback When the Color Animation Completes
- (IBAction)changeColor
{
//begin a new transaction
[CATransaction begin];
//set the animation duration to 1 second
[CATransaction setAnimationDuration:1.0];
//add the spin animation on completion
[CATransaction setCompletionBlock:^{
//rotate the layer 90 degrees
CGAffineTransform transform = self.colorLayer.affineTransform;
transform = CGAffineTransformRotate(transform, M_PI_2);
self.colorLayer.affineTransform = transform;
}];
//randomize the layer background color
CGFloat red = arc4random() / (CGFloat)INT_MAX;
CGFloat green = arc4random() / (CGFloat)INT_MAX;
CGFloat blue = arc4random() / (CGFloat)INT_MAX;
self.colorLayer.backgroundColor = [UIColor colorWithRed:red
green:green
blue:blue
alpha:1.0].CGColor;
//commit the transaction
[CATransaction commit];
}
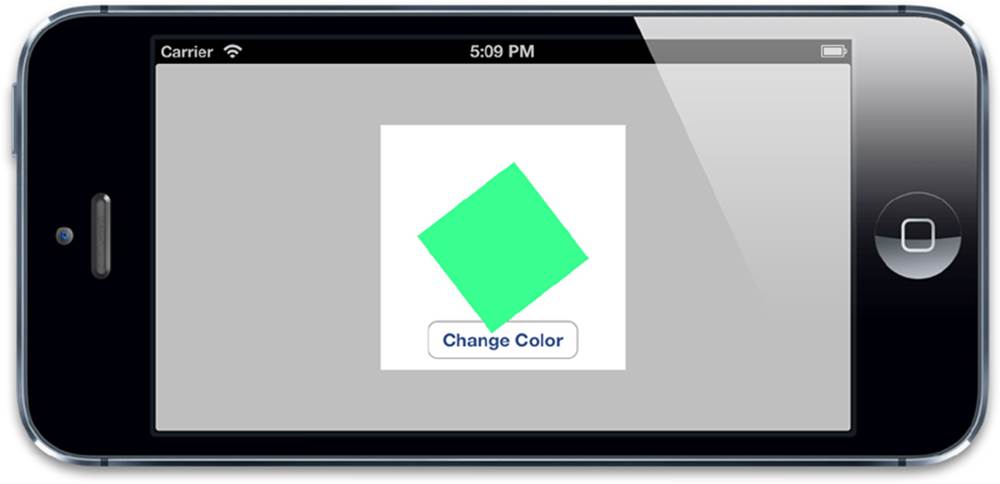
Figure 7.2 A rotation animation applied after the color fade has finished
Notice that our rotation animation is much faster than our color fade animation. That’s because the completion block that applies the rotation animation is executed after the color fade animation’s transaction has been committed and popped off the stack. It is, therefore, using the default transaction, with the default animation duration of 0.25 seconds.
Layer Actions
Now let’s try an experiment: Instead of animating a standalone sublayer, we’ll try directly animating the backing layer of our view. Listing 7.4 shows an adapted version of the code from Listing 7.2 that removes the colorLayer and sets the layerView backing layer’s background color directly.
Listing 7.4 Setting the Property of the Backing Layer Directly
@interface ViewController ()
@property (nonatomic, weak) IBOutlet UIView *layerView;
@end
@implementation ViewController
- (void)viewDidLoad
{
[super viewDidLoad];
//set the color of our layerView backing layer directly
self.layerView.layer.backgroundColor = [UIColor blueColor].CGColor;
}
- (IBAction)changeColor
{
//begin a new transaction
[CATransaction begin];
//set the animation duration to 1 second
[CATransaction setAnimationDuration:1.0];
//randomize the layer background color
CGFloat red = arc4random() / (CGFloat)INT_MAX;
CGFloat green = arc4random() / (CGFloat)INT_MAX;
CGFloat blue = arc4random() / (CGFloat)INT_MAX;
self.layerView.layer.backgroundColor = [UIColor colorWithRed:red
green:green
blue:blue
alpha:1.0].CGColor;
//commit the transaction
[CATransaction commit];
}
If you run the project, you’ll notice that the color snaps to its new value immediately when the button is pressed instead of animating smoothly as before. What’s going on? The implicit animation seems to have been disabled for the UIView backing layer.
Come to think of it, we’d probably have noticed if UIView properties always animated automatically whenever we modified them. So, if UIKit is built on top of Core Animation (which always animates everything by default), how come implict animations are disabled by default in UIKit?
We know that Core Animation normally animates any property change of a CALayer (provided it can be animated) and that UIView somehow turns this behavior off for its backing layer. To understand how it does that, we need to understand how implicit animations are implemented in the first place.
The animations that CALayer automatically applies when properties are changed are called actions. When a property of a CALayer is modified, it calls its -actionForKey: method, passing the name of the property in question. What happens next is quite nicely documented in the header file for CALayer, but it essentially boils down to this:
1. The layer first checks whether it has a delegate and if the delegate implements the -actionForLayer:forKey method specified in the CALayerDelegate protocol. If it does, it will call it and return the result.
2. If there is no delegate, or the delegate does not implement -actionForLayer:forKey, the layer checks in its actions dictionary, which contains a mapping of property names to actions.
3. If the actions dictionary does not contain an entry for the property in question, the layer searches inside its style dictionary hierarchy for any actions that match the property name.
4. Finally, if it fails to find a suitable action anywhere in the style hierarchy, the layer will fall back to calling the -defaultActionForKey: method, which defines standard actions for known properties.
The result of this exhaustive search will be that -actionForKey: either returns nil (in which case, no animation will take place and the property value will change immediately) or an object that conforms to the CAAction protocol, which CALayer will then use to animate between the previous and current property values.
And that explains how UIKit disables implicit animations: Every UIView acts as the delegate for its backing layer and provides an implementation for the -actionForLayer:forKey method. When not inside an animation block, UIView returns nil for all layer actions, but within the scope of an animation block it returns non-nil values. We can demonstrate this with a simple experiment (see Listing 7.5).
Listing 7.5 Testing UIView’s actionForLayer:forKey: Implementation
@interface ViewController ()
@property (nonatomic, weak) IBOutlet UIView *layerView;
@end
@implementation ViewController
- (void)viewDidLoad
{
[super viewDidLoad];
//test layer action when outside of animation block
NSLog(@"Outside: %@", [self.layerView actionForLayer:self.layerView.layer
forKey:@"backgroundColor"]);
//begin animation block
[UIView beginAnimations:nil context:nil];
//test layer action when inside of animation block
NSLog(@"Inside: %@", [self.layerView actionForLayer:self.layerView.layer
forKey:@"backgroundColor"]);
//end animation block
[UIView commitAnimations];
}
@end
When we run the project, we see this in the console:
$ LayerTest[21215:c07] Outside: <null>
$ LayerTest[21215:c07] Inside: <CABasicAnimation: 0x757f090>
So as predicted, UIView is disabling implicit animation when properties are changed outside of an animation block by returning nil for the property actions. The action that it returns when animation is enabled depends on the property type, but in this case, it’s a CABasicAnimation. (You’ll learn what that is in Chapter 8, “Explicit Animations”.)
Returning nil for the action is not the only way to disable implicit animations; CATransaction has a method called +setDisableActions: that can be used to enable or disable implicit animation for all properties simultaneously. If we modify the code in Listing 7.2 by adding the following line after [CATransaction begin], it will prevent any animations from taking place:
[CATransaction setDisableActions:YES];
So to recap, we’ve learned the following:
![]() UIView backing layers do not have implicit animation enabled. The only ways to animate the properties of a backing layer are to use the UIView animation methods (instead of relying on CATransaction), to subclass UIView itself and override the -actionForLayer:forKey: method, or to create an explicit animation (see Chapter 8 for details).
UIView backing layers do not have implicit animation enabled. The only ways to animate the properties of a backing layer are to use the UIView animation methods (instead of relying on CATransaction), to subclass UIView itself and override the -actionForLayer:forKey: method, or to create an explicit animation (see Chapter 8 for details).
![]() For hosted (that is, nonbacking) layers, we can control the animation that will be selected for an implicit property animation by either implementing the -actionForLayer:forKey: layer delegate method, or by providing an actions dictionary.
For hosted (that is, nonbacking) layers, we can control the animation that will be selected for an implicit property animation by either implementing the -actionForLayer:forKey: layer delegate method, or by providing an actions dictionary.
Let’s specify a different action for our color fade example. We’ll modify Listing 7.1 by setting a custom actions dictionary for colorLayer. We could implement this using the delegate instead, but the actions dictionary approach requires marginally less code. So how can we create a suitable action object?
Actions are usually specified using an explicit animation object that will be called implicitly by Core Animation when it is needed. The animation we are using here is a push transition, which is implemented with an instance of CATransition (see Listing 7.6).
Transitions are explained fully in Chapter 8, but suffice to say for now that CATransition conforms to the CAAction protocol, and can therefore be used as a layer action. The result is pretty cool; whenever we change our layer color, the new value slides in from the left instead of using the default crossfade effect (see Figure 7.3).
Listing 7.6 Implementing a Custom Action
@interface ViewController ()
@property (nonatomic, weak) IBOutlet UIView *layerView;
@property (nonatomic, weak) IBOutlet CALayer *colorLayer;
@end
@implementation ViewController
- (void)viewDidLoad
{
[super viewDidLoad];
//create sublayer
self.colorLayer = [CALayer layer];
self.colorLayer.frame = CGRectMake(50.0f, 50.0f, 100.0f, 100.0f);
self.colorLayer.backgroundColor = [UIColor blueColor].CGColor;
//add a custom action
CATransition *transition = [CATransition animation];
transition.type = kCATransitionPush;
transition.subtype = kCATransitionFromLeft;
self.colorLayer.actions = @{@"backgroundColor": transition};
//add it to our view
[self.layerView.layer addSublayer:self.colorLayer];
}
- (IBAction)changeColor
{
//randomize the layer background color
CGFloat red = arc4random() / (CGFloat)INT_MAX;
CGFloat green = arc4random() / (CGFloat)INT_MAX;
CGFloat blue = arc4random() / (CGFloat)INT_MAX;
self.colorLayer.backgroundColor = [UIColor colorWithRed:red
green:green
blue:blue
alpha:1.0].CGColor;
}
@end
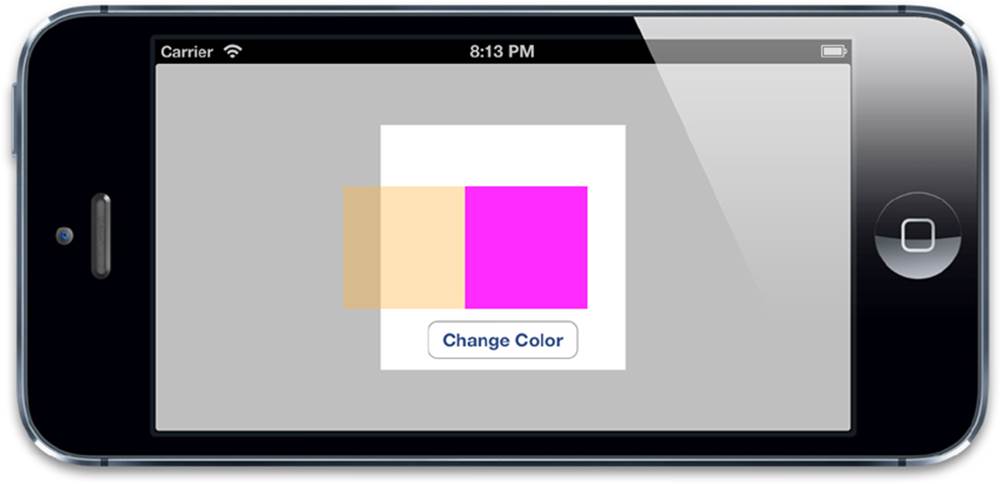
Figure 7.3 The color value animation implemented using a push transition
Presentation Versus Model
The behavior of properties on a CALayer is unusual, in that changing a layer property does not have an immediate effect, but gradually updates over time. How does that work?
When you change a property of a layer, the property value is actually updated immediately (if you try to read it, you’ll find that the value is whatever you just set it to), but that change is not reflected onscreen. That’s because the property you set doesn’t adjust the appearance of the layer directly; instead, it defines the appearance that the layer is going to have when that property’s animation has completed.
When you set the properties of a CALayer, you are really defining a model for how you want the display to look at the end of the current transaction. Core Animation then acts as a controller and takes responsibility for updating the view state of these properties onscreen based on the layer actions and transaction settings.
What we are talking about is effectively the MVC pattern in miniature. CALayer is a visual class that you would normally associate with the user interface (aka view) part of the MVC (Model-View-Controller) pattern, but in the context of the user interface itself, CALayer behaves more like a model for how the view is going to look when all animations have completed. In fact, in Apple’s own documentation, the layer tree is sometimes referred to as the model layer tree.
In iOS, the screen is redrawn 60 times per second. If the animation duration is longer than one 60th of a second, Core Animation is therefore required to recomposite the layer onto the screen multiple times between when you set the new value for an animatable property and when that new value is eventually reflected onscreen. This implies that CALayer must somehow maintain a record of the current display value of the property in addition to its “actual” value (the value that you’ve set it to).
The display values of each layer’s properties are stored in a separate layer called the presentation layer, which is accessed via the -presentationLayer method. The presentation layer is essentially a duplicate of the model layer, except that its property values always represent the current appearance at any given point in time. In other words, you can access a property of the presentation layer to find out the current onscreen value of the equivalent model layer property (see Figure 7.4).
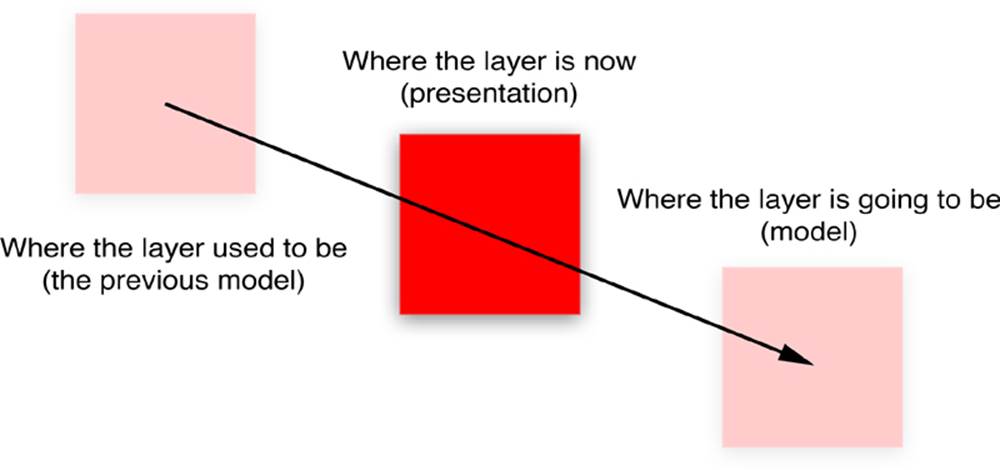
Figure 7.4 How model relates to presentation for a moving layer
We mentioned in Chapter 1 that in addition to the layer tree there is a presentation tree. The presentation tree is the tree formed by the presentation layers of all the layers in the layer tree. Note that the presentation layer is only created when a layer is first committed (that is, when it’s first displayed onscreen), so attempting to call -presentationLayer before then will return nil.
You may notice that there is also a –modelLayer method. Calling –modelLayer on a presentation layer will return the underlying CALayer that it is presenting. Calling -modelLayer on a regular layer just returns –self. (We already established that ordinary layers are in fact a type of model.)
Most of the time, you do not need to access the presentation layer directly; you can just interact with the properties of the model layer and let Core Animation take care of updating the display. Two cases where the presentation layer does become useful are for synchronizing animations and for handling user interaction:
![]() If you are implementing timer-based animations (see Chapter 11, “Timer-Based Animation”) in addition to ordinary transaction-based animations, it can be useful to be able to find out exactly where a given layer appears to be onscreen at a given point in time so that you can position other elements to correctly align with the animation.
If you are implementing timer-based animations (see Chapter 11, “Timer-Based Animation”) in addition to ordinary transaction-based animations, it can be useful to be able to find out exactly where a given layer appears to be onscreen at a given point in time so that you can position other elements to correctly align with the animation.
![]() If you want your animated layers to respond to user input, and you are using the -hitTest: method (see Chapter 3, “Layer Geometry”) to determine whether a given layer is being touched, it makes sense to call -hitTest: against the presentation layer rather than the model layer because that represents the layer’s position as the user currently sees it, not as it will be when the current animation has finished.
If you want your animated layers to respond to user input, and you are using the -hitTest: method (see Chapter 3, “Layer Geometry”) to determine whether a given layer is being touched, it makes sense to call -hitTest: against the presentation layer rather than the model layer because that represents the layer’s position as the user currently sees it, not as it will be when the current animation has finished.
We can demonstrate the latter case with a simple example (see Listing 7.7). In the example, tapping anywhere onscreen animates the layer to the position you’ve touched. Tapping on the layer itself sets its color to a random value. We determine whether the tap is inside the layer by calling the-hitTest: method on the layer’s presentation layer.
If you modify the code so that -hitTest: is called directly on the colorLayer instead of its presentation layer, you will see that it doesn’t work correctly when the layer is moving. Instead of tapping the layer, you now have to tap the location that the layer is moving toward for it to register the hit (which is why we used the presentation layer for hit testing originally).
Listing 7.7 Using presentationLayer to Determine Current Layer Position
@interface ViewController ()
@property (nonatomic, strong) CALayer *colorLayer;
@end
@implementation ViewController
- (void)viewDidLoad
{
[super viewDidLoad];
//create a red layer
self.colorLayer = [CALayer layer];
self.colorLayer.frame = CGRectMake(0, 0, 100, 100);
self.colorLayer.position = CGPointMake(self.view.bounds.size.width / 2,
self.view.bounds.size.height / 2);
self.colorLayer.backgroundColor = [UIColor redColor].CGColor;
[self.view.layer addSublayer:self.colorLayer];
}
- (void)touchesBegan:(NSSet *)touches withEvent:(UIEvent *)event
{
//get the touch point
CGPoint point = [[touches anyObject] locationInView:self.view];
//check if we've tapped the moving layer
if ([self.colorLayer.presentationLayer hitTest:point])
{
//randomize the layer background color
CGFloat red = arc4random() / (CGFloat)INT_MAX;
CGFloat green = arc4random() / (CGFloat)INT_MAX;
CGFloat blue = arc4random() / (CGFloat)INT_MAX;
self.colorLayer.backgroundColor = [UIColor colorWithRed:red
green:green
blue:blue
alpha:1.0].CGColor;
}
else
{
//otherwise (slowly) move the layer to new position
[CATransaction begin];
[CATransaction setAnimationDuration:4.0];
self.colorLayer.position = point;
[CATransaction commit];
}
}
@end
Summary
This chapter covered implicit animations and the mechanism that Core Animation uses to select an appropriate animation action for a given property. You also learned how UIKit utilizes Core Animation’s implicit animation mechanism to power its own explicit system, where animations are disabled by default and only enabled when requested. Finally, you learned about the presentation and model layers and how they allow Core Animation to keep track of both where a layer is and where it’s going to be.
In the next chapter, we look at the explicit animation types provided by Core Animation, which can be used either to directly animate layer properties, or to override the default layer actions.
All materials on the site are licensed Creative Commons Attribution-Sharealike 3.0 Unported CC BY-SA 3.0 & GNU Free Documentation License (GFDL)
If you are the copyright holder of any material contained on our site and intend to remove it, please contact our site administrator for approval.
© 2016-2026 All site design rights belong to S.Y.A.