Learn iOS 8 App Development, Second Edition (2014)
Chapter 14. Game On!
Games are a big deal. I’m uncomfortable confessing exactly how many hours I’ve spent capturing enemy suns or dodging zombies, but let’s just say that iOS games can be both engaging and addictive. While this book isn’t about game development—there are some great books on the subject—I would like to give you a little taste of how games are created in iOS. In this chapter, you’ll learn the following:
· How to create a simple iOS game based on SpriteKit
· How to design a SpriteKit scene
· How to make scene transitions
· How to add image and text content to your scenes
· How to write responder functions to provide user interaction
· How to define the physical behavior of nodes
· How to create physical relationships between nodes using attachments
· How to determine when nodes collide and do something when they do
· How to attach actions to nodes
The design of this game is simple. You’re a crewmember on the International Space Station (ISS), and you’ve been delivered a rare treat: fresh1 vegetables! Naturally, you want to make a salad. But you only have lab equipment on hand—a beaker and a lab dish—and then there’s that pesky problem of microgravity. What you end up with is a bunch of salad parts floating around the cabin. Your job is to herd those ingredients into the beaker using the lab dish, vaguely like the interface shown in Figure 14-1.
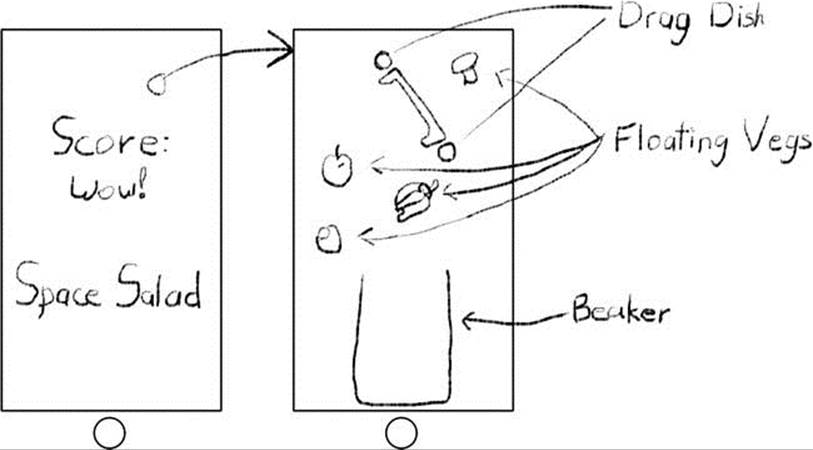
Figure 14-1. SpaceSalad design
To create SpaceSalad, you’re going to use SpriteKit. SpriteKit is one of the five key animation technologies in iOS, as described in Chapter 11. Let’s get started.
SpaceSalad
Begin by creating a new iOS app. This time, choose the Game app template, as shown in Figure 14-2.

Figure 14-2. Choosing the Game iOS app template
On the next sheet, fill in the app’s name (SpaceSalad), enter your Organization Identifier, and choose the Swift language. This template has an additional choice for Game Technology. Pick SpriteKit, as shown in Figure 14-3. The Game template is actually four templates in one. Depending on your Game Technology choice, you’ll get a radically different starting point for your app.
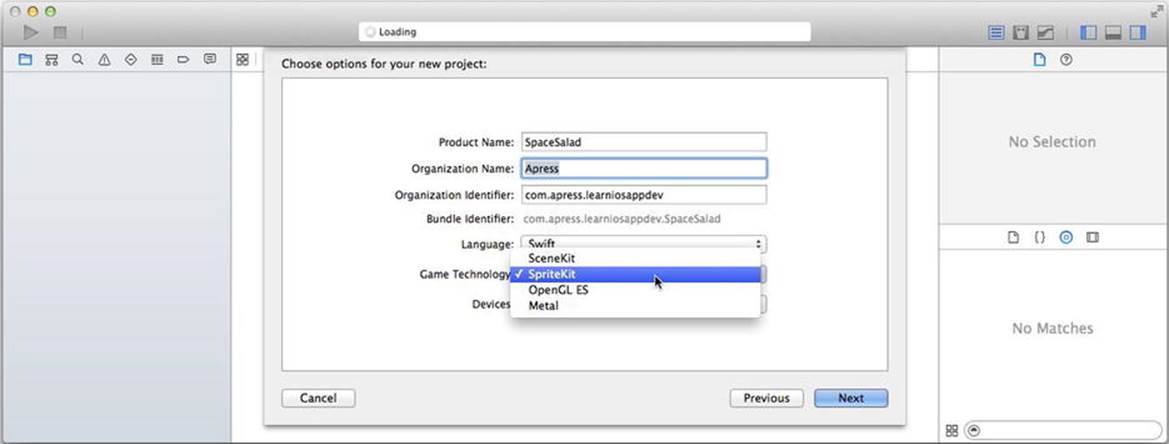
Figure 14-3. Creating a SpriteKit-based game app
Click the Create button and choose a location to save your new project. The app template created a fully functional “game” that you can run right now, as shown in Figure 14-4. Go ahead, I’ll wait.
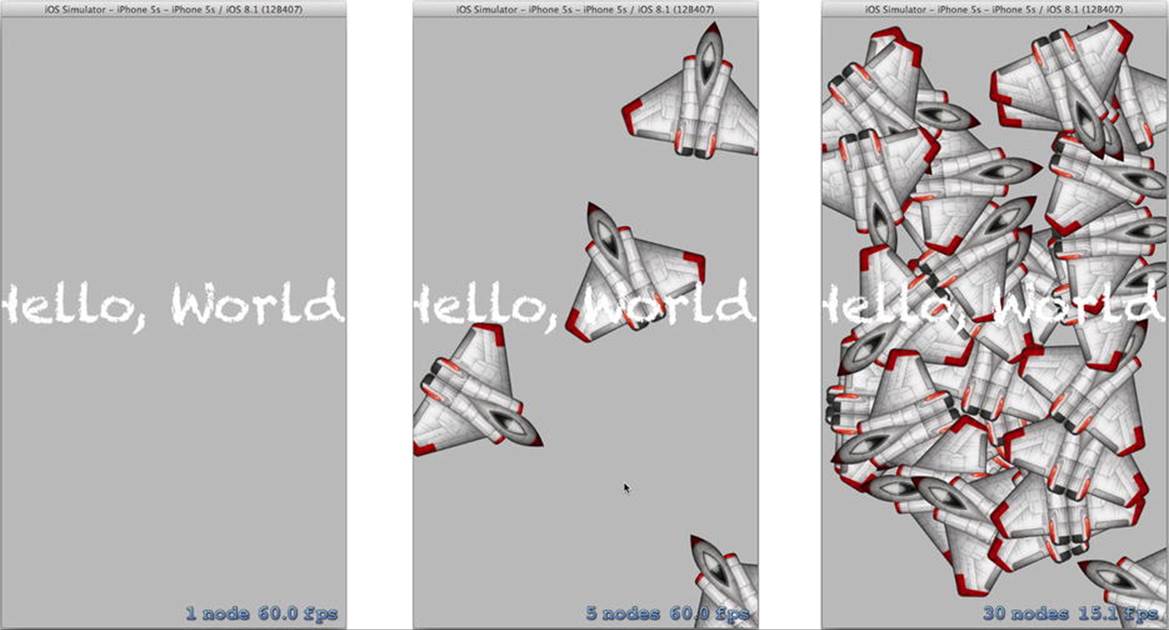
Figure 14-4. Running the SpriteKit template app
The app created by the template displays some text—the traditional “Hello, World” message. If you tap the screen, a rotating spaceship appears, as shown in the middle of Figure 14-4. As you continue to tap, more and more spaceships appear, all rotating simultaneously. To understand why this is so cool, you need to know a little about SpriteKit and how it differs from UIView and similar classes that you’ve used up to now.
A Brief Tour of SpriteKit
As I explained in Chapter 11, SpriteKit is designed for continuous 2D animation. It accomplishes this by having the graphics-processing unit (GPU) do most of the work. The code that’s running your app—in the central processing unit (CPU)—does few of the moment-to-moment computations needed to keep the animation going. It’s more of a director. It sets up the scene, places the actors, and yells “Action!” SpriteKit takes it from there.
SpriteKit is designed to be comfortable and as familiar as possible to iOS developers who have been programming with classes such as UIView, UIViewController, UIResponder, and so on. At the same time, there are a number of important differences, many necessary because of the separation of the CPU and GPU and other performance considerations. This makes working with SpriteKit a kind of “Bizarro World” experience, full of recognizable concepts and objects but also awash with inexplicable omissions and puzzling restrictions.
The Familiar
Compared to working with view objects, here’s what you’ll find familiar:
· SpriteKit nodes are like view objects. Each one represents something in the interface.
· A node has a position and a frame.
· Each node defines a local coordinate system.
· A node can be added to another node, becoming its subnode.
· Nodes can be scaled and rotated.
· Nodes can, naturally, be animated.
· Nodes are subclasses of UIResponder and can handle all of the standard touch events.
If you substitute the word view for node, you’ll immediately understand these concepts and their relationships. Similarly, a SpriteKit scene and a view controller perform similar roles and tasks.
The Unfamiliar
The big differences between SpriteKit nodes and view objects are as follows:
· Your code does not draw a node’s content.
· The origin of a node’s coordinate system is at its lower-left, not its upper-left, corner.
· Nodes can have a physics body that describes how it behaves and interacts with other nodes.
· Nodes have a string identifier rather than a numeric tag.
· Nodes appear in a SpriteKit scene.
· Scenes are designed in a special Interface Builder scene editor.
· SpriteKit scenes are presented, one at a time, in a SpriteKit view. A SpriteKit view is a UIView subclass and can appear anywhere a UIView can.
· There is no auto-layout, constraints, or adaption in SpriteKit.
The first difference is the big one. Nodes are drawn (rendered in GPU-speak) entirely by the graphics-processing unit. To accomplish this, all of the information needed to draw that node is first transferred to the GPU. Consequently, there is no drawRect(_:) function on a node, and you can’t use any of the core graphics drawing functions to directly draw your node. Instead, specialized subclasses of SKNode render an image (SKSpriteNode), text (SKLabelNode), or a geometric shape (SKShapeNode) in the scene.
Note There are two exceptions to this. First, you can always use core graphics to draw into an off-screen context, capture that as an image, and then supply that image to an SKSpriteNode. Second, it’s possible to write your own dynamic rendering code that runs in the GPU. But, as I explained in Chapter 11, that’s another world and well beyond the scope of this book.
The coordinates system is also vertically flipped from the one used by UIView objects. The origin of the coordinate system is in the lower-left corner of a node, and y coordinates increase as they move up.
The second big difference is how nodes are animated. In UIKit, you animate nodes by telling iOS what you want animated. You tell it to slide your view from this position to that position, change its scale, and fade in over a period of time. In SpriteKit, you animate nodes by telling iOS whythey should animate. You give nodes a shape, assign them a mass, define the forces that act on them, and tell SpriteKit what other nodes they collide with. SpriteKit then takes over and continuously animates the nodes, based on your description.
Finally, a SpriteKit scene (SKScene) takes on much the same role as a view controller, but it is not a view controller. A SpriteKit view (SKView, a UIView subclass) is the host for a SpriteKit scene. The SKView presents one SKScene at a time. It can replace it with a new scene, complete with an animated transition—much the way one view controller presents another view controller. But the host SKView and the view controller that owns it never change.
Note In this chapter, scene refers to a SpriteKit scene, not a storyboard scene.
Now that you have the general concepts, let’s start simple. Begin by creating a SpriteKit scene that displays a single image using a single node. That doesn’t sound too hard.
Making the Scene
The Game template creates a typical arrangement for hosting a SpriteKit view. The initial view controller (Game View Controller) contains a single root view object, whose class has been changed to SKView in the storyboard, as shown in Figure 14-5. The view controller does very little beyond acting as a host for the SKView.
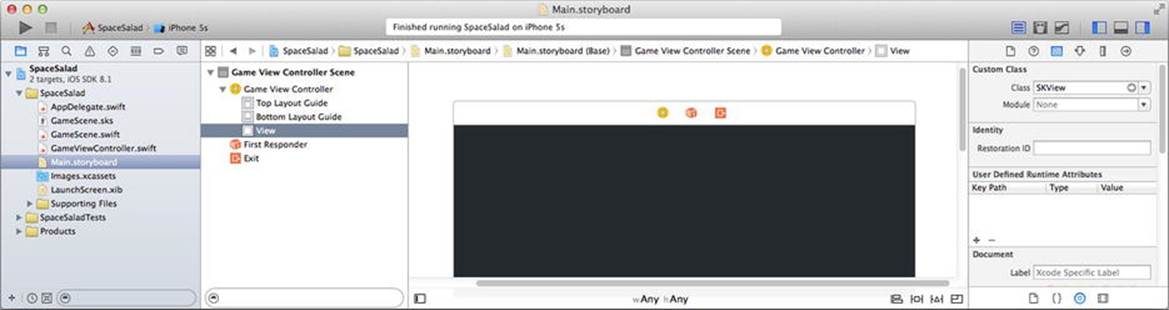
Figure 14-5. View controller hosting a SpriteKit view
Unlike view controllers and storyboards, SpriteKit scenes do not automatically load their scene files. To get the game going, so to speak, the view controller loads the view’s initial scene. Let’s take a look at that code.
Find the GameViewController.swift file and locate the viewDidLoad() function. Right now, the code there looks something like the following:
override func viewDidLoad() {
super.viewDidLoad()
if let scene = GameScene.unarchiveFromFile("GameScene") as? GameScene {
let skView = self.view as SKView
skView.showsFPS = true
skView.showsNodeCount = true
skView.ignoresSiblingOrder = true
scene.scaleMode = .AspectFill
skView.presentScene(scene)
}
}
This code calls the unarchiveFromFile(_:) function to load the GameScene object from the GameScene.sks file. An .sks file is a SpriteKit scene file. It then sets some properties of the scene and presents it in the SpriteKit view.
UNARCHIVING A SPRITEKIT SCENE
The unarchiveFromFile(_:) function is not an iOS function. It’s actually a little bit of glue, included in the game app template. It’s defined as an extension of SKNode. (Extensions can add additional methods to existing classes and are explained in Chapter 20.) You’ll find it in theGameViewController.swift file, and it will look something like this:
extension SKNode {
class func unarchiveFromFile(file : NSString) -> SKNode? {
if let path = NSBundle.mainBundle().pathForResource(file, ofType: "sks") {
var sceneData = NSData(contentsOfFile: path,
options: .DataReadingMappedIfSafe,
error: nil)!
var archiver = NSKeyedUnarchiver(forReadingWithData: sceneData)
archiver.setClass( self.classForKeyedUnarchiver(),
forClassName: "SKScene")
let scene = archiver.decodeObjectForKey(NSKeyedArchiveRootObjectKey)
as SKNode
archiver.finishDecoding()
return scene
} else {
return nil
}
}
}
An .sks file is an archive of SpriteKit objects. You’ll learn about how objects are archived in Chapter 19. For now, just know that an archive contains all of the data needed to reconstruct a set of objects, restoring their property values and connections.
Interface Builder has a SpriteKit scene editor that lets you create and configure your scene and node objects. These are archived and written to an .sks file that becomes one of your app’s resources. To load that scene, you just need to unarchive that file. But unlike storyboards, you can’t change the class of an object in the scene editor. The root object is always a standard SKScene object. This is where the unarchiveFromFile(_:) function performs a little sleight of hand.
During the unarchiving process, the class of each object is read from the file and used to construct that object. But you don’t want the top-level SKScene object to be a boring old SKScene object. You want it to be your custom subclass of SKScene (GameScene, in this case) with all of your properties and game logic. So, the unarchiveFromFile(_:) function gets the class of the node that’s calling this function (GameScene) and passes that to the setClass(_:,forClassName:) function. This function tells the unarchiver to substitute any instance of one class with another.
Now when the .sks file is unarchived and the unarchiver encounters an SKScene object, it constructs a GameScene object instead. When the file is finished loading, it returns your custom GameScene object, prepopulated with the SKNode objects from the file.
So, let’s see what’s in this magic GameScene.sks file. Select the file in the navigator and take a look. You should see something like what’s pictured in Figure 14-6.
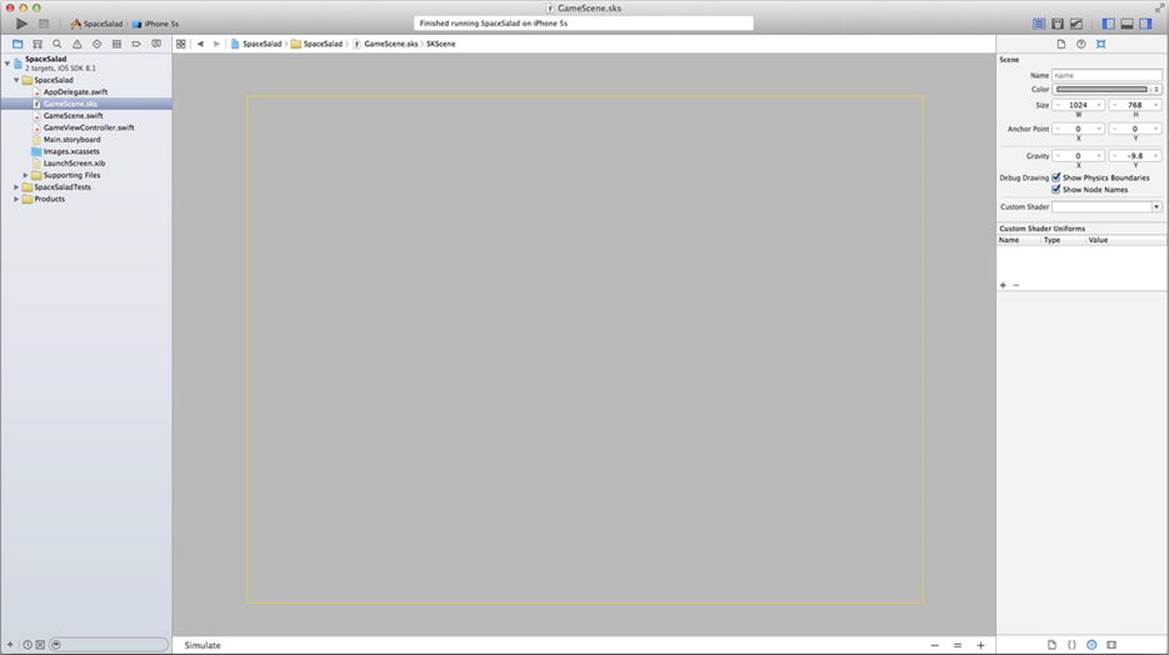
Figure 14-6. Template GameScene.sks file
There’s nothing in the GameScene.sks file. That is thoroughly uninteresting—and a little weird, since the template code went out of its way to read it. Where did the text and spaceships come from? Take a look at the GameScene.swift file.
override func didMoveToView(view: SKView) {
let myLabel = SKLabelNode(fontNamed:"Chalkduster")
myLabel.text = "Hello, World!";
myLabel.fontSize = 65;
myLabel.position = CGPoint(x: CGRectGetMidX(self.frame),
y: CGRectGetMidY(self.frame));
self.addChild(myLabel)
}
When an SKScene is presented in an SKView, it receives a didMoveToView(_:) call. In the didMoveToView(_:) function provided by the template, it programmatically creates a label node and inserted it into the scene. The mystery is solved. The “Hello, World!” message is created when the scene is presented.
Note The SpriteKit scene editor is new in Xcode 6. In earlier versions of iOS, all SpriteKit content had to be created programmatically.
While you’re here, take a look at where the spaceships come from. The touchesBegan(_:,withEvent:) function is received every time you touch the scene. Remember that SKScene and SKNode are both subclasses of UIResponder—the same UIResponder you learned about in Chapter 4.
Now that you’ve had a look around, delete the template code for the didMoveToView(_:) and touchesBegan(_:,withEvent:) functions. You’ll write you own later, but for the moment you don’t need them.
Adding Sprites
You want to start by adding a single node to your scene. You could do this in code, as you saw in the template code, but you came here to use the SpriteKit scene editor.
Your content is going to use some image resources, so take a brief pause to add all of the image resources you’ll need now. Locate the Learn iOS Development Projects ![]() Ch 14
Ch 14 ![]() SpaceSalad (Resources) folder and drag all of the image files into theImages.xcassets file, as shown in Figure 14-7.
SpaceSalad (Resources) folder and drag all of the image files into theImages.xcassets file, as shown in Figure 14-7.
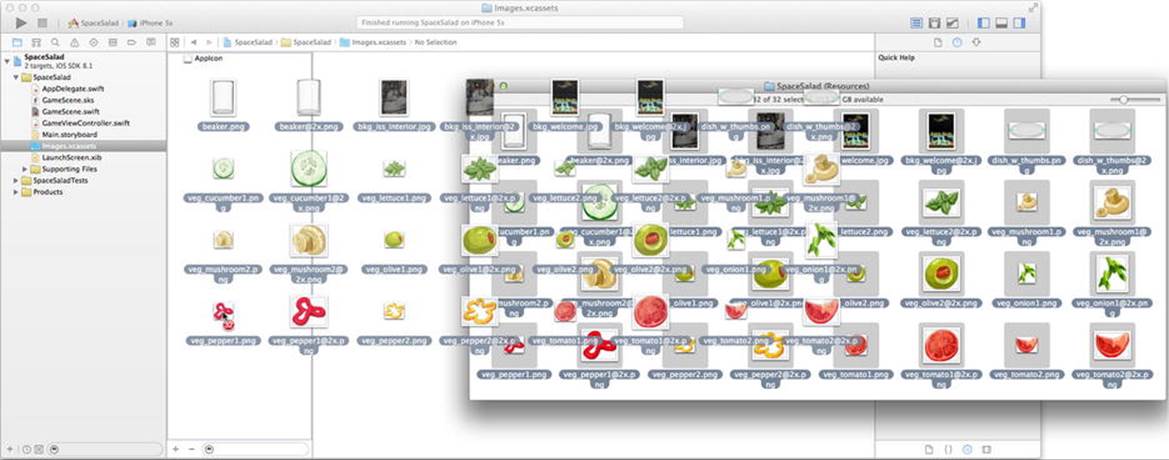
Figure 14-7. Importing image resources
Now select the GameScene.sks file. The default scene is in landscape orientation, so begin by switching it to portrait orientation. Select the root SKScene object—currently the only object in the scene. Use the node inspector to change its width and height from 1024 by 768 to 768 by 1024. While you’re here, set both gravity values to 0. After all, this scene is set in space.
Locate the Color Sprite object in the library, as shown in Figure 14-8. Drop a new sprite node into the scene.
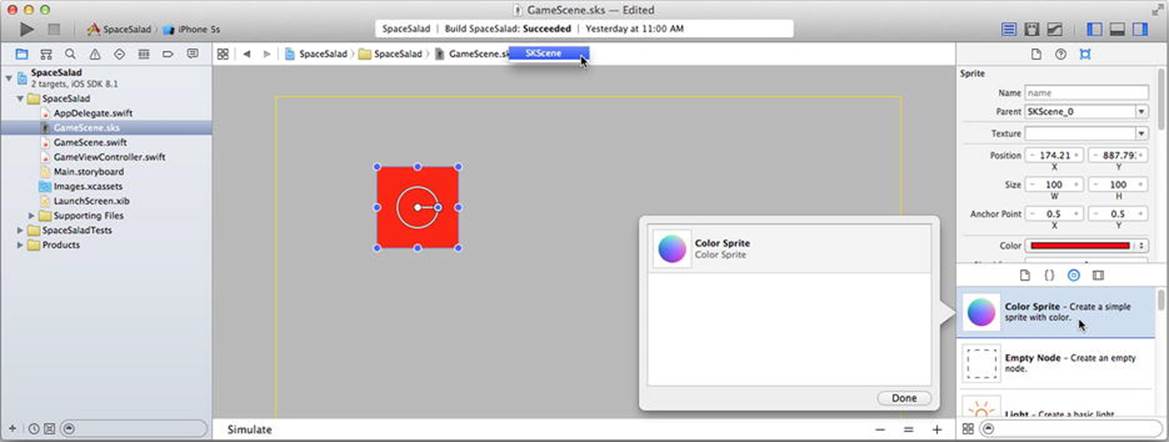
Figure 14-8. Adding the first node
Tip The scene editor has no outline view. To select a node, click its visual representation in the canvas or use the pop-up menu in the scene editor’s navigation ribbon, as shown in Figure 14-8.
A sprite node (SKSpriteNode) is a general-purpose node that will display and animate any image or geometric shape. You’ll use these a lot.
Set the new node’s Name attribute to background and its Texture to bkg_iss_interior.jpg, as shown in Figure 14-9. The sprite will resize itself to match the image resource. Set its Anchor Point attribute to (0,0) and then set its Position attribute to (0,0). The background node will now fill the scene.
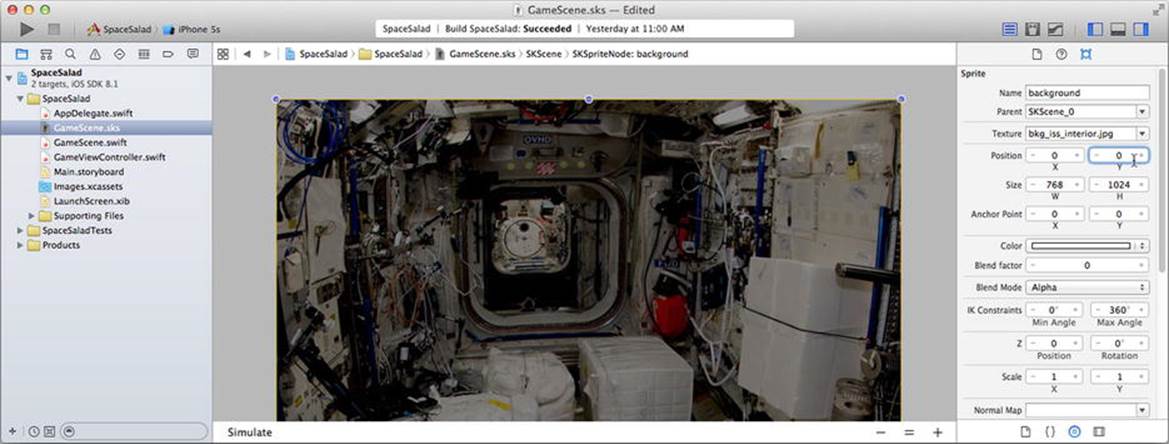
Figure 14-9. Configuring the background node
Sprite nodes have an anchorPoint property that determines the point in the image or shape where the sprite’s position property is anchored. It’s expressed as a fraction of its height and width. It defaults to (0.5,0.5), meaning the sprite’s position will correspond to the center of its image. By setting it to (0,0), the sprite’s position will be its lower-left corner. Now when you set background node’s position to (0,0), it places the node’s lower-left corner at the origin of the scene.
Go ahead and run it. Figure 14-10 shows the app running on an iPad and iPhone. It doesn’t do much that could even remotely resemble exciting, but you should be excited; you’ve successfully created a SpriteKit scene that contains working nodes.

Figure 14-10. The background node in action
Resizing a Scene
One node is great, but you’re going to need a lot more before you’re done. Stop the app, switch back to the GameScene.sks file, and drag in another color sprite node. Drag it near the lower-left corner of the scene, as shown in Figure 14-11. Set its name to veg and its Texture toveg_cucumber1.png. You’ve got two nodes now.
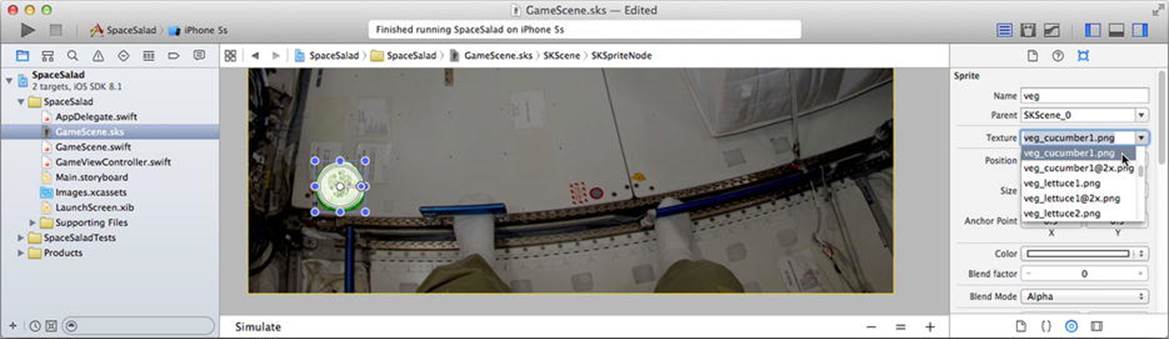
Figure 14-11. Adding the first vegetable node
Run the app again. It’s just about as you would expect. It’s still not exciting, but you’re getting the hang of adding sprite nodes to your scene. One thing you do notice is that the cucumber is almost off the edge when run on an iPhone, as shown on the right in Figure 14-12.
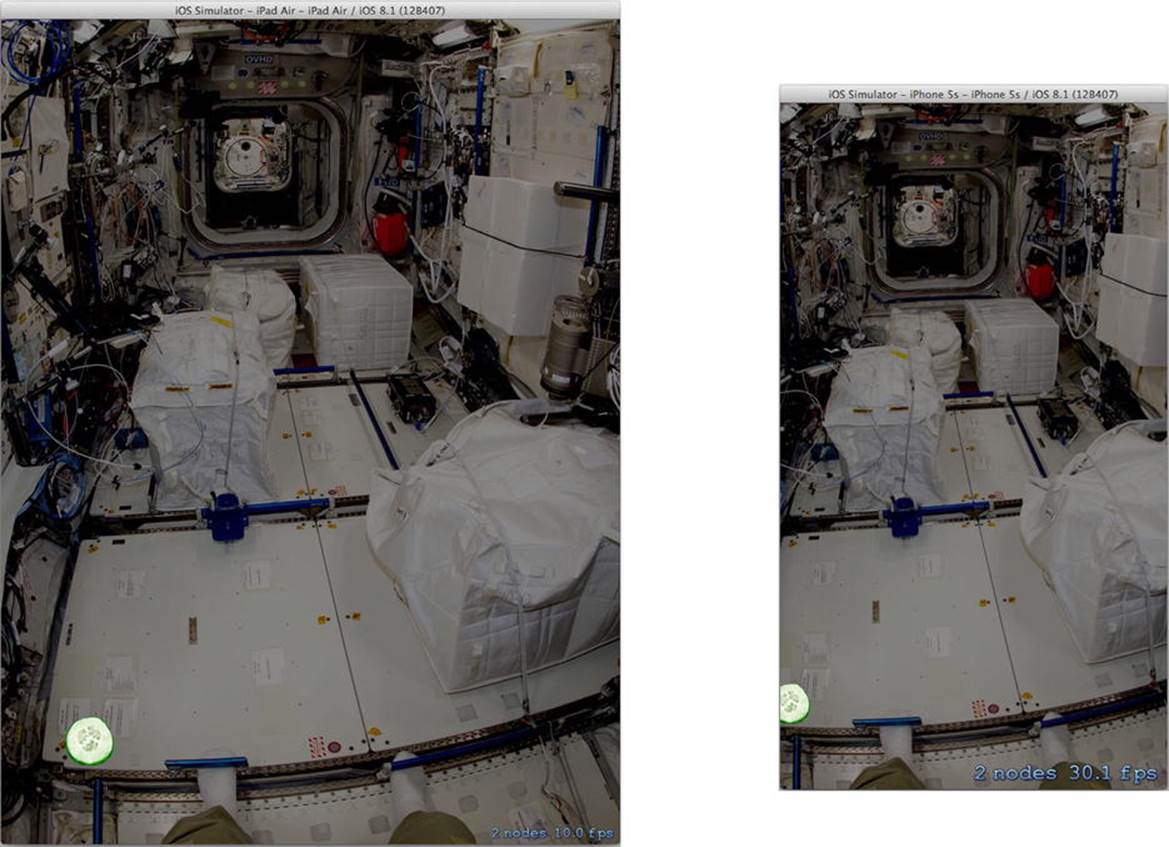
Figure 14-12. Running without adaption
As I mentioned earlier, SpriteKit has no concept of adaption. In fact, a scene doesn’t even size itself to fit the SpriteKit view. If you need it to fit the view or adapt its layout to different sizes and orientations, you’ll need to roll up your sleeves and do that yourself.
For this app, you want to automatically resize the scene to fit inside its host view. That’s actually easy. Select the GameScene.swift file and write a new didMoveToView(_:) function, as follows:
override func didMoveToView(view: SKView) {
size = view.frame.size
}
That’s all you have to do. When the scene is presented in the host SKView, SpriteKit calls your scene’s didMoveToView(_:) function. The code simply resizes the scene so it’s the same size as the host view.
Unfortunately, that doesn’t accomplish much. You see, there’s also no auto-layout or constraints or anything approximating that. The new code resized the scene, but it doesn’t alter the size or positions of any of the nodes in the scene. For that, you’ll need a little bit more code.
I’m going to provide you with a really simple—some would say naive—solution for repositioning your nodes. Either locate the Learn iOS Development Projects ![]() Ch 14
Ch 14 ![]() SpaceSalad folder and drag the ResizableScene.swift file into your project navigator or create a new ResizableScene.swift file and write the following code:
SpaceSalad folder and drag the ResizableScene.swift file into your project navigator or create a new ResizableScene.swift file and write the following code:
import SpriteKit
class ResizableScene: SKScene {
let backgroundNodeName = "background"
override func didChangeSize(oldSize: CGSize) {
let newSize = size
if newSize != oldSize {
if let background = childNodeWithName(backgroundNodeName) as? SKSpriteNode {
background.position = CGPointZero
background.size = newSize
}
let transform = CGAffineTransformMakeScale(newSize.width/oldSize.width,
newSize.height/oldSize.height)
enumerateChildNodesWithName("*") { (node,stop) in
node.position = CGPointApplyAffineTransform(node.position, transform)
}
}
}
}
The ResizableScene class overrides the didChangeSize(_:) function. This function is called whenever your scene is resized, as it will when your scene updates its size property over in didMoveToView(_:). The code looks for a node named background. If it finds one, it makes its size match the scene’s size.
It then proportionally translates the position of every node from the old size to the new one. So if a node was positioned at one-third the height and half of the width before, it will be in the same relative position after the resize. Note that the nodes are not resized, just repositioned.
To put this to work for you, change your GameScene class so it is now a subclass of ResizableScene, as follows (modified code in bold):
class GameScene: ResizableScene {
Run the app again, as shown in Figure 14-13. Compare these results with those in Figure 14-12.
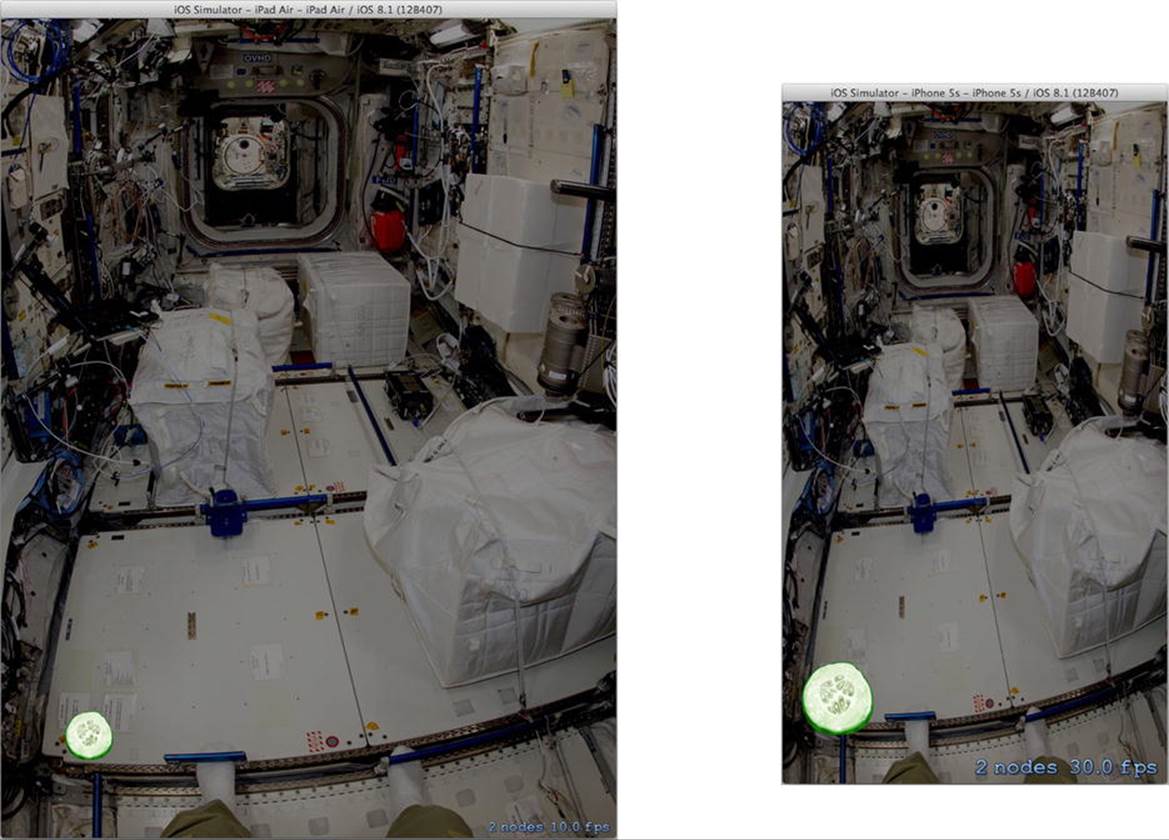
Figure 14-13. Self-resizing scene
And while we’re adapting the interface, also take a look at the sprite sizes. That cucumber looks awfully large in the iPhone interface, shown on the right in Figure 14-13. For the GameScene, adapt the sizes of your sprites along with their positions.
Return to the GameScene.swift file. Locate the didMoveToView(_:) function. Just after the statement that sets the size of the scene—indirectly calling the didChangeSize(_:) function—add the following code:
let backgroundNode = childNodeWithName(backgroundNodeName) as? SKSpriteNode
let scale = CGFloat( view.traitCollection.horizontalSizeClass == .Compact ? 0.5 : 1.0 )
enumerateChildNodesWithName("*") { (node,stop) in
if node !== backgroundNode {
node.xScale = scale
node.yScale = scale
}
}
Now on horizontally compact devices, such as iPhones, the size of everything except the background will be half the size. That’s enough with resizing and adapting.
Let’s Get Physical
You’ve created a SpriteKit scene, added sprite nodes, and adapted them to various display sizes. But your scene still doesn’t do anything yet. The nodes just sit there. So, what does a programmer have to do to get a little action around here?
In the introduction, I said you don’t tell SpriteKit nodes what to animate; you tell them why they should animate. You accomplish this by endowing your nodes with physical attributes such as geometry, mass, resistance, and so on. This is called a physics body, defined by theSKPhysicsBody class.
There are three kinds of physics bodies.
· A dynamic volume describes a shape with volume and mass that can be animated through forces and collisions. Use this to describe things that move and interact with their environment. A racquetball would be a dynamic volume.
· A static volume describes a solid shape that interacts with dynamic volumes but never moves nor is affected by forces or collisions. The wall of a racquetball court would be a static volume.
· An edge is an immovable boundary. It acts like a static volume but doesn’t enclose a shape. A line describing the ground would be an edge.
A cucumber slice sounds very much like a dynamic volume. It has a shape and a mass, it can move around, and it can bump into things. Select the GameScene.sks file. Select the cucumber node. In the node inspector, locate the Physics Definition section, as shown in Figure 14-14.
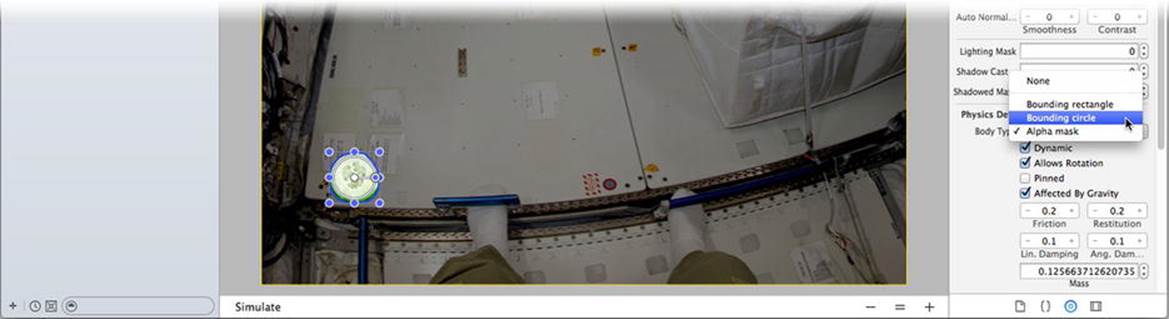
Figure 14-14. Adding a physics body to a node
Set the Physics Body attribute to Bounding circle. This creates a physics body whose shape is round. (The shape of the physics body will appear in the scene editor.) Make sure the Dynamic and Allows Rotation options are checked.
Change the Lin. Damping attribute to 0.01 and Restitution to 0.1. Linear damping (linearDamping) acts like drag through air or water, gently slowing the node as it travels. Restitution (restitution) determines how much energy it loses when it bounces off a surface or another node.
Run your app. This time, nothing happens—again. Your node has physical attributes, but there are no forces acting on it. (Remember that you turned off gravity earlier.) If you want your cucumber slice to move around, you need to give it a nudge.
Locate the didMoveToView(_:) function in GameScene.swift. It shouldn’t be hard; it’s the only function. At the end of the function, add the following code:
enumerateChildNodesWithName("veg") { (node,stop) in
func randomForce( # min: CGFloat, # max: CGFloat ) -> CGFloat {
return CGFloat(arc4random()) * (max-min) / CGFloat(UInt32.max) + min
}
if let body = node.physicsBody {
body.applyForce(CGVector(dx: randomForce(min: -50.0, max: 50.0),
dy: randomForce(min: -40.0, max: 40.0)))
body.applyAngularImpulse(randomForce(min: -0.01, max: 0.01))
}
}
view.ignoresSiblingOrder = true
The code then gives the node a little “kick.” It applies a variable amount of force in a random direction. It then adds a little “English” by applying a small amount rotational force.
Note Setting ignoresSiblingOrder to true is an optimization for sprite drawing. When false, it enforces a strict parent-to-child rendering order. This is sometimes important for compound nodes (nodes that contain other nodes) to render correctly. Your app doesn’t need that, and setting it to true allows the SpriteKit to render the scene more efficiently.
Now run the app and see what happens. Well, look at that! Your cucumber just drifted off into space—literally. It drifted right off the screen and disappeared! So, you know the physics body is working, and applying a force to the node caused it to move. Now you need to keep it from wandering off, or you’re never going to get a meal.
Setting Boundaries
What you need is a barrier or wall of some kind so your cucumber doesn’t get away from you. That sounds a lot like an edge physics body. Select the GameScene.swift file. Just before the enumerateChildNodesWithName(...) call you just added to thedidMoveToView(_:) function, add the following code:
if let background = backgroundNode {
let body = SKPhysicsBody(edgeLoopFromRect: background.frame)
physicsBody = body
}
This code gets the background node, the one that’s filling the background of the scene. It uses its frame to create an edge loop. An edge loop is an edge physics body that follows a path—a rectangle, in this case. In other words, it creates four immovable walls. These walls are then added to the scene.
Run your app again. Now the cucumber bounces off the edges and stays in the scene. This is physics bodies and collisions at work.
But one cucumber does not a salad make. Select the GameScene.sks file. Select the cucumber node. Hold down the Option key and drag a copy of the node into the scene. Repeat, 10 more times, until you have 12 nodes in total, as shown in Figure 14-15.
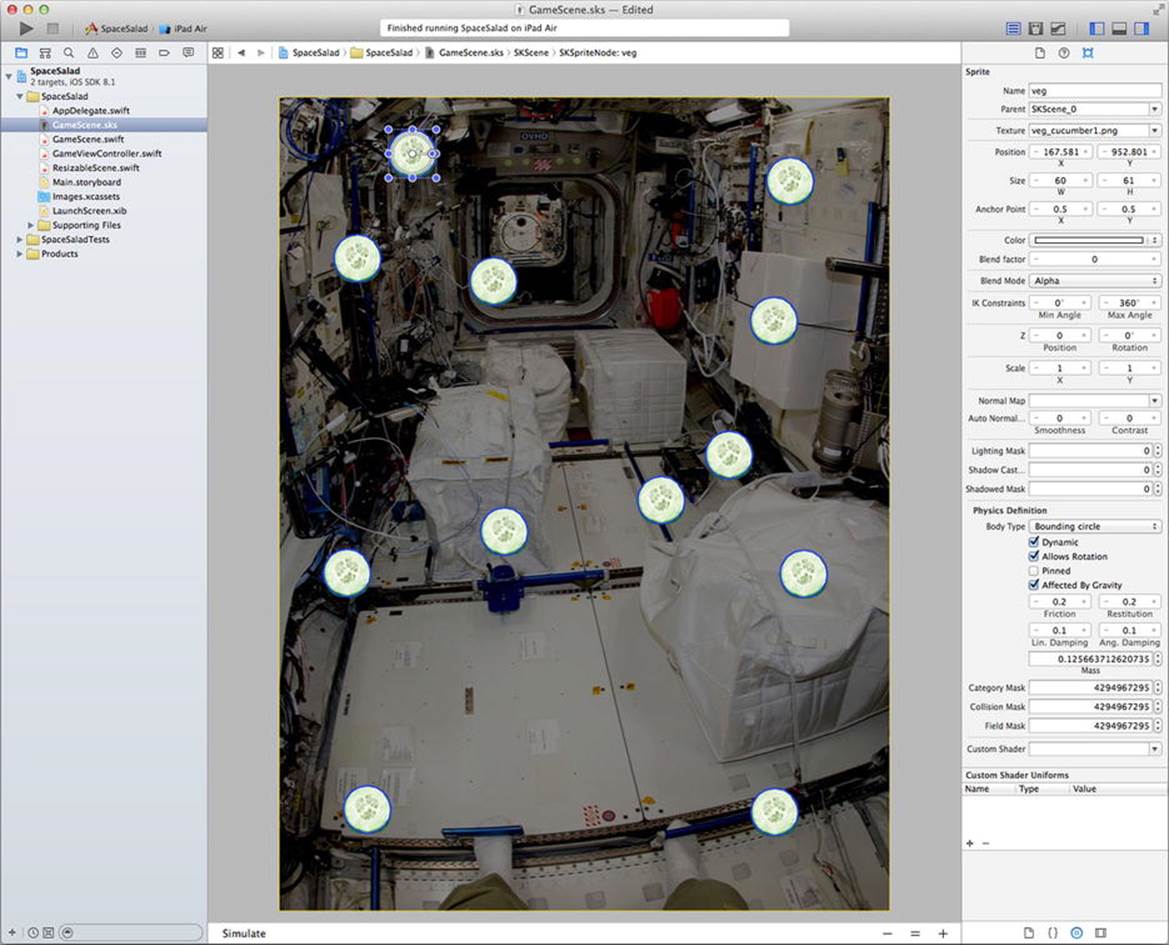
Figure 14-15. Duplicating the cucumber node
With each node, select it and set its Texture property to one of the veg_*.png image files so that every node uses a different texture image. Don’t select any of the @2x images; those are higher-resolution resources for Retina displays.
Run your app again, and they’ll all start drifting around, bumping into the walls and each other, as shown in Figure 14-16. You’ll see that they gradually slow down because of drag, resistance, and restitution. This is the real power of SpriteKit. With just a handful of attributes, you can describe a whole world of lifelike objects.

Figure 14-16. Many floating sprites
ENUMERATING CHILD NODES
The enumerateChildNodesWithName(_:,usingBlock:) function is exceptionally useful when working with scenes full of nodes. The function searches for nodes that match the name and passes each one to a code block that can do something with, or to, that node.
Nodes do not need to have unique names. In SpaceSalad, all of the vegetable nodes have the same name (veg). The statement enumerateChildNodesWithName("veg") { ... } processes just the vegetable nodes and ignores the rest.
But the name parameter is actually a search pattern. In your didChangeSize(_:) function, you used an enumerateChildNodesWithName("*") statement to process all the nodes in the scene. And that’s just the tip of the iceberg. You can select the nodes to process using globbing patterns such "*_car" (matches “red_car” and “blue_car”), "tire[1234]" (matches “tire1” but not “tire5”), and "pace_car/headlight" (matches a “headlight” node contained in a “pace_car” node).
Search patterns can be quite sophisticated. You’ll find a complete description in the SpriteKit Programming Guide. Locate the “Searching the Node Tree” section in the “Building Your Scene” chapter.
Adding Obstacles
The app is starting to look lively. Getting back to the design, the goal was to corral the individual salad ingredients into a beaker. The beaker will be a static volume. In other words, it will have a volume and interact with other sprites, but it will never move. This means the player can’t knock over the beaker. Maybe you can save that for an advanced level.
The beaker will be a sprite, just like the others. Drag a new color sprite into your GameScene.sks file. Set its Name attribute to beaker and its Texture attribute to beaker.png, as shown in Figure 14-17. Change its Anchor Point attribute to (0.5,0) and then set its position to(384,0), also shown in Figure 14-17.
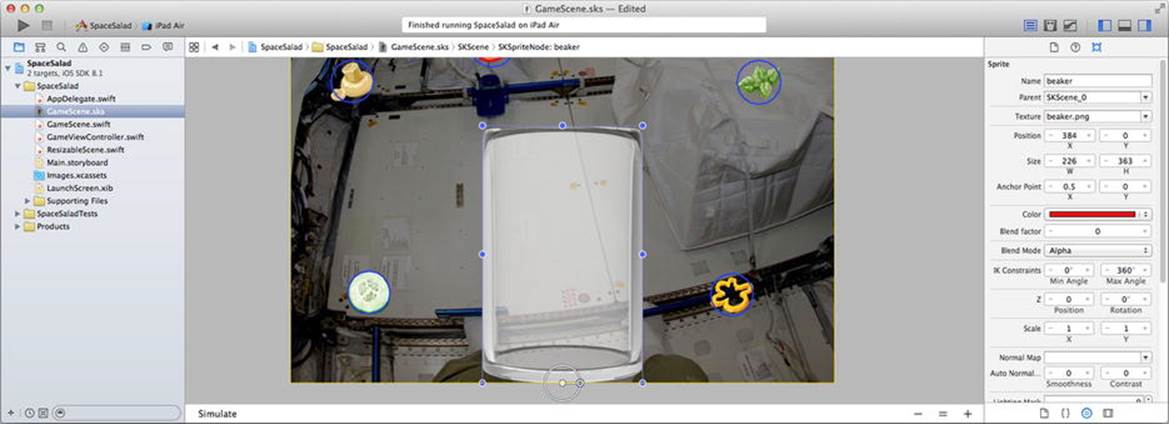
Figure 14-17. Adding the beaker node
Caution If you now have vegetable nodes that intersect your beaker node, move them so they don’t. You don’t want to start the physics simulation with the impossible condition of two bodies interpenetrating one another.
The position of the beaker node is at its bottom center, and the position is set to the bottom center of the scene. Because the ResizableScene class moves the node’s position proportionally, the beaker will always be sitting at the bottom center of the scene.
Instead of defining a simple physics body using the scene editor, create a more complex shape programmatically. In the GameScene.swift file, add the following code to the didMoveToView(_:) function, just before the code that nudges the vegetables:
if let beaker = childNodeWithName("beaker") as? SKSpriteNode {
if beaker.physicsBody == nil {
let bounds = BoundsOfSprite(beaker)
let side = CGFloat(8.0)
let base = CGFloat(6.0)
let beakerEdgePath = CGPathCreateMutable()
CGPathMoveToPoint(beakerEdgePath, nil, bounds.minX, bounds.minY)
CGPathAddLineToPoint(beakerEdgePath, nil, bounds.minX, bounds.maxY)
CGPathAddLineToPoint(beakerEdgePath, nil, bounds.minX+side, bounds.maxY)
CGPathAddLineToPoint(beakerEdgePath, nil, bounds.minX+side, bounds.minY+base)
CGPathAddLineToPoint(beakerEdgePath, nil, bounds.maxX-side, bounds.minY+base)
CGPathAddLineToPoint(beakerEdgePath, nil, bounds.maxX-side, bounds.maxY)
CGPathAddLineToPoint(beakerEdgePath, nil, bounds.maxX, bounds.maxY)
CGPathAddLineToPoint(beakerEdgePath, nil, bounds.maxX, bounds.minY)
let body = SKPhysicsBody(edgeLoopFromPath: beakerEdgePath)
beaker.physicsBody = body
}
}
It looks like a lot, but what it’s doing is really simple. The code gets the beaker node, determines its bounds (its frame in its local coordinate system), and then creates a path that roughly approximates the sides and bottom of the beaker, as illustrated in Figure 14-18. This path then becomes a set of walls that describe the physics body.
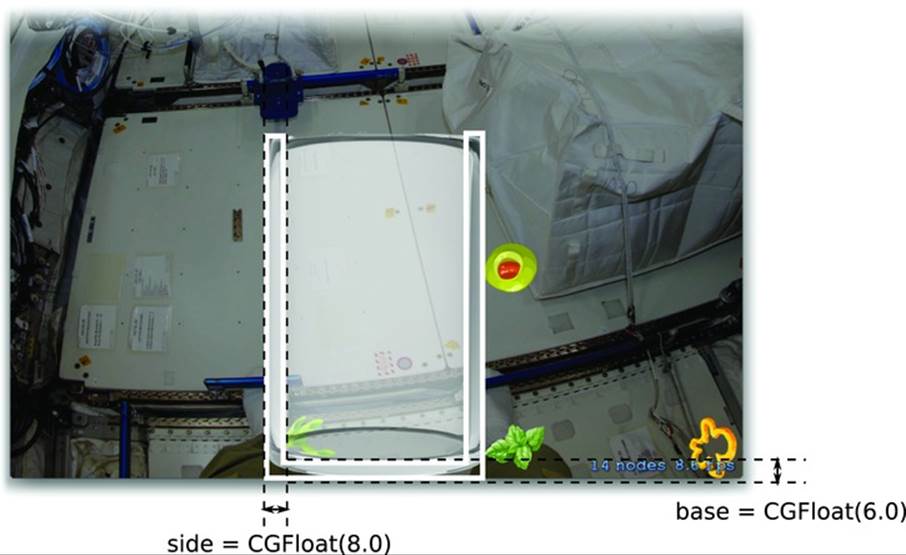
Figure 14-18. Physics body shape for beaker
A physics body shape can be quite complex. SpriteKit provides basic shapes for you (circle, rectangle, polygon, and so on). You can also base a sprite’s shape on its image, using the transparent portions of the graphic to determine the sprite’s outline. And, as you’ve just seen, you can create arbitrarily complex paths to describe its shape and volume.
Tip For the best performance, use the simplest body shape possible, which happens to be a circle. Using complex outlines or the shape’s image dramatically increases the computations SpriteKit must perform to determine whether a collision has occurred. That, in turn, dramatically reduces animation performance and will limit the number of sprites you can animate simultaneously.
This code uses a utility function to get the sprite’s frame in its local coordinate system. Add that function above (or below) your GameScene class, as follows. You’ll reuse it later.
func BoundsOfSprite( sprite: SKSpriteNode ) -> CGRect {
var bounds = sprite.frame
let anchor = sprite.anchorPoint
bounds.origin.x = 0.0 - bounds.width*anchor.x
bounds.origin.y = 0.0 - bounds.height*anchor.y
return bounds
}
Now when you run your app, the vegetables bounce off each other, the walls, and the sides of the beaker, as shown in Figure 14-19. If you’re lucky, you might even get a few inside the beaker.
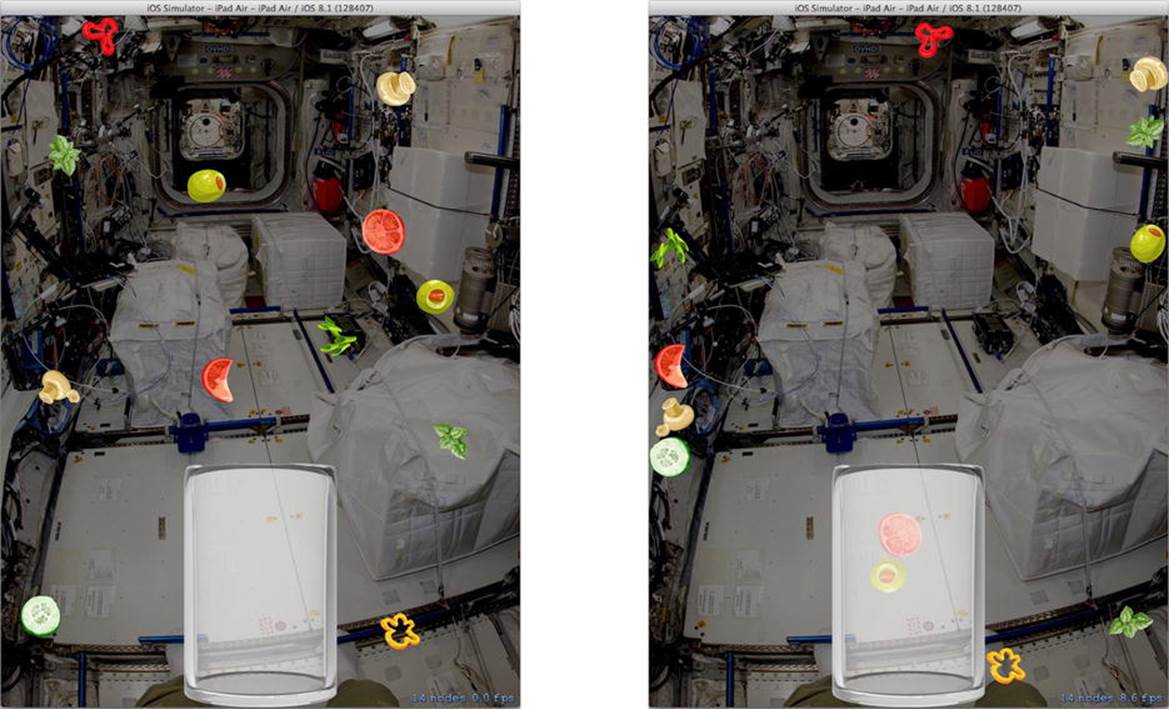
Figure 14-19. Vegetables interacting with beaker
But this isn’t a game of luck. This is a game of skill, and it’s time to add the lab dish so your user can push the vegetables around. That will require some interaction with the player.
Interacting with the Player
The player interacts with a single sprite: the lab dish. So clearly, you need to start by adding a lab dish to your scene. Select the GameScene.sks file and drag in a new color sprite.
Like your beaker, your lab dish is going to need an atypical shape. In the GameScene.swift file, near the code that creates the physics body for the beaker, add the following code. This is a fair bit of typing, so you might want to copy and paste it from the finished project in the Learn iOS Development Projects ![]() Ch 14
Ch 14 ![]() SpaceSalad folder.
SpaceSalad folder.
if let dish = childNodeWithName("dish") as? SKSpriteNode {
let scale = dish.xScale
dish.xScale = 1.0
dish.yScale = 1.0
let bounds = BoundsOfSprite(dish)
let minX = bounds.minX
let maxX = bounds.maxX
let midY = bounds.midY
let minY = bounds.minY
let width = bounds.width
let bottomThickness = CGFloat(10.0)
let curveInterpolationPoints = 4
let dishEdgePath = CGPathCreateMutable()
CGPathMoveToPoint(dishEdgePath, nil, minX, minY)
for p in 0...curveInterpolationPoints {
let x = minX+CGFloat(p)*width/CGFloat(curveInterpolationPoints)
let relX = x/(width/2)
let y = (midY-minY-bottomThickness)*(relX*relX)+minY+bottomThickness
CGPathAddLineToPoint(dishEdgePath, nil, x, y)
}
CGPathAddLineToPoint(dishEdgePath, nil, maxX, minY)
CGPathCloseSubpath(dishEdgePath)
let body = SKPhysicsBody(polygonFromPath: dishEdgePath)
body.usesPreciseCollisionDetection = true
dish.physicsBody = body
dish.xScale = scale
dish.yScale = scale
}
Just like the beaker, this code gets the bounds of the dish node and uses that to create a path. The path is an irregular polygon, square on one side and roughly concave on the other. You could read the code carefully and try to imagine the shape it’s creating. I could also include an illustration. Or, you can get SpriteKit to show it to you.
SpriteKit includes a number of debugging features. You’ve been looking at two of them since the beginning. In the GameViewController.swift file, the viewDidLoad() function loads the initial scene object and presents it. Before it does, it sets two properties, as follows:
skView.showsFPS = true
skView.showsNodeCount = true
This causes the scene object to display the number of nodes being rendered and the rate that the scene is being rendered at. See Figure 14-16 for an example. There are additional debugging aides, one of which draws a line corresponding to the physic bodies in the scene. When I turn on features like this, I like to configure them based on a symbolic constant. When I’m done with these aids, I can easily turn them off again. In that spirit, add the following constant, outside the GameViewController class definition:
let debugAids = true
Now return to the code that sets the debugging aids and change it as follows (modified code in bold):
skView.showsFPS = debugAids
skView.showsNodeCount = debugAids
skView.showsPhysics = debugAids
Run the app again. This time, SpriteKit will draw the outlines of all the physics bodies in the scene, as shown in Figure 14-20. (The background of Figure 14-20 has been washed out to make the outlines easier to see in print.)
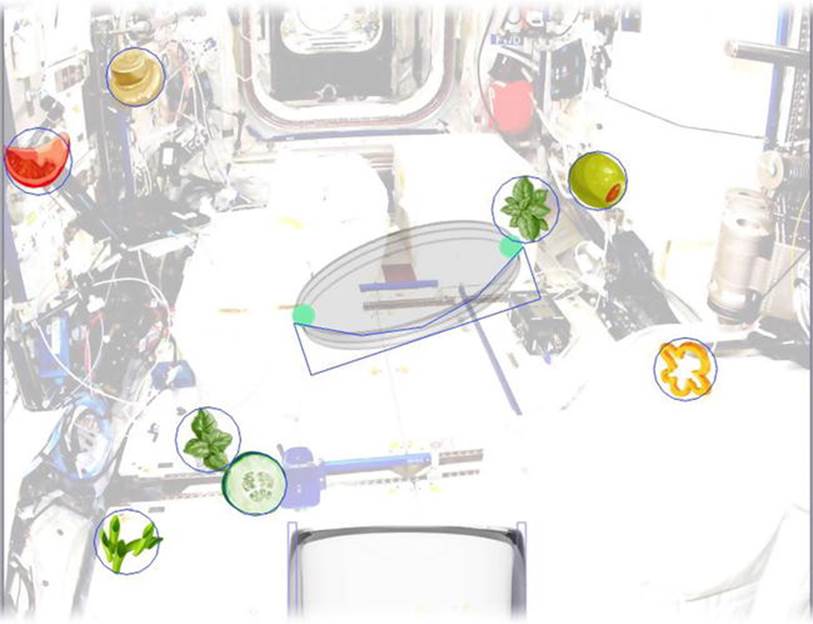
Figure 14-20. Physics body outlines
Responding to Touch
SKNode is a subclass of UIResponder. Thus, SKNode can participate in touch events by writing touch event handlers, exactly as you did in Chapter 4. Just like UIView, an SKNode’s userInteractionEnabled property is normally set to false. So, by default, no sprites receive touch events, and all the touch events fall through to the SKScene object. For this app, that’s perfect.
Your scene object will interpret the touch events and use that to move the lab dish around. This is done in the scene object because you’ll respond to touches just outside the dish. If the dish object was the one responding to touches, it would miss those events.
Here’s how the interaction with the lab dish node is going to work:
· The dish has two drag locations, centered at opposite ends of the node.
· When the user touches two fingers to the interface and those points are near enough to the thumb drag locations, the user starts dragging the dish.
· The touch positions are matched to the dish’s thumb drag locations by proximity. That is, the touch closest to the right end of the dish drags the right end of the dish.
· The dish is dragged around indirectly. The user’s touches are used to position two anchor points. These points are connected by attachments to the dish’s drag locations.
An attachment, as the name would imply, describes a physical relationship between two nodes or a node and a fixed location, called an anchor. An attachment can be inflexible, in which you get a “tow bar” or “pendulum” effect.
An attachment can also be flexible, where it acts like a spring. In this app, the flexible attachment is used with an anchor point. It’s as if you nailed the end of a spring to a fixed location and attached the other end to the dish. The physics engine then takes over, moving the dish to follow the forces imposed by the “spring.”
The code to do all of that is in Listing 14-1. Save yourself a lot of typing and copy these functions from the finished project in the Learn iOS Development Projects ![]() Ch 14
Ch 14 ![]() SpaceSalad folder.
SpaceSalad folder.
Listing 14-1. Dish Drag Logic
let dragProximityMinimum = CGFloat(60.0)
var dragNode: SKSpriteNode?
var leftDrag: SKNode?
var leftJoint: SKPhysicsJointSpring?
var rightDrag: SKNode?
var rightJoint: SKPhysicsJointSpring?
func dragPoints(dish: SKSpriteNode) -> (leftPoint: CGPoint, rightPoint: CGPoint) {
let dishSize = dish.size
let width = dishSize.width/dish.xScale
let rightThumbPoint = dish.convertPoint(CGPoint(x: -width/2, y: 0.0), toNode: self)
let leftThumbPoint = dish.convertPoint(CGPoint(x: width/2, y: 0.0), toNode: self)
return (leftThumbPoint,rightThumbPoint)
}
func attachDragNodes(dish: SKSpriteNode) {
let thumbs = dragPoints(dish)
func newDragNode( position: CGPoint ) -> SKNode {
var newNode: SKNode = ( debugAids ? SKSpriteNode(color: UIColor.redColor(),![]()
size: CGSize(width: 8, height: 8))
: SKNode() )
newNode.position = position
let body = SKPhysicsBody(circleOfRadius: 4.0)
body.dynamic = false
newNode.physicsBody = body
addChild(newNode)
return newNode
}
leftDrag = newDragNode(thumbs.leftPoint)
rightDrag = newDragNode(thumbs.rightPoint)
leftJoint = SKPhysicsJointSpring.jointWithBodyA( dish.physicsBody,
bodyB: leftDrag!.physicsBody,
anchorA: thumbs.leftPoint,
anchorB: thumbs.leftPoint)
leftJoint!.damping = 4.0
leftJoint!.frequency = 20.0
physicsWorld.addJoint(leftJoint!)
rightJoint = SKPhysicsJointSpring.jointWithBodyA( dish.physicsBody,
bodyB: rightDrag!.physicsBody,
anchorA: thumbs.rightPoint,
anchorB: thumbs.rightPoint)
rightJoint!.damping = 3.0
rightJoint!.frequency = 20.0
physicsWorld.addJoint(rightJoint!)
}
func moveDragNodes(# touchPoints: [CGPoint], dish: SKSpriteNode) {
assert(touchPoints.count==2,"Expected exactly 2 touch points")
var leftLoc = touchPoints[0]
var rightLoc = touchPoints[1]
let thumbs = dragPoints(dish)
if hypot(leftLoc.x-thumbs.leftPoint.x,leftLoc.y-thumbs.leftPoint.y)![]()
+ hypot(rightLoc.x-thumbs.rightPoint.x,rightLoc.y-thumbs.rightPoint.y) >
hypot(rightLoc.x-thumbs.leftPoint.x,rightLoc.y-thumbs.leftPoint.y)![]()
+ hypot(leftLoc.x-thumbs.rightPoint.x,leftLoc.y-thumbs.rightPoint.y) {
let swapLoc = rightLoc
rightLoc = leftLoc
leftLoc = swapLoc
}
leftDrag!.position = leftLoc
rightDrag!.position = rightLoc
}
func releaseDragNodes() {
if let dish = dragNode {
physicsWorld.removeJoint(rightJoint!)
physicsWorld.removeJoint(leftJoint!)
leftDrag!.removeFromParent()
rightDrag!.removeFromParent()
rightJoint = nil
leftJoint = nil
rightDrag = nil
leftDrag = nil
dragNode = nil
}
}
In a nutshell, the attachDragNodes(_:) function creates the attachment objects and connects them to the ends of the dish node. The moveDragNodes(touchPoints:,dish:) function moves the anchored ends of the attachments to new locations. This creates tension between the dish and the touch positions, causing the dish to move toward and between them. The releaseDragNodes() function deletes the attachment, allowing the dish to float free again.
To drive this process from touch events, add the touch event handler functions in Listing 14-2. If you’ve read Chapter 4, these should be self-explanatory. The touchesBegan(...) handler looks to see whether the user is touching the interface with two fingers and both of those touch points are within a reasonable distance of the dish node’s thumb positions. If all of that is true, it calls attachDragNodes(_:) to start dragging.
Listing 14-2. Touch Event Handlers
func points(# touches: NSSet, inNode node: SKNode) -> [CGPoint] {
return (touches.allObjects as [UITouch]).map() {
(touch) in touch.locationInNode(node)
}
}
override func touchesBegan(touches: NSSet, withEvent event: UIEvent) {
if touches.count == 2 /*&& !gameOver*/ {
if dragNode == nil {
dragNode = childNodeWithName("dish") as? SKSpriteNode
if let dish = dragNode {
let hitRect = dish.frame.rectByInsetting(dx: -dragProximityMinimum,![]()
dy: -dragProximityMinimum)
for point in points(touches: touches, inNode: self) {
if !hitRect.contains(point) {
dragNode = nil;
return
}
}
attachDragNodes(dish)
moveDragNodes(touchPoints: points(touches: touches, inNode: self),
dish: dish)
}
}
}
}
override func touchesMoved(touches: NSSet, withEvent event: UIEvent) {
if touches.count == 2 {
if let dish = dragNode {
moveDragNodes(touchPoints: points(touches: touches, inNode: self), dish: dish)
}
}
}
override func touchesEnded(touches: NSSet, withEvent event: UIEvent) {
releaseDragNodes()
}
override func touchesCancelled(touches: NSSet!, withEvent event: UIEvent!) {
touchesEnded(touches, withEvent: event)
}
The touchesMoved(...) handler just updates the anchor points with the latest touch positions. Finally, the touchesEnded(...) handler releases the dish. The points(touches:,inNode:) function is a utility that’s repeatedly used to extract the touch locations from a set of touch objects and return an array of their positions, in the local coordinates of a given node.
Let’s see what you got for all of that code. Run your app. Touch two fingers over the thumb spots on the lab dish. Once you’ve grabbed it, drag it around to herd the vegetables into the beaker, as shown in Figure 14-21.
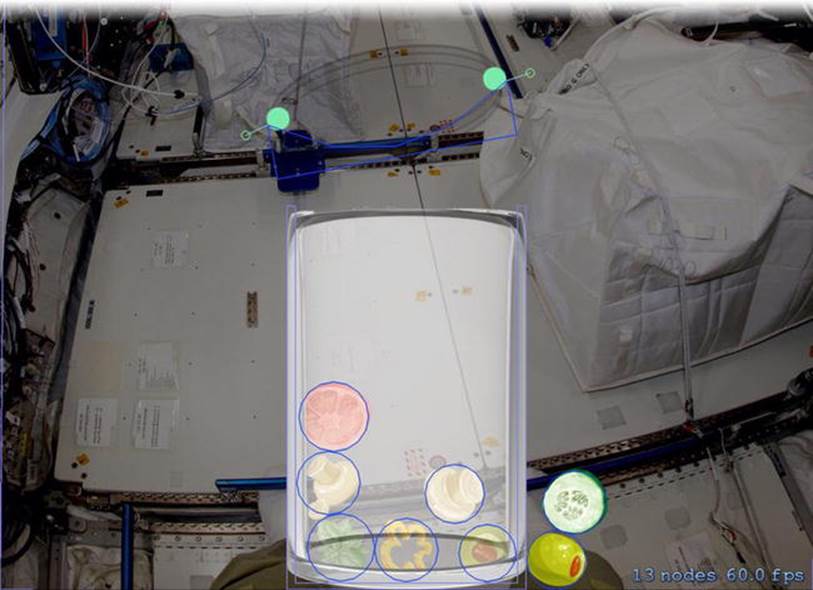
Figure 14-21. Dish node interaction
It’s not as easy as it looks, is it? Notice also that the code you added provides its own debugging aids. When debugAids is true, the code that creates the attachment nodes creates visible nodes (SKSpriteNode) rather than invisible nodes (SKNode). This lets you see where your attachment nodes are during debugging.
What you probably didn’t notice immediately is that the lab dish gets drawn over the vegetable nodes. Or maybe it doesn’t. Or maybe the beaker is drawn underneath some of the vegetables but not others. The problem here is that you haven’t established the vertical order of the nodes. Let’s attack that next.
Sprites on a Plane
Like UIView, SKNodes have a Z-order. UIViews are drawn in the order they appear in the subviews array. SKNodes, however, have a zPosition property. The greater the zPosition value, the closer the node is to the user. Nodes closer to the user draw on top of nodes that are farther away. The Z-ordering in SpriteKit is completely independent of the order you added the nodes to the scene and can be changed at any time.
If two nodes have the same zPosition value, SpriteKit makes no promises about which one will draw over the other. That can be hazardous at times. For example, your background node has the same zPosition as everything else in your scene. At some point, SpriteKit might decide to draw your background over your vegetables, making your salad disappear! You don’t want that to happen.
For SpaceSalad, you want the background to be the farthest sprite in the scene. You then want the dish to draw over the background but behind the vegetables. You want the vegetable to draw over the dish but behind the beaker.
Tip As a rule, sprites that overlap should have different zPosition values. Sprites that don’t (or shouldn’t) overlap, like your vegetables, can all share the same zPosition values.
Organize your sprites into discrete planes by assigning their zPosition. Start by adding the following enum to the GameScene.swift file, outside of the class definition, as follows:
enum GamePlane: CGFloat {
case Background = 0
case Clock
case Dish
case Vegetable
case Beaker
case Score
}
This will be useful later when you configure some nodes programmatically. Right now, use it as a guide to change the zPosition property of the nodes in your scene file.
Select the GameScene.sks file. Select all of the vegetable sprites at once (holding down the Command key to extend the selection) and change their Z Position to 3, as shown in Figure 14-22. Select the dish node and set its Z Position to 2. Select the beaker and set its Z Position to 4. The background already had a Z Position of 0.
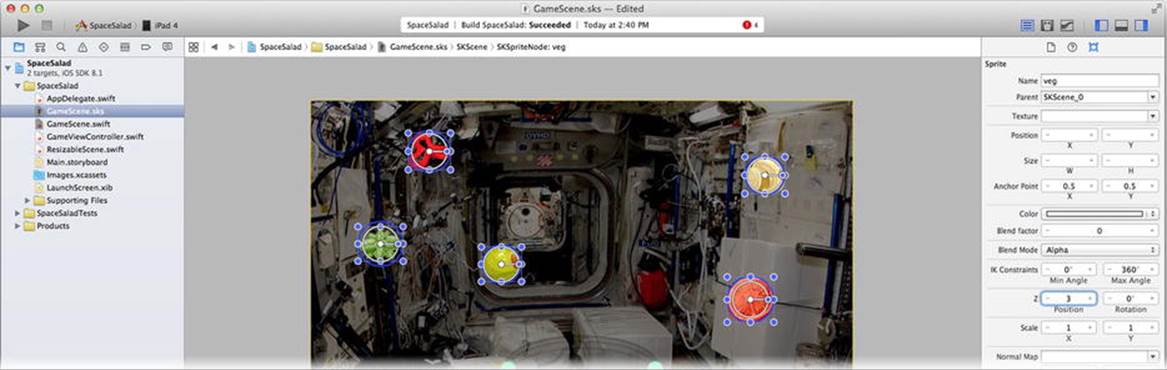
Figure 14-22. Setting the Z-order of nodes
Now your vegetables will always be behind your beaker and in front of the background.
Nodes That Go Bump
Once you created physics bodies for the vegetables, beaker, dish, and border, they all started bumping into to each other. These are called collisions in SpriteKit. It might seem obvious that everything with a physics body will collide with anything else with a physics body, but this is not the case.
You have a lot of control over what nodes collide with other nodes. Collisions are determined by two properties of the physics body: the category mask (categoryBitMask) and the collision mask (collisionBitMask).
Each property is an integer value with 32 single-bit flags. You use them by defining up to 32 different categories, assigning each a unique bit. In SpaceSalad, you’ll need four categories. Select the GameScene.swift file and add this enum outside the class definition, as follows:
enum CollisionCategory: UInt32 {
case Dish = 0b00000001
case Floaters = 0b00000010
case Beaker = 0b00000100
case EverythingElse = 0b00001000
}
You then assign each node to one or more of your categories, although a node is typically assigned to only one category. You then set its collisionBitMask property with all of the categories it will collide with. In effect, you define a matrix of possible collisions, allowing you to define a node that collides with some nodes and surfaces but not others. For example, your game might have a force field node. Droid and speeder nodes would collide with the field, but energy blast nodes would pass right through it.
You can set the collision categories for your nodes either programmatically or in the SpriteKit scene editor. For example, you could select all of the vegetable nodes and locate the Physics Definitions section in the attributes inspector. Since the physics bodies for the vegetables are defined in the scene editor, set their Category Mask to 2 (0b00000010).
Alternatively, you can assign them programmatically. In the GameScene.swift file, find the didMoveToView(_:) function. In the block of code that creates the physics body for the background, add the following statement:
body.categoryBitMask = CollisionCategory.EverythingElse.rawValue
Add similar statements to the code that creates the physics body for the beaker (using the value CollisionCategory.Beaker) and the lab dish (using CollisionCategory.Dish). If you don’t want to set the category values for all of the vegetable nodes in the scene editor, add the following statement to the code block that nudges the vegetable nodes:
body.categoryBitMask = CollisionCategory.Floaters.rawValue
For SpaceSalad, the categories aren’t that important (yet). So far, you’re only using categories to determine collisions. By default, the value of the collisionBitMask property is 0xffffffff, which means every body will collide with every other body in any category and is why your nodes have been bouncing around from the beginning.
But collision categories are also used for contact handling. Now that you’ve assigned your nodes collision categories, put those categories to work.
Contact!
When two physics bodies are touching, they are said to be in contact. The contacts that are of most interest are those associated with collisions. When two bodies collide, your game will often want to do something. A brick will explode, a missile will explode, or a tomato will explode. Or maybe something nonexplosive will occur. The point is, your app needs to know when these things happen.
This, too, is remarkably simple. To handle contact events, you must do the following:
1. Create a contact delegate object.
2. Make it the delegate for the physics simulation engine.
3. Define a didBeginContact(_:) or didEndContact(_:) delegate function, or both.
4. Set the contactsTestBitMap in a physics body with the categories that will cause contact events.
First, turn your GameScene object into a contact delegate by adding this protocol to your class in GameScene.swift, as follows:
class GameScene: ResizableScene, SKPhysicsContactDelegate {
You then need to make your object the delegate for the physics simulator. In your didMoveToView(_:) function, add the following statement:
physicsWorld.contactDelegate = self
Now add a didBeginContact(_:) delegate function to your GameScene class, as follows:
func didBeginContact(contact: SKPhysicsContact!) {
}
You still, however, won’t receive any didBeginContact(_:) calls. Contact handling only occurs on physics bodies that have set their contactsTestBitMap property to a bit mask filled with the categories of the bodies you want to handle contacts with.
For SpaceSalad, that’s going to be simple. The goal of the game is to push the vegetables into the beaker and then place the dish on top, to keep them from floating out again. So, the game will end when the lab dish touches the beaker and all of the vegetables are inside the beaker.
Set the contact test category for the dish node. Do this in the didMoveToView(_:) function. Locate the block of code that creates the physics body for the dish node, and add the following statement:
body.contactTestBitMask = CollisionCategory.Beaker.rawValue
Now whenever the dish is dragged down to touch the beaker, your didBeginContact(_:) function will be called. The contact object (SKPhysicsContact) will contain references to the two bodies that are touching, the coordinate where the contact occurred, and some information about the force and direction of the collision.
SpaceSalad isn’t interested in any of that. It just wants to know whether the game has ended. The problem is, your game has surprisingly little game logic so far; there are no timers or scores. With everything else in place, I think it’s time to turn this app into a game.
Gamifying SpaceSalad
Let’s start making your game act more like a game. One of the things that make a game exciting is setting a time limit and showing a big countdown timer. I tell you, that really gets my heart racing. Since it has a time limit, it means the game must come to an end at some point. This also implies that it must start at some point. Add some logic to start and stop the game and to manage a timer.
Back in GameScene.swift, add the following code to your class:
let gameDuration = 100.0
var timeRemaining = 0.0
var gameOver = false
func startGame( ) {
gameOver = false
timeRemaining = gameDuration
}
func endGame( score: Int ) {
gameOver = true
releaseDragNodes()
}
You now have a time limit for your game, along with functions to start and stop the game.
Tip In a larger project, you would isolate your game logic and game state using the Model-View-Controller design pattern. GameScene is your view object. This game logic would be in a separate game controller class (GameController) or isolated in an extension ofGameScene. A more complicated game might also warrant a separate game state object, your data model, particularly if you need to save and restore games.
When does the game start? It starts when GameScene is presented. At the end of the didMoveToView(_:) function, add the following statement:
startGame()
When does the game end? It ends when all of the salad ingredients are inside the beaker or the time runs out. And when the game ends, you’ll want to compute a score. Wrap all that logic into a single score() function by adding the following code to the class:
func score() -> (score: Int, won: Bool) {
var capturedCount = 0
var missing = false
let beakerFrame = childNodeWithName("beaker")!.frame
enumerateChildNodesWithName("veg") { (node,stop) in
if beakerFrame.contains(node.position) {
++capturedCount
} else {
missing = true
}
}
return (capturedCount*(Int(timeRemaining)+60),!missing)
}
This function calculates the score for the game and also determines whether the player has won, successfully getting all of the vegetables into beaker. It works by getting the frame of the beaker node and then locating the position of every veg node in the scene. Each captured vegetable counts toward a winning score. Any vegetable outside the beaker’s frame will set the missing flag to true, indicating that the game isn’t over yet. The score is calculated based on the number of captured vegetables and the amount of time still remaining; the faster you capture them all, the higher your score.
This function gives you everything you need to know when the game has completed. You can (finally!) write the contact handler from the previous section. Flesh out your contact handler with the following code (new code in bold):
func didBeginContact(contact: SKPhysicsContact!) {
let outcome = score()
if outcome.won {
endGame(outcome.score)
}
}
That was almost anticlimactic. Every time the dish touches the beaker, this code will quickly check to see whether all of the vegetables are inside the beaker and what the final score is. If the game has been won, it ends the game with the computed score.
Oh, and there’s one tiny detail to attend to. Back in the touchesBegan(_:,withEvent:) function, modify the first if statement so it reads as follows (modified code in bold):
if touches.count == 2 && !gameOver {
This simple change prevents the player from grabbing the dish and continuing to play after the game has ended.
Your game will run now, but you have nothing to show for your work. I mean that literally. There’s nothing that indicates that the game has started or ended or what the score was. If you want to see your new code in action, set some breakpoints in strategic functions likedidBeginContact(_:) and endGame(_:). Xcode will show you what’s going on, but you need the player to see it.
Actions in Action
I mentioned adding a timer to your game. Let’s do that now. This will, rather conspicuously, show that the game is running and when it’s over. Select the GameScene.sks file. This time, drag in a label node, as shown in Figure 14-23.
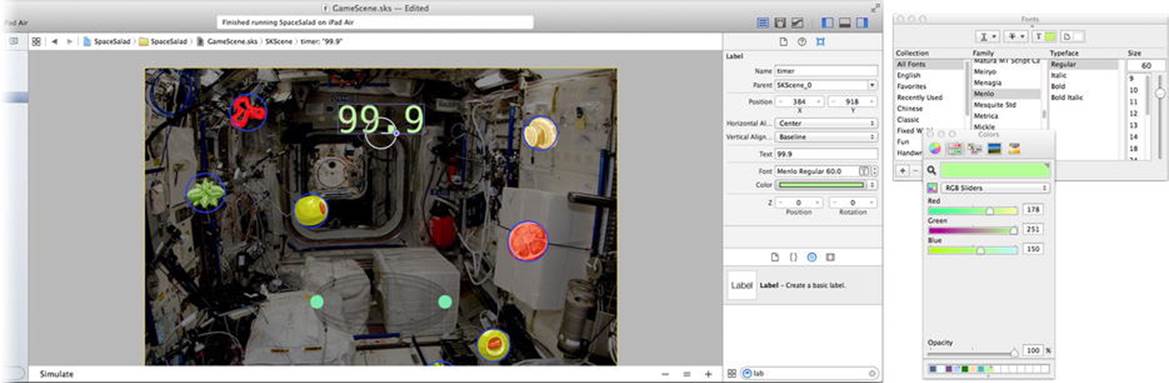
Figure 14-23. Adding a label node
Select the new label node and set its attributes as follows:
· Name: timer
· Position: (384,918)
· Text: 99.9
· Font: Menlo Regular 60.0
· Color: celery green (Red=178, Green=251, Blue=150)
· Z Position: 1 (GamePlane.Clock)
A label node (SKLabelNode) displays some text, just as a sprite node displays an image or color. Like a UILabel object, you can change what it displays simply by updating its text property. For SpaceSalad, you want to update the label every tenth of a second with the remaining time.
If you were doing this with UILabel, you’d probably schedule an NSTimer object to fire ten times a second and have your timer function update the label view. But that’s not how you do things in SpriteKit.
In SpriteKit, you animate nodes through actions. An action is an effect or procedure that you attach to a node. Every time SpriteKit has rendered the entire scene—called a frame, like a frame in a movie—it performs any pending actions.
The reason for this is because most of what SpriteKit does is done on a background thread, or threads. Actions, collision handlers, and so on, rarely execute on the main thread. To integrate smoothly with what’s happening in the scene, you simply create an action that describes what you want the node to do, and at its next opportunity, the node will do it.
Caution It is important that you don’t try to use any classes that aren’t thread-safe from your actions. Specifically, don’t have an action make changes to any UIView or UIViewController objects. Remember that many UIView changes must happen on the main thread.
There are all kinds of actions you can attach to a node. Here are some examples:
· Move a node to another position
· Move a node, following an arbitrary path
· Rotate
· Change scale
· Hide or reveal a node
· Fade in or out
· Change the texture or color of a node
· Remove a node from the scene
· Wait for a period of time
· Cause an action of another node to run
· Execute an arbitrary block of code
· Perform a sequence of actions
· Perform a group of actions, in parallel
· Perform an action repeatedly
The items at the beginning of this list are your basic animation actions. Remember, earlier, when I said you don’t tell nodes how to animate, you tell them why? I overstated this a bit. You typically animate nodes using the physics simulator, but you have a full complement of animation actions that you can direct any way you want, and you’ll use these in a moment.
The truly open-ended action is the one that executes a block of code. This is where you can attach any logic you want to a node.
The last few actions are where things get really interesting. The sequence and group actions perform a set of other actions, either sequentially or simultaneously. If you want to create an animation sequence (move, then rotate, then fade away, then remove), you create the individual actions, build a sequence action from those, and attach the sequence action to the node. Mixing in the code block action, you can run any logic before, during, or at the end of the sequence.
Finally, the repeat action will perform another action a set number of times or forever. The action it performs could be a sequence or group. Actions can be nested to any depth.
Actions are attached to a node using the runAction(_:) function. They run once and are disposed of. The “exception” is the repeat action, which isn’t finished until it has run all of its subactions the requisite number of times—or never, in the case of the repeat-forever action.
Tip There is also a special runAction(_:,completion:) function that runs an action on a node and then executes a code block. This is equivalent to creating a sequence action that runs an action followed by a code block action.
You’re going to use actions to update the timer in the scene. Select the GameScene.swift file and find the startGame() function. Add the following code:
if let label = childNodeWithName("timer") as? SKLabelNode {
let wait = SKAction.waitForDuration(0.1)
let decrement = SKAction.runBlock({
self.timeRemaining -= 0.1
if self.timeRemaining < 0.0 {
label.text = "End"
self.endGame(self.score().score)
} else {
label.text = NSString(format: "%.1f", self.timeRemaining)
}
})
let sequence = SKAction.sequence([wait,decrement])
let forever = SKAction.repeatActionForever(sequence)
label.runAction(forever)
}
The new code gets the timer node you just added to the scene. It then creates a sequence of actions. The first action does nothing (waits) for one-tenth of a second. The second action executes a block of code that gets the time remaining, decrements it by 0.1, and updates the label node, that is, until timeRemaining reaches 0.0. Then it sets the timer’s text to End and ends the game.
For these actions to run repeatedly, they are first assembled into a sequence action, which is then used to create a repeat-forever action. The repeat-forever action is the one added to the timer node.
Tip Most actions are immutable and can be reused and run on multiple nodes at the same time. If you have a commonly used action, create it once and reuse it as often as you need.
Since a repeat-forever action never finishes (from the node’s perspective), you need to stop it once the game ends. In the endGame(_:) function, add the following statement:
childNodeWithName("timer")?.removeAllActions()
The removeAllActions() function does exactly what you think it does.
Now run the app, as shown in Figure 14-24. You see the timer start immediately. If you can successfully get all of the vegetables into the beaker, the game will end, and the timer will stop. If not, the timer will eventually get to 0.0 and will stop the game.
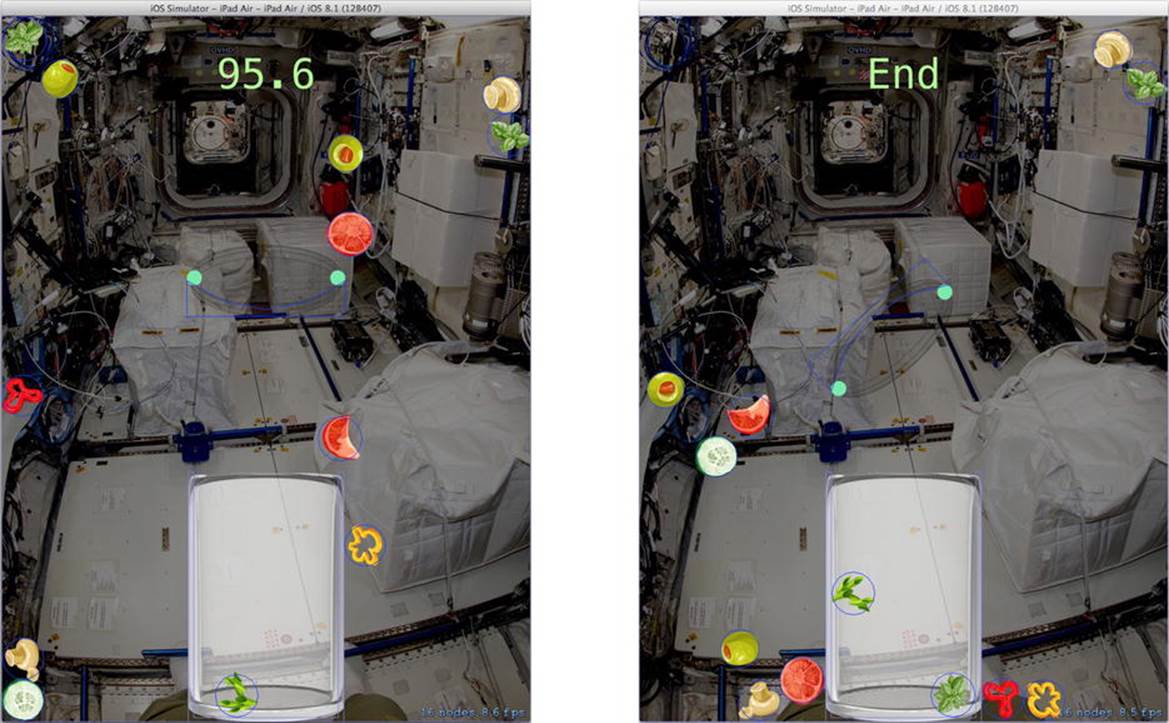
Figure 14-24. Game with timer
Traditional Animation
What’s also missing is something to tell the player what their score is. This will bring you full circle, back to straight-up animation sequences.
When the game ends, create a new label node that displays the score. Do that at the end of the endGame(_:) function with the following code:
let score = SKLabelNode(text: "Score: \(score)")
score.fontName = "Helvetica"
score.fontColor = SKColor.greenColor()
score.fontSize = CGFloat( view!.traitCollection.horizontalSizeClass == .Compact
? 54.0 : 120.0 )
let sceneRect = CGRect(origin: CGPointZero, size: frame.size)
score.position = CGPoint(x: sceneRect.midX, y: sceneRect.height*0.1)
score.zPosition = GamePlane.Score.rawValue
addChild(score)
With everything you’ve learned, this code should be easy to decipher. The code creates a new SKLabelNode, configures its font and text, and positions it in the horizontal center of the scene. Note that it sets the node’s zPosition to GamePlane.Score, so it draws on top of all of the other sprites. Finally, the node is added to the scene.
Run your app. Win the game or let it come to an end, and your score will appear.
That’s good but boring.
Return to this code. Set the initial scale of the new label sprite to something small by adding the following code to what you just wrote (added code in bold):
score.zPosition = GamePlane.Score.rawValue
score.xScale = 0.2
score.yScale = 0.2
addChild(score)
Now create actions to restore the size of the label, fade the label in, and move the label up—all at the same time. Immediately after the preceding code, add the following:
let push = SKAction.moveToY(sceneRect.height*0.8, duration: 1.0)
push.timingMode = .EaseOut
let grow = SKAction.scaleTo(1.0, duration: 1.2)
grow.timingMode = .EaseIn
let appear = SKAction.fadeInWithDuration(0.8)
let drama = SKAction.group([push,grow,appear])
score.runAction(drama)
A group action is an action that starts two or more actions simultaneously. So, the resizing, the movement, and the fade-in effect begin at the same time. Also note that these actions all have different durations. After 1.0 second has elapsed, the label has already completely appeared and has just stopped moving, but it is still growing. The group action finishes when its last action is done.
Now run your game and see how it ends. Yes, that’s a lot more interesting. (Sadly, I can’t show you the effect in print. You’ll just have to run the app yourself.)
Now what? Your game ends, but there’s no way to start it again. Yikes! Honestly, most games don’t start out right in the game. They usually have a welcome scene where you start the game, access help and settings, and so on. Let’s rework SpaceSalad so it has a welcome scene, and you’ll also see how easy it is to switch scenes inside a SpriteKit view.
Presenting Scenes
In the file template library, find the SpriteKit Scene template and drag one into your project navigator. Name the file WelcomeScene. Now create a welcome scene for your game with the following steps. (Alternatively, you can simply copy in the finished WelcomeScene.sks andWelcomeScene.swift files from the finished project in the Learn iOS Development Projects ![]() Ch 14
Ch 14 ![]() SpaceSalad folder.)
SpaceSalad folder.)
1. Set the dimensions of the scene to (768,1024).
2. Drag in a color sprite and configure it as follows:
a. Name: background
b. Texture: bkg_welcome.jpg
c. Position: (0,0)
d. Anchor Point: (0,0)
3. Drag in a label node and configure it as follows:
a. Position: (384,740)
b. Text: Tap to Play
c. Font: Helvetica Neue UltraLight 59.0
d. Color: White
e. Z Position: 1
4. Drag in another label node and configure it as follows:
a. Position: (384,657)
b. Text: Latest Score:
c. Font: Helvetica Neue Thin 30.0
d. Z Position: 1
5. Hold down the Option key and drag the last label to duplicate it. Configure the duplicate as follows:
a. Position: (384,549)
b. Text: Highest Score:
6. Drag in a new label node and configure it as follows:
a. Name: latest
b. Position: (384,608)
c. Text: none
d. Font: Helvetica Neue Bold 32.0
e. Color: White
f. Z Position: 1
7. Hold down the Option key and drag that last label to duplicate it. Configure the duplicate as follows:
a. Name: highest
b. Position: (384,500)
Your welcome scene should look like the one in Figure 14-25.
Figure 14-25. Designing the welcome scene
From the file template library, drag in a new Swift file and name it WelcomeScene. Select and fill it with the following code, assuming you didn’t copy the file already.
import SpriteKit
class WelcomeScene: ResizableScene {
override func didMoveToView(view: SKView) {
scaleMode = .AspectFill
size = view.frame.size
if let latest = childNodeWithName("latest") as? SKLabelNode {
latest.text = "\(GameViewController.latestScore())"
}
if let highest = childNodeWithName("highest") as? SKLabelNode {
highest.text = "\(GameViewController.highestScore())"
}
}
override func touchesBegan(touches: NSSet, withEvent event: UIEvent) {
if let scene = GameScene.unarchiveFromFile("GameScene") as? GameScene {
let doors = SKTransition.doorsOpenVerticalWithDuration(1.0)
view!.presentScene(scene, transition: doors)
}
}
}
Just like the didMoveToView(_:) function in GameScene, this one resizes its scene to fit the view. It then updates its two labels with the user’s latest and highest scores.
The single touch event handler loads the GameScene (just like the view controller is doing now) and presents it. But since there is (or soon will be) a scene already displayed, it adds a transition animation to the presentation.
Now you need to make some changes to your GameViewController. You view controller will keep track of the latest and highest scores. It also needs to be modified so the first scene it presents is the welcome scene.
Select the GameViewController.swift file. Add the following enum outside the class definition:
enum GameScoreKey: String {
case LatestScore = "latest"
case HighestScore = "highest"
}
Now add the following two class functions:
class func latestScore() -> Int {
return NSUserDefaults.standardUserDefaults().integerForKey(
GameScoreKey.LatestScore.rawValue)
}
class func highestScore() -> Int {
return NSUserDefaults.standardUserDefaults().integerForKey(
GameScoreKey.HighestScore.rawValue)
}
These two functions retrieve the player’s latest and highest scores from the user defaults. You’ll learn all about user defaults in Chapter 18. For now, just know that the user defaults is a place to store small bits of data that will be remembered between runs of your app.
In the viewDidLoad() function, find the code that loads the initial scene and change it as follows (modified code in bold):
if let scene = WelcomeScene.unarchiveFromFile("WelcomeScene") as? WelcomeScene {
let skView = self.view as SKView
skView.presentScene(scene)
}
While you’re here, I think you’re done with the debug aids. Find the let debugAids constant and change it to false.
You are almost done, I promise! The app now starts with the welcome scene that shows the latest scores. Tapping it presents the game scene, which starts that game. The only missing piece is when the game ends. The game needs to record the scores and transition back to the welcome scene.
Switch to the GameScene.swift file. Locate the endGame(_:) function and insert the following statement:
recordScore(score)
After the endGame(_:) function, add that new function.
func recordScore( score: Int ) {
let userDefaults = NSUserDefaults.standardUserDefaults()
userDefaults.setInteger(score, forKey: GameScoreKey.LatestScore.rawValue)
if score > GameViewController.highestScore() {
userDefaults.setInteger( score,
forKey: GameScoreKey.HighestScore.rawValue)
}
}
Back in the endGame(_:) function, locate the code that animates the score label. You’re going to change it so that once the animation is complete, the node waits for a few seconds and then presents the welcome scene. Add the following code (new code in bold):
let drama = SKAction.group([push,grow,appear])
let delay = SKAction.waitForDuration(4.5)
let exit = SKAction.runBlock({
if let scene = WelcomeScene.unarchiveFromFile("WelcomeScene")
as? WelcomeScene {
let doors = SKTransition.doorsCloseVerticalWithDuration(0.5)
self.view?.presentScene(scene, transition: doors)
}
})
score.runAction(SKAction.sequence([drama,delay,exit]))
You took the concurrent group of animation actions and made that one step in a sequence of actions, the last one executing a block of code to transition back to the welcome scene. Your finished game should look like the one in Figure 14-26.
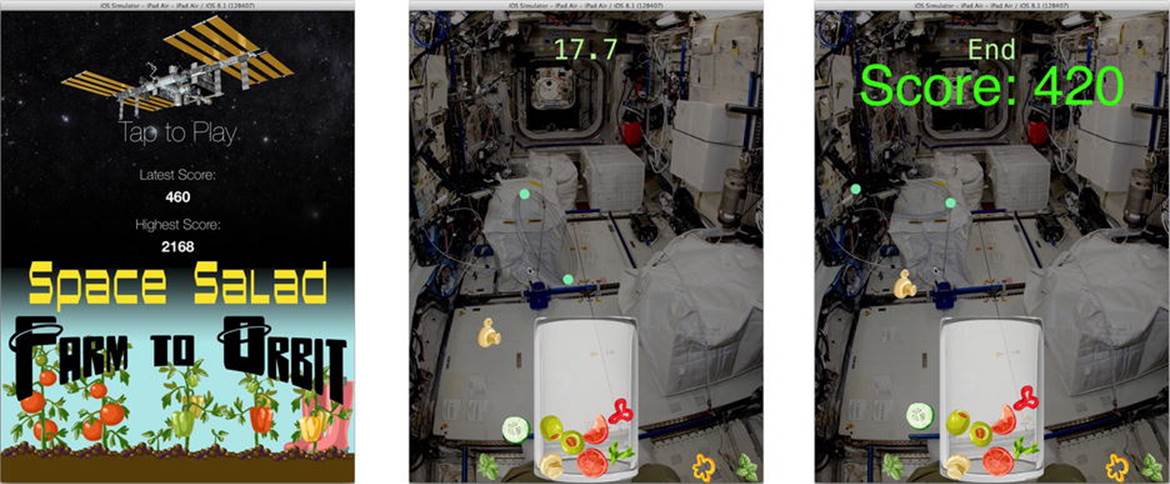
Figure 14-26. Finished SpaceSalad
Beyond SpaceSalad
Congratulations, you’ve covered a lot of ground in this chapter. SpriteKit is a big world, and you’ve toured a great deal of it. But you haven’t visited everything. In fact, there are a lot of SpriteKit destinations I didn’t even mention. It’s time to rectify that.
Here are a few topics you might want to explore on your own:
· There are a lot of different ways of creating the texture for a sprite node. For example, you can load or create a single large graphic and then create individual sprites that render portions of that image.
· You can apply Core Graphics filters (blur, saturate, glow, and so on) to sprites. See SKEffectNode.
· As I mentioned at the beginning, it’s possible to write your own sprite-rendering logic by writing an OpenGL ES fragment shader program. If you understood that sentence, see the SKShader class.
· Sprites can have a fixed border and will scale their interior, much the way UIButton will resize a graphic so its borders don’t look stretched when resized.
· For fine-grained animation control, your scene can execute code at the end of each frame in its update(_:) function. There are also opportunities to process the scene after actions have run (didEvaluateAction()) and after the physics simulator has updated all of the nodes (didSimulatePhysics()).
· The physics simulation engine (SKPhysicsWorld) has a number of interesting features. You can apply speed and gravity to the entire scene, add attachment joints, and find all of the physics bodies that intersect a line.
· There are other kinds of nodes. There are nodes that apply forces and nodes that provide lighting. There are even nodes that create turbulence.
You can read more about all of these topics and more in the SpriteKit Programming Guide that you’ll find in Xcode’s Documentation and API Reference window.
Summary
This is cause for some celebration. This was, by far, the most complex and difficult project in the book, and you did it using technologies you hadn’t used before. While SpriteKit shares a lot of similarities with the view classes you’ve used before and will continue to use, many aspects are radically different. Scene design uses a specialized editor, you must load the scene files yourself, and animation is different, not to mention there are completely new concepts like physics bodies and collisions.
With the momentum you’ve built up, you can, honestly, coast through the rest of this book. Later chapters are going to introduce you to even more iOS services, such as maps, and there’s a lot of practical information about Swift. But all of that is going to seem simple compared to what you’ve accomplished here.
Speaking of practical information, the next chapter is going to focus on Interface Builder—not so much how to use it as how it works, which is something that’s important to understand if you want to be an iOS master developer.
EXERCISE
SpaceSalad is a cute game, but it’s sort of jerky. That is, the lab dish often jitters when being dragged around. Try taking a moment to address that.
The behavior of sprites is a combination of all the physics body attributes and their geometry, along with the forces applied to those bodies. There are more than a couple of attributes you can adjust, and every one will have a subtle—or not so subtle—effect on how your sprites behave.
Here are a few things to look into. The “spring” joints between the player’s drag position and the thumb nodes of the lab dish have damping and frequency properties. These control the rate at which energy is lost by the spring and how fast it oscillates. Small changes here can have dramatic effects on how the connected nodes interact. A physics body also has a mass property. This is a combination of its area and density properties. Try making the lab dish “lighter” by reducing its density property. Try increasing or reducing the drag (linearDamping) of your vegetables. Play with these and other properties. What happens to game play if you set the veg node’s restitution to 0.0? What happens when you assign different restitutions to different nodes? This is a game; have some fun!
__________________
1This, sadly, is pure fantasy. There is no fresh food on the ISS, for fear of bacterial infection or other biological infestation. Maybe someday they’ll grow their own.
All materials on the site are licensed Creative Commons Attribution-Sharealike 3.0 Unported CC BY-SA 3.0 & GNU Free Documentation License (GFDL)
If you are the copyright holder of any material contained on our site and intend to remove it, please contact our site administrator for approval.
© 2016-2026 All site design rights belong to S.Y.A.