Learn iOS 8 App Development, Second Edition (2014)
Chapter 8. Model Citizen
This chapter is all about the model-view-controller design pattern. Design patterns, which I talked about in Chapter 6, are reusable solutions to common programming problems. The model-view-controller (MVC) design pattern is, arguably, the most important and wide-ranging design pattern used today. In this chapter, you’ll learn about the following:
· What the model-view-controller design pattern is
· What makes a good data model
· What makes a good view object
· What makes a good controller object
· How MVC objects communicate with each other
· When you can cheat
You might be thinking that all of this MVC stuff is a bunch of esoteric computer science theory that won’t really help you write your Death Star Laser Cannon Control app. On the contrary, learning (even a little) about the MVC design pattern will not only make your Death Star Laser Cannon Control app more reliable, it will actually make it easier to write and maintain. Good MVC design might require a little more thought and consideration up front but you save a whole lot of work in the end—and your app is likely to have fewer bugs.
So, feel free to skip this chapter, but when you press the Destroy Alderaan button on your app and nothing happens, you’ll have to answer to Lord Vader, not me.
The Model-View-Controller Design Pattern
In Chapter 6 I talked about the single responsibility principle, encapsulation, and the “open-closed” principle. All of these can be distilled into a simple concept.
An object should do one thing and do it well.
To do anything useful, your app must store data, display that data in an interface, and allow the user to interact with it. The model-view-controller design pattern organizes what your app must do (store, display, and interact) into objects (data objects, view objects, and controller objects) that do just one thing, and it describes how those objects work together. Let’s start with the simplest of the three:
Data Model Objects
Your data model consists of the objects that store your app’s information. Data model objects should do the following:
· Represent the data in your app
· Encapsulate the storage of that data
· Avoid assumptions about how the data is displayed or changed
The data of your app is whatever values, information, or concepts your app uses. In your MyStuff app, your data model was simply the names, locations, and images of the things you own. A chess app would have a slightly more complex data model; there would be an object that represented the chess board, objects for each player, objects for each piece, objects that recorded the moves, and so on. An astronomical catalog app might require dozens of classes and hundreds of thousands of objects to keep track of the visible stars.
The first job of your data model classes is to represent the data for your app, while hiding (encapsulating) how that data is stored. It should present the rest of your app with a simple interface so the other classes can get the information they need, without needing to know exactly how that data is represented or stored.
Even for “simple” apps, like MyStuff, encapsulation is important for the future of your app. For example, the image property of MyWhatsit stored a UIImage object with the picture of that item. Simple, right? But images can take up a lot of memory, and if your app is going to inventory hundreds, instead of dozens, of items, your app can’t keep all of those images in memory—it will run out of memory and crash.
You could address this problem by changing your data model so images that you’re not currently displaying—after all, you can’t display them all at once—are written to flash memory as individual image files. The next time an object requests the image property of a MyWhatsit object, your data model can determine whether it has that image in memory or whether it needs to retrieve it from flash storage.
The key concept is that all of these decisions are encapsulated in your data model. The other classes that use your MyWhatsit object just request the image property; they don’t know how, or where, that information is stored, and they shouldn’t care. Review the food truck analogy in the “Encapsulation” section of Chapter 6 if that isn’t clear.
The other really important aspect of the data model is what it is not. The data model is at the bottom of the MVC design, and it shouldn’t contain any properties or logic not directly related to your app’s data or how that data is maintained.
Specifically, it shouldn’t know anything about, or make any assumptions about, the view or controller objects it works with. It shouldn’t contain references to view objects, have methods that present the data in the user interface, or directly handle user actions. In this respect, the data model is the purest of the three MVC roles; it’s all about the data and nothing else.
View Objects
View objects sit in the middle of the MVC design. A good view object does the following:
· Presents some aspect of the data model to the user
· Understands the data it displays and how to display it, but nothing more
· May interpret user interface events and send actions to controller objects
A view object’s primary purpose is to display the values in your data model. View objects must, by necessity, understand at least some aspects of your data model, but they know nothing about controller objects.
How much does a view object know about the data model? That depends on the complexity of what’s being displayed. In general, it should know just enough to do its job and no more. A view that displays a string needs to know only the string value to display. A view that draws an animated picture of the night sky needs a lot of information: the list of visible stars, their magnitude and color, the coordinates of the observer, the current time, the azimuth, the elevation, the angle of view, and so on. To find examples, you have to look no further than the Cocoa Touch framework, which is full of view objects that display everything from the simplest string (UILabel) to entire documents (UIWebView).
It’s common for view objects, especially complex ones, to maintain a reference to the data model objects they display. Such a view object not only understands how to display the data but also knows what data to display.
View objects may also interpret user interface events (such as a “swipe” or a “pinch” gesture) and translate those into action messages (nextPage(_:) or zoomOut(_:)), which it sends to a controller object. A view object should not act on those actions; it should simply pass them on to a controller.
Note View objects that interpret user interaction and send action messages are called controls—not to be confused with controllers. Most control views (text field, button, slider, toggle switch, and so on) are subclasses of UIControl.
Controller Objects
Controllers are at the top of the MVC design and are the “business end” of your app. Controller objects are supervisors that oversee, and often coordinate, the data model and view objects. Controller objects do the following:
· Understand, and often create, the data model objects
· Configure, and often create, the view objects
· Perform the actions received from view objects
· Make changes to the data model
· Coordinate communications between the data model and view objects
· May take responsibility for keeping the view objects updated
It’s almost easier to explain what a controller is not than what it is. It is not your data model; a controller object does not store, manage, or convert your app’s data.1 It is not a view object; it does not draw the interface or interpret low-level events. It is, essentially, everything else.
Controllers can be involved in the initialization of your data model and view objects, often creating the data model objects and loading your view objects from an Interface Builder file.
Controller objects contain all of the business logic of your app. They perform the commands initiated by the user, respond to high-level events, and instigate changes to the data model. In complex apps, there are often multiple controller objects, each responsible for a particular feature or interface.
Your controller objects are also either the recipient or source of most of the messages within your app. How they are involved depends on your design, which brings us to the topic of interobject communications.
MVC Communications
In its simplest form, the communications between MVC objects form a loop (see Figure 8-1).
· Data model objects notify view objects of changes.
· View objects send actions to controller objects.
· Controller objects modify the data model.
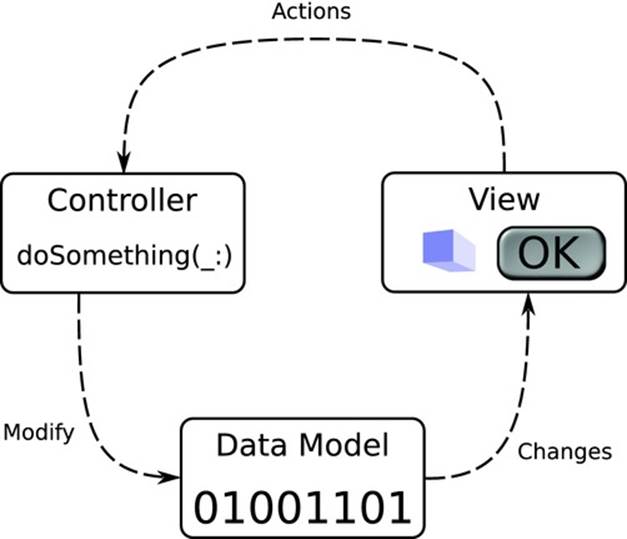
Figure 8-1. Simple MVC communications
In this arrangement, the data model is responsible for notifying any observers of changes. The view objects are responsible for observing and displaying those changes and sending actions to the controller objects. The controller objects perform the actions, often making changes to the data model, and the whole cycle starts again.
Counterintuitively, this simplified arrangement happens only in fairly sophisticated apps. Most of the time, the data model is not set up to post notifications, and the view objects don’t observe changes directly. Instead, the controller object steps in and takes responsibility for notifying the view objects when the data model changes, as shown in Figure 8-2.
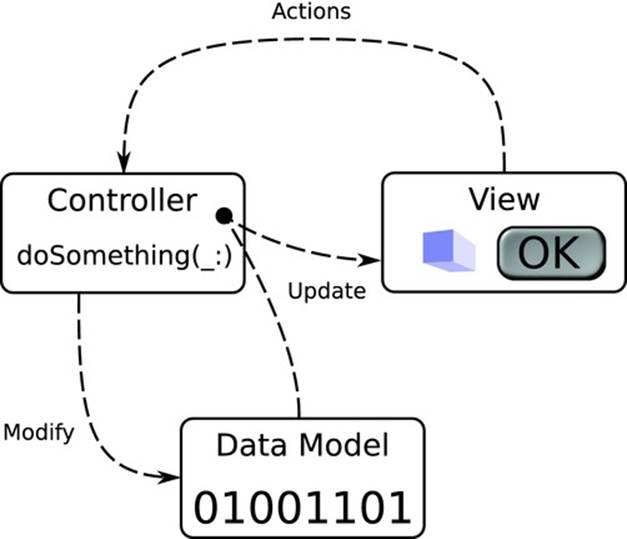
Figure 8-2. Typical MVC communications
Now that you have the basics of the MVC design pattern, let’s put together another iOS app. Instead of focusing on a particular iOS technology, such as the motion events or the camera, I want you to pay attention to the roles of your objects, their design, and how they change as your app evolves.
Color Model
You’re going to develop a new app called ColorModel. It’s an app that lets you choose a color using the hue-saturation-brightness (HSB) color model. Its initial design is simple, as shown in Figure 8-3. The interface consists of three sliders, one for each of the HSB values, and a view where the chosen color appears.
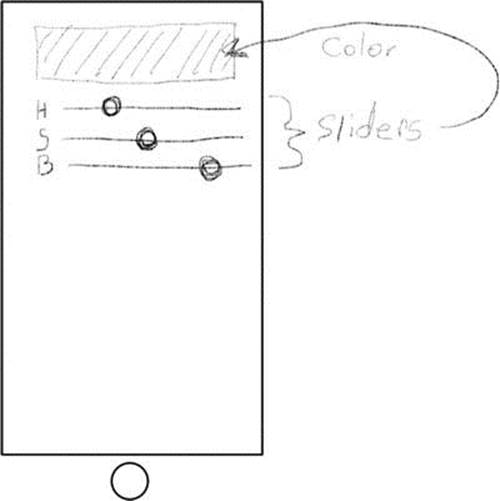
Figure 8-3. Initial design of ColorModel
Note A color model, or color space, is a mathematical representation of a visible color. There are several common models, suited to different applications. Computer displays and televisions use the red-green-blue (RGB) model, artists like to use the hue-saturation-brightness model, while printers use the cyan-magenta-yellow-black (CMYK) model. See http://en.wikipedia.org/wiki/Color_model.
Start by launching Xcode. Create and configure a new project by following these steps:
1. Use the Single View Application template.
2. Name the project ColorModel.
3. Set the language to Swift.
4. Set the device to iPhone.
5. Create the project.
6. On the General tab of the ColorModel target, uncheck the Landscape Left and Landscape Right orientations so only Portrait orientation is checked.
Creating Your Data Model
The first step (after design) of almost any app is to develop your data model. The data model in this app is remarkably simple; it's a single object that maintains the values for hue, saturation, and brightness. It also translates those values into a color object suitable for display and other uses. Start by adding a new Swift source file to your project. Grab a Swift file from the file template library and drag it into the ColorModel group of your project. Name the new file Color. Replace the code in the file with this:
import UIKit
class Color {
var hue: Float = 0.0
var saturation: Float = 0.0
var brightness: Float = 0.0
var color: UIColor {
return UIColor(hue: CGFloat(hue/360),
saturation: CGFloat(saturation/100),
brightness: CGFloat(brightness/100),
alpha: 1.0)
}
}
You now have a data model class. Its first three properties are floating-point values, one each for the color’s hue, saturation, and brightness. The hue is in degrees and can range between 0° and 360°. The other two are expressed as a percentage and can range between 0 percent and 100 percent.
The last property is a computed property—which just means it’s a value that’s calculated rather than stored. It returns a UIColor object that represents the same color as the current hue/saturation/brightness triplet.
The conversion from the hue-saturation-brightness values into a UIColor object (which uses the red-green-blue model, by the way) is thoughtfully provided by the UIColor class. I’m glad. There are formulas for converting between various color models, but it requires a lot more math than I want to explain.
Note It’s possible to make the color property settable too; you’d just need to add code to update the hue, saturation, and brightness values to match. Data models should be consistent; if the color property always represents the color of the current hue, saturation, andbrightness properties, then changing the color should also change the hue, saturation, and brightness so they still agree.
The values that UIColor uses to express hue, saturation, and brightness are, however, different from the one you choose (OK, I choose) for the data model. In your data model, hue is a Float value between 0.0 and 360.0. UIColor expects a CGFloat value between 0.0 and 1.0. Likewise,UIColor saturation and brightness values are also between 0 and 1. To convert between your model and the one used by UIColor, you must scale the values by dividing them by their range and converting from Float to CGFloat. This is the kind of detail that data models encapsulate (hide) from the rest of your app.
With your data model complete, it’s time to move on to the view objects.
Creating View Objects
Select your Main.storyboard Interface Builder file. In the object library, find the plain view object and drag one into your interface. Resize and position it so it occupies the top of the display, as shown in Figure 8-4. This will be the view where the user’s chosen color appears.
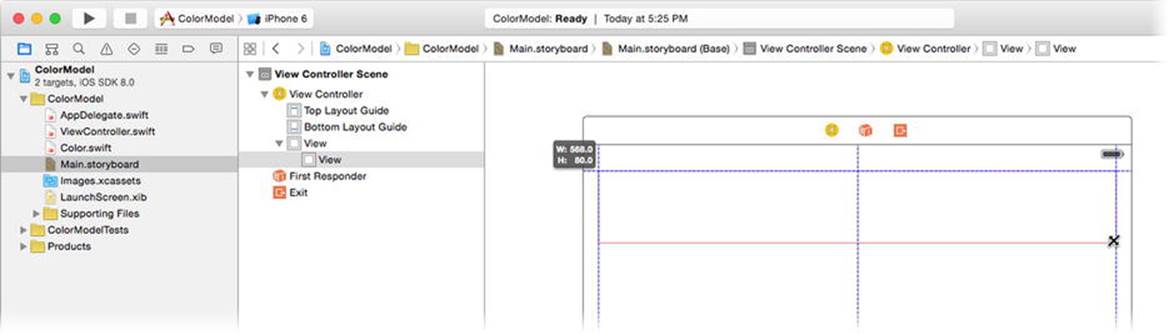
Figure 8-4. Adding a simple view object
Select the new view object and click the pin constraints control. Add top (Standard), left (20), and right (20) edge constraints, as shown in Figure 8-5. Also add a height constraint of 80 pixels.
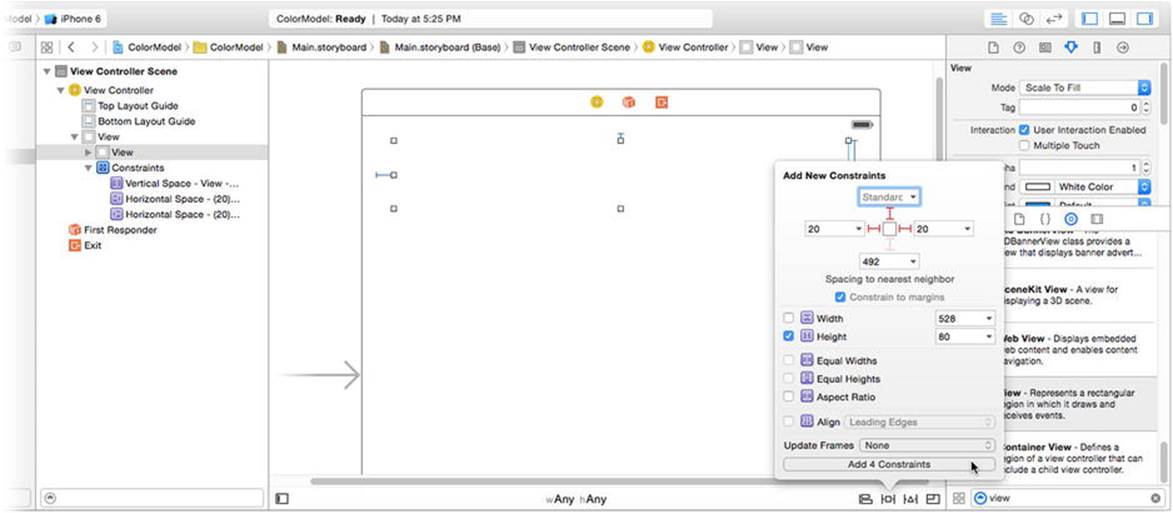
Figure 8-5. Setting the view object constraints
Find the label object in the library and drag one into your interface. Position it immediately below the lower-left corner of the view object. Set its title to H. Locate the slider object in the library and drag one into your interface, positioning it just below the color view and immediately to the right of the label you just added, as shown in Figure 8-6.

Figure 8-6. Adding the first label and slider
Align the label and slider so they are vertically centered. Size the slider so it extends from the right edge of the label to the right edge of the view.
You need two more label/slider pairs, so let’s quickly duplicate the ones you just created. Select both the label and slider views (by holding down the Shift key or by dragging out a selection rectangle that selects both). Now press the Option key. While holding down the Option key, click and drag the pair down. The Option key turns the drag into a copy operation. Position the pair immediately below the first two, as shown in Figure 8-7, and release the mouse.
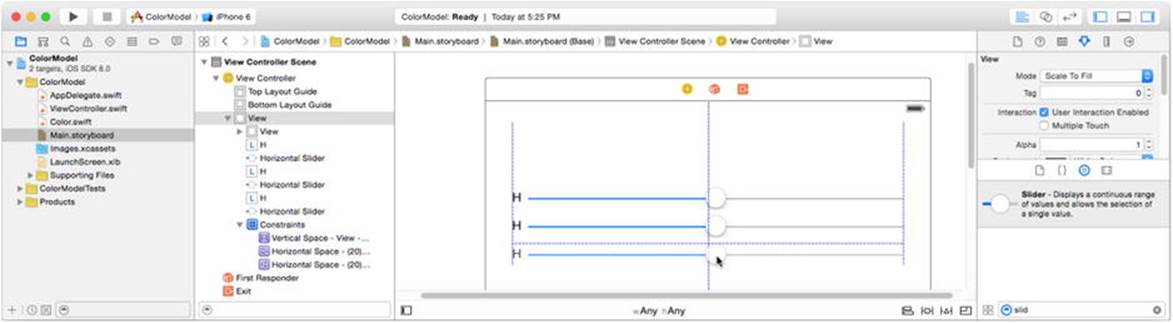
Figure 8-7. Duplicating the label and slider
Repeat the copy again so you have three labels and three slider controls. Control/right-click the top slider, drag down to the middle slider, release, and choose Equal Widths from the constraints menu. Repeat, dragging to the bottom slider, as shown in Figure 8-8. This adds constraints to keep the three slider controls the same width.
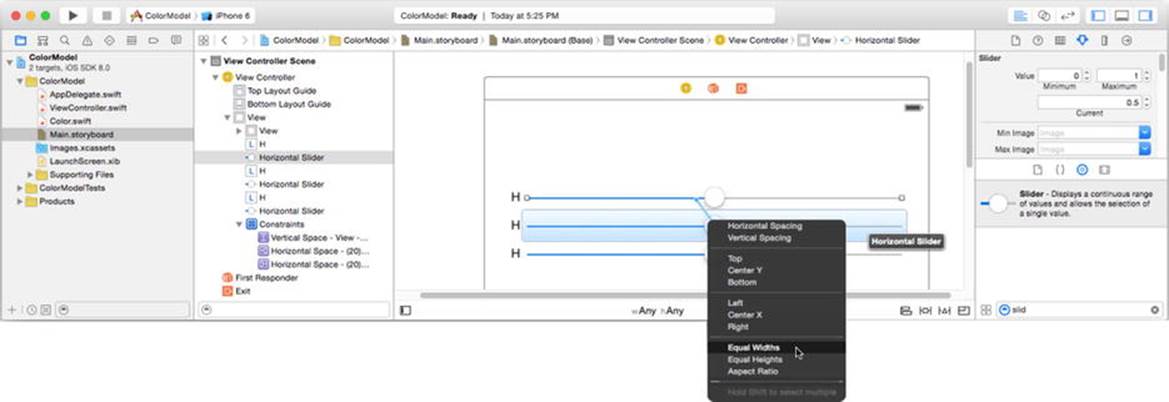
Figure 8-8. Constraining the widths of the sliders
Retitle the second and third labels to S and B. You now have all of the view objects you need. Flesh out the constraints by choosing Add Missing Constraints in View Controller from the Resolve Auto Layout Issues control.
In your data mode, the hue value ranges from 0° to 360° and saturation and brightness range from 0 percent to 100 percent. Change the value range of the three sliders to match. Select the top (hue) slider and use the attributes inspector to change its Maximum value from 1 to 360, as shown inFigure 8-9. Change the maximum value of the other two sliders to 100.
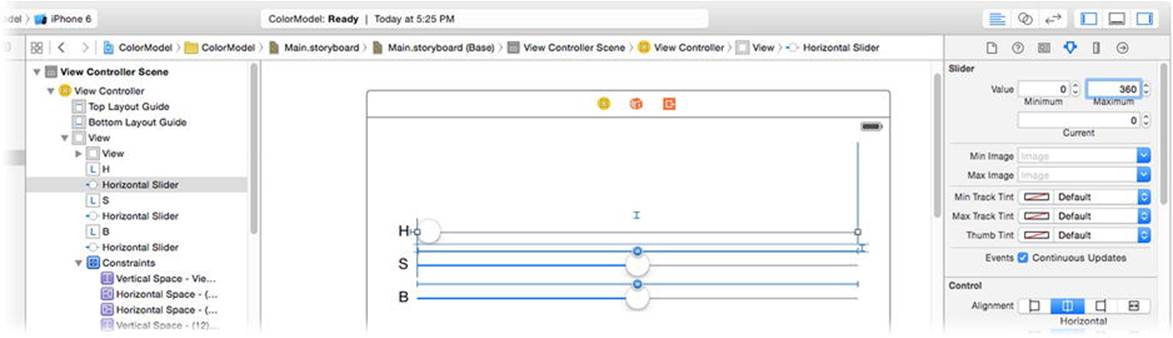
Figure 8-9. Establishing value range of slider control
Writing Your Controller
The Xcode project template already provides you with a controller class; you just need to fill it out. Select your ViewController.swift interface file. Your controller will need a reference to your data model object, along with outlets and actions to connect with your interface. Start by adding the properties to your ViewController class.
var colorModel = Color()
@IBOutlet var colorView: UIView!
The first is your controller’s connection with your data model. The second is an outlet that you’ll connect to your color view. This will let your controller update the color displayed in the view.
Finally, your controller will need three actions, one for each slider control, that will adjust one value in the data model. While still in your ViewController.swift file, add these three functions:
@IBAction func changeHue(sender: AnyObject!) {
if let slider = sender as? UISlider {
colorModel.hue = slider.value
colorView.backgroundColor = colorModel.color
}
}
@IBAction func changeSaturation(sender: AnyObject!) {
if let slider = sender as? UISlider {
colorModel.saturation = slider.value
colorView.backgroundColor = colorModel.color
}
}
@IBAction func changeBrightness(sender: AnyObject!) {
if let slider = sender as? UISlider {
colorModel.brightness = slider.value
colorView.backgroundColor = colorModel.color
}
}
Each action message will be received from one of the slider controls whenever it changes. Each method simply modifies the corresponding value in the data model with the new value of the slider. It then updates the color view to reflect the new color in the data model. In this implementation, your controller is taking responsibility for updating the view whenever the data model changes (see Figure 8-2).
Wiring Your Interface
The last step is to connect your controller’s outlets and actions to the view objects. Select the Main.storyboard Interface Builder file again. Select the View Controller object and use the connections inspector to connect your controller’s colorView outlet to the UIView object, as shown in Figure 8-10.
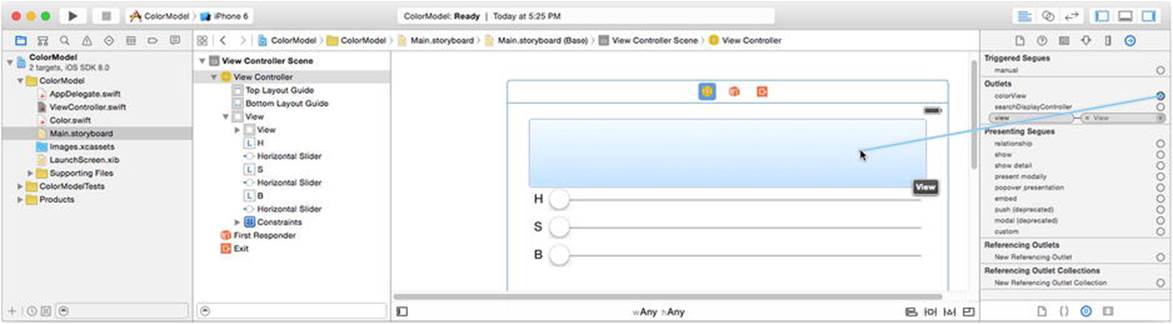
Figure 8-10. Connecting the colorView outlet
Now connect the actions of the three sliders to the controller’s changeHue(_:), changeSaturation(_:), and changeBrightness(_:) functions. Select the top slider. Using the connections inspector, connect the Value Changed event to the controller’s changedHue:action. Repeat, connecting the middle slider to the changeSaturation: action and connecting the bottom slider to the changeBrightness: action, as shown in Figure 8-11.
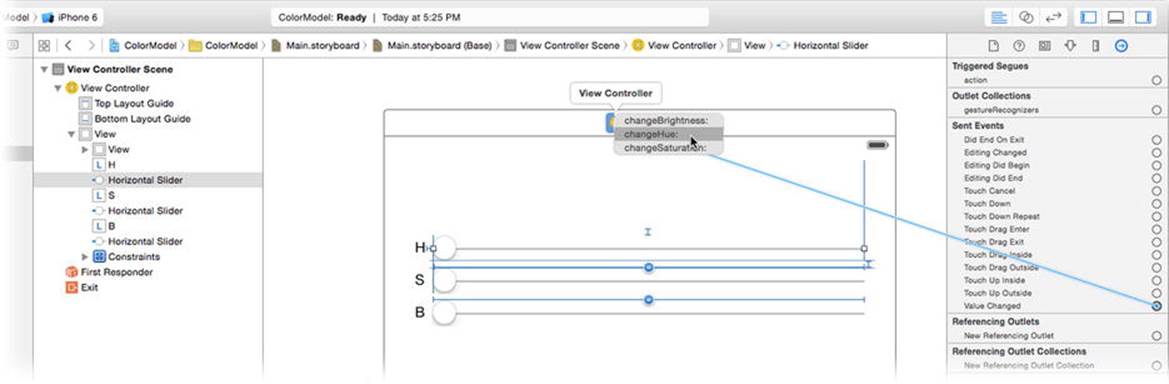
Figure 8-11. Connecting slider actions
Tip You could have made these connections by Control/right-clicking a slider and dragging to the controller. This works because the Value Changed event is the default event for control objects when connecting an action.
There’s one last, cosmetic detail to attend to. The values for the hue, saturation, and brightness in the data model all initialize to 0.0 (black). The default color in the color view is not black, and the initial positions of the sliders are all 0.5. So that your view objects are consistent with your data model from the beginning, select the sliders and use the attributes inspector to set the Current property to 0.0. Select the color view object and set its background attribute to Black Color, as shown in Figure 8-12.
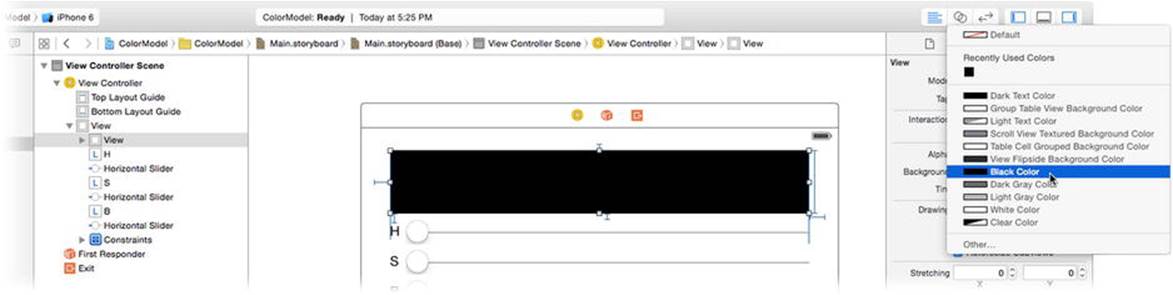
Figure 8-12. Finished ColorModel interface
Run your app in the iPhone simulator. It appears with the color black and all three sliders set to their minimum values. Change the values of the sliders to explore different combinations of hue, saturation, and brightness, as shown on the right in Figure 8-13.

Figure 8-13. First ColorModel app
Having Multiple Views
One reason the MVC design pattern separates the data model from the view objects is to avoid a one-to-one relationship between the two. With MVC you can create a one-to-many, or even a many-to-many, relationship between your data model and view objects. Exploit this by creating more view objects that display the same data model and in different ways. (You’ll find this version of the project in the Learn iOS Development Projects ![]() Ch 8
Ch 8 ![]() ColorModel-2
ColorModel-2 ![]() ColorModel folder).
ColorModel folder).
Start by selecting your Main.storyboard Interface Builder file. Using the right resizing handle, make the width of the three sliders considerably shorter. You want to temporarily create some room to add new view objects to their right, as shown in Figure 8-14.
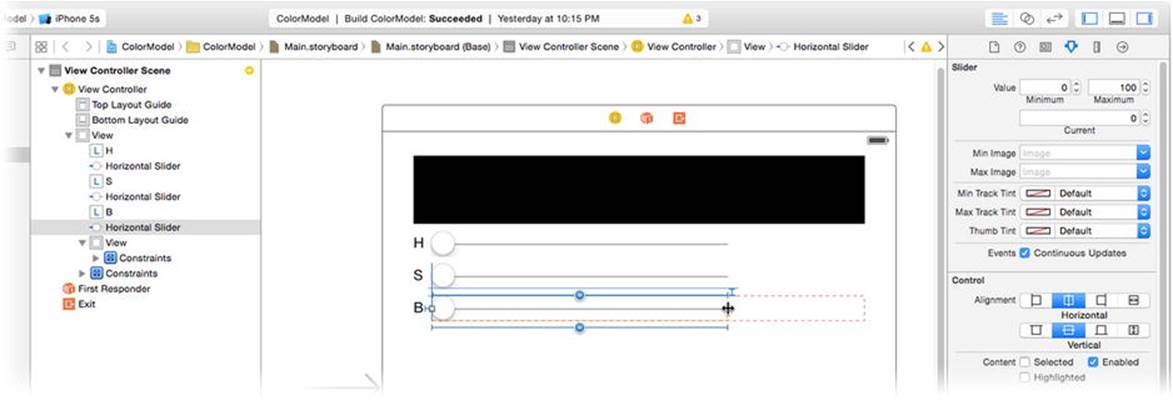
Figure 8-14. Making room for new view objects
Find the label object in the library and add three new labels, to the right of each slider and aligned with the right edge of the color view, as shown in Figure 8-15.
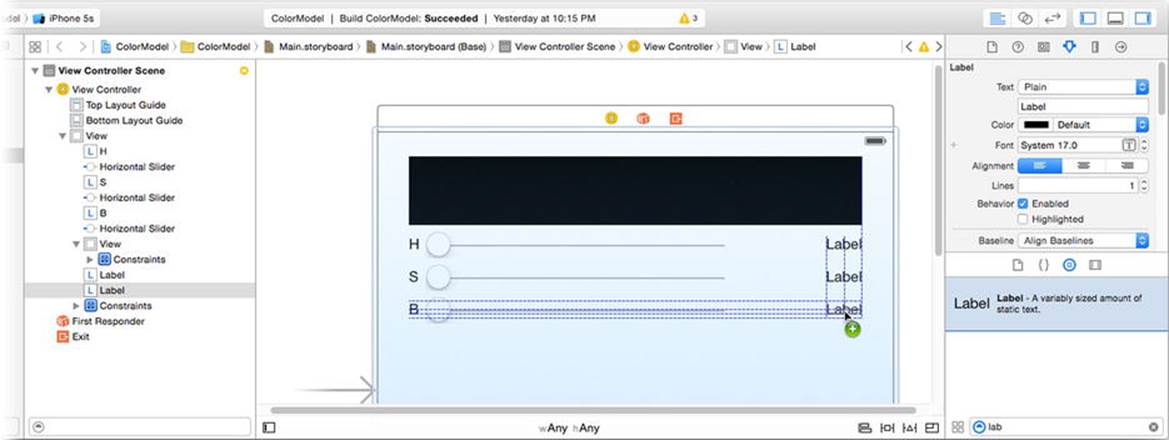
Figure 8-15. Adding HSB value labels
Each label will display the textual value of one property. Edit the text property of the three labels, either by using the attributes inspector or by double-clicking the label object. Change the top label to 360° (press Shift+Option+8 to get the degrees symbol), and the other two to 100%, as shown in Figure 8-16.
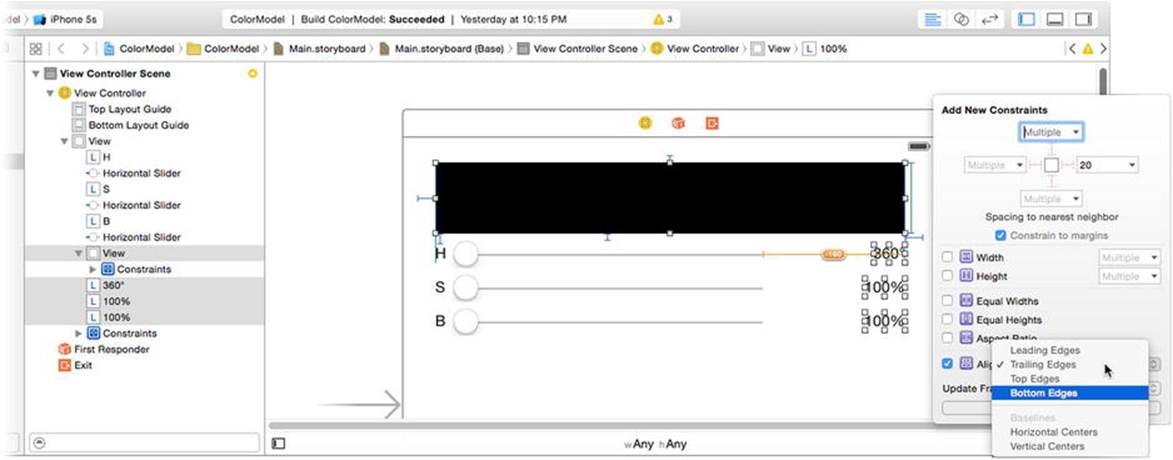
Figure 8-16. Adding right-alignment constraints for labels
Now create some constraints to right-justify the labels. Select all three new labels and the view object above them. Click the pin constraints control and add a right align edges constraint, also shown in Figure 8-16. This will add three new constraints to keep the right edge of the labels horizontally aligned with the right edge of the color view.
To vertically position the labels, select the “H” label and the “360” label, click the pin constraints control, and add a top edge alignment constraint. Repeat with the “S” and “100%” pair and the “B” and “100%” pair. Now the three labels on the right will now match the vertical position of the ones on the left. You could have also centered them to the sliders or added the same vertical spacing constraints the labels on the left are using. There are a million different combinations of constraints that will create the same layout. Use the one that makes sense to you.
Select the top slider. Select the right-edge constraint, created by Xcode, just to the right of the slider, as shown in Figure 8-17. Using the attributes inspector, set its value to -60. This changes the constraint so the right edge of the top slider is now inset from the right edge of the color view by 60 pixels, leaving room for the labels you just added.
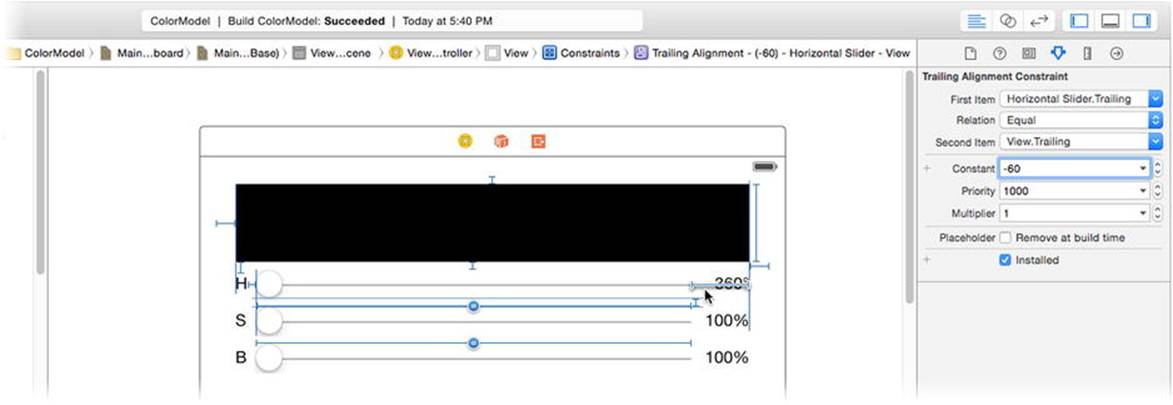
Figure 8-17. Adjusting the slider constraint
Note See how you made less work for yourself by adding equal width constraints for the second and third sliders, rather than simply setting the same right edge constraint for all three? By making the width of your sliders dependent on each other, you only have to modify the width of one and the others fall into line, literally.
You’ll need outlets to use these three labels, so add these to your ViewController.swift file:
@IBOutlet var hueLabel: UILabel!
@IBOutlet var saturationLabel: UILabel!
@IBOutlet var brightnessLabel: UILabel!
Connect these three outlets in Interface Builder. Switch back to the Main.storyboard file, select the view controller, and use the connections inspector to connect the outlets to their respective UILabel objects.
Switch back to your ViewController.swift file and modify the three actions so each also updates its respective label view, by adding the following code in bold:
@IBAction func changeHue(sender: AnyObject!) {
if let slider = sender as? UISlider {
colorModel.hue = slider.value
colorView.backgroundColor = colorModel.color
hueLabel.text = NSString(format: "%.0f°", colorModel.hue)
}
}
@IBAction func changeSaturation(sender: AnyObject!) {
if let slider = sender as? UISlider {
colorModel.saturation = slider.value
colorView.backgroundColor = colorModel.color
saturationLabel.text = NSString(format: "%.0f%%", ![]()
colorModel.saturation)
}
}
@IBAction func changeBrightness(sender: AnyObject!) {
if let slider = sender as? UISlider {
colorModel.brightness = slider.value
colorView.backgroundColor = colorModel.color
brightnessLabel.text = NSString(format: "%.0f%%", ![]()
colorModel.brightness)
}
}
These three new statements change the text in the label fields to display the textual value of each property. The %.0f format specifier rounds the data model’s floating-point value to the nearest integer. Literally translated, it means “Format (%) the floating-point value (f) so there are zero (.0) digits to the right of its radix point.”
Note The %% escape sequence means a single % character. Format string specifiers begin with % (such as %u or %02x). To include a single percent character in a format string, you use %%.
Now run your app again. This time, whenever you adjust the value of one of the sliders, both the color and the textual HSB value are updated too, as shown in Figure 8-18.
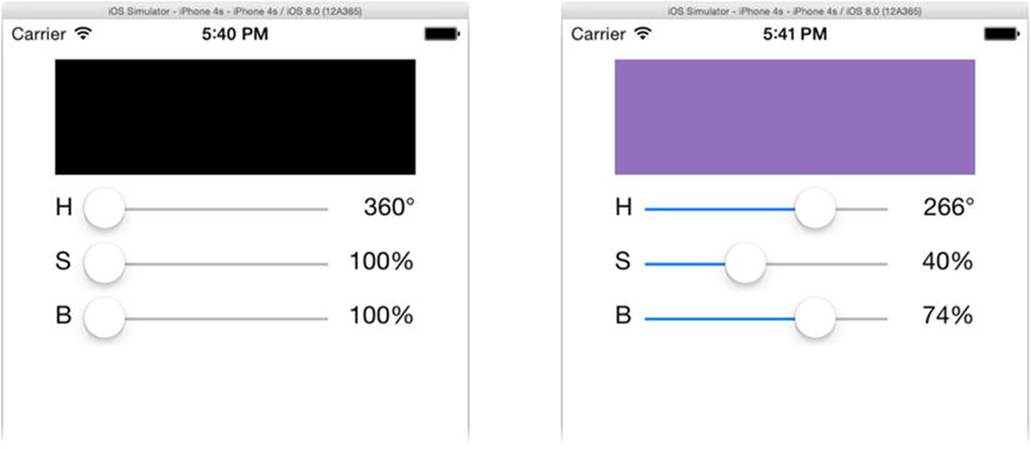
Figure 8-18. ColorModel with HSB values
One of the advantages of the MVC design pattern is that data model objects aren’t coupled to their view objects. If you want to display the same data model information in a second view or want to display the same information three different ways, you just add the appropriate view objects. The data model never changes. Let’s add yet another way to display the color and see how that affects your design.
Consolidating Updates
Now your data model appears, in different forms, in four different views. But why stop there? In the Main.storyboard file—you’re now working toward the project in the ColorModel-3 folder—add two more labels. Set the text of one to #000000 and the other to Web:. Position them as shown in Figure 8-19. Choose Add Missing Constraints in View Controller from the Resolve Auto Layout Issues control.
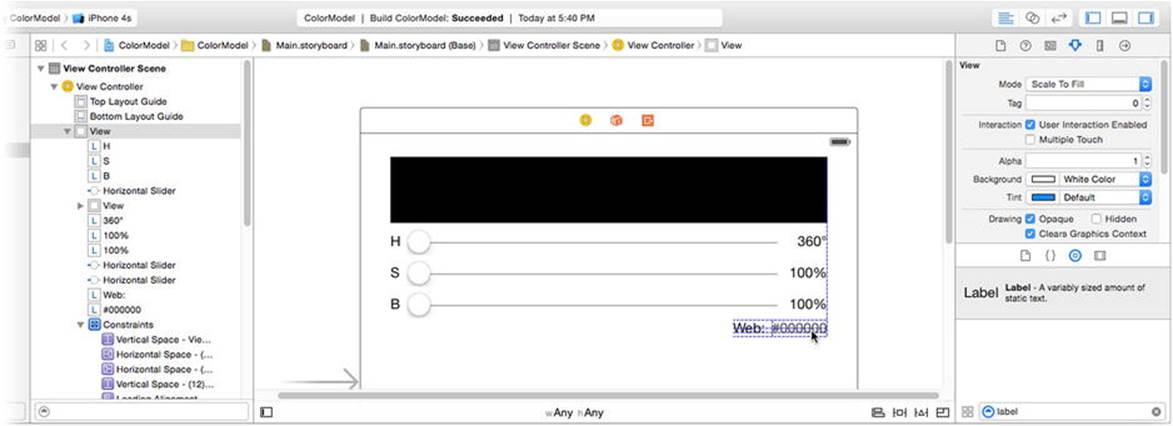
Figure 8-19. Adding web-safe color view
You’ll use this label to display the “web” color selected. This is the RGB value of the chosen color, as an HTML short color constant. You should be able to do the next two steps in your sleep. Add the following outlet property to ViewController.swift:
@IBOutlet var webLabel: UILabel!
Switch back to Main.storyboard and connect the webLabel outlet to the #000000 label object, as shown in Figure 8-20.
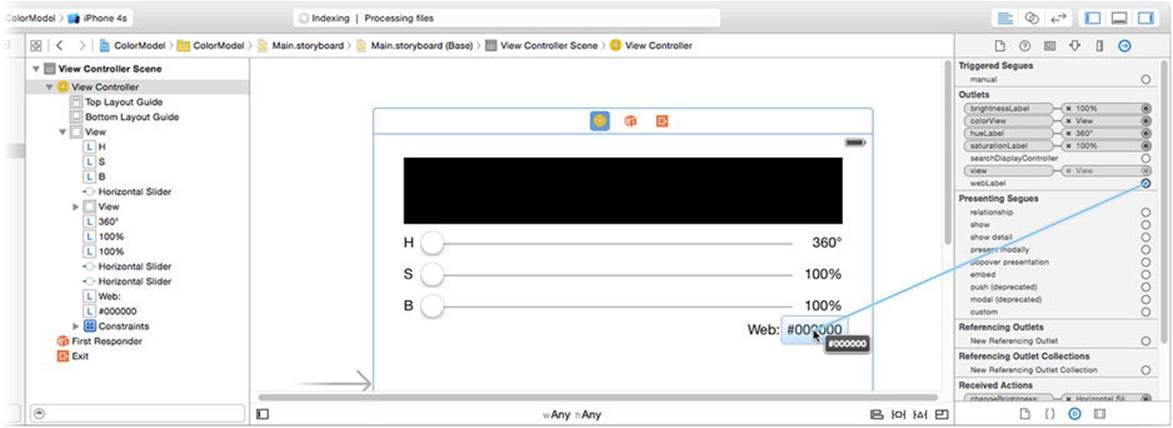
Figure 8-20. Connecting webLabel outlet
Now return to the ViewController.swift file and consider what needs to change. Here’s the code to set the webLabel view to display the hex value of the color:
var red: CGFloat = 0.0
var green: CGFloat = 0.0
var blue: CGFloat = 0.0
var alpha: CGFloat = 0.0
color.getRed(&red, green: &green, blue: &blue, alpha: &alpha)
webLabel.text = NSString(format: "#%02X%02X%02X", ![]()
CInt(red*255),CInt(green*255),CInt(blue*255))
This code extracts the individual red, green, and blue values from the UIColor object. It then uses those values (in the range of 0.0 to 1.0) to create a string of six hexadecimal digits, two for each color, in the range of 00 to ff, rounding down to the closest integer.
While that’s not a lot of code, it is a lot of code to repeat three times, because each action method (changeHue(_:), changeSaturation(_:), changeBrightness(_:)) must also update the new web value view.
There’s an old programming adage that says
If you’re repeating yourself, refactor.
This means if you find yourself writing the same code, again and again, it’s probably a good time to reorganize and consolidate your code. It’s a truism that the more code you write, the more chance you have of introducing a bug. A common goal of software engineers is to minimize the amount of code they write—not just because they’re lazy (at least, many of us are) but because it results in more succinct solutions.
Consolidate the updates to your various view objects into a single function named updateColor(). Replace the code in the three action methods that update the color view with a call to this new function (modified code in bold).
@IBAction func changeHue(sender: AnyObject!) {
if let slider = sender as? UISlider {
colorModel.hue = slider.value
updateColor()
}
}
@IBAction func changeSaturation(sender: AnyObject!) {
if let slider = sender as? UISlider {
colorModel.saturation = slider.value
updateColor()
}
}
@IBAction func changeBrightness(sender: AnyObject!) {
if let slider = sender as? UISlider {
colorModel.brightness = slider.value
updateColor()
}
}
Finally, write the updateColor() function.
func updateColor() {
let color = colorModel.color
colorView.backgroundColor = color
hueLabel.text = "\(Int(colorModel.hue))°"
saturationLabel.text = "\(Int(colorModel.saturation))%"
brightnessLabel.text = "\(Int(colorModel.brightness))%"
var red: CGFloat = 0.0
var green: CGFloat = 0.0
var blue: CGFloat = 0.0
var alpha: CGFloat = 0.0
color.getRed(&red, green: &green, blue: &blue, alpha: &alpha)
webLabel.text = NSString(format: "#%02X%02X%02X",
CInt(red*255),CInt(green*255),CInt(blue*255))
}
The first line updates the background color of the color view object, a task that had been repeated in each of the three actions. The next three statements update the three HSB label views, and the remaining code calculates the hexadecimal RGB value and updates webLabel.
Run your app again, as shown in Figure 8-21. Each change to the data model updates five different view objects, and your controller code is arguably simpler and easier to maintain than it was before. You can easily add new actions that update the data model; all you have to do is callupdateColor() before returning. Similarly, new view objects could be added and you’d only have to add an outlet and modify updateColor().
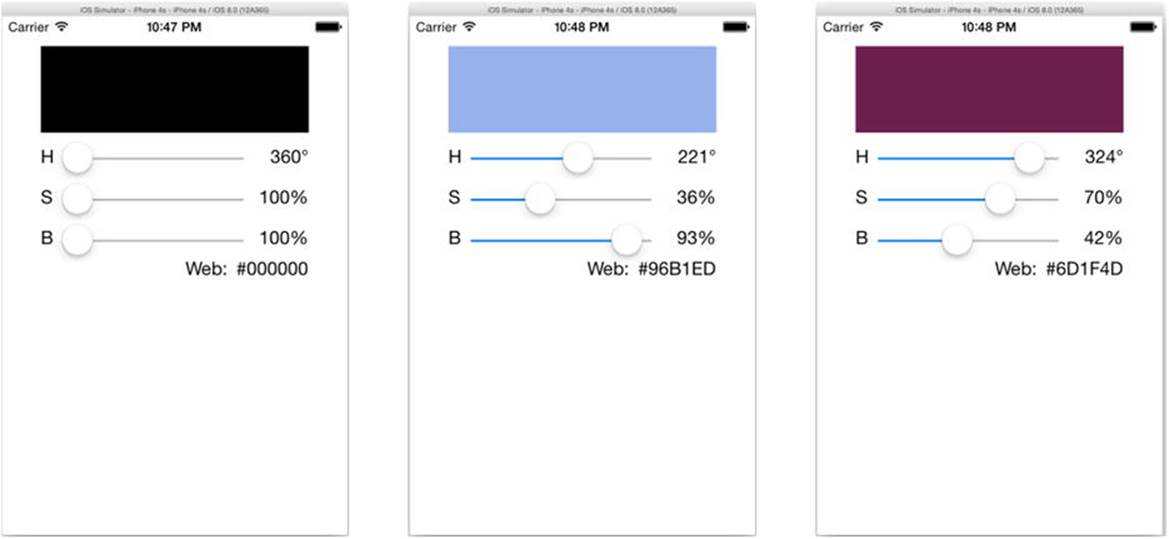
Figure 8-21. ColorModel with web value
Complex View Objects
So far, the view objects you’ve used in ColorModel display relatively trivial (String or UIColor) values. Sometimes view objects display much more complex data types. It’s not uncommon for complex view objects to maintain a reference to the data model. This gives them direct access to all of the information they need.
To make ColorModel a little more interesting, you’re going to replace the simple UIView object with a custom view object that displays a hue/saturation color chart, in addition to identifying the exact color selected by the hue, saturation, and brightness sliders. Revising your design, your new app should look like the one in Figure 8-22.
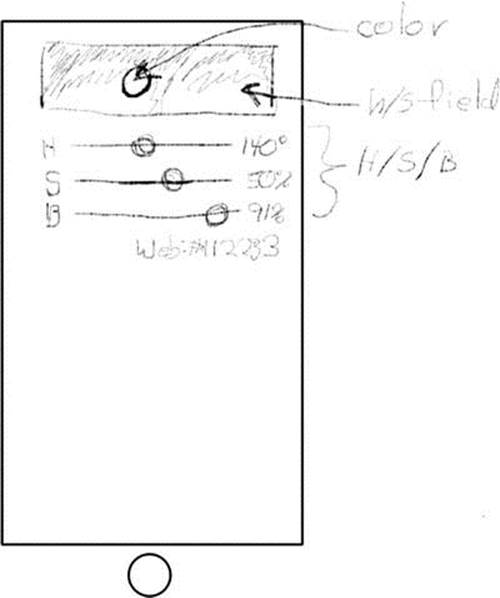
Figure 8-22. Updated ColorModel design
Replacing UIView with ColorView
Your new design will replace the UIView object in your current design with your own custom ColorView object. Start by adding a new Swift class to your project. Drag in a new Swift file from the file template library and name it ColorView. (Alternatively, you can drag the finishedColorView.swift file from this version of the project in the Learn iOS Development Projects ![]() Ch 8
Ch 8 ![]() ColorModel-4
ColorModel-4 ![]() ColorModel folder).
ColorModel folder).
If you’re starting from scratch, define the skeleton of the class in your new file so Interface Builder knows it exists.
import UIKit
class ColorView : UIView {
}
Upgrade the plain view in your interface from a UIImage object to your new ColorView object. In Main.storyboard, select the UIImage view object. Use the identity inspector to change the class of the object from UIView to ColorView, as shown in Figure 8-23.
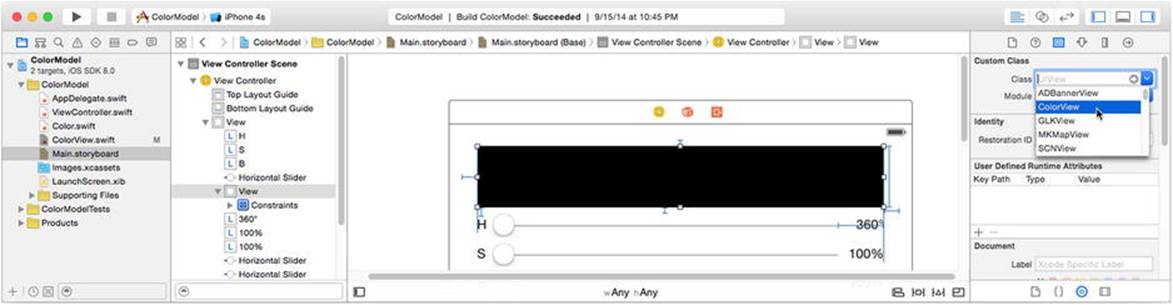
Figure 8-23. Changing the UIView into a ColorView
In your ViewController.swift file, find the colorView property that refers to this object. Change the type of the colorView property from UIView to ColorView (modified code shown in bold). Now your controller is connected to a ColorView object instead.
@IBOutlet var colorView: ColorView!
Connecting the View to Your Data Model
Your fancy new ColorView object will have a direct connection its data model (the Color object). Add that property in your ColorView.swift file.
var colorModel: Color?
Note The colorModel property is not an Interface Builder outlet (IBOutlet) because you’ll be setting this property programmatically rather than in Interface Builder. That’s not to say it couldn’t be an outlet; it just doesn’t need to be for this project.
Drawing ColorView
While still in your ColorView.swift file, you’re going to add a drawRect(_:) function that draws a 2D hue/saturation color chart at the current brightness level. At the position within the color chart that represents current hue/saturation, the view draws a circle filled with that color.
It’s a fair amount of code, and it’s not the focus of this chapter, so I’ll gloss over the details. The code for the drawRect(_:) function you need to add to ColorView.swift is in Listing 8-1. If you’re writing this app as you work through this chapter, I applaud you. If you’re not and you didn’t import the complete ColorView.swift file earlier, at least save yourself a lot of typing and copy the code for the drawRect(_:) function from the ColorView.swift file that you’ll find in the Learn iOS Development Projects ![]() Ch 8
Ch 8 ![]() ColorModel-4
ColorModel-4 ![]() ColorModel folder.
ColorModel folder.
Listing 8-1. ColorView.swift drawRect(_:) Function
override func drawRect(rect: CGRect) {
if let color = colorModel {
let bounds = self.bounds
if hsImage != nil && ( brightness != color.brightness || ![]()
bounds.size != hsImage!.size ) {
hsImage = nil
}
if hsImage == nil {
brightness = color.brightness
UIGraphicsBeginImageContextWithOptions(bounds.size, true, 1.0)
let imageContext = UIGraphicsGetCurrentContext()
for y in 0..<Int(bounds.height) {
for x in 0..<Int(bounds.width) {
let uiColor = UIColor(hue: CGFloat(x)/bounds.width,
saturation: CGFloat(y)/bounds.height,
brightness: CGFloat(brightness/100.0),
alpha: 1.0)
uiColor.set()
CGContextFillRect(imageContext,CGRect(x: x, y: y, width: 1, height: 1))
}
}
hsImage = UIGraphicsGetImageFromCurrentImageContext()
UIGraphicsEndImageContext()
}
hsImage!.drawInRect(bounds)
let circleRect = CGRect(x: bounds.maxX*CGFloat(color.hue/360)-radius/2,
y: bounds.maxY*CGFloat(color.saturation/100)-radius/2,
width: radius,
height: radius)
let circle = UIBezierPath(ovalInRect: circleRect)
color.color.setFill()
circle.fill()
circle.lineWidth = 3.0
UIColor.blackColor().setStroke()
circle.stroke()
}
}
In a nutshell, the ColorView draws a two-dimensional graph of the possible hue/saturation combinations at the current brightness level. (When iOS devices come out with 3D displays, you can revise this code to draw a 3D image instead!)
The point of interest (for this chapter) is that the ColorValue has a direct reference to the Color data model object, so your controller doesn’t have to explicitly update it with a new color value anymore. All your controller needs to do is tell the ColorView object when it needs to redraw; the ColorView will use the data model directly to obtain whatever information it needed to draw itself.
For this to happen, your controller needs to establish this connection when it creates the data model and view objects. In your ViewController.swift file, find the viewDidLoad() function and add this one bold line:
override func viewDidLoad() {
super.viewDidLoad()
colorView.colorModel = colorModel
}
When the view objects are created (when the Interface Builder file loads), the controller creates the data model object and connects it to the colorView object.
Now replace the code that you used to set the color to draw (via colorView's backgroundColor property) with code that simply tells the colorView object that it needs to redraw itself, shown in bold.
func updateColor() {
colorView.setNeedsDisplay()
let color = colorModel.color
...
Run your new app and try it. This is a dramatically more interesting interface, as shown in Figure 8-24.
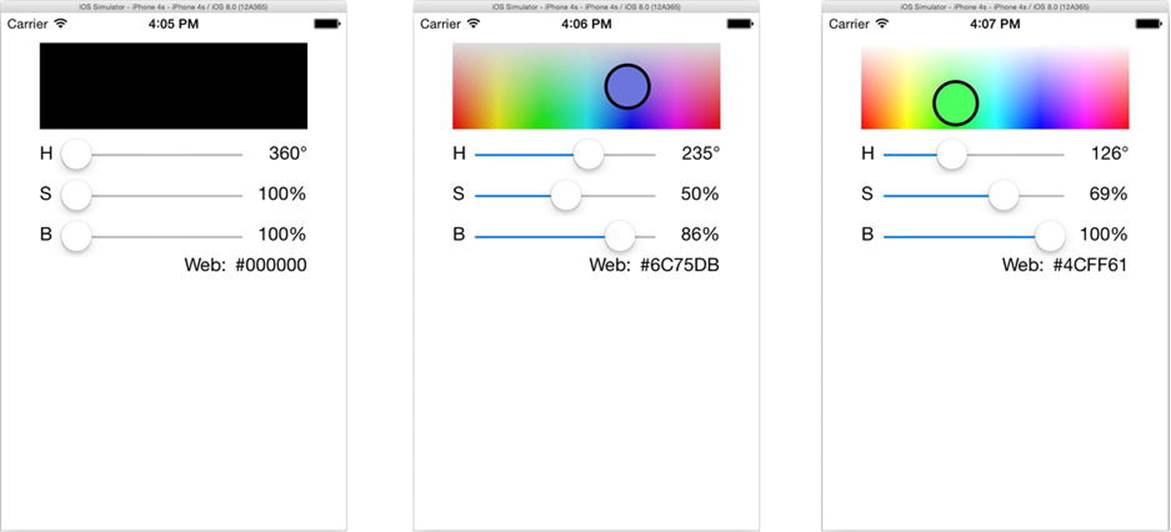
Figure 8-24. ColorModel with ColorView
This version of your app represents the next level of MVC sophistication. Instead of spoon-feeding simple values to your view objects, you now have a view object that understands your data model and obtains the values it needs directly. But the controller still has to remember to refresh all of the views whenever it changes the data model. Let’s take a different approach and have the data model tell the controller when it changes.
Being a Keen Observer
Way back in the “MVC Communications” section, I described a simple arrangement where the data model sent notifications to view objects (see Figure 8-1) letting them know when they need to update their display. You’ve already done this in your MyStuff app. You added apostDidChangeNotification() function to your MyWhatsit class. That method notified any interested parties that an item in your data model had changed. Your table view controller observed those notifications and redrew its table, as needed.
Using NSNotificationCenter to communicate data model changes to views is a perfect example of MVC communications. Save that in your bag of “iOS solutions I know.” I won’t repeat that solution here. Instead, I’m going to show you an even more sophisticated method of observing changes in your data model.
Key-Value Observing
I told you that design patterns run deep in iOS. You’re about to find out just how deep. MVC communications is based, in part, on the observer pattern. The observer pattern is a design pattern in which one object (the observer) receives a message when some event in another object (the subject) occurs. In MVC, the data model (the subject) notifies view or controller objects (the observers) whenever it changes. This relieves the controller from having to remember to update the view objects (that is, calling updateColor()) whenever it changes the data model. Now it—or any other object—can just change the data model at will; any changes will send notifications to its observers.
In MyStuff you accomplished this using NSNotifcation objects. In ColorModel you’re going to use some Cocoa Touch magic called key-value observing (KVO). KVO is a technology that notifies an observer whenever the property of an object is set. That’s right. All you do is set a property value, and any object observing that property is automatically notified.
Observing Key Value Changes
Observing property changes in a Swift object is a three-step process.
1. Make sure your properties are observable.
2. Become an observer for the property (identified by a key).
3. Implement an observeValueForKeyPath(_:,ofObject:,change:,context:) function.
The first step is to make the Color class eligible for KVO. (You’ll find the finished project in the Learn iOS Development Projects ![]() Ch 8
Ch 8 ![]() ColorModel-5
ColorModel-5 ![]() ColorModel folder.) Switch to the Color.swift file and make the following change to the class (new code in bold):
ColorModel folder.) Switch to the Color.swift file and make the following change to the class (new code in bold):
class Color: NSObject {
dynamic var hue: Float = 0.0
dynamic var saturation: Float = 0.0
dynamic var brightness: Float = 0.0
If you want to know why you needed to make these changes, see the sidebar “Swift and KVO.”
SWIFT AND KVO
Key-value observing depends on dynamically dispatched methods. In English, when you call an instance function of an object, either the CPU can jump directly to that code (static calling) or the caller can query the object and ask for the address of the code that should be run (dynamic dispatching). The latter is more flexible because an object can spontaneously alter the code that executes when you call its method. In Objective-C, Swift’s predecessor, all methods and properties are dynamically dispatched.
The disadvantage of dynamically dispatched methods is performance. It takes time to ask that question (“What code should I execute for method X?”), and it has to be asked and answered every time a method is called or a property is accessed. Swift prefers to use static dispatching, when it can, which is why it’s typically faster than Objective-C. The problem is that technologies like KVO—that depend on dynamic dispatching—simply won’t work with statically called functions.
But that’s not to say that Swift is incapable of using dynamically dispatched methods. In fact, it uses them all the time. Swift is also compatible with any Objective-C object, all of which use dynamically dispatched methods. To use KVO with a Swift object, you just need to get Swift to use dynamic dispatching on the properties and methods you’re interested in.
The first step is to make your class a subclass of NSObject. NSObject is the base class for all Objective-C classes. (Swift doesn’t have a common base class.) By making your object a subclass of NSObject, you’ve turned it into an Objective-C class, rather than a purely Swift class. This makes no real difference to the rest of your app; as I said, Swift will use an Objective-C object as effortlessly as a native Swift object. In fact, it doesn’t even change your object that much. But it has the important side effect of inheriting all of the standard KVO methods defined inNSObject.
The second step is to tell Swift to specifically use dynamic dispatching on the properties you want to observe. This is accomplished with the dynamic keyword. Placing dynamic before a var or func tells Swift that you want this property or function to always use dynamic dispatching. Behind the scenes, a dynamic property creates two hidden functions (both dynamically dispatched): a getter function called to obtain that value and a setter function called to change it. It’s this setter function that KVO intercepts to work its magic.
I honestly don’t know what the future of KVO in Swift will be. As of this writing, Swift is still at version 1.0 and is very much a work-in-progress. The official documentation for Swift simply states that KVO is “To be determined.” You can still use KVO in your Swift projects by leveraging Swift’s support for Objective-C, where KVO and similar technologies are a given. But I don’t know what the fate will be for KVO and native Swift classes. There’s a natural tug-of-war between Swift’s desire to be fast and efficient and the power of features like KVO. My hope is that Apple will find a way to efficiently support KVO in Swift—fingers crossed.
The second step is simple enough. In your ViewController.swift file, find the viewDidLoad() function and change the following code, adding the new code in bold:
super.viewDidLoad()
colorModel.addObserver(self, forKeyPath: "hue", options: .allZeros, context: nil)
colorModel.addObserver(self, forKeyPath: "saturation", options: .allZeros, context: nil)
colorModel.addObserver(self, forKeyPath: "brightness", options: .allZeros, context: nil)
colorModel.addObserver(self, forKeyPath: "color", options: .allZeros, context: nil)
colorView.colorModel = colorModel
Each statement registers your ViewController object (self) to observe changes to one property (the key path) of the receiving object (colorModel).
Thereafter, every time one of the observed properties of colorModel changes, your controller will receive an observeValueForKeyPath(_:,ofObject:,change:,context:) call. The first parameter identifies the property that changed on the ofObject parameter. Use these parameters to determine what changed and take the appropriate action.
Your new observeValueForKeyPath(_:,ofObject:,change:,context:) function will replace your old updateColor() function because it serves the same purpose. Replace updateColor() with the code in Listing 8-2. The code in bold shows what’s different.
Listing 8-2. observeValueForKeyPath(_:,ofObject:,change:,context:)
override func observeValueForKeyPath(keyPath: String!, ofObject object: AnyObject!, ![]()
change: [NSObject : AnyObject]!, context: UnsafeMutablePointer<Void>) {
switch keyPath {
case "hue":
hueLabel.text = "\(Int(colorModel.hue))°"
case "saturation":
saturationLabel.text = "\(Int(colorModel.saturation))%"
case "brightness":
brightnessLabel.text = "\(Int(colorModel.brightness))%"
case "color":
colorView.setNeedsDisplay()
var red: CGFloat = 0, green: CGFloat = 0, blue: CGFloat = 0, alpha: CGFloat = 0
colorModel.color.getRed(&red, green: &green, blue: &blue, alpha: &alpha)
webLabel.text = NSString(format: "#%02X%02X%02X",
CInt(red*255),CInt(green*255),CInt(blue*255))
default:
break
}
}
The code is straightforward. It checks to see whether the keyPath parameter matches one of the property names you expect to change. Each case updates the view objects affected by changes to that property.
You can now remove all of the references to updateColor(). Now your changeHue(_:) function looks like the following:
@IBAction func changeHue(sender: AnyObject!) {
if let slider = sender as? UISlider {
colorModel.hue = slider.value
}
}
None of your methods that change the properties of your data model have to remember to update the view because the data model object will notify your controller automatically whenever that happens. Run your app to try it, as shown in Figure 8-25.
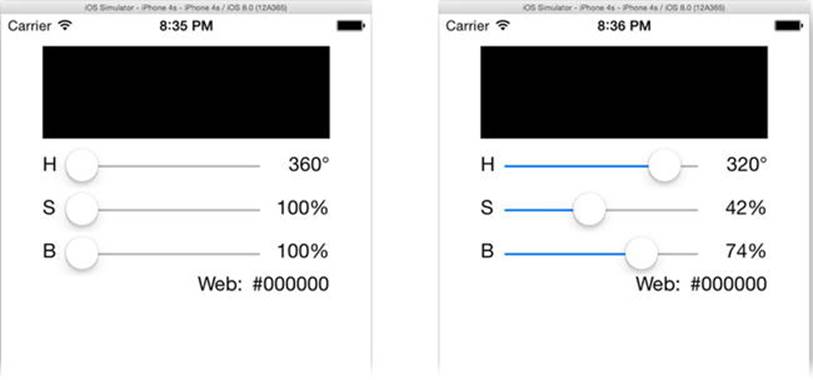
Figure 8-25. Defective KVO
Some parts of it work, but clearly something is wrong. Let’s think about the problem for a moment.
Creating KVO Dependencies
Your controller is receiving changes for the hue, saturation, and brightness properties because the three label objects are getting updated. The colorView and webLabel objects, however, never change. Your controller is not receiving change notifications for the colorproperty.
That’s because nothing ever changes the color property. (It’s not even allowed to change because it’s an immutable property.) The problem is that color is a synthesized property value: code, that you wrote, makes up the color value based on the values of hue, saturation, andbrightness. Swift and iOS don’t know that. All they know is that no one ever sets the color property (colorModel.color = newColor), so it never sends any notifications.
There are two straightforward ways to address this. The first would be to add code to your controller so that it updates the color-related views whenever it receives notifications that any of the other three (hue, saturation, or brightness) changed. That’s a perfectly acceptable solution, but there’s an alternative.
You can teach the KVO system about a property (the derived key) that is affected by changes to other properties (its dependent keys). Open your Color.swift file and add this special class function:
class func keyPathsForValuesAffectingColor() -> NSSet {
return NSSet(array: ["hue", "saturation", "brightness"])
}
Now run your app again and see the difference (see Figure 8-26) that one function makes.
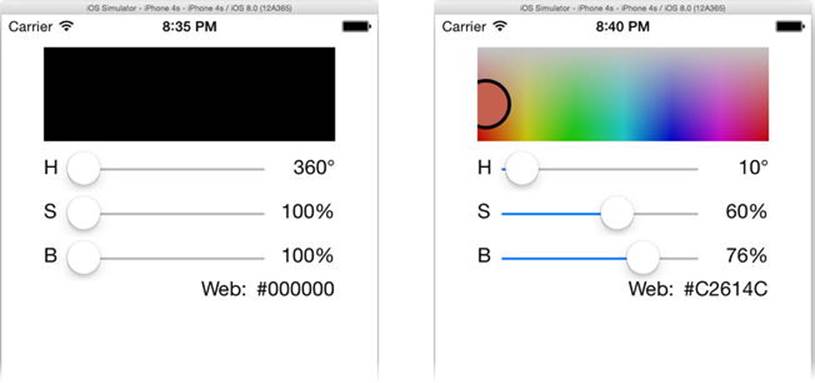
Figure 8-26. Working KVO updates
So, what’s happening? The special class function keyPathsForValuesAffectingColor()2 tells the KVO system that there are three properties (key paths) that affect the value of the color property: hue, saturation, and brightness. Now, whenever the KVO mechanism sees one of the first three properties change, it knows that color changed too and sends a second notification for the “color” key path.
Tip KVO is very flexible, and there are several ways to describe dependent keys. You can also write code that determines exactly what property change notifications are sent, when, and what information those notifications include. For a much more in-depth explanation, check out the Key-Value Observing Programming Guide that you’ll find in Xcode’s Documentation and API Reference.
I’m sure you’re thinking this is pretty cool, but you might also be thinking that it’s not that much less work than the updateColor() function you wrote in the previous section. And you’re right; it’s not. But that’s also because all of your data model changes come from one source (the slider controls), and there’s a relatively small number of places where your data model is altered. If that were to change, however, it becomes a whole new ball game.
Multivector Data Model Changes
As your app matures, it’s likely to get more complex, and changes to your data model can occur in more places. The beauty of KVO is that the change notifications happen in the same place the changes occur—in the data model.
It was OK to call changeColor() when the only places that changed the color were the three slider actions. But what if you added a fourth control view object that also changed them—or five or nine?
Here’s an example. The sliders in your app are nice, but they’re sooooo twentieth century. We live in the age of the touch interface. Wouldn’t it be nicer to just touch the hue/saturation graph and point to the color you want? Let’s do it.
Handling Touch Events
You should already know how to implement this—unless you skipped Chapter 4. If you did, go back and read it now. Add touch event handler methods to your custom ColorView class. The handlers will use the coordinates within the color chart to choose a new hue and saturation. Since you know what you’re doing, get started by adding three touch event handlers to ColorView.swift. (You’ll find the finished project in the Learn iOS Development Projects ![]() Ch 8
Ch 8 ![]() ColorModel-6
ColorModel-6 ![]() ColorModel folder).
ColorModel folder).
override func touchesBegan(touches: NSSet, withEvent event: UIEvent) {
changeColorTo(touch: touches.anyObject() as? UITouch)
}
override func touchesMoved(touches: NSSet, withEvent event: UIEvent) {
changeColorTo(touch: touches.anyObject() as? UITouch)
}
override func touchesEnded(touches: NSSet, withEvent event: UIEvent) {
changeColorTo(touch: touches.anyObject() as? UITouch)
}
These three handlers catch all touch began, moved, and ended events; extract the one touch object; and pass it to the changeColorTo(touch:) function.
Note Remember that, by default, a view object’s multipleTouchEnabled property is false, which means that its touch event handler methods will never see more than one touch object in touches, even if your user is touching the view with more than one finger.
Clearly, the changeColorTo(touch:) function is where the action is. Add these two functions to your class:
func changeColorTo(# touch: UITouch? ) {
if let contact = touch {
changeColorTo(point: contact.locationInView(self))
}
}
func changeColorTo(# point: CGPoint ) {
if let color = colorModel {
let bounds = self.bounds
if bounds.contains(point) {
color.hue = Float((point.x-bounds.minX)/bounds.width*360)
color.saturation = Float((point.y-bounds.minY)/bounds.height*100)
}
}
}
The changeColorTo(touch:) function simply checks to see whether a usable UITouch object is present. If so, it extracts the location of the touch in the coordinate system of the color view and passes it on to changeColorTo(point:).
The changeColorTo(point:) function does the interesting work. It converts the local coordinate into the hue and saturation at that location in the view and uses those values to update the data model.
Notice that this is all it has to do. It didn’t send an action message to the controller. It could have—that would be a perfectly reasonable implementation too. But since you have KVO, you don’t need to. Any object can make changes to the data model directly, and all the observers will receive the necessary notifications.
Try it. Run your app. Move the brightness slider off of 0 percent and then use your finger (or mouse) to drag around inside the color chart. The hue and saturation change as you drag your finger around, as shown in Figure 8-27.
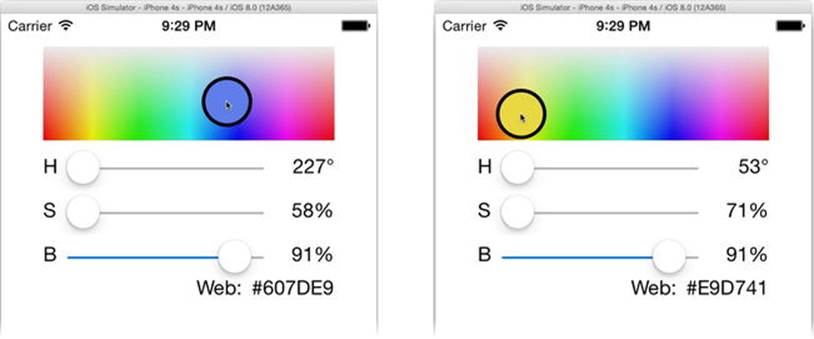
Figure 8-27. Turning ColorView into a control
Binding the Sliders
The only thing that doesn’t work is the hue and saturation sliders don’t move when you touch the color view. That’s because they’re still acting only as inputs. Up until this point, the only way the hue and saturation could have changed was to move the slider. Now that there are other pathways to changing these properties, you need to keep the sliders in synchronization with the data model too.
You’ll need a connection to the three sliders, so add that to your ViewController.swift file:
@IBOutlet var hueSlider: UISlider!
@IBOutlet var saturationSlider: UISlider!
@IBOutlet var brightnessSlider: UISlider!
Switch to the Main.storyboard Interface Builder file and connect these new outlets from your view controller object to the three UISlider controls.
Find the observeValueForKeyPath(_:,ofObject:,change:,context:) function in ViewController.swift and insert these three lines of bold code:
switch keyPath {
case "hue":
hueLabel.text = "\(Int(colorModel.hue))°"
hueSlider.value = colorModel.hue;
case "saturation":
saturationLabel.text = "\(Int(colorModel.saturation))%"
saturationSlider.value = colorModel.saturation
case "brightness":
brightnessLabel.text = "\(Int(colorModel.brightness))%"
brightnessSlider.value = colorModel.brightness
Now when the hue value changes, the hue slider will be changed to match, even if the change came from the hue slider.
Caution Moving a slider won’t cause an infinite loop of messages: the slider sends an action to the controller, which changes the data model, which updates the slider, which sends an action to the controller, and so on. That’s because slider controls send action messages only when the user drags them around, not when their value is set programmatically. Not all views, however, are so clever, and it’s possible to create infinite MVC message loops. The way to solve that is to send actions or notifications only when the value actually changes.
The color view and the sliders now update whenever the data model changes, and the color view can directly change the data model. Software engineers would say that these views are bound to properties of the data model. A binding is a direct, two-way linkage between a data model and a view.
Final Touches
You can now also easily fix an annoying bug in your app. The display values for the hue, saturation, and brightness are wrong (360°, 100%, and 100%) when the app starts. The values in the data model are 0°, 0%, and 0%. Switch to ViewController.swift and at the end ofviewDidLoad(), add this code:
colorModel.hue = 60
colorModel.saturation = 50
colorModel.brightness = 100
Since this code executes after your controller starts observing changes to your data model, these statements will not only initialize your data model to a color that’s not black but will also update all relevant views to match. Try it!
There’s also some icon resources in the Learn iOS Development Projects ![]() Ch 8
Ch 8 ![]() ColorModel (Icons) folder. Add them to the AppIcon group of the Images.xcassets item, just as you did for earlier projects.
ColorModel (Icons) folder. Add them to the AppIcon group of the Images.xcassets item, just as you did for earlier projects.
Cheating
The model-view-controller design pattern will improve the quality of your code, make your apps simpler to write and maintain, and give you an attractive, healthy glow. Do not, however, fall under its spell and become its slave.
While the use of design patterns gives you an edge in your quest to become a master iOS developer, I caution against using them just for the sake of using them. Pragmatic programmers call this over engineering. Sometimes the simple solutions are the best. Take this example:
class MyScoreController {
var score = 0
@IBOutlet var scoreView: UILabel!
@IBAction func incrementScore(sender: AnyObject!) {
score += 1
scoreView.text = "\(score)"
}
}
What’s wrong with this controller? MVC purists will point out that there’s no data model object. The controller is also acting as the data model, storing and manipulating the score property. This violates the MVC design pattern as well as the single responsibility principle.
Do you want my opinion? There’s nothing wrong with this solution; it’s just one #@$%&* integer! There’s nothing to be gained in creating a new class to hold just one number, and you’ll waste a whole lot of time doing it.
If someday, maybe, your data model grew to three integers, a string, and a localization object, then sure: refactor your app, pull the integer out of your controller, and move it to a real data model object. But until that day arrives, don’t worry about it.
There’s a programming discipline called agile development that values finished, working software over plans and pristine design. In these situations, my advice is to use the simplest solution that does the job. Be aware when you’re taking shortcuts in your MVC design, and have a plan to fix it when (and if) that becomes a problem, but don’t lash yourself to a design philosophy. Design patterns should make your development easier, not harder.
Summary
To summarize, MVC is good.
Is all of this computer science study making you want to take a break and listen to your favorite tunes? Well then, the next chapter is for you.
EXERCISE
While your ColorModel app came very close to the idealized MVC communications, it still relied on the controller to observe the changes and forward update events the view objects. Given the work you’ve done so far, how difficult would it be to make the color view observe data model changes directly?
It wouldn’t be that hard, and that’s your exercise for this chapter. Modify ViewController and ColorView so that ColorView is the direct observer of “color” changes in the Color object.
This is a common pattern in fairly extensive apps that have complex data models and lots of custom view objects. The advantage is that each view object takes on the responsibility of observing the data model changes specific to that view, relieving your controller objects from this burden.
You’ll find my solution to this exercise in the Learn iOS Development Projects ![]() Ch 8
Ch 8 ![]() ColorModel
ColorModel ![]() E1 folder.
E1 folder.
1There’s an exception to this rule that I’ll describe toward the end of this chapter.
2The name of the derived property is actually part of the function name. When you observe a property key (say, anyProp), KVO looks to see whether you’ve implemented a class function named keyPathsForValuesAffectingAnyProp(). If you did, it calls it to discover its dependent keys.
All materials on the site are licensed Creative Commons Attribution-Sharealike 3.0 Unported CC BY-SA 3.0 & GNU Free Documentation License (GFDL)
If you are the copyright holder of any material contained on our site and intend to remove it, please contact our site administrator for approval.
© 2016-2026 All site design rights belong to S.Y.A.