Introducing iOS 8 (2015)
Chapter 3. Diving into Swift
In this chapter, you will learn the basics of Swift, Apple’s new programming language. You will learn about creating variables, collections, loops, and conditions in Swift. These items are used in 99% of apps. This chapter will teach you the most important pieces of the Swift language, so you can start building apps fast.
What Is Swift?
Swift is a new programming language created by Apple as the language of their future. Swift was originally announced during the Apple Worldwide Developer Conference in June of 2014. Apple had used Objective-C, originally created for the Mac, for over 20 years. Swift was created to make writing code easier and more concise. Swift is perfect for beginners and has lowered the barriers so that anyone can make apps.
Playgrounds
One of Swift’s most exciting new features are playgrounds. Playgrounds are a quick and simple way to write your code and test it immediately. I highly recommend that you keep a playground file open next to you while you read this book. Follow along and write out each line of example code provided. Writing out the code will not only help you see how it works, but it will also improve your muscle memory. Open up a new playground file now (Figure 3-1).

Figure 3-1. New file
Open Xcode and Select File→New→File. Click Source under iOS. Next, click Playground and finally click Next (Figure 3-2).
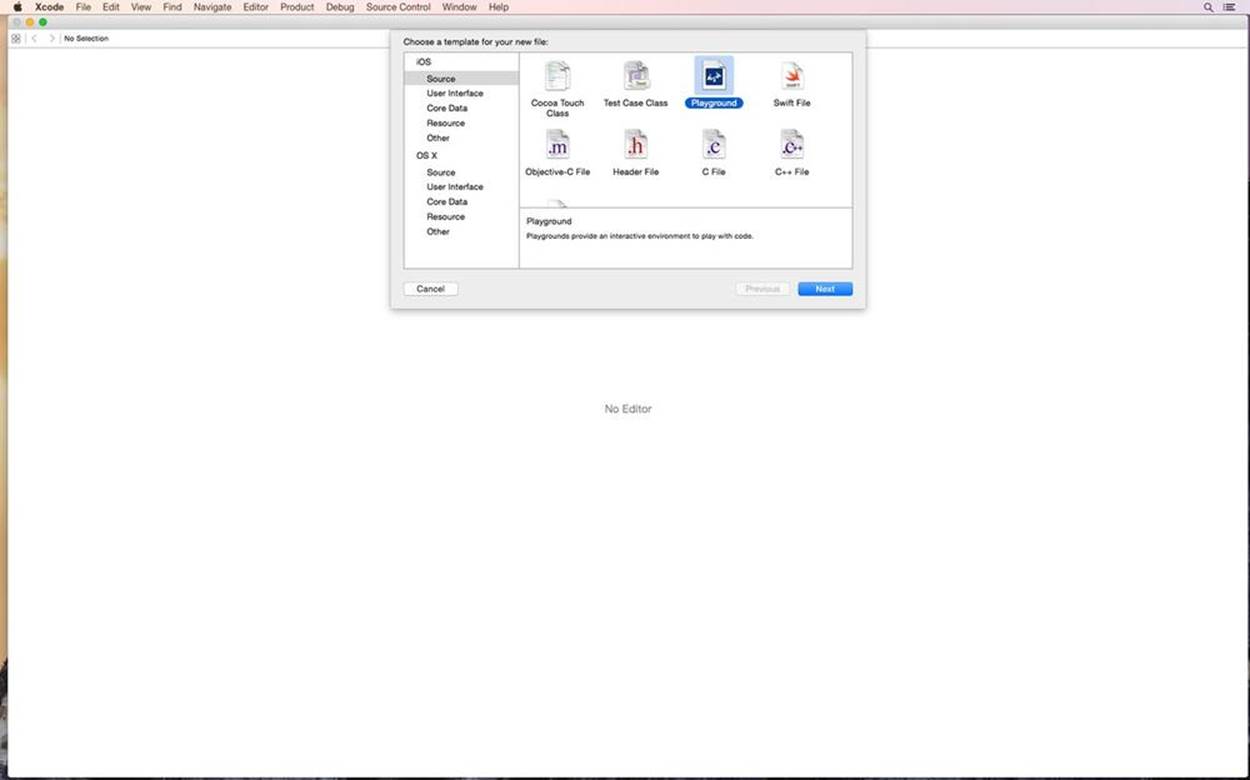
Figure 3-2. Select playground
TIP
Save your playground file after each chapter of the book.
Choose your Programming folder inside of Documents, created in the previous chapter, and click Create (Figure 3-3). You now have a playground file (Figure 3-4).
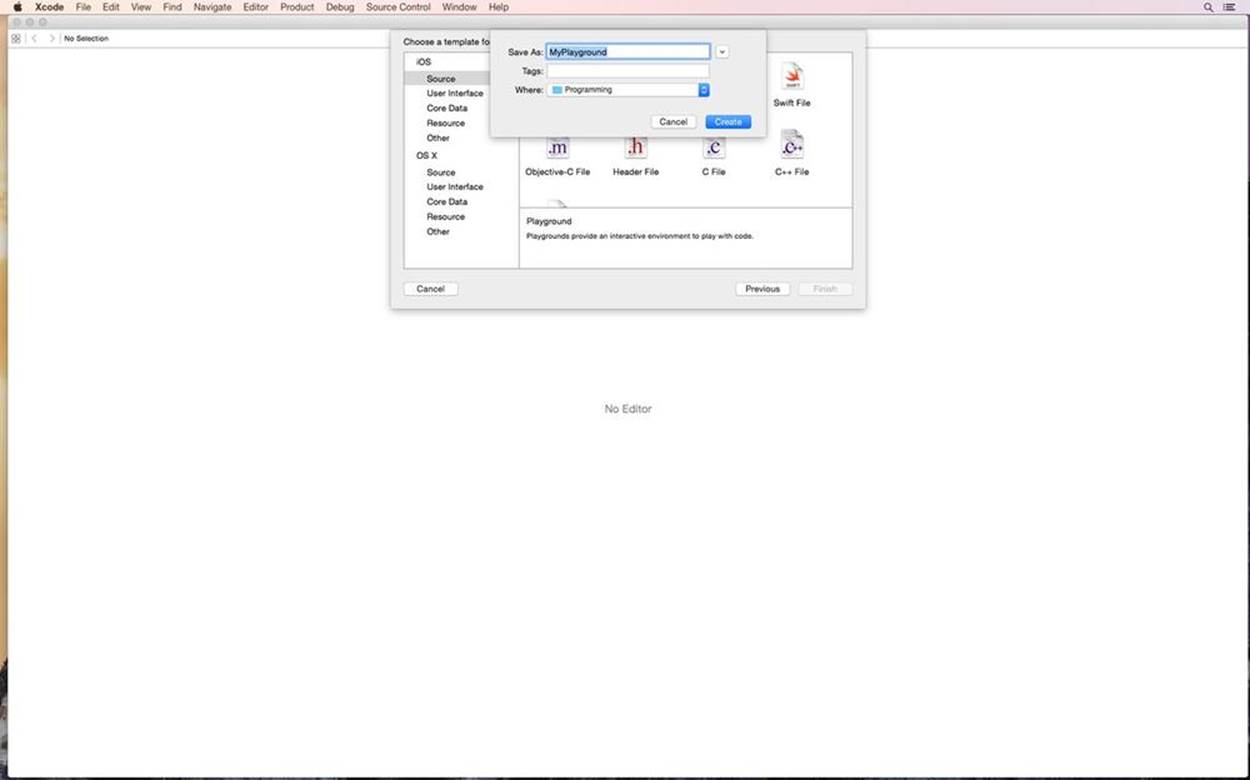
Figure 3-3. Name your playground
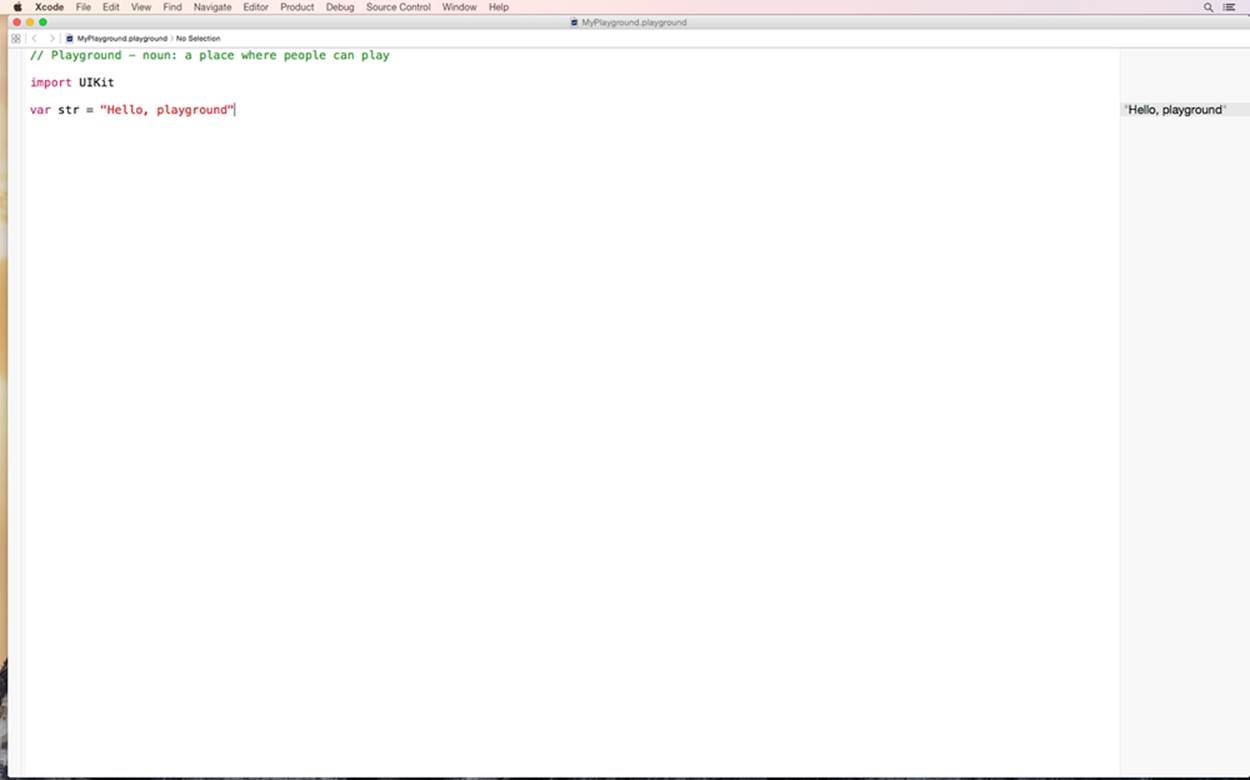
Figure 3-4. Playground file
TIP
Follow along with the example code from this book and experiment with your ideas. Experimenting is the best way to learn a new language. You can find the example code at AppSchool.com/book.
Creating Variables
Variables are used for values that will change, or are dynamic. Dynamic means that a value could change now or in the future. The var keyword stands for variable. This lets Xcode know you want to create, or declare, a variable.
Variables are referred to by their variable name. The variable name is linked to the value; that way, if the value changes, you still have a way to reference it. The variable name should be one word in camel-case. For example:
var numberOfYears
After the variable name comes a colon. This colon tells Xcode you are about to state the type for the new variable. A type is like a genre in film; some films are comedies, while others are drama, horror, or art films. Each genre has its own unique characteristics, but they are all films. To declare the type for a variable use a colon. After the colon, write the name of the type’s keyword. For example, to create an integer, use Int:
var numberOfYears: Int
Finally, you must set a value to the variable. The value you set must match the type of variable you chose; otherwise, the variable will not be created:
var numberOfYears: Int = 30
An equals sign is used to initialize a variable. Initialize means to set up or provide the default value to a variable. Think of it like unwrapping a new toy and forgetting to put in the batteries. The toy is useless until the batteries are added. You must initialize your variable with a value, or it will be effectively useless.
Integers
An integer, a whole number positive or negative, uses the Int keyword. The following line of code uses the var keyword to create a variable with favoriteNumber as the variable name. Then the colon is used to state the type. In this case, the type is integer, so the Int keyword is used. Finally, the variable’s value is set to 4 using the equals sign:
var favoriteNumber: Int = 4
Float
A float, a number with a decimal place, uses the Float keyword. For example, this line of code uses the var keyword to create a variable and sets accountBalance as the variable name. Then the colon is used to set the type using the Float keyword. Finally, the variable’s value is set to1203.51 by using the equals sign:
var accountBalance: Float = 1203.51
Boolean
A Boolean, a variable with the value true or false, uses the Bool keyword. This line of code uses the var keyword to create a variable and sets isStudent as the variable name. Then the colon is used to state the type using the Bool keyword. Finally, the variable’s value is set to trueby using the equals sign:
var isStudent: Bool = true
Strings
A string, a collection of characters, uses the String keyword and is created with double quotes. This line of code uses the var keyword to create a variable and sets firstName as the variable name. Then the colon is used to state the type using the String keyword. Finally, the variable’s value is set to "Steve" by using the equals sign:
var firstName: String = "Steve"
NOTE
Remember whenever you are creating a variable, you must follow this format:
var variableName: type = newValueHere
Objects
Variables can also be used to represent objects. The keyword for the type is the object’s class name. Remember, a class is a blueprint for an object. It contains all the attributes and behaviors for the objects it creates.
This line of code uses the var keyword to create a variable and sets fastCar as the variable name. Then the colon is used to state the type; in this case, the Car keyword is used to create a car. Finally, the variable’s value is set to a new car object by using the equals sign. This example could work with any custom class:
var fastCar: Car = Car()
PERSONAL CHALLENGE
Make your own integer, float, Boolean, and string variables in your playground.
Constants
Sometimes there are things you are 100% sure will not change, like your birthday. For these situations, you use a constant instead of a variable. Constants are designed to work with values that will not change after they are set. Once the value has been set, it will remain that value for its entire lifetime. This consistent value is referred to as static. Static means the value will not change now or in the future.
Creating a constant is very similar to creating a variable. The only difference is that the let keyword is used instead of the var keyword. For example:
var numberOfYears: Int = 30
let name: String = "Steve"
let isMale: Bool = true
var bankAccountBalance: Float = 1034.20
You will notice the name and isMale variables are constants. These are items that will not change now or in the future.
You may be asking yourself, “Why don’t I just always use a variable and never change it after I create it?” Well, that would work, but it goes against the best practices of programming. Best practices are recommended rules to provide a better experience for users and developers. For example, using a constant instead of a variable saves on memory and processing power. If all developers do this, it will make a better experience for the user.
PERSONAL CHALLENGE
Create your own personal variables and constants in your playground. How many can you think of describing yourself?
Type Inference
Declaring the type on each and every variable or constant can be laborious. The engineers at Apple are always working on new shortcuts to make developers’ lives easier. Based on the value you provide on the right side of the equals sign, Swift can automatically detect, or infer, the required type. This is called type inference, and it simplifies creating a variable. Here is an updated example:
var numberOfYears = 30
let name = "Steve"
let isMale = true
var bankAccountBalance = 1034.20
The type and colon are no longer required, because Swift can detect the type of the value provided on the right side of the equals sign. Swift then automatically sets the variable’s type to match the type from the value. This saves a lot of writing and makes your code simpler.
Modifying Strings
The String class provides convenient methods like uppercaseString, where the string is changed to its uppercase value. The // show the variable after it has been updated:
var favoriteFood: String = "Pasta"
favoriteFood = favoriteFood.uppercaseString
//PASTA
When you set the favoriteFood variable to favoriteFood.uppercaseString, the equals sign takes the value from the right and applies it to the variable on the left. To break it out in steps:
1. favoriteFood //"Pasta"
2. favoriteFood.uppercaseString //"PASTA"
3. favoriteFood = favoriteFood.uppercaseString //"PASTA"
4. favoriteFood //"PASTA"
Most code will execute sequentially. This means that the top line will run and complete, then the second line, then the third line, etc. The next line cannot execute until the first line is finished.
PERSONAL CHALLENGE
What happens if you remove line 3 from the playground? Why do you think this happens?
There is also lowercaseString, which changes the string to the lowercase version of its characters, not to mention capitalizedString, which provides a string with the first letter of each word capitalized.
Appending Strings
You can take a string variable and add on to the end of it. This is called appending:
var beach = "Beach"
beach = beach + "Ball"
//"BeachBall"
Strings can be appended with other strings to create new, longer strings. For example:
let firstName = "Steve"
var lastName = "Derico"
lastName = firstName + lastName
//"SteveDerico"
Or you can add string variables between other strings. For example:
let firstName = "Steve"
let lastName = "Derico"
var fullName = firstName + " " + lastName
var favoriteMovie = "Back To The Future"
var movieString = "My name is " + fullName + " and my favorite movie is "
+ favoriteMovie
//My name is Steve Derico and my favorite movie is Back To The Future
Variables in Strings
You can add variables directly into your strings using string interpolation. String interpolation is a term for creating a string with placeholders inside of it. Those placeholders are then filled in while the application is running. In this case, a string is created with double quotes. The placeholder is created with a \(). Inside of the placeholder is the variable to be inserted into the string. String interpolation is a very convenient way to convert a nonstring variable into a string:
let seatsPerRow = 25
let numberOfRows = 15
var seatsString = "In the theater, there are \(numberOfRows) rows and
\(seatsPerRow) seats in each row."
//In the theater, there are 15 rows and 25 seats in each row.
Collections
In some cases, it is necessary to hold on to many variables or constants in a container for better organization. Swift provides two collection classes that hold and organize your variables.
Arrays
What if you wanted to hold on to the name for each person standing in line for a roller coaster? You could create a variable for each person in line, but that would get cumbersome. You also don’t know how many people could be in line at any given moment. To solve problems like this, you use an array.
An array is a container that can hold many variables in a specific order. An array can hold a nearly unlimited number of items and assigns each item a specific position value, or index. The index is the item’s position inside the array. You can create an array like this:
var names: [String] = ["Steve", "Jeff", "Andy", "Andrew",
"Cole", "Mike", "Mikey"]
Start with the same var keyword, followed by a colon. Next, add a set of brackets with the type inside the brackets. On the other side of the equals sign, start your array with an open bracket. Inside the bracket, each item is separated by a comma. The array ends with a closed bracket.
Arrays in Swift must all have the same type. This means an array can hold all strings, like the previous one, but it cannot hold a mixture of strings and integers. Arrays can only hold variables of the same type.
Swift can automatically detect the type of variable for a given array. Instead of explicitly writing the type of variable, you can drop the type when you declare an array:
var names = ["Steve", "Jeff", "Andy"]
Navigating arrays
Each item inside an array has a specific position, or index. The index is just like a marathon race. First, Second, Third, etc. The trick to know about indexes is that they always start with zero. The first item in the array will be at index 0, the second item in the array is at index 1, the third item in the array is at index 2, etc. To access an item inside an array, use the following format. For example:
names[0]
//Steve
names[1]
//Jeff
names[2]
//Andy
It takes a little getting used to, but once you get used to it, you won’t think twice about it. Indexes always start with zero.
PERSONAL CHALLENGE
Create your own array with the names of your family members.
Use the count method to get the total number of items in the array. The index of the last item in the array will always be one less than the count:
names.count
//3
To check if an array is empty, or has no items inside of it, use isEmpty:
var cats = ["Big Kitty"]
cats.isEmpty
//false
Modifying arrays
Arrays that are declared with the var keyword are dynamic and can be changed as needed. To append or add an item to the end of your array, for example:
var names = ["Steve", "Jeff", "Andy"]
names.append("Wally")
//["Steve","Jeff","Andy","Wally"]
You can add another array to your array. For example:
var names = ["Steve", "Jeff", "Andy", "Wally"]
var parents = ["Mike", "Adam", "Nick"]
names = names + parents
// ["Steve", "Jeff", "Andy", "Wally", "Mike", "Adam", "Nick"]
You can replace an item in the array by accessing its index and setting it to a new value. For example:
names[6] = "Sam"
To place an item at a specific location, you can use the insert method provided by array. The insert method will move all items after the specified index up one position and place the inserted item at the specific index:
var names = ["Steve", "Jeff", "Andy", "Wally", "Mike", "Adam", "Sam"]
names.insert("Buster", atIndex: 2)
// ["Steve", "Jeff", "Buster", "Andy", "Wally", "Mike", "Adam", "Sam"]
To remove an item from a specific index, use the removeAtIndex method:
var names = ["Steve", "Jeff","Buster", "Andy", "Wally", "Mike", "Adam", "Sam"]
names.removeAtIndex(2)
//["Steve", "Jeff", "Andy", "Wally", "Mike", "Adam", "Sam"]
Dictionaries
Storing multiple items together in an array isn’t the only way to organize your variables. Dictionaries can hold multiple variables and organize them using keys and values. These keys and values work just like Webster’s Dictionary on your bookshelf. The key is the word you are looking for, and the value is the definition of the word. Dictionaries are not sorted or organized in a specific order. You must use the key to retrieve the value. For example:
var homeruns : [String: Int] = ["Posey": 24,"Pagan":19,"Pence":15]
In this example, there are three keys: "Posey", "Pagan", and "Pence". Each key has a corresponding value. Provide the corresponding key, inside the brackets, to access a value:
homeruns["Posey"]
//24
Add another key/value pair. For example:
var homeruns = ["Posey": 24,"Pagan":19,"Pence":15]
homeruns["Sandoval"] = 10
//["Posey": 24,"Pagan":19,"Pence":15,"Sandoval":10]
Replace an item by just setting the key to a new value. For example:
homeruns["Posey"] = 36
//["Posey": 36,"Pagan":19,"Pence":15,"Sandoval":10]
Remove a key/value pair by setting the key to nil. nil is a blank value and will be discussed further at the end of this chapter. For example:
homeruns["Sandoval"] = nil
//["Posey": 36,"Pagan":19,"Pence":15]
Loops
Imagine you are working out at the gym and your workout calls for you to lift weights eight times. You will be doing the same task, but eight times in a row. To handle repeatable work in programming, you use loops. Loops are used to repeat a particular section of code.
For-Condition-Increment
The most common loop is called the For-Condition-Increment or just a for loop for short. This loop has three pieces: a variable, a condition, and an increment. The variable is often an integer that is used to keep track of the current number of loops completed. The condition is checked after each loop; if it is true, the loop runs again. If the condition is false, the loop stops. Finally, the increment is the amount added to the variable every time the loop executes:
for (var counter = 0; counter < 8; counter++) {
liftWeights()
}
The grammar, or syntax, of a loop begins with the for keyword. This tells Xcode you are going to create a loop. The for keyword is followed by a set of parentheses. Inside the parentheses are the variable, condition, and increment. For example:
for (VARIABLE; CONDITION; INCREMENT) {
}
The first piece is the variable. The variable is commonly known as a counter because it counts the number of times the loop is completed. It is very common to declare a variable named counter and set it to 0. For example:
for (var counter = 0;CONDITION; INCREMENT) {
}
Next, place a semicolon after the variable to separate it from the condition. The condition, in this case, is set to operate while the counter is less than eight. This will result in the loop executing a total of eight times. For example:
for (var counter = 0; counter < 8; INCREMENT) {
}
Add a semicolon after the condition to begin the increment. The increment is the code that updates the counter variable. For example:
for (var counter = 0; counter < 8; counter++) {
}
Most increments are written using a common shorthand practice. Normally, to increment a variable by one, the syntax looks like this:
counter = counter + 1
This code takes the counter variable and sets it equal to the counter variable plus one. This increases the counter value by one each time it is executed. However, Apple has provided a shortcut. Add ++ to the end of a variable name to increment it by one. For example:
counter++
This is the same as:
counter = counter + 1
for-in
Writing out a variable, condition, and increment can become laborious. The for-in loop was created to provide a simple way to iterate through an array or dictionary. The for-in loop automatically detects the condition and increment. Moreover, it creates a variable for you that represents the current item in the array. For example:
var favoriteStates = ["California", "New York", "Colorado", "Oregon"]
for state in favoriteStates {
println(" \(state) is one of my favorite states")
}
//California is one of my favorite states
//New York is one of my favorite states
//Colorado is one of my favorite states
//Oregon is one of my favorite states
The println method, pronounced “print line,” creates a string and displays it in the Debugger. The Debugger will be covered during Chapter 6. for-in loops can be used with dictionaries as well. To loop through an entire dictionary, you must list a variable name for both the key and the value. For example:
var homeruns = ["Posey": 24,"Pagan":19, "Pence":15]
for (name, hrs) in homeruns {
println( " \(name) has \(hrs) Homeruns this season.")
}
//Posey has 24 Homeruns this season.
//Pagan has 19 Homeruns this season.
//Pence has 15 Homeruns this season.
Ranges
A range is similar to an array of integers from one number to another. There are two types of ranges. A closed range is written with three dots and includes the uppermost number:
1...5
//1,2,3,4,5
A half-closed range is written with two dots followed by a less-than sign and does not include the uppermost number:
1..<5
//1,2,3,4
You can use for-in loops with a range of numbers instead of an array or dictionary. For example:
for index in 1...5 {
println("The current number is \(index)")
}
//The current number is 1
//The current number is 2
//The current number is 3
//The current number is 4
//The current number is 5
Conditional Statements
Have you ever been to a restaurant that sings to its guests on their birthday? Then you have been part of a conditional statement. A conditional statement is used to make decisions in your code.
if Statements
These decisions or logic can be defined using a conditional statement like an if statement. An if statement determines if a condition is true or false; if the condition is true, a particular section of code is executed; otherwise, it is skipped. For example:
if isBirthdayToday == true {
singBirthdaySong()
}
Conditional statements are written using the if keyword followed by the condition in question. In the example above, the condition is set to isBirthdayToday == true. The double equals sign is used to compare two values. If the values are the same, the result will be true; otherwise, the result will be false. If isBirthdayToday is true, it will execute the singBirthdaySong() method and sing to the guest. Otherwise, singBirthdaySong() will be skipped. Finally, open and closed braces are used to define the beginning and end of the code block.
if-else
At the end of a theater production or play, it is common for the actors to bow and actresses to curtsy. Each gender has its own specific action; each member in the production will either curtsy or bow, not both or neither. If you wanted to write this in Swift, it would look like this:
if isMale == true {
bow()
}else{
curtsy()
}
In this case, you check to see if isMale is true. If the variable is true, bow() will execute. Otherwise, the else keyword is triggered and curtsy() will execute. The top and bottom sections of this if statement are mutually exclusive. In other words, you can have one or the other, not both or neither.
Sometimes you need to check multiple conditions to determine what the next step is. When you wake up in the morning, it is common to have a routine for weekdays and a different routine for Saturday or Sunday. For example:
if isWeekday == true {
getReadyForWork()
} else if isSaturday == true {
goRunning()
} else {
goToYoga()
}
In this case, you first check if today is a weekday. If today is a weekday, then you call getReadyForWork() and the if statement skips over the remaining sections. But if it is not a weekday, then the code skips the first section and goes on to the else if condition.
The else if condition is called if the first condition is false. If it is Saturday, goRunning() is called, and the remaining sections of code are skipped.
Finally, if neither of the conditions are met, the else block is called. The else block will catch anything the if or else if conditions did not catch. If it is not a weekday and it is not Saturday, then goToYoga() is called.
These if statements can be a very powerful tool in your programming tool belt. They can be used to control the logic and flow of your application. Remember that each condition you check for in an if statement must result in true or false.
Optionals
Optionals are variables that could result in the absence of a value. In some cases, it is not possible to know for sure if a variable will have a value. For example, a word in Spanish may not directly translate to a word in English. This means the variable could result in no value. This valueless state is called nil.
Optionals can be used with any type of variable and are explicitly declared using the ? symbol next to the type keyword. For example:
var translatedWord: String?
Since possible valueless variables must be explicitly stated, it is safe to assume all nonoptional variables will have a value. This pattern is designed to help developers from accidentally working with a valueless variable. A nonoptional variable must have a value to exist. However, an optional variable can be valueless.
Optionals are not used directly. Before using an optional, it must be unwrapped. Think of using an optional like opening a piece of candy. You have to take off the wrapper before you can eat it. Remember an optional, when unwrapped, could be nil. This would be the equivalent of unwrapping your candy and finding nothing inside the wrapper.
The process of unwrapping an optional helps to remind the developer to check and make sure the variable is not nil. There are two steps to using an optional. The first step is to check if the optional is nil. This is commonly done with an if statement like this:
var translatedWord: String? = translate("cat")
if translatedWord != nil {
//translatedWord has a value
} else{
//The translatedWord has no value
}
Once you have verified the optional contains a value, you must unwrap it. Unwrapping an optional is as simple as placing an ! mark after the variable name. For example:
var translatedWord: String? = translate("cat")
if translatedWord != nil {
println(translatedWord!)
//gato
}
Optionals can be a bit confusing at first, but just remember a variable that could be valueless must be an optional. The valueless value for an optional is called nil.
In this chapter, you learned the basics of Swift. You can now create variables, constants, and even optionals. You are now familiar with how to create strings, integers, floats, arrays, and dictionaries. You understand how to create a loop and check conditions with an if statement. Now it is time to put your knowledge to the test. Keep up the momentum and build your very own Tip Calculator.
Exercise: Tip Calculator
Your next app will help users calculate how much to tip the waiter each time they are at a restaurant. The user will enter the total and then select from three choices for the tip rate: 15, 20, and 25 percent. The user will then tap the calculate button, and the tip amount will display on the screen. A screenshot of the final product is provided in Figure 3-5.
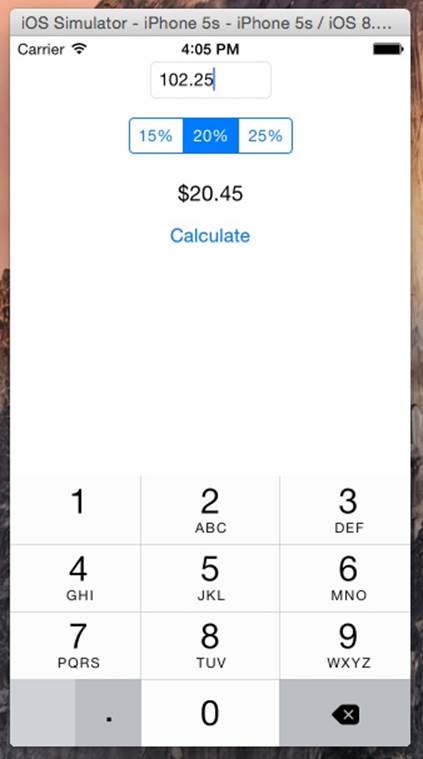
Figure 3-5. Finished Tip Calculator
Now that you understand what your app will do and how it will look, it’s time to get started in Xcode. Click the Xcode icon on your Dock; if Xcode is not on your Dock, use Spotlight to launch Xcode.
Xcode will launch with a familiar welcome screen. Close the welcome screen and click File→New→Project from the top menu bar (Figure 3-6).

Figure 3-6. New project
Select Single View Application from the template dialog box and click Next (Figure 3-7).

Figure 3-7. Project template dialog
Some of the project options may already be filled in for you.
Set the Product Name to TipCalculator and set Organization Name and Organization Identifier to your first and last name with no spaces. Finally, make sure the Language is Swift and Devices is set to iPhone (Figure 3-8).
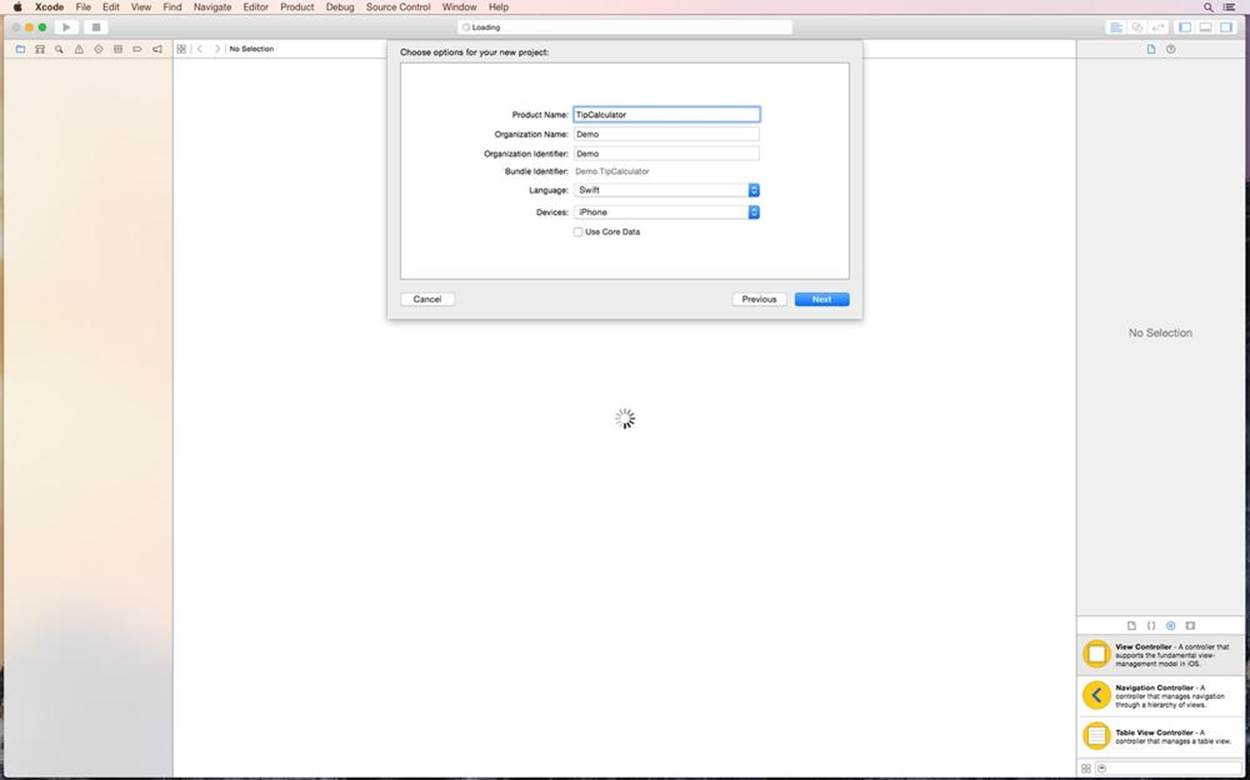
Figure 3-8. Project detail dialog
Select Documents from the left sidebar, select your Programming folder, and click Create to save the project (Figure 3-9).
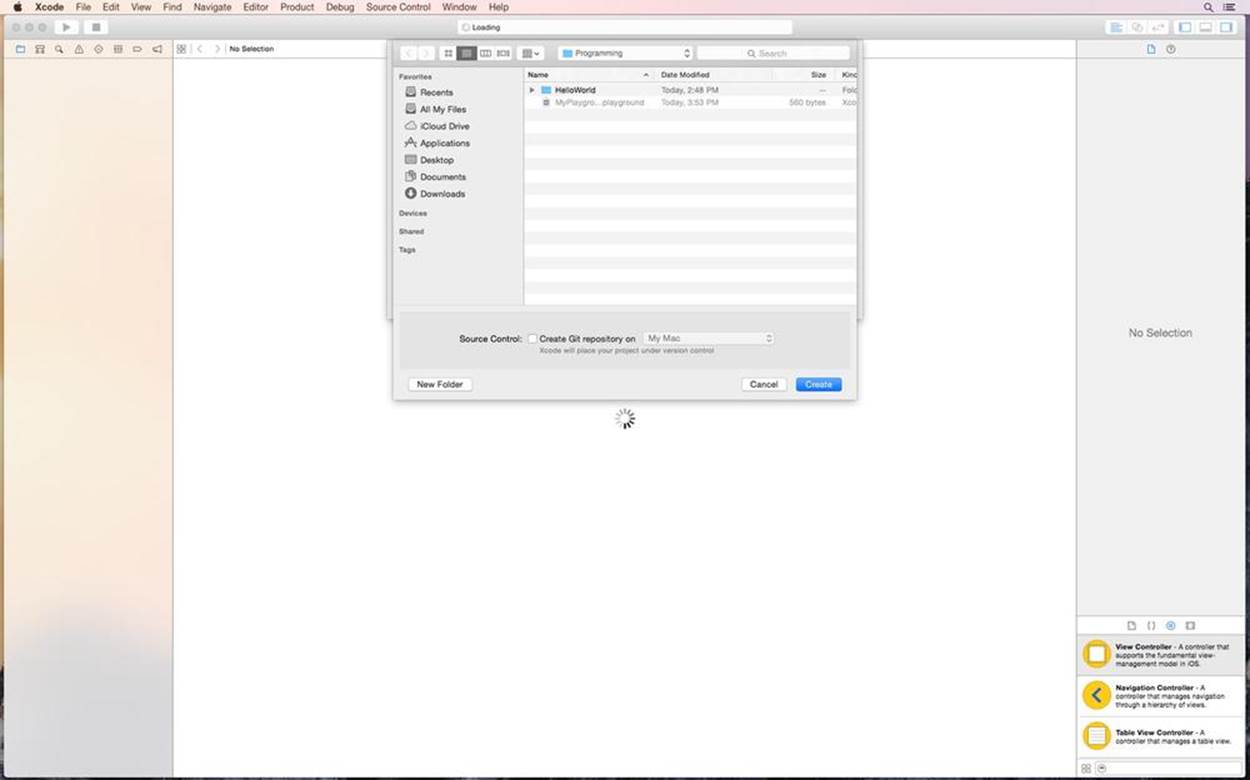
Figure 3-9. Save project
The project details will be shown (Figure 3-10).
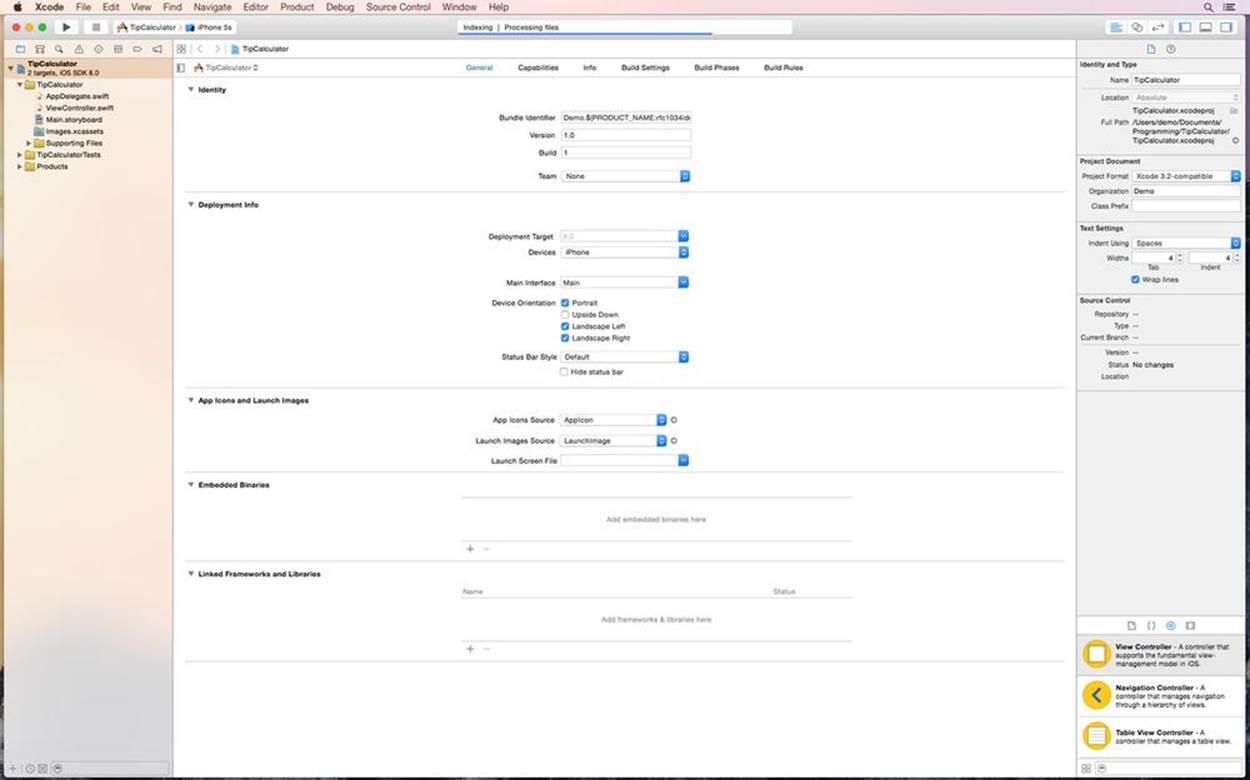
Figure 3-10. Project details
Dive right into the interface. Click the Main.storyboard file from the Project Navigator (Figure 3-11).
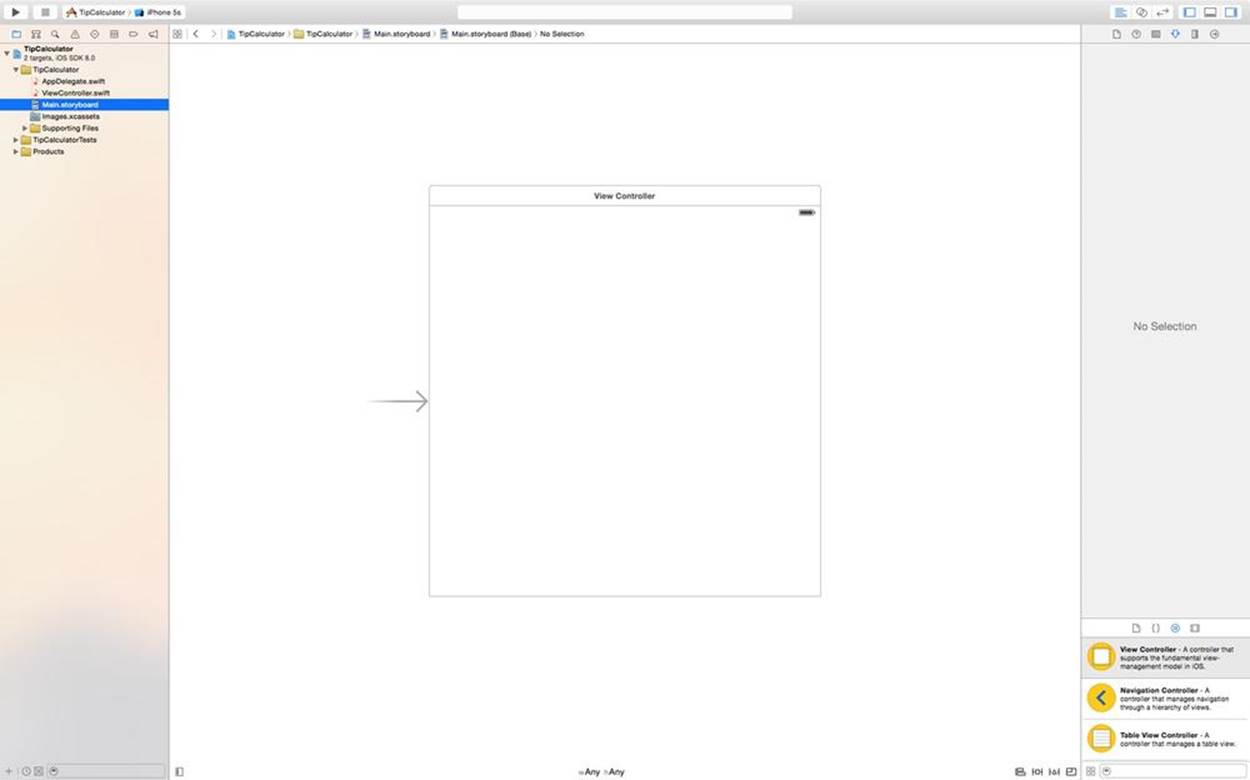
Figure 3-11. Main.storyboard
This app will run only on iPhone. Click the first tab at the top of the Inspector. The tab looks like a piece of paper with a folded corner. About halfway down, deselect the Use Auto Layout checkbox. A dialog box will appear; select iPhone and then Disable Size Classes (Figure 3-12). The shape of the user interface will change. Auto Layout is used for multiple screen sizes and will be covered in Chapter 7 of this book.
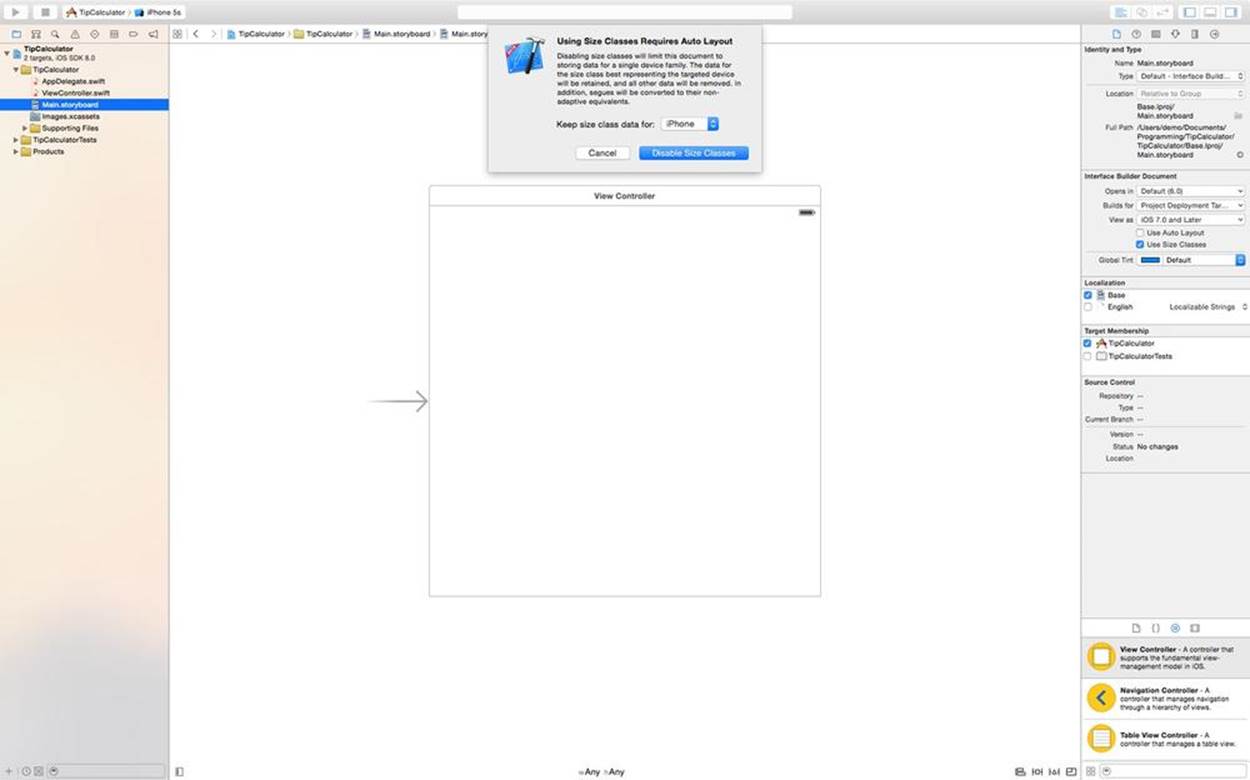
Figure 3-12. Disable size classes
Make sure the Inspector is showing on the right side of your screen. If not, click the Inspector View button. The Inspector View button is the square button with a stripe on the right side in the upper-right corner of your screen. This will show the Inspector.
Look for the small toolbar halfway down the Inspector on the right side of your screen. The Object Library icon should still be highlighted (Figure 3-13). If not, click the small circle icon that is third from the left.

Figure 3-13. Object Library
At the bottom of the Object Library is a small search box; type the word Label (Figure 3-14). The Object Library search box is a convenient way to find the interface elements you need, but be sure to clear your search once you are done. Otherwise, you will not be able to see the other available elements.
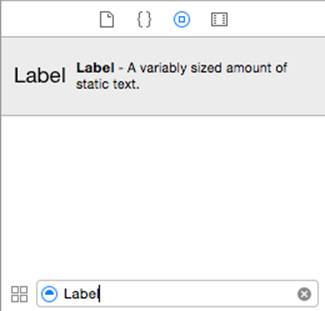
Figure 3-14. Label in Object Library
Drag a Label into the middle of the interface (Figure 3-15). Use the guidelines to help ensure you are in the horizontal and vertical center.
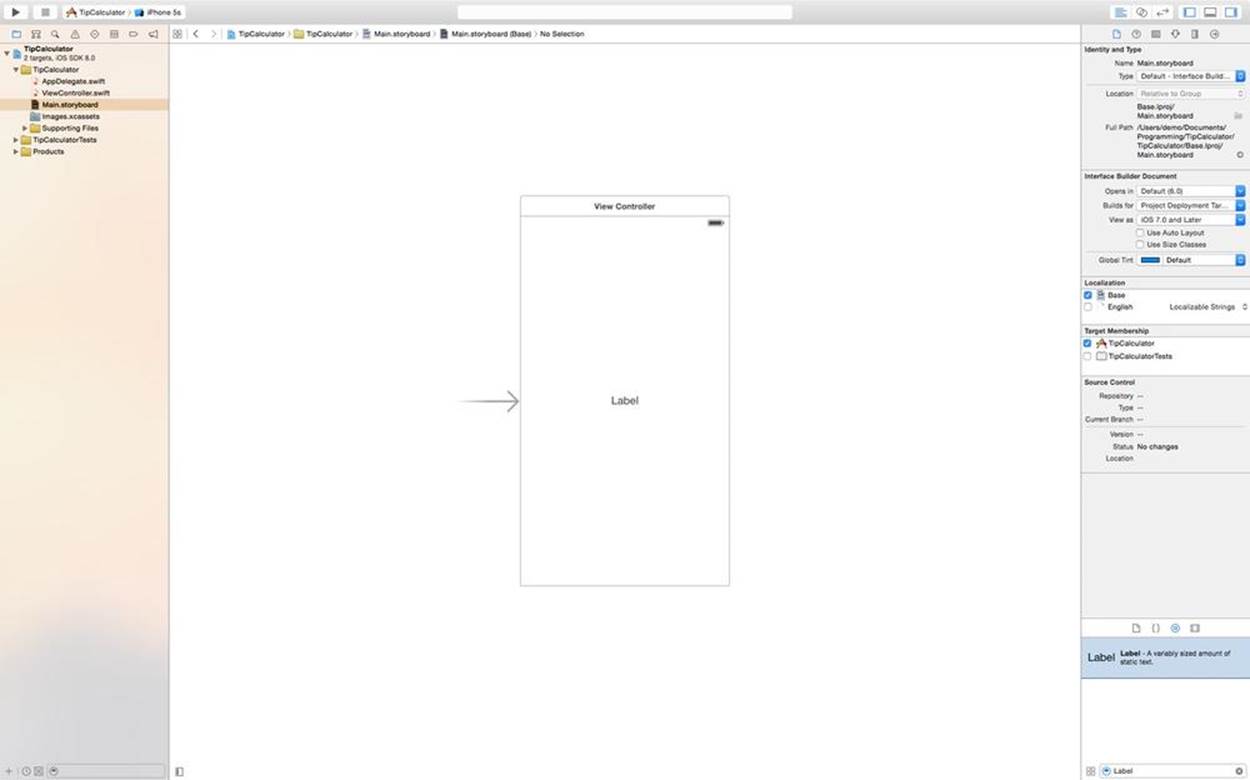
Figure 3-15. New Label
Look at the toolbar at the top of the Inspector. Click the Attributes Inspector icon; it is the fourth from the left (Figure 3-16). The icon looks like a downward facing arrow.
![]()
Figure 3-16. Attributes Inspector icon
Set the text attribute to $0.00 and press the Return key. Then click the center alignment button (Figure 3-17).
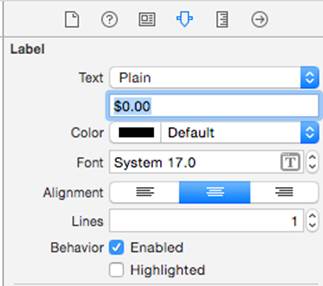
Figure 3-17. Label title
Look back to the top toolbar on the Inspector. Click the small ruler icon second from the right to open the Size Inspector (Figure 3-18). The Size Inspector helps to precisely set the position of an element on the interface.
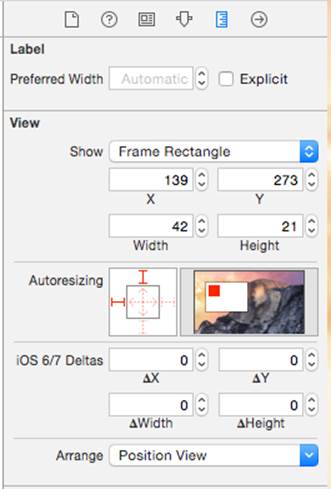
Figure 3-18. Size Inspector
Set the width to 100, the X value to 110, and the Y value to 200. Notice the Label’s new position on the interface and then click the Attributes Inspector icon (Figure 3-19).
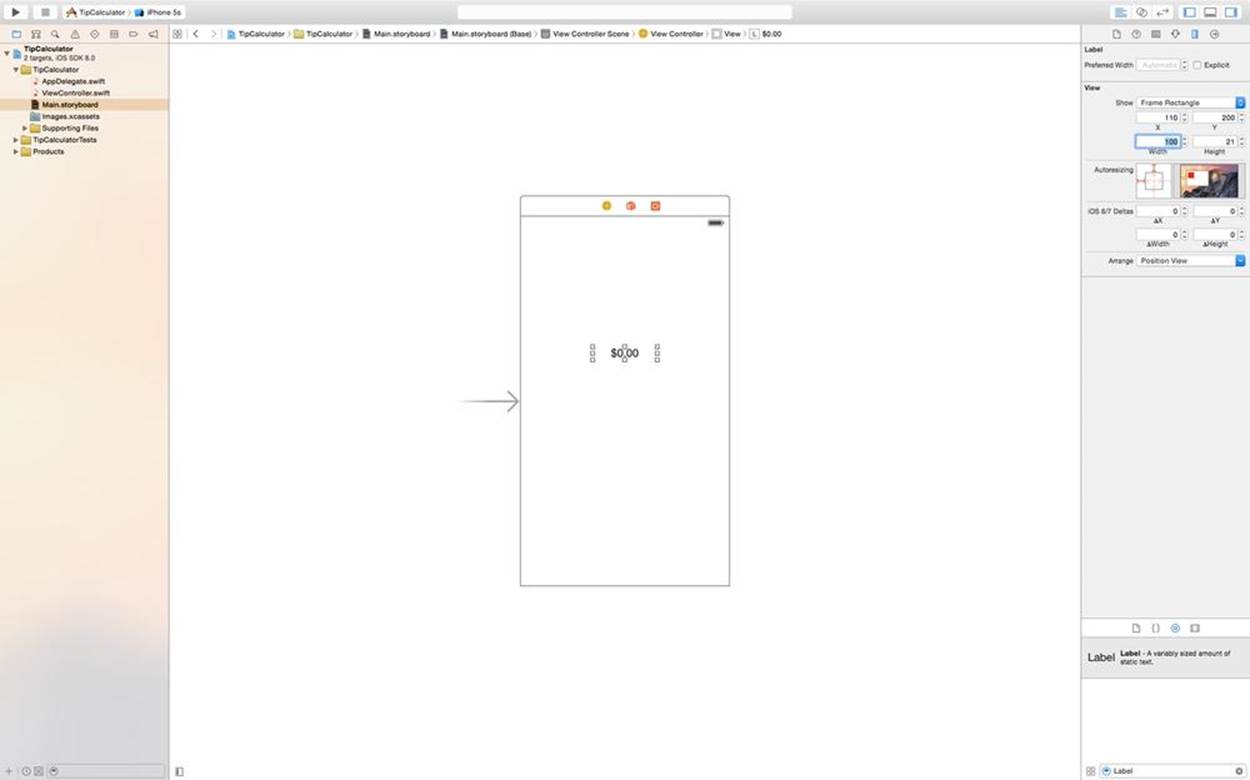
Figure 3-19. Repositioned Label
Next, you will add a Button to the interface. Move your cursor to the bottom-right corner of the screen. Click inside the Object Library search box and erase the word Label.
Scroll down through the Object Library and find Button (Figure 3-20). Drag a Button just above the Label. Be sure to keep it horizontally centered by using the guidelines to help position the element (Figure 3-21).
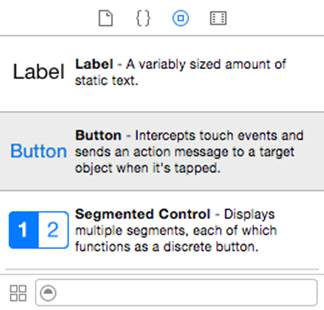
Figure 3-20. Button in Object Library
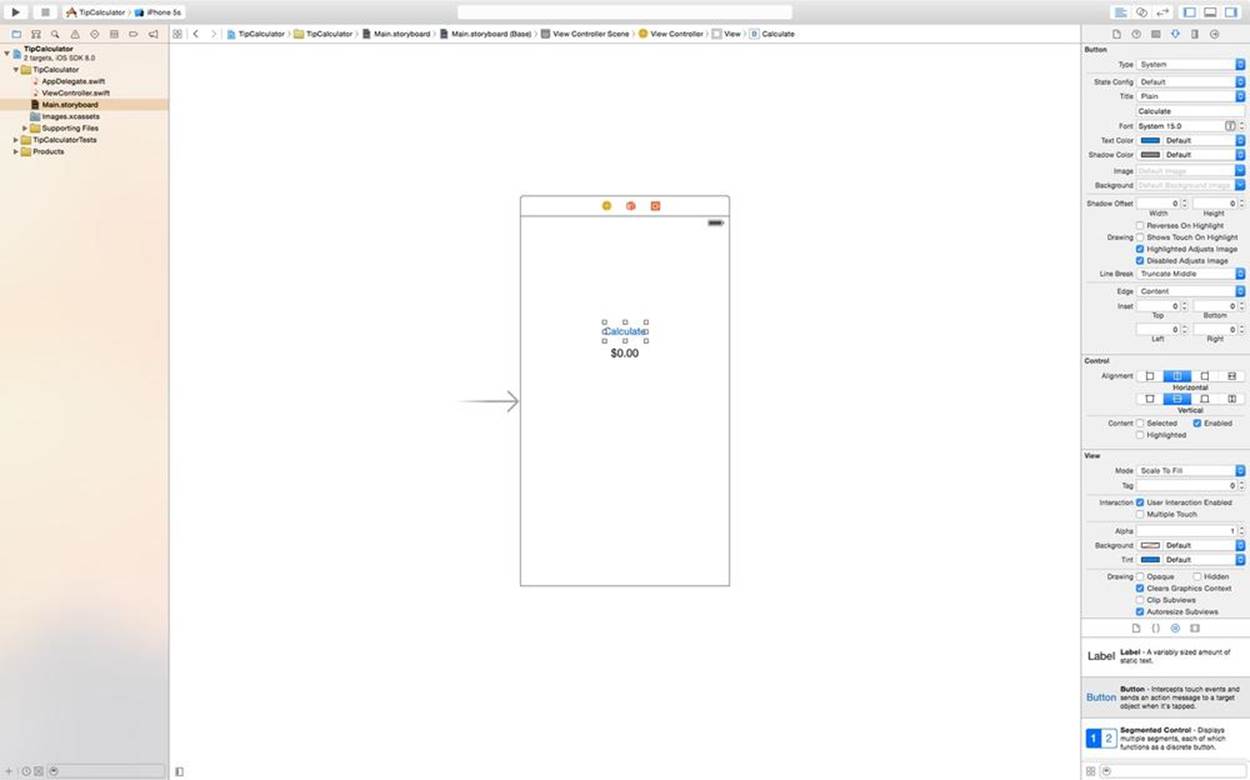
Figure 3-21. New Button
Double-click the Button, type the word Calculate, and then press the Return key.
Next, you will add a Segmented Control to the interface (Figure 3-22). A Segmented Control is like a light switch with more than two options. A Segmented Control holds two or more segments with action-like Buttons; however, only one segment can be selected at a time.

Figure 3-22. Segmented Control in Object Library
Scroll through the Object Library and drag a Segmented Control onto the interface. Position the Segmented Control just above your new Button (Figure 3-23).

Figure 3-23. New Segmented Control
Verify that the Attributes Inspector is selected in the Inspector. Change the number of segments in the Inspector from 2 to 3 (Figure 3-24). You will see the Segmented Control expand on the interface (Figure 3-25).
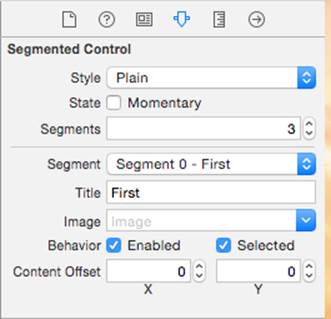
Figure 3-24. Attributes Inspector for Segmented Control
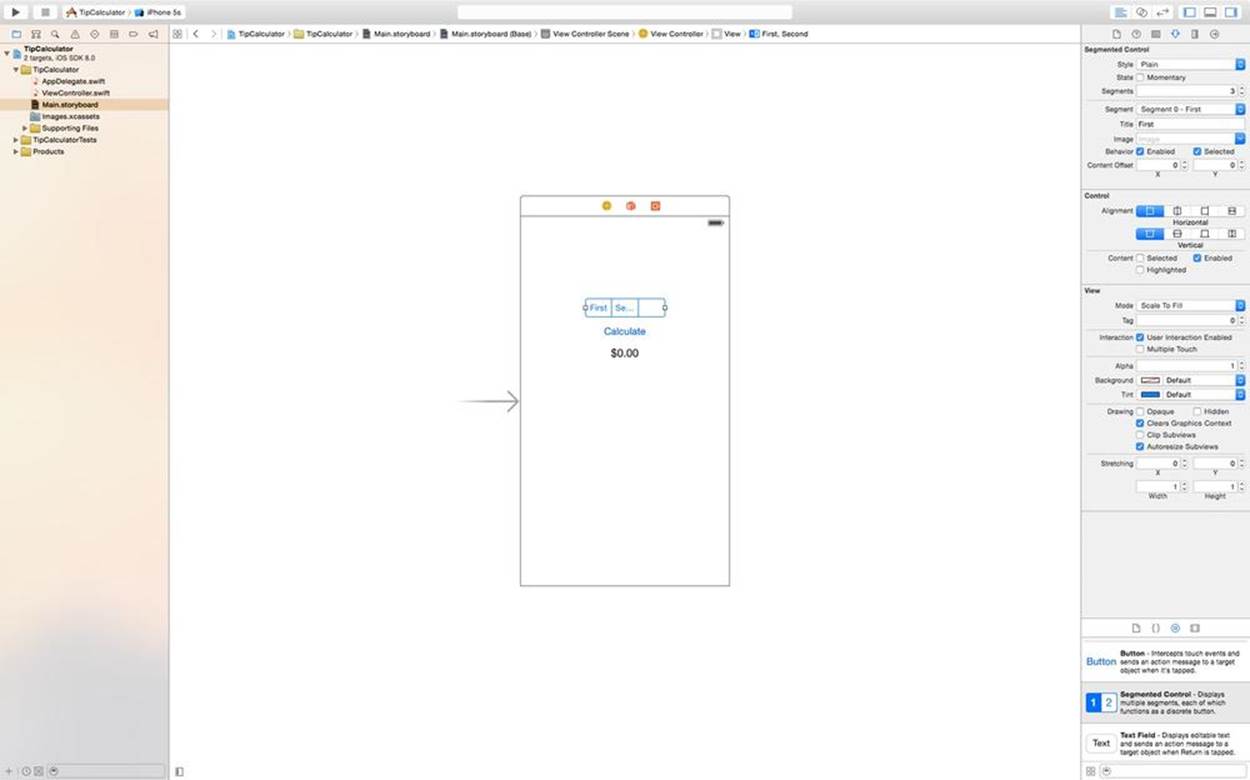
Figure 3-25. Three sections in Segmented Control
Next, double-click the word “First” inside the Segmented Control on the interface. The text will become editable; change it to 15% and then press the Return key. Change the second segment’s text to 20% and then double-click inside the blank space of the third segment and set it to 25%(Figure 3-26).
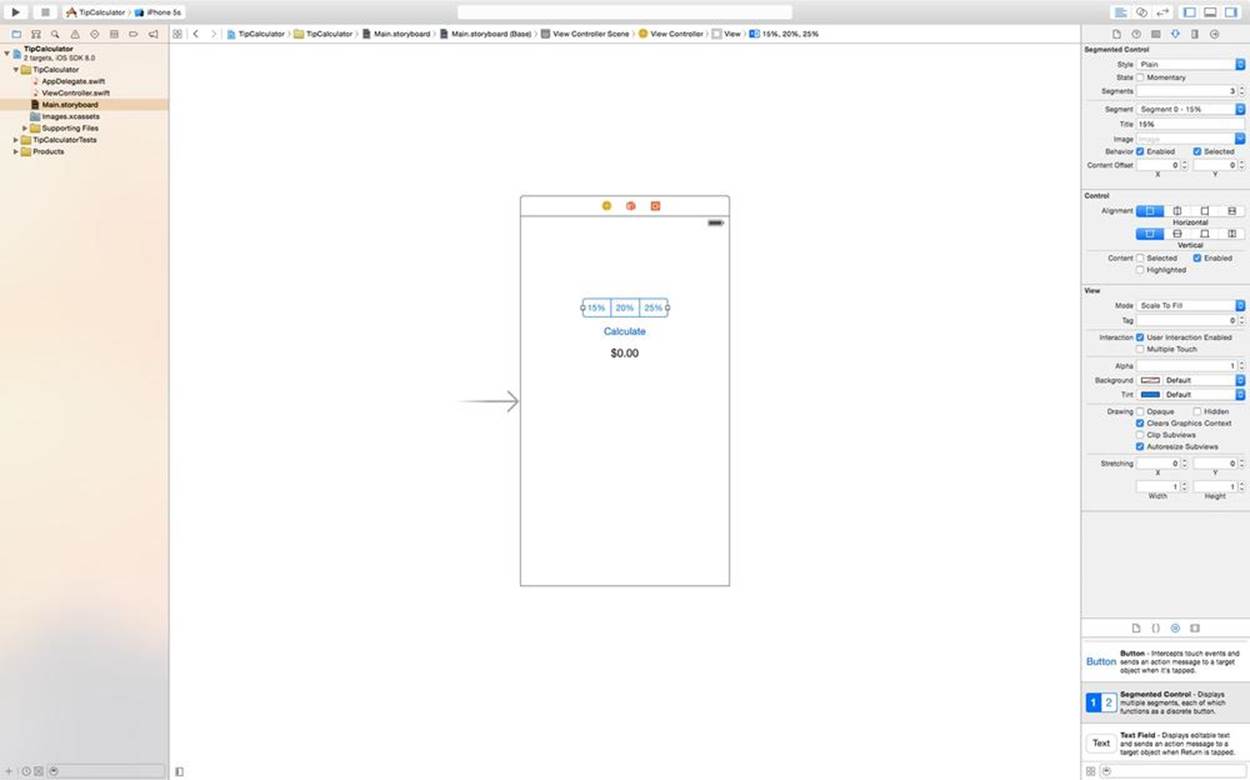
Figure 3-26. New Segmented Control titles
The final element to add to the Interface will be a Text Field. A Text Field allows the user to provide input via the keyboard.
Scroll down in the Object Library and select Text Field (Figure 3-27). Drag a Text Field onto the interface and position it just above the Segmented Control (Figure 3-28).
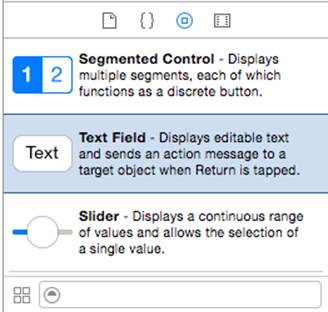
Figure 3-27. TextField in Object Library
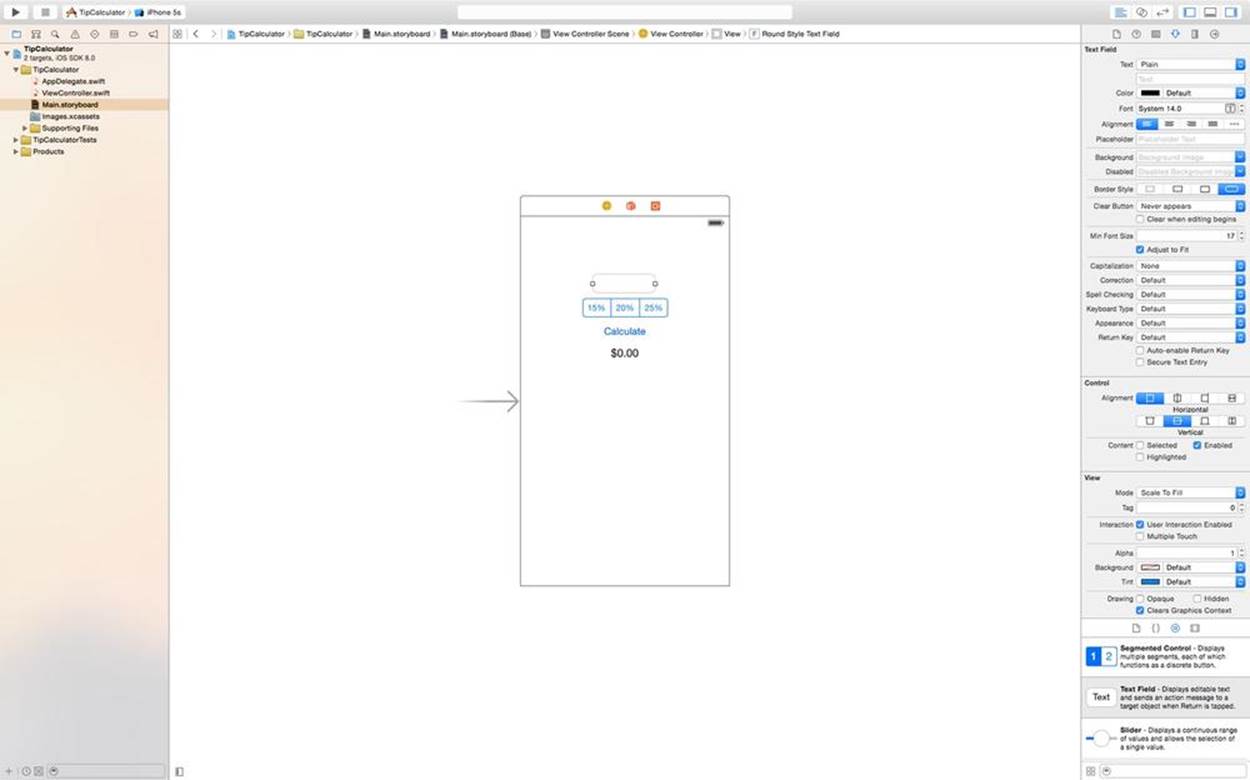
Figure 3-28. New Text Field
Turn to the Attributes Inspector and find the Placeholder attribute; it is the fifth attribute from the top. Enter the text Total Bill $ (Figure 3-29). This placeholder text will serve as a guide to users before they tap inside the Text Field.
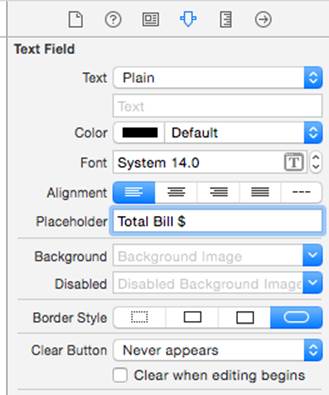
Figure 3-29. Text Field Attributes Inspector
Once the user taps inside the Text Field, the placeholder text will be cleared, and the keyboard will appear from the bottom of the screen.
Next, scroll down the Inspector until you find the Keyboard Type attribute. Click the drop-down arrows next to the word Default and select Decimal Pad (Figure 3-30). This will present a keyboard with only numbers, so your users will not be able to type letters into the Text Field.
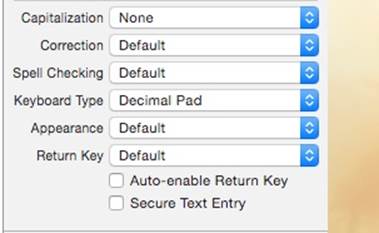
Figure 3-30. Text Field keyboard
The interface is now complete. Now it is time to connect the view, your user interface, to the controller, which is your Swift file. Just like the last exercise, you will use the Assistant Editor to help draw your connections between the view and controller.
In the upper-right corner of the screen, click the Assistant Editor button (Figure 3-31). This will open the Assistant Editor on the right side of your screen. To clean up more space, hide the Inspector by clicking the Inspector View button in the upper-right corner of your screen (Figure 3-32).
![]()
Figure 3-31. Assistant Editor button

Figure 3-32. Hidden Inspector
The Assistant Editor will open the ViewController.swift file automatically. You can verify this by checking the filename shown at the top of the Assistant Editor, right next to the word “Automatic.”
Select the Text Field element on the Interface. While holding the Control key, click and drag from the Text Field to below the words:
class ViewController: UIViewController {
Release your mouse when you see a blue horizontal line (Figure 3-33) and then a pop-up dialog will be shown (Figure 3-34).

Figure 3-33. Control-drag connection

Figure 3-34. Pop-up connection dialog
Since you will be retrieving a value from the Text Field, you will use the Outlet connection type. Enter billTextField for the variable name and leave the remaining values as UITextField and Weak. Click Connect when finished.
The connection generated code when you clicked the Connect button (Figure 3-35). Take a look at the generated code:
@IBOutlet var billTextField : UITextField!
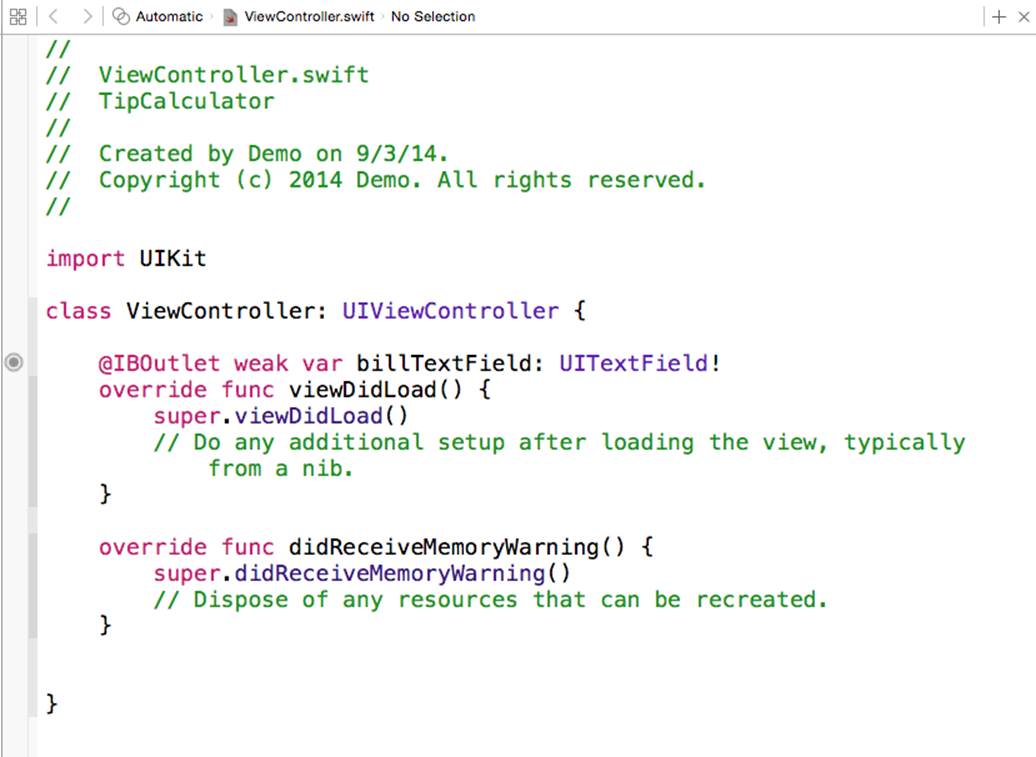
Figure 3-35. ViewController.swift
Skip over the first word and come back to it later. You know the var keyword is used to declare a variable. billTextField is the name of your new variable, the colon is used to designate the type of variable, and the UITextField is the type. Finally, the @IBOutlet keyword is used to declare an outlet connection between the view and controller. The new billTextField variable will be used to reference the Text Field from your code.
Select the Segmented Control on the interface. While holding the Control key, click and drag from the interface to just below the following words:
class ViewController: UIViewController {
Release your mouse when you see a blue horizontal line (Figure 3-36); a pop-up dialog will be shown (Figure 3-37).
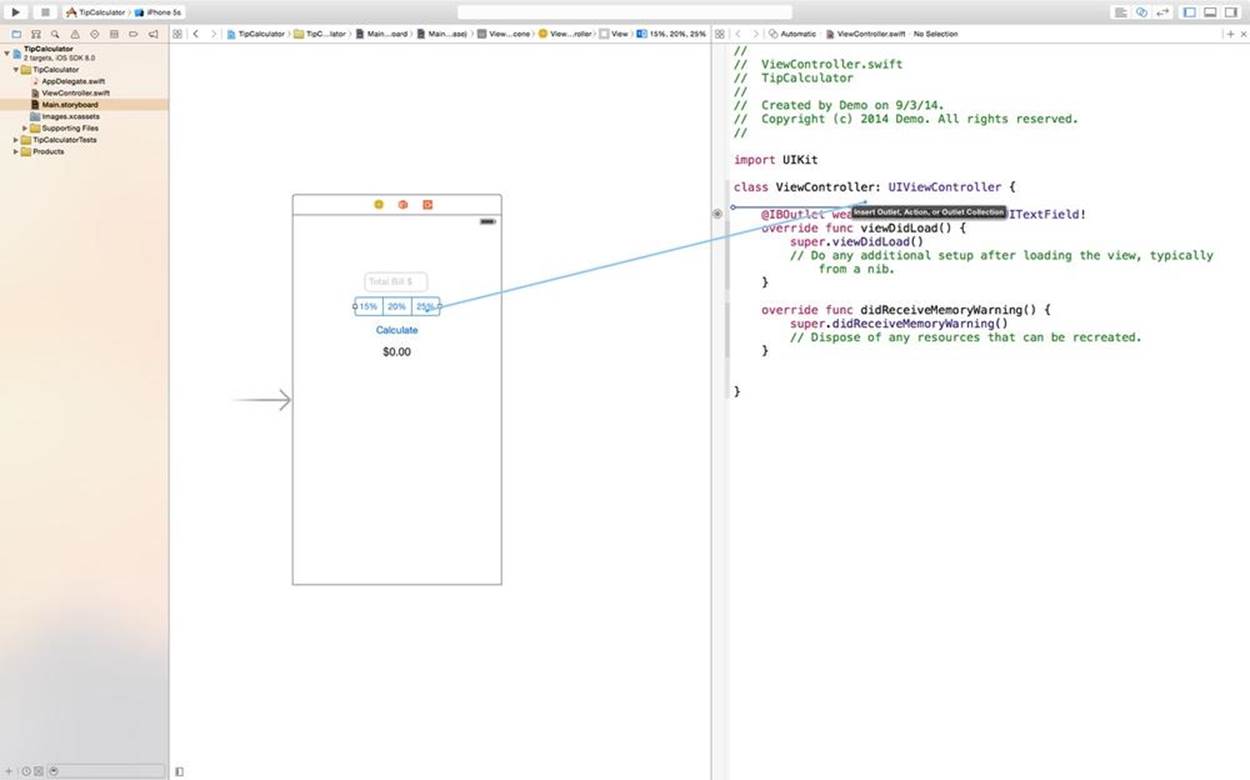
Figure 3-36. Control-drag connection
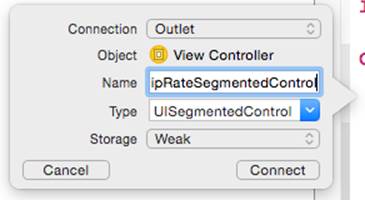
Figure 3-37. Pop-up connection dialog
Set the Connection type to Outlet. Name the connection tipRateSegmentedControl. Leave the rest of the options as they are and click Connect.
Select the Label on the interface. While holding the Control key, click and drag from the interface to just below the following words:
class ViewController: UIViewController {
Release your mouse when you see a blue horizontal line (Figure 3-38); a pop-up dialog will be shown (Figure 3-39).
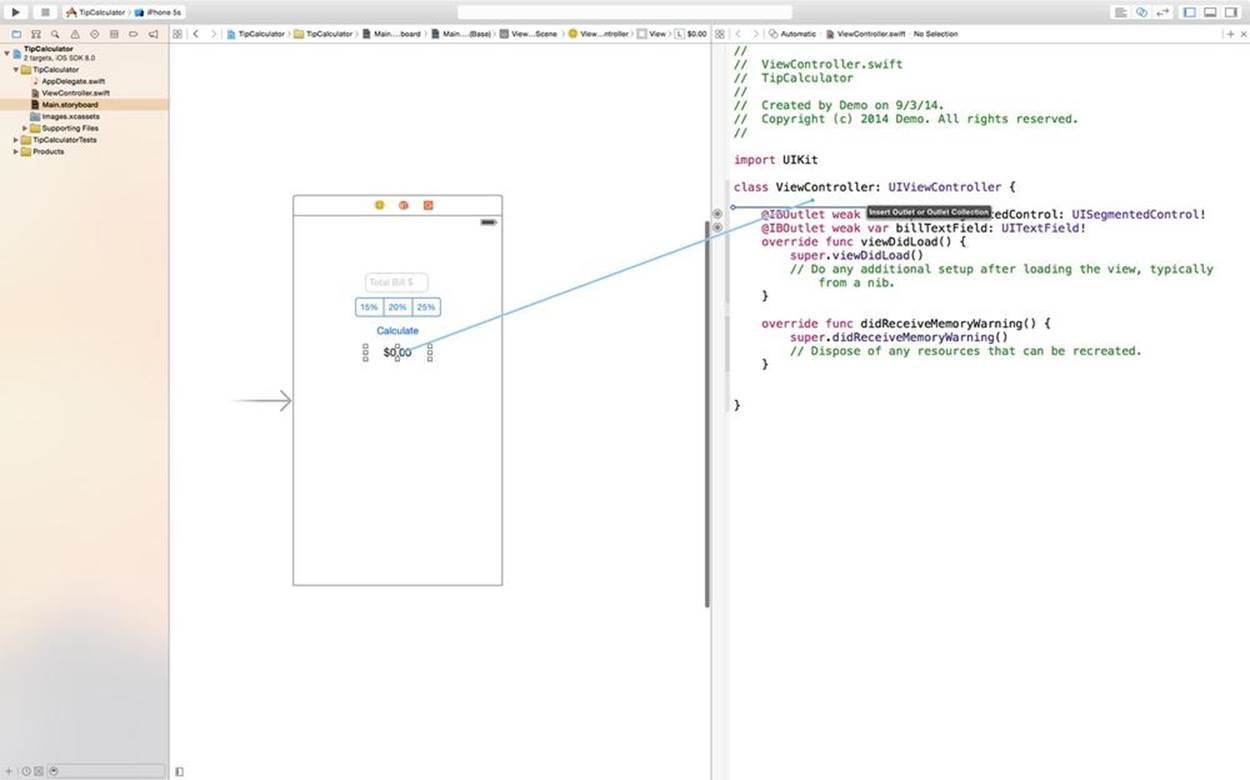
Figure 3-38. Control-drag connection
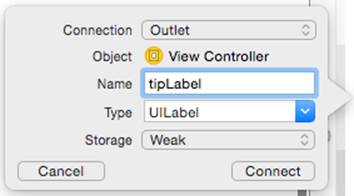
Figure 3-39. Pop-up connection dialog
Set the Connection type to Outlet. Name the connection tipLabel. Leave the rest of the options as they are and click Connect.
Finally, select the Button on the interface. While holding the Control key, click and drag from the interface to just below the following words:
class ViewController: UIViewController {
Release your mouse when you see a blue horizontal line (Figure 3-40); a pop-up dialog will be shown (Figure 3-41).
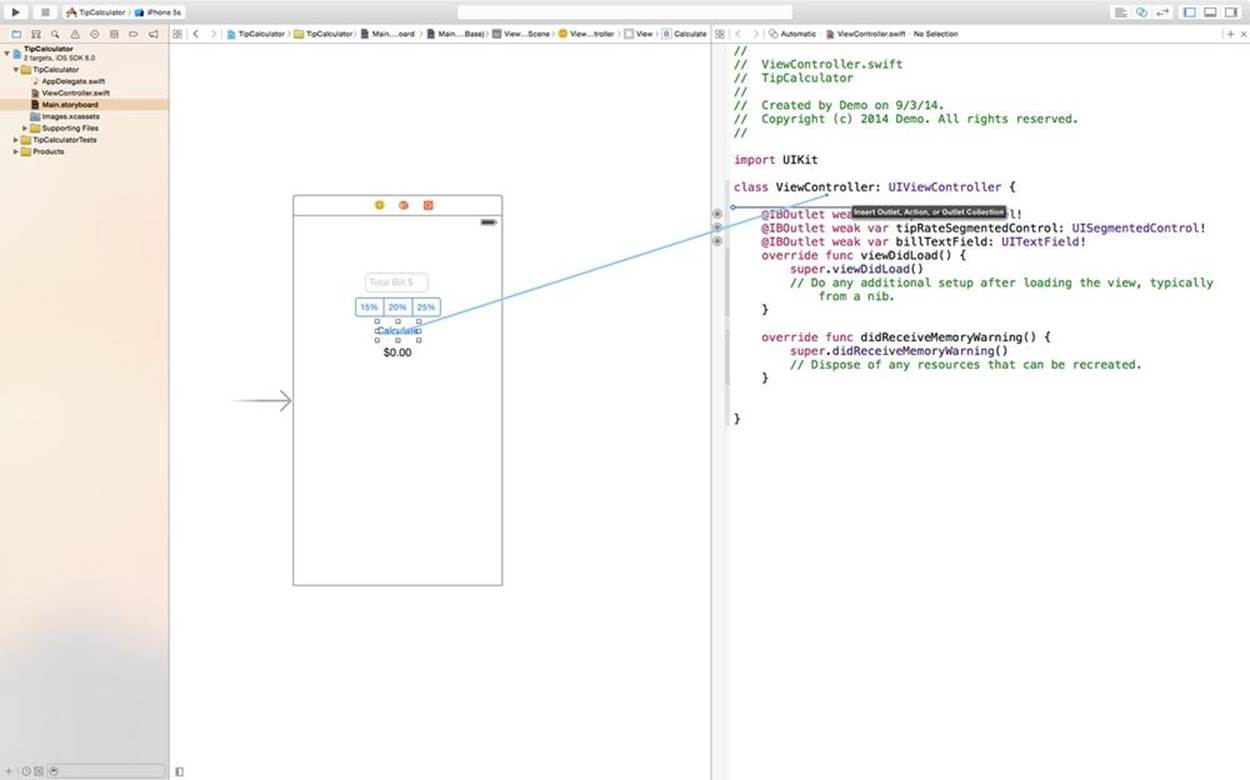
Figure 3-40. Control-drag connection
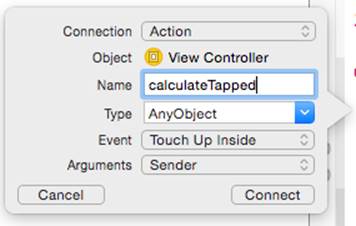
Figure 3-41. Pop-up connection dialog
Set the Connection type to Action. Name the connection calculateTapped. Leave the rest of the options as they are and click Connect.
The following code has been added to your ViewController.swift file:
@IBOutlet var tipLabel : UILabel!
@IBOutlet var tipRateSegmentedControl : UISegmentedControl!
@IBOutlet var billTextField : UITextField!
@IBAction func calculateTapped(sender : AnyObject) {
}
The calculateTapped action automatically created a method that will be called every time the Calculate button is tapped. Place your cursor between the braces of the calculateTapped method.
It’s best practice to write notes that explain what you would like to accomplish before writing it in code. This process, called pseudocoding, helps to map the idea of a particular method before it is implemented. You can use comments to write notes directly inside of Xcode. Comments are also used to inform other developers about the code. Comments are not seen by Xcode when the app is running or being built.
To create a comment, write two forward slashes and then your message. For example:
@IBAction func calculateTapped(sender : AnyObject) {
//This code is run each time the Calculate Button is tapped.
}
Add the following comments to the calculateTapped method:
@IBAction func calculateTapped(sender : AnyObject) {
//1. Get the total bill
//2. Determine the tip rate
//3. Calculate the Tip
//4. Display the Tip
}
Next, you will determine the tip rate: 15%, 20%, or 25%. Once you have the tip rate, you will multiply the total bill by the tip rate to calculate the tip. Finally, you will display the tip to the user.
Now that you have set the plan for your method, go through and write the code for each step inside the calculateTapped method.
To get the total bill, you will use the text attribute from the Text Field variable billTextField. Place your cursor at the end of the first comment and press the Return key. Then type the following:
var userInput = billTextField.text as NSString
Notice that while you are typing, Xcode will provide words to help you write your code. For example, delete the “.text” from billTextField and type ..
This predictive typing system is called Autocomplete. Autocomplete can dramatically improve a developer’s experience. The Autocomplete pop-up will show you all the attributes and methods available for a particular variable.
After the billTextField., type te. Autocomplete will update as you type and present the text attribute. Autocomplete even shows you that the text attribute will return a string; press the Tab key to accept.
You have now captured the text from the user in the Text Field. However, the text attribute from Text Field provides a string. You cannot complete mathematics with a set of characters. You will need to convert your string into a float. Remember, a float is a number with a decimal place. This will serve you perfectly for dealing with currency. To convert the string to a float, write the following on the next line:
var totalBill: Float = userInput.floatValue
This line of code creates a new variable using the var keyword and assigns it a name, totalBill, and then sets the type to float. Your new totalBill variable is set to userInput converted to a float, using the floatValue method. Step 1 is complete.
Your next step is to determine the tip rate. You will determine the tip rate by detecting which of the three segments is selected on the Segmented Control. Segmented Controls have an attribute called selectedSegmentIndex that provides a position representing the selected segment. Add the following code under the second comment:
var index: Int = tipRateSegmentedControl.selectedSegmentIndex
This code creates a new variable called index and sets itself equal to the tipRateSegmentedControl’s selected segment. Your new index variable will hold the position of the selected segment. Remember that indexes always start with zero. Index 0 is 15%, index 1 is 20%, index 2 is 25%.
Now that you have the selected segment’s index, you need to determine if the first, second, or third button is selected. Then you will set the tip rate based on the selected button. This is a perfect opportunity to write an if statement. Before you write your if statement, create a variable to hold the current tip rate:
var tipRate: Float = 0.15
This line of code creates a Float variable named tipRate. You then set the default value to 0.15. The tipRate variable will change based on which segment is selected. Start your if statement below the tipRate variable line:
var tipRate: Float = 0.15
if index == 0 {
tipRate = 0.15
}
The if statement begins with the keyword if followed by a condition. In this case, the condition is checking whether the index’s value is currently set to 0. If so, the condition will return true; if not, it will return false. If the condition is true, the code between the braces will execute. Otherwise the app will skip over the braces and on to the next use case. Add the following else if code to your if statement:
var tipRate: Float = 0.15
if index == 0 {
tipRate = 0.15
} else if index == 1 {
tipRate = 0.20
}
The else if statement checks an additional condition. If index is zero, the else if section would not execute. The else if asks if the index is 1. If this is true, it will set the tipRate variable to 0.20. Add the final section to your if statement:
var tipRate: Float = 0.15
if index == 0 {
tipRate = 0.15
} else if index == 1 {
tipRate = 0.20
} else {
tipRate = 0.25
}
For the final section, you added an else statement. An else statement will be triggered for any condition that is not caught by the previous two if statements. In this case, there are only three possible answers: 0, 1, or 2. The else statement will handle the condition if the index is 2.
Now that you have the total bill and tip rate, it is time to calculate the tip. Place your cursor under the third comment line and write the following:
var tip: Float = totalBill * tipRate
This line of code creates a new Float variable named tip and sets it to the result of totalBill multiplied by tipRate. This completes step 3.
Place your cursor under the fourth comment and write this final line of code:
tipLabel.text = "$\(tip)"
This line of code sets the text attribute to your tipLabel. You created a new string using the double quotes. In the new string, you placed a dollar sign followed by the value of the tip variable. The \( ) portion of the string is used as a placeholder for any variable. In this case, the placeholder was used for the tip variable.
Click the Play button in the upper-left corner of your screen. The iOS Simulator will launch and run Tip Calculator. Click inside the Text Field and enter a value. Notice the keyboard will only allow numbers and decimal places. Next, select a tip rate and click Calculate. Your tip will be shown in the Label below.
Don’t worry if you received an error, a warning, or your app did not run as expected. The best way to learn is to make mistakes. Practice makes perfect. A sample version of the project is available on AppSchool.com/book. Download it, compare it, and try, try again. Don’t be afraid to start the exercise over and walk through it until you get it right.
All materials on the site are licensed Creative Commons Attribution-Sharealike 3.0 Unported CC BY-SA 3.0 & GNU Free Documentation License (GFDL)
If you are the copyright holder of any material contained on our site and intend to remove it, please contact our site administrator for approval.
© 2016-2026 All site design rights belong to S.Y.A.