iPad All-in-One For Dummies, 7th Edition (2015)
Book II. Just for Fun
 Visit www.dummies.com/extras/ipadaio for information about wonderful entertainment apps available for the iPad.
In this book…
· Buy and share content using the Family Sharing feature
· Find out about creating time lapse video and using smart filters on photos
· Discover how Twitter, Flickr, iCloud Sharing, and Facebook are integrated into several apps
· Use Messages to send instant messages
· Become expert at using the iBooks and other e-reader apps
· Explore Newsstand to subscribe to and read publications
· Have fun by playing games
Chapter 1. Buying Content at iTunes and Beyond
In This Chapter
![]() Exploring the iTunes Store
Exploring the iTunes Store
![]() Previewing, buying, and renting media
Previewing, buying, and renting media
![]() Shopping beyond iTunes
Shopping beyond iTunes
![]() Using iCloud to push purchases to all devices
Using iCloud to push purchases to all devices
![]() Setting Up Family Sharing
Setting Up Family Sharing
iPad is set up with a preinstalled iTunes Store app that makes it easy to shop for music, movies, TV shows, audiobooks, and podcasts at Apple’s iTunes Store.
In this chapter, you discover how to use your iPad to find content on the iTunes Store website. That content can be downloaded directly to your iPad, or to another device and then synced to your iPad. With the new Family Sharing feature, which I cover in this chapter, as many as six people can share purchases and make purchases using the same credit card. Finally, I cover a few options for buying content from other online stores and how to download purchases automatically using iCloud.
 I cover opening an iTunes account and downloading iTunes software to your computer in Book I, Chapter 5. If you need to, handle those two tasks before digging into this chapter.
Exploring the iTunes Store
Whether it’s your favorite shopping source or not, the iTunes Store is set up to be your most convenient source for content on your iPad at the moment. Sure, you can get content from other places, but the iTunes Store app comes preinstalled on your iPad — and Apple makes it easy to access it from various Apple devices or your PC.
So, it’s time you get to know the iTunes Store: the easiest way to grab all those movies, TV shows, and music that you love for viewing and listening to on your iPad.
Visiting the iTunes Store
Using the iTunes Store from your iPad is easy with the preinstalled iTunes Store app. You just tap the iTunes Store app on the Home screen.
Now you can roam around trying different options. You have music, movies, TV shows, and audiobooks to choose from. If you begin to purchase or rent an item and you’re not already signed in with your Apple ID, the dialog shown in Figure 1-1 appears, asking for your sign-in information. Enter your ID and password (you may have created one when you set up your iPad or may have already had one) and tap OK.
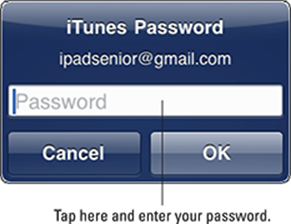
Figure 1-1: Log in to the iTunes Store.
Start exploring musical selections by tapping the Music button in the row of buttons at the bottom of the screen, if it’s not already selected, as shown in Figure 1-2. Tap the See All link in any category of music to display more music selections.
Tap the Music button in the upper-left corner to go back to the featured Music selections; then tap the Genres button at the top left of the screen. This step displays a list of music genres that you can choose from. Tap one. Items in the genre are organized by criteria, such as New and Noteworthy Albums and iTunes Essentials. Tap any listed item to see more details about it, as shown in Figure 1-3.
The navigation techniques in these steps work essentially the same in any of the content categories (the buttons at the bottom of the screen), which include Music, Movies, Audiobooks, and TV Shows. Just tap one to explore it.
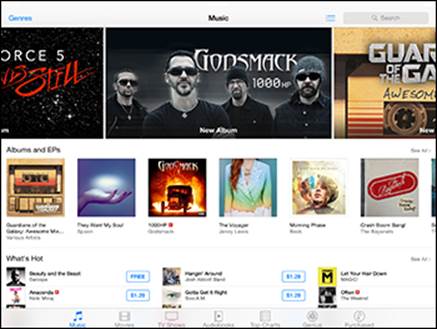
Figure 1-2: Browse selections in the iTunes Store.
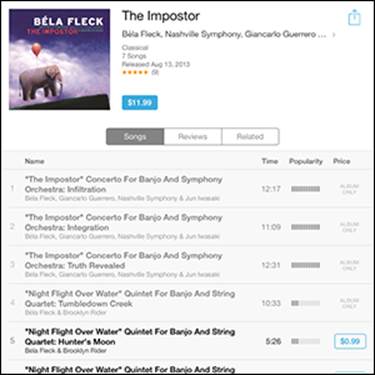
Figure 1-3: Detailed information may include the genre, release date, and song list.
If you want to use the Genius playlist feature, which recommends additional purchases based on the contents of your library, open the iTunes Store app on your iPad and tap the Genius button at the bottom of the screen. If you’ve made enough purchases in iTunes, song and album recommendations appear based on those purchases. You also see the content in your iTunes Match library (a fee-based music service) if you have one.
Finding a selection
You can look for a selection in the iTunes Store in several ways. You can use the Search feature, search by genres or categories, or view artists’ pages. Here’s how these work:
· Search: Tap in the Search field shown in Figure 1-4 and enter a search term, which could be a genre of music, the name of an album or song, or an artist’s name, for example, using the onscreen keyboard. Tap the Search button on the keyboard or, if one of the suggestions given appeals to you, just go ahead and tap it. Search results are divided into categories such as Songs and Albums. Flick down to scroll through them and find what you need. Tap Cancel to return to the Music selections screen.
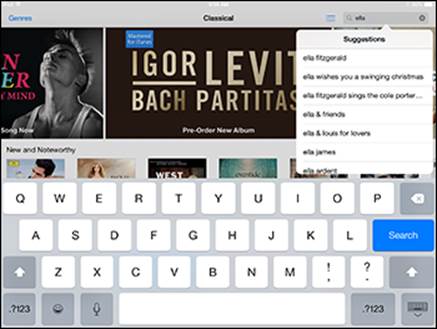
Figure 1-4: Search by composer, artist, or album title.
· Link: On a description page that appears when you tap a selection, you can find more offerings by people involved, such as a singer or actor, if you tap the Related tab, as shown in Figure 1-5.
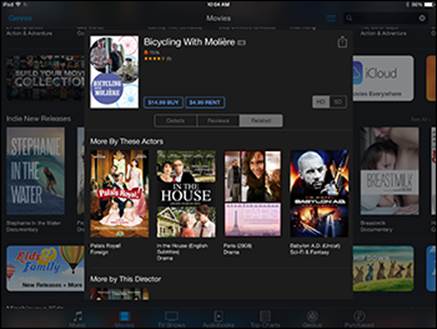
Figure 1-5: If you have an artist you favor, search for him.
If you find a selection you like, tap the Share button at the top of the description page to share your discovery with a friend via Mail, Message, Twitter, or Facebook. For all sharing choices but AirDrop, a message appears with a link that your friend can click to view the selection. Enter an address in the To field and tap Send or Post. Your friend is now in the know.
Previewing music, a movie, or an audiobook
Because you’ve already set up an iTunes Store account (if you haven’t done so yet, see Book I, Chapter 5), when you choose to buy an item, it’s automatically charged to the credit card or PayPal account you have on record or against any allowance you have outstanding from an iTunes gift card.
However, you might just want to preview an item before you buy it to be sure that it’s a good fit. If you like it, buying and downloading are then easy and quick.
Follow these steps to preview your content:
1. Open the iTunes Store and locate a selection you might want to buy using any of the methods I outline in earlier sections.
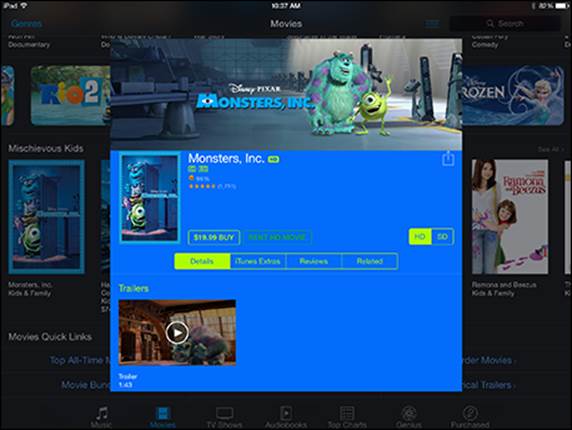
2. Tap the item to see detailed information about it, as shown in Figure 1-6.
3. Sample the content:
· For a movie or audiobook selection, tap the Trailer button (see Figure 1-6) to play a preview.
· For a TV show, tap an episode to get further information.
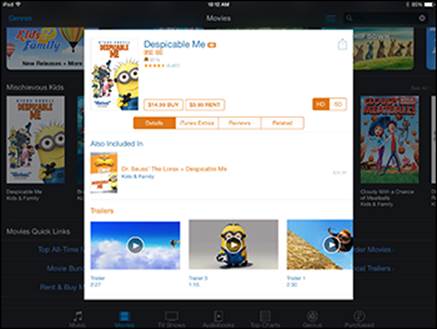
Figure 1-6: Why not preview before you buy?
· If you want to listen to a sample of a music selection, tap the track number or name of a selection with a red preview icon to the right of it, as shown in Figure 1-7. A small square appears and the track plays. Tap the square to stop the preview.
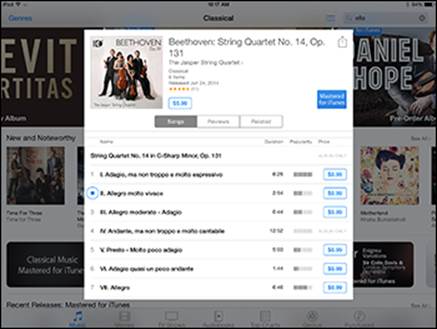
Figure 1-7: You can also preview music before you rent or buy.
If you like what you hear or see, you’re ready to buy. Which brings you to the next section.
Buying a selection
Although you can find some freebies out there, and you can rent certain movies rather than buy them, you’ll often have to buy the music, video, or audio that you want to enjoy. Buying involves authorizing the purchase and downloading the content to your iPad (which is done automatically after the purchasing part is complete).
 Buying and downloading a movie while running your iPad on a 3G/4G network can eat up your data allocation and take a while — if such a large file can even download at all. You’re better off downloading this content while connected to a Wi-Fi network. To play it safe, to disable cellular download for the iTunes Store, go to Settings⇒iTunes & App Store and turn off the Use Cellular Data switch.
When you find an item you want to buy, here’s how to make your purchase:
1. Tap the button that shows either the price (if it’s a selection available for purchase; see Figure 1-8) or the word Free (if it’s a selection available for free).
The button label changes to Buy X, where X is the particular content you’re buying, such as a song or album.
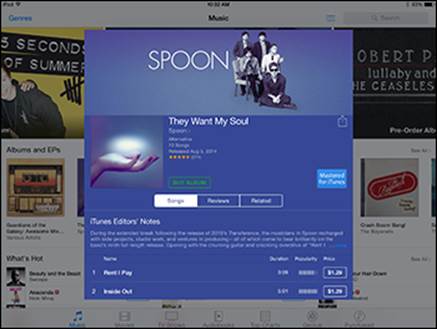
Figure 1-8: Buy the content you want using these buttons.
2. Tap the Buy X button.
The iTunes Password dialog appears. (Refer to Figure 1-1.)
3. Enter your password and tap OK, or if you have a credit, tap the Redeem link and enter the code provided.
In the confirming dialog, tap Download. The item begins downloading and is automatically charged to your credit card or against a store credit. When the download finishes, you can view the content using the Music or Videos app, depending on the type of content you bought.
If you want to buy music, you can open the description page for an album and click the album price, or buy individual songs rather than the entire album. Tap the price for a song and then proceed to purchase it.
Note the Redeem button on many iTunes Store screens. Tap this button to redeem any iTunes gift certificates you might have gotten from your generous friends, or from yourself. Your purchases are debited against your certificate balance; if the item costs more, your credit card is then charged for the remainder.
If you don’t want to allow purchases from within apps (for example, Music or Videos) but rather want to allow purchases only through the iTunes Store, you can tap Settings⇒General⇒Restrictions and then tap Enable Restrictions and enter a passcode. After you set a passcode, you can tap individual apps to turn on restrictions for them, as well as for actions such as deleting apps, sharing via AirDrop, or using Siri.
Renting movies
In the case of movies, you can either rent or buy content. If you rent, which is less expensive but makes the content yours for only a short time, you have 30 days from the time you rent the item to begin to watch it. After you have begun to watch it, you have 24 hours remaining from that time to watch it as many times as you like (but only on the same device). To rent a movie, follow these steps:
1. With the iTunes Store open, tap the Movies button.
2. Locate the movie you want to rent and tap to open it, as shown in Figure 1-9.
3. Tap the Rent button.
The Rent button changes to a Rent Movie button (see Figure 1-10). At this point, you may be asked to enter your Apple ID and password.
4. Tap the Rent Movie button to confirm the rental.
The movie begins to download to your iPad immediately, and your account is charged the rental fee.
After the download is complete, you can use the Videos app to watch it. (See Chapters 2 and 3 in this minibook to read about how these apps work.)

Figure 1-9: To rent, start by viewing details about the content.

Figure 1-10: If you want to watch it only once, rent and save money.
Some movies are offered in high-definition versions in addition to standard definition. These HD movies look great on that crisp, colorful iPad screen, especially if you have a third-generation (or later) iPad with Retina display. It’s best to download these over a Wi-Fi connection because a 3G/4G connection could incur hefty charges.
You can also take content that you’ve downloaded to your computer and sync it to your iPad. See Book I, Chapter 5 for more about this process.
Shopping Anywhere Else
Many content stores have added iPad-friendly videos to their collections, so you do have alternatives to iTunes for your choice of movies or TV shows. You can also shop for music from sources other than iTunes, such as Amazon.
You can open accounts at these stores by using your computer or your iPad’s Safari browser and then following a store’s instructions for purchasing and downloading content. Keep in mind that costs will vary. For example, one such provider is Hulu. To get iPad-friendly content from Hulu, you have to sign up for the Hulu Plus service and pay a monthly fee (less than $10). Then, download the app directly from Hulu and start watching content.
Here are some online stores and content providers that offer iPad-compatible content:
· TV (www.tv.com) provides its online television and movie content to iPad.
· Ustream (www.ustream.tv) has a mobile app for streaming sports and entertainment programs to mobile devices.
· ABC (http://abc.go.com) and CBS News (www.cbsnews.com) stream live TV programming to the iPad.
· Netflix (www.netflix.com) makes movies and TV shows available that can be streamed to the iPad.
· PBS (www.pbs.org), the king of documentary and artsy movie programming, has several apps for iPad including Nova Elements iPad App, PBS Kids iPad app, and PBS for iPad for other programming.
· iMP4hub (www.imp4hub.com) is all about free MPEG-4–format movies for iPad, iPhone, and Android devices.
Additionally, if you get content onto your Mac or Windows machine, you can stream it to your iPad using Air Video ($2.99) and Air Video Server, and it will do an on-the-fly conversion. For more information, go to www.inmethod.com/air-video/index.html. Another free utility for Windows, OS X, and Linux that converts most video to an iPad-friendly format is HandBrake. Go to http://handbrake.fr for more information.
There are also apps that stream content if you pay a subscription fee or are an existing customer. Two good ones are Xfinity TV from Comcast and TWCable from Time Warner.
Enabling Autodownloads of Purchases from Other Devices
With iCloud, after you set up an iCloud account, either during the initial setup of your device or through iPad Settings, you can make a purchase or download free content on any of your Apple devices that have been set up for auto-download, and you can have those purchases automatically copied onto any or all your Apple devices. To enable this auto-download feature on iPad, follow these steps:
1. Tap Settings on the Home screen.
To use iCloud, first set up an iCloud account. See Book I, Chapter 5 for detailed coverage of iCloud, including setting up your account.
2. Tap iTunes & App Store.
3. In the options that appear, tap the On/Off switch to turn on any category of purchases you want to auto-download to your iPad from other Apple devices: Music, Apps, or Books (see Figure 1-11).
At this point, Apple doesn’t offer an option of auto-downloading video content using these settings, probably because video is such a memory and bandwidth hog. You can always download video directly to your iPad through the iTunes Store app or sync to your computer using iTunes to get the content or through the iTunes U app for educational content.
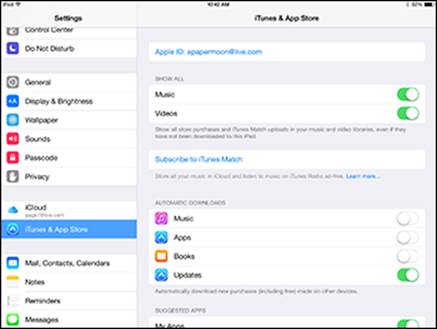
Figure 1-11: Authorize purchases from an app by turning it on here.
Setting Up Family Sharing
Family Sharing is a new feature that allows up to six people to share whatever anybody in the group has purchased from the iTunes, iBooks, and App Stores even though you don’t share Apple accounts. Your family must all use one credit card to purchase items, but you can approve purchases by younger children. You can also share calendars, photos, and a family calendar (see Book V, Chapter 3 for information about Family Sharing and Calendar, and Book II, Chapter 6 for information on sharing Photos in a Family album).
Start by turning on Family Sharing:
1. Tap Settings.
2. Tap iCloud and then tap Set Up Family Sharing.
3. Tap Get Started.
4. Tap Continue.
5. On the Share Purchases screen, tap Share Purchases from a different account to use another Apple account.
6. Tap Continue and check the payment method you want to use.
7. Tap Continue.
8. On the screen that appears, tap Add Family Member.
9. Enter the person’s name (assuming that this person is listed in your contacts) or email address (see Figure 1-12).
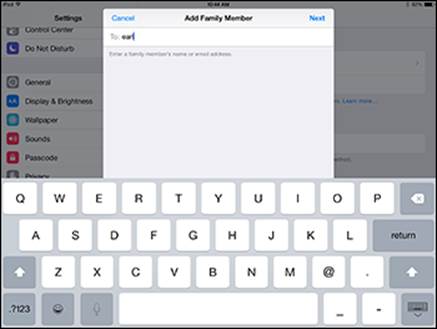
Figure 1-12: Add the family member’s name or email address.
An invitation is sent to that person’s email. When the invitation is accepted, the person is added to your family.
Note that the payment method for this family is displayed under Shared Payment Method in this screen. All those involved in a family have to use a single payment method for family purchases.
All materials on the site are licensed Creative Commons Attribution-Sharealike 3.0 Unported CC BY-SA 3.0 & GNU Free Documentation License (GFDL)
If you are the copyright holder of any material contained on our site and intend to remove it, please contact our site administrator for approval.
© 2016-2025 All site design rights belong to S.Y.A.