iPad All-in-One For Dummies, 7th Edition (2015)
Book II. Just for Fun
Chapter 4. Getting the Most Out of iPad Cameras and FaceTime
In This Chapter
![]() Looking good in photos
Looking good in photos
![]() Exploring Photo Booth
Exploring Photo Booth
![]() Taking videos
Taking videos
![]() Making video calls with FaceTime
Making video calls with FaceTime
With its gorgeous Retina screen (from third-generation iPads on), iPad is a natural for viewing photos and videos. It supports most common photo formats, such as JPEG, TIFF, and PNG. You can shoot your photos and videos by using the built-in cameras in iPad with preprogrammed square or panorama modes, and edit your images using filters that are new with the Camera app that comes with iOS 7. Additionally, you can sync photos from your computer, iPhone, or digital camera, and save images you find online or receive by email to your iPad.
If you have the third-generation or later iPad, you have a built-in iSight camera for your rear-facing camera. This improvement on previous iPad cameras is a 5-megapixel beauty with an illumination sensor that adjusts for whatever lighting is available. Face detection balances focus across as many as ten faces in your pictures. The video camera option offers 1080p HD (high-definition video) with video stabilization that makes up for some shaking as you hold the device to take videos.
When you have photos to play with, the Photos app lets you organize photos from the Camera Roll and view photos in albums, one by one, or in a slideshow. A new feature lets you view photos by the year they were taken, with images divided into collections by the location or time you took them. You can also AirDrop, email, message, post to Facebook, or tweet a photo to a friend, or print it. And if you like to play around with photo effects, you’ll enjoy the photo-editing features as well as the preinstalled app, Photo Booth.
If video is more up your alley, in this chapter, you also discover how to use the video cameras in iPad. For those who want to share videos of themselves and their surroundings with others, I cover using the video cameras along with FaceTime to make video calls.
Working with Photos
iPads (except for the original iPad) come with cameras — two, to be exact. These cameras allow you to capture video and photos. And because one camera is front-facing and the other is rear-facing, you can switch between them to capture images of yourself holding the iPad or images of what you’re looking at.
On an iPad, the front-facing camera captures high-definition video at 720p; the rear-facing camera captures high-definition video at 1080p.
When you capture photos, they appear in the Photos app’s Camera Roll, where you can view them, email them, and so on. (See Chapter 6 in this minibook for more about using the Photos app.) The Photo Streams feature lets you share groups of photos with people using iCloud on an iOS 6 device or later, or on a Mac computer with the Mountain Lion OS or later installed, or on a PC via iCloud. (See Book V, Chapter 1 for more about sharing files using iCloud.)
The cameras in the iPad are just begging to be used, so get started!
Taking pictures with the iPad camera
When you use an iPad camera, you can switch it between a standard camera and a video camera, and choose whether to use the front or rear camera. To work with the standard camera to take pictures, follow these steps:
1. Tap the Camera app icon on the Home screen to open the app.
If the orange-highlighted word in the row of words below the Capture button (see Figure 4-1) is Video, slide up to set Photo (the still camera) as the active setting rather than video.
2. Set the Square option using the same slider control below the Capture button.
This setting lets you create square images like those you see on the popular Instagram site.

Figure 4-1: The Camera app.
3. Move the camera around until you find a pleasing image, and then you can do a couple of things at this point to help you take your photo:
· Tap the area of the grid where you want the camera to autofocus.
· Pinch the screen to display a zoom control; drag the circle in the zoom bar to the right or left to zoom in or out on the image. Note that zooming doesn’t change resolution and so can degrade the image.
4. Tap the Capture button at the right side of the screen.
You’ve just taken a picture, and it’s stored automatically in the Photos app Camera Roll.
5. Tap the icon in the top-right corner to switch between the front camera and rear camera.
You can now take pictures of yourself.
6. Tap the Capture button, hold and release it to take another picture.
Alternately, you can use the volume rocker as a shutter release. Remember to smile!
7. To view the last photo taken, swipe to the left or tap the thumbnail of the latest image in the bottom-right corner of the screen (visible in Figure 4-2).
The Photos app opens and displays the photo.

Figure 4-2: The latest photo you took appears as a thumbnail.
8. Tap Done.
You return to the Camera app.
9. Tap the Home button to close the Camera app and return to the Home screen.
Printing photos
If you have a printer that’s compatible with Apple AirPrint technology, you can print photos. As of this writing, most major manufacturers offer printers that have this capability, and you can bet that Apple’s working with other manufacturers to provide more compatible choices. However, if you don’t want to spring for one of these models, you can also use apps such as Printopia and HandyPrint to provide this functionality to other printers on your network.
 If you don’t have access to this kind of wireless printer, when you plug iPad into your computer, you can sync both devices via iTunes.
To print a photo, do this:
1. With Photos open, maximize the photo you want to print.
2. Tap the Share icon and then tap Print.
The Printer Options dialog appears. (See Figure 4-3.)
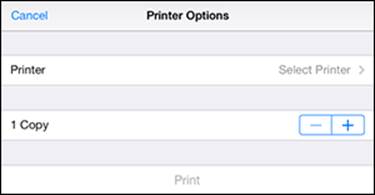
Figure 4-3: The Printer Options dialog.
3. Tap Select Printer.
iPad searches for a compatible wireless printer.
4. Tap the plus or minus signs in the Copy field to set the number of copies to print.
5. Tap the Print button.
Your photo goes on its way to your printer.
Playing around with Photo Booth
Photo Booth is a photo-manipulation app that goes hand in hand with the still camera built into the iPad (except for the original iPad) hardware. You can use this app to capture photos using various fun effects, such as Kaleidoscope and X-Ray. You can then copy or email photos from within Photo Booth.
Note that photos you take with Photo Booth open automatically and are saved to your Photos app’s Camera Roll.
Here’s how to take photos using Photo Booth effects:
1. Tap the Photo Booth icon on the Home screen.
The different possible effects that can be used in the current view of the camera appear. (See Figure 4-4.)
2. Tap an effect.
3. Tap the Capture button.
An image using that effect is captured. (See Figure 4-5.)
To return to the various effects, tap the Effects button in the bottom-left corner of the screen.

Figure 4-4: Effects from mild to wild.

Figure 4-5: My front hallway, with the Light Tunnel effect applied.
The image appears along with a filmstrip of all the images you’ve captured using Photo Booth.
4. If you want to delete a photo, tap the Share icon, tap a photo, tap the Trash button that appears, and then tap Delete Photo.
5. Press the Home button.
You return to the Home screen, and your photos are available in the Camera Roll folder of the Photos app.
Capturing Your Own Videos with the Built-in Cameras
In iPads, two video cameras that can capture video from either the front or rear of the device make it possible for you to take videos that you can then share with others.
To record a video, follow these steps:
1. Tap the Camera app on the Home screen.
The Camera app opens.
2. Tap and slide the line of words below the red Record button so that Video becomes the orange selection.
This step switches from the still camera to the video camera (as shown in Figure 4-6).
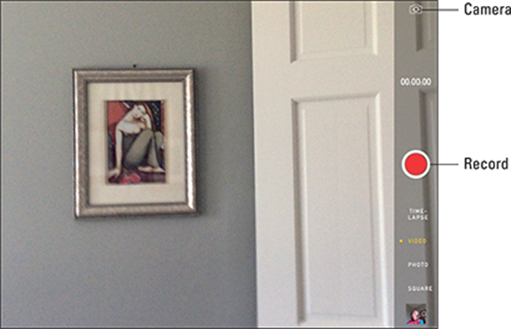
Figure 4-6: It takes one tap to move between camera and video.
3. If you want to switch between the front and rear cameras, tap the icon near the top-right corner of the screen (refer to Figure 4-6).
4. Tap the red Record button (refer to Figure 4-6) to begin recording the video.
The Record button turns into a red square when the camera is recording, as shown in Figure 4-7.

Figure 4-7: Use the Record button to begin and end shooting a video.
5. To stop recording, tap the Record button again.
A thumbnail link to your new video displays in the bottom-left corner of the screen.
6. Tap the video to play it, share it, or delete it.
In the future, you can find and play the video in your gallery when you open the Photos app.
 Before you start recording, make sure you know where the camera lens is (in the top-center portion of the device on the front and top-right side of the back when holding iPad in a portrait orientation) — while holding the iPad and panning, you can easily put your fingers directly over the lens!
Getting Face to Face with FaceTime
FaceTime is an excellent video-calling app that’s available on the iPhone 4 and later and is now available on iPads (except for the original iPad). The app lets you call people who have FaceTime on their iOS 5 or later devices using a phone number or an email address. You and your friend or family member can see each other as you talk, which makes for a much more personal calling experience.
In iOS 7, the ability to make audio-only FaceTime calls has been added. The audio quality beats a phone call by quite a bit, and the audio-only calls don’t require quite so robust a connection or use as much data bandwidth as a video FaceTime call does.
You can also show the person on the other end of the call your surroundings by using the rear iPad camera and panning around you. The possibilities are limitless: Show your husband the toy you’re thinking of buying your son for his birthday, let your girlfriend see your new car while she’s busy at work, or share your artwork or trip to the wine country with friends.
You can use your Apple ID and email address to access FaceTime, so after you install it, it works pretty much out of the box. See Book I, Chapter 5 for more about getting an Apple ID.
If you’re having trouble using FaceTime, make sure the feature is turned on. Tap Settings on the Home screen and then tap FaceTime. Tap the On/Off switch to turn it on, if necessary. You can also select the email and phone account that can be used to make phone calls to you on this Settings page.
Who can use FaceTime
Here’s a quick rundown of what device and what iOS you need for using FaceTime’s various features:
· FaceTime is available on all iPads except the original iPad.
· You can call people who have iPhone 4 or later, iPad 2 or later, fourth-generation iPod touch, or a Mac (running OS X 10.6.6 or later).
· You can use a phone number to connect with iPhone 4 or later.
· You can connect using an email address with a Mac, iPod touch, or iPad.
Making a FaceTime call
You can make and receive calls with FaceTime using a phone number (iPhone 4/4s/5/5s/5c) or an email account (iPad 2 or later, iPod touch fourth-generation or later, or a Mac running OS X 10.6.6 or later), and show the person on the other end what’s going on around you.
 If you have a Wi-Fi–only iPad and use FaceTime over a Wi-Fi network, that limits the places from which you can make or receive video calls to your home wireless network or a public hotspot. On the other hand, you avoid costly data usage over a 3G or 4G network with this setup even if you own a 3G/4G iPad model.
You have to use the appropriate method for placing a FaceTime call, depending on the kind of device the person you’re calling has. If you’re calling an iPhone 4 or later user, use a phone number the first time you call, and thereafter, you can use the phone number or email address; if you’re calling an iPad 2 or later, an iPod touch, or a FaceTime for Mac user, you have to make the call using that person’s email address.
You can’t adjust audio volume from within the app or record a video call. Nevertheless, on the positive side, though its features are limited, this app is very straightforward to use.
Follow these steps to use FaceTime:
1. Connect to a Wi-Fi or cellular (with iOS 6 or later) network.
See Book I, Chapter 5 for details on connecting.
2. If you know that the person you’re calling has FaceTime on an iPhone 4 or later, an iPad 2 or later, or a Mac, add the person to your iPad Contacts.
See Book V, Chapter 5 for how to do this if that person isn’t already in Contacts.
3. Tap the FaceTime app icon on the Home screen.
The first time you use the app, you may be asked to select the phone number and email account you want to use for FaceTime calls and then to click Next. The FaceTime screen appears.
4. ![]() Tap the Contacts button in the bottom-right corner of the screen.
Tap the Contacts button in the bottom-right corner of the screen.
5. Scroll to locate and tap a contact’s name.
The contact’s information displays (as shown in Figure 4-8).
You can also place a FaceTime call using Siri. Just say something like “Make a FaceTime call to Joey” and confirm Joey’s contact information, and the call is placed.
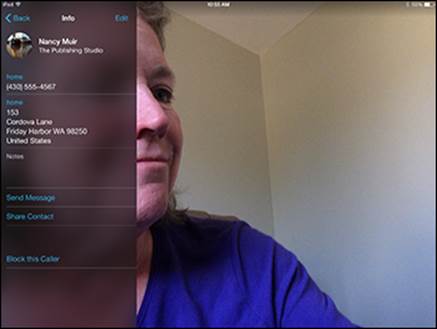
Figure 4-8: Information displayed in Contacts.
6. Tap the contact’s stored phone number or email address and then tap the Call button (shaped like a phone handset).
You’ve just placed a FaceTime call!
When you call somebody using an email address, the person must be signed in to his Apple ID account and have verified that the address can be used for FaceTime calls. iPad 2 or later and iPod touch (fourth-generation and later) users can make this setting by tapping Settings and then FaceTime; FaceTime for Mac users make this setting by choosing FaceTime⇒Preferences.
When the person accepts the call, you see the person’s image and a small, draggable box containing your image (referred to as a Picture in Picture, or PiP). (See Figure 4-9.)
You can also simply go to the Contacts app, find a contact, tap the FaceTime icon in that person’s record, and then tap her phone number or email address in the pop-up menu that appears to make a FaceTime call.
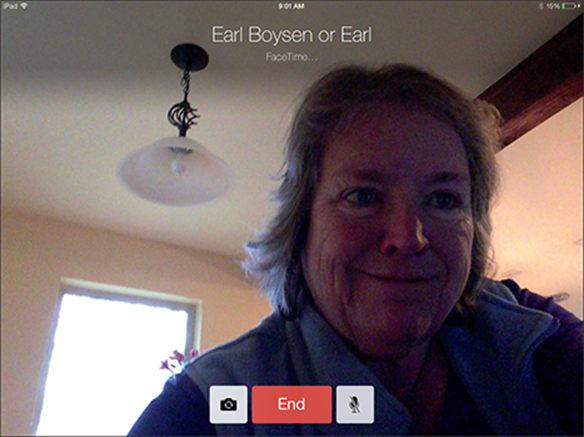
Figure 4-9: A FaceTime call in progress.
![]() To view recent calls, tap the Recents button (refer to Step 4). Tap a recent call to call the person back.
To view recent calls, tap the Recents button (refer to Step 4). Tap a recent call to call the person back.
Accepting or ending a FaceTime call
If you’re on the receiving end of a FaceTime call, accepting the call is about as easy as it gets. When the call comes in, follow these steps:
1. Tap the Answer button to take the call or tap the Decline button to reject it. (See Figure 4-10.)
If you want to decline the call and get a reminder to call back later, tap the Reminder button. You can choose to get a reminder in an hour or when you leave your current location. If you’d rather not answer but send a message to the caller, such as “Can’t talk right now” or “Call me later,” tap the Message button. If you do accept the call, chat away with your friend and tap the FaceTime button if you want to view video images.
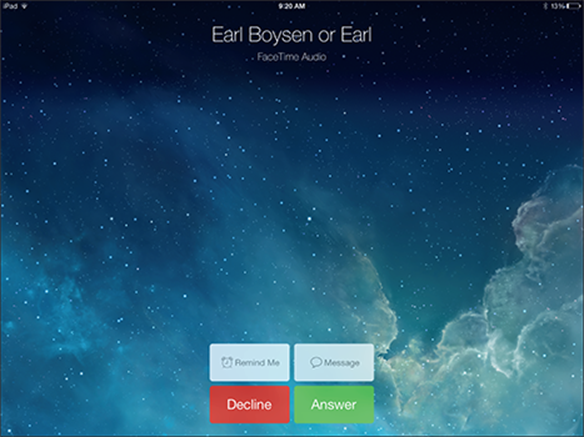
Figure 4-10: You’re it; accept or decline the call.
2. When you’re done talking, tap the End button (shown in Figure 4-11).
The call ends.

Figure 4-11: Ending a FaceTime call.
To mute sound during a call, tap the Mute button, which looks like a microphone with a line through it. Tap the button again to unmute your iPad or iPhone.
To add a caller to your Favorites list, with FaceTime open, tap the Favorites button (marked with a star icon), and then tap the plus sign and select the person’s name from the contact list to add the person to Favorites. You can then locate the person to make a call to her by tapping Favorites and choosing that person from a short list rather than scrolling through all your contacts.
Switching views
When you’re on a FaceTime call, you might want to use iPad’s built-in camera to show the person you’re talking to what’s going on around you. Tap the Switch Camera button (refer to Figure 4-11) to switch from the front-facing camera that’s displaying your image to the rear-facing camera that captures whatever you’re looking at (shown in Figure 4-12).
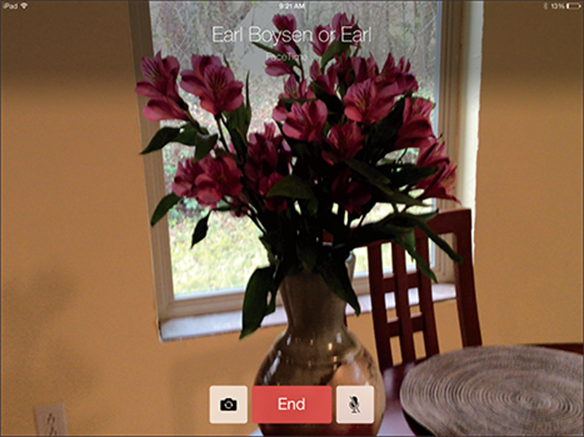
Figure 4-12: Show your friend what’s in front of you.
Tap the Switch Camera button again. You switch back to the front camera, displaying your image.
All materials on the site are licensed Creative Commons Attribution-Sharealike 3.0 Unported CC BY-SA 3.0 & GNU Free Documentation License (GFDL)
If you are the copyright holder of any material contained on our site and intend to remove it, please contact our site administrator for approval.
© 2016-2025 All site design rights belong to S.Y.A.