iPad All-in-One For Dummies, 7th Edition (2015)
Book II. Just for Fun
Chapter 5. Getting Social with Twitter, Facebook, and iMessage
In This Chapter
![]() Using Twitter or Facebook on iPad
Using Twitter or Facebook on iPad
![]() Creating an iMessage account
Creating an iMessage account
![]() Using iMessage to address, create, read, and send messages
Using iMessage to address, create, read, and send messages
![]() Deleting a conversation
Deleting a conversation
![]() Sending audio, video, and maps
Sending audio, video, and maps
Unless you’ve spent the last few years working in Antarctica without a radio, you know that Twitter is a social networking service referred to as a microblog because it involves only short posted messages. Twitter support is incorporated into the iPad’s iOS, so you can tweet people from within the Safari, Photos, Camera, Maps, and other apps.
The Facebook app can also be activated through Settings. Facebook, the most popular social networking site, is integrated into iPad. You can also post messages and items such as photos to your Facebook page right from within several apps.
Messages is an app used for instant messaging (IM). IM involves sending a text message to somebody’s iPhone, iPod touch, iPad, or Mac (using any phone number or email address that the person has registered to her iCloud account) to carry on an instant conversation. With iOS 8 comes a few new features for Messages, including the capability to opt out of certain conversations, leave group conversations, and share your current location.
In this chapter, I introduce you to ways in which iPad makes use of Twitter, Facebook, and instant messaging to let you stay connected to the world.
Experiencing Twitter and Facebook on iPad
Twitter and Facebook are the darlings of the social networking world. Twitter, as a microblog, allows you to post only short messages (up to 140 characters) called tweets. Facebook is much more robust, allowing lengthy postings as well as photographs, videos, and various gifting schemes to woo Facebook friends. The use of each is integrated into iPad, typically via the Share feature in apps. When you tap the Share button, you can tap the Twitter or Facebook button to share the selected content via those services, if you have installed their apps and enabled them in Settings (see Figure 5-1).

Figure 5-1: Use app-sharing features to tweet or post to Facebook.
Connecting your iPad to Facebook and Twitter
Facebook and Twitter are integrated into the sharing feature of iPad. When you’re in an app such as Maps and you tap the Share button, you can post an item, such as a map, to Twitter or Facebook. This integration is described in the next task.
Before you use these integrated features, however, you have to have an account on those systems, install the Twitter and/or Facebook app, and enter information about your accounts. Follow these steps to do this with Facebook:
1. Tap Settings and then tap Facebook.
2. In the settings that appear (see Figure 5-2), tap the Install button to install the app.
3. When prompted, enter your Apple ID and password.
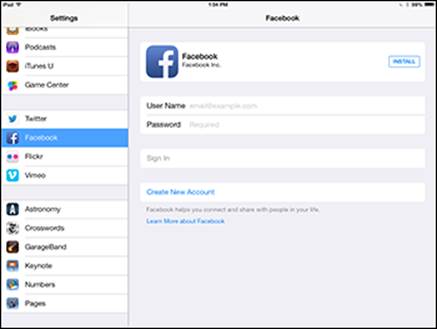
Figure 5-2: Tap the Install button, and the Facebook app appears on one of your many Home screens.
4. Enter your Facebook username and password and then tap Sign In.
5. On the confirming screen, tap the Sign In button.
 Note that signing into Facebook downloads all Facebook friends to your Contacts app and downloads any Facebook events to your Calendar app on iPad. You can turn off individual apps that use your Facebook account one by one in the main Facebook settings.
Twitter is a social networking service that involves posting very short messages (tweets; limited to 140 characters; an attachment such as a photo may limit this character count further) online so that your friends can see what you’re up to. The ability to tweet is integrated into several apps. You can post tweets using the Share button within Safari, Photos, Camera, and Maps. First, go to Settings and tap Twitter. Then tap the Install button and add your account information.
Many readers already have a Twitter account and are hooked on tweeting. If you’ve never tweeted, you can go to www.twitter.com to sign up with the service; then activate Twitter in Settings and use the Twitter for iPad app to manage your Twitter account. After you have an account, you can post tweets, have people follow your tweets, and follow the tweets that other people post.
Tweeting or posting to Facebook
When you have your Twitter account set up, you can be in a compatible app such as Safari, Photos, Camera, and Maps, and choose Twitter in the screen that appears when you tap the Share button. You see a Tweet form like the one shown in Figure 5-3. Just write your message in the form and then tap Send. Note that a number in the bottom-left corner lets you know how many characters you have left to use in your tweet.
To post to Facebook, just tap Facebook in the Share menu (refer to Figure 5-2), and follow pretty much the same procedure as for Twitter, except that you are allowed to choose who can see your posting: the general public, your friends, just you, or all friends (which includes friends of your friends).
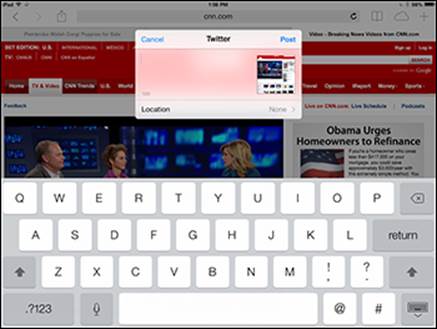
Figure 5-3: Tweeting is a simple menu choice in several apps.
See Book I, Chapter 6 or Chapters 3 and 6 in this minibook for more about tweeting in the Safari or Photos apps.
 When you’re filling in the tweet or Facebook posting, you can tap Location and then tap Enable in the dialog that appears to turn on Location Services, which allows Twitter to ascertain your location and share it with others. Be cautious about using this feature; if many people follow you on Twitter, they can use your location to track your movements and know where you live, where you go to school, where you socialize, and so on. This information can be used to commit a variety of online and offline crimes.
Setting Up an iMessage Account
iMessage is a messaging service that is available through the preinstalled Messages app that allows you to send and receive instant messages (IMs) to and from others using an Apple iOS device (and on your Mac, if you have OS X Mountain Lion or later).
Instant messaging differs from email or posting to Facebook in an important way. Whereas you might email somebody and wait days or weeks before that person responds, or you might post a comment to your Facebook timeline that could sit a while before anybody views it, instant messaging communication happens almost immediately. You send an IM, and it appears on somebody’s Mac, iPhone, iPod touch, or iPad right away; if the person wants to participate in a live conversation, that conversation begins immediately, allowing a back-and-forth dialogue in real time.
To set up iMessage, follow these steps:
1. Tap Settings on the Home screen.
2. Tap Messages.
The settings shown in Figure 5-4 display.
3. If iMessage isn’t set to On, tap the On/Off switch (shown in Figure 5-4) to turn it on.
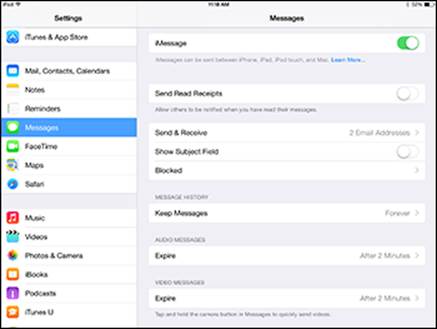
Figure 5-4: Turn on iMessage in Settings.
4. Check the Send & Receive setting to be sure that the email account associated with your iPad is correct.
This should be set up automatically based on your Apple ID.
5. To allow a notice to be sent to a sender to indicate that you’ve read a message, tap the On/Off switch for Send Read Receipts.
You can also choose to show a subject field in your messages.
6. If you want to include a subject field in messages, tap the On/Off switch for the Show Subject Field option.
7. Tap the Home button to close Settings.
Messages adds your iPhone’s number (if you have an iPhone using the same iCloud account) automatically as a location to which people can message you. Your iCloud email addresses are also added automatically. To add other email accounts for Messages to use, tap the Send & Receive button, tap Add Another Email, and then follow the directions to add another email account. To delete an account, tap the information button to the right of it, tap Remove This Email, and then confirm the deletion.
Using Messages to Create and Send Text, Audio, and Video Messages
Now you’re ready to use iMessage. This is a remarkably simple process that involves typing and sending a message and then waiting while the other person types and sends a message back. This can go on for hours, so prepare a quick exit message ahead of time, just in case. (I have to walk my dog, the cat just exploded … you get the idea.)
Sending text messages
If you just have words to share, text messages are the tried-and-true method. Follow these steps to use Messages to send a text-based instant message:
1. From the Home screen, tap Messages in the Dock.
2. If this is the first time you’re using Messages, on the screen that appears (see Figure 5-5), tap the New Message button to begin a conversation.
3. Address your IM.
You can address a message in a couple of ways:
· Begin to type a name, email address, or phone number in the To field, or tap the iPad’s Dictation key (not present on the iPad 2) on the onscreen keyboard and speak the address, and a list of matching contacts appears.
· Tap the plus icon to the right of the address field, and the All Contacts list displays, as shown in Figure 5-6.
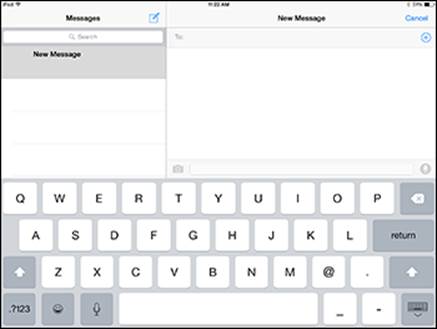
Figure 5-5: Get the conversation going here.
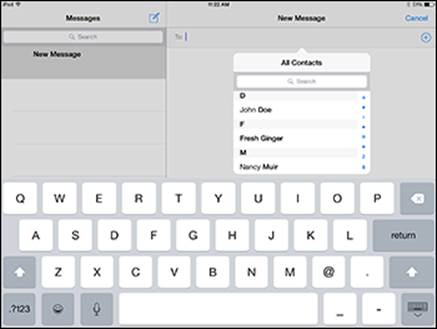
Figure 5-6: You can choose somebody to message from your Contacts list.
You can send messages only to people who have an iCloud account that includes an email address or phone number.
You can also use Siri (not present in iPad 1 or 2) to send a message by simply pressing and holding the Home button, speaking your command, and then selecting the correct contact and method of messaging (phone or email).
4. Tap a contact on the list you chose to display in Step 3.
If the contact has both an email address and phone number stored, the Info dialog appears, allowing you to tap one or the other, according to which method you want to use for addressing the message.
5. To create a message, simply tap in the message field near the bottom of the screen and type or dictate your message.
6. To send the message, tap the Send button.
When your recipient(s) responds, you see the conversation displayed on the right side of the screen, as shown in Figure 5-7. Tap in the message field again to respond to the last comment.
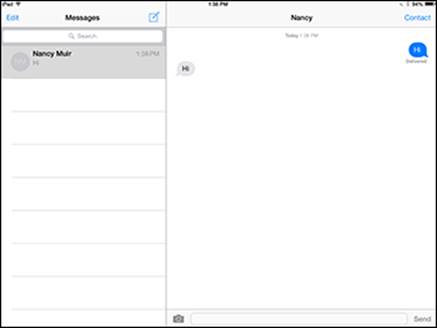
Figure 5-7: Follow the conversation as you and your friend text back and forth.
Here are some additional tips for using Messages:
· Talking with multiple people: You can address a message to more than one person by simply choosing more recipients in Step 4 in the preceding list.
· Canceling a message: If you begin a conversation and change your mind before sending your message, tap the Cancel button near the top right of the screen.
· Viewing a conversation: Your conversations are listed in the left pane of the Messages app. Tap one, and the various comments in it display, along with a note of the date and time of each comment.
Sending and receiving audio messages
With iOS 8, when you’re creating a message, you can also create an audio message. With Messages open:
1. Tap the New Message button in the top-right corner of the left pane.
2. Enter an addressee’s name, email address, or phone number in the To field.
3. Tap and hold the Microphone button (the microphone symbol to the right of the message entry field; see Figure 5-8).
4. Speak your message or record a sound or music near you.
5. Tap the Send button (an upward-pointing arrow at the top of the recording circle). The message appears as an audio track in the recipient’s Messages inbox. To play the track, she just holds the phone up to her ear or taps the Play button.
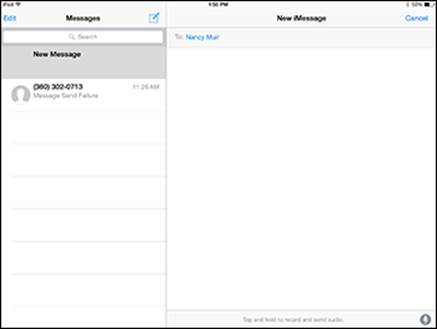
Figure 5-8: Tap the Microphone button.
Sending a photo or video
When you’re creating a message, you can also create a short video message, which can be a fun way to share your surroundings as well as your ideas. With Messages open:
1. Tap the New Message button in the top-right corner.
2. Tap the camera icon on the left of the message entry field; then, in the popover that appears (see Figure 5-9), tap Photo Library and select a photo.
You are returned to the message.
3. If you prefer to capture a photo or video, with the choices in Figure 5-9 displayed, tap Take Photo or Video and then tap the Capture button to take a photo.
Alternatively, you can move the slider at the bottom right to select Video. Move the phone around to take a video and tap the red Stop button when you’ve recorded what you want to record. Tap the Use Photo or Use Video button. Your photo or video is attached to your message.
4. To send multiple photos or videos, repeat Step 3 for each one.
5. Tap Send to send your message and attachments.
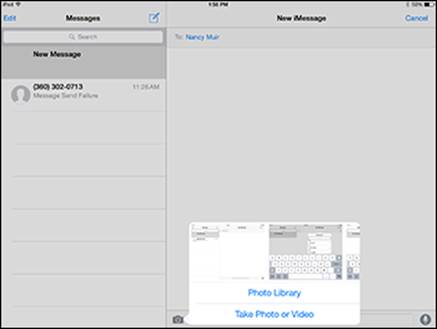
Figure 5-9: Use a photo you’ve already captured or take a photo or video now to send.
Sending a map of your location
 When sending a message, you can also send a map showing your current location by following these steps:
1. Tap a message that you’ve received and then tap Details.
2. Tap Send My Current Location (see Figure 5-10), and a map will be inserted as a message attachment. If asked, tap Allow Messages to Access Your Location.
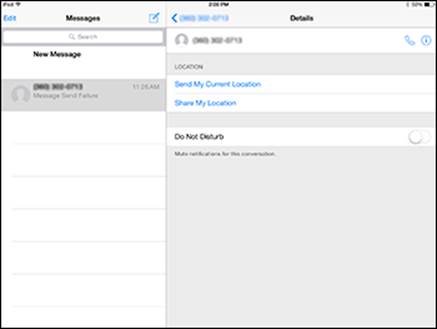
Figure 5-10: Choose to send your location to provide a map to the message recipient.
You can also share your location in the middle of a conversation rather than send a map attachment with your message. In the screen shown in Figure 5-10, tap Share My Location and then tap Share for One Hour, Share Until End of Day, or Share Indefinitely. A map showing your location will appear above your conversation until you stop sharing.
Clearing a Conversation
When you’re done chatting, you might want to clear a conversation to remove the clutter before you start a new one.
To clear a conversation, follow these steps:
1. With Messages open, swipe to the right on the message you want to delete.
2. Tap the Delete button next to any item you want to clear and then tap Delete. (See Figure 5-11.)

Figure 5-11: Get rid of yesterday’s IM with a tap.
Understanding Group Messaging
If you want to start a conversation with a group of people, you can use group messaging. Group messaging is great for keeping several people in the conversational loop. You can
· Create a group message simply by addressing a message to more than one person and sending it. The message and replies to it are delivered to everybody in the group.
·  When you receive a group message, you can manage your participation in the conversation by tapping the Details button. To temporarily mute notifications of responses to a conversation, set the Do Not Disturb switch to Off. Set Do Not Disturb back On to again receive contributions to the conversation. Tap Leave This Conversation to permanently exit the conversation.
All materials on the site are licensed Creative Commons Attribution-Sharealike 3.0 Unported CC BY-SA 3.0 & GNU Free Documentation License (GFDL)
If you are the copyright holder of any material contained on our site and intend to remove it, please contact our site administrator for approval.
© 2016-2026 All site design rights belong to S.Y.A.