iPad All-in-One For Dummies, 7th Edition (2015)
Book IV. Getting Productive with iWork
Chapter 2. Pages Has a Way with Words
In This Chapter
![]() Making changes to a Pages document
Making changes to a Pages document
![]() Toiling with text
Toiling with text
![]() Focusing on formatting with the ruler
Focusing on formatting with the ruler
![]() Setting advanced formatting options with the Format button
Setting advanced formatting options with the Format button
![]() Formatting the document
Formatting the document
![]() Using selection buttons
Using selection buttons
This chapter delves into the Pages app, which is the word-processing and page-layout tool in the iWork suite of apps. Pages gives you powerful tools for creating documents of all kinds.
In this chapter, I tell you how to work with text and text boxes, format a document, and use the simple-to-use Pages interface.
To find basic instructions for managing documents and sharing them via WebDAV, iCloud, email, or iTunes, see Chapter 1 in this minibook.
Editing a Pages Document
After you open a Pages document, you can edit it using the tools shown in Figure 2-1.
 To find out how to create a new Pages document, see Chapter 1 in this minibook.
When you tap somewhere within the text, the keyboard and tools shown in Figure 2-1 appear. When you tap an image, a toolbar offering Cut, Copy, Delete, and Comment tools appears. When you leave an iWork document for another app and then return to it, remember that you return to the same location you left.
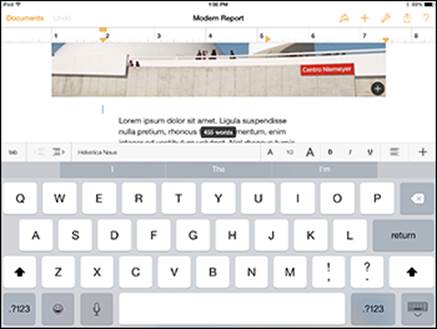
Figure 2-1: An open document with text tools displayed.
When a document is open, the Documents button is visible at the left of the toolbar, at the top of the screen; tap this button to return to the Documents window, where you can create a new document by tapping the button labeled with the plus sign (+).
When working on a multipage document, you can quickly move through the document by swiping up or down.
In Pages, you can touch and hold your finger anywhere at the right side of a page to bring up the navigator (shown in Figure 2-2), which shows a thumbnail of a page; you can move very quickly through the document by dragging up or down on the screen. When you’re on the page you want, just lift your finger off the screen. If you don’t want to leave the page you started from, swipe to the right to make the navigator disappear.
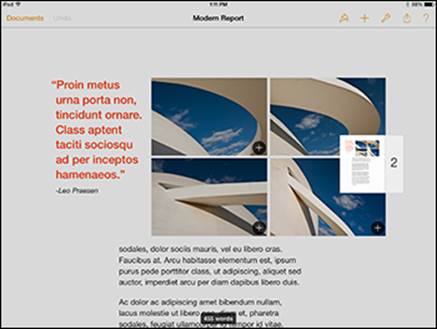
Figure 2-2: Using the navigator.
Working with Text in Pages
You can get a leg up on creating a document if you start from an iWork template (a template other than the Blank template, which is, well, blank). Even though you may see only a text placeholder in the template, the basic structure helps you get started. Templates appear when you tap the plus sign (+) on the Documents window to add a new document. Just tap a template to open it.
After you open a document, entering text is simple. You have four ways to start entering text:
· Type text. Tap the spot in the document where you want to enter text and start typing. You can use the onscreen keyboard or a wireless keyboard.
· Dictate text. Tap the Dictation key (not available on iPad 2) on the onscreen keyboard (the small microphone) and speak your text, including punctuation. Dictation also allows some simple commands such as “Next line.”
· Cut, copy, or paste text (or a combination). Use the cut, copy, and paste tools to cut text in your Pages document and move it to another location, or to copy text in any iPad app (for example, from a website accessed by the Safari browser) and paste it into your Pages document. You get these controls by pressing and holding on text to display a set of tools.
· Import text. You can use iTunes, iCloud, Mail, or cloud storage apps such as Dropbox to move existing documents to your iPad. You can create the documents on your Mac or PC by using tools such as iWork, Microsoft Office, or Google Apps. When the document is ready, import that file saved in .txt, Word, or Pages formats to your iPad as described in Chapter 1 of this minibook and continue working with the document using iWork for iPad. If you work on a document using iWork for iCloud with a browser from a PC or Mac, the document will automatically be saved both in iCloud and to all your iOS devices.
After you have text in your Pages document, you can start to manage it.
Setting Basic Formatting by Using the Ruler
As is the case in most word-processing programs, a ruler at the top of a page in document editing view lets you set basic formatting. The ruler can be hidden, but tapping in the document displays it, as shown in Figure 2-3. Tapping text also displays the keyboard with formatting tools along the top. You can also tap the Format button shaped like a paintbrush at any time to display the Formats dialog.
The ruler shows you the settings for whatever is selected in the document. Tap text in the document, and the ruler is immediately enabled and reflects the settings for the selection (in this case, the margins). Tapping in the document may also bring up the onscreen keyboard and a contextual set of tool buttons, as shown in Figure 2-3. You can use them to use features such as Cut, Copy, Delete, and Paste.
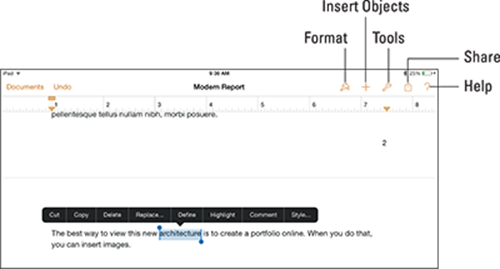
Figure 2-3: Displaying the ruler and formatting tools in Pages.
 Press and hold text to bring up a set of contextual buttons, a double-tap selects the word at the insertion point, and a triple-tap selects the paragraph and brings up slightly different selection buttons.
The formatting bar along the top of the onscreen keyboard provides basic formatting tools. The tools on the ruler that can be used on the selection (from left to right in Figure 2-4) are described in this list:
· Tab: Tap this button to set new tab stops.
· Indent: Tap either of the Indent buttons to indent text in one level or out one level at a time.
· Font: In Figure 2-4, the font is Helvetica Neue. Tap the font name to open a popover with a list of fonts to select from. Note that available fonts in Pages on iPad are fewer than in Mac or Windows programs, and you can’t add fonts as you can on a computer. So if a font isn’t supported on iPad, another font is substituted, which could affect layout and appearance adversely.
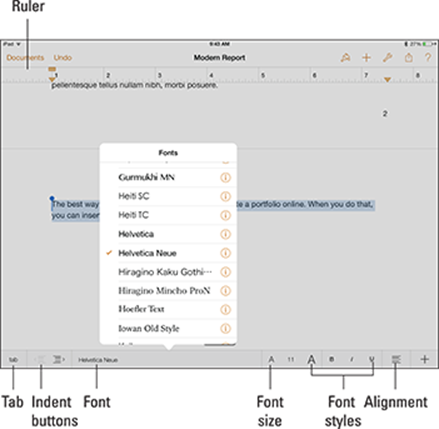
Figure 2-4: The ruler indicates settings for the current selection.
· Font Size: Tap the large A on the right to enlarge selected text by one point; tap the smaller A on the left to decrease the text size. By using the tool in the middle, you can set the font size to an exact number.
· Font Styles: You can choose bold, italic, or underlining.
· Alignment: The selected paragraph can be aligned to the left, center, or right, or justified so that both margins are straight with no ragged edges. You don’t have to select the paragraph with a triple-tap for alignment to work. If you have selected a word or an insertion point, the paragraph containing either item is the selected paragraph.
· Insert: Tapping the last button on the Formatting toolbar displays a menu of insertion commands including Comment, Link, Page Break, Column Break, and Footnote. (Link appears only if text is selected; Line Break appears only if no text is selected.)
Feel free to experiment with the formatting within your Pages documents, and remember that the Undo button in the upper left is there to help you out if you change your mind about an action you’ve taken.
You can also use the ruler to set the margins for paragraphs. Just slide the indicators along the ruler. Note that the top indicator for the left margin reflects the margin of the first line in a paragraph; the lower indicator is the left margin of all other lines in the paragraph. You can indent the first line of a paragraph, but you can also outdent it (or provide a hanging first line); an outdent works well in a list.
Getting and Setting Info about the Selection
The Format button on the toolbar at the top-right of the document opens a popover that provides settings in addition to those shown on the ruler. (See the preceding section.) When you select text and tap the Format button, you see a popover with three tabs along the top: Style, List, and Layout. Select a tab to access various formatting options, as I describe in the following three sections.
Setting character style: Font, size, and color
One setting that you can adjust by using the Format button is Style. Tap the Format button, and the popover shown in Figure 2-5 opens. (The Style tab in the top-left corner of the popover is selected by default.)
The powerful Style tab of the Format popover has a wide range of functionality. The topmost section lets you set the character style for the selected text. The character style is simply the set of styles applied to characters. The second section of the popover lets you set the paragraph style — the style for the entire paragraph in which the selection is set.
You can’t create your own paragraph styles in Pages for iOS, but you can use any you created in Pages for Mac. Pages for iOS retains styles from Pages for Mac documents internally so that they still work if you open the document back in Pages for Mac.
After selecting the characters you want to style, tap Format and then the current font setting in the popover. (It’s 14-point American Typewriter in Figure 2-5.) The popover shown in Figure 2-6 opens, and you can select another font, font size, or color for the font.
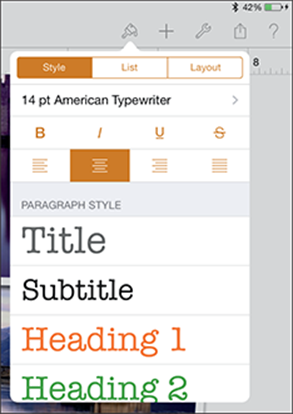
Figure 2-5: Use the Format button to set styles.
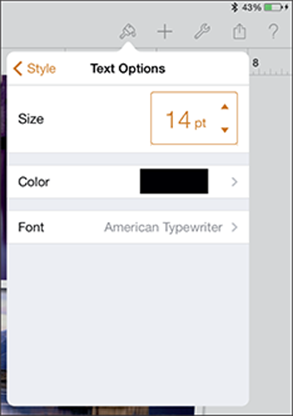
Figure 2-6: Adjust character styles.
Tap the color well (the swatch of color next to the word Color), and you can select a new color, as shown in Figure 2-7. You can tap one of the small circles at the bottom of this popover to display additional choices.
Creating indents and list styles
After you select a paragraph, tap the Format button and then, in the popover, tap the List tab to experiment with indentation and lists. The options shown in Figure 2-8 include arrow buttons at the top of the view that let you move the left margin in (indent) or out (outdent). You also can choose to make automatic numbering, lettering, or bullets available by choosing a list format.
When you add an element to the list or delete an element from it, Pages automatically renumbers the list for you.
Establishing alignment, columns, and line spacing
The Layout tab in the top-right corner of the Format popover lets you set layout options, as shown in Figure 2-9. These include the options for creating columns and adjusting line spacing.
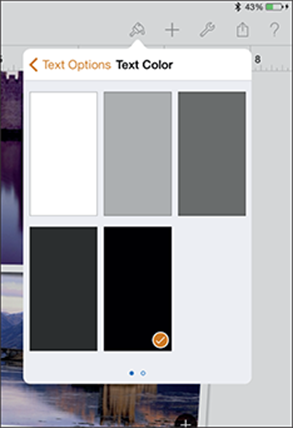
Figure 2-7: Change the font color.

Figure 2-8: Handle indents and lists.
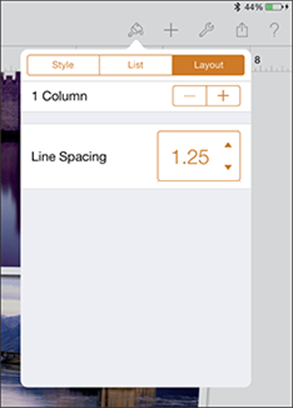
Figure 2-9: Adjust layout settings.
Formatting a Document
You can format the text in your document, but you should attend to one other type of formatting: formatting the document itself. It includes page headers and footers, page numbers, and backgrounds that appear on all pages. Here’s how to do just that:
1. Open a Pages document and tap Tools.
The Tools popover appears, as shown in Figure 2-10.
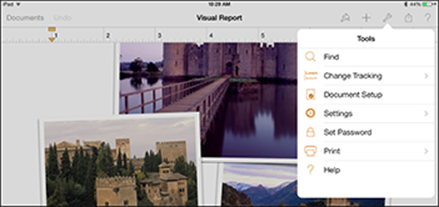
Figure 2-10: The Tools options.
2. Tap the Document Setup option.
You see a blueprint-like section that’s markedly different from the view you see when you edit an individual page. Note that this page will not rotate when you turn your iPad, it displays in portrait orientation only (see Figure 2-11).
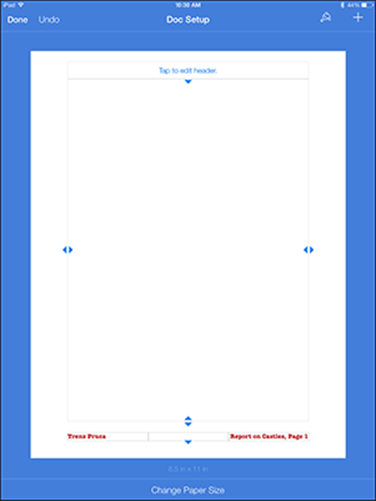
Figure 2-11: Set up your document.
3. Tap a header or footer to customize it.
You can use the three footer sections to insert the author’s name, a title, the version number, or the page number, for example.
4. Type some text in the section of the header or footer that you want to customize.
5. To add page numbers to your document, tap in the header or footer section that you want to use for the page number; then tap the Page Numbers button in the contextual menu that appears.
This contextual menu is displayed only when you tap a header or footer.
You can choose the format of the page numbers, as shown in Figure 2-12.
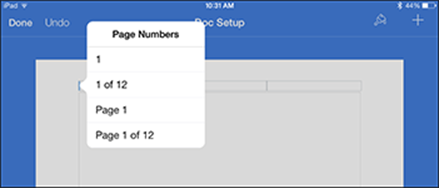
Figure 2-12: Insert page numbers.
6. Tap the style you prefer.
7. Set the outer limits of the area for the page content (as well as for header and footer) by dragging the lines, as shown in Figure 2-13.
These settings determine the printable area of your document on the page. Margins that you set using the ruler define this area.

Figure 2-13: Set the print margins.
8. Tap the Change Paper Size button on the bottom of the page and select a predefined paper size, as shown in Figure 2-14.
Tap US Letter to print on 8½ -x-11-inch paper or A4 to print on standard international letter paper.
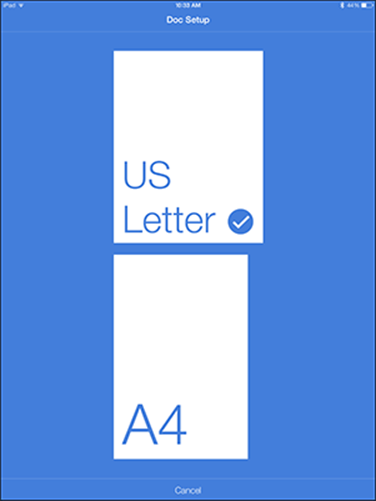
Figure 2-14: Select a paper size.
9. Tap Cancel if you decide not to change the page size and then Done to return to your document.
After your page is set up, you’re ready to finish entering text in your document and print it when it’s done.
Working with Selection Buttons
When you read this chapter from start to finish, you see various sets of selection buttons shown on the toolbar that appears whenever you press and hold in a document — and often shown with selected text. The buttons vary depending on which element is selected. Some selection buttons may look familiar to you from other apps that you may have used on the iPad and the Mac (as well as on other types of computers), including the Cut, Copy, and Paste commands.
When you select a chunk of text, you may also see these options:
· Delete: Delete the selected text or object.
· Highlight: Highlight selected text with a felt-tip marker effect.
· Comment: Insert a comment where you can enter a note about items in your document or comment on the work of others that you’re reviewing.
All materials on the site are licensed Creative Commons Attribution-Sharealike 3.0 Unported CC BY-SA 3.0 & GNU Free Documentation License (GFDL)
If you are the copyright holder of any material contained on our site and intend to remove it, please contact our site administrator for approval.
© 2016-2025 All site design rights belong to S.Y.A.