iPad All-in-One For Dummies, 7th Edition (2015)
Book IV. Getting Productive with iWork
Chapter 4. Presenting Keynote
In This Chapter
![]() Considering important issues before you create a presentation
Considering important issues before you create a presentation
![]() Working with Keynote
Working with Keynote
![]() Animating a presentation with transitions and builds
Animating a presentation with transitions and builds
![]() Preparing to present
Preparing to present
![]() Playing a presentation
Playing a presentation
Keynote, the first component created for iWork, was originally written for Steve Jobs to use in presentations at conferences and trade shows, including Apple’s Worldwide Developers Conference and IDG Worldwide’s Macworld conferences. After these “trials by fire,” Keynote was joined by Pages to become the first two components of iWork.
Presentation software is a different type of product in comparison to the other two iWork applications. It typically consists of content presented by a speaker (whether in person or in absentia) to an audience.
With Keynote you have a few presentation possibilities. Small-group or one-on-one presentations using iPads are made possible because you can easily present short but impressive presentations almost anywhere. In addition, you can connect the iPad to a projector or TV via a VGA adapter or HDMI adapter, and present to larger groups from a smaller machine. On iPad, you can also use the video-mirroring feature AirPlay and Apple TV to put your iPad display on your TV screen. If you choose to display a presentation to a single person or small group on the iPad itself and you have a third-generation (or later) iPad, you’ll find the Retina display a dazzling way to wow your audience.
In this chapter, you find out how to prepare and stage a presentation using Keynote. After adding text to slides and using animated transitions, you’ll soon have a sophisticated and useful presentation.
Concepts to Consider before You Create a Presentation
A presentation is meant to be viewed. A person (usually you, but sometimes the viewer) controls the pace of the presentation. Follow these tips when building a presentation:
· Weigh small-group versus large-group presentations. You have options on iPad in addition to the traditional model of presenting to a group. This model offers an opportunity for one-on-one presentations that you can give in almost any setting, such as a sales call in a client’s office. If you’re working on a small-group or one-on-one presentation, the text and graphics don’t have to reach across a ballroom to the viewer’s eye, so size elements on the slide accordingly.
· Make use of existing content. Keynote for iOS helps you easily transfer presentations between your iPad and your Mac via iTunes. It also syncs its content via iCloud. Sometimes, that’s the right thing to do. You can reuse the slides and rearrange them (possibly splitting a large presentation into many). Restructuring and rearranging an existing Keynote presentation that’s going to be presented to a small group rather than to a larger audience can be a good idea.
· Consider your canvas. When working on a presentation, you’re using a small canvas. A slide has much less space to hold information than does a piece of paper (or a spreadsheet page). No matter how large your audience, never overcrowd your slides.
· Avoid too much variety. Using too many graphical object styles (such as illustrations, photos, and line drawings) or too many font styles (such as bold and underline) can make for a choppy-looking presentation. Luckily, Keynote themes help you provide a cohesive and clean look for your presentation. Even though you may make small changes to text and add graphics, try to maintain an overall look and feel.
· Add movement to slides. You have options for movement (see the “Using Transitions and Builds” section, later in this chapter) that you don’t have with printed documents. You can add effects to transition from one slide to another. Experiment with the Keynote transitions and use them to help people understand your progress in the presentation. For example, you can use a transition to introduce a new topic.
Getting Started with Keynote on iPad
You get started with the Keynote app the same way you do with Numbers or Pages: Create a new document or open an existing one. The basic windows are the same, but Keynote has some minor differences. This section is your guide.
Navigating the Keynote screen
When you open (or create) a Keynote document (which is always presented in landscape orientation), the basic Keynote screen appears, as shown in Figure 4-1. The name of the document is centered on the toolbar at the top. At the left, the Presentations button returns you to the Documents window, where thumbnail images represent the first page of each of your saved files.
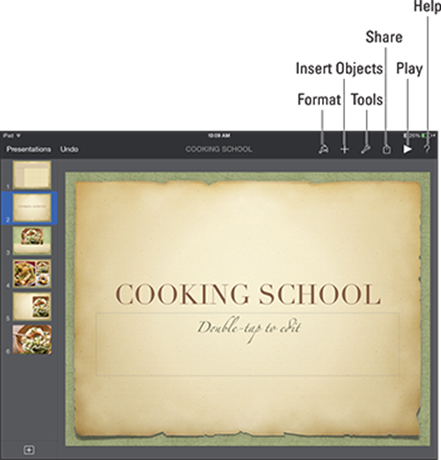
Figure 4-1: The basic Keynote screen.
On the right side of the toolbar (refer to Figure 4-1) are the usual buttons. The buttons, from left to right, are described in this list:
· Format: As always, this button lets you modify the selected object or objects. Your choices depend on which type of object is selected. (If nothing on the slide is selected, the button is grayed out.)
· Insert Objects: Lets you insert media such as photos, tables, charts, and shapes, as shown in Figure 4-2.
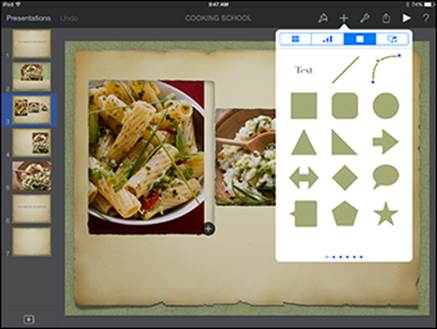
Figure 4-2: Insert objects into slides.
· Tools: Shows you the popover you see in Figure 4-3. You can use various tools to add transitions and builds, find text in the presentation, work with Presenter Notes and presentation tools, work with Keynote’s internal settings, set a password to protect the Keynote document, print, or go to Help for assistance using the application.
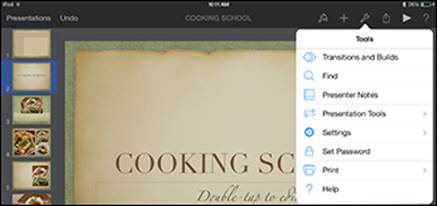
Figure 4-3: Use the Keynote tools.
· Share: Share by using iCloud; sending a copy via AirDrop, Message, or Mail; or opening the presentation in another app in a format such as PDF or PowerPoint.
· Play: Use this button to play your presentation on your iPad screen; if you have an external display adapter or Apple TV enabled in the Control Center, the slides appear on the display while the iPad screen shows the controls.
Tap Settings on the Tools menu to access the following tools (see Figure 4-4):
· Check Spelling: Turn on this option to have Keynote alert you to spelling issues as you type.
· Slide Numbers: This option lets you turn slide numbers on and off. Just as with pages of a Pages document, you should let the app handle the numbering so that the slide (or page) numbers are correct even if you move elements around, delete slides, or add slides.
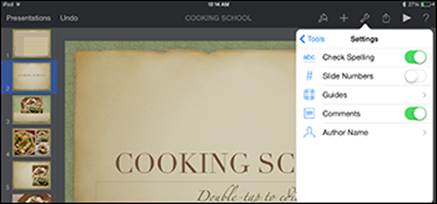
Figure 4-4: Use the advanced tools in Keynote.
· Guides: The Guides option on the Advanced menu makes a setting available to display guidelines that appear as you move an object toward the center of the slide or other objects, at the edges of the slide, or in 10-percent increments horizontally and vertically along the slide. You can choose which style of guide you want to appear.
· Comments: Tap this selection to turn Comments off or on. When you turn them on, small yellow sticky notes appear in a presentation wherever there’s a comment.
· Author Name: Tap this option to enter a name for Keynote to use in any comments you insert (see Figure 4-5).
 One difference between Keynote and the other iWork apps is that it always appears in landscape (horizontal) orientation; as you rotate the iPad, the image doesn’t rotate because the slides are all designed to be shown horizontally. It isn’t a Keynote limitation as much as a nod to the realities of projectors and other displays.
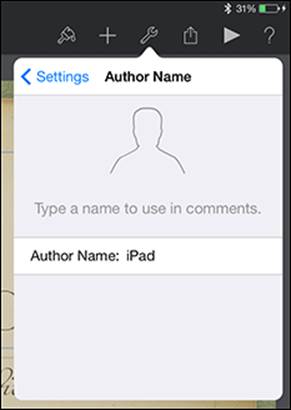
Figure 4-5: Provide an author name for your presentation and comments.
On the left side of the screen, in the navigator, are thumbnail views of the slides in your presentation. To go to any slide in your presentation, just tap its thumbnail.
Creating your first Keynote slide and adding text
The templates in all iWork apps provide you with useful starting points. In Keynote, you’re almost certain to find prebuilt slides you can use, and then it’s only a matter of organizing your own data. To create a presentation, follow these steps:
1. Tap Keynote on the Home screen.
2. On the Documents window, tap the plus sign (+) to create your new presentation from a template or from another presentation, as described in Chapter 1 of this minibook.
3. Tap the Standard or Wide tab, depending on the appropriate scale of slides for your presentation, and then tap a theme to use it on your new presentation.
A new presentation based on that theme opens.
4. Double-tap a text placeholder on the slide to edit it.
The text placeholder opens for editing and the onscreen keyboard appears.
5. Enter any text you want and then tap the slide itself or the Hide Keyboard key in the bottom-right corner of the onscreen keyboard to close the keyboard when you’re done.
Formatting text
With Keynote — perhaps more than with the other iWork apps — it’s more fill-in-the-blanks than fuss around with formatting. You can get right to work. The font is determined by the theme you choose, but you can modify its size and add effects such as bold and italic. Here’s how:
1. Double-tap text to select the type you want to change.
2. Tap the Format button, and from the various tabs of the Format popover, choose a text style option (Title or Subtitle, for example), and tap any of the formatting choices (Bold, Italic, Underline, or Strikethrough) to apply them to the selected text.
3. Tap anywhere else on the screen to hide the Format popover.
Adding a new slide
To add a new slide, tap the plus sign (+) in the lower-left corner (see Figure 4-6) and choose the style of slide from the gallery that appears. Want to add a bulleted list? Just choose a slide style with a bulleted list already on it.
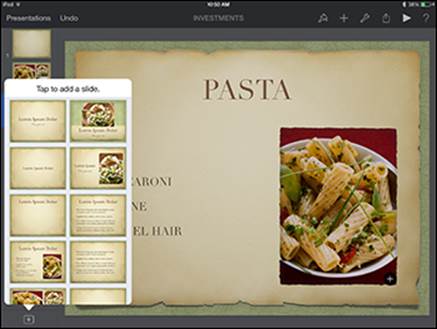
Figure 4-6: Add a new slide.
 You can choose the layout for the slide you’re adding from the thumbnails shown in the popover. As Figure 4-7 demonstrates, the layouts for new slides vary from template to template.

Figure 4-7: Slides vary by template.
Adding media
Themes provide image placeholders for some slides. To change a placeholder image, simply tap the Insert Objects button (shaped like a plus sign) in the lower-right corner of the current image. A popover opens, showing the various albums in the Photos app. Locate an item and tap to insert it.
If you want to add an image outside a placeholder, make sure that no placeholder is selected and then tap the Insert Objects button. Tap any of the four tabs: Tables, Charts, Shapes, or Media. Choose the item you want to insert, and it appears on your slide.
You can now tap and move the object around with your finger. Keynote provides the coordinates for precise positioning and also provides you with guidelines as you align the object with the center of the screen or the edge of another object via rulers on the top and left side of the screen. To resize an object, drag a corner handle until it’s the size you want and then let it go.
Managing slides
Tap a slide in the navigator to select it. Tap the slide again to bring up the selection buttons shown in Figure 4-8. You can now take an action; for example, tap Delete, and the slide is gone. (Remember, if you make a mistake, just tap Undo at the top left of the screen.) The Transition button brings up a selection of transition effects to apply (see the next section for more about this).
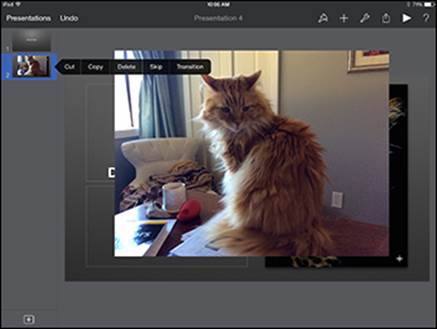
Figure 4-8: Delete a slide.
You can also use the contextual menu’s selection buttons to cut, copy, and paste slides. After you have cut or copied a slide (tap it twice and then tap Cut or Copy), tap the slide after which you want it to appear, and then tap Paste. (You always paste the contents of the Clipboard after the slide you select.)
Another option appears in the selection buttons: Skip. It collapses the selected slide in the navigator into a thin line. When you play the presentation, the slide is skipped over. The thin line in the navigator is big enough for you to tap it to bring up its selection buttons: Tap the Don’t Skip button to bring the slide back to full size and include it in the presentation.
Select the slide from the navigator. If you tap the slide itself, the selection buttons act on the selected object within the slide.
Using Transitions and Builds
You can enliven a presentation and make it a better communication tool by using Keynote animations to animate the transition as you move from one slide to another. You can also use animations to build a slide. Building refers to the process of applying an animation effect that controls how each bullet or another object within a single slide appears onscreen. The process of creating transitions and builds is much the same, and I cover them in this section.
A little animation is a good thing. Feel free to try all the options, but then decide which one — or maybe two — you want for your presentation. Too many animations are distracting and compete with the content you’re presenting, unintentionally becoming the focus for the audience.
Working with transitions
Tap a slide and then tap Transition from the toolbar that appears (refer to Figure 4-8). Tap a transition effect, such as Clothesline. Tap the Options tab to make transition settings. To preview the transition, tap Play.
Transitions can work on slides as a whole or work on parts of slides; when they work on parts of slides, they’re often called builds. Note that a transition consists of two parts:
· Effects: These are the visual effects that are displayed.
· Options: Options include the direction in which the animation moves as well as whether it starts in response to a tap or when a previous transition is finished. Options also include the duration of the transition or the amount of delay before it starts.
Though a transition may appear to happen between two slides, it happens after you tap a slide to go to the next one. The transition is attached to the first slide in the sequence of two adjacent slides.
Here’s how to build a transition:
1. In the navigator on the left side of the screen, press and hold the slide for which you want to build a transition and tap Transition in the tools that appear.
The list of transition effects appears in a popover, as shown in Figure 4-9. A number of transition effects are available; swipe up and down to see them all. (The list of transitions is controlled by the Effects button at the bottom-left corner of the popover.)
2. When you find a transition effect that interests you, tap the name and then tap Play to select it and see a preview.
3. Tap the Options button in the bottom-right corner of the popover (see Figure 4-9) to set the effect options, as shown in Figure 4-10.
4. Set the duration and when the effect should start.
If you want the effect to start after a delay of a certain duration, use the Delay setting.
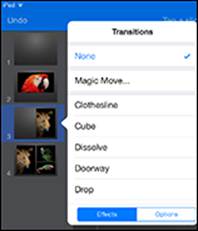
Figure 4-9: Choose an effect.
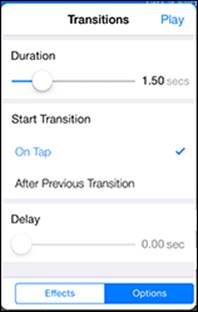
Figure 4-10: Set the duration and start.
5. Continue to change the effects and options until you’re satisfied.
Options vary depending on the effect you’ve selected. You’ll probably want to try the combinations by tapping the Play button in the upper-right side of the popover several times.
6. Tap Done in the upper-right corner of the screen to apply the transition and return to the navigator.
After you apply a transition effect to a slide, the Transitions button appears next to the slide whenever you select that slide in the navigator (see Figure 4-11). You can tap the Transition option to open the Transitions popover to edit the effect.
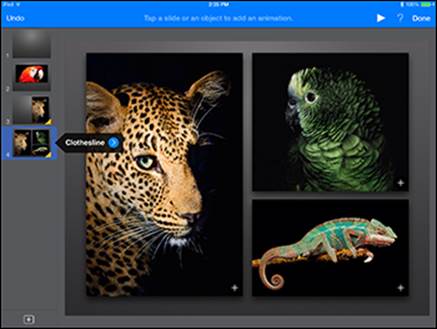
Figure 4-11: The effect is indicated on the slide in the navigator.
Working with builds
Builds are much like transitions except, rather than occurring between slides, they work when elements within a single slide are displayed and control how those elements appear on the slide. For example, you might build a bulleted list displaying one bullet at a time. Here’s how to set a build:
1. In the display portion of the screen, tap the object you want to build.
Each object can have two sets of builds: effects used when the object appears and an effect when it disappears.
2. Tap to choose the type of build you want to apply — either a build-in or a build-out, as shown in Figure 4-12.
3. Select the build effect you want to use, as shown in Figure 4-13.
As with slide-to-slide transitions, as soon as you select an effect, tap the Play button and the effect previews for you.
4. Tap the Options button at the bottom of the popover to set options, as shown in Figure 4-14.
You can begin the build when you tap or after the previous object appears. You can also set a delay in seconds before the next step in the build begins. Note that a number in a yellow circle is created on the object you’re applying the build to; you can tap the number later to go back and change the effect or options.
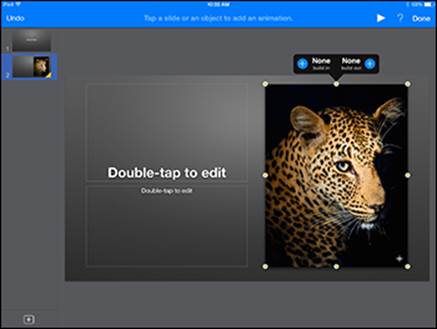
Figure 4-12: Set builds for an object.
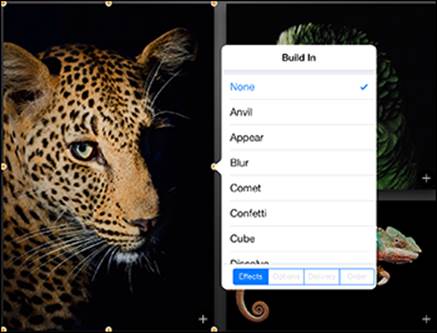
Figure 4-13: Select the build effect.
5. Tap the Delivery button at the bottom of the popover to select whether the build happens all at one time or with the addition of each component.
Depending on what the selected object is, this step can build each item in a bulleted list separately or each wedge in a pie chart in sequence. (Delivery options are not available if they don’t apply.)
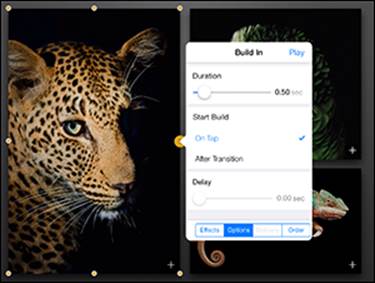
Figure 4-14: Choose an option.
Managing multiple builds on a single slide
As you create builds, each one is numbered. The numbers appear in small, yellow circles as soon as you have chosen an effect. You can manage the sequence of these builds. To do so, follow these steps:
1. Select the appropriate slide, tap the Tools button, and then tap Transitions and Builds.
You see the yellow circles around the numbers of the builds on that slide (see Figure 4-15).

Figure 4-15: Numbers in yellow represent builds on an object on the slide.
2. Tap any build to edit it using the techniques you used to create the build.
See the previous section.
The yellow circle for a build is shown in Figure 4-16. You can see two transitions for the selected object. In this case, transition 2 is the build-in, and transition 1 is the build-out. (That happens to be the order they were created in, but they don’t have to be in that order.) Thus, you can separately tap either transition number to change its settings or even delete it if you’ve gone transition-crazy.
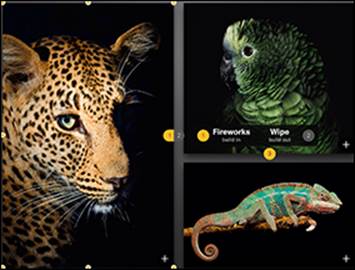
Figure 4-16: Edit an existing build.
3. To reorder the builds, tap a build number and then tap the Order button in the bottom-right corner of the popover (see Figure 4-17).
Drag builds to arrange them in the order you want them executed (see Figure 4-17). The numbers automatically change. Keynote picks up identifying text, such as the title, so that you can keep them straight.
4. Tap the Play button in the top-right corner of the popover to test the builds.
5. When you’re satisfied, tap Done.
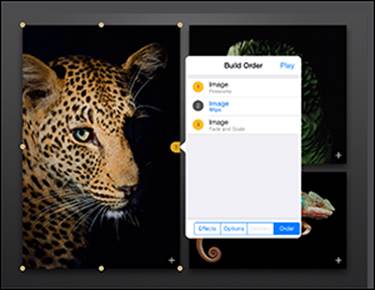
Figure 4-17: Set the build order.
Preparing to Present
After you’ve dotted every i and crossed every t in your presentation, added all the great ideas you’ve been storing in your brain, and tweaked the animations, your presentation is done. However, you still have to prepare to present your presentation.
Using a projector
The cable known as the Lightning to VGA Adapter ($49 from the Apple Store) connects your iPad to any VGA device, such as a projector. With it, you can use Keynote to give your presentation. There’s also a $39 version for older iPad Dock connectors.
The Digital AV Adapter cable accessory is available for $49 for the Lightning version and $39 for the Dock version. You can use it to connect to devices such as HDTVs and many projectors that have HDMI connectors.
When you connect a projector (or any other type of display) to your iPad with the HDMI or VGA adapter, the Keynote app can sense that it has a second display. It uses this display when you start a slideshow in the Keynote app. (See the “Playing Your Presentation” section, later in this chapter.) While it’s sending the presentation to the external display, it lets you control it from your iPad. Figure 4-18 shows what you see on the iPad as it plays a presentation on an external display.
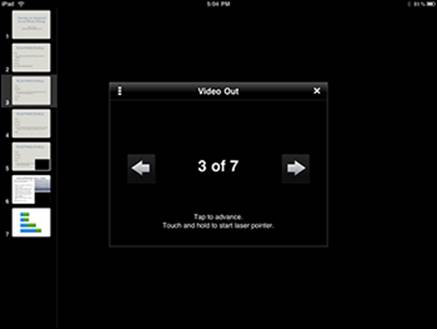
Figure 4-18: Control a presentation on an external display.
The slides appear on the external display, but you can control the presentation using your iPad. On the left side of the screen, a navigator shows thumbnail images of your slides. Being able to see the next slide helps you transition to it elegantly without shuffling papers and distracting your audience and yourself. You can tap the arrows in the center of the iPad screen to move forward and backward among slides.
You can also mirror or stream what’s on your iPad screen using an Apple TV connected to your HDTV’s HDMI port.
Mirroring shows what’s on your screen, such as a Keynote slide. You can zoom in and out and rotate your screen on your iPad, and that’s what you’ll see mirrored on your TV. As you move through your Keynote presentation on your iPad, the presentation on the TV changes right along with it.
Using nanopresentations
iPad is a game-changer in many ways. Its size (and therefore its portability) and its remarkably clear screen (especially on third-generation or later iPads with Retina display) are only two of its features that open great new opportunities. Keynote for iOS can help you take advantage ofnanopresentations (presentations you make one-on-one or to a small group of people).
Whether you’re used to presentations as a presenter or an audience member, you’ll probably be pleasantly surprised at how well presentations to small groups can work. Perhaps the most interesting difference is the simplest one: Because the speaker can sit down and join the audience around a table, in a circle, or in a group of chairs, the speaker/audience or teacher/student paradigm of many presentations is immediately broken — and this can be a breath of fresh air. It certainly seems to make discussions and audience questions livelier.
For presentations to large (or even medium-size) groups, your iPad and a projector work well. But for a smaller group, a projector is often a bit of overkill. You can use your iPad for a presentation to a few people seated around a table or — to be more iPad-like — seated or standing anywhere they want.
Think about the possibilities. If you’re selling something that’s not easy to carry around, a photo album on your iPad is a helpful way to show prospective customers what you’re talking about. But a Keynote presentation — even a handful of slides shown one-on-one — can be much more effective and impressive than a photo album or brochure.
Are you canvassing door to door for a politician or a cause? Again, a Keynote presentation of perhaps half a dozen slides can present the issue with pictures, text, and diagrams. You can even hand a printed version of the presentation out for people to ponder after you’ve gone. You can fill in the gaps and answer questions, but it’s certainly more effective than knocking on a door and asking whether you can come in and set up a computer and a projector.
 One great advantage of nanopresentations is that instead of talking to a large group that’s sitting in the dark, you’re presenting to a few people sitting around a table or on a sofa with you. People generally don’t have enough time to doze off or become distracted.
Great presentation pointers
Here are a few presentation pointers:
· Avoid the dark. If you’re using a projector, use the least possible amount of room-darkening for your presentation. Make certain you can see your audience.
· Use question-and-answer sections. Use frequent, short Q&A sections in your presentations to involve your audience as much as possible.
· Use a road map. Let people know where they’re going in your presentation and where they are at any moment. When you’re reading a book, the heft of the unread pages gives you an idea of how far you’ve come. With a presentation, one slide after another can come out of the dark with no clue to how each one fits into the presentation.
· Use big font sizes. Have you ever looked closely at the presentations given by the late Steve Jobs and others at Apple? Consider using 60 points for the font size. Whether you’re creating your Keynote presentation on a Mac or an iPad or using iWork for iCloud with your browser, you’re probably close to the screen. Your audience will be far away (even if you’re just sitting across a table from them). In addition, you may have become accustomed to using font sizes that print well. Those font sizes are smaller than sizes that appear well on a screen. Go big.
· Buy a dock or cover for your iPad that acts as a stand. Several iPad cover options let you prop up your iPad display so that somebody sitting across from you can get a good view of its screen. Check out the Apple iPad accessories section in the online store, or search for iPad covers at a search engine and find one that appeals to you.
· Check out the physical setup. Leave time to check out your equipment and space before the presentation to make sure everything works properly.
Playing Your Presentation
After you prepare all the elements in your presentation, little remains to do when you want to play it. Tap the Play button at the right side of the toolbar to begin playing. The transitions and builds happen automatically.
Tap to advance to the next slide. If you’re using an external monitor, tap the Next and Previous buttons. (Refer to Figure 4-18.)
If your presentation contains hyperlinks, simply tap to open them in Safari on iPad. (Keynote automatically detects hyperlinks by the presence of an Internet schema, such as http://.)
The Keynote app has a built-in laser pointer, so to speak: Tap and hold the iPad screen, and a red pointer appears on the display along with a set of pointers that use other colors. (If you’re using an external display or projector, it appears on that display as well.) You can then emphasize parts of the slide to the audience. One advantage of this method is that you can continue to face your audience while pointing out details on the slides. The alternative is to walk over to the slide, turn your back on the audience, and point — not an outstanding idea. (Audience members sometimes sneak out the moment you turn your back.)
All materials on the site are licensed Creative Commons Attribution-Sharealike 3.0 Unported CC BY-SA 3.0 & GNU Free Documentation License (GFDL)
If you are the copyright holder of any material contained on our site and intend to remove it, please contact our site administrator for approval.
© 2016-2025 All site design rights belong to S.Y.A.