iPad All-in-One For Dummies, 7th Edition (2015)
Book V. Using iPad to Get Organized
Chapter 4. Working with Reminders and Notifications
In This Chapter
![]() Adding a new task in Reminders
Adding a new task in Reminders
![]() Editing a task
Editing a task
![]() Scheduling and displaying reminders
Scheduling and displaying reminders
![]() Making a new list
Making a new list
![]() Syncing with other devices and calendars
Syncing with other devices and calendars
![]() Completing or deleting a reminder
Completing or deleting a reminder
![]() Managing notifications from Notification Center
Managing notifications from Notification Center
![]() Using Do Not Disturb
Using Do Not Disturb
The Reminders app and the Notification Center feature warm the hearts of iPad owners who need help remembering the details of their lives.
Reminders is a kind of to-do list that lets you create tasks and set reminders so that you don’t forget important commitments. Notifications let you review all elements that you should be aware of in one place, such as new mail messages, text messages, calendar appointments, reminders, and alerts.
If you occasionally need to escape all your obligations, try the Do Not Disturb feature. Turn this feature on and you won’t be bothered with alerts till you turn it off again.
In this chapter, I tell you how to set up and view tasks in Reminders, and I explain how Notification Center can centralize all your alerts.
Creating a Task in Reminders
Reminders help you stay on schedule, avoid embarrassing missed appointments, and stay on top of your hundreds of errands each and every day. Creating a task in Reminders is pretty darn simple.
 Note that when you first begin to use Reminders, you’ll have only the Reminders list to add tasks to. However, you can create your own categories of reminder lists; see the “Creating a List” section, later in this chapter, to find out how to do this.
To create a reminder, follow these steps:
1. Tap Reminders on the Home screen.
2. On the screen that appears (see Figure 4-1), tap a blank slot in any category in the displayed list to add a task.
The onscreen keyboard appears.
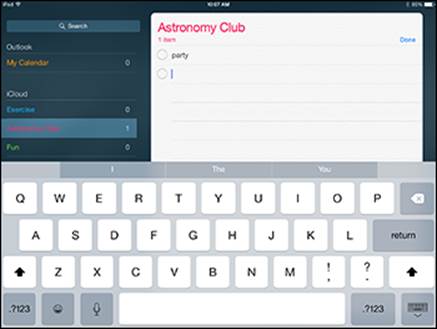
Figure 4-1: Add a reminder task.
3. Enter a task name or description using the onscreen keyboard and tap the Done button.
The new task is added to the Reminders list.
You can create reminders using Siri. Just press and hold the Home button till Siri asks what you need to do, and then say something like “Create a reminder to call Mom this Thursday at noon.” Siri displays the reminder and asks you to confirm that you want to create it. Just say, “Yes,” and it’s done.
See the next task to discover how to add more specifics about an event for which you’ve created a reminder.
Editing Task Details
What’s a task without the details? For example, try to remember the task Pick Up Grammy Award without having a few notes to specify when and where and what you should wear. Reminder tasks help get you where you need to be when you need to be there.
To edit a task and add details, follow these steps:
1. Tap a task and then tap the Details button (it looks like a small i ) that appears to the right of it to open the Details dialog (see Figure 4-2).

Figure 4-2: Add the information you need about a particular event in this dialog.
2. Tap a Priority.
Choose None, Low, Medium, or High from the choices that appear.
The Notes priority settings display the associated number of exclamation marks on a task in a list to remind you of its importance.
3. Tap List and then, from the options that display (see Figure 4-3), select a list to put your task on.
4. Tap Details to return to the dialog and then tap Notes.
5. Using the onscreen keyboard, enter a note about the task.
6. Tap Done when you’re finished entering details.
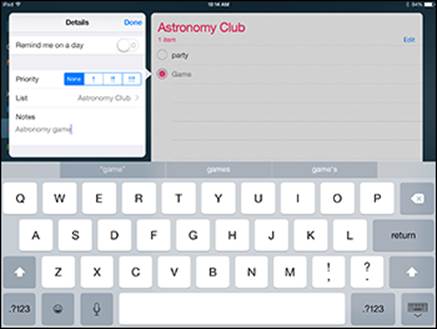
Figure 4-3: Your event can be viewed in the Reminders app.
Scheduling a Reminder
A major feature of Reminders, given its name, is to remind you of upcoming tasks. After you’ve saved a task, you can set a reminder for it.
To set a reminder, follow these steps:
1. Tap a task and then tap the Details button that appears to the right of the task.
2. In the dialog that appears, tap Remind Me on a Day to turn the feature on.
3. Tap the Alarm field for the On a Day field to turn it on.
A list of dates and times appears.
4. Tap the date that appears below this setting to display the date and time, as shown in Figure 4-4.
5. Tap and swipe the Day, Hour, and Minute fields to scroll to the date and time for the reminder.
6. Tap the Done button.
The settings for the reminder are saved.
If you want a task to repeat with associated reminders, tap the Repeat field, and from the Details dialog that appears, tap Every Day, Week, 2 Weeks, Month, or Year (for annual meetings or fun-filled holiday get-togethers with the gang). Tap Done to save the setting. To stop the task from repeating, tap the End Repeat field, tap End Repeat Date, and select a date from the scrolling calendar.
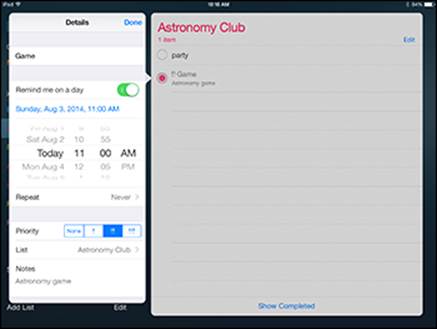
Figure 4-4: Scroll to set the date and the time of your event.
You can scroll the monthly calendar display to show months in the past or future by tapping the forward or backward arrows, and tap any date to show its tasks in the daily list on the right.
Creating a List
You can create your own lists of tasks to help you organize different parts of your life. To do so, follow these steps:
1. Tap Reminders on the Home screen.
Reminders opens.
2. Tap Add List to display the New List form, shown in Figure 4-5.
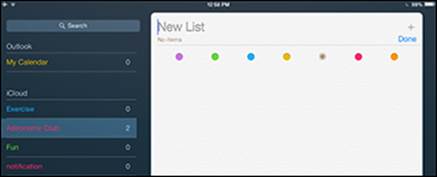
Figure 4-5: Lists might include reminders for personal or work-related events.
3. Enter a name for the list and tap a color.
The list name will appear in that color in List view.
4. Tap Done to save the list.
5. Tap a blank line to create a task in the list.
Syncing with Other Devices and Calendars
You can determine which tasks are synced to your device from other devices or calendars such as Outlook in Windows or Calendar on a Mac. To make all the settings in this task work correctly, first set up your default calendar and then set up your iCloud account under Accounts in the Mail, Contacts, Calendars settings.
After you’ve made these settings, follow these steps to sync with other devices and calendars:
1. Tap Settings on the Home screen.
2. Tap iCloud.
3. Make sure that in the pane on the right, both Calendars and Reminders are set to On. (See Figure 4-6.)
4. Tap Mail, Contacts, Calendars and scroll down to the Calendars category of settings.
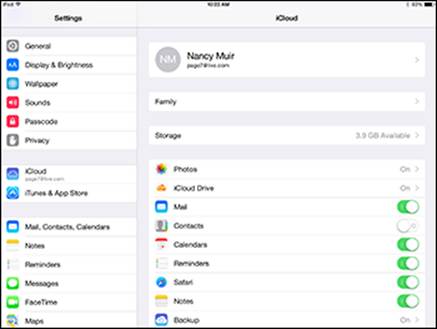
Figure 4-6: Make settings to control what information is shared with your iPad via iCloud.
5. Tap Sync and then choose how far back to sync reminders (see Figure 4-7).
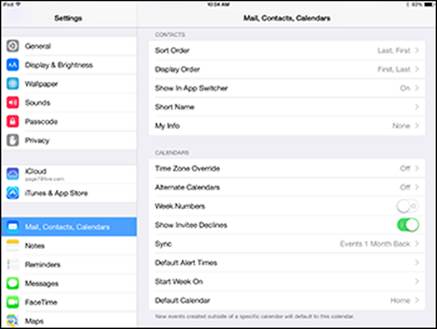
Figure 4-7: If you don’t need all reminders, sync to a specific period.
Deleting a Reminder
Are you making progress in checking tasks off your list? You may want to delete a task so that you don’t continue to get notifications about it or to give yourself a feeling of accomplishment. Here’s how:
1. With Reminders open and a list of tasks displayed, tap the circular check box to the left of a task or tasks.
2. Tap Edit and then tap the red circle to the left of each item you want to delete (see Figure 4-8).
The task is deleted.
3. Tap Done to return to List view.
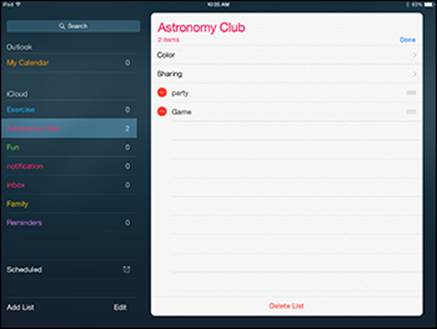
Figure 4-8: Choose as many tasks as you like to delete.
Setting Notification Types
Notification Center is a list of various alerts, appointments, and useful information such as stock quotes and weather that you can display by swiping down from the top of any iPad screen. Notifications is on by default, but you can change certain settings to control which types of notifications are displayed.
Follow these steps to set notification types:
1. Tap Settings.
2. Tap Notifications.
In the settings that appear (see Figure 4-9), you see a list of items that you can set to be included in Notification Center. For example, Messages and Reminders might be included, but alerts in game apps might not.
3. Tap any item, such as Reminders.
Notifications settings appear for that app, as shown in Figure 4-10.
4. Tap the Show in Notification Center On/Off switch to include or exclude that item from Notification Center.
5. Choose how to be notified:
· Alert Style: No alert or banner appears.
· Banners: A banner appears and then disappears automatically.
· Alerts: You have to take an action to dismiss the alert when it appears.
· Badge App Icon: Places a red circle and a number on icons on your Home screens to represent alerts associated with those apps.
· View in Lock Screen: Turn on this setting if you want to be able to view alerts when the Lock Screen is displayed.
6. When you’ve finished making settings for an individual app, tap the Notifications button to return to the Notifications settings or tap the Home button.
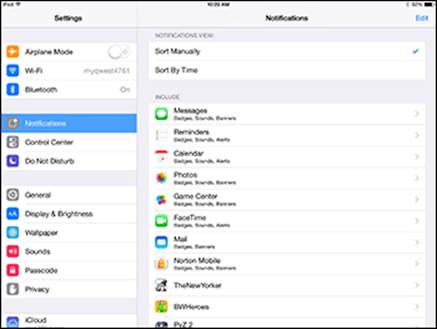
Figure 4-9: Choose your Notification Center options here.
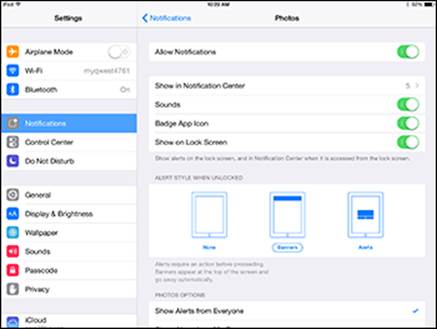
Figure 4-10: Control each item you want to include in Notification Center in this pane.
Viewing Notification Center
After you specify which alerts and reminders should appear in Notification Center, you can review them regularly to keep yourself on track.
To view notifications, follow these steps:
1. From any screen, tap the status bar on top and drag down to open Notification Center with Today’s items displayed. (See Figure 4-11.)
Note that items are divided into lists by type, such as Reminders, Calendar items, and Mail.
2. To close Notification Center, tap the upward-pointing arrow in the bottom-center of Notification Center and drag up, toward the status bar.
To determine which alerts and reminders display in Notification Center, see the preceding task.
You can also view Notification Center from the Lock screen. Just swipe down from the top of the screen to reveal it, and swipe up to hide it again.
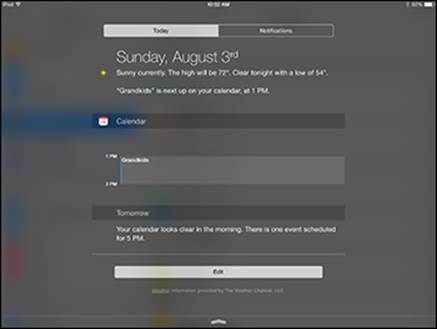
Figure 4-11: Notification Center is a convenient one-stop location for all your commitments and reminders.
Checking Out Today and Notifications Tabs
 There are two tabs in Notification Center (refer to Figure 4-11): Today and Notifications. Each view gives you a unique perspective on the tasks on your plate. To look at the information on each of these tabs, follow these steps:
1. Swipe down from the top of the screen to display Notification Center.
2. Tap Today (see Figure 4-12) to show all reminders and other items you’ve selected to display in Notification Center (see the earlier section, “Setting Notification Types”) that occur today.
Note that you can also swipe to the right to move to the next tab.
3. Tap the Notifications tab to see items for today and tomorrow plus missed and other future items.

Figure 4-12: The Today and Notifications views give you a clearer perspective on your commitments.
Going to an App from Notification Center
To jump easily from Notification Center to any app that causes an alert or reminder to be displayed, follow these steps:
1. Swipe down from the top of the screen.
Notification Center displays.
2. Tap any item in a category, such as Reminders or Stocks.
The item opens in its originating app.
If you’ve tapped an email message, you can reply to the message by using the procedures described in Book I, Chapter 7.
Get Some Rest with Do Not Disturb
Do Not Disturb is a simple but useful setting you can use to stop any alerts and FaceTime calls from making a sound or being displayed. You can make settings to allow calls from certain people to get through or to allow several repeat calls from the same person in a short time period to come through. (Apple has assumed in designing this app that such repeat calls may signal an emergency situation or urgent need to get through to you.)
To set up Do Not Disturb, follow these steps:
1. Tap Settings.
2. Tap Do Not Disturb to turn the feature on.
3. Tap the Manual On/Off switch to turn the feature on.
4. In the other settings shown in Figure 4-13, do any of the following:
· Tap Scheduled to allow alerts during a specified time period to be displayed.
· Tap Allow Calls From and then, from the next screen, select Everyone, No One, Favorites, or All Contacts.
· Tap Repeated Calls to allow a second call from the same person in a three-minute time period to come through.
5. Tap the Home button to return to the Home screen.
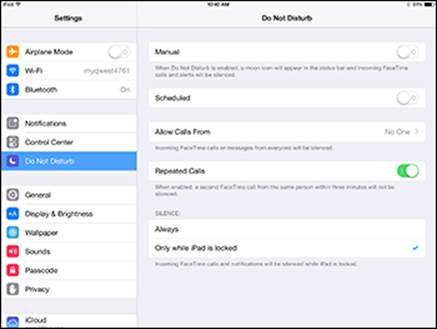
Figure 4-13: Manage how Do Not Disturb operates from here.
All materials on the site are licensed Creative Commons Attribution-Sharealike 3.0 Unported CC BY-SA 3.0 & GNU Free Documentation License (GFDL)
If you are the copyright holder of any material contained on our site and intend to remove it, please contact our site administrator for approval.
© 2016-2026 All site design rights belong to S.Y.A.