iPad All-in-One For Dummies, 7th Edition (2015)
Book I. Getting Started with iPad
Chapter 5. Setting Up iTunes to Sync and Buy Apps
In This Chapter
![]() Getting connected to the Internet
Getting connected to the Internet
![]() Downloading iTunes and creating an account
Downloading iTunes and creating an account
![]() Making iPad settings in iTunes
Making iPad settings in iTunes
![]() Syncing iPad to your computer
Syncing iPad to your computer
![]() Using iCloud
Using iCloud
![]() Purchasing apps from the App Store
Purchasing apps from the App Store
![]() Updating your apps
Updating your apps
Apple designed its iTunes desktop application as a way for you to manage settings for how your iPad syncs with your computer. Using iTunes, you can share information and content such as calendar events, pictures, music, movies, and contacts. Before you can use iTunes to sync from a PC, you have to download the software, and if you want to make purchases from the store, you need to open an iTunes account, both of which I cover in this chapter. You can also use the iCloud service to store and share content online using a Wi-Fi connection. In this chapter, I cover how to set up an iCloud account and make settings to back up and share content in the cloud.
But iTunes isn't just for syncing content. Some apps, such as Contacts and Videos, come preinstalled on your iPad. But as you know if you're an iPhone user, a world of other apps is out there, including many that are designed specifically for your iPad. After you set up iTunes, you can buy apps (or download free ones) in the App Store using your iTunes account. Some are free and some come for a price (typically from 99¢ to about $10, though a few go up to $50 or more).
In this chapter, I tell you how to connect to the Internet (you need an Internet connection to access the App Store). Then I tell you how to set iTunes and iCloud to sync your iPad with other devices and how you can acquire apps for your iPad through the App Store.
 After you have an iTunes account, you can also shop iTunes for music, videos, audiobooks, and more. See Book II, Chapter 1 for more about shopping for multimedia content.
Connecting to the Internet
To browse the web, access Mail, and shop online, you first have to be connected to the Internet, so I'm putting this information right up front. How you connect to the Internet depends on which iPad model you own:
· The Wi-Fi–only iPad connects to the Internet, logically enough, via a Wi-Fi network. You may already have set up this type of network in your own home using your computer and some equipment from your Internet provider. You can also connect through public Wi-Fi networks(hotspots). You probably have already noticed how many hotspots your town or city has: Look for Internet cafés, coffee shops, hotels, libraries, and transportation centers such as airports or bus stations. In fact, after you start looking, you'll notice lots of signs alerting you to free Wi-Fi locations — they're everywhere.
· If you own a Wi-Fi and 3G- or Wi-Fi and 4G-enabled iPad, you can still use a Wi-Fi connection (which is usually much faster if you have a good connection), but you can also use a paid data network through AT&T, Sprint, T-Mobile, or Verizon to connect via a cellular network just about anywhere you can get cellular phone coverage. If you have a 3G or 4G model, you don't have to do anything; with a contract for coverage, the connection is made automatically wherever cellular service is available, just as it is on your cellphone.
See Chapter 1 in this minibook for more about the capabilities of different iPad models and the costs associated with a cellular network.
When you're in range of a hotspot, a pop-up may display automatically; if it doesn't, follow these steps:
1. Tap Settings on the Home screen.
2. Tap Wi-Fi.
3. Be sure that Wi-Fi is set to On (see Figure 5-1) and choose a network to connect to.
Network names should appear automatically when you're in range of networks. When you're in range of a public hotspot, if access to several nearby networks is available, you may see a message asking you to tap a network name to select it.
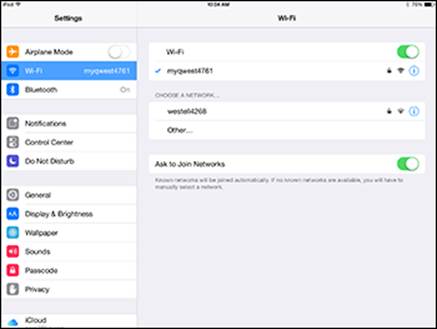
Figure 5-1: Turning on Wi-Fi.
4. After you select a network (or if only one network is available), you may see a message asking for your password; if you do, enter the password.
You may need to ask the owner of the hotspot (for example, a hotel desk clerk or business owner) for this password or enter your home network password.
5. Tap the Join button and you're connected.
 Free public Wi-Fi networks typically don't require passwords. However, it's therefore possible for someone else to track your online activities over these unsecured networks. No matter how much you might be tempted, you might want to avoid accessing financial accounts or sending unencrypted sensitive email when connected to a public hotspot.
Setting Up iTunes
Think of iTunes as Apple's version of the Mall of America. It's both one place from which you can manage your iPad settings for syncing content, and a great big online store from which you can buy content and apps for your Mac or PC, iPod touch, iPhone, and iPad. It's also the place where you can make settings for several of these devices to control how they download and share content. Even if you find some other sources of content for your iPad, it's worth having an iTunes account, if only to use the settings it provides.
Before you can use iTunes to manage your iPad, you have to download the latest version of iTunes by going to www.apple.com/itunes. You should also create an iTunes account, providing a payment method so that you can use iTunes on your computer or use the iTunes app on your iPad to purchase apps and content.
You can use an iTunes account, or an Apple ID and iCloud, to register your iPad when you first buy it before you can use it. In my case and perhaps in yours, the nice man at the Apple Store activated my iPad before I left the store with it, so I set up my own iTunes account the first time I wanted to buy a hot movie title.
Making Settings and Syncing
Remember that great photo of your promotion party you have on your hard drive? How do you get that onto iPad so you can show it off at the next family reunion? Or how about that audiobook on career success that you bought and downloaded to your laptop on your last business trip? It would sure be handy to get that sucker onto your iPad. Never fear: By making a few easy settings and syncing with your computer, you can bring all that content over in a flash.
Remember that you can also sync content using iCloud. See the section “Understanding iCloud,” later in this chapter, for more about that option.
Making iPad settings using iTunes
When you plug your Lightning to USB Cable (the Dock Connector to USB Cable for third-generation iPads and earlier) into your iPad and computer and then open iTunes, a whole group of settings becomes available. These help you determine how content will sync between the two devices.
If you're using a Mac, you already have iTunes installed, but be sure that you have the latest version (at the time of this writing it’s version 11.4). Open iTunes and choose Check for Updates. For Windows users, you should download the iTunes application to your computer so that you have the option of using it to sync (transfer) downloaded content to your iPad.
Note that you can sync wirelessly to your computer by tapping Settings on the Home screen, tapping General, and tapping iTunes Wi-Fi Sync. In the settings that appear, tap Sync Now. This works only if your computer is connected to the same Wi-Fi network.
Here's how to use the iTunes settings for your iPad:
1. Connect your iPad to your computer using the Lightning to USB Cable.
Plug the Lightning end of your cable (the smaller end) into your iPad and plug the other end of the cord into a USB port on your computer.
2. Open your iTunes software.
On a Mac, click the iTunes button in the Dock; on a Windows 7 computer, choose Start⇒All Programs⇒iTunes; and on a Windows 8 or 8.1 computer, simply begin to type iTunes from the Start screen and then click iTunes in the search results.
iTunes opens, and your iPad is listed in the Devices section of the Source List.
3. Click the name of your iPad in the Devices section of the Source List or the upper-right corner if the Source List isn't displayed, as shown in Figure 5-2.
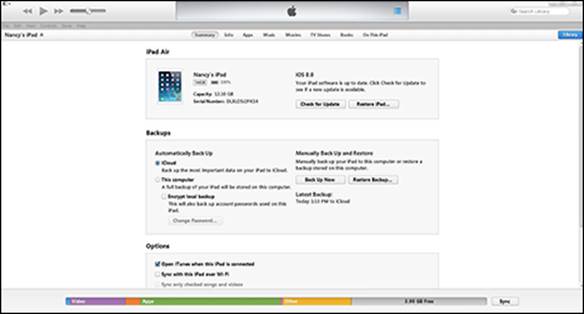
Figure 5-2: The various tabs you can use to control iPad from iTunes.
A series of tabs displays. The tabs offer information about your iPad and the settings you can use to specify which content such as music, movies, or podcasts to download and, for some content types, when to download. Figure 5-3 shows the settings on the Movies tab. The settings on the various tabs relate to the kind of content you want to download and whether you want to download it automatically when you sync or do it manually. See Table 5-1 for an overview of the settings that are available on each tab.

Figure 5-3: This pane includes settings to control how backups and syncing occur.
4. Make all settings for the types of content you plan to obtain on your computer and sync to your iPad, and then click the Sync button in the bottom-right corner to sync files with the iPad.
Table 5-1 iPad Settings in iTunes
|
Tab Name |
What You Can Do with These Settings |
|
Summary |
Perform updates to iPad software and set general backup and syncing options. |
|
Info |
Specify which information to sync: Contacts, Calendars, Email accounts, Bookmarks, or Notes. Perform an advanced replacement of info on the iPad with info from the computer. Note that for users of OS X Mavericks, this tab doesn't appear, and all Info syncing must be done via iCloud. |
|
Apps |
Sync apps and data that you've downloaded to your computer to the iPad and manage the location of those apps and folders. Choose whether to automatically install new apps and organize/arrange icons, folders, and the order of Home screens. |
|
Tones |
Choose to sync selected or sync all tones. |
|
Music |
Choose which music to download to your iPad when you sync. |
|
Movies |
Specify whether to automatically download movies. |
|
TV Shows |
Choose which shows and episodes to sync automatically. |
|
Podcasts |
Choose which podcasts and episodes to sync automatically. |
|
iTunes U |
Sync all, a specified number of unplayed courses, or a specified number of recent items in all or selected collections. |
|
Books |
Choose to sync all or only selected audio and electronic books to your iPad. |
|
Photos |
Choose the folders or albums from which you want to download photos or albums. |
|
On This iPad |
Select content on the iPad to copy to iTunes. |
Be alert to warnings when you sync your iPad and computer because, depending on your settings, you may overwrite or erase content you've downloaded when you sync. You may want to copy content that you've downloaded to your iPad directly to your iTunes library before syncing so that your computer doesn't erase what you've downloaded during the sync.
Syncing iPad to your computer
After you specify which content to download in iTunes (see the preceding section), you use the Lightning to USB Cable to connect your iPad and computer to sync info like contacts and calendar settings. Note that Wi-Fi syncing can take place when iPad is asleep and plugged into power.
With iTunes installed on your computer and an iTunes account set up, follow these steps to sync to your iPad:
1. Plug the Lightning end (the smaller end) of your Lightning to USB Cable into your iPad.
2. Plug the other end of the Lightning to USB Cable into your computer.
iTunes opens and shows an iPad item in the Source List. (If you’re displaying the Sidebar, the iPad appears there instead.)
3. Click iPad to view its settings (see Figure 5-4), and then click the Sync button.
Your iPad screen should show the words Sync in Progress; if it doesn't, click the Sync button in the lower-right corner.
When the syncing is complete, disconnect the cable. Any media you chose to transfer in your iTunes settings, and any new photos on your computer, have been transferred to your iPad.
Figure 5-4: Syncing connects your computer and iPad so that you can share data.
4. After syncing, unplug the Lightning to USB Cable from your iPad and your computer.
Syncing wirelessly
You can also use the iTunes Wi-Fi Sync setting to allow cordless syncing if you are within range of a Wi-Fi network that has a computer connected to it with iTunes installed.
Follow these steps to make Wi-Fi syncing settings:
1. First, with your iPad connected to your computer and with iTunes open, on the Summary tab of iTunes, click Sync with this iPad over Wi-Fi and then click Apply.
2. On your iPad, Tap Settings⇒General⇒iTunes Wi-Fi Sync.
3. In the pane shown in Figure 5-5, tap Sync Now to sync with a computer connected to the same Wi-Fi network.
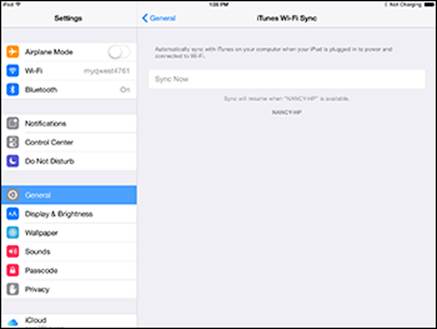
Figure 5-5: Set up your iPad to sync using the nearest Wi-Fi network.
Understanding iCloud
You have an alternative to syncing content by using iTunes. iCloud is a service that allows you to back up all your content and certain settings, such as bookmarks, to online storage. (However, note that some content, such as videos, aren’t backed up, so consider an occasional backup of content to your computer or from your computer to an external storage device such as a USB stick, as well). That content and those settings are then pushed automatically to all your Apple devices through a wireless connection.
All you need to do is get an iCloud account, which is free, and then make settings on each device for which types of content you want to have pushed to each device. After you've done that, any content you create or purchase on one device — such as music, apps, books, and TV shows, as well as documents created in Apple's iWork apps, photos, and so on — can be synced among your devices automatically.
When you get an iCloud account, you get 5GB of free storage. If you want additional storage, you can buy an upgrade from one of your devices. In round numbers, 20GB is $12 a year; 200GB is $48 a year; 500 GB is $120 a year, and 1 terabyte is $240. Most people will do just fine with the free 5GB of storage. Note that items you've purchased from iTunes, which include any music such as ripped CDs that you've synced across devices using the iTunes Match service, don’t count toward your data storage.
To upgrade your storage, go to iCloud in Settings, tap Storage, and then tap Buy More Storage. In the settings that appear, tap the amount you need and then tap Buy.
You can make settings for backing up your content to iCloud in the iCloud pane of Settings. You can have content backed up automatically, or you can back it up manually. See Chapter 9 in this minibook for more about this topic.
If you pay $24.99 a year for the iTunes Match service, you can sync a huge amount of audio content (up to 25,000 tracks) in your iTunes library to your devices, which may be a less expensive way to go than paying for added iCloud storage. Tap Match in iTunes or visitwww.apple.com/itunes/itunes-match for more information.
Getting an iCloud account
Before you can use iCloud, you need an iCloud account, which is tied to the Apple ID that you probably already have. You can turn on iCloud when first setting up your iPad or use Settings to sign up using your Apple ID. Follow these steps:
1. When first setting up your iPad (except for an original iPad), tap Use iCloud in the sequence of screens that appears (see Figure 5-6).
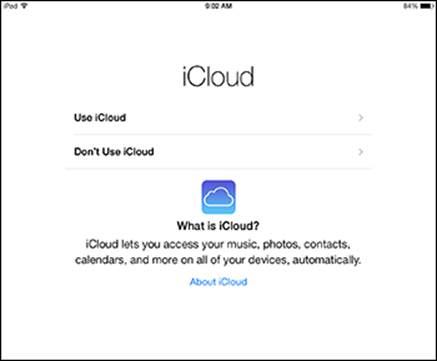
Figure 5-6: Set up iCloud while setting up your iPad.
2. In the next screen, tap Back up to iCloud.
Your account is now set up based on the Apple ID you entered earlier in the setup sequence.
Here are the steps to set up iCloud backup on your iPad :
1. Open the Settings app, tap iCloud, and then tap Backup.
2. In the next screen (see Figure 5-7), tap the On/Off switch to turn on iCloud Backup.
To perform a manual backup, tap Back Up Now.
An alert may appear asking whether you want to allow iCloud to use the location of your iPad. Tap OK.
Your account is now set up.
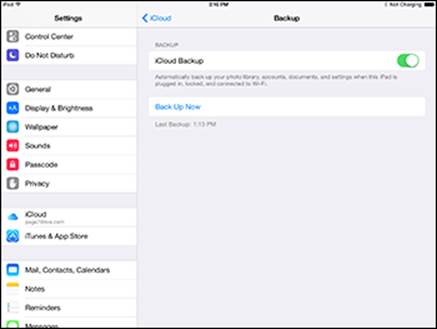
Figure 5-7: Tap the On/Off switch to turn on iCloud Backup.
Making iCloud sync settings
When you have an iCloud account up and running (see the preceding section), you have to specify which type of content should be synced with your iPad via iCloud. Note that content you purchase and download from the iTunes Store is synced among your devices automatically via iCloud. Follow these steps to specify the type of content to sync:
1. Tap Settings and then tap iCloud.
2. In the iCloud settings, as shown in Figure 5-8, tap the On/Off switch for any item that's turned off that you want to turn on (or vice versa).
You can sync Mail, Contacts, Calendars, Reminders, Safari, Notes, Photos, Passbook, Keychain (an app that stores all your passwords across all your Apple devices), Find My iPad, and iCloud Drive.
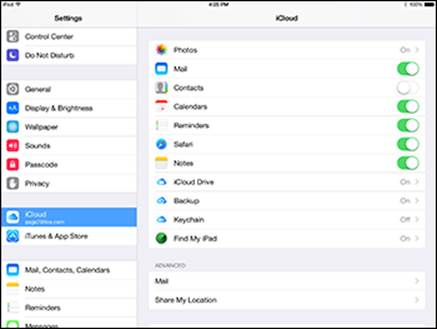
Figure 5-8: Choose the items you want to have synced over iCloud with your iPad here.
3. To enable automatic downloads of music, apps, and books, scroll down and tap iTunes & App Store in Settings.
4. Tap the On/Off switch for Music, Apps, Books, or Updates to set up automatic downloads of any of this content to your iPad via iCloud.
If you want to allow iCloud to provide a service for locating a lost or stolen iPad, tap the On/Off switch in the Find My iPad field to activate it. This service helps you locate, send a message to, or delete content from your iPad if it falls into other hands.
Buying Apps or Downloading Apps
Apps provide all kinds of functionality, from the ability to plan travel, manage finances, and find local restaurants and gas stations to hard-core business productivity and serious gaming fun. By buying and downloading apps, you can assemble a custom computing experience.
Most iPhone apps will work on your iPad, so if you own the trendy mobile phone and have favorite apps on it, you might want to use them on your iPad! Also, for more about my recommended apps, go to www.dummies.com/extras/ipadaio.
Searching the App Store
Apple isn't one to miss a profit opportunity, so naturally, one of the iPad built-in apps is the App Store. This is the apps portal that will get you to thousands of great apps for everything from games to bean counting.
If you want to get apps that aren’t available in the App Store, you can join the estimated 4 million people who have done what's called jailbreaking to liberate their iPhones or iPads from the tyranny of getting apps solely through iTunes. Be forewarned that jailbreaking voids your iPad warranty, impedes your access to Apple updates, opens you up to the dangers of malware, and could even make it hard to download and use legitimate Apple-approved apps. A handful of jailbreaking tools cut down on the installation of malware, such ashttps://cydia.saurik.com/upgrading/. But again, for the average iPad user, I recommend avoiding jailbreaking.
Here's your quick introduction to using the App Store to obtain whatever apps your heart desires:
1. Tap the App Store icon on your iPad Home screen.
The site shown in Figure 5-9 appears.
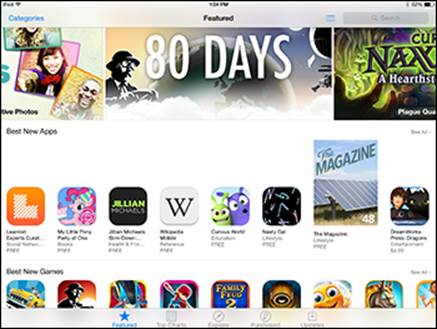
Figure 5-9: Viewing your purchased apps.
2. At this point, you have several options for finding apps:
· Tap in the Search field, enter a search term, and tap the Search button on the onscreen keyboard to see results.
· Tap and swipe the screen to scroll down to see more selections.
· Tap the Categories button at the top of the screen to see different categories of apps.
· Tap the Top Charts button at the bottom of the screen to see which free and paid apps other people are downloading most.
· Tap the Explore option to display apps in categories such as Great Free Games, Get Stuff Done, and Interactive Kids Stories. Tap a category to display apps that fit within it.
· Tap the Popular Near Me button at the top of the Explore view to display apps that are popular among people in or near your location. (This may or may not produce useful results, depending on where you are.)
· Tap the Purchased button to view apps you've already purchased, as shown in Figure 5-10. An item with a cloud symbol to the right of it means that you need to download it to use it.
· Tap the See All button in any category shown in the Featured view to view all the items in that category.
· In the Top Charts view, use the Paid, Free, and Top Grossing tabs to narrow down your search.
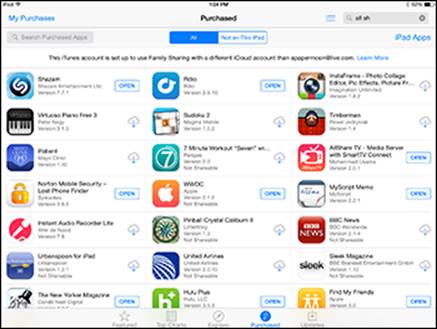
Figure 5-10: Viewing your purchased apps.
Getting apps from the App Store
Getting free apps or buying apps requires that you have an iTunes account, which I cover earlier in this chapter. After you have an account, you can use the saved payment information there to buy apps or download free apps. Follow these steps to get an app from the App Store:
1. With the App Store open, tap the Search field, enter an app name (a free app that you might like to have is Netflix, for example, so I use that for these steps), and then tap the Search button on the onscreen keyboard.
2. Tap Netflix in the suggested search results that appear, as shown in Figure 5-11.
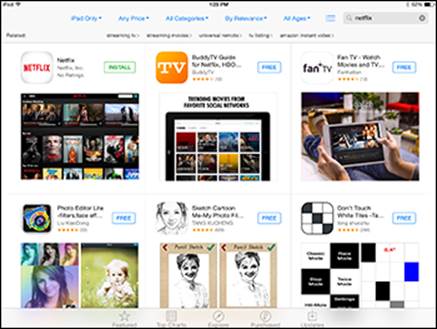
Figure 5-11: Tap the app you need.
3. In the app details, tap the price button (which in this case reads Free) for Netflix.
Note that to get a paid app, you'd tap the price button, which displays the cost of the app.
The price button changes to read Install App (or in the case of a paid app, the button changes to read Buy App).
4. Tap the Free (or price) button and then tap Install.
You may be asked to enter your iTunes password and tap the OK button to proceed. Note that an app with a cloud icon indicates one that you have already purchased but is not installed on your iPad; you can download it at no charge.
The app downloads and appears on a Home screen (probably your second Home screen if you haven't yet downloaded many apps). If you purchase an app that isn't free, at this point, your credit card is charged for the purchase price or your Store credit is reduced by the amount of the purchase price.
Only preinstalled apps are located on the first iPad Home screen of your iPad by default, plus a few more such as Podcasts and iBooks on the second Home screen. Apps you download are placed on additional Home screens, and you have to scroll to view and use them. See the next section for help in finding your newly downloaded apps using multiple Home screens.
If you've opened an iCloud account, any iOS app that you purchase on your iPad can be set up to automatically be pushed to other Apple iOS devices. See earlier sections in this chapter for more about iCloud.
If you're a road warrior, you'll be glad to hear that the travel industry is all over apps to help you get around because the iPad is such a logical travel companion. Lonely Planet has released country guides for the iPad, and iPhone apps for travelers are being re-created for iPad. See Book III, Chapter 3 if you're someone who hits the road on a regular basis and wants to make the most of your iPad.
Organizing your apps
iPad can display up to 15 Home screens. By default, the first and part of the second contain preinstalled apps; other screens are created to contain any apps you download or sync to your iPad. At the bottom of any iPad Home screen (just above the Dock), dots indicate the number of Home screens, as shown in Figure 5-12.
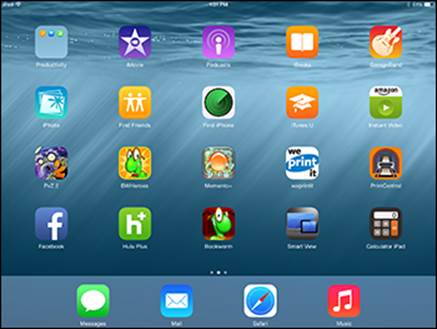
Figure 5-12: Finding apps on the various iPad Home screens.
You can use some very nice features in iTunes to organize apps on your connected iPad, but you can also organize things right on the iPad using a few different methods.
Here's some advice on how to organize your apps:
1. Tap the Home button to open the last displayed Home screen.
2. Flick your finger from right to left or tap either end of the Home screen dots to move to the next or previous Home screen.
Note that the dots near the bottom of the screen indicate which Home screen you're on. To move back, flick from left to right.
3. To reorganize apps on a Home screen, press and hold any app on that page.
The app icons begin to jiggle, and any apps you installed will sport a Delete button (a gray circle with a black X on it (see Figure 5-13).
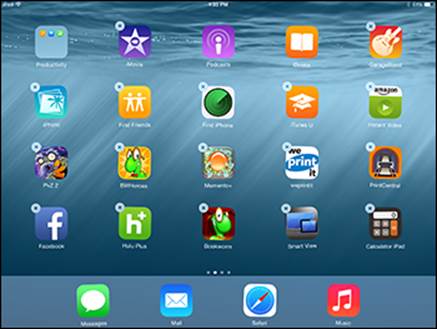
Figure 5-13: Move an app to another location on a Home screen.
4. Press, hold, and drag an app icon to another location on the screen to move it.
5. Tap the Home button to stop all those icons from jiggling!
To move an app from one page to another, while things are jiggling, you can press, hold, and drag an app to the left or right to move it to the next Home screen. You can also manage what app resides on what Home screen and in which folder from iTunes when you've connected iPad to iTunes via a cable or wireless sync, which may be easier for some.
You can also manage your apps from iTunes with your iPad connected using the settings on the Apps tab for that iPad. You can even reorder the Home screens there.
 Press the Home button twice and you get a preview of open apps in the App Switcher. With iOS 8, you also get a row of recently used contacts with photos if the contact contains one. When you tap a contact, you then get options to call, message, or FaceTime call that person. Scroll among the apps and tap the one you want to go to. The App Switcher also allows you to swipe to move an app upward, out of this preview list, and stop it from running.
Organizing apps in folders
iPad lets you organize apps in folders so that you can find apps more easily. When you've populated a folder, you can flick it to open the folder and see all the apps in it. The process is simple. For iPad, follow these steps to get more organized:
1. Tap and hold an app till all apps do their jiggle dance.
2. Drag one app on top of another app.
The two apps appear in a box with a placeholder name in a strip above them. (See Figure 5-14.)
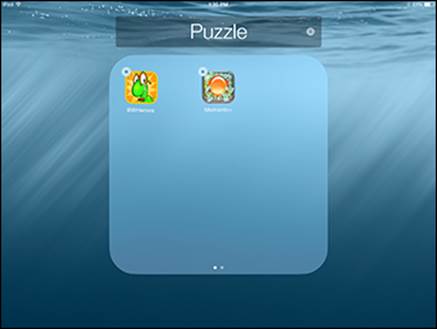
Figure 5-14: Collect apps in folders to help you save Home screen space.
3. To delete the placeholder name and change the folder name, tap in the field above the box.
The placeholder text is deleted, and the keyboard appears.
4. Tap the Delete key to delete the placeholder name and then type one of your own.
If you change your mind and want to put the app back on the Home screen, you can easily drag it out of the folder.
5. Tap anywhere outside the bar to save the name.
6. Tap the Home button to stop all that jiggling!
The folder appears on the Home screen where you began this process.
To get to the items stored in your folder, just double-tap it.
Deleting apps you no longer need
Not all apps are endlessly entertaining or useful. When you no longer need an app you have installed, it's time to get rid of it to save some space on your iPad. (Note, however, that you can't delete apps that were preinstalled on the iPad such as Notes, Calendar, or Photos.) If you use iCloud to push content across all Apple iOS devices, note that deleting an app on your iPad won't affect that app on other devices.
To send an app on its way, do this:
1. Display the Home screen that contains the app you want to delete.
2. Press and hold the app until all apps begin to jiggle.
3. Tap the Delete button for the app you want to delete.
4. In the confirmation dialog, as shown in Figure 5-15, tap Delete to proceed with the deletion.
5. Tap the Rate button to rate the app or No Thanks to opt out of the survey.
If you have several apps to delete, you can delete them by using iTunes when your iPad is connected to your computer, making the process a bit more streamlined.
Don't worry about wiping out several apps at one time by deleting a folder. You can't delete full folders, only individual apps within them.
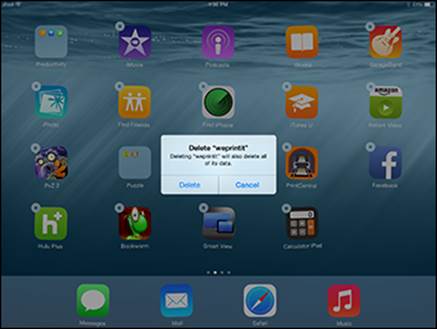
Figure 5-15: Tap Cancel if you have regrets; otherwise, tap Delete to send the app on its way.
Updating apps
App developers update their apps all the time to fix problems or add new features, so you might want to check for those updates. The App Store icon on the Home screen displays the number of available updates in a red circle. Tap the App Store icon when you have some apps with updates ready.
Now you can proceed with these steps to update your apps:
1. Tap the Updates button to access the Updates screen (see Figure 5-16) and then tap any item you want to update.
To update all, tap the Update All button. Note that if you have Family Sharing turned on, there will be a folder titled Family Purchases that you can tap to display apps that are shared across your family’s devices. To update all of those, tap each one’s Update All button.
2. If you choose the Updates button in Step 1, in the app screen that appears, tap Update.
You may be asked to confirm that you want to update, or to enter your Apple ID password and then tap OK to proceed. You may also be asked to confirm that you are over a certain age or agree to terms and conditions; if so, scroll down the Terms form (reading all items as you go, of course) and at the bottom, tap Agree.
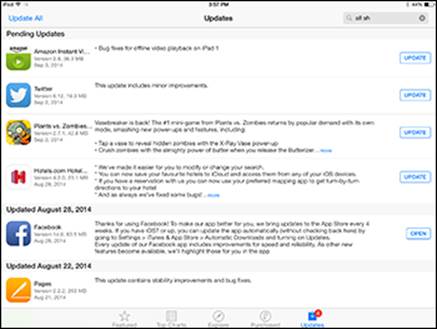
Figure 5-16: Choose what you want to update here.
You can download multiple apps at one time. If you choose more than one app to update instead of downloading them sequentially, all items are downloaded simultaneously. You can keep working in the App Store after you've initiated a download.
 If you have an iCloud account and update an app on your iPad, it's also updated on any other Apple iOS devices automatically via an Internet connection. Apps updated on your other devices are also updated on your iPad if you enable automatic updates on the iPad, as explained earlier in this chapter.
All materials on the site are licensed Creative Commons Attribution-Sharealike 3.0 Unported CC BY-SA 3.0 & GNU Free Documentation License (GFDL)
If you are the copyright holder of any material contained on our site and intend to remove it, please contact our site administrator for approval.
© 2016-2026 All site design rights belong to S.Y.A.