iPad All-in-One For Dummies, 7th Edition (2015)
Book I. Getting Started with iPad
Chapter 6. Browsing the Web
In This Chapter
![]() Discovering Safari
Discovering Safari
![]() Creating and using bookmarks
Creating and using bookmarks
![]() Using Safari Reading List and Reader
Using Safari Reading List and Reader
![]() Saving web clips to the Home screen
Saving web clips to the Home screen
![]() Adding an image to your Photo Library
Adding an image to your Photo Library
![]() Emailing a link to a website
Emailing a link to a website
![]() Making private browsing and cookie settings
Making private browsing and cookie settings
![]() Posting photos and printing from Safari
Posting photos and printing from Safari
![]() Using iCloud tabs
Using iCloud tabs
Getting on the Internet with your iPad is easy using its Wi-Fi or 3G/4G capabilities. After you’re online, the preinstalled browser, Safari, can take you all around the web. Safari will be familiar to you if you’ve used an Apple device before or the browser on your Mac or PC. On iPad, you’re actually using a hybrid of the mobile version of Safari, also used on iPhone and iPod touch, and the desktop Safari.
If you’ve never used Safari, this chapter helps you get up to speed quickly. In this chapter, you discover how to open Safari and navigate among web pages using tabbed browsing, as well as how to use iCloud tabs to share your browsing history among devices. Along the way, you learn about All Tabs view, a version of which has been available in iPhone and now comes to the iPad. All Tabs view lets you view all your open web pages as thumbnails.
You see how to place a bookmark for a favorite site or web clip on your Home screen. You can also view your browsing history, save online images to your Photo Library, post photos to sites from within Safari, and email a hotlink to a friend. Two useful Safari features are Shared Links to see URLs posted to your Twitter timeline and iCloud Keychain, used for storing passwords and credit card information in one handy, safe place online. You explore the Safari Reader and Safari Reading List features, including the ability to save links and web pages to Reading List, and find out how to keep yourself safer while online using private browsing. I also show you the simple steps involved in printing what you find online.
Exploring Safari
If you need to know how to connect to the Internet, see Chapter 5 in this minibook. After you’re connected, you’re ready to browse with Safari.
If you’ve used Safari before, you’ll notice a major difference in how it works on your iPad. It offers all the typical browser tools, but an important iPad feature is the use of gestures on the touchscreen to manipulate pages and navigate the web.
 Though Safari is a fine browser, you aren’t limited to it. You can download other browsers to iPad, such as Google Chrome, Atomic Web Browser, and Safe. Check out the App Store for the latest available browsers.
Try the following steps to practice using Safari:
1. After you’re connected to a network, tap the Safari icon on the Home screen.
Safari opens, probably displaying the Apple Home page the first time you go online. (See Figure 6-1.)
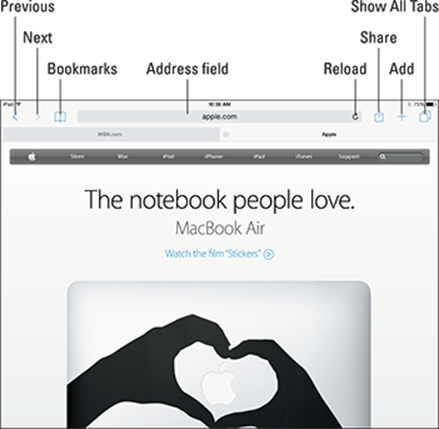
Figure 6-1: These tools will be familiar to you from almost any browser you may have used.
2. Put two fingers together on the screen and swipe outward to enlarge the view, as shown in Figure 6-2.
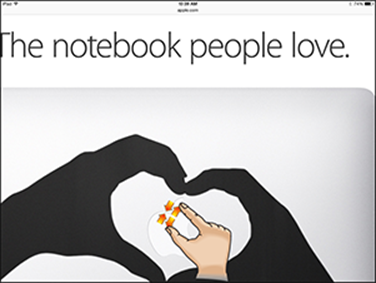
Figure 6-2: Enlarge the screen so that you can read the fine print.
3. Double-tap the screen with a single finger to restore the default screen size.
Using the pinch method (see Chapter 2 in this minibook) allows you to enlarge or reduce the screen to various sizes, giving you more flexibility and control than the double-tap method.
4. Put your finger on the screen and flick upward to scroll down the page.
5. To return to the top of the web page, put your finger on the screen and drag downward, or tap the status bar at the top of the screen.
When you enlarge the display, you gain more control using two fingers to drag from left to right or from top to bottom on the screen. On a reduced display, one finger works fine for making these gestures.
Navigating among web pages
I expect that you have entered URLs and used the Forward and Back buttons in a browser to navigate around the web. However, the iPad’s onscreen keyboard differs slightly from a standard keyboard, and it might help you to run through how you navigate with the mobile version of Safari.
Follow these steps for a bit of navigating practice:
1. With Safari open, tap in the Address/Search field.
The onscreen keyboard appears, as shown in Figure 6-3.
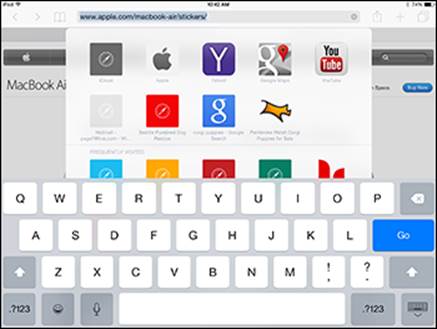
Figure 6-3: This keyboard requires you to do a few unique things to use numbers and symbols.
2. To clear the field, press the Delete key on the keyboard. Enter a web address, using the .com key to make entry faster.
 Hold down the .com key to access options like .edu, .gov, and .net. If you have no website in mind, go to this book’s companion site, www.ipadmadeclear.com.
3. Tap the Go key on the keyboard (refer to Figure 6-3).
The website appears.
· ![]() If, for some reason, a page doesn’t display, tap the Reload icon at the end of the Address/Search field.
If, for some reason, a page doesn’t display, tap the Reload icon at the end of the Address/Search field.
· ![]() If Safari is loading a web page and you change your mind about viewing the page, you can tap the Cancel icon (the X) that appears at the end of the Address/Search field during this process to stop loading the page.
If Safari is loading a web page and you change your mind about viewing the page, you can tap the Cancel icon (the X) that appears at the end of the Address/Search field during this process to stop loading the page.
4. ![]() Tap the Back button to go to the last page Safari displayed.
Tap the Back button to go to the last page Safari displayed.
5. ![]() Tap the Forward button to go forward to the page you came from when you tapped Previous.
Tap the Forward button to go forward to the page you came from when you tapped Previous.
6. To follow a link to another web page, tap the link with your finger.
To view the destination web address of the link before you tap it, just touch and hold the link, and a menu appears that displays the address at the top, as shown in Figure 6-4.
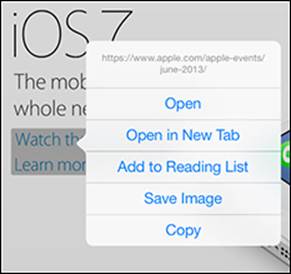
Figure 6-4: You can open a link in a new page using this menu.
With iOS 8, Apple has added QuickType to support predictive text in the onscreen keyboard. This feature adds the ability for iPad to spot what you probably intend to type from text you’ve already entered and make a suggestion to save you time typing.
·  HandBrake: www.handbrake.fr
· SWF to Video Scout: http://bytescout.com/?q=/products/enduser/swftovideoscout/swftovideoscout.html
Using tabbed browsing
Safari includes a feature called tabbed browsing, which allows you to have several web pages open at one time on separate tabs so that you can move easily among those sites. You may have used tabbed browsing in other popular browsers, such as the desktop version of Safari, Internet Explorer, Google Chrome, or Mozilla Firefox. This is a handy feature of Safari that’s worth exploring.
To add a tab, follow these steps:
1. With Safari open, tap the Add button (shaped like a + symbol) near the upper-right corner of the screen (refer to Figure 6-1).
A new tab opens with a list of your saved Favorites (see how to save Favorites later in this chapter), the Address/Search field becomes active, and the onscreen keyboard appears (see Figure 6-5).
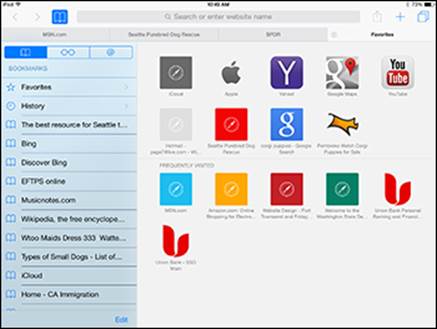
Figure 6-5: Here’s where you can enter the address for the new tab you created.
2. To add a new page (meaning that you’re opening a new website), tap one of the Favorites or frequently used sites displayed (refer to Figure 6-5) or tap in the address bar that appears, enter a website address, and then tap the Go key.
Note that you can get to the same new page by simply tapping in the address bar from any site.
The site opens.
3. Switch among open sites by tapping another tab, or tap the Show All Tabs button to see all open web pages.
If you tap Show All Tabs, you can then tap a page to go to it or tap Done to close the All Tabs view.
4. To close a tab, scroll to locate the tab and then tap the Close button in the upper-left corner of the tab.
Using tabbed browsing, you can not only place a site on a tab but also place a search results screen on a tab. If you recently searched for something, those search results will be on your Recent Searches list. Also, if you’re displaying a search results page when you tap the plus (+) button to add a tab, the first ten suggested sites in the results will be listed there for you to choose from.
Viewing browsing history
As you know, when you move around the web, your browser keeps a record of your browsing history. This record can be handy when you visit a site that you want to view again but whose address you’ve forgotten. (We’ve all done it.) On your iPad, you use the Bookmarks popover to get to your history.
Follow these steps to browse your browsing history:
1. ![]() With Safari open, tap Bookmarks.
With Safari open, tap Bookmarks.
2. In the popover that appears, as shown in Figure 6-6, tap the Bookmarks tab.
Alternatively, tap and hold the Back button in Safari to quickly display a list of your browsing history.
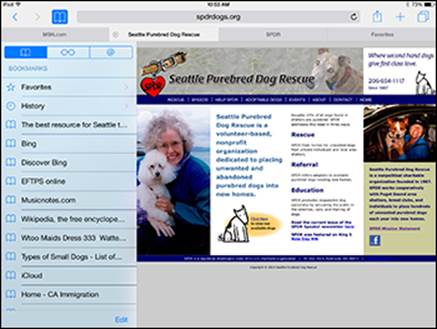
Figure 6-6: In addition to bookmarks, this menu is your gateway to your browsing history.
3. In the Bookmarks list that appears (see Figure 6-7), tap a site to navigate to it.
To clear the history, tap the Clear button in the bottom-right corner (see Figure 6-7). This button is useful when you don’t want your spouse or children to see where you’ve been browsing for birthday or holiday presents!
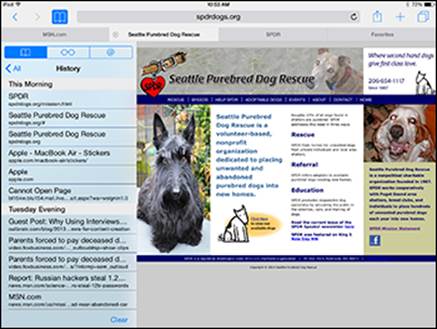
Figure 6-7: Use your finger to scroll down to view more of this list.
Searching the web
If you don’t know the address of the site you want to visit (or you want to do research on a topic or find information you need online), get acquainted with Safari’s Search feature on the iPad. By default, Safari uses the Google search engine.
You can use Spotlight Search on your iPad to search the web without having opened Safari first. Also, with Siri, you simply speak a request, such as “Search the web for information on dogs.” You can also use the On this Page results to go to a match on the currently displayed page.
1. With Safari open, tap in the Search/Address field. (See Figure 6-8.)
The onscreen keyboard appears.
2. Tap one of the suggested sites that appears in a list or enter a search word or phrase.
What you enter can be a topic or a web address.
3. In the search results that are displayed, tap a link to visit that site.
You can change your default search engine from Google to Bing, DuckDuckGo, or Yahoo!. In Settings, tap Safari and then tap Search Engine. Tap Yahoo!, DuckDuckGo, or Bing, and your default search engine is set.
You can browse for specific items such as images, videos, or news by tapping the corresponding link at the top of the Google results screen. Also, tap the More button in this list to see additional options to narrow your results, such as searching for books or shopping sources related to the subject.
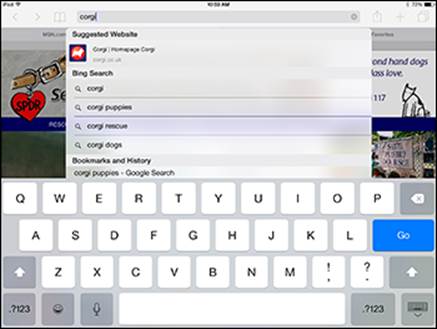
Figure 6-8: Use Search to locate a word or phrase on any site.
Adding and Using Bookmarks
Bookmarks, which you have probably used in other browsers, are a way to save sites that you visit often so that you can easily go to them again. Follow these steps to add bookmarks:
1. ![]() With a site displayed that you want to bookmark, tap the Share button.
With a site displayed that you want to bookmark, tap the Share button.
2. On the popover that appears (see Figure 6-9), tap Add Bookmark.
3. In the Add Bookmark dialog, as shown in Figure 6-10, edit the name of the bookmark (if you want) by tapping the name of the site and using the onscreen keyboard to edit that name.
4. Tap Location and choose whether to save this page to Favorites or Bookmarks.
Favorites is the default option, which displays this site in the Favorites list in the search suggestions.
5. Tap the Save button.
6. ![]() To go to the bookmark, tap Bookmarks and then tap the History tab.
To go to the bookmark, tap Bookmarks and then tap the History tab.
7. On the History list that appears (see Figure 6-11), tap the bookmarked site you want to visit.
If you want to save a web location to your desktop, read “Adding Web Clips to the Home Screen,” later in this chapter.
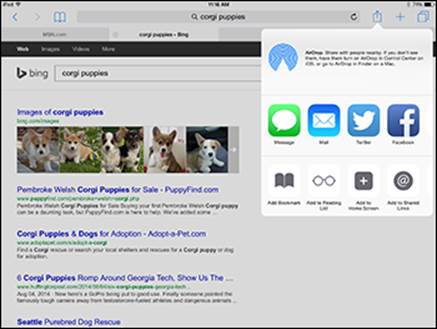
Figure 6-9: Choose to add a bookmark in this menu.
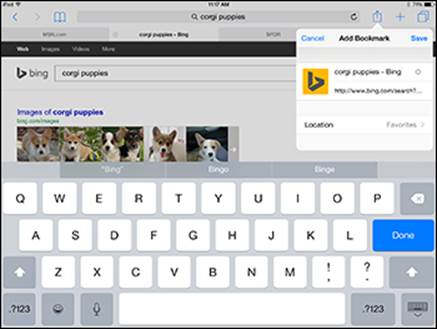
Figure 6-10: Give your bookmark a name that makes sense to you.
When you tap Bookmarks, you can tap Edit and then use the New Folder option to create folders to organize your bookmarks. First, turn on the Show Favorites Bar switch in Settings in the Safari pane. When you next add a bookmark, you can then choose, from the dialog that appears, to add the new bookmark to any folder by tapping Location.
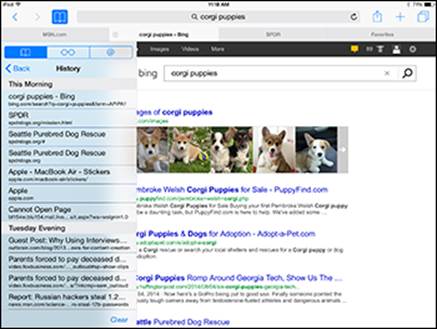
Figure 6-11: Tap to go to a favorite bookmark.
Using Safari Reading List
Remember when you were in school and had lots of reading assignments to keep track of from all your classes? Well, after graduation, reading lists don’t go away; whether you’re staying up-to-date in your chosen field or just keeping up with the latest articles and information, being able to assemble a list of online reading can be a great help. The Safari Reading List provides a way to save content that you want to read at a later time so that you can easily visit it again.
You can save not only links to site pages but also the pages themselves, which allows you to read the content even when you’re offline.
![]() To use Reading List, follow these steps:
To use Reading List, follow these steps:
1. With a site displayed that you want to add to your Reading List, tap the Share button.
2. On the menu that appears, tap Add to Reading List.
The site is added to your list.
3. ![]() To view your Reading List, tap Bookmarks and then go to the Reading tab (the eyglasses icon).
To view your Reading List, tap Bookmarks and then go to the Reading tab (the eyglasses icon).
4. In the Reading List that appears (see Figure 6-12), tap the content you want to revisit and resume reading.
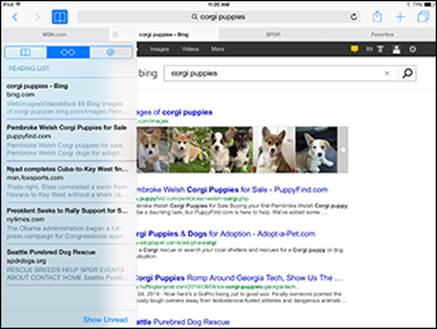
Figure 6-12: It’s so easy to find where you left off reading with Safari’s Reading List.
If you want to see both the Reading List material you’ve read and the material you haven’t read, tap Show All near the bottom of the Reading List tab. To see just the material you haven’t read, use the Show Unread button (refer to Figure 6-12). Be aware, however, that with websites that change content frequently, the content you placed on your Reading List may not be available at a later date.
To save an image on a web page to your Reading List, tap and hold the image until a menu appears, and then tap Add to Reading List (this is available only for some images).
To delete an item, with the Reading List displayed, swipe left or right, and the Delete button appears. Tap this button to delete the item from the Reading List.
Reading with Safari Reader
Reading content on the web isn’t always user friendly. The ads, sidebars, and various distractions can take away from your reading experience. Happily, the Safari Reader feature gives you an e-reader type of experience right within your browser, removing other stories and links as well as those distracting advertisements. Not all websites support the Reader view.
1. Tap the Reader button (see Figure 6-13) on the left side of the Search/Address field when you’re on a site where you’re reading content such as an article that supports the Reader feature.
The content appears in a reader format. (See Figure 6-14.)

Figure 6-13: The Reader button appears when the feature is available for the page you’re viewing.

Figure 6-14: At last … an easy-on-the-eyes reading experience on the web!
2. Scroll down the page.
The entire content is contained in this one long page.
3. When you finish reading the material, just tap the Reader button in the Search/Address field again to go back to the material’s source.
If you’re holding the iPad in landscape orientation, the Reader window doesn’t fill the screen, and you can tap either side of the Reader window to go back to the source material.
If a video is contained in an article that you’re perusing in Reader, it still appears with the standard Play button. Tap the button, and the video plays right within Reader.
When in a Reader screen, tap the small or large letter A at the top of the screen to adjust the font size for the article.
Adding Web Clips to the Home Screen
The Web Clips feature allows you to save a website as an icon on your Home screen so that you can go to the site at any time with one tap. You can then reorganize those icons just as you can reorganize apps icons. (See Chapter 2 in this minibook for information on organizing apps on Home screens.)
Here are the steps for adding web clips:
1. ![]() With Safari open and displaying the site you want to add, tap the Share button.
With Safari open and displaying the site you want to add, tap the Share button.
2. On the popover that appears (refer to Figure 6-9), tap Add to Home Screen.
3. In the Add to Home dialog that appears (see Figure 6-15), you can edit the name of the site to be more descriptive (if you like) by tapping the name of the site and using the onscreen keyboard to edit its name.
4. Tap the Add button.
The shortcut to the site is added to your Home screen.
 You can have up to 15 Home screens on your iPad to accommodate the web clips and apps you download. You can also use folders to organize your web clips and save space on your Home screens. If you want to delete an item from your Home screen for any reason, press and hold any app on the Home screen until all items on the screen start to jiggle and Delete buttons appear on all items except preinstalled apps. Tap the Delete button on the item you want to delete, and it’s gone. (To get rid of the jiggle, press the Home button.)

Figure 6-15: Give your web clip a descriptive name or use the site’s URL.
Saving an Image to Your Photo Library
Have you found a photo that you like online? Maybe your BF’s Facebook image or a picture of your upcoming vacation spot? You can easily save images you find online that are not protected from copying to the iPad Photos app library. Here’s how:
1. Display a web page that contains an image you want to copy.
2. Press and hold the image.
The menu in Figure 6-16 appears unless the website protects images from being copied.
3. Tap the Save Image option (see Figure 6-16).
The image is saved to the Photo Library in the Photos app.
Be careful about copying images from the Internet and using them for business or promotional activities. Most images are copyrighted, and you may be violating that copyright if you use an image in (say) a brochure for your association or a flyer for your community group. Note that some search engines offer the option of browsing only for images that aren’t copyrighted.
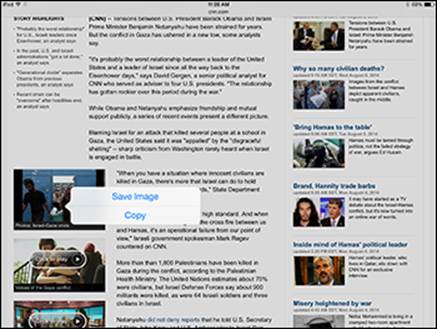
Figure 6-16: Quickly saving an online image into Photos.
Posting photos and printing from Safari
You can post photos on your iPad to sites such as eBay, Craigslist, or Facebook from within Safari. Follow these steps (to follow this example, download the Facebook for iPad app and create a Facebook account, if you haven’t already):
1. Go to Facebook and sign in.
2. Click an Add Photos/Video, Upload, or similar link, like the one shown in Figure 6-17.
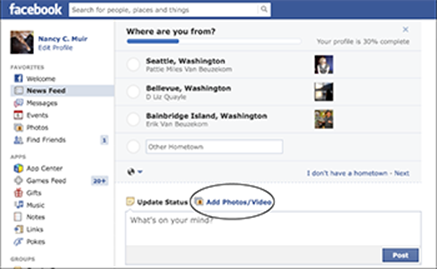
Figure 6-17: Posting photos without leaving Safari is so convenient!
3. Tap a photo source such as Recently Added, and then tap the photo or video you want to post (see Figure 6-18).
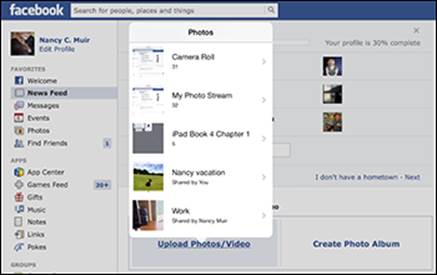
Figure 6-18: Find that great shot of Uncle Ernie or the Grand Canyon right here.
4. Tap Post or Upload, depending on what the site uses, to post the photo or video.
Sending a Link
If you find a great site that you want to share, you can do so easily by sending a link in an email; just follow these steps:
1. ![]() With Safari open and the site you want to share displayed, tap the Share button.
With Safari open and the site you want to share displayed, tap the Share button.
2. On the popover that appears (refer to Figure 6-9), tap Mail.
3. In the message form that appears, which contains the link (see Figure 6-19), enter a recipient’s email address, a subject, and your message.
4. Tap Send.
The email goes on its way.
The email is sent from the default email account that you’ve set up on your iPad. For more about setting up an email account, see Chapter 7 in this minibook.
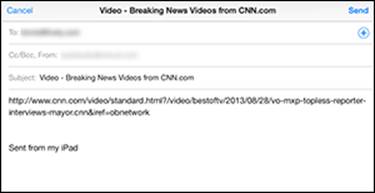
Figure 6-19: Use this simple email form to send an image and message.
When entering a user name or password in any online form, such as an email message or Search field, you can take advantage of Safari’s AutoFill feature. Turn this on by going to Settings and tapping Safari. Safari can then use information from iPad’s Contacts app as well as remember names and passwords that you’ve entered before to offer options for completing text entries as you type.
To tweet the link using your Twitter account, in Step 2 of the preceding steps, choose Tweet, enter your tweet message in the form that appears, and then tap Send. For more about using Twitter with the iPad, see Book II, Chapter 5. If you have a fourth-generation or newer iPad, you can also choose AirDrop in the same menu to share with someone in your immediate vicinity who has an AirDrop-enabled device.
A four-finger swipe from right to left on your screen gets you back to Safari from either Mail or Twitter.
Making Private Browsing and Cookie Settings
Apple has provided some privacy settings for Safari that you should consider using. Private Browsing automatically removes items from the download list, stops Safari from using AutoFill to save information used to complete your entries in the Address/Search field as you type, and erases some browsing history information. These features can keep your online activities more private. The Accept Cookies setting allows you to stop the downloading of cookies (small files that document your browsing history so that you can be recognized by a site the next time you go to or move within that site) to your iPad.
You can control both settings by choosing Safari in Settings. Tap to turn the Do Not Track feature on or off (see Figure 6-20). Tap the arrow next to Block Cookies and choose to never save cookies, always save cookies, or save cookies only from the current website or visited third-party and advertiser sites (the default setting).
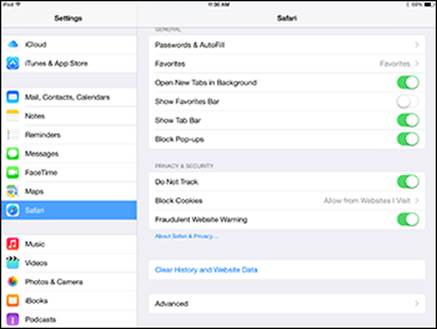
Figure 6-20: Protect your private information and activities from prying eyes with these settings.
You can also use the Clear History and the Website Data setting to clear your browsing history, saved cookies, and other data manually (refer to Figure 6-20).
Printing from Safari
If you have a wireless printer that supports the Apple AirPrint technology (most major manufacturers such as HP, Epson, Lexmark, Canon, and Brother offer at least one AirPrint model at this point), you can print web content using a wireless connection. Here’s how:
1. ![]() With Safari open and the site you want to print displayed, tap the Share button.
With Safari open and the site you want to print displayed, tap the Share button.
2. On the popover that appears, scroll to the right on the bottom list of buttons and then tap Print.
3. In the Printer Options dialog that appears (see Figure 6-21), tap Select Printer.
4. In the list of printers that appears, tap the name of your wireless printer.
5. If you need more than one copy, tap either the plus or minus button in the Copy field to adjust the number of copies to print.
The default is set to print one copy, so you can skip this step if you don’t need more. If you have a printer capable of two-sided printing you can tap the Double-Sided switch.
6. Tap Print to print the displayed page.
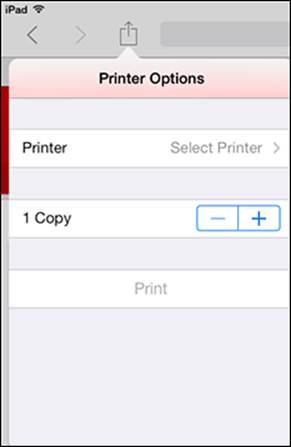
Figure 6-21: Print directly from your iPad if you have a compatible wireless printer.
The Mac applications Printopia and HandyPrint make any shared or network printer on your home network visible to your iPad. Printopia has more features but will cost you, whereas HandyPrint is free. A still better option is an xPrintServer because it can use AirPrint to print to all printers on your network and lets you attach a USB printer.
If you don’t have an AirPrint–compatible wireless printer or don’t wish to use an app to help you print wirelessly, just email a link to the web page to yourself, open the link on your computer, and print from there.
Understanding iCloud Tabs
iCloud Tabs were new with iOS 6.0. What this feature allows you to do is to access all browsing history among your different devices from any device. If you begin to research a project on your iPad before you leave home, for instance, you can then pick up where you left off as you sit in a waiting room with your iPhone.
Follow these steps to use iCloud Tabs:
1. Check to make sure that both devices are using the same iCloud account by going to Settings⇒iCloud and checking the account name.
2. In Settings, tap Safari and make sure that Do Not Track is turned off; this setting allows sharing to take place among devices.
3. Open Safari on your iPad and click the Show All Tabs button in the upper-right corner.
4. Tap another device.
All items in your other device’s browsing history are displayed (see Figure 6-22).
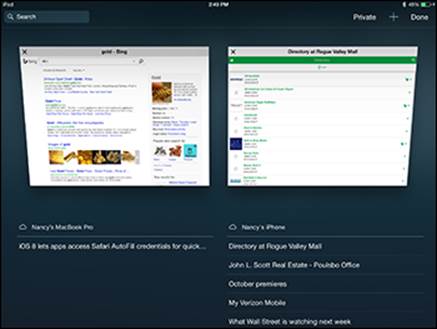
Figure 6-22: Pick up where you left off on another device using iCloud Tabs.
All materials on the site are licensed Creative Commons Attribution-Sharealike 3.0 Unported CC BY-SA 3.0 & GNU Free Documentation License (GFDL)
If you are the copyright holder of any material contained on our site and intend to remove it, please contact our site administrator for approval.
© 2016-2026 All site design rights belong to S.Y.A.