iPad For Dummies, 8th Edition (2016)
Part I. Getting to Know Your iPad
Chapter 3. Synchronicity: Getting Stuff to and from Your iPad
In This Chapter
![]() Getting your head around iCloud
Getting your head around iCloud
![]() Starting your first sync
Starting your first sync
![]() Disconnecting during a sync
Disconnecting during a sync
![]() Synchronizing contacts, calendars, email accounts, and bookmarks
Synchronizing contacts, calendars, email accounts, and bookmarks
![]() Synchronizing music, podcasts, videos, photos, books, and applications
Synchronizing music, podcasts, videos, photos, books, and applications
![]() Synchronizing manually
Synchronizing manually
We have good news and … more good news. The good news is that you can easily set up your iPad so that your contacts, appointments, reminders, events, mail settings, bookmarks, books, music, movies, TV shows, podcasts, photos, and apps are synchronized between your computer and your iPad (or other iDevices). And the more good news is that after you set it up, your contacts, appointments, events, and everything else we just mentioned can be kept up to date automatically in multiple places — on one or more of your computers and iPad, iPhone, and iPod touch devices.
Here’s more good news: Whenever you make a change in one place, it’s reflected almost immediately in all the other places it occurs. So if you add or change an appointment, an event, or a contact on your iPad while you’re out and about, the information is automatically updated on your computers and iDevices. And if no Wi-Fi or cellular network is available at the time, the update syncs the next time your iPad encounters a wireless network, all with no additional effort on your part.
This communication between your iPad and computer is called syncing (short for synchronizing). Don’t worry: It’s easy, and we walk you through the entire process in this chapter.
But wait. We have even more good news. Items that you choose to manage on your computer, such as movies, TV shows, podcasts, and email account settings, are synchronized only one way — from your computer to your iPad, which is the way it should be.
The information in this chapter is based on iTunes 12.3 and iOS 9, the latest and greatest when these words were written. If your screens don’t look exactly like ours, you probably need to upgrade to iTunes 12.3 or higher (choose iTunes⇒Check for Updates), or iOS 9 or higher (on your iPad, tap Settings⇒General⇒Software Update), or both. Both upgrades — iTunes and iOS — are free, and offer useful new features not found in their predecessors.
 Because Apple updates iTunes and iOS often, having the latest and greatest version is a double-edged sword. Sometimes you’ll see something in the book that looks different on your iPad because you’re using a newer version of iOS than we had when we wrote this. If you encounter a figure or an instruction that conflicts with what you’re seeing on your iPad (and you’re certain you’re using the latest and greatest versions of both iTunes and iOS), please drop us a note so that we can make any necessary changes; our email addresses appear at the end of this book’s introduction.
 iOS 9 does let you set up your iPad computer-free (and as such, you’re not required to sync your iPad with a computer running iTunes). Turn to Chapter 2 if you really want to set up your iPad computer-free. But some things are easier with a computer than without.
In this chapter, you find out how to sync all the digital data your iPad can handle, right after this short interlude about Apple’s iCloud service.
A Brief iCloud Primer
Apple’s iCloud service is more than just a wireless hard drive in the sky. iCloud is a complete data synchronization and wireless storage solution. In a nutshell, iCloud stores and manages your digital stuff — your music, photos, contacts, events, and more — and makes it available to all your computers and iDevices automatically.
iCloud pushes information such as email, calendars, contacts, reminders, and bookmarks to and from your computer and to and from your iPad and other iDevices, and then keeps those items updated on all devices wirelessly and without any effort on your part. iCloud also includes nonsynchronizing options, such as photo stream and iCloud photo sharing (see Chapter 9) and email (see Chapter 5).
Your free iCloud account includes 5GB of storage, which is all many users will need. If you have several devices (including Macs and PCs) or like saving data in the cloud, you’ll probably find yourself needing more storage; 20- and 200-gigabyte upgrades are available for $1 and $4 a month, respectively.
A nice touch is that music, apps, periodicals, movies, and TV shows purchased from the iTunes Store, as well as your photo stream and iTunes Match content (see Chapter 7), don’t count against your 5GB of free storage. iBooks don’t count against your 5GB either, but audiobooks do. You’ll find that the things that do count — such as mail, documents, photos taken with your iPad camera, account information, settings, and other app data — don’t use much space, so 5GB may last a long time.
If you’re not using iCloud photo library, you might want to sync your iPad photos with a computer every so often and then delete the photos from the iPad. Otherwise, over time, those photos will take up a lot of space.
If you plan to go PC-free but still want to have your email, calendars, contacts, and bookmarks synchronized automatically and wirelessly (and believe us, you do) between computers and other iDevices, here’s how to enable iCloud syncing on your iPad:
1. On your Home screen, tap Settings.
2. In the list of settings on the left, tap iCloud.
3. Tap Account, and then provide your Apple ID and password (if you haven’t provided it previously).
4. Tap Done.
A list of apps appears. Tap any individual on/off switch to enable or disable iCloud sync for Mail, Contacts, Calendars, Reminders, Safari (Bookmarks), Notes, and News.
In the same list are five items that don’t have switches:
· iCloud Drive: This feature lets iCloud-savvy apps open and save documents and data in iCloud. Your options follow:
· iCloud Drive: Allow apps to use iCloud Drive.
·  Show on Home Screen: This new option creates an iCloud Drive icon on your Home screen. Tap it and you’ll see all the documents all your apps have ever saved to iCloud Drive.
· Look Me Up by Email: Tap to see a list of apps that allow other people to look you up by your Apple ID. When enabled, users of the app will be able to look for you by your first and last names.
· Use Cellular Data: Use cellular data for sending and receiving data from your iCloud Drive. This option is enabled only on Wi-Fi + cellular iPads, of course. We suggest that you enable this option only if you are fortunate enough to have an unlimited data plan.
· Photos: Enable or disable four iCloud services with the by now familiar on/off switches (see Chapter 9 for details). The options are:
· iCloud Photo Library: Automatically upload and store your entire photo library in iCloud. The benefit is that you can access all your photos and videos on all your Macs and iDevices. One possible downside: This option could put you over iCloud’s free 5GB limit.
If you enable iCloud photo library, a pair of mutually exclusive options appear. If you choose Optimize iPad Storage, whenever your iPad runs low on space, your full-resolution photos and videos will automatically be replaced with lower-resolution versions that use less space. Or if you choose Download and Keep Originals, your iPad will download full-resolution versions of every photo and video in your iCloud photo library.
· Upload to My Photo Stream: Automatically upload photos you shoot with your iPad camera and send them to all your devices when connected to Wi-Fi.
When Upload to My Photo Stream is enabled, the Upload Burst Photos option appears. Enable it to upload all photos taken in burst mode; disable to upload only favorites from bursts.
· iCloud Photo Sharing: Create and share albums with other iCloud users, or subscribe to other iCloud users’ shared albums.
· Backup: Enable or disable iCloud backup, which backs up your photo library, accounts, documents, and settings whenever your iPad is plugged in, locked, and connected to Wi-Fi. Tap the Back Up Now button to initiate a backup, well, now.
· Keychain: Keep passwords and credit card information you save up to date on all devices you approve. The info is encrypted and can’t be read by Apple (or, we hope, by anyone else).
· Find My iPad: Tap this option to reveal two choices. The first is Find My iPad, so you can locate, lock, or erase your iPad and prevent anyone else from erasing or reactivating it without your password. The second option, Send Last Location, tells the iPad to send its location when the battery gets critically low.
 Tap Storage (near the top of the screen) to manage iCloud storage or upgrade your storage plan. Tap Family (also near the top) to add or remove family members and shared payment methods from your Family Sharing plan (which you read more about in Chapter 15).
You find out much more about iCloud in the rest of this chapter and several other chapters, so let’s move on to syncing your iPad.
Syncing with iTunes
Synchronizing your iPad with iTunes on a Mac or PC provides three main benefits over computer-free iPad use:
· iTunes makes it easier to manage your media — your music, movies, apps, and so on — than managing it directly on your iPad.
· Managing your iPad’s contents with iTunes provides numerous options that you won’t find anywhere on your iPad.
· Managing your iPad’s apps and Home screen layouts is much easier in iTunes than on your iPad.
Synchronizing your iPad with your computer is a lot like syncing an iPod or iPhone with your computer. If you’re an iPod or iPhone user, the process will be a piece of cake. But even if you’ve never used an iPod, an iPhone, or iTunes, the process isn’t difficult. Follow these steps:
1. Start by connecting your iPad to your computer with the USB cable that came with your iPad.
When you connect your iPad to your computer, iTunes should launch automatically. If it doesn’t, chances are that you plugged the cable into a USB port on your keyboard, monitor, or hub. Try plugging it into one of the USB ports on your computer instead. Why? Because USB ports on your computer supply more power to a connected device than USB ports on a keyboard, monitor, or most hubs, and the iPad requires a lot of that power — even more than an iPod or an iPhone.
You may see an alert asking whether you want iTunes to open automatically when you connect this iPad. Click Yes or No, depending on your preference. You have the opportunity to change this setting later if you like, so don’t give it too much thought.
If iTunes still doesn’t launch automatically, try launching it manually.
2. ![]() Click the iPad icon (shown in the margin), which is near the top left of the iTunes window.
Click the iPad icon (shown in the margin), which is near the top left of the iTunes window.
If you use more than one iDevice with this computer and you hover the pointer over the iPad icon, you’ll see the number of devices (for example, 3 Devices). If you have multiple devices, clicking the button displays a drop-down list with all your devices.
 If you don’t see the iPad icon and you’re positive that it’s connected to a USB port on your computer (not the keyboard, monitor, or hub), try restarting your computer.
The Welcome to Your New iPad screen appears.
3. Click Set Up as New iPad or select a backup from the Restore from This Backup drop-down menu and then click Continue.
 See Chapter 16 for the scoop on restoring from iCloud or iTunes backups. For this example, we tap Set Up as New.
The Sync with iTunes screen appears.
4. Click the Get Started button.
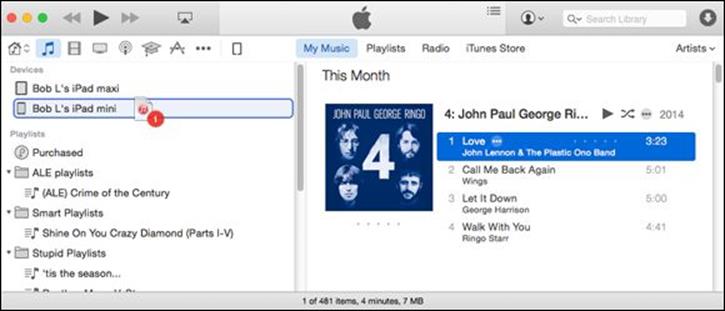
The iPad screen appears, as shown in Figure 3-1.
5. Click the Summary tab near the top of the window on the left, as shown in Figure 3-1.
If you don’t see a Summary tab, make sure your iPad is still connected. If you don’t see your iPad’s name near the top-left corner of the iTunes window, as shown in Figure 3-1, go back to Step 1 and try again.
6. (Optional) If you want to rename your iPad, click its name and type a new one.
We renamed the one in Figure 3-1 Bob LeVitus’s iPad.

Figure 3-1: The Summary pane is pretty painless.
From the Summary pane, you can set any options that you want from the Options area:
· Open iTunes When This iPad Is Connected check box: Select this option if you want iTunes to launch automatically whenever you connect your iPad to your computer. Why might you choose not to enable this option? If you intend to connect your iPad to your computer to charge it, for example, you might not want iTunes to launch every time you connect it. If you do choose to enable it, iTunes launches and synchronizes automatically every time you connect your iPad.
Don’t worry about this setting too much right now. As usual, if you change your mind, you can always come back to the Summary pane and deselect the Open iTunes When This iPad Is Connected check box.
If you do select the Open iTunes When This iPad Is Connected check box but don’t want your iPad to sync automatically every time it’s connected, launch iTunes and choose iTunes⇒Preferences (Mac) or Edit ⇒ Preferences (PC). Click the Devices tab at the top of the window and select the Prevent iPods, iPhones, and iPads from Syncing Automatically check box. This method prevents your iPad from syncing automatically, even if the Open iTunes When This iPad Is Connected option is selected. If you choose this option, you can sync your iPad by clicking the Sync or Apply button that appears in the lower-right corner of the iTunes window when your iPad is selected in the sidebar. (The Apply button is shown in Figure 3-1.)
· Sync with This iPad Over Wi-Fi: If you want to sync automatically over your Wi-Fi connection, select this check box.
 If you choose to sync wirelessly, your iPad and computer must be on the same Wi-Fi network and your iPad must be plugged into a power source for syncing to occur.
You may need to scroll down to see the following options (which are not visible in Figure 3-1).
· Sync Only Checked Songs and Video: If you want to sync only items that have check marks to the left of their names in your iTunes library, select this check box. If you choose to use Apple’s iTunes Match cloud-based storage (described in Chapter 7), as we have in Figure 3-1, this option will appear dimmed and be unavailable.
· Prefer Standard Definition Videos: If you want high-definition videos you import to be automatically converted into smaller standard-definition video files when you transfer them to your iPad, select this check box.
Standard-definition video files are significantly smaller than high-definition video files. You’ll hardly notice the difference when you watch the video on your iPad (unless it’s an iPad with a Retina display, in which case you’ll almost certainly notice), but you can have more video files on your iPad because they take up less space.
The conversion from HD to standard definition takes a long time, so be prepared for very long sync times when you sync new HD video and have this option selected.
If you plan to use Apple’s digital AV adapter (choose the dock version or Lightning version, as appropriate), or Apple TV ($99) to display movies on an HDTV, consider going with high definition. Although the files will be bigger and your iPad will hold fewer videos, the HD versions look spectacular on a big-screen TV. There’s more info on these accessories in Chapter 17.
· Convert Higher Bit Rate Songs to 128/192/256 Kbps AAC: If you want songs with bit rates higher than 128, 192, or 256 Kbps converted into smaller AAC files when you transfer them to your iPad, select this check box and choose the lower bit rate from the drop-down menu (which reads 128 kbps in Figure 3-1).
A higher bit rate means that the song will have better sound quality but use a lot of storage space. Songs that you buy at the iTunes Store or on Amazon, for example, have bit rates of around 256 Kbps. So a four-minute song with a 256-Kbps bit rate is around 8MB; convert it to 128-Kbps AAC, and it’s roughly half that size (that is, around 4MB) while sounding almost as good.
Most people don’t notice much (if any) difference in audio quality when listening to music on most consumer audio gear. So unless you have your iPad hooked up to a great amplifier and superb speakers or headphones, you probably won’t hear much difference, but your iPad can hold roughly twice as much music if you choose this option. Put another way, we’re picky about our audio, and we both used to select this option to allow us to carry more music around with us on our iPads before we subscribed to iTunes Match and Apple Music. Neither of us has noticed the lower bit-rate songs sounding much different (or worse) with the types of headphones and speakers we use with our iPads. Finally, using higher bit rates may increase the time it takes to sync.
· Manually Manage Videos: To turn off automatic syncing in the Video panes, select this check box.
One more thing: If you decide to select the Prevent iPods, iPhones, and iPads from Syncing Automatically check box on the Devices tab in iTunes Preferences (that’s iTunes⇒Preferences on a Mac and Edit⇒Preferences on a PC), you can still synchronize manually by clicking the Sync or Apply button in the lower-right corner of the window.
 Why the Sync or Apply button? Glad you asked. If you’ve changed any sync settings since the last time you synchronized, the Sync button instead says Apply. When you click that button — regardless of its name — your iPad will start to sync.
Backing Up Your iPad
Whether you know it or not, your iPad backs up your settings, app data, photos and videos you shoot, and other information whenever you connect to a computer and use iTunes to sync with, update, or restore your iPad.
Every time you sync your iPad and computer, most (but not all) of your iPad content, including (but not limited to) photos in the Camera Roll album, text messages, notes, contact favorites, and sound settings is backed up to either your computer’s hard drive or to iCloud before the sync begins. Most of your media, including songs, TV shows, and movies, isn’t backed up in this process. This shouldn’t be a problem; these files should be restored when you sync with iTunes again.
Backups are saved automatically and stored on your computer by default, or you can choose to back up to iCloud by clicking the appropriate button in the iTunes Summary pane.
To switch to backing up to iCloud using iTunes on your computer, follow these steps:
1. Connect the iPad to the computer.
If iTunes doesn’t launch automatically when you connect the iPad, launch it now.
2. Click the iPad icon near the top of the window on the left.
If you use more than one iDevice with this computer, select the device from the drop-down list that appears when you click the iPad icon.
3. On the left, click the Summary tab.
4. In the Automatically Back Up section, click iCloud.
If anything goes wonky, or you get a new iPad, you can restore most (if not all) of your settings and files that aren’t synced with iCloud or iTunes on your computer. Or, if you’ve backed up an iPhone, an iPod touch, or another iPad, you can restore the new iPad from the older device’s backup.
Regardless of whether you back up locally or to iCloud, you should encrypt your backups. Unless you enable encryption, important data such as website and Wi-Fi passwords won’t be backed up. Because backups to iCloud are encrypted by default with the Apple ID password associated with the account, you don’t have to do anything else if you choose iCloud backups. But if you back up to your computer, encryption is turned off by default. So enable the Encrypt Local Backup check box (refer to Figure 3-1).
Trust us, you want your backups encrypted; just select the box, type a password (and don’t forget it), and you’ll never have to think about it again.
If you’re using an iPad computer-free, here’s how to enable backing up to iCloud from your iPad (if it’s not already enabled), which we strongly suggest computer-free iPad users do without further delay:
1. Tap Settings ⇒ iCloud.
2. Tap Backup.
3. Tap iCloud Backup to switch it on (green).
 Choosing this option means your iPad no longer backs up automatically if you connect it to a computer.
If you are a computer-free iPad user, you don’t care because you never connect your iPad to a computer. But if you sync your iPad with your computer like many folks do, give some thought to which option suits your needs. Restoring from a computer backup requires physical or Wi-Fi access to that computer, but you don’t need Internet access. Restoring from iCloud requires Internet access — and can happen anywhere on Earth that has it.
Backups are good; select one or the other and move on.
One last thing: Many users maintain both types of backup: iCloud and computer. To do this, merely enable This Computer instead of iCloud (or iCloud instead of This Computer) and click the Back Up Now button. When the backup is finished, switch it back (or not). Either way, you now have a backup on your hard disk and a second backup in iCloud (and redundancy is a good thing when it comes to backups).
Disconnecting the iPad
When an iPad is connected to your computer, you see the eject icon to the right of its name in the devices drop-down menu (Bob LeVitus’s iPad in Figure 3-2). If your iPad is connected and syncing, you’ll instead see the sync icon next to the device (Bob LeVitus’s Other iPad in Figure 3-2). At the same time, a message appears at the top of the iTunes window to inform you that your iPad is syncing, as shown at the top of Figure 3-2.
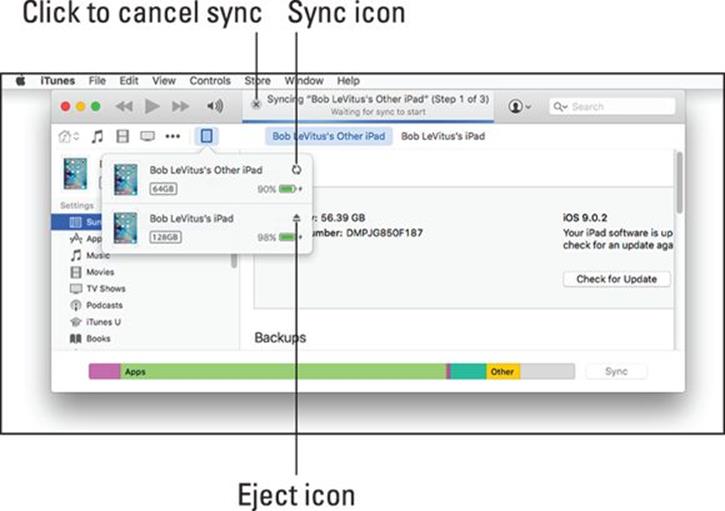
Figure 3-2: During a sync, the eject icon turns into a sync icon; click the x-in-a-circle to cancel the sync.
When the sync is finished, the sync icon in Figure 3-2 stops spinning and morphs back into an eject icon, and the message at the top of the window disappears.
If you disconnect your iPad before the sync finishes, all or part of the sync may fail. Although early termination of a sync isn’t usually a problem, it’s safer to cancel the sync and let it finish gracefully than to yank the cable out while a sync is in progress. So just don’t do that, okay?
To cancel a sync properly and disconnect your iPad safely from your Mac or PC, click the little x-in-a-circle to the left of the sync message in iTunes, as shown in Figure 3-2.
Synchronizing Your Data
Your next order of business is to tell iTunes what data you want to synchronize between your iPad and your computer.
To get started, first select your iPad by clicking the iPad icon (or the devices drop-down menu, if you have more than one iDevice) near the top left of the iTunes window. Then click the Info tab, which is the last tab in the Settings list on the left.
If you’re using iCloud to sync contacts, calendars, bookmarks, or notes, you won’t be able to enable these items in iTunes, as we’re about to describe. Turn off iCloud syncing on your iPad (Settings⇒iCloud) for items you want to sync with your Mac or PC.
On some displays you may see only one or two sections at any time and have to scroll up or down to see the others.
The Info pane has five sections: Sync Contacts, Sync Calendars, Sync Mail Accounts, Other, and Advanced. The following sections look at them one by one. One last thing: To use your iPad with your Google or Yahoo! account, you must first create an account on your iPad, as described in Chapter 5. After you’ve created a Yahoo! or Google account on your iPad, you can enable contact or calendar syncing with it in the Settings app’s Mail, Contacts, Calendars section.
Contacts
In Figure 3-3, note that the section is named Sync Contacts because this image was captured on a Mac. Contacts (formerly known as Address Book) is the Mac application that syncs with your iPad’s Contacts app.
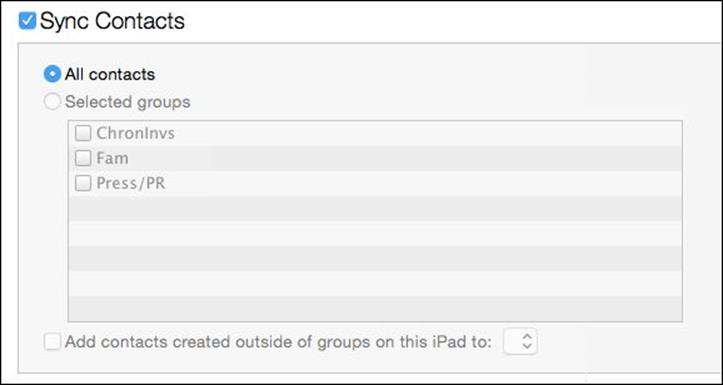
Figure 3-3: Want to synchronize your contacts? This is where you set up things.
If you use a PC, you see a drop-down list that gives you the choices of Outlook, Google Contacts, Windows Address Book, or Yahoo! Address Book. Don’t worry — the process works the same on either platform.
The iPad syncs with the following address book programs:
· Mac: Contacts and other address books that sync with Contacts, such as Microsoft Outlook 2011 or the discontinued Microsoft Entourage
· PC: Windows Contacts (Vista, Windows 7 or later), Windows Address Book (XP), Microsoft Outlook, and Microsoft Outlook Express
· Mac and PC: Yahoo! Address Book and Google Contacts
You can sync contacts with multiple apps.
Here’s what each option does:
· All Contacts: One method is to synchronize all your contacts, as shown in Figure 3-3. This will synchronize every contact in your Mac or PC address book with your iPad’s Contacts app.
· Selected Groups: You can synchronize any or all groups of contacts you’ve created in your computer’s address book program. Just select the appropriate check boxes in the Selected Groups list, and only those groups will be synchronized.
If you sync with your employer’s Microsoft Exchange calendar and contacts, it’s possible that all personal contacts and calendars already on your iPad will be wiped out. You might want to check with the administrator of your Exchange server or other iPad users before you enable syncing with Exchange.
Calendars
The Calendars section of the Info pane determines how synchronization is handled for your appointments, events, and reminders. You can synchronize all your calendars, as shown in Figure 3-4. Or you can synchronize any or all individual calendars you’ve created in your computer’s calendar program. Just select the appropriate check boxes.
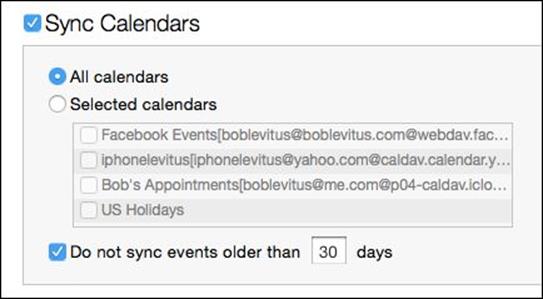
Figure 3-4: Set up sync for your calendar events here.
The iPad syncs with the following calendar programs:
· Mac: iCal or Calendar
· PC: Microsoft Exchange and Outlook 2003, 2007, and 2010
· Mac and PC: Google and Yahoo! Calendars
You can sync calendars with multiple apps.
Advanced
Every so often, the contacts, calendars, mail accounts, or bookmarks on your iPad get so screwed up that the easiest way to fix things is to erase that information from your iPad and replace it with information from your computer.
If that’s the case, go to the Advanced section of the Info pane and click to select the Contacts or Calendars check boxes (or both). Then, the next time you sync, that information on your iPad will be replaced with the contacts or calendars from your computer.
 Because the Advanced section is at the bottom of the Info pane and you have to scroll down to see it, you can easily forget that the Advanced section is there. Although you probably won’t need to use this feature very often (if ever), you’ll be happy you remembered that it’s there if you do need it.
One last thing: Check boxes in the Advanced section are disabled for items not selected. If you’re using iCloud and you want to replace any of these items on your iPad, you must first enable that item as discussed in the previous sections of this chapter. In other words, to replace contacts or calendars we had to disable iCloud syncing before we could enable the check boxes to replace the Contacts and Calendars on this iPad.
Synchronizing Your Media
If you chose to let iTunes manage synchronizing your data automatically, welcome. This section looks at how you get your media — your music, podcasts, videos, and photos — from your computer to your iPad.
Podcasts and videos (but not photos) from your computer are synced only one way: from your computer to your iPad. If you delete a podcast or a video that got onto your iPad via syncing, the podcast or video will not be deleted from your computer when you sync.
That said, if you buy or download any of the following items from the Apple iTunes, iBooks, or App Store on your iPad, the item will be copied back to your computer automatically when you sync:
· Songs
· Ringtones
· Podcasts
· Videos
· iBooks, e-books, and audiobooks
· Apps
· Playlists that you create on your iPad
And if you save pictures from email messages, the iPad camera, web pages (by pressing and holding down on an image and then tapping the Save Image button), or screen shots (which can be created by pressing the Home and sleep/wake buttons simultaneously), these too can be synced using your favorite photo application (as long as it’s Photos, Aperture, or Adobe Photoshop Elements).
You use the Apps, Music, Movies, TV Shows, Podcasts, iTunes U, Books, Audiobooks, Tones, and Photos panes to specify the media that you want to copy from your computer to your iPad. The following sections explain the options you find in each pane.
To view any of these panes, make sure that your iPad is still selected and then click the appropriate tab in the list of Settings on the left.
The following sections focus only on syncing. If you need help acquiring apps, music, movies, podcasts, or anything else for your iPad, just flip to the most applicable chapter for help.
The last step in each section is “Click the Sync or Apply button in the lower-right corner of the window.” You have to do this only when selecting that item for the first time and if you make any changes to the item after that.
Sharp-eyed readers may notice that we aren’t covering syncing iPad apps in this chapter. Apps are so darn cool that we’ve given them an entire chapter, namely Chapter 11. In that chapter, you discover how to find, sync, rearrange, review, and delete apps, and much, much more.
Music, music videos, and voice memos
To transfer music to your iPad, select the Sync Music check box in the Music pane. You can then select the option for Entire Music Library or Selected Playlists, Artists, and Genres. If you choose the latter, select the check boxes next to particular playlists, artists, and genres you want to transfer. You also can choose to include music videos or voice memos or both by selecting the appropriate check boxes at the top of the pane (see Figure 3-5).
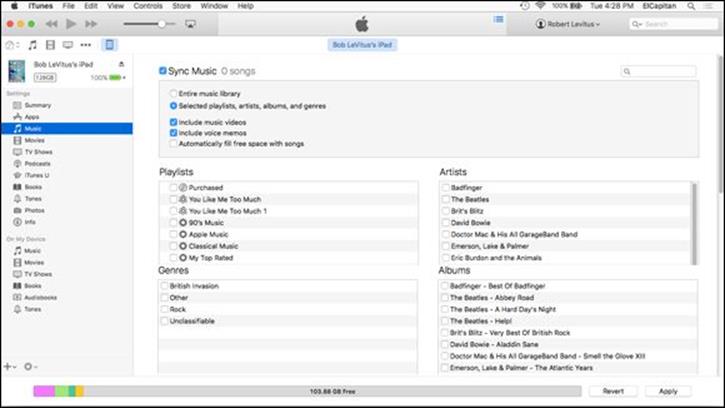
Figure 3-5: Use the Music pane to copy music, music videos, and voice memos from your computer to your iPad.
How much space did I use?
If you’re interested in knowing how much free space is available on your iPad, look near the bottom of the iTunes window while your iPad is connected. You’ll see a chart that shows the contents of your iPad, color-coded for your convenience. As you can see in the figure, this iPad has a whopping 103.88GB of free space. Hover your cursor over any color to see a bubble with info on that category, as shown for Documents and Data in the figure.
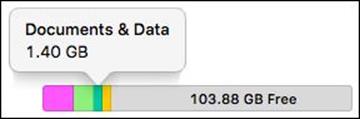
You can find similar information about space used and space remaining on your iPad by tapping Settings⇒General⇒Usage. The iPad’s display isn’t as pretty as the one pictured here, but it is useful when you need that info and you’re not near your computer.
If none of the options just mentioned sounds just right (pun intended), you may prefer using the On This iPad tab, which is covered in some detail later in this chapter.
If you choose Entire Music Library and have more songs in your iTunes library than storage space on your iPad, you’ll see an error message when you try to sync. You’ll also see a yellow alert on the right side of the capacity chart at the bottom of the screen, along with how much over your iPad’s capacity adding the entire music library would make you. To avoid such errors, select playlists, artists, and genres that total less than the free space on your iPad, which is also displayed in the capacity chart at the bottom of the iTunes screen.
Music, podcasts, and video are notorious for using massive amounts of storage space on your iPad. If you try to sync too much media content, you see lots of error messages. Forewarned is forearmed.
One solution is to create one or more iPad-specific playlists and sync only those. Or listen to podcasts with the Podcasts app, which can stream episodes (in addition to letting you download them).
Finally, if you select the Automatically Fill Free Space with Songs check box, iTunes fills any free space on your iPad with music. Think long and hard about enabling this option. We recommend against it because when it’s enabled, you can easily run out of space for pictures and videos you shoot or documents you save (to name just a few of the possible consequences of filling your iPad with songs).
Movies
To transfer movies to your iPad, select the Sync Movies check box and then choose an option for movies you want to include automatically from the pop-up menu, as shown in Figure 3-6. If you choose an option other than All, you can optionally select individual movies and playlists by selecting the boxes in appropriate sections.
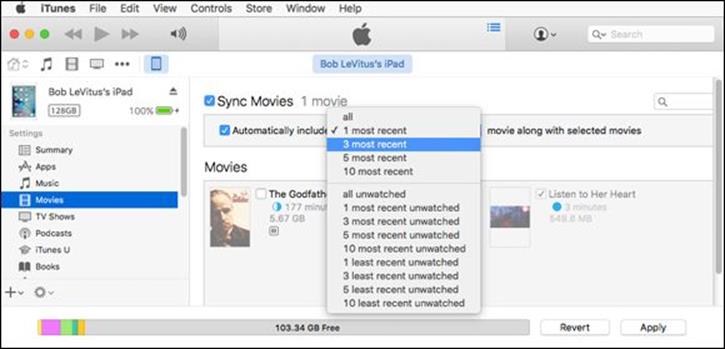
Figure 3-6: Your choices in the Movies pane determine which movies are copied to your iPad.
TV shows
The procedure for syncing TV shows is slightly different from the procedure for syncing movies. First, select the Sync TV Shows check box to enable TV show syncing. Then choose how many episodes to include and whether you want all shows or only selected shows from the two pop-up menus, as shown in Figure 3-7. If you want to also include individual episodes or episodes on playlists, select the appropriate check boxes in the Shows, Episodes, and Include Episodes from Playlists sections of the TV Shows pane.
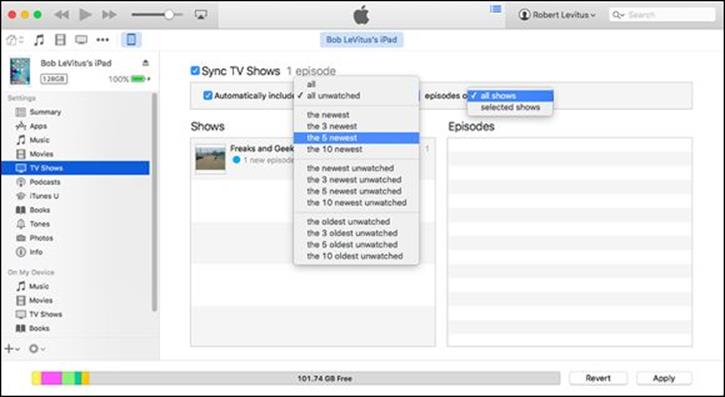
Figure 3-7: These menus determine how TV shows are synced with your iPad.
Regardless of the choices you make in the pop-up menus, you can always select individual episodes by selecting their check boxes.
Podcasts, iTunes U, and books
You can also sync podcasts, educational content from iTunes U, two types of books — e-books for reading and audiobooks for listening — and photos.
If you like to read e-books or watch or listen to podcasts or iTunes U courses, visit the App Store (see Chapter 11) and grab copies of Apple’s free Podcasts, iBooks, and iTunes U apps. Audiobooks, on the other hand, don’t require a special app; you can listen to them using the Music app (see Chapter 7).
Podcasts
To transfer podcasts to your iPad, select the Sync Podcasts check box in the Podcasts pane. Then you can automatically include however many podcasts you want by making selections from the two pop-up menus, the same way you did for TV Shows. If you have podcast episodes on playlists, you can include them by selecting the appropriate check box in the Include Episodes from Playlists section.
iTunes U
To sync educational content from iTunes U, first select the Sync iTunes U check box to enable iTunes U syncing. Then choose how many episodes to include and whether you want all collections or only selected collections from the two pop-up menus. If you want to also include individual items or items on playlists, select the appropriate check boxes in the Items section and Include Items from Playlists section of the iTunes U pane.
Books
By now we’re sure you know the drill: You can sync all your e-books and audiobooks as well as just sync selected titles by choosing the appropriate buttons and check boxes in the Books pane.
To sync e-books, you need the free iBooks app; if you don’t already have it, you can download it from the App Store. For more information on apps and the App Store, read Chapter 11. To start using iBooks, see Chapter 10.
Tones
If you have custom ringtones in your iTunes library, select the Sync Tones check box in the Tones pane. Then you can choose either all ringtones or individual ringtones by selecting their check boxes. These tones can be used also as text tones and alarms.
Photos
Syncing photos is a little different from syncing other media because your iPad has a built-in camera — two cameras, actually — and you may want to copy pictures or videos you take with the iPad to your computer, as well as copy pictures stored on your computer to your iPad.
You won’t see syncing options if you’ve enabled iCloud photo library. But if you haven’t, you can sync your iPad photos and videos with the following programs:
· Mac: Aperture version 3.2 or later, Photos version 1.2 or later, or Image Capture (included with Mac OS X), which can import photos only from your iPad to your Mac (and not from your Mac to your iPad).
Apple ended development of Aperture in 2014. Although you can’t buy a new copy, if you already own Aperture, it still works. That said, it will probably stop working someday, so you might want to start thinking about a different solution.
· PC: Adobe Photoshop Elements or Adobe Photoshop Album (or any other app that recognizes the iPad as a camera when you connect it).
You can also sync photos with any folder on your Mac or PC that contains images.
In the Photos pane, select the Sync Photos From check box, and then choose an application or folder from the pop-up menu (which says Photos in Figure 3-8).
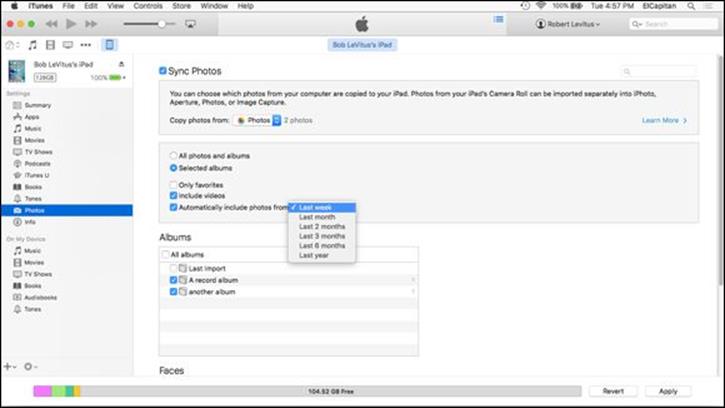
Figure 3-8: The Photos pane determines which photos will be synchronized with your iPad.
If you choose an application that supports photo albums (such as Photoshop Elements, Aperture, or Photos), projects (Aperture), events (Photos), facial recognition and places (Aperture or Photos), or any combination thereof, you can automatically include recent projects (Aperture), events (Photos), or faces (Aperture and Photos) by making a selection from the same pop-up menu.
Note that although Photoshop Elements includes features called Places and Faces, those features are not supported by your iPad.
You can also type a word or phrase in the search field (in the upper right) to search for a specific event or events.
If you choose a folder full of images instead of Photos or another app, you can create subfolders inside it that will appear as albums on your iPad. But if you choose an application that doesn’t support albums or events, or a single folder full of images with no subfolders, you have to transfer all or nothing.
Because we selected Photos in the Sync Photos From menu, and Photos 1.2 (the version installed on our Mac) supports projects and faces in addition to albums and photos, we have the option of syncing any combination of photos, projects, albums, and faces.
If you’ve taken any photos with your iPad or saved images from a web page, an email, an MMS message, or an iMessage since the last time you synced, the appropriate program launches (or the appropriate folder is selected), and you have the option of uploading the pictures to your computer.
Manual Syncing
This chapter has focused on automatic syncing thus far. Automatic syncing is great; it selects items to sync based on criteria you’ve specified, such as genre, artist, playlist, and album. But it’s not efficient for transferring a few items — songs, movies, podcasts, or other files — to your iPad.
The solution? Manual syncing. With automatic syncing, iTunes updates your iPad automatically to match your criteria. Changes to your iTunes library since your last sync are synced automatically to your iPad. With manual syncing, you merely drag individual items to your iPad.
Automatic and manual sync aren’t mutually exclusive. If you’ve set up automatic syncing, you can still sync individual items manually.
You can manually sync music, movies, TV shows, podcasts, and iTunes U lessons but not photos and info such as contacts, calendars, and bookmarks.
To configure your iPad for manual syncing:
1. Connect your iPad to your computer via USB or Wi-Fi.
If iTunes doesn’t open automatically, open it manually.
2. Click the iPad icon.
If you have more than one iDevice, the iPad icon becomes a drop-down menu listing all your connected iDevices. Click the icon to display the menu with your devices, and then select the device you want.
3. (Optional) Click the Summary tab. In the Options section, select Manually Manage Music and Videos.
This step disables automatic syncing for music and videos.
If you’re happy with automatic syncing and just want to get some audio or video from your computer to your iPad, feel free to skip this step.
To add items from iTunes to your iPad without using the syncing controls or performing an actual sync, first click the icon for the type of media you want to copy to your iPad — music, movies, or TV shows — or click the ellipsis (…) to select podcasts, iTunes U, audiobooks, or tones. Then start dragging the media to the left. As you do, a new pane appears on the left side of the iTunes window. Drag the media to this pane, as shown in Figure 3-9, and the media will be copied to your iPad immediately.
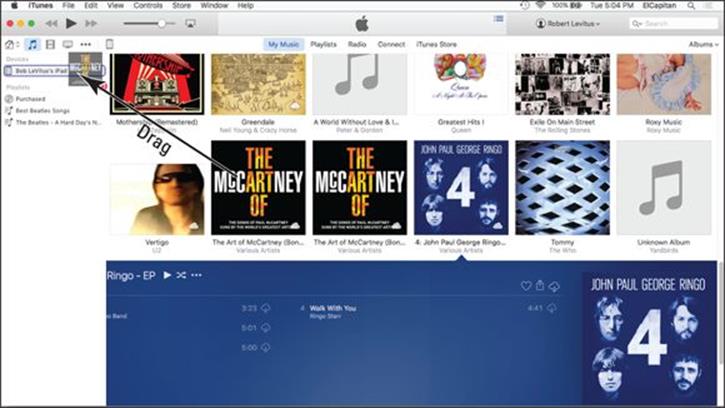
Figure 3-9: Drag and drop to copy media to your iPad.
In Figure 3-9, we dragged an album called “The Art of McCartney” from the My Music tab, using the Album view. You can just as easily drag media from the other items in the menu: Song List, Artists, Genres, or Composers. And you can add other types of content, such as movies, TV shows, podcasts, and books. Just click the appropriate icon or the ellipsis. (We selected the music icon in the figure.)
You can add a media file to your iPad without syncing at least one other way. As before, your iPad has to be connected to your computer via Wi-Fi or USB, so you have to see the iPad icon above the picture of your iPad or this (as well as the previous method) won’t work.
The other way to add media to your iPad without syncing is to click the little ellipsis (…) in a circle next to songs, albums, movies, TV shows, books, and other media. Choose Add To Playlist from the pop-up menu and then choose your iPad in the list to add the file to your iPad.
And that’s pretty much all you need to know to sync files automatically or manually. And if you haven’t figured out how to watch movies or listen to audio on your iPad yet, it’s only because you haven’t read Part III on multimedia, where watching and listening to your iPad are made crystal clear.
All materials on the site are licensed Creative Commons Attribution-Sharealike 3.0 Unported CC BY-SA 3.0 & GNU Free Documentation License (GFDL)
If you are the copyright holder of any material contained on our site and intend to remove it, please contact our site administrator for approval.
© 2016-2026 All site design rights belong to S.Y.A.