iPad For Dummies, 8th Edition (2016)
Part III. The Multimedia iPad
 See www.dummies.com/extras/ipad to find out about international and third-party keyboards.
In this part …
![]() Enjoy listening to music, podcasts, and audiobooks, plus get tips and hints for making your listening even more enjoyable.
Enjoy listening to music, podcasts, and audiobooks, plus get tips and hints for making your listening even more enjoyable.
![]() Everyone loves movies; learn how to capture good video with your iPad, watch video on your iPad, and share video with others with (what else?) your iPad.
Everyone loves movies; learn how to capture good video with your iPad, watch video on your iPad, and share video with others with (what else?) your iPad.
![]() Find out how to shoot photos with your iPad, store them, sync them, and do all kinds of other interesting things with them.
Find out how to shoot photos with your iPad, store them, sync them, and do all kinds of other interesting things with them.
![]() Join the e-book craze: Download and read a good book right on your iPad with the nifty iBooks app and store.
Join the e-book craze: Download and read a good book right on your iPad with the nifty iBooks app and store.
Chapter 7. Get in Tune(s): Audio on Your iPad
In This Chapter
![]() Checking out your iPad’s inner iPod
Checking out your iPad’s inner iPod
![]() Bossing your tunes around
Bossing your tunes around
![]() Having it your way: Tailoring your audio experience
Having it your way: Tailoring your audio experience
![]() Shop 'til you drop with the iTunes Store app
Shop 'til you drop with the iTunes Store app
Your iPad is one of the best iPods ever — and it’s especially adept at playing audio and video. In this chapter, we show you how to use your iPad to listen to music and other audio content; in Chapter 8, we cover video.
We start with a quick tour of the iPad’s Music app. Then we look at how to listen to music on your iPad. After you’re nice and comfy with using it this way, we show you how to customize your listening experience so that it’s just the way you like it. Then we offer a few tips to help you get the most out of using your iPad as an audio player. Finally, we show you how to use the iTunes app to buy music, audiobooks, videos, and more, and how to download free content.
We assume that you already synced your iPad with your computer or with iCloud and that your iPad contains audio content — songs, podcasts, or audiobooks. If you don’t have any audio on your iPad yet, we humbly suggest that you get some (flip to Chapter 3 and follow the instructions for syncing, or launch the iTunes Store app and buy a song or download a free podcast) before you read the rest of this chapter.
Okay, now that you have some audio content on your iPad to play with, are you ready to rock?
Introducing Your iPad’s Music Player
To use your iPad to listen to music, just tap the Music icon on the Home screen. Then, at the bottom of the screen that appears, you should see five icons: For You, New, Radio, Connect, and My Music.
If you don’t see these icons, tap the back icon in the upper-left corner of the screen (the one that looks like a little arrow pointing to the left).
 If you’re used to the previous version of the Music app, you’re surely wondering where your songs, playlists, artists, and everything else went. Don’t worry; everything has been moved to the My Music tab, which we get to a little later in the chapter.
Before we can tell you about the Music app, you’ll need to know about the new Apple Music and the not-so-new iTunes Match subscription services, because almost everything in the Music app works differently if you subscribe to one or both. So, to avoid confusion, read the nearby “Apple Music and iTunes Match Rock” sidebar before you do anything else.
Apple Music and iTunes Match Rock
iTunes Match and Apple Music are a pair of subscription music services offered by Apple.
iTunes Match is the older of the two, designed to let you store all your music in iCloud so you can stream all your songs to any Mac, PC, or iDevice. It performs its magic by first determining which songs in your iTunes library are available in iCloud. And because tens of millions of songs are up there already, chances are that most of your music is already in iCloud. Then, iTunes proceeds to upload a copy of every song it can’t match (which is much faster than uploading your entire music library). The result is that you can stream any song in your iTunes library on any of your Macs, PCs, or iDevices, regardless of whether the song files are available on the particular device.
As a bonus, all the music that iTunes matches plays back from iCloud at 256-Kbps AAC DRM-free quality even if your original copy was lower quality. (You can even replace your lower bit-rate copies by downloading higher-quality versions.)
You can store up to 25,000 songs in iCloud — songs you purchased from the iTunes Store don’t count. The result is that only tracks or albums you specify are stored locally on your devices, saving gigabytes of precious storage space.
At just $24.99 a year, iTunes Match is a bargain, but Apple Music, introduced in early 2015, may be a better (albeit more expensive) option. For $9.99 a month (or $14.99 a month for you and up to five family members), your subscription provides access to more than 30 million songs on demand. That’s good, but what’s even better is that Siri now knows more about music than most people. Of course she can play songs, albums, artists, or genres by name, but you can also ask her to play things such as the number-one song in October of 1958 or music by a particular artist; in a few seconds, you’ll be listening to whatever your heart desires.
Both services require Internet access, but as long as you’re connected you can have your whole music library (iTunes Match) or access to over 30 million songs (Apple Music) on your iPad or other device, which means you won’t have to worry about filling up your iDevice with music.
We’d be remiss if we didn’t warn you that unless you have an unlimited data plan (on your cellular-equipped iPad), you might want to disable iTunes Match and Apple Music over cellular by tapping Settings⇒Music, and then turning off the Use Cellular Data switch. Both subscription services are reasonably priced, but data surcharges could cost you a lot if you’re not careful.
Finally, here’s our favorite tip for subscribers to either service: Before you go off the grid — say, on a plane flight or a cruise — tap the iCloud download button next to all the songs, albums, and playlists you want to have available when you’re at 30,000 feet or out on the ocean.
You’re welcome.
It’s music, just not YOUR music
Before we look at managing and listening to your music, let’s take a quick look at the other tabs in the all-new Music app.
If you’re not an Apple Music subscriber, you’ll see four tabs: My Music, Playlists, Radio, and Connect. If you’re an Apple Music subscriber, you’ll see two additional tabs — For You and New — filled with music that’s not technically yours, though you can listen to it as much as you care to for $9.99 ($14.99 for a family up to six people) per month.
 Apple Music subscribers can listen to (almost) any song, album, or playlist that they discover; nonsubscribers can listen to a preview and purchase (almost) any song, album, or playlist they discover.
Here’s a quick rundown of what you’ll find in each tab:
· Playlists: If you’ve made any playlists — on your iPad or in iTunes on your computer — this is where you’ll find them.
· Radio: If you’ve ever listened to the radio, you will grok the Radio tab immediately.
· Connect: This tab offers news and gossip direct from artists you choose to “follow” (by tapping the Follow button on their artist page). Or tap the See Who You’re Following link near the top of the page to enable Automatically Follow Artists (when you add their songs to your music library). Not every artist “connects” at this time, but new artists appear regularly. If you can’t connect with your favorite artist now, try again in a few weeks or months.
Apple Music subscribers see two additional tabs:
· For You: Many would say the first tab — For You — is the best thing about the new Music app, and we have to agree. Here you’ll finds music that iTunes thinks you’ll enjoy: playlists, albums, artists, and songs that (mostly) aren’t part of your iTunes library. It’s scary how often iTunes suggests music we enjoy; most days we listen to things we find in the For You tab more than we listen to the music we already own.
· New: Here you’ll find the latest releases, plus song and album charts for dozens of musical genres as well as curated playlists featuring new songs and artists.
The Radio, Connect, For You, and New tabs all operate in the same fashion; each is a long page filled with content. Scroll down to see more, and then tap any item to see additional information.
While you’re browsing these tabs, you’ll encounter several small icons; here’s what each of them does:
·  Tap the + icon to add this song, album, or playlist to My Music (available only to Apple Music subscribers).
·  Tap the heart icon to tell iTunes you love this artist, song, album, or playlist, which helps the For You tab suggest music it thinks you’ll enjoy.
·  Tap the ellipsis icon to see additional options, which may include Play Next, Add to Up Next, Add to a Playlist, create Genius Playlist, Make Available Offline, and Show in iTunes Store.
·  Tap the Play icon to listen to this song, album, or playlist.
By now we’re sure you’re ready to start listening to some music. We begin with some radio because we know every one of you has Radio (and some of you may not have anything in your My Music tab yet).
To get started, tap the Music icon on your Home screen and then tap the Radio icon at the bottom of the screen.
The first thing you see at the top of the screen is Beats 1, Apple’s new live radio station. It’s on the air worldwide 24 hours a day, 7 days a week, with world-class programming, interviews, and music. To listen, tap the Listen Now button.
If Beats 1 isn’t your cup of tea, scroll down the page for additional radio stations organized by
· Recently Played: These are stations that — you guessed it — you’ve played recently. Tap one to listen to it now.
· Featured Stations: This handful of stations has been hand-picked for your enjoyment by the nice folks at Apple. Tap one to listen to it.
· Genres: These stations are organized by genre, with stations as subgenres, as shown in Figure 7-1. Tap a subgenre to listen to it.
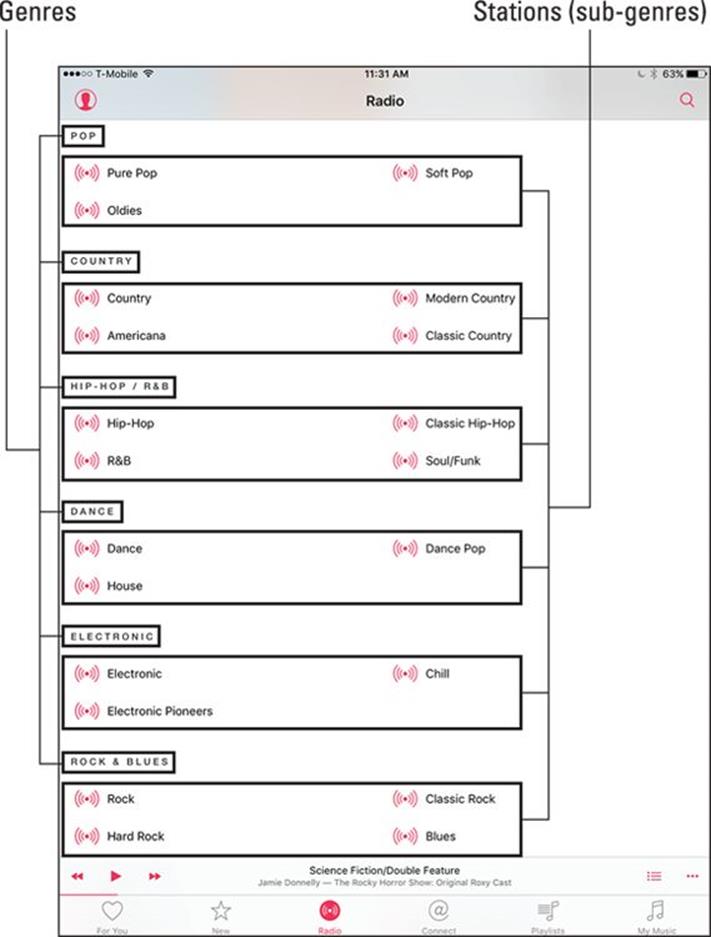
Figure 7-1: Scroll down past Recently Played and Featured Stations to find stations organized by genre.
Did we mention that iTunes Radio is available on your iPhone, iPad, iPod touch, Mac, PC, and Apple TV for free? You’ll hear the occasional ad, but you can listen without ads if you subscribe to iTunes Match.
So that’s how you find a station; tap a station to start listening to it.
When a station is playing, the name of the current song appears near the bottom of the screen (“Science Fiction/Double Feature” in Figure 7-1); tap it for additional options, as shown in Figure 7-2.
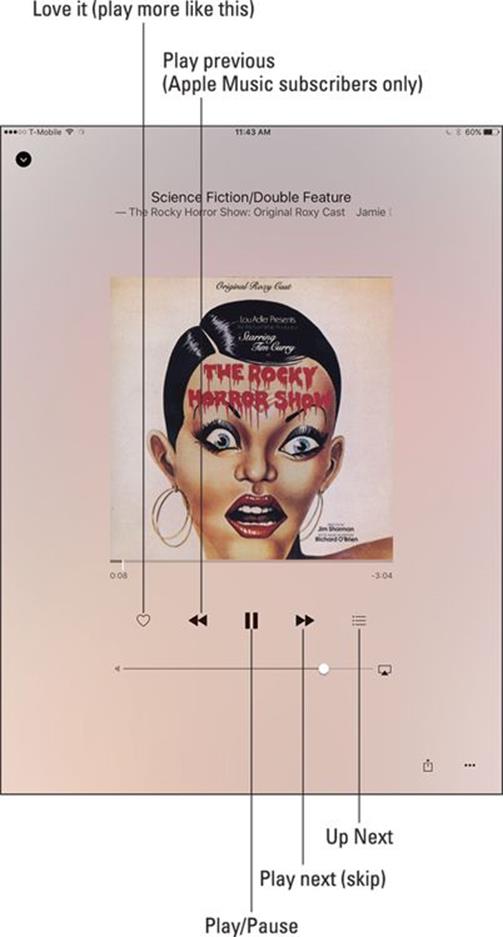
Figure 7-2: Tap the song’s name to see these options.
If you want stations to play more songs you’ll like, tap the heart icon to the left of the play/pause icon whenever a song you love is playing. The more you do this the better the suggestions in the For You tab will be.
And that, friends, is pretty much all you need to know to use and enjoy radio stations in the Music app.
My Music Is Your Music
Moving right along, let’s look at how to listen to music you already own, which is to say the music in your iTunes library. If you haven’t already launched the Music app, do so now, and then tap My Music at the bottom of the screen.
A library without library cards
Music in the My Music tab becomes available by syncing with iTunes (as described in Chapter 3), subscribing to iTunes Match, subscribing to Apple Music, buying music as described near the end of this chapter, or any combination of the four.
Note that a music file doesn't have to be stored on your iPad to be available on the My Music tab. You must have Internet access to play songs that aren’t on your device. If you want to ensure that you'll be able to listen to a song, an album, or a playlist anytime you like, even without an Internet connection, you’ll have to tap the ellipsis button (…) and choose Make Available Offline.
Readers with older devices surely remember previous versions of the Music app, which served up Artist, Album, Song, and Playlist buttons at the bottom of the main screen. You’ll be happy to know that those useful features and many more are right here in My Music, albeit hidden in the drop-down menu at the top of the screen.
Below the Shuffle All and Shuffle buttons is a section with recently added songs or albums, as shown in Figure 7-3. Two of its five items are obscured by the drop-down menu in Figure 7-3; to see a longer list, tap Recently Added.
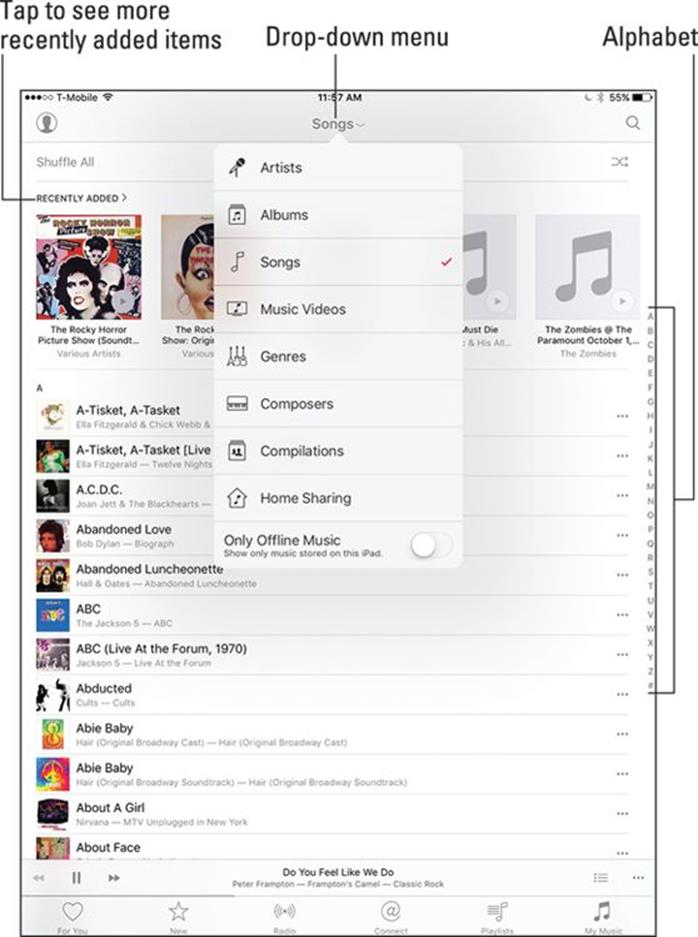
Figure 7-3: To see more of the songs or albums you’ve listened to lately, tap Recently Added.
The drop-down menu at the top of the screen lets you choose how your music is displayed. Tap Artists to see your music arranged by Artists, Albums, Songs, Genres, Composers, and more. If Songs isn’t currently selected, tap the menu and select it to view your songs displayed in alphabetical order, as shown in Figure 7-3.
If the list is longer than one screen (which it probably is), flick upward to scroll down or flick downward to scroll up. An easier way to find a song is to tap one of the little letters on the right side of the screen to jump directly to artists whose names start with that letter. In Figure 7-3, for example, that letter is A. The letters on the right are extremely small, so unless you have tiny fingers, you may have to settle for a letter close to the one you want or tap several times until you select the correct one.
Our technical editor for previous editions, the late Dennis Cohen, suggested that using a stylus instead of your finger may help. He was probably right.
But there’s an even easier way to find an artist — or a song, an album, or a music compilation, for that matter. Tell Siri what you want to hear. All you have to do is ask (see “Using your voice to control your music,” later in this chapter, for details).
If Siri isn’t a viable option for you, you can achieve the same effect by typing your query. Tap the magnifying glass in the upper-right corner and then tap in the search field at the top of the screen to activate the virtual keyboard. Now type the name of the artist (or song or album) you’re looking for, tap the Search button, and enjoy.
So choosing Songs from the drop-down menu displays a list of your songs; just tap any song in the list to hear it. But if you choose Artists, you see a Recently Added section and a list of artists.
When you tap an artist’s name in the main list (or in a list of search results), one of two things occurs:
· If you have songs from more than one album by an artist in your music library: A list of albums and the songs they contain appears. Tap a song to play it or tap the first item in the list of songs on a particular album — Shuffle — to hear all songs on that album at random.
· If all songs in your music library by that artist are on the same album or aren’t associated with a specific album: A list of all songs by that artist appears.
Either way, tap a song and the music starts.
Now for the good news: All the other items in the pop-up menu — Albums, Music Videos, Genres, Composers, and Compilations — work just like Artists. And, of course, Songs is nothing more than a long list of every song in your library. So you now know how to display and browse your library seven ways!
Play it again, list
Tap the Playlists tab at the bottom of the screen to view your playlists. If you don’t have any playlists on your iPad, or don’t know what a playlist is, don’t sweat it. If you had any, you’d find them here; if you don’t know what they are, let us tell you.
Playlists let you create and organize collections of songs around a particular theme or mood: opera arias, romantic ballads, British invasion, or whatever. Or you can make playlists of your favorite albums, favorite songs of all times, or greatest hits collections. (Younger folks sometimes call playlists mixes; older folks think of them as the digital equivalent of a mix tape.)
Tap a playlist and a list of the songs it contains appears. If the list is longer than one screen, flick upward to scroll down. Tap a song in the list and it plays. Or tap Shuffle (above the list of songs) to hear a song at random from the playlist; all subsequent songs will then play at random.
That’s all there is to selecting and playing songs from your playlists.
It’s easier to create playlists in iTunes on your computer than in the Music app on your iPad.
As you see in Chapter 3, you can sync playlists with iTunes on your computer. Or if you’re an Apple Music subscriber, all your playlists are always available on all your devices.
Although it may be easier to create playlists in iTunes on your computer, this is an iPad book, so we show you how to create playlists in the Music app on your iPad:
1. Tap the Music icon.
2. Tap the Playlists icon at the bottom of the screen.
If you’re an Apple Music subscriber, the drop-down menu at the top offers All Playlists, My Playlists, and Apple Music Playlists, plus a switch to show Only Offline Music (music stored on this iPad).
If you don’t subscribe to Apple Music, you’ll see all your playlists but will not see a drop-down menu.
3. Tap New at the top of the screen on the right.
4. In the Title field, type a name for your new playlist.
5. (Optional) Type a description of your new playlist in the Add Description field.
6. Tap Add Songs (below the Add Description field).
7. Tap Artists, Albums, Songs, Music Videos, Genres, Composers, Compilations, or Playlists to choose songs for this playlist.
If you chose Songs, an alphabetical list of songs appears.
If you chose any of the other options, a list of whatever you selected —Genres, Composers, Albums, and such — appears. You need to tap an Album, Genre, Composer, or whatever before you see a list of songs.
Or tap the Search Music field and type the name of the song, artist, album, or whatever.
Finally, note the little + that appears to the right of each song in the list.
8. Tap the + next to a song name to add the song to your playlist.
Repeat this process until you’ve added all the songs you want on this playlist.
9. Tap the Done button in the upper-right corner.
If you create a playlist on your iPad and then sync with your computer, that playlist remains on the iPad and will also appear in iTunes on your computer. Or if you’re an Apple Music subscriber, the playlist will appear on all your other devices within a few minutes.
The playlists remain until you delete them — in iTunes or on your iPad. To remove a playlist in iTunes, select the playlist’s name in the source list and then press Delete or Backspace. To remove a playlist on your iPad, tap the Edit button (at the top of the list of playlists on the left), tap the red minus sign to the left of its name, and then tap the big red Delete button that appears to the right of its name.
You can also edit playlists on your iPad. To do so, tap the playlist you want to edit and then tap the Edit button near the top of the screen on the right to do any (or all) of the following:
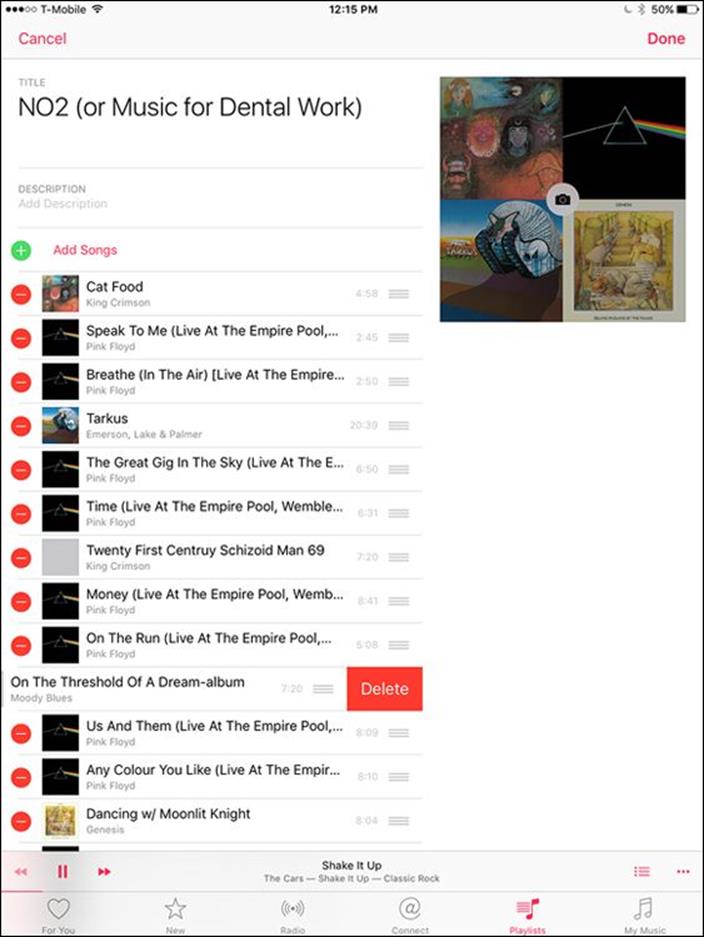
· Move a song up or down in the playlist: A little icon with three gray bars appears to the right of each song, as shown in Figure 7-4. Drag the icon up to move the song higher in the list or drag down to move the song lower in the list.
· Add more songs to the playlist: Tap the + Add Songs button above the list.
· Delete a song from the playlist: Tap the – sign to the left of the song name. Note that deleting a song from the playlist doesn’t remove the song from your iPad or your iTunes library; it removes it only from this particular playlist.
Figure 7-4: Tap the red – sign and then tap the red Delete button to remove a song.
When you finish editing, tap the Done button in the top-right corner of the screen. That’s all there is to creating and managing playlists on your iPad.
Share and share alike
One of our favorite features on the iPad has always been Home Sharing, which lets you use your iPad to stream music, movies, TV shows, and other media content from the iTunes library on your Mac or PC.
iOS 8 introduced a new kind of sharing called Family Sharing, which lets you share purchases from iTunes, iBooks, and the App Store with up to six people in your family without having to share account information. Now you can pay for family purchases with the same credit card and approve kids’ spending right from your iPad or iPhone. Here’s the scoop on both types of sharing: Home and Family.
Home Sharing feature
Turn on Home Sharing to stream music, movies, TV shows, and other media from your computer to your iPad. The big gotcha here is that Home Sharing is available only if your iPad and your computer are on the same Wi-Fi network and use the same Apple ID.
To make Home Sharing work for you, first enable it on your computer, and then enable it on your iPad. To set up Home Sharing on your computer, launch iTunes and then Choose File⇒Home Sharing⇒Turn on Home Sharing. Type your Apple ID and password in the appropriate fields and click the Turn On Home Sharing button. From now on, as long as iTunes is open, your iTunes library will be available for Home Sharing on your Wi-Fi network.
Once Home Sharing is enabled on your computer (and your iPad and computer are on the same Wi-Fi network), enable Home Sharing on your iPad by tapping My Music at the bottom of the screen and then tapping the drop-down menu (which says Songs in Figure 7-3). Tap the last item on the menu, Home Sharing; if any shared libraries are available, you’ll see them listed; tap one or more to make their contents available on your iPad for as long as you’re connected to this Wi-Fi network.
Here’s where it gets cool: Now, when you look at My Music, rather than just seeing the playlists, artists, and songs you’ve synced with your iPad (and your Apple Music), you’ll now see all the playlists, artists, songs, albums, and everything else in the iTunes libraries on the Home Sharing computers as well. And you’ll continue to see the shared content in your Music app as long as your iPad remains connected to this Wi-Fi network.
To switch back to seeing just your music, reverse the process and disable Home Sharing for all other libraries.
 Movies and TV shows shared via Home Sharing don’t appear in the Music app. Look for them in the Videos app, as described in Chapter 8.
Home Sharing is simple, elegant, and free. If you’ve never used this feature, what are you waiting for?
Family Sharing feature
Introduced in iOS 8, Family Sharing lets up to six members of the same family share everything they buy at the iTunes, iBooks, and App Stores. It also provides sharing of family photos and a family calendar, location sharing, and more. Finally, if you have a family subscription to Apple Music, up to five additional family members can use Apple Music at no additional cost.
To set up Family Sharing, one adult in the household (known as the family organizer) invites up to five family members to join and agrees to pay for all iTunes, iBooks, and App Store purchases those family members initiate while part of Family Sharing.
When any family member buys an app, a song, an album, a movie, or an iBook, it is billed directly to the family organizer’s account. The item is then added to the purchaser’s account and shared with the rest of the family. The organizer can turn on Ask to Buy for any family member to require approval for any purchase. When a purchase is initiated, a notification is sent to the family organizer, who can review the item and approve or decline the request from his or her iPad.
The fine print says: You can be part of only one family group at a time and may switch to a different family group only twice per year. The features of Family Sharing may vary based on country and content eligibility.
Family Sharing requires iCloud, and works with the following software and operating systems: iOS 8 or later, OS X 10.10 Yosemite or later, Find My Friends 3.0, Find My iPhone 3.1, and iCloud for Windows 4.0.
To become the family organizer, open Settings, tap iCloud, and then tap Set Up Family Sharing.
After you enable Family Sharing and invite your family members to join, everyone will have immediate access to other members’ music, movies, TV shows, books, and apps, so you can download whatever you want to your iPad with a tap anytime you like without having to share an Apple ID or password.
Taking Control of Your Tunes
Now that you have the basics down, take a look at some other things you can do with the Music app, starting with the controls you see when a song is playing.
 If you don’t see the controls when a song is playing, tap the song name near the bottom of the screen.
Now, here’s how to use those controls:
·  Back icon: Tap to return to whichever list you used last — Playlists, Artists, Songs, and so on.
· Scrubber bar: Drag the little white line (the playhead) along the scrubber bar to skip to any point within the song. Note that the white line is near the left end of the bar in Figure 7-5, which means the person has heard roughly 5 percent of the song so far.
· Time elapsed and remaining: Just below the scrubber bar on the left is the amount of time this song has played already (0:38 in Figure 7-5) and how much of this song remains to be played (-3:58 in the figure).
· Song name, artist, and album: Near the top of the screen see the name of the currently playing song, artist, and album. Tap it once and it will turn into 5 stars; tap to rate this song from one to five stars.
· Love It button: If you love this song, tapping the heart button will help the Music app choose more appropriate tracks in the For You tab.
· Restart/previous track/rewind icon: Tap once to go to the beginning of the track. Tap twice to go to the start of the preceding track in the list. Touch and hold down this icon to rewind the song at double speed.
· Play/pause icon: Tap to play or pause the song.
· Next track/fast forward icon: Tap to skip to the next track in the list. Touch and hold down this icon to fast-forward through the song at double speed.
· Show up next: Tap to switch to a list of upcoming songs. Tap Done when you’re finished to return to the song controls.
· Volume control: Drag the little dot left or right to reduce or increase, respectively, the volume level.
·  AirPlay selector icon: You may or may not see the AirPlay selector icon (shown in the margin and visible in Figure 7-5). AirPlay lets you stream content wirelessly over Wi-Fi from your iPad to any AirPlay-enabled device. Check out the “Playing with AirPlay” sidebar for the details.
· Share button: Tap to share this song with others via AirDrop, Message, Mail, Twitter, Facebook, or any of the other options in your iOS 9 Share sheet.
· Shuffle button: Tap once to shuffle songs and play them in random order. The button turns dark gray when shuffling is enabled. Tap it again to play songs in order again. The button goes back to its original color — light gray.
You can also shuffle tracks in any list of songs — such as playlists or albums — by tapping Shuffle, which appears at the top of the list.
· Repeat button: Tap this button to hear the song that’s currently playing again when it finishes.
· More Options button: Tap this button to add this song to a playlist or delete it from My Music.
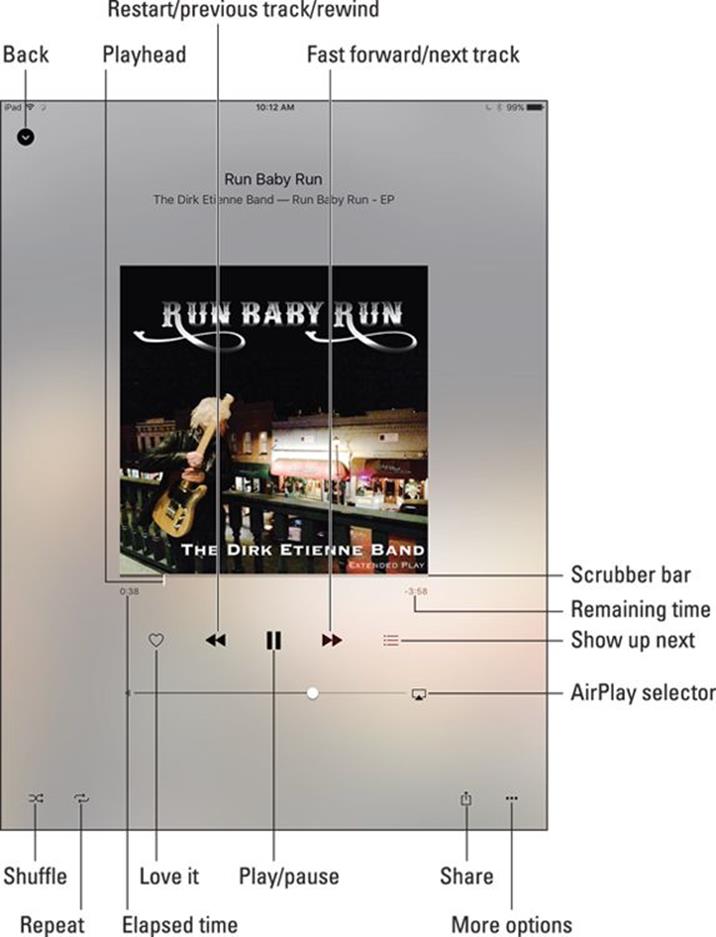
Figure 7-5: These are the controls that appear when a song is playing.
If you’re using the headset included with your iPad, you can squeeze the mic to pause, and squeeze it again to play. You can also squeeze it twice in rapid succession to skip to the next song. Sweet!
Playing with AirPlay
AirPlay is a wicked cool bit of technology baked into every copy of iOS. It enables you to wirelessly stream music, photos, and video to AirPlay-enabled devices such as Apple’s AirPort Express Wi-Fi base station and second-generation (and later) Apple TVs, plus certain third-party devices that have AirPlay technology, including (but not limited to) speakers and receivers.
The AirPlay Selector icon (shown here), which is available in some apps and Control Center, can be quite shy. It will appear only if your iPad detects an AirPlay-enabled device on the same Wi-Fi network. Bob has two Apple TVs at his house, so he sees both when he taps his AirPlay selector icon.
Tapping one Apple TV or the other sends whatever is playing on the Music app to that Apple TV. The Apple TV, in turn, is connected to an HDTV via HDMI (an optical audio cable would suffice if you want to stream only audio, not video).
But wait — there’s more! If you use an Apple TV as your AirPlay-enabled device, in addition to streaming music, video, or photos from your iPad to your HDTV, you can also stream from your Mac, PC, iPad, or iPod touch. Bob just loves his Apple TV and says it is one of his favorite Apple inventions and would be a bargain at twice the price.
And that, gentle reader, is all you need to know to enjoy listening to music (and podcasts and audiobooks) on your iPad. But wait! There’s more! Although you now know all you need to know about listening to music, you can customize your listening experience to make it even better.
Customizing Your Audio Experience
In this section, we cover some Music features designed to make your listening experience more enjoyable.
Setting preferences
You can change a few preference settings to customize your iPad-as-an-iPod experience.
Play all songs at the same volume level
The iTunes Sound Check option automatically adjusts the level of songs so that they play at the same volume relative to each other. That way, one song never blasts out your ears even if the recording level is much louder than that of the song before or after it. To tell the iPad to use these volume settings, you first have to turn on the feature in iTunes on your computer. Here’s how to do that:
1. Choose iTunes⇒Preferences (Mac) or Edit⇒Preferences (PC).
2. Click the Playback tab.
3. Select the Sound Check check box to enable it.
Now, to tell the iPad to use the Sound Check settings from iTunes: On the iPad’s Home screen, tap Settings⇒Music⇒Sound Check.
Choose an equalizer setting
An equalizer increases or decreases the relative levels of specific frequencies to enhance the sound you hear. Some equalizer settings emphasize the bass (low end) notes in a song; other equalizer settings make the higher frequencies more apparent. The iPad has more than a dozen equalizer presets, with names such as Acoustic, Bass Booster, Bass Reducer, Dance, Electronic, Pop, and Rock. Each one is ostensibly tailored to a specific type of music.
The way to find out whether you prefer using equalization is to listen to music while trying out different settings. To do that, first start listening to a song you like. Then, while the song is playing, follow these steps:
1. On the Home screen, tap Settings⇒Music⇒EQ.
2. Tap different EQ presets (Pop, Rock, R&B, or Dance, for example), and listen carefully to the way they change how the song sounds.
3. When you find an equalizer preset that you think sounds good, press the Home button and you’re finished.
If you don’t like any of the presets, tap Off at the top of the EQ list to turn off the equalizer.
 According to Apple’s iPad battery information page (www.apple.com/batteries/ipad.html), applying an equalizer setting to song playback on your iPad can decrease battery life. So you need to decide which is more important to you: using equalization or maximizing battery life.
Set a volume limit for music (and videos)
You can instruct your iPad to limit the loudest listening level for audio or video. To do so, here’s the drill:
1. On the Home screen, tap Settings⇒Music⇒Volume Limit.
2. Drag the slider to adjust the maximum volume level to your liking.
The Volume Limit setting limits the volume of only music and videos. It doesn’t apply to podcasts or audiobooks. And, although the setting works with any headset, headphones, or speakers plugged into the headset jack on your iPad, it doesn’t affect sound played on your iPad’s internal speaker.
Setting a sleep timer
If you like to fall asleep with music playing but don’t want to leave your iPad playing music all night long, you can turn on its sleep timer.
Here’s how:
1. On the Home screen, tap the Clock icon.
2. In the lower-right corner, tap the Timer icon.
3. Set the number of hours and minutes you want music to play, and then tap the When Timer Ends button.
4. Tap the last item in the list, Stop Playing.
If you don’t see the Stop Playing item, don’t be alarmed (semi-clever wordplay intended). You’re simply looking at the middle (or the beginning) of the list of available alert sounds. To scroll to the bottom of the list and find the elusive Stop Playing item, flick upward on the list a few times.
5. In the upper-right corner, tap the Set button.
6. Tap the Start button.
That’s it! If you have music playing already, you’re finished. If not, press the Home button, tap the Music icon, and select the music you want to listen to as you fall asleep. When the specified time period elapses, the music stops playing and your iPad goes to sleep. By then, we hope you’re in slumberland as well.
Using your voice to control your music
Here’s something cool: You can boss around your music by using nothing but your voice. Just press and hold down the Home button (or the equivalent button on a headset) and, after you hear the tone, you can:
· Play an album, an artist, or a playlist: Say “Play” and then say “album,” “artist,” or “playlist,” and the name of the album, artist, or playlist, respectively. You can issue these voice commands at any time except when you’re on a phone call or having a FaceTime video chat. In other words, you don’t have to have music playing for these voice commands to work.
· Shuffle the current playlist: Say “Shuffle.” This voice command works only if you’re listening to a playlist.
· Find out more about the song that’s playing: Ask “What’s playing?” “What song is this?” “Who sings this song?” or “Who is this song by?” Again, these commands work only if you’re already listening to music.
· Get creative: In iOS 9, Siri has a much better grasp on music than before, so try asking her to do things like these:
· Play songs popular in 1973.
· Play music by The Beatles.
· Play the playlist “Music I Love.”
· Play James Taylor’s first album.
· Play some classic rock.
Siri can usually interpret commands such as these, and within seconds you’ll be listening to exactly what you want to hear. Plus, if you’re an Apple Music subscriber, you can ask Siri to play virtually any song in the iTunes Store (30 million plus at last count). Finally, because you’re listening to this music on your iPad, you won’t look stupid when you’re talking to it!
Although we found that controlling your music by speaking works most of the time, in noisy environments the iPad may mishear your verbal request and start playing the wrong song or artist or try to call someone on the phone. Using the wired headset helps. And syntax counts, so remember to use the exact wording in the list.
Siri can also identify songs playing in the background, just like the Shazam app we rave about in Chapter 18. Just ask Siri, “What song is playing?” and let her listen for a moment. She’ll identify the song if she can — and she even has a sense of humor about it. When we asked her to identify “Come Together” by The Beatles, she replied, “This is The Beatles playing ‘Come Together.’ Right now.”
By the way, Siri’s newfound song-identification prowess is powered by Shazam but doesn’t require you to install the Shazam app. That said, we like all the other bells and whistles that the Shazam app brings to the party enough that we still recommend it.
Shopping with the iTunes Store app
Last but certainly not least, the iTunes Store app lets you use your iPad to download, buy, or rent just about anything you can download, buy, or rent with the iTunes application on your Mac or PC, including music, audiobooks, and videos. And, if you’re fortunate enough to have an iTunes gift card or gift certificate in hand, you can redeem it directly from your iPad.
If you want to do any of those tasks, however, you must first sign in to your iTunes Store account. Tap Settings⇒iTunes and App Store⇒Sign In. Type your username and password, and then tap OK. Or, in the unlikely event that you don’t have an iTunes Store account, tap Settings⇒Store⇒Create New Account, and follow the on-screen instructions.
After the iTunes Store knows who you are (and, more importantly, knows your credit card number, gift card balance, or PayPal info), tap the iTunes Store icon on your Home screen and shop until you drop.
All materials on the site are licensed Creative Commons Attribution-Sharealike 3.0 Unported CC BY-SA 3.0 & GNU Free Documentation License (GFDL)
If you are the copyright holder of any material contained on our site and intend to remove it, please contact our site administrator for approval.
© 2016-2026 All site design rights belong to S.Y.A.