iPad For Seniors For Dummies, 8th Edition (2016)
Part III. Having Fun and Consuming Media
Chapter 15. Finding Your Way with Maps
Get ready to …
· Go to Your Current Location
· Change Views
· Zoom In and Out
· Go to another Location
· Drop a Pin
· View Favorites
· Delete a Favorite
· Find Directions
· View Information about a Location
· Add a Location to a Contact
· Share Location Information
· Get Turn-by-Turn Navigation Help
You may have used a maps app on a smartphone before. The big difference with the iPad is its large screen, on which you can view all the beautiful map visuals, traffic flow, and maps in standard views and even 3D as long as you have an Internet connection. You can also display the map and written directions simultaneously or have Maps speak your directions, guiding you as you drive.
If you’re new to the Maps app, you’ll find that it has lots of useful functions. You can find directions with suggested alternative routes from one place to another. You can bookmark locations to return to them. Also, the Maps app makes it possible to get information about locations, such as the phone numbers and web links to businesses. You can even add a location to your Contacts list or share a location with a buddy by using Mail, Messages, Twitter, or Facebook. New with iOS 9 comes the Nearby feature to help you explore local attractions and businesses and the Transit view for public transit maps for select cities around the world.
You’re about to have lots of fun exploring the world of Maps in this chapter.
Go to Your Current Location
1. The iPad can figure out where you are at any time and display your current location as long as you have an Internet connection and have turned Location Services on in Privacy Settings. On the Home screen, tap the Maps icon.
2. Tap the Current Location icon (the small arrow in the bottom-left corner; see Figure 15-1). Your current location is displayed with a pin in it and a pulsating blue circle around it. The circle indicates how accurate the location is; it can be anywhere within the area of the circle.
3. Double-tap the screen to zoom in on your location. (Additional methods of zooming in and out are covered in the “Zoom In and Out” task later in this chapter.)

Figure 15-1
 If you don’t have a 3G or 4G iPad, your current location is a rough estimate based on a triangulation method. Only 3G- and 4G-enabled iPads with the Global Positioning System (GPS) can pinpoint where you are. Still, if you type a starting location and an ending location to get directions, you can get pretty accurate results even with a Wi-Fi–only iPad.
Change Views
1. The Maps app offers three views: Map, Satellite, and Transit. iPad displays Map view (the top-left image in Figure 15-2) by default the first time you open Maps. To change views, with Maps open, tap the Information button in the bottom-right corner of the screen. The Information pop-up menu appears, as shown in the top-right image in Figure 15-2.
2. Tap the Satellite option. Satellite view (refer to the top-right image in Figure 15-2) appears.
3. Tap Show Labels if labels aren’t currently displayed (if they are this option is titled Hide Labels). Satellite view is displayed with street names superimposed.
4. Tap Transit (refer to the bottom image in Figure 15-2).
5. Finally, you can display a 3D effect (see Figure 15-3) on any view by tapping 3D Map in the Information pop-up menu. Tap 2D in the pop-up menu to return to a 2D view.
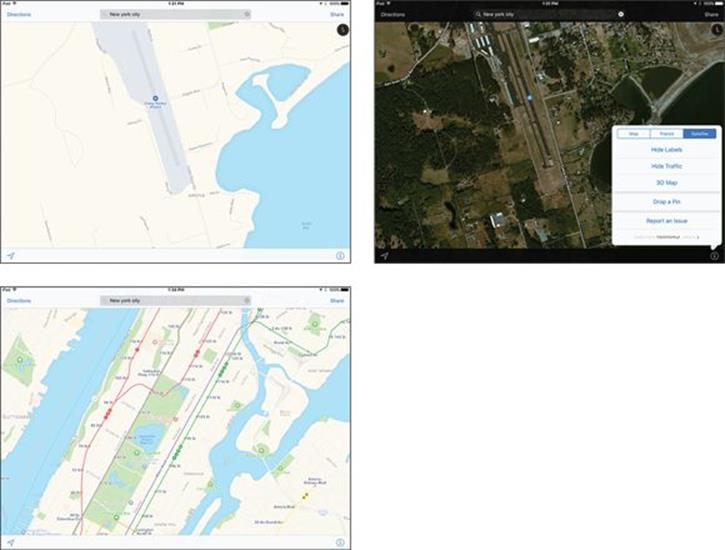
Figure 15-2
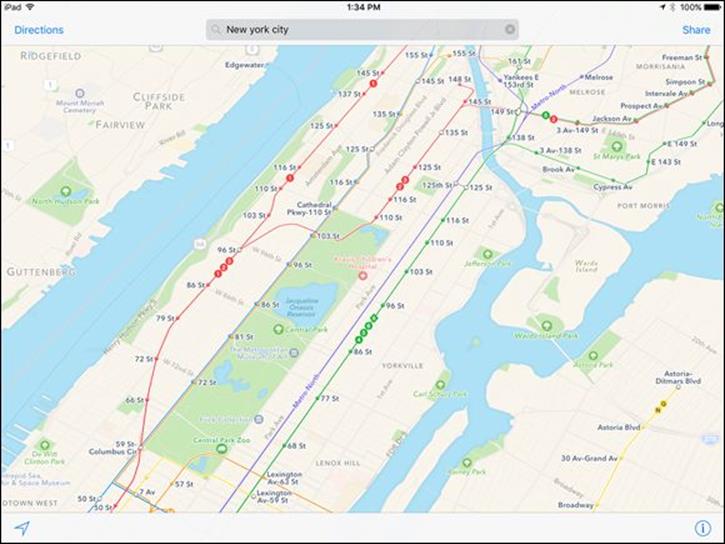
Figure 15-3
The Information pop-up menu Show Traffic feature only provides a traffic overlay on the map in a larger metropolitan area (this feature doesn’t really work in small towns or rural settings — neither does the Transit view), the traffic overlay shows red dashes on roads indicating accidents or road closures and orange dashes to indicate traffic slowdowns to help you navigate your rush-hour commute or trip to the mall.
You can drop a pin to mark a location on a map that you can return to. See the task “Drop a Pin,” later in this chapter, for more about this topic.
To print any displayed map to an AirPrint-compatible printer, just tap Share in the top-right corner and then tap the Print button.
Zoom In and Out
1. You’ll appreciate the Zoom feature because it gives you the capability to see more or less detailed maps and move around a map. With a map displayed, double-tap with a single finger to zoom in.
2. Double-tap with two fingers to zoom out, revealing less detail.
3. Place two fingers together on the screen and move them apart to zoom in.
4. Place two fingers apart on the screen and then pinch them together to zoom out.
5. Press your finger to the screen and drag the map in any direction to move to an adjacent area.
It can take a few moments for the map to redraw itself when you enlarge, reduce, or move around it, so have a little patience. Areas that are being redrawn look like blank grids that fill in eventually. Also, if you’re in Satellite or Transit view, zooming in may take some time; wait, because the blurred image resolves itself.
Go to another Location
1. With Maps open, tap the Search field. The keyboard opens. If you’ve displayed directions for a route, you won’t see the Search field; tap the Clear button on a directions screen to get back to the Search field.
2. Type a location, using a street address with city and state, a stored contact name, or a destination such as Empire State Building or Detroit airport. Maps first displays buttons for categories such as Food and Health that you can use to narrow your search, and then displays suggestions (see Figure 15-4) as you type if it finds any logical matches. Tap a suggestion or tap the Search key on the keyboard, and the location appears, with a pin inserted into it and a label with the location and an Information icon. Note that if several locations match your search term, several pins may display in a suggestions list.
3. Tap the arrow on the right side of the information box to see more about the destination (see Figure 15-5).
 You can tap the Dictation key on the onscreen keyboard and speak a location to the iPad if you prefer. Tap the Search field, tap the Dictation key, speak the location, and then tap the Dictation key or the Search field again. What you’ve spoken appears there. Next, tap the Search button on the keyboard to display the location.
Try pressing the Home button and asking Siri for a type of business or location by zip code. If you crave something with pepperoni, for example, say, “Find pizza in 99208 zip code.” Tap an item in the results to display a small map you can tap to open the Maps app to find your way there. See Chapter 19 for more about using Siri.
When you start a search, icons for categories of nearby businesses appear. This Nearby feature is new in iOS 9. Find out more about using this feature in the last section of this chapter, Find Local Places with Nearby.
4. Tap the screen and drag in any direction to move to a nearby location.
5. Tap the Share button and then tap Add to Favorites. Tap Save in the screen that appears (modifying the location name first, if you like), and the location is saved to Favorites. Now when you tap in the Maps Search field, Favorites are listed. Tap Favorites to view and go to a favorite site.
If you enter a destination such as Bronx Zoo, you may want to enter its city and state as well. Entering just Bronx Zoo landed me in Woodland Park Zoo in Tacoma, Washington, because Maps looks for the closest match to your geographical location in a given category.
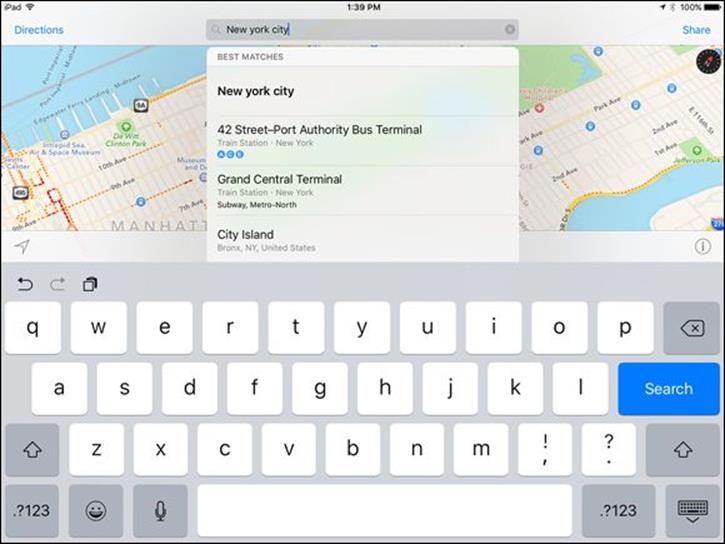
Figure 15-4
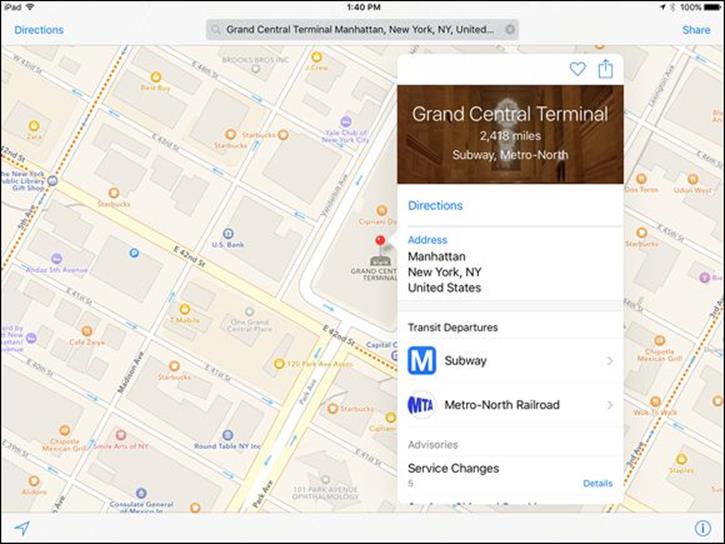
Figure 15-5
Drop a Pin
1. Pins are markers. A green pin marks a start location, a red pin marks a search result, and a blue pin (referred to as the blue marker) marks your iPad’s current location. If you drop a pin yourself, it appears in a lovely purple. Display a map that contains a spot where you want to drop a pin to help you find directions to or from that site. If you need to, you can zoom in to a more detailed map to see a better view of the location you want to pin.
2. Tap and hold your finger on the screen at the location where you want to place the pin. The pin appears.
3. Tap the arrow on the right of the information box to display details about the pin’s location (see Figure 15-6).
If a site has associated reviews on the review site Yelp (www.yelp.com), you can display details about the location and scroll down to read those reviews.
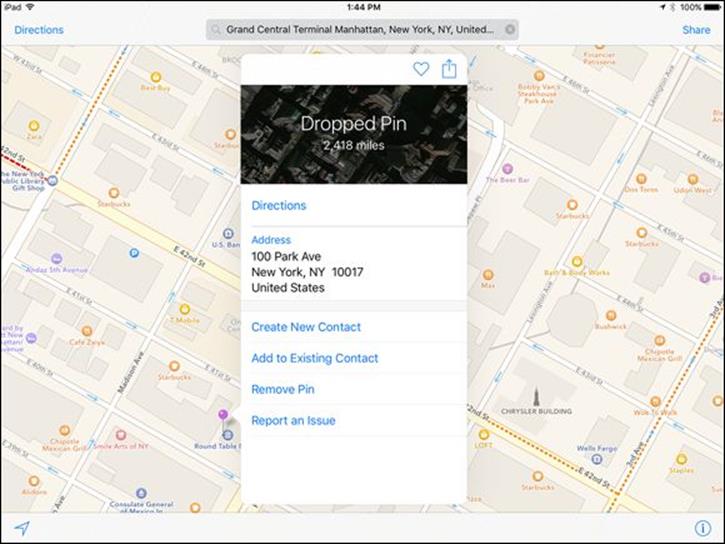
Figure 15-6
View Favorites
1. To view your favorites, tap the Search field, and then tap Favorites on the list that appears.
2. Tap a favorite to go to that location in Maps.
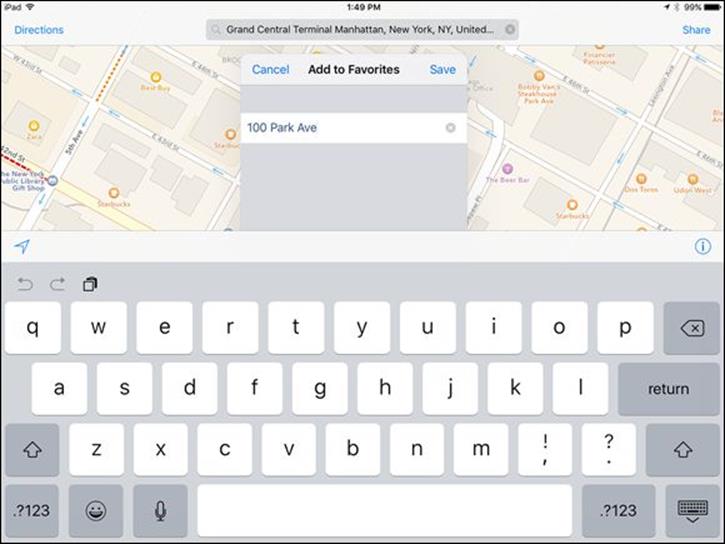
Figure 15-7
Delete a Favorite
1. Tap the Search field and then tap Favorites. In the pop-up menu that appears, tap Edit. A red minus icon appears to the left of each favorite, as shown in Figure 15-8.
2. Tap a red minus icon.
3. Tap Delete. The favorite is removed.
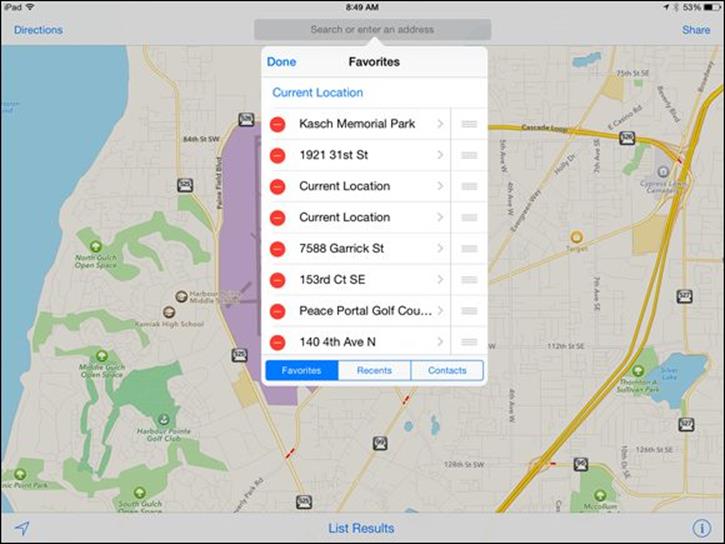
Figure 15-8
You can also use a touchscreen shortcut after you’ve displayed the Favorites in Step 1. Simply swipe across a favorite and then tap the Delete button that appears.
Find Directions
1. You can get directions in a couple of ways. With at least one pin on your map in addition to your current location, tap the Directions button and then tap the End field and enter another address or destination. Tap Route. A line appears, showing the route between your current location and the specified destination (see Figure 15-9). Tap the Drive or Walk tab to get the kind of directions you prefer. Tap Clear to return to the Maps main screen.
2. You can also enter two locations other than your current location to get directions from one to the other. Tap the Directions button in Maps and then tap the Start field. The keyboard appears along with an End field.
3. Enter a starting location.
4. Tap the End field and enter a destination location.
5. Tap the Route button. The route between the two locations is displayed along with step-by step-directions (see Figure 15-10).
6. You can also tap the arrow on the right side of the information bar that appears when you tap any selected pin and use the Directions button to generate directions (refer to Figure 15-6).
7. When a route is displayed, an information bar appears along the bottom of the Directions pane, telling you the distance and the time it takes to travel between the two locations. Tap the menu button on the right side of this bar to display directions.
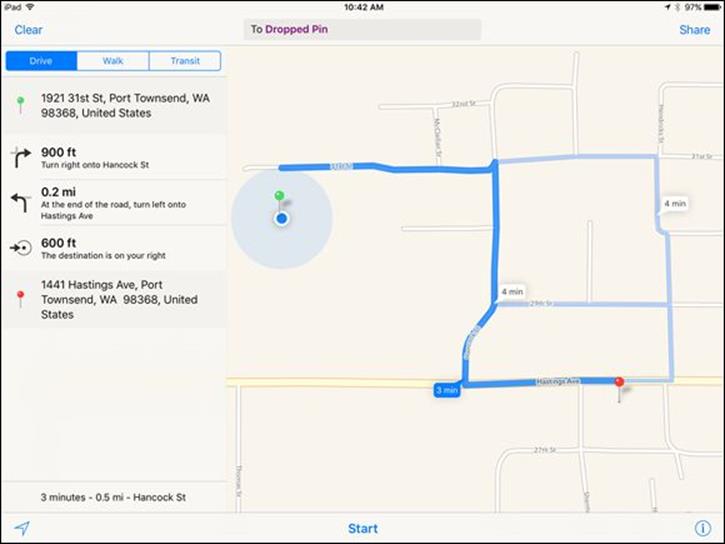
Figure 15-9
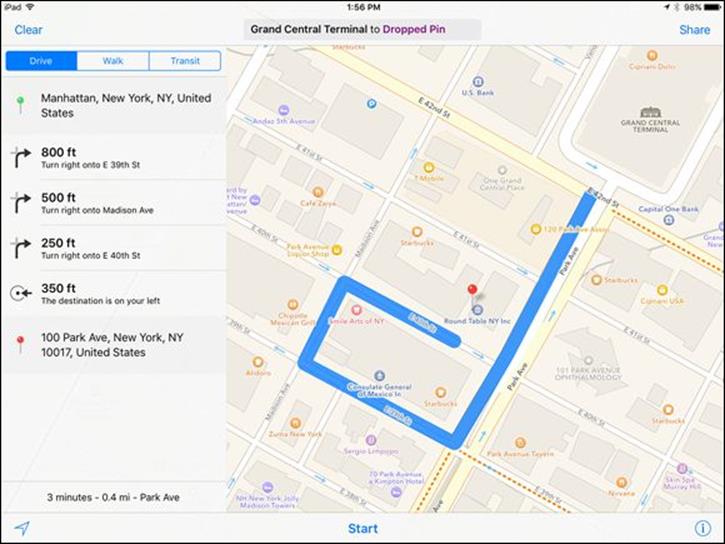
Figure 15-10
View Information about a Location
1. In earlier tasks in this chapter, you display the Information pop-up menu for locations to get directions. In this task, you focus on the useful information displayed there. Go to a location and tap the pin.
2. On the information box that appears above the pinned location, tap the arrow on the right (refer to Figure 15-1).
3. In the Information pop-up menu (see Figure 15-11), tap the web address listed in the Homepage field to be taken to the location’s web page, if it has one associated with it.
4. You can also press and hold either the Phone (refer to Figure 15-11) or Address field and use the Copy button to copy the phone number, for example, so that you can place it in a Notes document for future reference.
5. Tap the map to return to Map view.
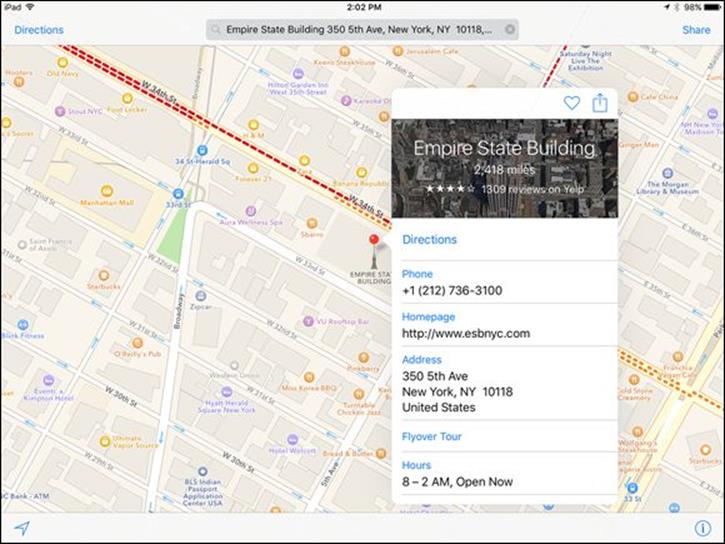
Figure 15-11
Rather than copy and paste information, you can easily save all information about a location in your Contacts address book. See the next task, “Add a Location to a Contact,” to find out how.
 New to iOS 9 is the ability to share a map with the Notes app, which places the current map in a new note. Just tap the Share button and select Notes from the list of options.
Add a Location to a Contact
1. Tap a pin to display the information box.
2. Tap the arrow on the right side of the box.
3. In the Information popover that appears, scroll down and then tap Create New Contact (refer to Figure 15-6).
4. In the resulting dialog, whatever information was available about the location has already been entered. Enter any additional information you need, such as name, phone, or email address.
5. Tap Done. The information is stored in your Contacts address book.
If you tap Add to Existing Contact instead in Step 3, you can choose a contact from your Contacts list to add the location information to.
You can choose a distinct ringtone or text tone for a new contact. Just tap the Ringtone or Text Tone field in the New Contact form to see a list of options. When that person calls via FaceTime or texts you via iMessage, you’ll recognize him from the tone that plays.
Share Location Information
1. Tap a pin to display the information box.
2. Tap the arrow on the right of the box.
3. In the Information pop-up menu that appears, tap the Share button.
4. In the resulting pop-up menu (see Figure 15-12), you can choose to share via AirDrop, Mail, Twitter, or Facebook. New with iOS 9, you also have the ability to share to Notes or Reminders. Tap Mail to see how this option works.
5. On the form that appears, use the onscreen keyboard to enter the recipient’s email address. (If you chose Facebook or Twitter in Step 4, you’d enter recipient information as appropriate to the service you chose.) Then enter a message if you wish, and tap Send to share the map.
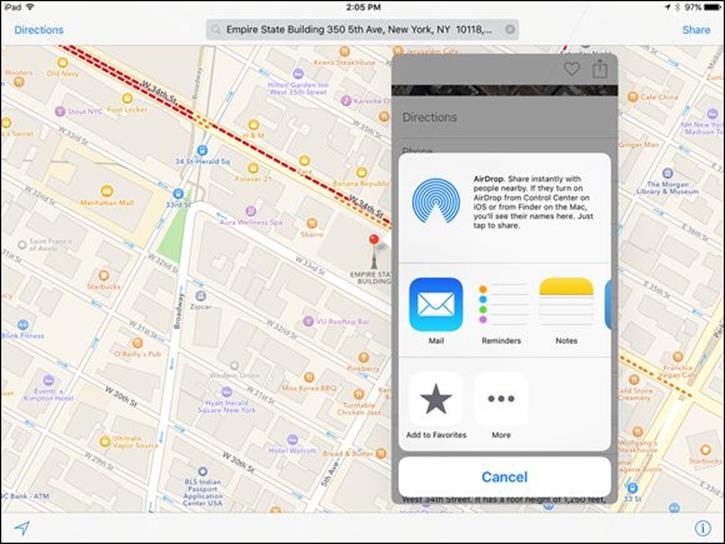
Figure 15-12
You may have to install and set up the Twitter or Facebook app before sharing Maps content with those services. You also must have an account with these services to use them to share content.
Get Turn-by-Turn Navigation Help
1. When you’ve entered directions for a route and displayed that route, you can begin listening to turn-by-turn navigation instructions that can be helpful as you’re driving. Tap the Start button at the bottom of the screen to start. The narration begins, and large text instructions are displayed, as shown in Figure 15-13.
2. Continue driving according to the route until the next instruction is spoken.
3. For an overview of your route at any time, tap the Overview button in the top-right corner. Tap Resume to go back to the step-by-step instructions.
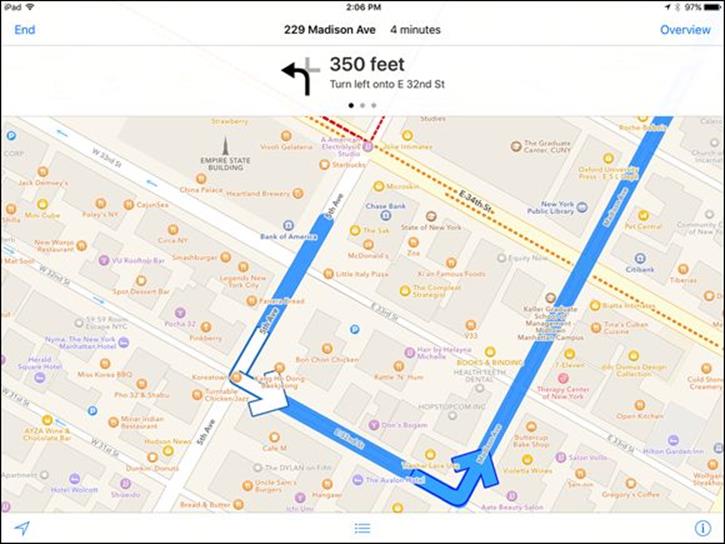
Figure 15-13
To change route information from miles to kilometers, from the Home screen tap Settings ⇒ Maps, and tap In Kilometers to change the setting.
Find Local Places with Nearby
1. When you perform a search, a row of buttons appears across the top of the results. These take you to Nearby results; that is, businesses and services that are near your current location. Begin a search and tap one of these buttons, such as Food.
2. Results for the Food category are shown in Figure 15-14. These offer additional buttons that help you to narrow down the type of food you’re looking for, as well as a list of nearby restaurants. Tap an item in the list. A map of all results in that category, including an information bar for the item you selected, is displayed.
3. Tap the information bar for the location you selected to display more information about it (see Figure 15-15).
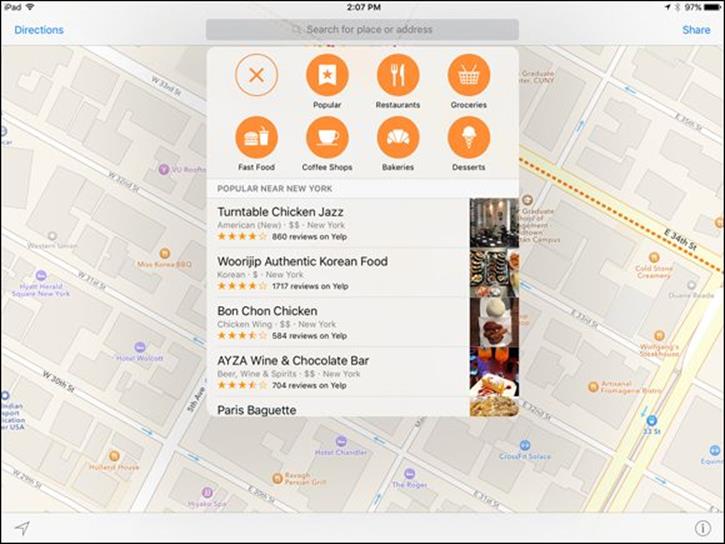
Figure 15-14
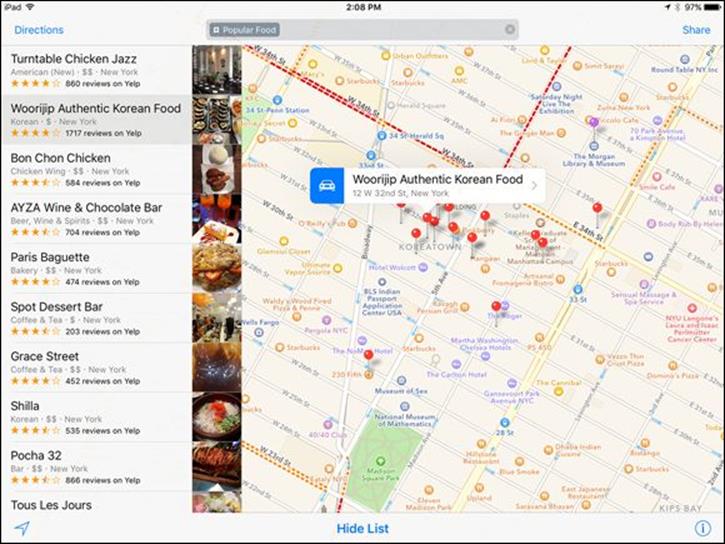
Figure 15-15
All materials on the site are licensed Creative Commons Attribution-Sharealike 3.0 Unported CC BY-SA 3.0 & GNU Free Documentation License (GFDL)
If you are the copyright holder of any material contained on our site and intend to remove it, please contact our site administrator for approval.
© 2016-2026 All site design rights belong to S.Y.A.