iPad: The Missing Manual (2014)
Part 3. The iPad Online
Chapter 11, Getting Online
Chapter 12, The Web
Chapter 13, Email
Chapter 11. Getting Online
The iPad’s concept as an all-screen machine is a curse and a blessing. You may curse it when you’re trying to type text, wishing you had real keys. But when you’re online—oh, baby. That’s when the Web comes to life, looming larger and clearer than you’d think possible. That’s when you see real email, full-blown YouTube videos, hyper-clear Google maps, and all kinds of Internet goodness, right in your hand.
So many of its miracles, however, depend on its ability to get online. And how likely it is to succeed depends on which model you bought: the WiFi-only model, or the WiFi+Celluar model.
Either way, it might help to explore your options.
WiFi Hotspots
WiFi, known to geeks as 802.11, is wireless networking, the same technology that gets computers and phones online at high speed in any WiFi hotspot. All iPad models can get online through WiFi hotspots.
Hotspots are everywhere these days: in homes, offices, coffee shops, hotels, airports, and thousands of other places. Unfortunately, a hotspot is a bubble about 300 feet across; once you wander out of it, you’re off the Internet. So, in general, WiFi is for people who are sitting still.
When you’re in a WiFi hotspot, your iPad usually gets a fast connection to the Internet, as though it’s connected to a cable modem or DSL. Even if you bought the cellular keyboard model, it looks for a WiFi connection first and considers connecting to a cellular network only if there’s no WiFi.
Sequence of Connections
The iPad isn’t online all the time. To save battery power, it opens the connection only on demand: when you check email, request a Web page, and so on. At that point, the iPad tries to get online following this sequence:
§ First, it sniffs around for a WiFi network that you’ve used before. If it finds one, it connects quietly and automatically. You’re not asked for permission, a password, or anything else.
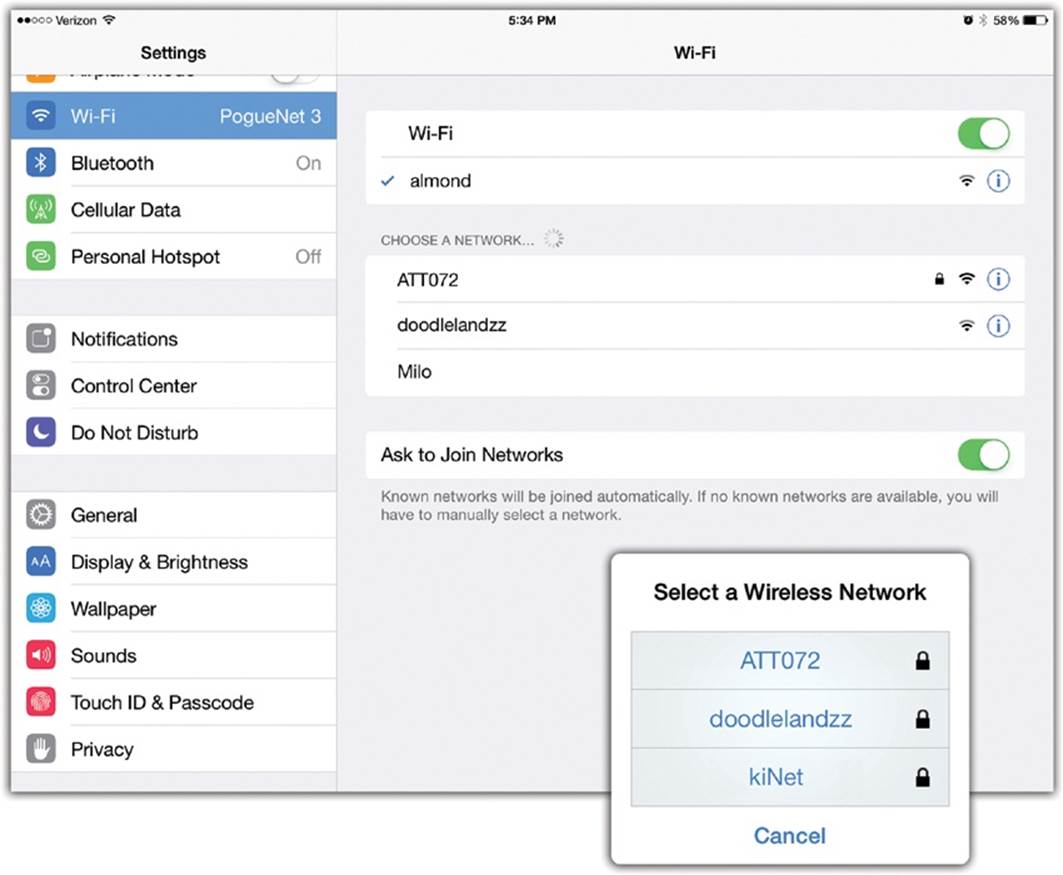
§ If the iPad can’t find a previous hotspot, but it detects a new hotspot, a message appears (below, inset). It displays any new hotspots’ names; tap the one you want. (If you see a ![]() icon, then that hotspot is password protected.)
icon, then that hotspot is password protected.)
Silencing the “Want to Join?” Messages
Sometimes, you might be bombarded by those “Do you want to join?” messages at a time when you have no need to be online. You might want the iPad to stop bugging you—to stop offering WiFi hotspots. In that situation, from the Home screen, tap Settings→Wi-Fi (or tell Siri, “Open WiFi settings”), and then turn off Ask to Join Networks. When this option is off, the iPad never interrupts you by bounding in, wagging its tail, and dropping the name of a new network at your feet. In this case, to get onto a new network, you have to visit the aforementioned Settings screen and select it, as described next.
The List of Hotspots
At some street corners in big cities, WiFi signals bleeding out of apartment buildings give you a choice of 20 or 30 hotspots to join. But whenever the iPad invites you to join a hotspot, it suggests only a couple of them: the ones with the strongest signal and, if possible, no password requirement.
NOTE
Sometimes, the overlords of a hotspot choose not to broadcast its name. If you know its name, though, you can still get onto it; tap Other and type it in.
But you might sometimes want to see the complete list of available hotspots—maybe because the iPad-suggested hotspot is flaky. To see the full list, from the Home screen, open Settings→Wi-Fi. Tap the one you want to join, as shown on the facing page.
TIP
Tap ![]() next to your current hotspot’s name to view an info sheet for techies. It shows your IP address, subnet mask, router address, and other delicious stats. Even mere mortals, however, will sometimes enjoy the Forget this Network button. It removes this hotspot from the list, which is handy if you’ve moved away and don’t need to be reminded of the high speed that was once yours.
next to your current hotspot’s name to view an info sheet for techies. It shows your IP address, subnet mask, router address, and other delicious stats. Even mere mortals, however, will sometimes enjoy the Forget this Network button. It removes this hotspot from the list, which is handy if you’ve moved away and don’t need to be reminded of the high speed that was once yours.
Commercial Hotspots
Tapping the name of the hotspot you want to join is generally all you have to do—if it’s a home WiFi network. Unfortunately, joining a commercial WiFi hotspot—one that requires a credit card number—requires more than just connecting to it. You also have to sign into it.
In general, the iPad prompts you to do that automatically. A big login screen pops up on its own, interrupting whatever you’re doing; that’s where you supply your credit card information or (if you have a membership to this WiFi chain, like Boingo or T-Mobile) your name and password. TapSubmit or Proceed, try not to contemplate the cost, and enjoy your surfing.
(If that login screen doesn’t appear, or if you canceled out of it accidentally, open Safari. You’ll see the “Enter your payment information” screen, either immediately or as soon as you try to open a Web page of your choice.)
Mercifully, the iPad memorizes your password. The next time you use this hotspot, you won’t have to enter it again.
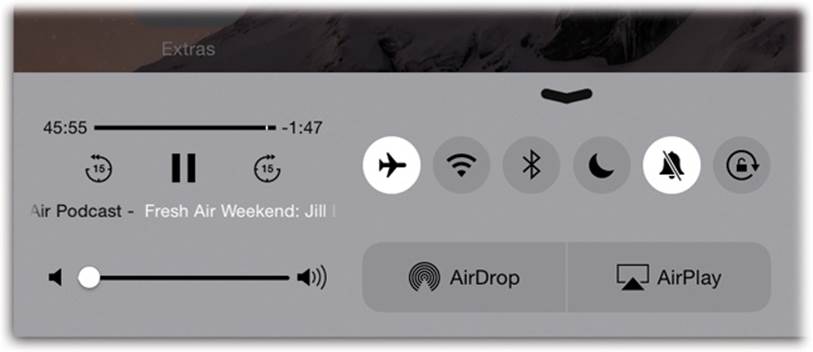
Airplane Mode and WiFi Off Mode
In Airplane mode, you turn off all wireless circuitry: Bluetooth, WiFi, and (if you have it) cellular. Now you can’t get onto the Internet. You’re saving power, however, and complying with airline regulations.
The short way to turn it on: Swipe up from the bottom of the screen; on the Control Center, tap ![]() so it turns white. (The long way: Open Settings, turn on Airplane Mode.)
so it turns white. (The long way: Open Settings, turn on Airplane Mode.)
In Airplane mode, anything that requires Internet access—text messages, Web, email, apps—triggers a message: “Turn off Airplane Mode or use WiFi to access data.” Tap either OK (to back out of your decision) or Settings (to turn off Airplane mode and get online).
You can, however, enjoy all the other iPad features: Music, Camera, and so on. You can also work with stuff you’ve already downloaded to the phone, like email and Web pages you’ve saved in the Reading List.
On the same Control Center, you can also turn WiFi and Bluetooth on and off independently. An iPad is perfectly OK to use on flights—even during takeoff and landing in the U.S.—with WiFi and Bluetooth turned on. (It’s the cellular circuitry, on the cellular iPad, that must be turned off in flight.)
Personal Hotspot (Tethering)
Tethering means using a cellphone as an Internet antenna for gadgets that don’t have cellular built in, like laptops, iPod Touches, game consoles, and WiFi iPads. The phone gets online using the cellular network and shares its connection over a personal WiFi hotspot. (Which is why Apple calls its tethering feature Personal Hotspot.)
Basically, your cellphone connects to the Internet with its cellular connection—and converts that signal into WiFi, as this diagram more or less makes clear.
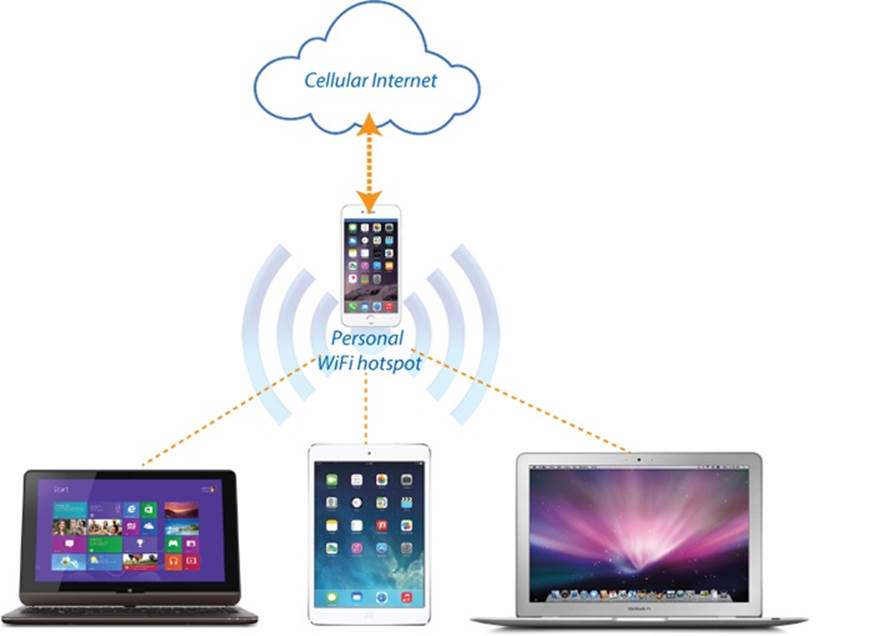
In fact, several gadgets can share the phone’s connection simultaneously. Your phone becomes a personal cellular router, like a MiFi.
But here’s what’s wild: A cellular iPad can be a hotspot, too. You could replace the iPhone in the diagram above with a cellular iPad.
In short, tethering might make your life on the road easier in two ways:
§ If you have a WiFi-only iPad, you can get online if an iPhone or another phone has Personal Hotspot (tethering) turned on.
§ If you have a cellular iPad, it can serve as the conduit to the Internet for your laptop—or other people’s laptops or WiFi iPads.
Apple’s execution of this feature is especially nice. For example, the hotspot shuts itself off 90 seconds after the last laptop disconnects. That’s hugely important, because a personal hotspot is a merciless battery drain.
The hotspot feature may cost, say, $20 a month extra on your cellphone plan, or it may be included in your plan. Either way, beware of the monthly data limit. You’re sharing it among more devices now. It can go quickly, and the overage charges can be steep.
To get this feature, you have to sign up for it by calling your cell company or visiting its Web site (if you didn’t already do that when you signed up for service).
Turning On the Hotspot
On the phone or cellular iPad, open Settings→Cellular→Personal Hotspot (or tell Siri, “Open cellular settings”). Turn Personal Hotspot On.
TIP
Once you’ve used Personal Hotspot for the first time, you won’t have to drill down as far to get to it. A new Personal Hotspot item appears right there on the main Settings screen from now on.
You have to use a password for your personal hotspot; it’s to ensure that people sitting nearby can’t surf using your connection and run up your cell bill. The software proposes a password, but you can edit it and make up one of your own. (It has to be at least eight characters long and contain letters, numbers, and punctuation. Don’t worry—your laptop or other WiFi gadget can memorize it for you.)
Connecting via WiFi
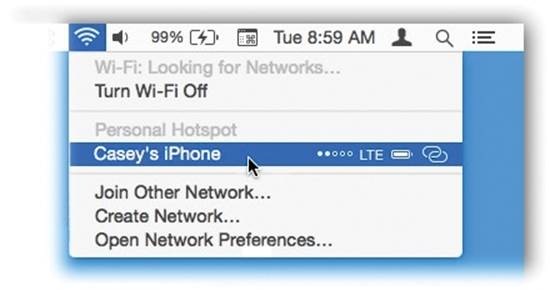
After about 15 seconds, the name of the cellular device (iPhone or cellular iPad) shows up as though it’s any other WiFi network.
On your computer or WiFi iPad, choose that name from the ![]() menu. Enter the password, and bam—you’re now online. On the Mac or a WiFi-only iPad, the
menu. Enter the password, and bam—you’re now online. On the Mac or a WiFi-only iPad, the ![]() changes to look like this:
changes to look like this: ![]() .
.
You can leave the iPhone or iPad put away while connected. You’ll surf away on your laptop, baffling every Internet-less soul around you. Your laptop can now use email, the Web, chat programs—anything it could do in a real WiFi hotspot (just a little slower).
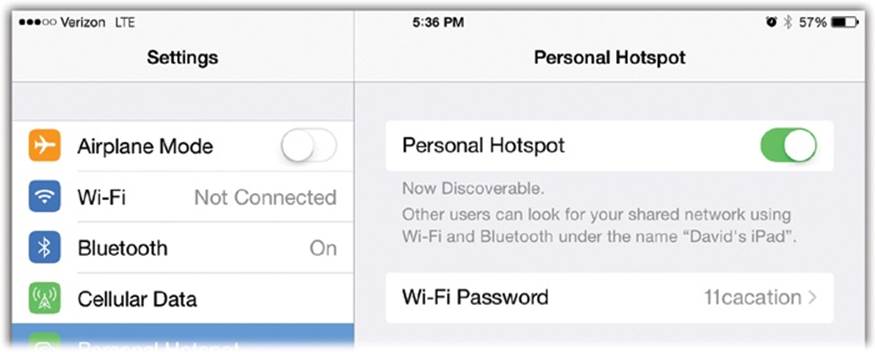
A blue bar appears at the top of the iPhone or cellular iPad’s screen to make you aware that other gadgets are connected; in fact, it shows how many are connected at the moment. (You can tap that bar to open the Personal Hotspot screen in Settings.)
Most carriers won’t let more than five people connect through a single cellular device, though.
Instant Hotspot
If all your gadgets are made by Apple, you get extra perks. Now, when you want your laptop to get online, you don’t have to wake your iPhone or cellular iPad, unlock it, open Settings, and turn on Personal Hotspot.
Instead, its name appears in your laptop’s ![]() menu all the time, ready for choosing—even if the phone or iPad is asleep and locked, and even if Personal Hotspot is turned off! Handily enough, the
menu all the time, ready for choosing—even if the phone or iPad is asleep and locked, and even if Personal Hotspot is turned off! Handily enough, the ![]() menu also shows the battery and signal status of your iPhone or cellular iPad.
menu also shows the battery and signal status of your iPhone or cellular iPad.
When your Mac or WiFi iPad is online through your cellular connection, it tries to save you money by suspending data-intensive jobs like full backups and software updates. And it closes down the connection when you no longer need it, to save your cellular gadget’s battery.
All of this works only if the gadgets both have Bluetooth turned on and are signed into the same iCloud account. The Mac has to be running OS X Yosemite; the touchscreen gadgets need iOS 8.1.
The Cellular iPad
A cellular iPad costs $130 more than a WiFi-only iPad. And you have to pay for cellular service, which costs from $10 to $400 a month, depending on how many gigabytes of data you want to burn through.
But the beauty of a cellular iPad is, of course, that you can use it outside WiFi hotspots. On the road. At the beach, in the car, on the mountain.
TIP
There’s one exception to that “you have to pay to use cellular” bit. If you bought your iPad from T-Mobile, you get 200 megabytes a month of free cellular service, forever. That’s not tons, but it’s enough for email checks and a few Web visits each month, and of course you can always buy more if you need it.
It may be a strange concept at first: Even though it may have cellular service, the iPad is not a phone. It doesn’t get onto the cellular voice network—only onto the cellular data network.
Cellphone carriers (Verizon, AT&T, and so on) maintain separate networks for voice and Internet data—and every year, they spend billions of dollars trying to make those Internet networks faster. Over the years, they’ve come up with data networks like these:
§ Old, slow cellular network. The earliest, slowest cellular Internet connections were called things like EDGE (AT&T) or 1xRTT (Verizon and Sprint). The good part is that these networks are almost everywhere, so a cellular iPad can get online almost anywhere you can make a phone call. You’ll know when you’re on one of these slow networks because your status bar bears a symbol like ![]() or
or ![]() .
.
The bad news is that it’s slow. Dog slow—dial-up slow.
§ 3G cellular networks. The world wasn’t happy with those slow networks, so the carriers spent several years building faster systems called 3G networks. (3G stands for “third generation.” The ancient analog cellphones were the first generation; EDGE-type networks were the second.) Geeks refer to the 3G network standard by its official name: HSDPA, for High-Speed Downlink Packet Access.
Web pages that take 2 minutes to appear using EDGE or 1xRTT show up in about 20 seconds on 3G. Email downloads much faster, especially when there are attachments.
§ 4G networks. AT&T enhanced HSDPA, made it faster using a technology called HSPA+ (High-Speed Packet Access), and calls it 4G. (You’ll know when you’re on one; your status bar says ![]() .) But nobody else recognizes HSPA+ as real 4G, which is why AT&T feels fine advertising “the nation’s largest 4G network.” The other carriers aren’t even measuring that network type.
.) But nobody else recognizes HSPA+ as real 4G, which is why AT&T feels fine advertising “the nation’s largest 4G network.” The other carriers aren’t even measuring that network type.
§ 4G LTE networks. Now this is 4G.
An LTE network (Long-Term Evolution), offered in major cities by all four carriers, gives you amazing speeds—in some cases, faster than your broadband Internet at home. When your status bar says ![]() , it’s fantastic.
, it’s fantastic.
But LTE is not all sunshine and bunnies; it has two huge downsides.
First: coverage. LTE coverage is available in hundreds of U.S. cities, which is a good start. But that still leaves most of the country, including huge chunks of several entire states, without any 4G coverage at all.
Verizon covers the most cities; AT&T has about half as many; Sprint and T-Mobile have only a handful. Whenever you’re outside the high-speed areas, your iPad falls back to the slower speeds.
The second big problem with LTE is that, to receive its signal, a phone’s circuitry uses a lot of power.
You’ll always know which kind of network you’re on, thanks to the icons on the status bar: You’ll see either ![]() for WiFi, or one of the cellular icons (
for WiFi, or one of the cellular icons (![]() ,
, ![]() ,
, ![]() ,
, ![]() , or
, or ![]() ).
).
Or “No service” if there’s nothing available at all.
NOTE
The iPad connects to the cellular network only if it can’t find a WiFi hotspot to join.
And how much faster is one than the next? Well, network speeds are measured in kilobits and megabits per second (which isn’t the same as the more familiar kilobytes and megabytes per second; divide by 8 to get those).
The EDGE/1xRTT network is supposed to deliver data from 70 to 200 kbps, depending on your distance from the cell towers. 3G gets 300 to 700 kbps. A WiFi hotspot can spit out 650 to 2,100 kbps. And 4G LTE can deliver speeds as fast as 100 Mbps on the iPad Air 2. You’ll rarely get speeds near the high ends—but even so, you can see that there’s quite a difference.
The bottom line: LTE and WiFi are awesome. EDGE/1xRTT—not so much.
TIP
You sometimes might want to turn off WiFi, but leave cellular on. Why? Because sometimes, the iPad bizarrely won’t get online at all. It’s struggling to use a WiFi network that, for one reason or another, isn’t connecting to the Internet. By turning WiFi off, you force the iPad to use its cell connection—which may be slower, but at least it works!
Signing Up for Service
You can thank Steve Jobs for this one: He negotiated with the cellular carriers to offer à la carte cell service for the cellular iPad. You don’t have to sign up for a two-year contract, as you would with a cellphone. You can buy a month here, a month there.
When you want to order some, open Settings→Cellular→Set Up Cellular Data; choose the plan you want. Depending on how you bought your iPad, you may even be able to switch plans and carriers from time to time (The Universal Apple SIM Card).
Twitter and Facebook
Twitter, of course, is a free service (sign up at twitter.com) that lets you send out short messages, like text messages, to anyone who wants to get them from you. On Twitter, people spread news, links, thoughts, and observations directly to the people who care—incredibly quickly. And Facebook is—well, Facebook. 1.3 billion people sharing their personal details and thoughts can’t be wrong, right?
These services are woven into the built-in iPad apps.
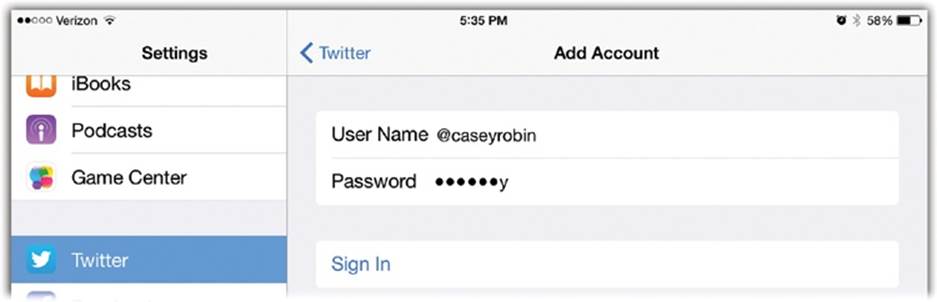
In Settings→Twitter or Settings→Facebook, enter your account name and password or sign up for an account. Here, too, you’re offered the chance to download the Twitter or Facebook apps. You can also tap Update Contacts, which adds the Twitter or Facebook addresses of everybody in your Contacts app to their information cards. .
Once you’ve set up Twitter and Facebook this way, you’ll find some nifty buttons built into your other apps, for one-tap tweeting or Facebook posting. For example, the Share button (![]() ) appears in Photos, Maps, Safari, and other apps, making it easy to post a photo, location, or Web page. Siri understands commands like “Tweet” and “Post to Facebook,” too, so you can broadcast when the spirit moves you.
) appears in Photos, Maps, Safari, and other apps, making it easy to post a photo, location, or Web page. Siri understands commands like “Tweet” and “Post to Facebook,” too, so you can broadcast when the spirit moves you.
In each case, you wind up at a small tweet sheet or Facebook sheet. Here you can add a comment to the link or photo, or attach your current location, or (for Facebook) specify who’s allowed to see this post.
For Twitter posts, the keyboard at that point offers dedicated @ and # keys. (The # is for creating hashtags—searchable keywords on a tweet like #iPad4bugs—that Twitter fans can use when searching for tweets about certain topics. And the @ precedes every Twitter person’s address—@pogue, for example.)
All materials on the site are licensed Creative Commons Attribution-Sharealike 3.0 Unported CC BY-SA 3.0 & GNU Free Documentation License (GFDL)
If you are the copyright holder of any material contained on our site and intend to remove it, please contact our site administrator for approval.
© 2016-2026 All site design rights belong to S.Y.A.