iPad: The Missing Manual (2014)
Part 4. Connections
Chapter 17. Settings
The Settings app is like the Control Panel in Windows or System Preferences on the Mac. It’s a tweaking center that affects every aspect of the iPad: the screen, ringtones, email, Web connection, and so on.
In this book, you can read about the iPad’s preference settings in the appropriate spots—wherever they’re relevant. And the Control Center, of course, is designed to eliminate trips into Settings.
But so you’ll have it all in one place, here’s an item-by-item walkthrough of the Settings app and its structure in iOS 8.
Two Settings Tricks
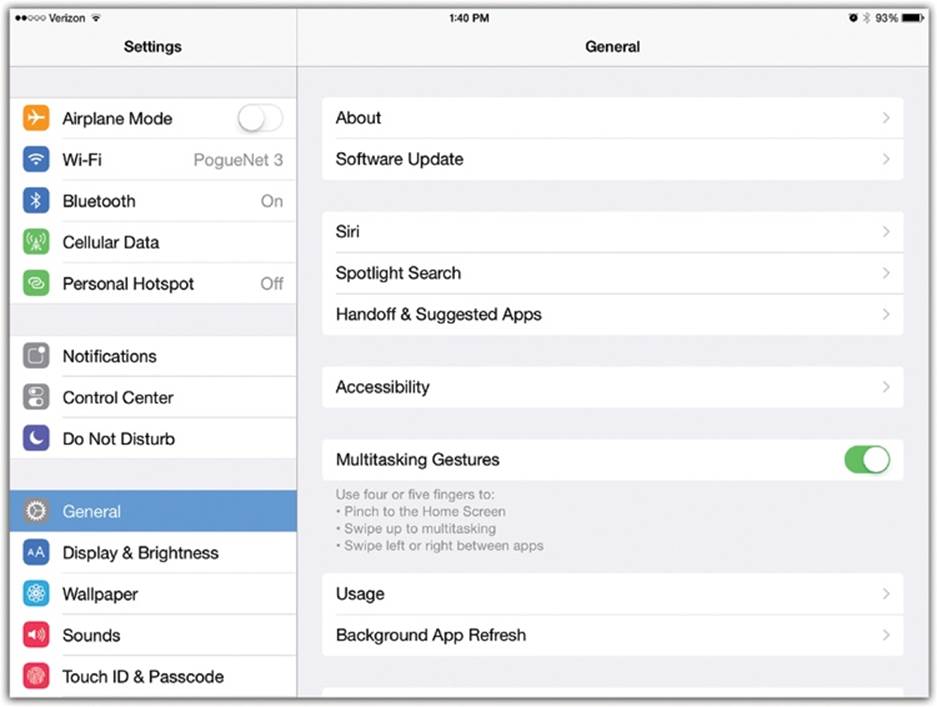
The Settings app starts as a master list of panels—left side; tap the Settings category (Notifications or General, let’s say) to view the corresponding options on the right portion of the screen.
Even then, you may find that you’re not done “drilling down.” You may have to tap, for example, General, then Keyboard, then Shortcuts, burrowing deeper into that right-side pane each time. It’s a lot of navigation.
Fortunately, you have two kinds of shortcuts.
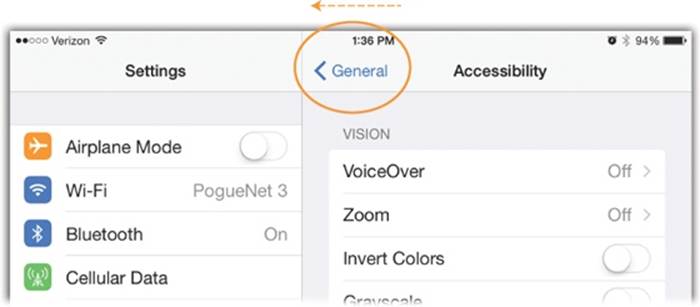
First, you can “back out” to an earlier Settings screen by tapping the ![]() button in the upper-left corner.
button in the upper-left corner.
Second, you can jump directly to a particular Settings screen—from within any app—using Siri (Chapter 3). You can say, for example, “Open Sound settings,” “Open Brightness settings,” “Open Notification settings,” “Open WiFi settings,” and so on. Siri promptly takes you to the corresponding screen—no tapping required.
Airplane Mode
As you’re probably aware, you’re not allowed to make cellular connections on U.S. airplanes. The WiFi-only iPad is fine at any time in flight—but according to legend (if not science), a cellular iPad’s radio can interfere with a plane’s navigation equipment.
But a cellular iPad does a lot more than get online. Are you supposed to deprive yourself of all the music, videos, movies, and email that you could be using in flight, just because cell signals are forbidden?
Nope. Just turn on Airplane mode by tapping the switch at the top of the Settings list (so the switch background turns green). The word Cellular dims there in Settings (you’ve turned off your cellular circuitry). The WiFi and Bluetooth switches turn off, too—but you’re now welcome to switch them back on even while in Airplane mode.
Now it’s safe (and permitted) to use the iPad in flight, because its cellular features are turned off completely. You can’t get online on the cellular network, but you can do anything else in the iPad’s bag of tricks (including getting online with WiFi, if the plane has it).
TIP
Turning Airplane mode on and off is faster if you use the Control Center (Control Center). Same for WiFi, described next.
WiFi
This item in Settings opens the WiFi Networks screen, where you’ll find three useful controls:
§ WiFi On/Off. If you don’t plan to use WiFi, then turning it off gets you more life out of each battery charge. Tap anywhere on this On/Off slider to change its status.
TIP
Turning on Airplane mode automatically turns off the WiFi antenna—but you can turn WiFi back on. That’s handy when you’re on a flight with WiFi on board.
§ Choose a Network. Here’s a list of all nearby WiFi networks that the iPad can “see,” complete with a signal-strength indicator and a padlock icon if a password is required. An Other item lets you access WiFi networks that are invisible and secret unless you know their names. SeeChapter 11 for details on using WiFi with the iPad.
§ Ask to Join Networks. If this option is On, then the iPad is continuously sniffing around to find a WiFi network. If it finds one you haven’t used before, a small dialog box invites you to hop onto it.
So why would you ever want to turn this feature off? To avoid getting bombarded with invitations to join WiFi networks, which can happen in heavily populated areas, and to save battery power. (The iPad will still hop automatically onto hotspots it’s joined in the past, and you can still view a list of available hotspots by opening Settings→WiFi.)
Carrier
If you see this panel at all, then you’re triply lucky. First, you have a cellular iPad. Second, you’re enjoying a trip overseas. Third, you have a choice of cellphone carriers who have roaming agreements with AT&T, Verizon, T-Mobile, or Sprint. Tap your favorite and prepare to pay some serious roaming fees.
Bluetooth
Here’s the on/off switch for the iPad’s Bluetooth transmitter, which is required to communicate with a Bluetooth speaker, earpiece, keyboard, laptop (for tethering), or hands-free system in a car. When you turn the switch on, you’re offered the chance to pair the iPad with other Bluetooth equipment; the paired gadgets are listed here for ease of connecting and disconnecting.
TIP
The Control Center (Control Center) has a Bluetooth button. It’s faster to use that than to visit Settings.
Cellular Data (Cellular iPads)
These days, not many cellular plans let you use the Internet as much as you want; most have monthly limits. For example, $20 a month might include 4 gigabytes of Internet data use.
Most of the settings on this screen are meant to help you control how much Internet data your cellular iPad uses:
§ Cellular Data. This is the on/off switch for Internet data. If you’re traveling overseas, you might want to turn this off to avoid racking up insanely high roaming charges. Your cellular iPad becomes a WiFi-only iPad.
§ Enable LTE. Every now and then, you’ll be in some area where you can’t connect to the Internet even though you seem to have an LTE signal; forcing your iPad to the 4G or 3G network often gives you at least some connection. Turning LTE off does just that. (Not available on iPad 2.)
§ Data Roaming. This control can prevent staggering international roaming fees. On AT&T or T-Mobile, you can turn off Data Roaming (when you’re out of the country, you won’t get slapped with outrageous Internet fees).
§ Personal Hotspot. Here’s where you go the very first time you turn on Personal Hotspot (Airplane Mode and WiFi Off Mode). Once that’s done, a new Personal Hotspot on/off switch appears on the main Settings screen, so you won’t have to dig this deep in the future. (Not available on iPad 2.)
§ SIM PIN. Your SIM card (on cellular iPads) stores all your account information. SIM cards are especially desirable abroad, because in most countries, you can pop yours into any old cellular iPad and have working service. If you’re worried about yours getting stolen or lost, then turn this option on. You’ll be asked to enter a passcode.
Then, if some bad guy ever tries to put your SIM card into another iPad, he’ll be asked for the password. Without the password, the card (and the iPad) won’t get online over the cellular airwaves.
TIP
And if the evildoer guesses wrong three times, the words “PIN LOCKED” appear on the screen, and the SIM card is locked forever. You’ll have to get another one from AT&T or whatever. So don’t forget the password.
§ Cellular Data Usage. The iPad also helps you track how much Internet data you’ve used this month, expressed as megabytes of data, including email messages and Web page material. These are extremely important statistics, because your iPad plan is probably capped at, for example, 2 gigabytes a month. If you exceed your monthly maximum, you’re instantly charged $15 or $20 for another chunk of data. So keeping an eye on these statistics is a very good idea.
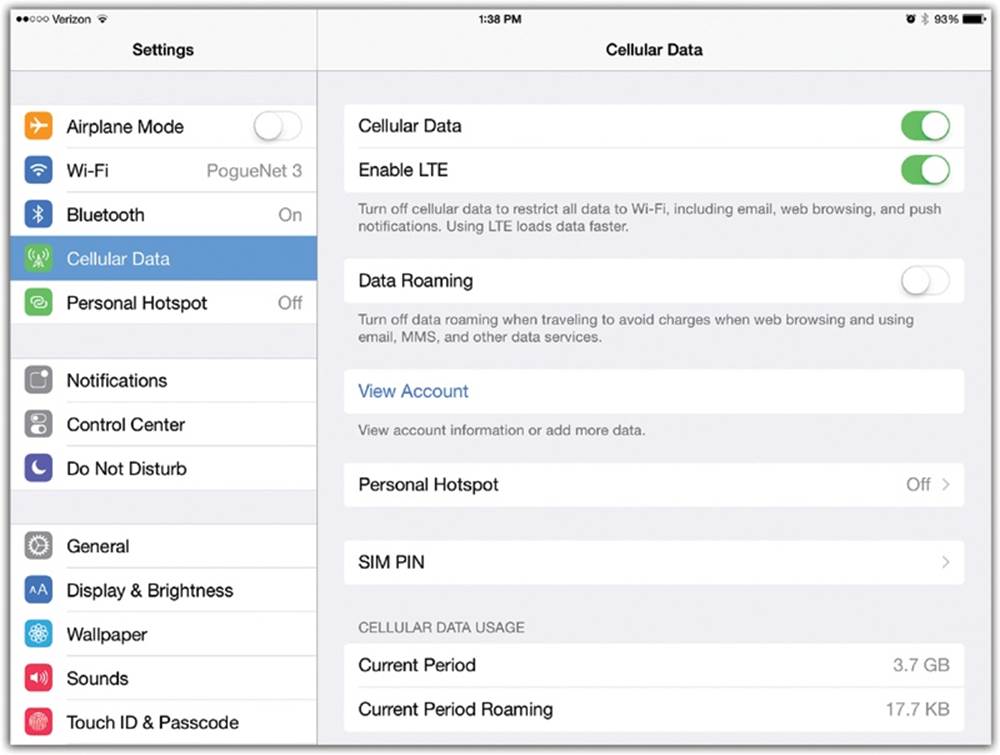
(The Current Period means so far this month; Current Period Roaming means overseas or in places where your cell company doesn’t have service.)
Now, your cell company is supposed to alert you as you get closer and closer to your monthly limit—but in iOS 8, you can check your Internet spending at any time.
§ Use cellular data for: This list offers individual on/off switches for every single Internet-using app on your iPad. Each one is an item that could consume Internet data without your awareness. Now, at last, you can shut up the data hogs you really don’t feel like spending megabytes on.
VPN
VPN stands for virtual private networking, a secure way for you to connect to a corporate network from the road. You can read more about it on Virtual Private Networking (VPN). On this screen, you see a list of whatever VPN connections you or some network administrator you love set up, ready to use.
Personal Hotspot
Once you’ve turned this feature on (Airplane Mode and WiFi Off Mode) in Cellular, this command appears here, too—on the main Settings screen for your convenience.
Notifications
This panel lists all the apps that think they have the right to nag for your attention. Flight-tracking programs alert you that there’s an hour before takeoff. Social-networking programs ping you when someone’s trying to reach you. Games let you know when it’s your move. Instant-messaging apps ding to let you know that you have a new message. It can add up to a lot of interruption.
On this panel, you can tailor, to an almost ridiculous degree, how you want to be nagged. See Chapter 1 for a complete description.
Control Center
The Control Center is written up on Control Center. There are two settings to change here. If you turn off Access on Lock Screen, then the Control Center isn’t available on the iPad’s Lock screen. No passing prankster can change your iPad’s settings without your password.
And if you turn off Access Within Apps, then you won’t land in the Control Center by accident when you’re playing some game that involves a lot of swiping.
Do Not Disturb
Ah, yes, here it is: one of iOS’s most useful features. See Contacts, Calendars, Reminders….
General
The General pages offer a huge, motley assortment of settings governing the behavior of the virtual keyboard, Siri, the password-protection feature, and about 6 trillion other things:
§ About. Tapping this item opens a page for the statistics nut. Here you can find out how many songs, videos, and photos your iPad holds; how much storage your iPad has; techie details like the iPad’s software and firmware versions, serial number, model, WiFi and Bluetooth addresses, and so on. (It’s kind of cool to see how many applications you’ve installed.)
At the very top, you can tap the iPad’s name to rename it.
§ Software Update. When Apple releases a new software update for your iPad, you can download it directly to the iPad. You no longer need to connect to a Mac or a PC for that job.
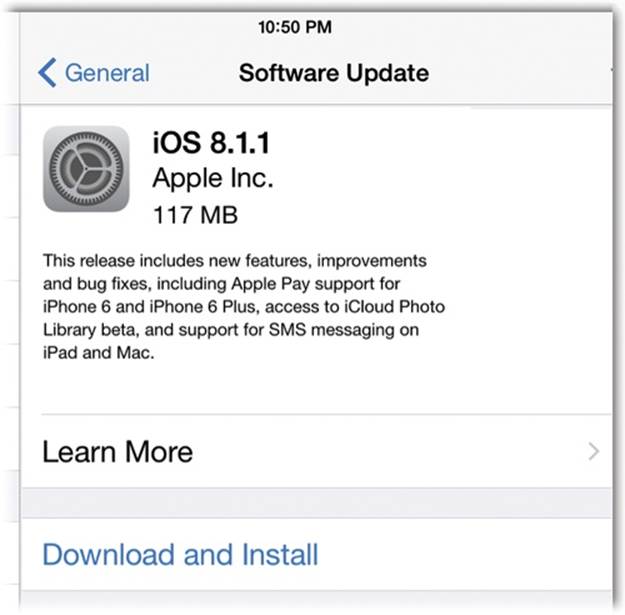
You’ll know when an update is waiting for you, because you’ll see a little number badge on the Settings icon, as well as on the word General in Settings. Tap it, and then tap Software Update, to see and install the update. (If no number badge is waiting, then tapping Software Updatejust shows you your current iOS version.)
§ Siri. Here’s the master on/off switch for Siri, the voice-commanded virtual-assistant feature, and the on/off switch for the hands-free “Hey, Siri” feature. Both are described in Chapter 3. (Unavailable on the iPad 2.)
Also on this panel: a choice of languages; a Voice Gender setting (male or female); an option to have Siri’s responses read aloud only when you’re on headset (so you don’t disturb those around you); an option to choose your own Contacts card, so Siri knows, for example, where to go when you say, “Give me directions home.”
§ Spotlight Search. Here you can control which kinds of things Spotlight finds when it searches your iPad. Tap to turn off the kinds of data you don’t want it to search: Mail, Notes, Calendar, whatever.
TIP
You can also drag these categories into a new order, using the little ![]() as a handle. Why? Because that’s the order that things will appear in the results list when you actually perform a search. If you mainly search your text messages, for example, then by all means drag Messages to the top of the list, so they’ll appear first.
as a handle. Why? Because that’s the order that things will appear in the results list when you actually perform a search. If you mainly search your text messages, for example, then by all means drag Messages to the top of the list, so they’ll appear first.
§ Handoff & Suggested Apps. Handoff is the new iOS 8 feature for people who own both an iPhone and an iPad or Mac; it automatically passes half-finished documents between them when you come home, as described on iPad as Speakerphone. This is the on/off switch. (Not available on iPad 2 or 3rd Generation.)
The Suggested Apps feature really has no business being on the same screen—it’s unrelated. It’s the new iOS 8 feature that displays the faint icon of an app that might be useful right now, based on where you are (an airline’s app when you’re in the airport, for example). Here you can turn that feature off, both for apps you already have on the iPad (My Apps) and apps that Apple thinks you might like to download (App Store).
§ Use side switch to: Every iPad except the Air 2 has a tiny switch on the right top edge. It can be either a Mute switch (the iPad makes no sounds) or a Lock Rotation switch (the picture doesn’t turn when the tablet does). Here’s where you make your choice. (Whichever function youdon’t choose here becomes a button in your Control Center.)
§ Accessibility. These options are intended for people with visual, hearing, and motor impairments, but they might come in handy now and then for almost anyone. All these features are described in Chapter 6.
§ Usage. This screen is proof that the iPad is an obsessive-compulsive. You find out here that it knows everything about you, your apps, and your iPad activity.
For example, the new Battery Usage screen shows which apps are killing your battery life (see Battery Life Tips). The Usage readout here shows, in hours and minutes, how much time you’ve spent using all iPad functions since the last time it was charged up (although it’s not broken down by activity, alas). Standby is how much time the iPad has spent in Sleep mode.
Battery Percentage adds a digital readout to the battery gauge on your status bar (for example, 65%).
The Storage section shows how much of your iPad’s storage space is currently used and free. Tap Manage Storage to see a list of every single app on your iPad, along with how much space it’s eating up. (Biggest apps are at the top.) Better yet, you can tap an app to see how much it and its associated documents consume—and, for apps you’ve installed yourself, there’s a Delete App button staring you in the face.
The idea, of course, is that if you’re running out of space on your iPad, this display makes it incredibly easy to see what the space hogs are—and delete them.
The next section, iCloud, also reports on storage—but in this case, it shows you how much storage you’re using on your iCloud account. (Remember, you get 5 gigabytes free; after that, you have to pay.) If you tap Manage Storage, you get to see how much of that space is used up by which apps—Mail is usually one of the biggest offenders.
§ Background App Refresh. The list that appears here identifies apps that try to access the Internet to update themselves, even when they’re in the background. Since such apps can drain your battery, you have the option here to block their background updating.
You can also turn off the master Background App Refresh switch here. Now the only apps that can get online in the background are a standard limited suite (music playback and GPS, for example).
§ Auto-Lock. As you may have noticed, the iPad locks itself after a few minutes of inactivity on your part. In locked mode, the iPad ignores screen taps. Without this mode, reaching into your bag for a wallet or a pen could, at least theoretically, fire up some iPad program or even dial a call.
On the Auto-Lock screen, you can change the interval of inactivity before the auto-lock occurs (1 minute, 2 minutes, and so on), or you can tap Never. In that case, the iPad locks only when you click it to sleep.
§ Restrictions. This means “parental controls.” (Apple called it “Restrictions” instead so as not to turn off potential corporate customers. Can’t you just hear it? “‘Parental controls?’ This thing is for consumers?!”) Complete details appear on Restrictions and Parental Controls.
§ Date & Time. Here you can turn on 24-hour time, also known as military time, in which you see “1700” instead of “5:00 PM.” (You’ll see this change everywhere times appear, including at the top of the screen.)
Set Automatically refers to the iPad’s built-in clock. If this item is turned on, then the iPad finds out what time it is from an atomic clock out on the Internet. If not, then you have to set the clock yourself. (Turning this option off produces two more rows of controls: The Time Zoneoption becomes available, so you can specify your time zone, and a “number spinner” appears so you can set the clock.)
§ Keyboard. Here you can turn off some of the very best features of the iPad’s virtual keyboard. (All these shortcuts are described in Chapter 2.)
It’s hard to imagine why you wouldn’t want any of these tools working for you and saving you time and keystrokes, but here you go: Auto-Capitalization is where the iPad thoughtfully capitalizes the first letter of every new sentence for you. Auto-Correction is where the iPad suggestsspelling corrections as you type. Check Spelling, of course, refers to the pop-up spelling suggestions. Enable Caps Lock is the on/off switch for the Caps Lock feature, in which a fast double-tap on the Shift key turns on Caps Lock.
Predictive refers to QuickType, the row of three word candidates that appears above the keyboard when you’re typing. Split Keyboard refers to the thumb-typing keyboard described on Making the Keyboard Work; if you find yourself invoking that keyboard accidentally, turn it off here.
The “.” Shortcut switch turns on or off the “type two spaces to make a period” shortcut for the ends of sentences, and Enable Dictation is the on/off switch for the ability to dictate text. (If you never use dictation, turning this switch off hides the ![]() button on the keyboard, giving the space bar more room to breathe.)
button on the keyboard, giving the space bar more room to breathe.)
§ Language & Region. The iPad: It’s not just for Americans anymore. The iPad Language screen lets you choose a language for the iPad’s menus and messages. Region Formats controls how the iPad displays dates, times, and numbers. (For example, in the U.S., Christmas is on 12/25; in Europe, it’s 25/12.)
Calendar lets you choose which kind of calendar system you want to use: Gregorian (that is, “normal”), Japanese, or Buddhist. Finally, the Advanced screen lets you turn off the automatic setting of date, time, and number languages to match your main iPad language. You know—for people who want their dates, times, and numbers in a different language.
§ iTunes Wi-Fi Sync. You can sync your iPad with a computer wirelessly, as long as the iPad is plugged in and on WiFi. Details on Syncing the iPad.
§ VPN. See Chapter 16 for details on virtual private networking.
§ Reset. On the all-powerful Reset screen, you’ll find seven ways to erase your iPad.
Reset All Settings takes all the iPad’s settings back to the way they were when it came from Apple. Your data, music, and videos remain in place, but the settings all go back to their factory settings.
Erase All Content and Settings is the one you want when you sell your iPad, or when you’re captured by the enemy and want to make sure they will learn nothing from you or your iPad.
NOTE
This feature takes awhile to complete—and that’s a good thing. The iPad doesn’t just delete your data; it also overwrites the newly erased memory with gibberish to make sure the bad guys can’t see any of your deleted info, even with special hacking tools.
Reset Network Settings makes the iPad forget all the memorized WiFi networks it currently autorecognizes.
Subscriber Services does nothing on most modern iPads; it’s left over from older Verizon cellular iPad models.
Reset Keyboard Dictionary has to do with the iPad’s autocorrection feature, which kicks in whenever you’re trying to input text. Ordinarily, every time you type something the iPad doesn’t recognize—some name or foreign word, for example—and you don’t accept the iPad’s suggestion, it adds the word you typed to its dictionary so it doesn’t bother you with a suggestion again the next time. If you think you’ve entered too many words that aren’t legitimate terms, you can delete from its little brain all the new “words” you’ve taught it.
Reset Home Screen Layout undoes any icon moving you’ve done on the Home screen. It also consolidates all your Home screen icons, fitting them onto as few screens as possible.
Finally, Reset Location & Privacy refers to the “OK to use location services?” warning that appears whenever an iPad program, like Maps or Camera, tries to figure out where you are. This button makes the iPad forget all your responses to those permission boxes. In other words, you’ll be asked permission all over again the first time you use each of those programs.
Display & Brightness
In iOS 8, Apple moved these controls out of the swamp of the General settings—and gave them a place of proper honor.
Ordinarily, the iPad controls its own screen brightness. An ambient-light sensor hidden behind the glass at the top of the iPad’s face samples the room brightness each time you wake the iPad and adjusts the screen: brighter in bright rooms, dimmer in darker ones.
When you prefer more manual control, here’s what you can do:
§ Brightness slider. Drag the handle on this slider to control the screen brightness manually, keeping in mind that more brightness means shorter battery life.
If Auto-Brightness is turned on, then the changes you make here are relative to the iPad’s self-chosen brightness. In other words, if you goose the brightness by 20 percent, then the screen will always be 20 percent brighter than the iPad would have chosen for itself.
TIP
The Control Center (Control Center) gives you a much quicker road to the Brightness slider. This version in Settings is just for old-timers.
§ Auto-Brightness On/Off. Tap anywhere on this switch to disable the ambient-light sensor completely. Now the brightness of the screen is under complete manual control.
§ Text Size. Apple has finally realized what anyone over 40 already knows: As you age, small type becomes harder to read. This universal text-size slider can boost the size of text in every app on your iPad.
Technically, what you’re seeing is the front end for Apple’s Dynamic Type feature. And even more technically, not all apps work with Dynamic Type (yet). But most of the built-in Apple apps do—Contacts, Mail, Maps, Messages, Notes, Phone, Reminders, and Safari Reader—and other software companies will follow suit.
TIP
If the largest type setting here still isn’t big enough, you’re not out of luck. Hiding in the Accessibility panel described on Text Messages Using Apps, there’s an option called Larger Type. Tap it and then turn on Larger Dynamic Type to make the large end of the type-size scale twice as big. Now you can read the iPad from the moon.
§ Bold Text. If the spindly fonts of iOS 8 are a little too light for your reading tastes, you can flip this switch on (see Larger Text). After restarting, the iPad makes everything a little bolder.
Wallpaper
Wallpaper can mean either the photo on the Unlock screen (what you see when you wake the iPad up), or the background picture on your Home screen. On this panel, you can change the image used for either one. Assign to Contact has step-by-step instructions.
Sounds
Here’s where you choose a ringtone sound for incoming FaceTime or Continuity calls:
§ Ringer and Alerts. The slider here controls the volume of the iPad’s ringing.
Of course, it’s usually faster to adjust the ring volume by pressing the up/down buttons on the left edge whenever you’re not on a call or playing music or video. But if you find that your volume buttons are getting pressed accidentally, you can also turn off Change with Buttons. Now you can adjust the volume only with this slider, here in Settings.
§ Sounds. The sound the iPad makes when it rings is up to you; by tapping Ringtone, you can view the iPad’s list of 27 built-in ringtones, plus 13 “alert tones,” plus any new ones you’ve added yourself.
Tap a ring sound to hear it. After you’ve tapped one you like, confirm your choice by tapping Sounds to return to the Sounds screen.
NOTE
You can choose a different ringtone for each person in your Contacts (Adding to the Contacts List).
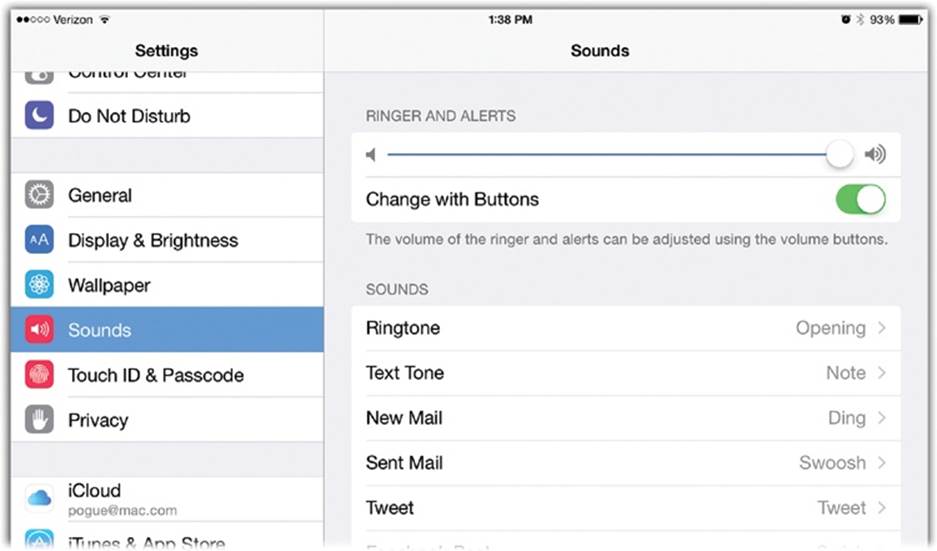
But why stop with a ringtone? The iPad can make all kinds of other sounds to alert you: to the arrival of a new text message or email; to the successful sending of an outgoing email message, tweet, or Facebook post; to Calendar or Reminders alarms; to the arrival of AirDrop files; and so on.
This is a big deal—not just because you can express your individuality through your choice of ringtones, text tones, reminder tones, and so on, but also because you can distinguish your iPad’s blips and bleeps from somebody else’s in the same family or workplace.
For each of these events, tap the light-gray text that identifies the current sound for that event (“Tri-tone” or “Ding,” for example). On the resulting screen, tap the different sound options to find one you like; then tap Sounds to return to the main Sounds screen.
On that Sounds screen, you can also turn on or off the Lock Sounds (the sounds you get when you tap the Sleep/Wake switch on the top of the iPad) and the Keyboard Clicks that play when you type on the virtual keyboard.
Touch ID & Passcode
Here’s where you set up a password for your iPad, or (if you have an iPad Air 2 or mini 3) where you teach the iPad to recognize your fingerprints. Full details appear at the end of Chapter 1.
Privacy
By “privacy,” Apple means “apps and Apple accessing your data.”
Many an app works better, or claims to, when it has access to your address book, calendar, photos, and so on. Generally, when you run such an app for the first time, it explicitly asks you for permission to access each kind of data. But here, on this panel, you have a central dashboard—and on/off switches—for each data type and the apps that want it.
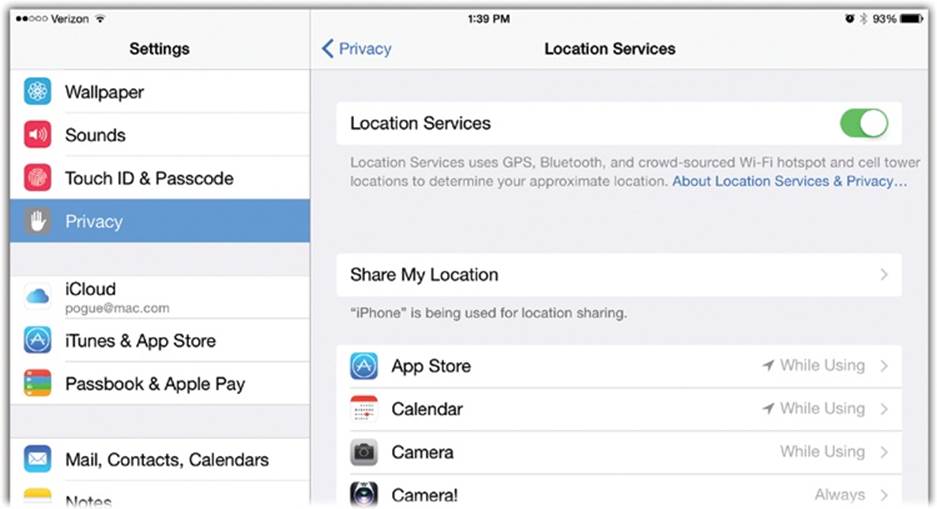
Location Services
Suppose, for example, that you tap Location Services. At the top of the next screen, you’ll find the master on/off switch for all Location Services. If you turn it off, then the iPad can no longer determine where you are on a map, geotag your photos, find the closest ATM, tell your friends where you’re hanging out, and so on. Below this master switch, you’ll find these options:
§ Share My Location. Every year, Apple comes up with new ways for you to broadcast your iPad’s location—and, by extension, your own. For example, Find My Friends, Messages, and Family Sharing all have features that let certain other people (with your permission) see where you are right now.
Here’s the on/off switch for the whole feature. If it’s off, nobody can find you right now. If Share My Location is on, then this screen also shows you the names of people to whom you’ve given permission to track you—a handy reminder.
§ App Store, Camera, Maps…. This screen goes on to list every single app that uses your location information, and it lets you turn off this feature on a by-app basis. You might want to do that for privacy’s sake—or you might want to do that to save battery power, since the location searches sap away a little juice every time.
Tap an app’s name to see when it wants access to your location. You might see Always, Never, or While Using the App (the app can’t use your location when it’s in the background). On the same screen, you can see a description of why the app thinks it needs your location. Why does the Calendar need it, for example? “To estimate travel times to events.”
The little ![]() icon indicates which apps have actually used your location data. If it’s gray, that app has checked your location in the past 24 hours; if it’s purple, it’s locating you right now; if it’s hollow, that app is using a geofence—it’s waiting for you to enter or leave a certain location, like Home or Work. The Reminders app uses the geofencing feature, for example.
icon indicates which apps have actually used your location data. If it’s gray, that app has checked your location in the past 24 hours; if it’s purple, it’s locating you right now; if it’s hollow, that app is using a geofence—it’s waiting for you to enter or leave a certain location, like Home or Work. The Reminders app uses the geofencing feature, for example.
§ System Services. Here are the on/off switches for the iPad features that use your location.
A few examples: Cell Network Search (lets a cellular iPad tap into Apple’s database of cellular frequencies by location, which speeds up connections); Location-Based iAds (advertisements that Apple slaps at the bottom of certain apps—or, rather, their ability to self-customize based on your current location); Setting Time Zone (permits the iPad to set its own clock when you arrive in a new time zone.
In the Product Improvement list, the options include Diagnostics and Usage (sends location information back to Apple, along with diagnostic information so that, for example, Apple can see where calls are being dropped); Popular Near Me (the section of the App Store that lists apps downloaded by people around your current spot); Routing & Traffic (sends anonymous speed/location data from your iPad, which is how Maps knows where there are traffic tie-ups); and so on.
Contacts, Calendars, Reminders…
This list (on the main Privacy screen) identifies the kinds of data that your apps might wish to access; we’re going way beyond location here. For example, your apps might want to access your address book or your calendar.
Tap a category—Contacts, for example—to see a list of the apps that are merrily tapping into its data. And to see the on/off switch, which you can use to block that app’s access.
Twitter, Facebook
Similarly, new apps you download may sometimes want access to your Facebook and Twitter accounts. Lots of apps, for example, harness your existing Facebook account for the purpose of logging in or finding friends to play games with. Tap Twitter or Facebook to see which apps are using your account information.
Diagnostics & Usage
Do you give Apple permission to collect information about how you’re using your iPad and how well the iPad is behaving each day? On this screen, you can choose Don’t Send or Automatically Send. And if you tap Diagnostic & Usage Data at the bottom, you can see the actual data the iPad intends to send. (Hint: It’s programmery gibberish.)
Advertising
The final Privacy option gives you a Limit Ad Tracking switch. Turning it on won’t affect how many ads you see within your apps—but it will prevent advertisers from delivering ads based on your interests. You’ll just get generic ads.
There’s a Reset Advertising Identifier button here, too. You may not realize that, behind the scenes, you have an Ad Identifier number. It’s “a nonpermanent, non-personal device identifier” that advertisers can associate with you and your habits—the things you buy, the apps you use, and so on. That way, the advertisers can insert ads into your apps that pertain to your interests—without ever knowing your name.
But suppose you’ve been getting a lot of ads that seem to mischaracterize your interests. Maybe you’re a rustic shepherd, and you keep seeing ads for hyperviolent games. Or maybe you’re a nun, and you keep getting ads for marital aids.
In those cases, you might want to reset your Ad ID with this button, thus starting from scratch as a brand-new person about which the advertisers know nothing.
iCloud
Here’s where you enter your iCloud name and password—and where you find the on/off switches for the various kinds of data synchronization that iCloud can perform for you. Chapter 15 tells all.
iTunes & App Store
If you’ve indulged in a few downloads (or a few hundred) from the App Store or iTunes music store, then you may well find some settings of use here. For example, if you tap your Apple ID at the top of the panel, you get these buttons:
§ View Apple ID. This takes you to the Web, where you can look over your Apple account information, including credit card details.
§ Sign Out. Tap when, for example, a friend wants to use her own iTunes account to buy something on your iPad. As a gift, maybe.
§ iForgot. If you’ve forgotten your Apple ID password, tap here. You’ll be offered a couple of different ways of establishing your identity—and you’ll be given the chance to make up a new password.
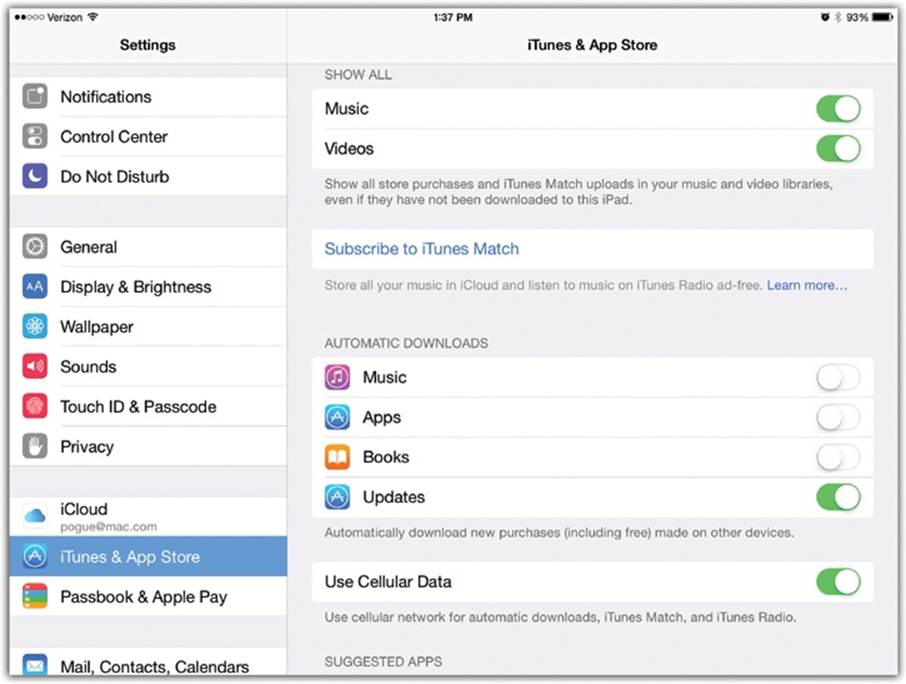
Show All
This option is handy if you own more than one Apple gadget. It means that, in your lists of Music and Videos, you’ll see the names of songs and movies you’ve bought using your other Apple phones, tablets, and computers—even though they’re not on this iPad yet. Seeing them listed makes it easy to download them to your iPad, no extra charge.
In related news, the iTunes Match option gives your iPad access to your entire music collection online—if you’ve signed up for Apple’s iTunes Match service ($25 a year; see iTunes Match).
Automatic Downloads
If you have an iCloud account (and you probably should), then a very convenient option is available to you: automatic downloads of music, apps, and ebooks you’ve bought on other iOS gadgets. For example, if you buy a new album on your iPhone, turning on Music here means that your iPad will download the same album automatically next time it’s in a WiFi hotspot.
Updates means that if you accept an updated version of an app on one of your other Apple gadgets, it will be auto-updated on this iPad, too.
Those downloads are, however, big. On a cellular iPad, they can eat up your monthly data allotment right quick and send you deep into Surcharge Land. That’s why the cellular iPad does that automatic downloading only when you’re in a WiFi hotspot—unless you turn on Use Cellular Data. Hope you know what you’re doing.
Finally, the Suggested Apps section offers a duplicate set of on/off switches for the Suggested Apps feature described on General.
Passbook and Apple Pay
Here’s everything the iPad needs to know in order to help you buy stuff online with your fingerprint (Apple Pay (iPad Air 2, Mini 3)): your credit or debit card details and your contact information. Appears on the iPad Air 2 and mini 3 only.
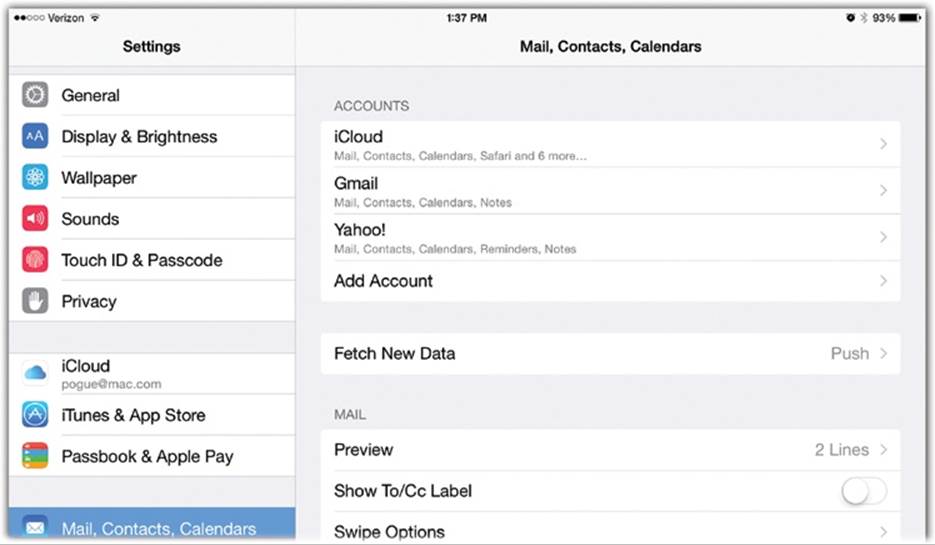
Mail, Contacts, Calendars
There’s a lotta stuff going on in one place here. Breathe deeply; take it slow.
Accounts
Your email accounts are listed here; this is also where you set up new ones. See Setting Up Your Account for details.
Fetch New Data
More than ever, the iPad is a real-time window into the data stream of your life. Whatever changes are made to your calendar, address book, or email back on your computer at home (or at the office) can magically show up on your iPad, seconds later, even though you’re across the country.
That’s the beauty of “push” email, contacts, and calendars. You get push email if you have a free Yahoo Mail account. You get all three if you’ve signed up for an iCloud account (Chapter 15), or if your company uses Microsoft Exchange (Chapter 16).
Having an iPad that’s updated with these critical life details in real time is amazingly useful, but there are several reasons why you might want to turn off the Push feature. You’ll save battery power, save money when you’re traveling abroad (where every “roaming” Internet use can run up your cellular bill), and avoid the constant “new mail” jingle when you’re trying to concentrate (or sleep).
And what if you don’t have a push email service, or if you turn it off? In that case, your iPad can still do a pretty decent job of keeping you up to date. It can check your email every 15 minutes, every half-hour, every hour, or only on command (Manually). That’s the decision you make in theFetch New Data panel here. (Keep in mind that more frequent checking means shorter battery life.)
TIP
The iPad always checks email each time you open the Mail app, regardless of your setting here. If you have a push service like iCloud or Exchange, it also checks for changes to your schedule or address book each time you open Calendar or Contacts—again, no matter what your setting here.
Here you set up your email account information, specify how often you want the iPad to check for new messages, how you want your Mail app to look, and more.
§ Preview. It’s cool that the iPad shows you the first few lines of text in every message. Here you can specify how many lines. More lines mean you can skim your inbound messages without having to open many of them; fewer lines mean more messages fit without scrolling.
§ Show To/Cc Label. If you turn this option on, then a tiny, light-gray logo appears next to many of the messages in your inbox. The ![]() logo indicates that this message was addressed directly to you; the
logo indicates that this message was addressed directly to you; the ![]() logo means you were merely “copied” on a message primarily intended for someone else.
logo means you were merely “copied” on a message primarily intended for someone else.
If there’s no logo at all, then the message is in some other category. Maybe it came from a mailing list, or it’s an email blast (a Bcc), or the message is from you, or it’s a bounced message.
§ Swipe Options. Which colorful insta-tap buttons would you like to appear when you swipe across a message in a list? See Read It for details.
§ Flag Style. You can flag messages to draw your own attention to them, either with the old-style flag icon—or, for visual spark, an orange dot. Here’s where you choose.
§ Ask Before Deleting. Ordinarily, you can delete an open message quickly and easily, just by tapping the ![]() icon. But if you’d prefer to encounter an additional confirmation step before the message disappears, then turn this option on.
icon. But if you’d prefer to encounter an additional confirmation step before the message disappears, then turn this option on.
NOTE
The confirmation box appears only when you’re deleting an open message—not when you delete one from the list of messages.
§ Load Remote Images. Spammers, the vile undercrust of lowlife society, have a trick. When they send you email that includes a picture, they don’t actually paste the picture into the message. Instead, they include a “bug”—a piece of code that instructs your email program to fetch the missing graphic from the Internet. Why? Because that gives the spammer the ability to track who has actually opened the junk mail, making those email addresses much more valuable for reselling to other spammers.
If you turn this option off, then the iPad does not fetch “bug” image files at all. You’re not flagged as a sucker by the spammers. You’ll see empty squares in the email where the images ought to be. (Graphics sent by normal people and legitimate companies are generally pasted right into the email, so they’ll still show up just fine.)
§ Organize By Thread. This is the on/off switch for the feature that clumps related back-and-forths into individual items in your Mail inbox.
§ Always Bcc Myself. If this option is on, then you’ll get a secret copy of any message you send. That’s handy if you want your computer to have a record of replies you sent from your iPad.
§ Mark Addresses. The iPad can make an email address appear in red type if it’s somebody outside your company (Life on the Corporate Network). That’s to help you avoid making costly security errors.
§ Increase Quote Level. Each time you reply to a reply, it gets indented more, so you and your correspondents can easily distinguish one reply from the next.
§ Signature. A signature is a bit of text that gets stamped at the bottom of your outgoing email messages. Here’s where you can change yours.
§ Default Account. Your iPad can manage an unlimited number of email accounts. Here you can tap the account you want to be your default—the one that’s used when you create a new message from another program, like a Safari link, or when you’re on the All Inboxes screen of Mail.
Contacts
Contacts is a first-class citizen with an icon of its own on the Home screen, so it gets its own little set of options in Settings:
§ Sort Order, Display Order. How do you want the names in your Contacts list sorted—by first name or by last name?
Note that you can have them sorted one way but displayed another way. Not all the combinations make sense.
§ Show in App Switcher. The app switcher now displays icons for the people you contact most (or contacted most recently). You can turn that feature off here.
§ Short Name. When this switch is on, the Mail app may fit more email addressees’ names into its narrow To box by shortening them. It may display “M. Mouse,” for example, or “Mickey,” or even “M.M.”—whatever you select here.
Prefer Nicknames is similar. It instructs Mail to display the nicknames for your friends (as determined in Contacts) instead of their real names.
§ My Info. Tap here to tell the iPad which card in Contacts represents you. Knowing who you are is useful to the iPad in a number of places—for example, it’s how Siri knows what you mean when you say, “Give me directions home.”
§ Default Account. Here again, the iPad can manage multiple address books—from iCloud, Gmail, Yahoo, and so on. Tap the account you want new contacts to fall into, if you haven’t specified one in advance. (This item doesn’t appear unless you have multiple accounts.)
Calendars
Your iPad’s calendar can be updated by remote control, wirelessly, through the air, either by your company (via Exchange, Chapter 16) or by somebody at home using your computer (via iCloud, Chapter 15).
§ Time Zone Override. Whenever you arrive in a new city, the iPad, if it can get online, learns what time zone it’s in and changes its own clock automatically.
So here’s a mind-teaser. Suppose there’s a big meeting in California at 2 p.m. tomorrow—but you’re in New York right now. How should that event appear on your calendar? Should it appear as 2 p.m. (that is, its local time)? Or should it appear as 5 (your East Coast time)?
It’s not an idle question, because it also affects reminders and alarms.
Out of the box, Time Zone Override is turned off. The iPad slides appointments around on your calendar as you travel to different time zones. If you’re in California, that 2 p.m. meeting appears at 2 p.m. When you return to New York, it says 5 p.m. Handy—but dangerous if you forget what you’ve done.
If you turn on the Override, though, the iPad leaves all your appointments at the hours you record them—in the time zone you specify with the pop-up menu here. This option is great if you like to record events at the times you’ll be experiencing them; they’ll never slosh around as you travel. If you, a New Yorker, will travel to San Francisco next week for a 2 p.m. meeting, write it down as 2 p.m.; it will still say 2 p.m. when you land there.
§ Alternate Calendars. If you prefer to use the Chinese, Hebrew, or Islamic calendar systems, go nuts here.
§ Week numbers. This option makes Calendar display a little gray notation that identifies which week you’re in (out of the 52 this year). It might say, for example, “W42.” Because, you know, some people aren’t aware enough of time racing by.
§ Show Invitee Declines. You can invite someone to a meeting, as described on Making an Appointment. If they click Decline (they can’t make it), maybe you don’t need your iPad to alert you. In that case, turn this switch off.
§ Sync. If you’re like most people, you refer to your calendar more often to see what events are coming up than to see the ones you’ve already lived through. Ordinarily, therefore, the iPad saves you some syncing time and storage space by updating only relatively recent events on your iPad calendar. It doesn’t bother with events that are older than 2 weeks, or 6 months, or whatever you choose here. (Or you can turn on All Events if you want your entire life, past and future, synced each time—storage and wait time be damned.)
§ Default Alert Times. If you like to set reminder alarms for calendar appointments, then these options can save you some steps. Here you can set it up so that every new appointment has the reminder alarm turned on—and set how much in advance it rings. For Birthdays and All-Day Events, you can request an alarm at 9 a.m. on the day of the event, a day or two before, or a week ahead. For regular Events, your choices range from 1 week before to 5 minutes before—or even At time of event.
§ Start Week On. This option specifies which day of the week appears at the left edge of the screen in the calendar’s Day and Month views. For most people, that’s Sunday, or maybe Monday—but for all iOS cares, your week could start on a Thursday.
§ Default Calendar. This option lets you answer the question: “When I add a new appointment to my calendar on the iPad, which calendar (category) should it belong to?” You can choose Home, Work, Kids, or whatever category you use most often.
Notes
Notes can sync with various online services: iCloud, Gmail, Yahoo, and so on. Tap Default Account here to specify which one should receive new notes you create if you haven’t specifically chosen one.
Reminders
Here are the preference settings for the Reminders app:
§ Sync. How far back do you want Reminders to go when it syncs its to-do lists with your computer, iCloud, and various other calendar programs?
§ Default List. Suppose you’ve created multiple Reminder lists (Groceries, Movies to Rent, To Do, and so on). When you create a new item—for example, by telling Siri, “Remind me to fix the sink”—which list should it go on? Here’s where you specify.
Messages
These options govern text messages (SMS) and iMessages, both of which are described in Chapter 5:
§ iMessage. This is the on/off switch for iMessages. If it’s off, then your iPad never sends or receives these handy, free messages—only regular text messages.
§ Send Read Receipts. If this is on, then people who send you iMessages will know when you’ve seen them. They’ll see a tiny gray text notification beneath the iMessage bubble that contains their message. If you’re creeped out by people being able to know when you’re ignoring them, then turn this item off.
§ Send & Receive. Here you can enter additional email addresses that people can use to send your iPad iMessages.
This screen also offers a Start new conversations from item that lets you indicate what you want to appear on the other guy’s iPad when you send a text: your cellphone number or email address.
§ Show Subject Field. If email messages can have subject lines, why not text messages? Now they can; the message arrives with a little dividing line between the subject and the body, offering your recipient a hint as to what it’s about.
§ Blocked. Here’s a way to build up a list of people you don’t want to hear from.
§ Keep Messages. In iOS 8, you can now specify how long you want Messages to retain a record of your exchanges: 30 days, a year, or forever.
§ Audio Messages. You can now shoot audio utterances to other people just as easily as you can type them. Here you can set them to auto-delete after 2 minutes. Why? First, because audio files take up space on your iPad. Second, because you may consider them spoken text messages—notrecordings to preserve for future generations.
§ Video Messages. Same deal here. You can set up video clips you send in Messages to auto-delete after a couple of minutes for the same reasons.
FaceTime
These options pertain to FaceTime, the video calling feature described in Chapter 4. Here, for example, is the on/off switch for the entire feature; the on/off switch for making FaceTime calls over a cellular connection, via an iPhone (which would eat up your monthly data plan); a place to enter your Apple ID, so people can make FaceTime calls to you; and a place to enter email addresses and a phone number, which can also be used to reach you.
The Caller ID section lets you specify how you want to be identified when you place a call to somebody else: either as a phone number or an email address.
Finally, here yet again is the Blocked option—another way to edit the list of people you don’t want to hear from (Reminders).
Maps
The Maps app has a few settings of its own:
§ Navigation Voice Volume. As Siri gives you spoken navigational instructions, how loud do you want her to be? Or would you like her to shut up entirely?
§ Distances. Measured in miles or kilometers, sir/madam?
§ Map Labels. Would you like place names to appear in English—or in their native spellings?
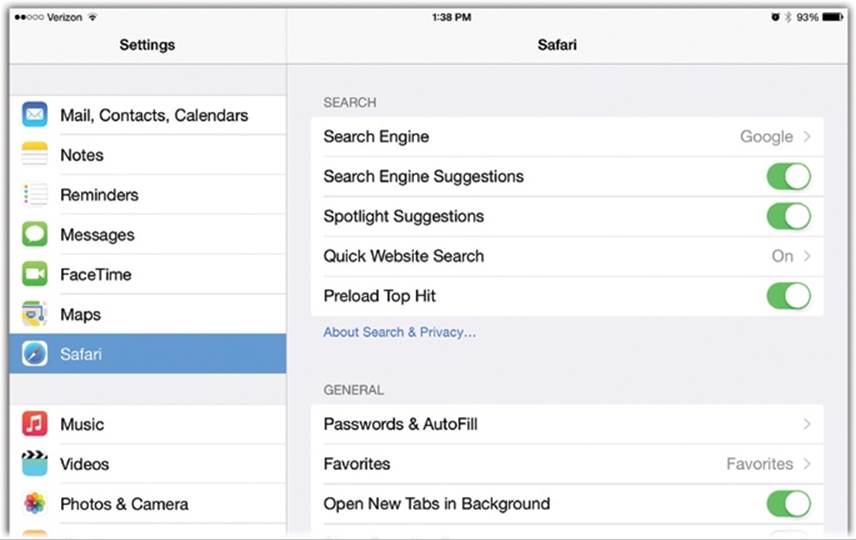
Safari
Here’s everything you ever wanted to adjust in the Web browser but didn’t know how to ask.
Search
§ Search Engine. Your choice here determines who does your searching from the search bar: Google, Bing, Yahoo, or DuckDuckGo (a limited search service famous for its refusal to collect your data or track your searches).
§ Search Engine Suggestions. As you type into Safari’s search box, it tries to save you time in two ways. First, it sprouts a list of common search requests, based on what millions of other people have sought. This list changes with each letter you type. Second, Safari may autocomplete the address based on what you’ve typed so far, using suggestions from your History and bookmarks list. This switch shuts off those suggestions. (It’s here primarily for the benefit of privacy hounds, who object to the fact that their search queries are processed by Apple in order to show the suggestions.)
§ Spotlight Suggestions. In iOS 8, Spotlight searches (Chapter 2) can now find matches from the iTunes, iBooks, and App stores; from databases of local businesses, restaurants, and theaters; and from the Web. Unless you turn this off.
§ Quick Website Search. You can search within a site (like Amazon or Reddit or Wikipedia) using only Safari’s regular search bar, as described on Quick Website Search. If, that is, this switch is on.
§ Preload Top Hit. As you type into the search box, Safari lists Web sites that match. The first one is the Top Hit—and if this switch is on, then Safari secretly downloads that page while you’re still finishing your search. That way, if the Top Hit is the page you wanted, it appears almost instantly when you tap.
But here’s the thing: Safari downloads the Top Hit with every search—which uses up data. Which could cost you money if you’re using a cellular iPad.
General
§ Passwords & AutoFill. Safari’s AutoFill feature saves you tedious typing by filling in your passwords, name, address, and phone numbers on Web forms automatically (just for the sites you want). It can even store your credit card information, which makes buying things online mucheasier and quicker.
This screen lists the different kinds of data that Safari can auto-fill for you: Your contact info. Web site account names and passwords. (Tap Saved Passwords to see the complete list of the passwords it’s memorized; tap Edit to delete certain ones.) Your credit cards. (Again, tap Saved Credit Cards to see or delete the memorized cards.)
§ Favorites. As described on Quick Website Search, your Favorites in Safari are just ordinary bookmarks in an extraordinary folder. Here you can choose a different folder as the home of your Favorites.
§ Open New Tabs in Background. When you tap a link with your finger, should the new page open in front of the current page—or behind it? Answer here.
§ Show Favorites Bar. Turn on this switch if you’d like Safari to display a button bar of your bookmarks, just below the address bar. Eats up screen space but saves you some digging every time you want to visit one of your favorites.
§ Show Tab Bar. Do you want to see a little strip of filing-folder tabs, representing all your open windows (as you would on a computer)?
§ Block Pop-ups. In general, you want this turned on. You really don’t want pop-up ad windows ruining your surfing session. Now and again, though, pop-up windows are actually useful. When you’re buying concert tickets, for example, a pop-up window might show the location of the seats. In that situation, you can turn this option off.
Privacy & Security
§ Do Not Track. If you turn this on, then Web sites agree not to secretly track your activity on the Web. The problem is, of course, that this program is voluntary—and the sleazy operators just ignore it.
§ Block Cookies. You can learn all about cookies—and these options to tame them—on Password Suggestions.
§ Fraudulent Website Warning. This option makes Safari warn you when you try to visit what it knows to be a phishing site. (Phishing is a common Internet scam. The bad guy builds a fake version of Amazon, PayPal, or a bank’s Web site—and tries to trick you into “logging in.” You therefore unwittingly give up your name and password.)
§ Clear History and Website data. Like any Web browser, Safari keeps a list of Web sites you’ve visited recently to make it easier for you to revisit them: the History list. And like any browser, Safari therefore exposes your activities to any suspicious spouse or crackpot colleague. If you’re nervous about that prospect, then tap Clear History and Website data to erase your tracks. This feature deletes all the cookies that Web sites have deposited on your “hard drive.”
§ Use Cellular Data. The Reading List feature (The Reading List) is wonderful. But because it requires downloading entire Web pages to your iPad—and then syncs them to all your other Apple gadgets—it uses a lot of data. If you have a cellular iPad, and you fear going over your cellphone plan’s monthly data allotment, then turn this off. You’ll be allowed to save sites to your Reading List only when in a WiFi hotspot.
§ Advanced. Safari recognizes HTML5, a Web technology that lets Web sites store data on your iPad, for accessing even when you’re not online (like your Gmail stash). In Website Data, you can see which Web apps have created these databases on your iPad and delete them if necessary.
JavaScript is a programming language whose bits of code frequently liven up Web pages. If you suspect some bit of code is choking Safari, however, you can turn off its ability to decode JavaScript here.
The Web Inspector is for Web-site programmers. You connect your iPad to a Mac with a USB cable; then, in Safari on the computer, you choose Debug→iPad→[the name of the Web site currently on the iPad’s screen]. You’ll be able to examine errors, warnings, tips, and logs for HTML, JavaScript, and CSS—great when you’re designing and debugging Web pages or Web apps for the iPad.
Music
On this panel, you can adjust a bunch of iPod playback features. Most of them—Sound Check, EQ, Volume Limit, and Group By Album Artist—are described starting on AirPlay.
Then comes Show All Music. It makes the Music app list all the music you’ve acquired from Apple, even the songs you haven’t actually downloaded to your iPad.
Genius, iTunes Match, and Home Sharing are described in Chapter 7.
Videos
Here’s what you can adjust for the Videos app:
§ Start Playing. When you play a video you’ve seen before, you can have it begin either from Where Left Off or From Beginning.
§ Show All Videos. Do you want the Videos app to show all the TV shows and movies you’ve ever bought from Apple—even the ones you haven’t actually stored on the iPad?
§ Home Sharing. You can also access your iTunes video collection, as described on The Videos App.
Photos & Camera
Here’s a motley collection of photo-related settings:
§ iCloud Photo Library, My Photo Stream, iCloud Photo Sharing, Upload Burst Photos. These options are described on iCloud Sync.
§ Summarize Photos. In the Photos app, the Years and Collections screens generally display one tiny thumbnail for every single photo. This feature is designed to make those displays more manageable by displaying fewer, but representative, thumbnails. (You won’t see any difference unless you have a pretty huge collection of photos.)
§ Play Each Slide For. How long do you want each photo to remain on the screen? You can choose 2, 3, 5, 10, or 20 seconds. (Hint: 2 is plenty, 3 at most. Anything more than that will bore your audience silly.)
§ Repeat, Shuffle. These options work just as they do for music. Repeat makes the slideshow loop endlessly; Shuffle plays the slides in random order.
§ Grid turns the “Rule of Thirds” grid on or off on the camera’s viewfinder screen (The “Rule of Thirds” Grid).
§ Keep Normal Photo. See the tip on Tip.
iBooks
Why, it’s every setting imaginable that pertains to the iBooks ebook reading app. They’re described on Playing Games.
Podcasts
These settings affect the Podcasts app described on Photo Booth. They govern how often the app auto-downloads new episodes, and how many; whether it can do so using cellular data (instead of WiFi) on a cellular iPad; and whether you want the app to auto-delete podcasts you’ve already listened to.
Game Center
You can read about the Game Center on Game Center. This page of preferences offers options like these:
Game Invites
More security stuff. Do you want your iPad to permit invitations from other people to play games? How about people in the same room or building, inviting you to play over WiFi or Bluetooth? Here are the on/off switches for Allow Invites and Nearby Players.
Game Center Profile
Here’s your Game Center player name. Tap it to edit your nickname, make your Game Center listing invisible to strangers (Public Profile), or associate a new email address with your account.
Friend Recommendations
Playing games isn’t much fun without friends to play against, so Game Center is happy to suggest fellow Game Center participants from your Contacts list or your Facebook account. Unless you turn off these switches.
Twitter, Facebook, Flickr, Vimeo
These pages let you enter your name and password just once, in this one place, for each of these popular Web services—so that the iPad, and other apps, can freely access those accounts without having to bother you.
Each of these panels also offers an Install button, making it quick and easy to download the official Twitter, Facebook, Flickr, and Vimeo apps.
The Twitter and Facebook options offer some additional choices:
§ Twitter. Update Contacts adds your friends’ Twitter account names to their cards in Contacts, saving you that tedious data entry.
§ Facebook. Tapping Settings lets you tell the iPad how to alert you when new Facebook posts arrive: with a sound, for example. You can also limit Facebook video recordings to standard definition, to avoid massive data charges.
The Allow These Apps items let you control which built-in apps can access your Facebook account; for example, turn off Calendar if you don’t want to see your friends’ Facebook birthdays on your calendar.
Finally, Update All Contacts is the powerful button that adds photos and Facebook account names to the corresponding friends’ cards in your Contacts app, as described on Adding to the Contacts List.

App Preferences
At the bottom of the Settings app screen, you see a list of apps that have installed setting screens of their own. For example, here’s where you can edit your screen name and password for the AIM chat program, change how many days’ worth of news you want the NY Times Reader to display, and so on. Each one offers an assortment of changeable preference options.
It can get to be a very long list.
All materials on the site are licensed Creative Commons Attribution-Sharealike 3.0 Unported CC BY-SA 3.0 & GNU Free Documentation License (GFDL)
If you are the copyright holder of any material contained on our site and intend to remove it, please contact our site administrator for approval.
© 2016-2026 All site design rights belong to S.Y.A.