Learning iPhone Programming (2010)
Chapter 12. Integrating Your Application
The iPhone offers standard view controllers for taking pictures with the camera and sending email from within your own application. The software ecosystem surrounding your application is extremely rich with such built-in services and applications. You should take advantage of these as much as possible. In this chapter, we’ll look at how you can do that.
Application Preferences
Users look for application preferences in two main settings: in the application itself, and in the iPhone’s Settings application. For simple applications, applications with few preferences, and applications with preferences that need to be modified regularly, you should keep the preferences within the application itself. However, for more complicated applications, applications with complicated or numerous different preferences, and applications with preferences that the user will rarely have to modify, it’s preferable to use the Settings application.
Warning
Despite it being done in some applications currently for sale on the App Store, Apple advises that you should never split your preferences between the Settings application and a custom settings screen inside your own application. According to Apple, “If you have preferences, pick one solution and use it exclusively.” This is good advice; having multiple places to change settings is confusing not just for the user, but also for you as a developer.
Adding a preferences panel for your application to the main Settings application is easy. You do this by adding a special Settings.bundle file to your application and then configuring the Root.plist file contained inside the bundle in the Xcode editor.
When the built-in Settings application launches, it checks each third-party application for the presence of a Settings Bundle. For each bundle it finds, it displays the application’s name and icon on the main page. When the user taps the row belonging to the application, Settings loads theRoot.plist Settings Page file and uses that file to display your application’s main page of preferences.
Let’s add a Settings Bundle to the Where Am I? application we wrote in Chapter 11. Open the WhereAmI project in Xcode, right-click on the project’s icon in the Groups & Files pane in Xcode, and select Add→New File. In the pop-up window that appears, click on the Resource category in the lefthand pane underneath iPhone OS, select Settings Bundle, as shown in Figure 12-1, and click Next. Accept the default suggested name of Settings.bundle when prompted.
You’ll notice that the bundle appears in the Groups & Files pane in Xcode with an icon that looks a lot like a Lego brick. If you click on the arrow beside it to expand the bundle you’ll see the Root.plist file that contains an XML description of the settings root page, and an en.lprojdirectory containing the localized string resource file (for English). You can add further localizations to your Settings Bundle if needed.
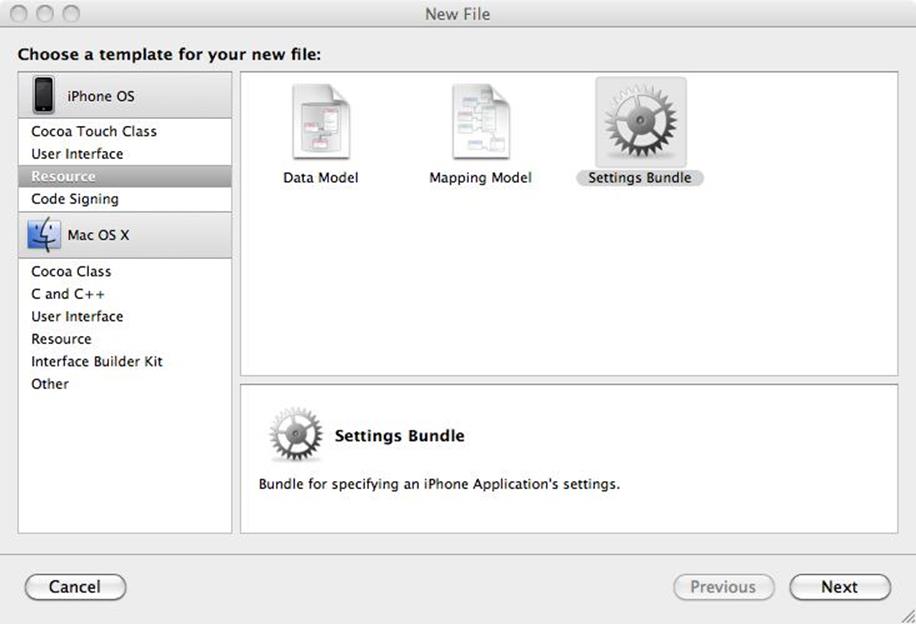
Figure 12-1. Adding a Settings Bundle to your application
The default Settings Bundle contains some example settings. Click on the Build and Run button in the Xcode toolbar to compile and deploy the application into iPhone Simulator. Tap the simulator’s Home button to quit out of the application, and then find the Settings application on the Home screen. Tap the Settings application to open it, and you should see something similar to Figure 12-2.
Since we haven’t added an icon to the application (see Adding an Icon in Chapter 9), the space to the left of the WhereAmI entry is blank; if we had added an icon it would be displayed next to our application name. If you now tap the WhereAmI entry, you’ll be presented with the default preferences pane generated from the Settings Bundle, also shown in Figure 12-2.

Figure 12-2. The simulator Settings application (left) with the default Settings Bundle we added to the Where Am I? application (right)
Note
If a file called Icon-Settings.png (a 29×29-pixel image) is located at the top level of your application’s bundle directory (drag it into the top level of your project under Groups & Files and check the box to copy the item), that icon is used to identify your application preferences in the Settings application. If no such image is present, the Settings application uses a scaled down version of your application’s icon file instead.
Returning to Xcode, click on the Root.plist file inside Settings.bundle to open it in the Xcode editor, and you’ll see the property list description of the Settings page. Option-click the disclosure triangle next to PreferencesSpecifiers, and you’ll see all the settings, as shown inFigure 12-3.
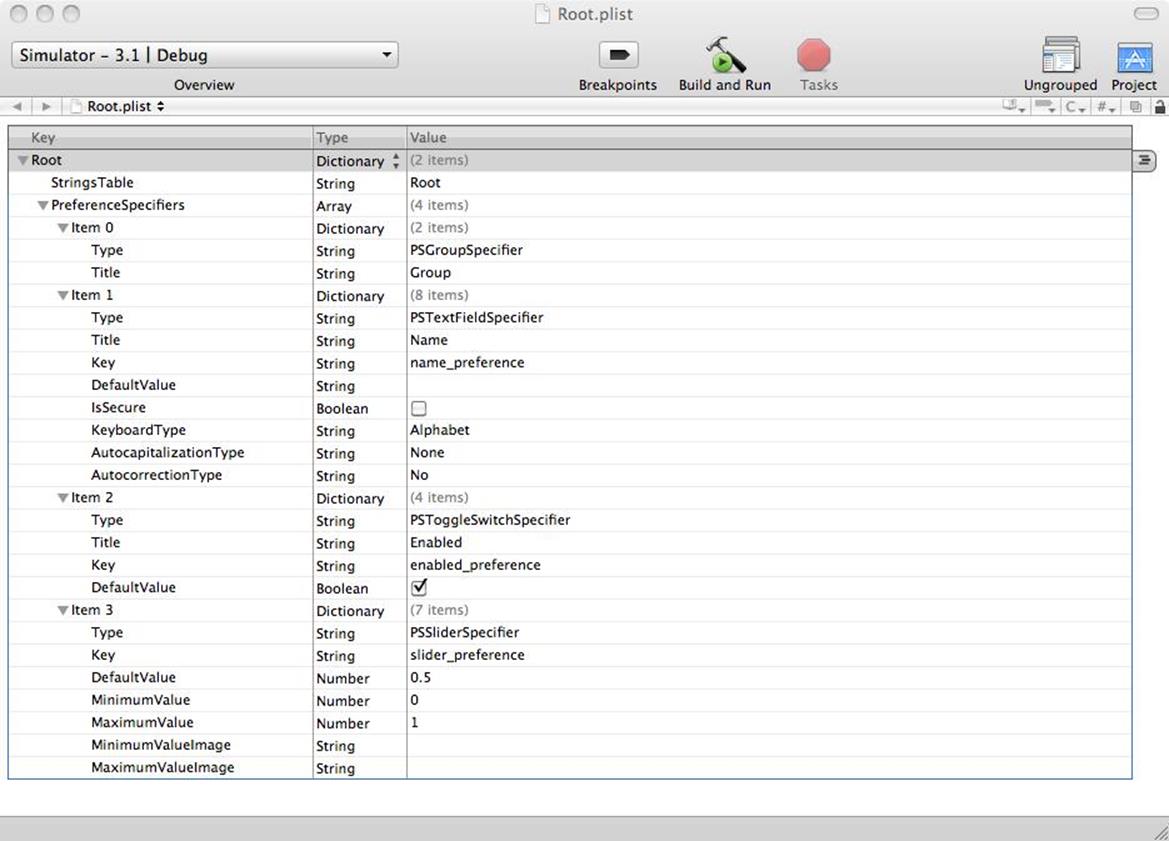
Figure 12-3. The Root.plist file in Settings.bundle
Note
Like any property list file, Xcode by default displays the Root.plist file as a key-value pair list. However, you can see the raw XML of the Root.plist property list by right-clicking on the Root key and selecting Open As→Source Code File.
If you compare Figures 12-2 and 12-3, you can see how the property list file (Figure 12-3) compares to the rendered user interface (Figure 12-2):
§ Item 0 (PSGroupSpecifier) is a group label whose value is the string Group.
§ Item 1 (PSTextFieldSpecifier) is a text label whose value is the string Name.
§ Item 2 (PSToggleSwitchSpecifier) is a toggle switch labeled “Enabled” with a default value of YES.
§ Item 3 (PSSliderSpecifier) is a slider bar with a minimum value of 0, a maximum value of 1, and a default value of 0.5.
Each UI element is an item described in the PreferenceSpecifiers array.
To make this easier to work with, you can tell Xcode explicitly that the Root.plist file is an iPhone Settings bundle. From the Xcode menu select View→Property List Type→iPhone Settings plist (you may need to double-click on Root.plist before this option becomes available on the menu). This tells Xcode to format the contents of the property list a little differently, as shown in Figure 12-4, making it easier to understand and edit.
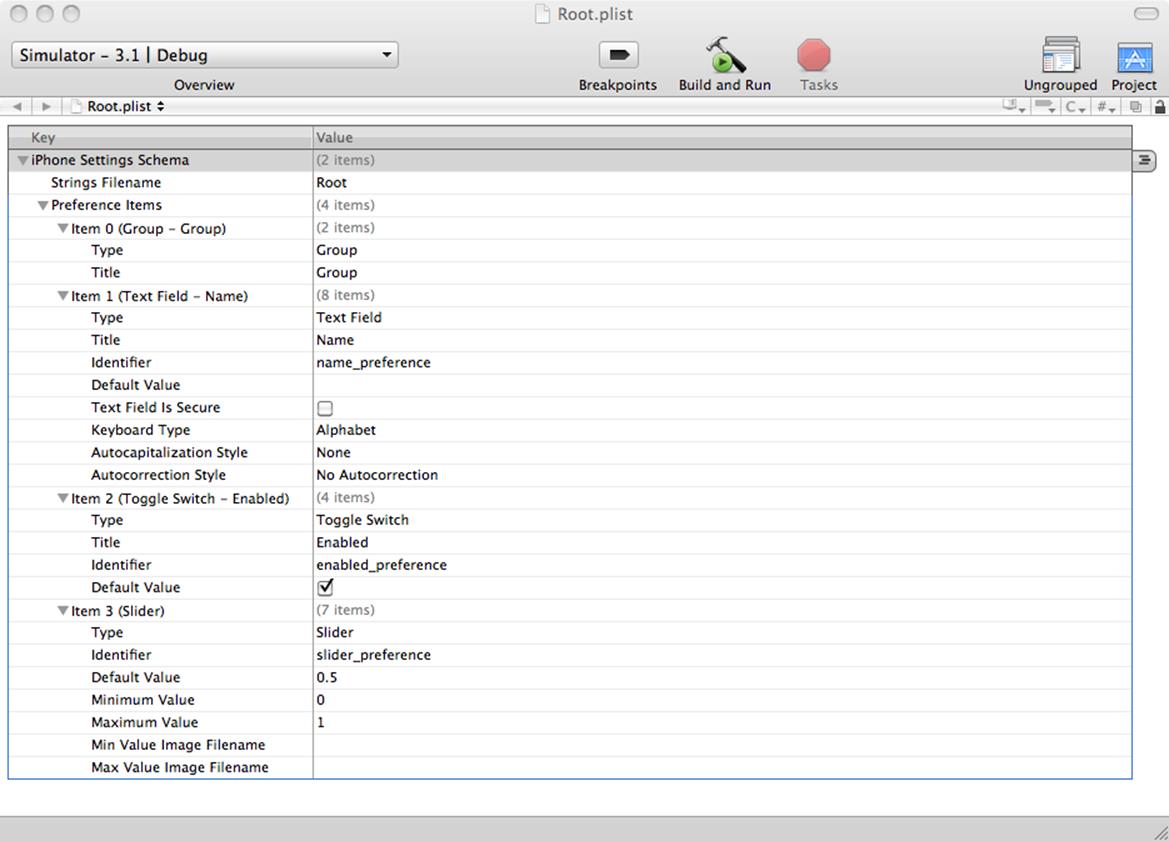
Figure 12-4. The Root.plist file formatted using the View→Property List Type→iPhone Settings plist from the Xcode menu bar
There are six possible property list keys:
§ Group (PSGroupSpecifier)
§ Title (PSTitleValueSpecifier)
§ Text Field (PSTextFieldSpecifier)
§ Toggle Switch (PSToggleSwitchSpecifier)
§ Multi Value (PSMultiValueSpecifier)
§ Slider (PSSliderSpecifier)
Additionally, although we won’t go into it here, you can point to child preference panes (additional settings pages) using the Child Pane (PSChildPaneSpecifier) property list key.
Let’s modify the default property key list provided by Xcode.
Click on Item 3 and press the Backspace key to delete it from the property list file; do the same for Item 1. You should be left with a Group and a Toggle Switch.
Rename the Group: under Item 0, double-click on the Title property’s value and enter Latitude & Longitude.
Keep the Toggle Switch unmodified. After doing this, the Root.plist file should resemble Figure 12-5.
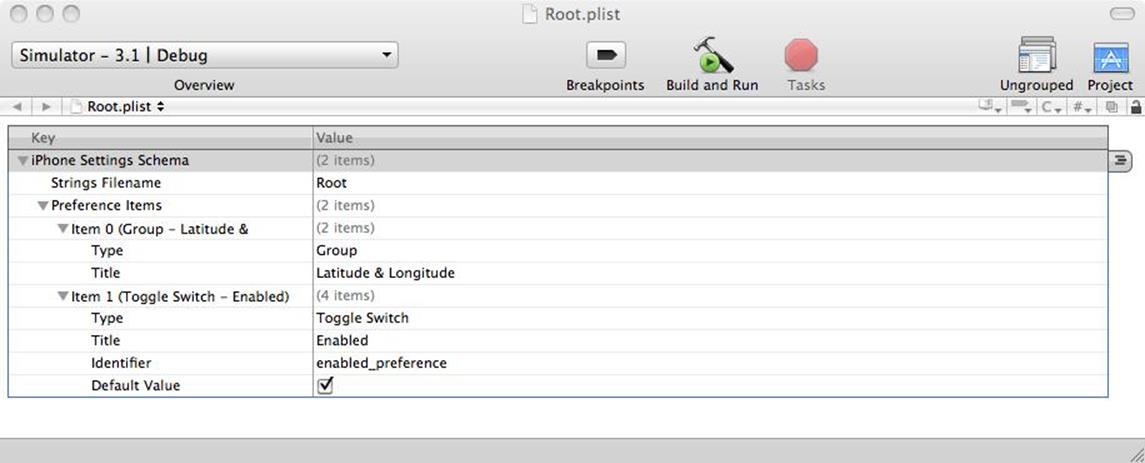
Figure 12-5. The edited property list pane in the Xcode editor
Make sure you’ve saved your changes to the Root.plist file and click the Build and Run button in the Xcode toolbar. Once the application has started, tap the Home button and make your way to the Settings application. Tap the WhereAmI preference entry, and you should now see something closely resembling Figure 12-6. We’re going to use the preference pane to toggle whether we want the application to display the latitude and longitude on the screen when it displays our map.
Note
When you run your application in iPhone Simulator, it stores preference values in ~/Library/Application Support/iPhone Simulator/User/Applications/<APP_ID>/Library/Preferences, where <APP_ID> is a randomly generated directory name. However, each time Xcode performs a clean install of your application, any previous version of the application’s preferences will be deleted.
Return to Xcode and click on the WhereAmIAppDelegate.m file to open it in the Xcode editor. Now add the following class method, which initializes the default settings for the application:
+ (void)initialize {
NSUserDefaults *defaults = [NSUserDefaults standardUserDefaults];
NSDictionary *defaultsToRegister =
[NSDictionary dictionaryWithObject:@"YES"
forKey:@"enabled_preference"];
[defaults registerDefaults:defaultsToRegister];
}
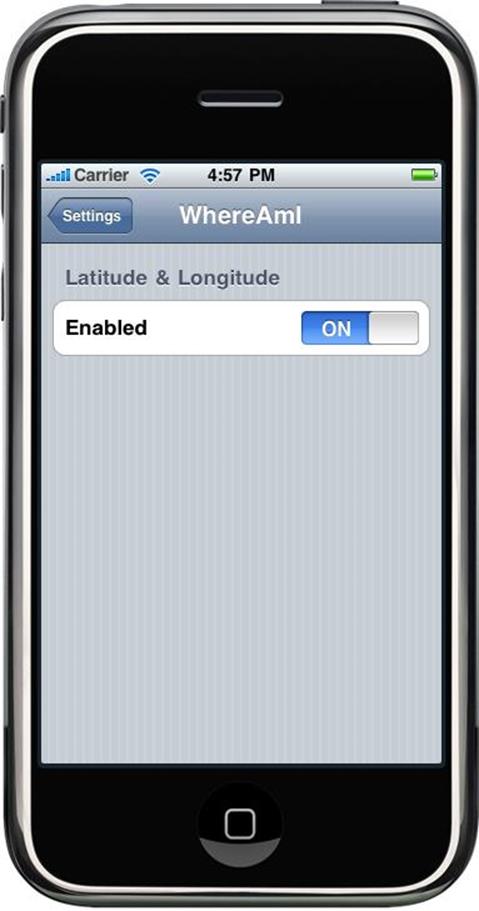
Figure 12-6. The edited property list pane in the Settings application
If your user has already accessed the application’s settings inside the iPhone Settings application, the default settings will already have been initialized. If this has not been done, the values will not exist and will be set to nil (or in the case of Booleans, to NO). As the application delegate is loaded, this method initializes the user defaults (the initialize: message is sent to each class before it receives any other messages).
Using this method to set the defaults has the unfortunate side effect that you have to specify your defaults in two places: in the Root.plist file, where they properly belong; and in your application delegate, where they don’t.
The right way to deal with this problem is to read in the defaults from the Settings.bundle file which is stored as part of your application. To do this, replace the initialize: method with the following:
+ (void)initialize {
NSUserDefaults *defaults = [NSUserDefaults standardUserDefaults];
NSString *settingsBundle =
[[NSBundle mainBundle] pathForResource:@"Settings" ofType:@"bundle"];
NSDictionary *settings =
[NSDictionary dictionaryWithContentsOfFile:
[settingsBundle stringByAppendingPathComponent:@"Root.plist"]];
NSArray *preferences = [settings objectForKey:@"PreferenceSpecifiers"];
NSMutableDictionary *defaultsToRegister =
[[NSMutableDictionary alloc] initWithCapacity:[preferences count]];
[defaults registerDefaults:defaultsToRegister];
}
If your application preferences don’t exist when your application is launched, you can therefore read the values directly from the Settings.bundle file rather than having to store the defaults in two places.
You can check that your preference bundle is working correctly by adding the following into the application delegate’s applicationDidFinishLaunching: method and checking the Console (select Run→Console from the Xcode menu bar). Add the lines shown in bold:
- (void)applicationDidFinishLaunching:(UIApplication *)application {
NSUserDefaults *defaults = [NSUserDefaults standardUserDefaults];
BOOL enabled = [defaults boolForKey:@"enabled_preference"];
NSLog(@"enabled = %d", enabled);
self.locationManager = [[[CLLocationManager alloc] init] autorelease];
... other code not shown ...
}
We may have working preferences, but they don’t do anything yet. Let’s change that right now. Click on the WhereAmIViewController.h interface file to open it in the Xcode editor, and add the following outlets to the declaration (inside the curly braces of the @interface block):
IBOutlet UIButton *backgroundButton;
IBOutlet UILabel *latLabel;
IBOutlet UILabel *longLabel;
There is no need to make them properties.
Make sure you’ve saved all your changes (Option-⌘-S), and then double-click on the WhereAmIViewController.xib NIB file to open it in Interface Builder. Click on File’s Owner, and in the Connections tab of the Inspector window connect the backgroundButton outlet to theUIButton we used as a background for the labels, as shown in Figure 12-7; then connect the latLabel and longLabel outlets to the “Latitude” and “Longitude” UILabels, respectively.
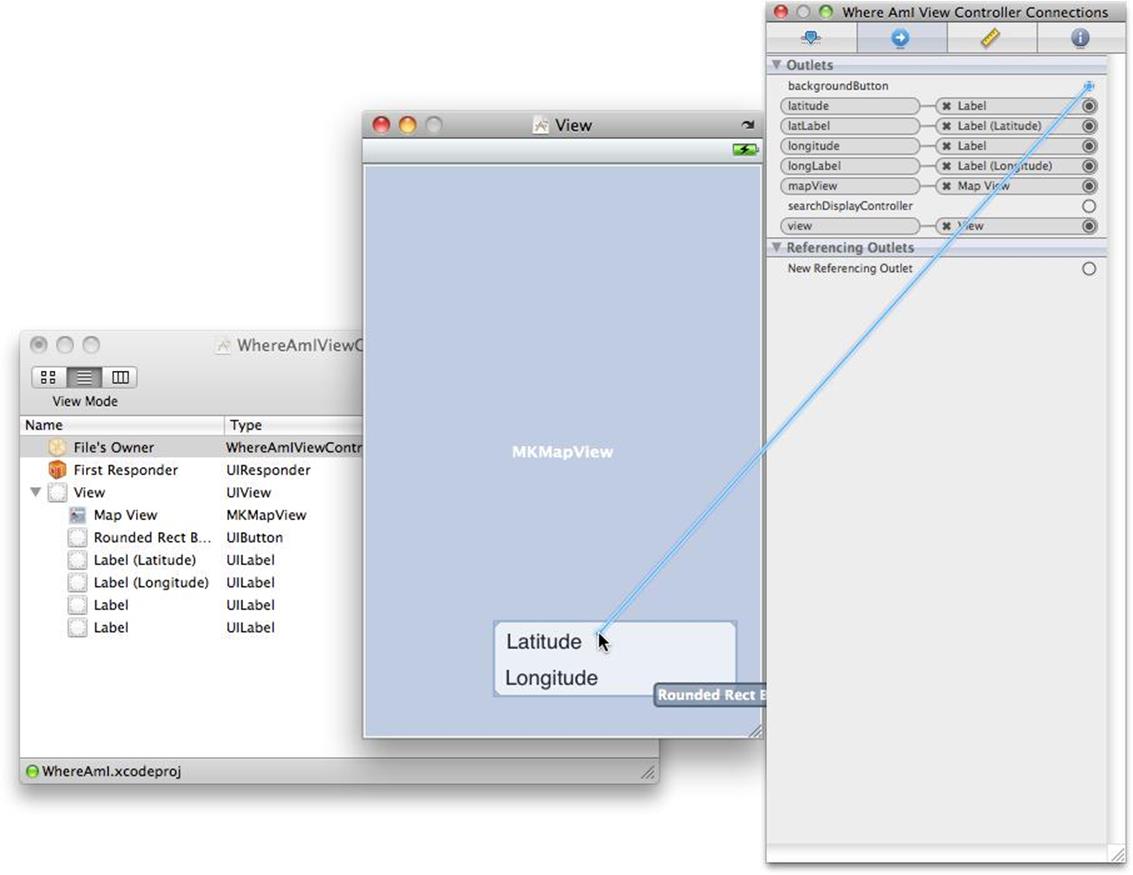
Figure 12-7. Connecting the new outlets to File’s Owner
Save your changes to the NIB file and return to Xcode. Then click on the WhereAmIViewController.m implementation file to open it in the Xcode editor. Add the following viewWillAppear: method:
- (void)viewWillAppear:(BOOL)animated {
NSUserDefaults *defaults = [NSUserDefaults standardUserDefaults];
if ( [defaults boolForKey:@"enabled_preference"] ) {
backgroundButton.hidden = NO;
latLabel.text = @"Latitude";
longLabel.text = @"Longitude";
} else {
backgroundButton.hidden = YES;
latLabel.text = @"";
longLabel.text = @"";
}
[super viewWillAppear:animated];
}
This method checks the application preferences to see if Latitude & Longitude are enabled. If they are, we set the text of the labels appropriately and make sure the button is visible. Correspondingly, if Latitude & Longitude are disabled, we hide the button and empty both strings.
Finally, we have to go back into the application delegate file and make a small modification to the locationManager:didUpdateToLocation:fromLocation: method. Here we have to stop the application from printing the current latitude and longitude to the screen if Latitude & Longitude are disabled via preferences. Add the lines shown in bold (wrapping the two existing assignments):
NSUserDefaults *defaults = [NSUserDefaults standardUserDefaults];
if ( [defaults boolForKey:@"enabled_preference"] ) {
viewController.latitude.text =
[NSString stringWithFormat:@"%f", newLocation.coordinate.latitude];
viewController.longitude.text =
[NSString stringWithFormat:@"%f", newLocation.coordinate.longitude];
}
This brackets the lines that set the text of the UILabels with an if() block; we set the text of the labels only if Latitude & Longitude are enabled in the preferences.
We’re done here. Make sure all of your changes have been saved, and click the Build and Run button in the Xcode toolbar to compile and deploy your application into iPhone Simulator.
By default, the Latitude & Longitude display is enabled, so everything should appear as before. However, if you disable Latitude & Longitude in Settings, quit out of Settings, and relaunch the Where Am I? application, you’ll see that Latitude & Longitude has disappeared, as shown inFigure 12-8.
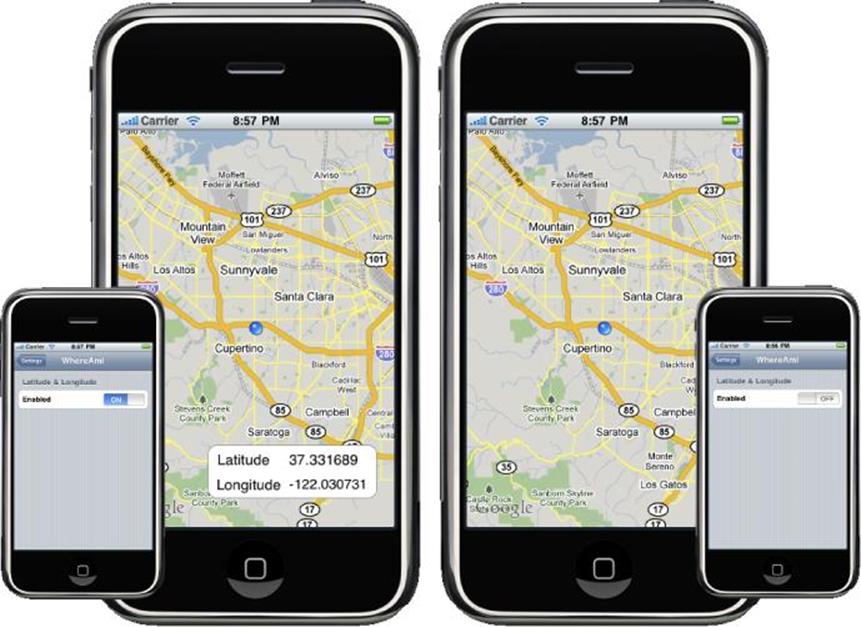
Figure 12-8. With Latitude & Longitude enabled in the preferences (left) and disabled (right)
Accessing Global Preferences
As well as your own application preferences, you can programmatically access the device’s global preferences from your own application:
NSString *path = [NSHomeDirectory()
stringByAppendingPathComponent:
@"Library/Preferences/.GlobalPreferences.plist"];
NSDictionary *dict = [NSDictionary dictionaryWithContentsOfFile:path];
NSLog(@"Phone number: %@", [dict objectForKey:@"SBFormattedPhoneNumber"]);
While there are a number of entries, the two keys that are probably going to be of most interest to you as a developer are AppleLocale and SBFormattedPhoneNumber. These are the current localizations used by the device; as I am based in the United Kingdom my AppleLocale isen_GB, and my phone number is formatted to the current locale.
You can also retrieve the phone number directly from the global preferences:
NSString *phoneNumber = [[NSUserDefaults standardUserDefaults]
objectForKey:@"SBFormattedPhoneNumber"];
NSLog(@"Phone number: %@", phoneNumber);
You should be aware that the phone number might not always be available unless the number has been set in the Phone→My Number preference panel in the Settings application on the device. This is not guaranteed to be the case for all devices, as some carriers don’t set this automatically.
Custom URL Schemes
One of the more interesting features provided by the SDK is the ability for your application to use custom URL schemes to launch other applications, and in turn, to register custom URL schemes of its own. These schemes can be used to launch your application, either from the browser or from another application on the device. Additionally, such schemes are not just limited to launching the application; you can pass additional information to your application via the URL.
Using Custom Schemes
Most of the built-in applications Apple provides respond to custom URL schemes; for example, the Maps, Mail, YouTube, iTunes, and App Store applications will all open in response to custom URLs. However, there are also many established third-party applications with published URL schemes that you can use in your own application.
Note
At the time of this writing, a fairly extensive list of URL schemes for third-party iPhone applications was available at http://handleopenurl.com/scheme.
Making a telephone call
You can easily trigger a telephone call from your application by using the tel: URL scheme:
NSString *string = @"tel:+19995551234";![]()
NSURL *url = [NSURL URLWithString:string];
[[UIApplication sharedApplication] openURL:url];
![]()
The phone number must not contain spaces or square brackets, although it can contain dashes and a leading + sign indicating that the international call prefix should be prepended.
Sending an SMS message
Unfortunately, Apple has not provided either a standard view controller as it did with email or an API for sending SMS messages from your application. This is regrettable, but if you consider the abuses that programmatic access might allow, you can probably follow the company’s reasoning as to why this is not available.
However, you can use the custom URL scheme sms:[phone number] to open the SMS application and allow your users to send SMS messages:
NSString *string = @"sms:+19995551234";![]()
NSURL *url = [NSURL URLWithString:string];
[[UIApplication sharedApplication] openURL:url];
![]()
As for tel: URLs, the phone number must not contain spaces or square brackets.
As this will cause your application to exit and you cannot prepopulate the body of the SMS message, it’s not generally very useful.
Registering Custom Schemes
Regardless of what you intend to do after a custom URL launches your application, you must first register your custom scheme using your application’s Info.plist file. Let’s do that for our City Guide application. You can choose any of the versions of the City Guide application we’ve worked on so far for this addition.
Open the project in Xcode and click on its Info.plist file to open it in the Xcode editor. Right-click the top row’s Information Property List and select Add Row. A row will be added and you’ll be prompted to select a key from a drop-down menu. Scroll to the bottom and select “URL types.” This will create an array key item, so click the disclosure triangle next to “URL types” to expand it.
Click on Item 0 to expand it to show the URL identifier line. The value for this can actually be anything, but it’s normal to use the Bundle Identifier, so double-click on the Bundle Identifier value to select it and then copy the identifier string. Then double-click on the field to the right of the URL identifier and paste it into the box.
Now right-click on Item 0, and select Add Row. You’ll be presented with a shorter drop down of possible values; this time select URL Schemes. This will create an array key item. Expand it, double-click on the value box for its Item 0, and enter cityguide.
If you’ve followed the procedure correctly, your Info.plist file should now look like mine does in Figure 12-9. We’re done; adding a custom URL scheme to your application really is that easy.
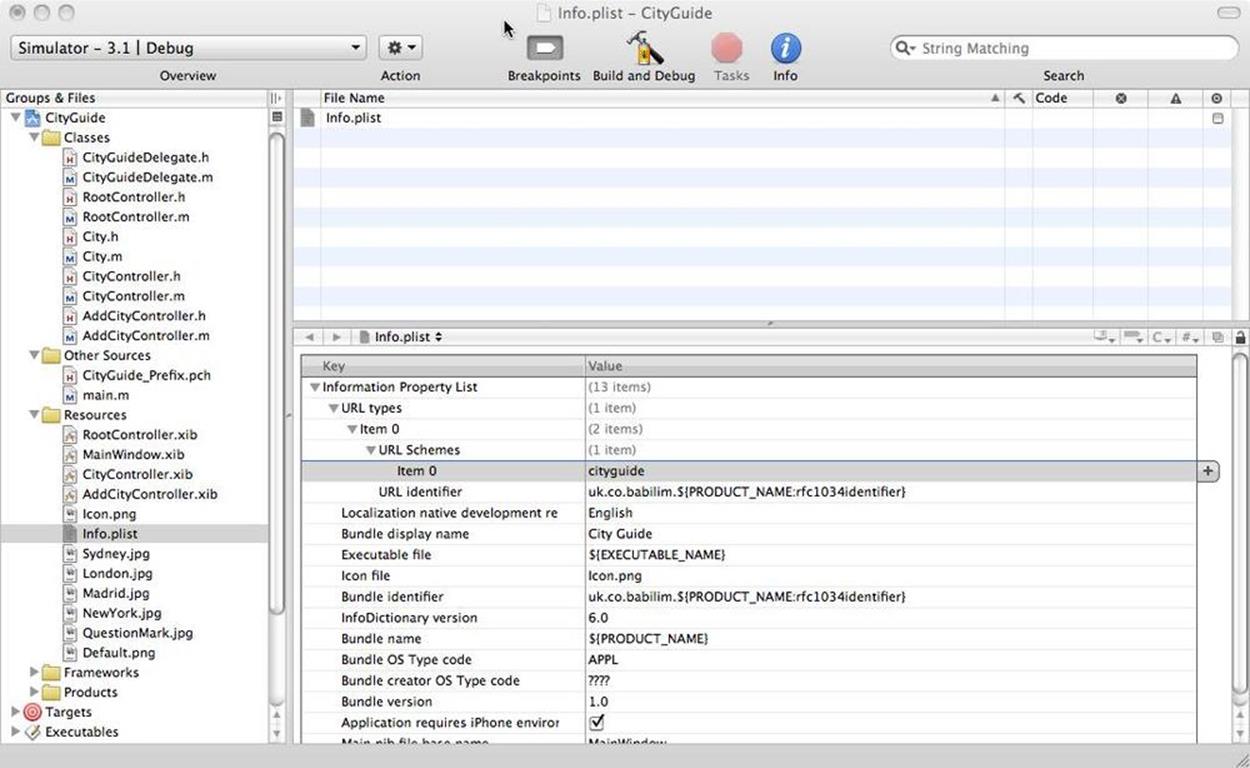
Figure 12-9. The Info.plist with our cityguide:// scheme registered
Of course, now that we’ve added the custom URL scheme we need to modify our application code so that it knows what to do with it. We’re going to modify the City Guide application to take URLs of the form cityguide://<City Name> and open the relevant city page (e.g., the London page for cityguide://London).
Warning
If two different applications register with the same URL scheme, the most recently installed application will be the one that responds to custom URLs conforming to the URL scheme.
We really need to make only a few changes to the City Guide application to implement handling custom URL schemes. When the application is opened in response to a cityguide:// URL, the application:handleOpenURL: method is called in the application delegate class.
Click on the CityGuideDelegate.m implementation file to open it in the Xcode editor, and add the following method:
- (BOOL)application:(UIApplication *)application
handleOpenURL:(NSURL *)url
{
// URL of the form cityguide://London
viewController.placeFromURL = [url host];
return YES;
}
Save your changes and then click on the RootController.h interface file. Here we need to declare an instance variable (put this inside the @implementation block’s curly braces):
NSString *placeFromURL;
Now declare it as a property:
@property (nonatomic, retain) NSString *placeFromURL;
In the corresponding RootController.m implementation file, synthesize the new property:
@synthesize placeFromURL;
Now modify the viewDidLoad: method to do the actual work. I’ve highlighted the code that you need to add to deal with the custom URL scheme:
- (void)viewDidLoad {
self.title = @"City Guide";
self.navigationItem.rightBarButtonItem = self.editButtonItem;
CityGuideDelegate *delegate =
(CityGuideDelegate *)[[UIApplication sharedApplication] delegate];
cities = delegate.cities;
if ( self.placeFromURL ) {
NSIndexPath *indexPath;
for( int i = 0; i < cities.count; i++ ) {
City *thisCity = [cities objectAtIndex:i];
if( [thisCity.cityName isEqualToString:self.placeFromURL] ) {
indexPath = [NSIndexPath indexPathForRow:i inSection:0];
}
}
// Begin debugging code
UIAlertView *alert = [[UIAlertView alloc]
initWithTitle:self.placeFromURL
message:[NSString stringWithFormat:@"indexPath = %@", indexPath]
delegate:self
cancelButtonTitle:nil
otherButtonTitles:@"OK", nil];![]()
[alert show];
[alert autorelease];
// End debugging code
CityController *city =
[[CityController alloc] initWithIndexPath:indexPath];
[delegate.navController pushViewController:city animated:NO];
[city release];
}
}
![]()
Displaying the UIAlertView is purely for debugging purposes to give some feedback. We’re using it because the Debugger Console is unavailable, since the application is started by clicking a URL rather than by running under Xcode. It’s not integral to handling the custom URL scheme, and once you understand what’s going on, you can delete this section of the code.
We’re done. Click the Build and Run button to compile and deploy the application into iPhone Simulator. Once the application is launched, quit again by clicking the Home button and navigate to Safari. Click on the address bar, enter cityguide://London, and click the Go button (or tap the Return key).
If all goes well, Safari should quit and the City Guide application will launch. Soon afterward, you should see something similar to Figure 12-10.
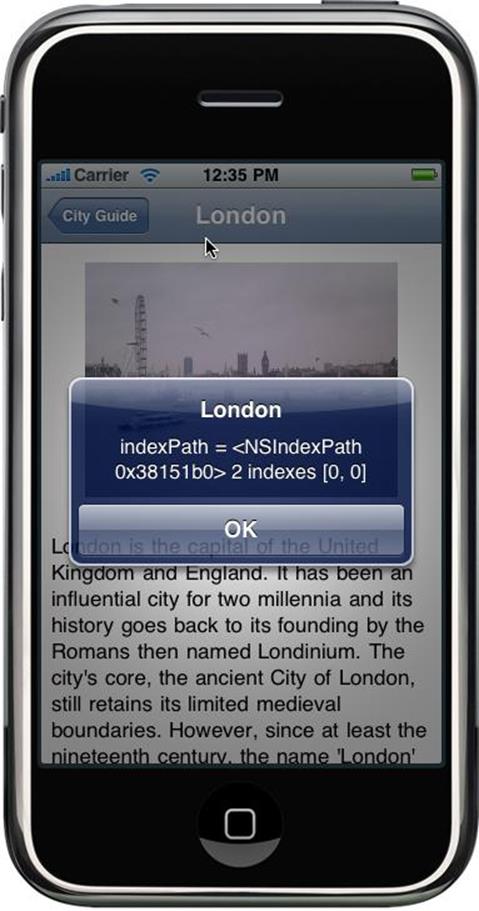
Figure 12-10. Opening the City Guide application from Safari
This doesn’t work only in Safari; we can now open the City Guide application from other applications using the following snippet of code:
NSString *string = @"cityguide://London";![]()
NSURL *url = [NSURL URLWithString:string];
[[UIApplication sharedApplication] openURL:url];
![]()
This will open the London city guide in the City Guide application.
Media Playback
Just as it has done for images with the UIImagePickerController class (see The Image Picker View Controller in Chapter 6) and for email with the MFMailComposeViewController class (see Sending Email in Chapter 7), Apple has provided a standard way to select and play back iPod media inside your own application.
Warning
The MPMediaPickerController and associated classes make use of the iPod library; this is not present in iPhone Simulator and will work correctly only on the device itself.
However, things are a little bit more complicated than the two previous cases; here we use an MPMediaPickerController that, via the MPMediaPickerControllerDelegate protocol, returns an MPMediaItemCollection object containing the media items the user has selected, and that can be played using an MPMusicPlayerController object.
These classes are provided by the Media Player framework; if you want to use them, you must add the Media Player framework to your project by right-clicking the Frameworks group in Groups & Files and selecting Add→Existing Frameworks.
Let’s reuse the Prototype application. Open the Finder and navigate to the location where you saved the Prototype project. Right-click on the folder containing the project files and select Duplicate; a folder called Prototype copy will be created containing a duplicate of the project. Rename the folder PrototypePlayer, and just as we did in Chapter 7, prune the application down to the stub with the Go! button and associated pushedGo: method that we’ll use to trigger the display of our media player.
Note
To prune the Prototype application down to the stub, you will need to:
1. Delete the WebViewController.h, WebViewController.m, and WebView.xib files from your project.
2. Remove the #import "WebViewController.h" line from PrototypeViewController.m.
3. Delete the current body of the pushedGo: method.
Next, open the PrototypeViewController.h interface file, import the Media Player framework into the interface (.h) files, and declare your class as an MPMediaPickerControllerDelegate:
#import <UIKit/UIKit.h>
#import <MediaPlayer/MediaPlayer.h>
@interface PrototypeViewController : UIViewController
<MPMediaPickerControllerDelegate> {
IBOutlet UIButton *goButton;
}
-(IBAction) pushedGo:(id)sender;
@end
Save your changes, and open the PrototypeViewController.m implementation file. In the pushedGo: method, instantiate an MPMediaPickerController object and present its view modally to the user:
-(IBAction) pushedGo:(id)sender {
MPMediaPickerController *mediaPicker =
[[MPMediaPickerController alloc]
initWithMediaTypes: MPMediaTypeAnyAudio];
mediaPicker.delegate = self;
mediaPicker.allowsPickingMultipleItems = YES;
[self presentModalViewController:mediaPicker animated:YES];
[mediaPicker release];
}
Now implement the following two delegate methods:
- (void) mediaPicker:(MPMediaPickerController *) mediaPicker
didPickMediaItems:(MPMediaItemCollection *) userMediaItemCollection
{
[self dismissModalViewControllerAnimated: YES];
MPMusicPlayerController *musicPlayer =
[MPMusicPlayerController applicationMusicPlayer];
[musicPlayer setQueueWithItemCollection: userMediaItemCollection];
[musicPlayer play];![]()
}
- (void) mediaPickerDidCancel: (MPMediaPickerController *) mediaPicker {
[self dismissModalViewControllerAnimated: YES];
}
![]()
The MPMusicPlayerController responds to all the messages you might expect (e.g., play, pause, stop, volume). You can link these directly to buttons in your user interface if you want to give users direct control over these functions.
Like the UIImagePickerControllerDelegate methods we met earlier in the book, these two methods are used to dismiss the view controller and handle the returned items.
Save your changes, and click on the Build and Run button in the Xcode toolbar to build and deploy your code. Remember that you’ll need to configure your project (see Putting the Application on Your iPhone in Chapter 3) to allow you to deploy the application onto your iPhone or iPod touch so that you can test the application on your device.
Once your application loads, tap the Go! button to bring up the MPMediaPickerController, select some songs, and tap the Done button in the navigation bar (see Figure 12-11). Your music should start playing.
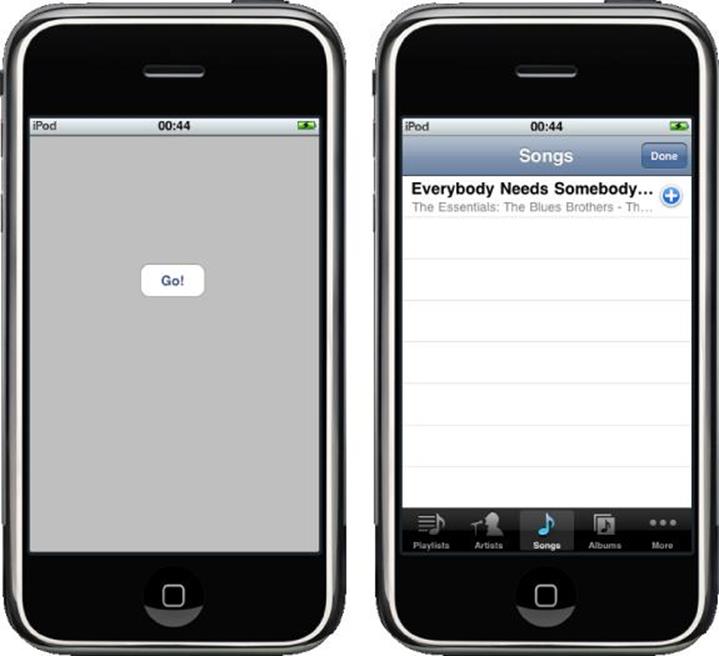
Figure 12-11. The initial main view (left) and MPMediaPickerController (right)
Once playback has begun, you need to keep track of the currently playing item and display that to the user, or at the very least provide some way for the user to pause (or stop) playback, or perhaps to change her selection. The MPMusicPlayerController class provides two methods: thebeginGeneratingPlaybackNotifications: method and a corresponding endGeneratingPlaybackNotifications: method. Add this line to the didPickMediaItems: method:
- (void) mediaPicker:(MPMediaPickerController *) mediaPicker
didPickMediaItems:(MPMediaItemCollection *) userMediaItemCollection {
[self dismissModalViewControllerAnimated: YES];
MPMusicPlayerController *musicPlayer =
[MPMusicPlayerController applicationMusicPlayer];
[musicPlayer setQueueWithItemCollection: userMediaItemCollection];
[musicPlayer beginGeneratingPlaybackNotifications];
[musicPlayer play];
}
When the begin method is invoked, the class will start to generate notifications of when the player state changes and when the current playback item changes, which your application can register to handle by adding itself as an observer using the NSNotificationCenter class:
- (void) mediaPicker:(MPMediaPickerController *) mediaPicker
didPickMediaItems:(MPMediaItemCollection *) userMediaItemCollection {
[self dismissModalViewControllerAnimated: YES];
MPMusicPlayerController *musicPlayer =
[MPMusicPlayerController applicationMusicPlayer];
[musicPlayer setQueueWithItemCollection: userMediaItemCollection];
[musicPlayer beginGeneratingPlaybackNotifications];
NSNotificationCenter *notificationCenter =
[NSNotificationCenter defaultCenter];
[notificationCenter addObserver:self
selector:@selector(handleNowPlayingItemChanged:)
name:@"MPMusicPlayerControllerNowPlayingItemDidChangeNotification"
object:musicPlayer];
[notificationCenter addObserver:self
selector:@selector(handlePlaybackStateChanged:)
name:@"MPMusicPlayerControllerPlaybackStateDidChangeNotification"
object:musicPlayer];
[musicPlayer play];
}
This will invoke the selector methods in our class when the appropriate notification arrives. (You could, for example, use the first to update a UILabel in your view telling the user the name of the currently playing song.)
However, for now let’s just implement these methods to print messages to the console log. In the PrototypeViewController.h interface file, declare the selector methods:
@interface PrototypeViewController : UIViewController
<MPMediaPickerControllerDelegate>
{
IBOutlet UIButton *goButton;
}
-(IBAction) pushedGo:(id)sender;
- (void)handleNowPlayingItemChanged:(id)notification;
- (void)handlePlaybackStateChanged:(id)notification;
@end
Then, in the PrototypeViewController.m implementation file, add the following method. This will be called when the current item being played changes:
- (void)handleNowPlayingItemChanged:(id)notification {
MPMusicPlayerController *musicPlayer =
[MPMusicPlayerController applicationMusicPlayer];
MPMediaItem *currentItem = [musicPlayer nowPlayingItem];![]()
NSLog(@"%@", currentItem);
}
![]()
Unusually, the MPMediaItem class has only one instance method: valueForProperty:. This is because the class can wrap a number of media types, and each type can have a fairly wide range of metadata associated with it. You can find a full list of possible keys in the MPMediaItemclass reference, but keys include MPMediaItemPropertyTitle and MPMediaItemPropertyArtwork, among others.
While the second method handles changes in state, we can use this to update our user interface (e.g., changing the state of the Play and Stop buttons when the music ends):
- (void)handlePlaybackStateChanged:(id)notification {
MPMusicPlayerController *musicPlayer =
[MPMusicPlayerController applicationMusicPlayer];
MPMusicPlaybackState playbackState = [musicPlayer playbackState];
if (playbackState == MPMusicPlaybackStatePaused) {
NSLog(@"Paused");
} else if (playbackState == MPMusicPlaybackStatePlaying) {
NSLog(@"Playing");
} else if (playbackState == MPMusicPlaybackStateStopped) {
NSLog(@"Stopped");
}
}
Save your changes, and click on the Build and Run button in the Xcode toolbar to build and deploy your code onto your device. Once your application loads, tap the Go! button to bring up the MPMediaPickerController again, select some songs, and tap the Done button in the navigation bar. Your music should start playing, but this time you should see something similar to the following log messages in the Debugger Console:
2009-12-11 00:29:42.535 Prototype[447:207] <MPMediaItem 0x1373e0>
persistentID: 6817778870160863775
2009-12-11 00:29:42.685 Prototype[447:207] Playing
Using the Address Book
Just like the MPMediaPickerController class in the preceding section, and the other classes we met earlier in the book, Apple has provided an ABPeoplePickerNavigationController and associated delegate protocol to allow you to both prompt the user for contact information and display contact information to the user. However, in this case the framework it provides also allows your application to interact with person and group records directly.
Warning
Once you reach the lower levels of the Address Book framework—for instance, dealing with individual person records—the interface presented by the framework is in C rather than Objective-C. This is especially obvious when dealing with the address book programmatically rather than interactively using the navigation controller.
Interactive People Picking
To illustrate how to use the ABPeoplePickerNavigationController, we’re going to reuse the Prototype application code yet again. So, open the Finder and navigate to the location where you saved the Prototype project. Right-click on the folder containing the project files and select Duplicate; a folder called Prototype copy will be created containing a duplicate of the project. Rename the folder Prototype4, and just as we did before, prune the application down to the stub (as we did in the previous section for the media player example) with the Go! button and associated pushedGo: method that we’ll use to trigger the display of our address book picker.
Click on the PrototypeViewController.h interface file to open it in the Xcode editor. We need to declare the class as both an ABPeoplePickerNavigationControllerDelegate and a UINavigationControllerDelegate. Both declarations are necessary for the class to interact with the ABPeoplePickerNavigationController:
#import <UIKit/UIKit.h>
#import <AddressBook/AddressBook.h>
#import <AddressBookUI/AddressBookUI.h>
@interface PrototypeViewController : UIViewController
<UINavigationControllerDelegate,
ABPeoplePickerNavigationControllerDelegate>
{
IBOutlet UIButton *goButton;
}
-(IBAction) pushedGo:(id)sender;
@end
Now modify the pushedGo: method in the corresponding PrototypeViewController.m implementation file:
-(IBAction) pushedGo:(id)sender {
ABPeoplePickerNavigationController *peoplePicker =
[[ABPeoplePickerNavigationController alloc] init];
peoplePicker.peoplePickerDelegate = self;![]()
[self presentModalViewController:peoplePicker animated:YES];
[peoplePicker release];
}
![]()
Unlike most Objective-C classes, the ABPeoplePickerNavigationController uses the peoplePickerDelegate property to specify its delegate rather than the more common delegate property.
Next, add the three mandatory ABPeoplePickerNavigationControllerDelegate methods specified by the delegate protocol:
- (BOOL)peoplePickerNavigationController:
(ABPeoplePickerNavigationController *)picker
shouldContinueAfterSelectingPerson:(ABRecordRef)person![]()
{
[self dismissModalViewControllerAnimated:YES];
return NO;
}
- (BOOL)peoplePickerNavigationController:
(ABPeoplePickerNavigationController *)picker
shouldContinueAfterSelectingPerson:(ABRecordRef)person
property:(ABPropertyID)property
identifier:(ABMultiValueIdentifier)identifier![]()
{
return NO;
}
- (void)peoplePickerNavigationControllerDidCancel:
(ABPeoplePickerNavigationController *)picker![]()
{
[self dismissModalViewControllerAnimated:YES];
}
![]()
If this method returns YES, the picker will continue after the user selects a name from the address book, displaying the person’s details. If the method returns NO, the picker will not continue. If you intend to return NO, you should also dismiss the view controller.
![]()
This method is called only if you want the picker to continue after the user selects a name from the address book. The address record is then displayed to the user. If this method returns YES, the picker will continue after the user selects a property (e.g., a mobile phone number, fax number). If the method returns NO, the picker will not continue. If you intend to return NO, you should also dismiss the view controller.
![]()
This method is called when the user taps the Cancel button in the navigation bar of the picker interface.
We’ve reached a point where you can compile and check the code, but remember that you should also add the AddressBook and AddressBookUI frameworks to the project before clicking the Build and Run button in the Xcode toolbar. When you do so, you should see the familiar gray screen with the Go! button as shown in Figure 12-12; click it and you’ll be presented with a view of the address book. Selecting a name in the address book will dismiss the picker view and return you directly to the main gray screen.
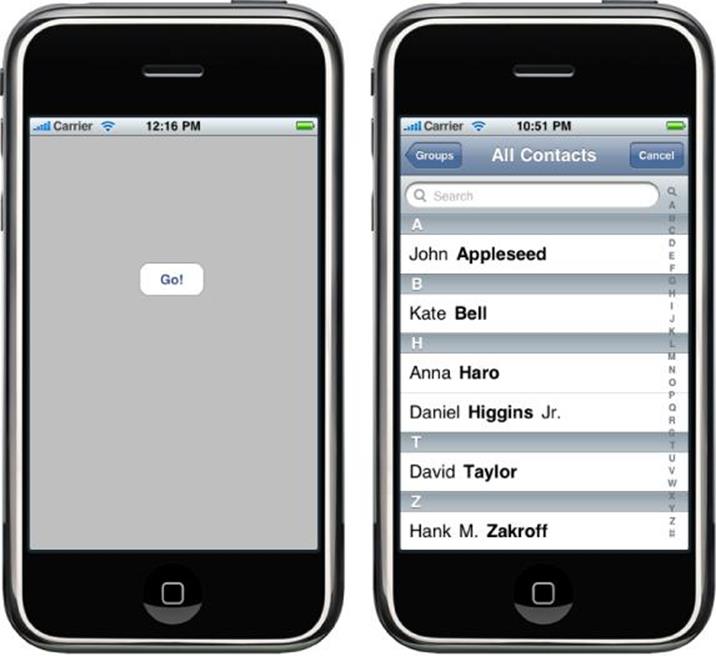
Figure 12-12. The initial main view (left) and the ABPeoplePickerNavigationController (right)
The picker is displayed, but even if the user selects a name from the list, we don’t do anything with the returned record. Let’s add some additional code to the peoplePickerNavigationController:shouldContinueAfterSelectingPerson: method to fix that omission:
- (BOOL)peoplePickerNavigationController:
(ABPeoplePickerNavigationController *)picker
shouldContinueAfterSelectingPerson:(ABRecordRef)person
{
NSString *name = (NSString *)ABRecordCopyCompositeName(person);![]()
ABMutableMultiValueRef phones =
ABRecordCopyValue(person, kABPersonPhoneProperty);
NSArray *numbers =
(NSArray *)ABMultiValueCopyArrayOfAllValues(phones);
ABMutableMultiValueRef emails =
ABRecordCopyValue(person, kABPersonEmailProperty);
NSString *addresses =
(NSString *)ABMultiValueCopyArrayOfAllValues(emails);
NSString *note = (NSString *)
ABRecordCopyValue(person, kABPersonNoteProperty );
NSLog( @"name = %@, numbers = %@, email = %@, note = %@",
name, numbers, addresses, note );
[self dismissModalViewControllerAnimated:YES];
return NO;
}
![]()
The ABRecordCopyCompositeName() method returns a human-readable name for the record.
There are two basic types of properties: single-value and multivalue. Single-value properties contain data that can have only a single value, such as a person’s name. Multivalue properties contain data that can have multiple values, such as a person’s phone number. You can see from the preceding code that single-value and multivalue properties are handled slightly differently.
Note
You can find a full list of the different properties available in an address book record in the ABPerson class documentation.
Make sure you’ve saved your changes and click the Build and Run button in the Xcode toolbar to compile and deploy your application into iPhone Simulator. When the application launches, click the Go! button and then select a name from the list. You should see something similar toFigure 12-13 logged to the Console (select Run→Console from the Xcode menu bar to display the Debugger Console).
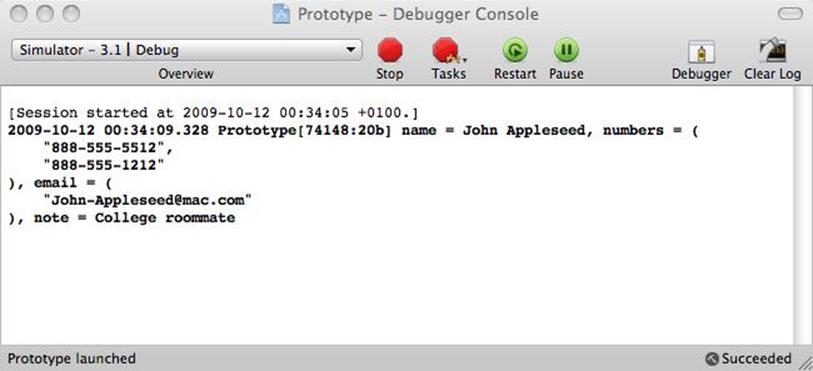
Figure 12-13. The properties returned from the people picker controller for John Appleseed
What if we want to retrieve a specific phone number from the list? It’s easier to let the user select the phone number he needs, and that’s where the peoplePickerNavigationController:shouldContinueAfterSelectingPerson:property:identifier: method would come into play (we returned NO from this earlier in this section, so this example does not allow the user to select a number).
A multivalue property is a list of values, but each value also has a text label and an identifier associated with it. This second delegate method provides you with both the property and the identifier for the value (i.e., a specific phone number) that is of interest to the user.
However, if you know which property value you’re looking for inside the multivalue property, you can programmatically retrieve the identifier for that value. For example, here’s how you’d select the mobile phone number from the list of returned phone numbers:
ABMultiValueRef phones = ABRecordCopyValue(person, kABPersonPhoneProperty);
ABMultiValueIdentifier identifier;
for( int i = 0; i < numbers.count; i++ ) {
if( CFStringCompare( ABMultiValueCopyLabelAtIndex(phones, i),
kABPersonPhoneMobileLabel, 1 ) == 0 ) {
identifier = ABMultiValueGetIdentifierAtIndex(phones, i);
}
}
You can then retrieve the mobile phone number at any time by using the identifier:
NSString *mobile =
(NSString *) ABMultiValueCopyValueAtIndex(phones,
ABMultiValueGetIndexForIdentifier(phones, identifier));
NSLog(@"Mobile = %@", mobile);
Programmatic People Picking
You do not have to use the ABPeoplePickerNavigationController to access the address book; you can access it directly, as shown here:
ABAddressBookRef addressBook = ABAddressBookCreate();
CFArrayRef allPeople = ABAddressBookCopyArrayOfAllPeople(addressBook);
for (int i = 0; i < ABAddressBookGetPersonCount(addressBook); i++) {
ABRecordRef ref = CFArrayGetValueAtIndex(allPeople, i);
NSString *contact = (NSString *)ABRecordCopyCompositeName(ref);
NSLog( @"%@", contact );
}
The preceding code will instantiate a copy of the address book, retrieve references to all of the records, and then iterate through the array of records. Then, in the same way we dealt with records after interactively retrieving them with the picker controller, we print the full name of each contact to the Debug Console.
All materials on the site are licensed Creative Commons Attribution-Sharealike 3.0 Unported CC BY-SA 3.0 & GNU Free Documentation License (GFDL)
If you are the copyright holder of any material contained on our site and intend to remove it, please contact our site administrator for approval.
© 2016-2026 All site design rights belong to S.Y.A.