Teach Yourself VISUALLY iPhoto for iPad (2013)
Chapter 4: Introducing Photo Browsing
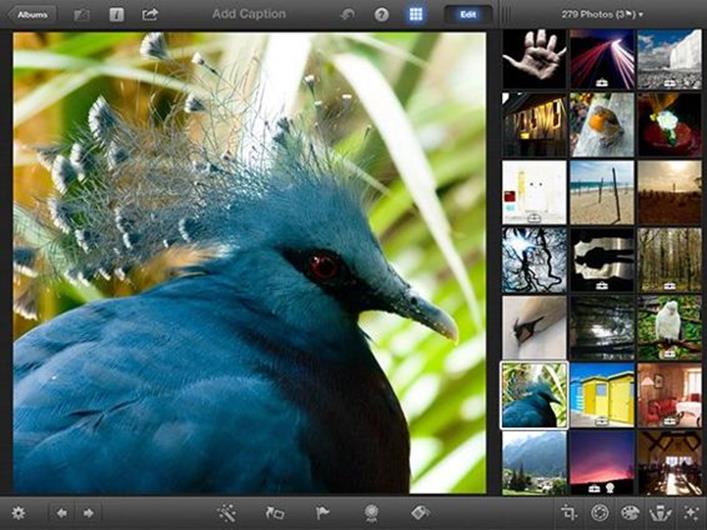
You can use iPhoto’s browser to preview photos, collect photos for sharing, and select photos for editing. The browser displays a grid of thumbnails — small preview photos. You can change the thumbnail display to suit the way you work.
Understanding Photo Browsing
Introducing the Thumbnail Browser
View Single Photos
Introducing the Thumbnail Grid
Select Multiple Photos by Dragging
Select Multiple Photos by Tapping
Select a Range of Photos
Using the Loupe
Find Similar Photos
View Photo Information
Understanding Photo Browsing
You can use Photo Browsing to preview your photos and select them for editing. All of iPhoto’s main features, including simple and advanced editing, tagging, flagging, and sharing, are built into the browser.
To use the browser, first select an album, event, or photo collection on the main page. Tap to open it. The browser displays the photos for that item only. To browse all the photos on your device, select the Photos item.
Understanding Thumbnails
The browser displays thumbnails — small photo previews arranged on a grid. You can change the size and position of the grid and hide it completely to leave more — or less — room for photo previews. When you edit or tag a photo (see Chapter 6 for details) iPhoto adds a small white symbol to the photo’s thumbnail. You can use this feature to see at a glance which photos are modified, which are favorites, and so on.

Understanding Previews
To view a photo, tap its thumbnail. iPhoto loads a larger version of the photo into the main preview area on the screen. You can now edit the photo, share it, or view information about it. Note that although the Photos app has a full-screen preview option, iPhoto does not. You can hide the edit buttons along the bottom of the screen, but you cannot hide the top toolbar.

Understanding Photo Selection
You can select more than one photo at a time. You cannot edit more than one photo at once, but you can tag multiple photos, share them, or add them to a journal. You can also search for visually similar photos. Some of the selection options are invisible — you can find out about them later in this chapter.

Introducing the Thumbnail Browser
You can use the options in the thumbnail browser to rearrange the thumbnail view. You can also access the main editing tools, caption your photo, and use the tagging features described in Chapter 6.
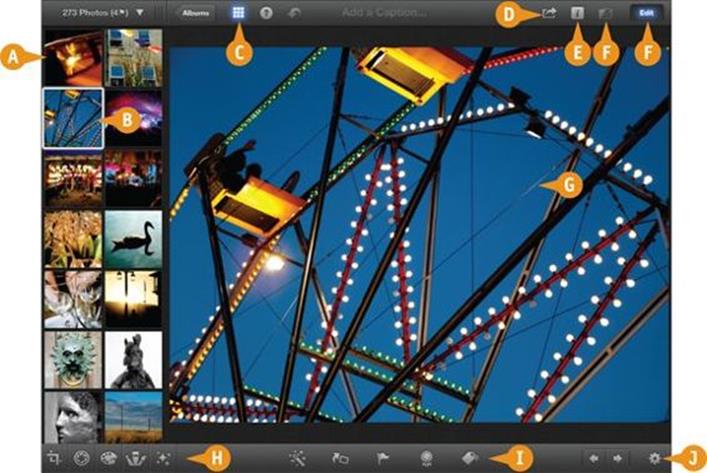
A Thumbnails Grid
Displays a scrollable list of small photo previews.
B Selected Thumbnail
A selected thumbnail is outlined with a white box.
C Show/Hide Icon
Tap this icon to show or hide the thumbnails grid.
D Share Icon
Tap this icon to display iPhoto’s sharing options.
E Info Icon
Tap this icon to display info about the photo.
F Edit Options
Tap to select edit mode and show or hide edits.
G Preview Area
Selected photos appear here.
H Edit Icons
Tap to use iPhoto’s advanced editing features.
I Main Toolbar
Tap these icons for simple edits and for tagging and flagging.
J Supporting Tools
Scroll through the photos and select further options.
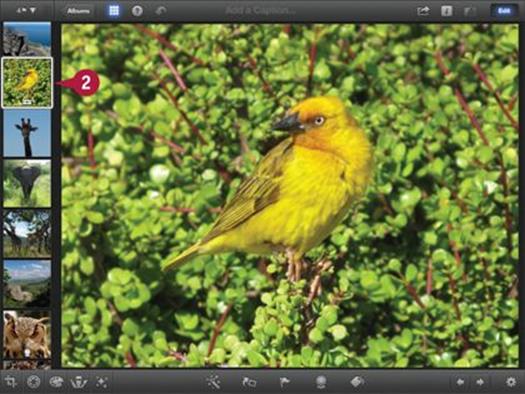
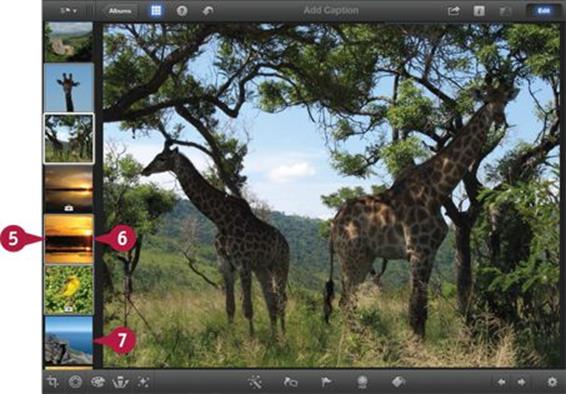
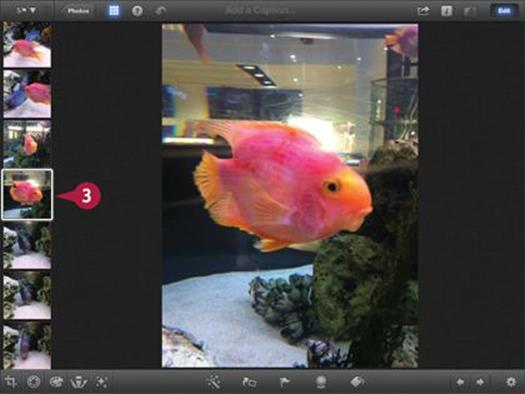
View Single Photos
You can select a single photo by tapping its thumbnail, by swiping through the thumbnails, or by tapping a pair of buttons to step through the thumbnails.
When you select a photo, iPhoto automatically resizes it to fill the preview area. You can now edit the photo, share it, or check its information to find out about the camera and settings used to take the photo. Or you can simply look at it. Note that there is no full-screen preview option, but you can hide the bottom toolbar by tapping the Edit button at the top right.
View Single Photos
![]() Select an album or event or the Photos collection on the main page.
Select an album or event or the Photos collection on the main page.
iPhoto displays the photos in the item you selected.
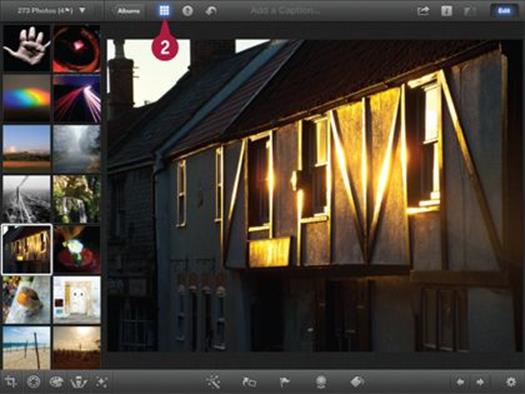
![]() If the thumbnail grid is not visible, tap the Show/Hide Thumbnails icon (
If the thumbnail grid is not visible, tap the Show/Hide Thumbnails icon (![]() ).
).
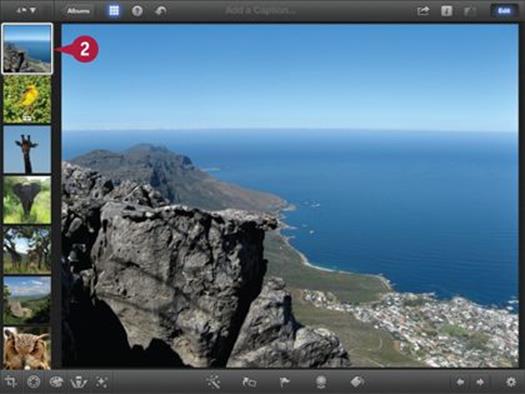
![]() Tap any thumbnail to display a photo in the main preview area.
Tap any thumbnail to display a photo in the main preview area.
iPhoto displays the photo.
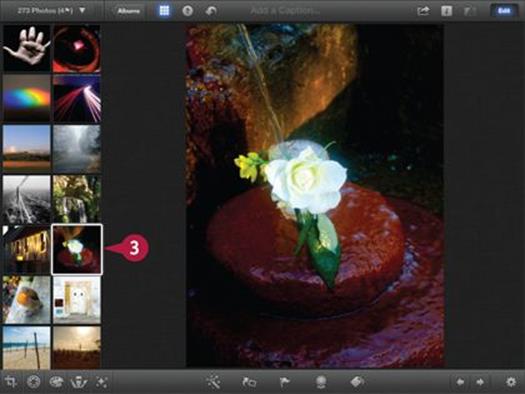
![]() Swipe left or right to view the previous or next photo in the list.
Swipe left or right to view the previous or next photo in the list.
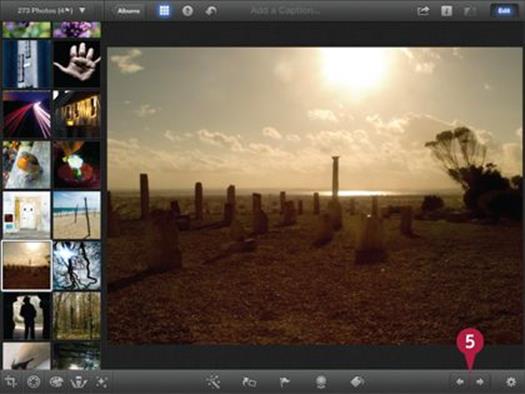
![]() Tap one of the previous or next buttons to view the previous or next photo in the thumbnails list.
Tap one of the previous or next buttons to view the previous or next photo in the thumbnails list.
iPhoto displays the previous or next photo.
TIPS
Can I zoom into part of a photo?
You can use a two-finger pinch in the preview area to zoom into and out of a photo to view details. You can also use a two-finger rotation to rotate a photo. The two gestures are similar, so practice pinching to avoid rotating your photos by accident. You can double-tap part of a photo to zoom in and double-tap again to zoom out.
Is there a difference between swipe scrolling and button scrolling?
Many users feel that swipe-scrolling feels quicker and more natural than button scrolling because the scroll buttons are small. If you swipe to scroll, you can cancel the swipe before the next photo appears by lifting your finger. iPhoto “un-scrolls” the preview window to show the original photo.
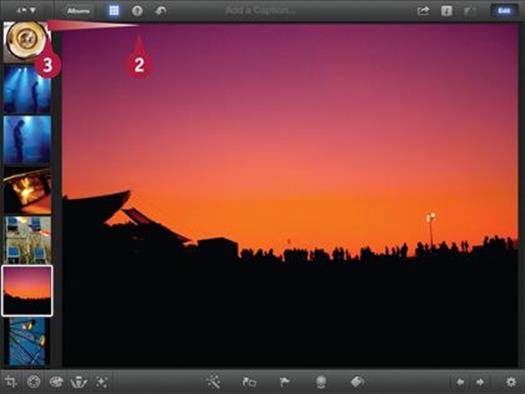
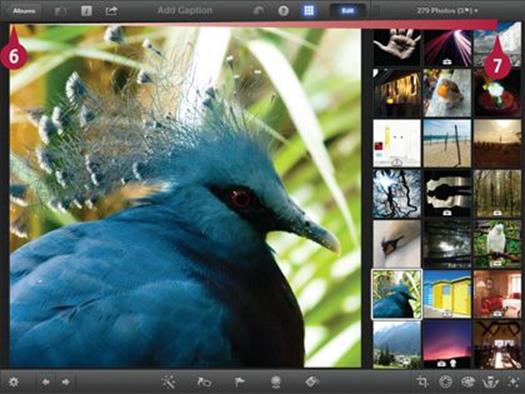
Introducing the Thumbnail Grid
You can set up the thumbnail grid to maximize space for previews, or hide it altogether. The default width shows two thumbnails, but you can set the width to display between one and four thumbnails instead. You can also move the thumbnail grid to the left or the right of the preview area.
The thumbnail toolbar includes extra photo filtering features that work with iPhoto’s tagging and flagging features. You can use these to show a selection of thumbnails. For details, see Chapter 6.
Introducing the Thumbnail Grid
![]() Open the thumbnail browser.
Open the thumbnail browser.
Note: See the previous section to open the thumbnail browser.
![]() Tap and hold the divider at the top of the thumbnail grid.
Tap and hold the divider at the top of the thumbnail grid.
![]() Slide it to the left and release it.
Slide it to the left and release it.
iPhoto displays a single column of thumbnails.
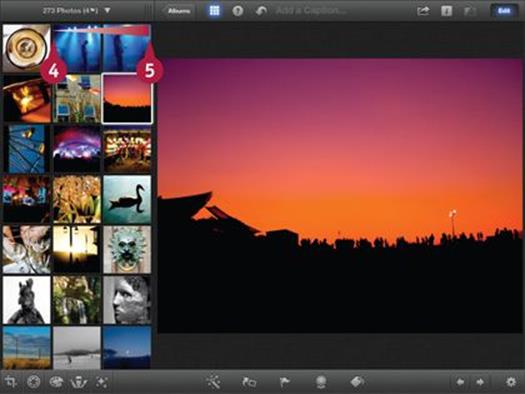
![]() Tap and hold the divider again.
Tap and hold the divider again.
![]() Slide it to the right and release it.
Slide it to the right and release it.
iPhoto displays two, three, or four columns of thumbnails.
![]() Tap and hold the thumbnail toolbar.
Tap and hold the thumbnail toolbar.
![]() Drag it to the right of the screen and release it.
Drag it to the right of the screen and release it.
iPhoto moves the thumbnail grid to the right edge of the screen.
Note: Be careful to tap the toolbar, not the divider or the disclosure triangle.

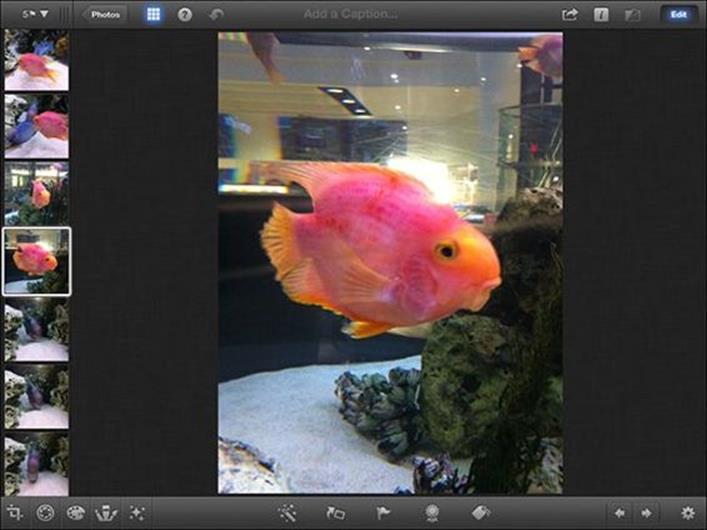
![]() Tap the Show/Hide Thumbnails icon (
Tap the Show/Hide Thumbnails icon (![]() ) for the thumbnail grid.
) for the thumbnail grid.
A iPhoto hides the thumbnails and resizes the photo so it almost fills the screen.
Note: You can tap the Show/Hide Thumbnails icon again to show the thumbnails.
Note: You can also show and hide the thumbnail grid by tapping and dragging the edge next to the preview area.
TIPS
Why can I move the thumbnails to either side of the screen?
Some users are left-handed, whereas others find it more comfortable to keep the thumbnails on the right-hand side of the screen. If you prefer the thumbnails at the left, you can ignore this feature.
Can I move the thumbnails to the top or bottom of the screen?
In landscape mode, the thumbnails can be placed only on either side of the preview area. If you rotate your device to portrait mode, the thumbnails automatically move to the bottom of the screen. You cannot move them to the top. In portrait mode, you can view up to five thumbnail rows by dragging the horizontal divider. You can also scroll through them vertically, which is a very quick way to preview the thumbnails list.
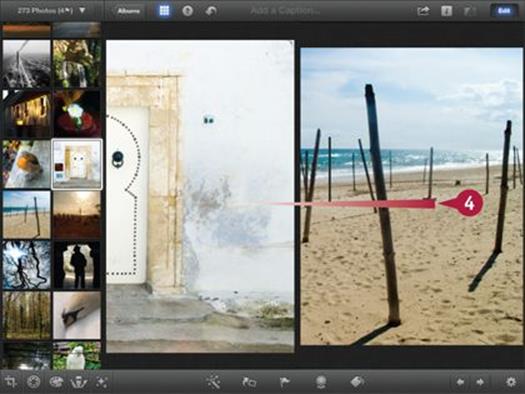
Select Multiple Photos by Dragging
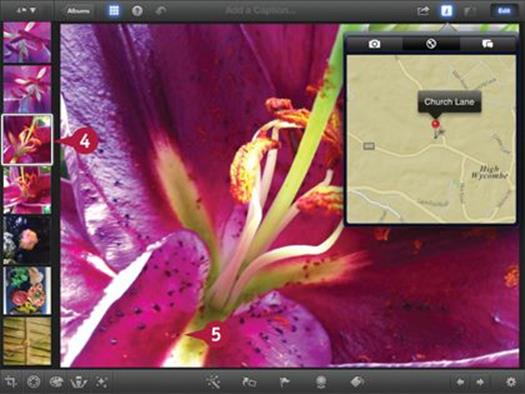
You can preview multiple photos in the preview area. This is a good way to select photos before you share them or add them to a journal. You can also use this feature to tag and flag multiple photos.
You can drag photos to the preview area to select more than one photo a time. To deselect a photo from a multiple preview, swipe down on it. You can also double-select a photo in a group preview to view it at maximum size. Double selection adds a double-width border around a thumbnail.
Select Multiple Photos by Dragging
![]() Open the thumbnail browser.
Open the thumbnail browser.
![]() Tap a photo to select it.
Tap a photo to select it.
iPhoto displays the photo in the preview area.
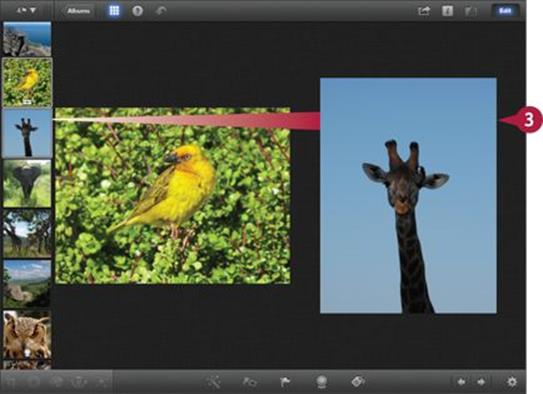
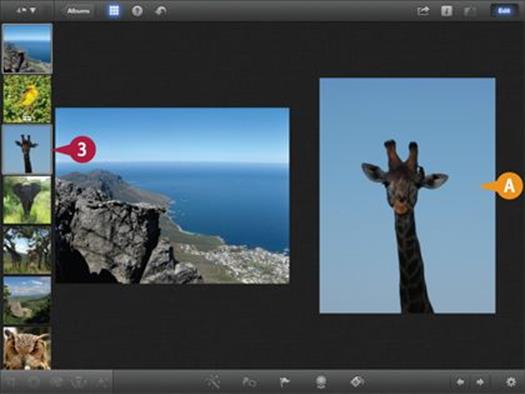
![]() Drag another thumbnail from the grid onto the preview area.
Drag another thumbnail from the grid onto the preview area.
iPhoto displays both photos, resizes them automatically to make them fit, and draws a thin white selection frame around both thumbnails.
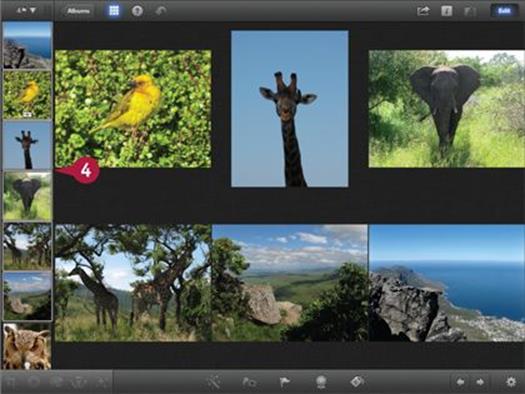
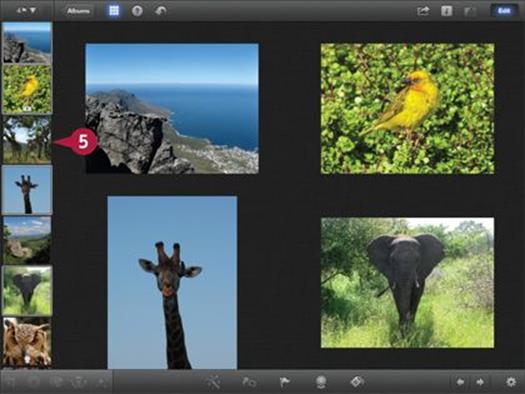
![]() Repeat step 3 and drag further thumbnails into the preview area.
Repeat step 3 and drag further thumbnails into the preview area.
iPhoto displays the other photos, resizing them as needed.
Note: You can add any thumbnail from any position in the list, in any order.
![]() Tap a thumbnail to double-select a photo and expand it to fill the preview area.
Tap a thumbnail to double-select a photo and expand it to fill the preview area.
Note: You can also tap any photo in the preview area to expand it.
![]() Tap the photo or its thumbnail again to restore multiple previews.
Tap the photo or its thumbnail again to restore multiple previews.
![]() Tap any unselected thumbnail to remove the multiple selections.
Tap any unselected thumbnail to remove the multiple selections.
Note: You can swipe down on a photo to remove it from a multiple selection without deselecting the others.
TIPS
How many photos can I preview at once?
You can view up to 12 photos in the preview area. If you select more than 12 photos, iPhoto previews the first 11 and adds a message at the bottom right-hand corner telling you that further photos are selected but not shown. You cannot view these photos — there is no way to scroll the previews.
Can I zoom and rotate the photos?
If you pinch-zoom any photo in a multiple preview, you can zoom into it. You can also drag the zoomed area inside its frame. The size of the frame does not change. You can also use a two-finger rotation gesture to rotate a photo.
Select Multiple Photos by Tapping
You can select photos for multiple preview by tapping and holding their thumbnails.
Although to some users dragging feels slightly more natural than tapping, the latter offers extra features, more positive responses, and more control. For example, you can remove a single photo from the preview list by tapping it and holding it.
Select Multiple Photos by Tapping
![]() Open the thumbnail browser.
Open the thumbnail browser.
![]() Tap a thumbnail to preview a photo.
Tap a thumbnail to preview a photo.
iPhoto displays the photo in the preview area.
![]() Tap and hold another thumbnail.
Tap and hold another thumbnail.
A iPhoto adds the second photo to the preview area.

![]() Repeat step 3 to add further photos.
Repeat step 3 to add further photos.
iPhoto adds the photos to the preview area.
Note: You can add any thumbnail from any position in the list, in any order.
![]() Tap and hold a selected thumbnail to remove it from the preview list.
Tap and hold a selected thumbnail to remove it from the preview list.
iPhoto deselects the photo and removes it from the preview area.
Note: Be careful to tap and hold the photo. If you tap without holding, iPhoto either double-selects a photo if it is already selected, or cancels the multiple selection.
TIPS
Can I select a range of photos?
You can, but not by tapping with two fingers. iPhoto includes a range selection option, but it is slightly hidden. For details, see the next section.
Can I combine tapping with dragging?
You can use either gesture to add a photo to the preview area. iPhoto does not remember which gesture you used, so you always can tap and hold a photo to deselect it from a multiple preview, even if you added it by dragging.
Select a Range of Photos
You can use a partially hidden feature in iPhoto to select a range of photos. Selecting a range saves you time. You can select the first and last photos in the range, and iPhoto automatically selects the photos between them.
You can also use this feature to select individual photos by tapping them once to select them and tapping them again to deselect them. When you tap Done, iPhoto adds all selected photos to the preview area.
Select a Range of Photos
![]() Open the thumbnail browser.
Open the thumbnail browser.
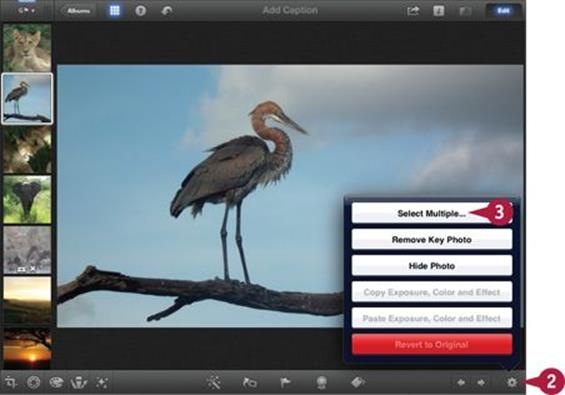
![]() Tap the settings (gear) icon (
Tap the settings (gear) icon (![]() ).
).
![]() Tap the Select Multiple option.
Tap the Select Multiple option.
Note: If the settings (gear) icon is not visible, tap the Edit button near the top right of the screen.
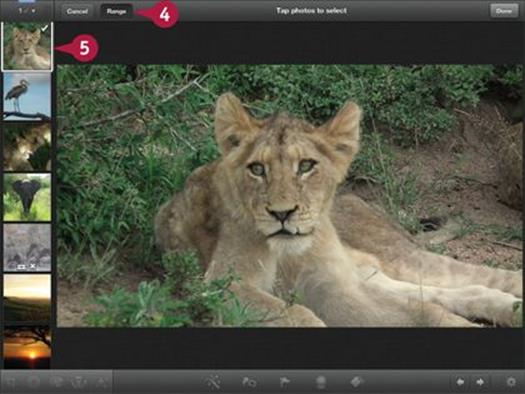
iPhoto opens the Range page.
![]() Tap the Range button.
Tap the Range button.
![]() Tap the first photo in the range you want to select.
Tap the first photo in the range you want to select.
iPhoto highlights the photo with a white border and marks it with a check mark.
Note: You cannot use any of the editing tools or tagging and flagging features while the Range page is open.
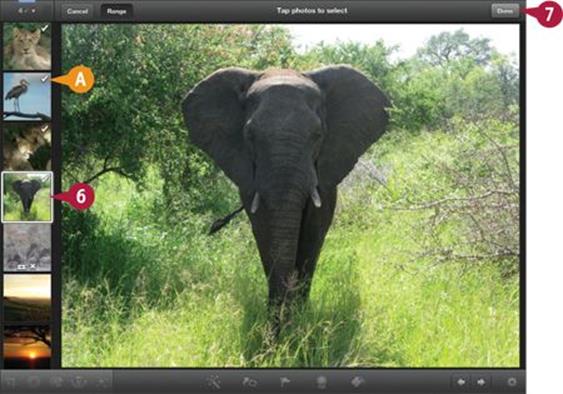
![]() Tap the last photo in the range you want to select.
Tap the last photo in the range you want to select.
A iPhoto highlights all photos in the range with a check mark.
Note: You can scroll up and down the thumbnails and select any photo as the end of the range.
![]() Tap Done.
Tap Done.
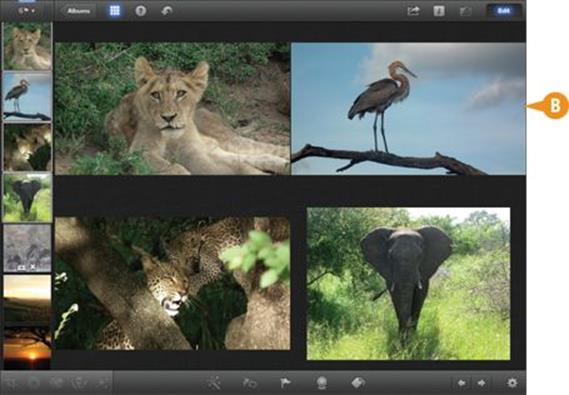
B iPhoto hides the range selection page and adds all the photos in the range to the preview area.
TIP
Do I have to select a range?
When you use the Select Multiple feature, you can select individual photos by tapping them. This feature is similar to the tap and hold selection option in the previous section, with three differences: selected photos are not added to the preview area until you tap Done; selected photos are highlighted with a check mark; and you can tap photos to select them without having to hold them. Although using Select Multiple adds an extra couple of taps, it is the most flexible and powerful way to select multiple photos.
Using the Loupe
iPhoto includes a virtual magnifying glass called a loupe. The loupe looks and works like a small magnifying lens. You can drag it over a photo to magnify a small area.
Professional photographers use a glass loupe to highlight details and look for flaws on paper prints. You can use the virtual loupe in the same way. The loupe’s small size is fixed and you can only use it to magnify a preview. You cannot use it to work on a small part of a photo while editing.
Using the Loupe

![]() Tap any photo to select it and view it in the preview area.
Tap any photo to select it and view it in the preview area.
![]() Close two fingers, and then tap and hold them on the preview area at the same time.
Close two fingers, and then tap and hold them on the preview area at the same time.
Note: You may find it takes practice to get the gesture to work for you. Try to move your fingers as little as possible after tapping.
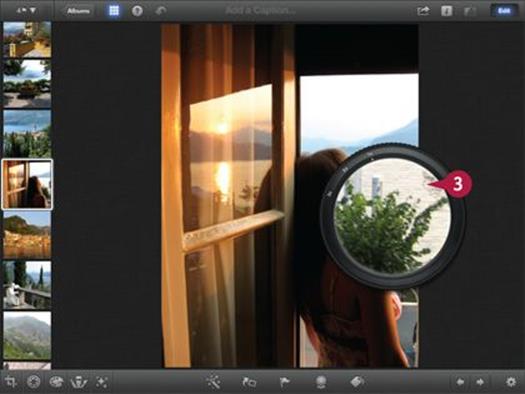
iPhoto displays the loupe and magnifies the area you selected.
![]() Drag the loupe over the photo to move it and magnify a different area.
Drag the loupe over the photo to move it and magnify a different area.
Note: You can drag the rim of the loupe or the magnified “lens” area.

![]() Place two fingers inside the loupe area and rotate them to change the magnification.
Place two fingers inside the loupe area and rotate them to change the magnification.
Note: Rotate clockwise to increase magnification and counterclockwise to decrease it.
Note: When the loupe first appears, rotating counterclockwise does nothing because the magnification is already as low as it can be.
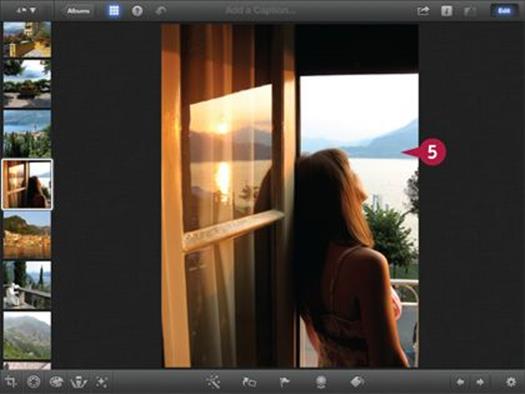
![]() When done, tap anywhere on the photo or on the loupe to make it disappear.
When done, tap anywhere on the photo or on the loupe to make it disappear.
iPhoto hides the loupe.
TIPS
Can I use the loupe on multiple photos?
The loupe works only on a single preview. You cannot use it when multiple photos are selected. However, you can pinch-zoom into any selected photo in the preview area. The size of the photo’s frame is fixed, but you can zoom in to magnify an area and drag the magnified view within the frame.
Can I use the loupe on a zoomed photo?
You can usually use the loupe on a photo you have already pinch-zoomed. However, the loupe does not appear if you have already pinch-zoomed to the highest possible magnification, and it does not offer any extra magnification if you pinch-zoom by smaller amount.
Find Similar Photos
You can search the thumbnails to find similar photos. This feature is still experimental. It can find photos with very obvious similarities in colors and textures, but it cannot recognize photos by theme. For example, it cannot recognize family or group shots, beach shots, sunsets, and so on.
The search feature is hidden. You can access it by double-tapping any photo. If iPhoto finds matches, it displays them in the preview area and plays a short repeating tone. If it cannot find matches, iPhoto plays a buzz.
Find Similar Photos
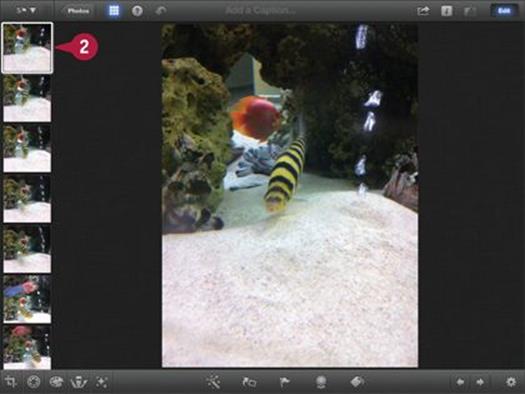
![]() Open the thumbnail browser.
Open the thumbnail browser.
![]() Double-tap any photo to begin the search.
Double-tap any photo to begin the search.
iPhoto plays a short mechanical sound when it begins its search.
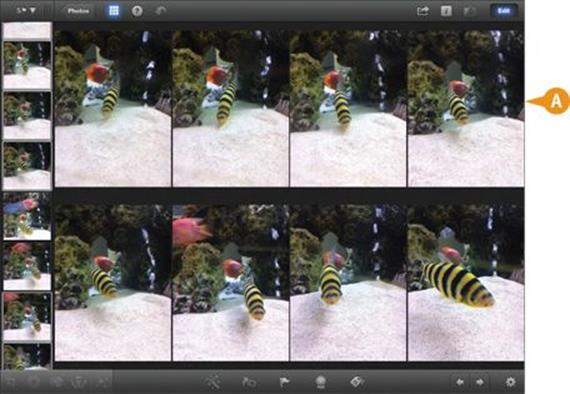
A If there are matches, iPhoto plays a companion sound, and then highlights and displays matching photos in the preview area, just as if you selected them manually.
Note: “Similar” seems to mean “with similar colors.” Shapes and composition are less important.
![]() Double-tap a photo that does not match any others.
Double-tap a photo that does not match any others.
iPhoto plays the “searching” sound.
If there is no match, iPhoto plays the “no match found” buzz and does not show any further photos in the preview area.
TIPS
How fast is the search feature?
Searches are almost instant, although they can take a second or two if iPhoto is searching thousands of thumbnails. iPhoto plays a “searching now” tone when it begins. If you search a few hundred photos, the results appear almost immediately.
Can I tune the search to make it more sensitive or to recognize faces?
The search feature compares the range of colors in a photo. It does not recognize shapes. There are no search options, so you cannot fine-tune the search. iPhoto has no facial-recognition feature, and the search feature is not a substitute.
View Photo Information
You can use the Info option to display information about your photos, including the date of the photo, the camera used, and the camera settings. If your camera saves photos with location information, you can view the photo’s location on a map and the approximate street address, if one exists.
The Info feature lists technical details including the aperture, shutter speed, lens focal length, exposure mode, exposure correction, and ISO number, known technically as EXIF (Exchangeable Image Format) data. You can also check the resolution in absolute dimensions and megapixels, the file size, and the file format.
View Photo Information
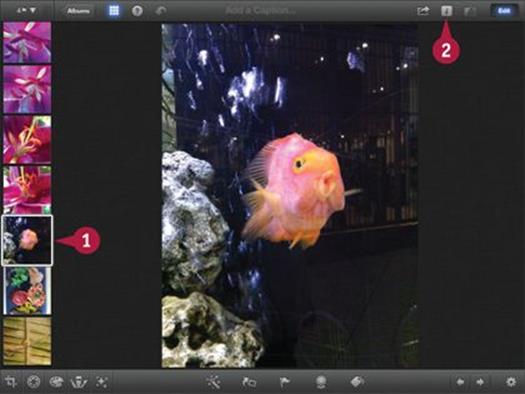
![]() Open the thumbnail browser and tap a photo to select it.
Open the thumbnail browser and tap a photo to select it.
![]() Tap the info icon (
Tap the info icon (![]() ) to view information.
) to view information.
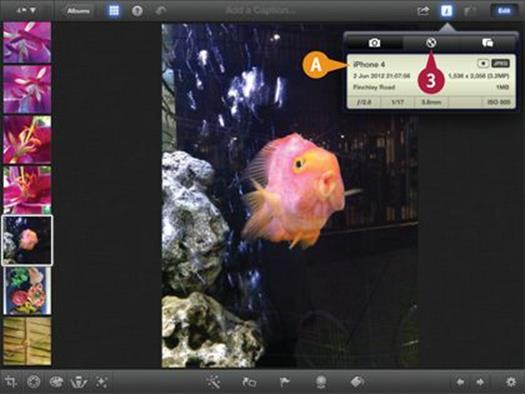
A iPhoto displays the photo info in a pop-over, including the time, data, location, file type, and exposure mode.
Note: Not all photos include all possible information. If information is missing, boxes and fields are left empty.
Note: The exposure mode icon — the dot to the left of the JPEG box — uses standard symbols. For an explanation, see www.inspiredart.biz/Digital%20Symbols.htm.
![]() Tap the Map button to view the photo location.
Tap the Map button to view the photo location.
Note: The Map button only appears when the photo includes location information.
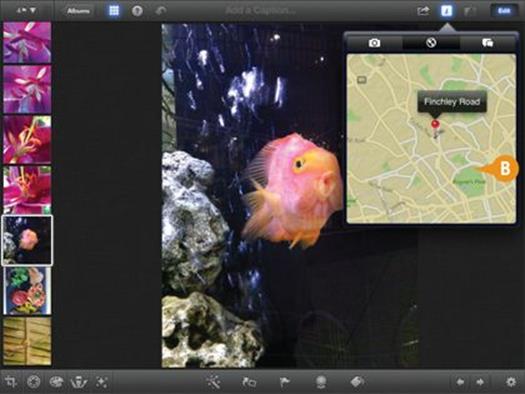
iPhoto displays the photo location on a map with a red pin.
B Optionally, you can drag the map in the frame to view more of it.
Note: You cannot pinch the map to zoom in and out.
![]() Tap a different thumbnail to view that photo’s info.
Tap a different thumbnail to view that photo’s info.
iPhoto displays the info for the new photo.
Note: You do not need to close the pop-over and reopen it to view the info for another photo.
![]() Tap anywhere outside the Info pop-over to close it.
Tap anywhere outside the Info pop-over to close it.
Note: You cannot select multiple photos while the pop-over is open.
Note: You can use the Comments button to add comments to photos uploaded to Facebook and Flickr as described in Chapter 12.
TIPS
Which iPhone and iPad models save location details?
All iPhones from the 3G onwards and all iPad 3G/4G models save location information as long as you enable location services in the Settings app. iPad Wi-Fi models use stored Wi-Fi information to estimate locations. Accuracy is very variable. If Wi-Fi is off, location services are also off.
Which digital cameras save location details?
The large number of models makes it impossible to list them. Many affordable cameras from around 2010 onwards include a GPS — Global Positioning Service — feature. GPS has been available as an option on professional cameras from around 2005. If in doubt, check your camera’s manual to see if GPS is available.
All materials on the site are licensed Creative Commons Attribution-Sharealike 3.0 Unported CC BY-SA 3.0 & GNU Free Documentation License (GFDL)
If you are the copyright holder of any material contained on our site and intend to remove it, please contact our site administrator for approval.
© 2016-2025 All site design rights belong to S.Y.A.