Teach Yourself VISUALLY iPhoto for iPad (2013)
Chapter 6: Tagging and Flagging Photos
You can use photo tagging to highlight the photos you love, to select photos for sharing, and to hide the photos you do not want to see. Tagging is easy, but learning to use tagging effectively takes some extra effort.

Understanding Photo Tagging
Flag Photos
Create Favorites
Add Custom Tags
Hide Photos
Search Tagged Photos
Caption Photos
Understanding Photo Tagging
You can use tagging to select photos and organize them into special albums. iPhoto offers three standard tags you can apply manually to your photos: a flag to mark a photo temporarily, a favorite icon, and an X to hide a photo. You can also tag photos with words. iPhoto automatically applies a toolbox tag to photos after editing. And when you beam photos between devices, iPhoto marks them internally with yet another hidden tag.
The secret to using tagging efficiently is to understand how to use the different kinds of tags for common tasks, such as journal creation, smart album creation, and photo sharing.
Understanding Flagging
Use the flag tag to select photos for a task, such as sharing the photos to Facebook or adding them to a journal. Do not use flagging to mark photos you like. For speed, you can flag or unflag groups of photos with a few taps. You can also flag photos taken in the last day or last week. These more advanced flagging options are easy to miss, unless you know where to find them. Flagged photos appear automatically in the Flagged smart album.

Understanding Favorites
Use the blue ribbon tag to mark your favorite photos. iPhoto automatically collects favorite photos in a special Favorites smart album. As soon as you tag at least one photo as a favorite, the Favorites album is created for you and you can view it on the Albums page. Do not use the blue ribbon symbol to mark photos for sharing — use the flag instead.

Understanding Hidden Photos
Use the X tag to hide photos. Hiding photos does not delete them. (There is no way to delete photos in iPhoto.) It removes them from the main thumbnails list and all other photo collections. iPhoto includes an option to view all hidden photos, so you can change your mind and unhide them later. The hide feature is hidden in a popover.

Understanding Custom Tags
You can tag photos with your own words or phrases. For example, you can tag photos with the names of friends or family, or by subject or other content, or with a date or description of a special event. iPhoto automatically collects photos with the same tags into smart albums that appear in the Albums list. Note that tags only work on iDevices and are not copied when you sync your photos to a Mac or PC.

Understanding Edited Photos
When you edit a photo, iPhoto automatically tags it with a toolbox symbol. The symbol works much like a tag. You cannot apply it by hand, but you can use it as a quick way to select edited images for viewing or sharing. Edited photos automatically appear in the special Edited album.

Understanding Beamed Photos
When you share a photo with another device using iPhoto’s beaming feature, iPhoto automatically applies a “beamed” tag. You cannot apply this tag manually, and it has no visible symbol. Beamed photos appear in the main Photos list and are collected automatically in the Beamed smart album. You cannot import beamed photos into iTunes or the Mac version of iPhoto.

Using Tags as Search Filters
You can use tags as a search filter. For example, the iPhoto thumbnails list can show photos that are tagged with a flag or marked as hidden. You can also view photos you have edited or list them by date. You can share a collection of photos tagged with a flag by beaming them, e-mailing them, or uploading them to a social networking site.

Using Flags for Viewing and Sharing
You can use combined tags to select photos for viewing or sharing. Begin by selecting photos manually, viewing an album, or filtering a collection in the thumbnail browser. Next, flag the photos using iPhoto’s Flag All option. You can now share the photos or collect them into a journal. Use the Unflag All option to unflag them when done.

Flag Photos
You can flag photos in two ways. The thumbnail browser displays a list of tagging icons along the bottom toolbar. Tap the flag icon to flag a photo or unflag an already flagged photo.
There is also a quick but hidden way to flag multiple photos. Select one or more photos, and then tap the flag icon and hold it. iPhoto displays a popover with further options. You can use this feature to flag photos in groups, or to unflag photos with a single tap. These group options work only on the currently visible thumbnails.
Flag Photos

![]() Launch iPhoto.
Launch iPhoto.
![]() Open the thumbnail browser from within an album, an event, or the general photos collection.
Open the thumbnail browser from within an album, an event, or the general photos collection.
![]() Tap the Edit button at the top right if edit mode is not selected, and then tap any thumbnail to select it for viewing.
Tap the Edit button at the top right if edit mode is not selected, and then tap any thumbnail to select it for viewing.
Note: The steps in this section also work if you select a group of photos.
The thumbnail browser displays the photo.
![]() Tap the flag icon (
Tap the flag icon (![]() ) to flag the photo.
) to flag the photo.
iPhoto flashes a brief animation of a flag, adds the flag symbol to the photo, and also highlights the flag icon in the toolbar.

![]() Tap the flag icon (
Tap the flag icon (![]() ) again to unflag the photo.
) again to unflag the photo.
iPhoto displays the flag disappearing to the right, removes the flag symbol from the photo, and unhighlights the flag on the toolbar.
Note: Flag symbols on photos appear in the thumbnail view in the editor, but not in the Photos collection.
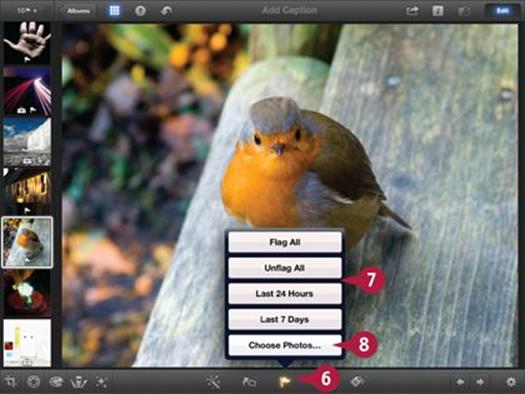
![]() Tap and hold the flag icon (
Tap and hold the flag icon (![]() ).
).
iPhoto displays a popover with further options.
![]() Tap one of the options to flag a group of photos.
Tap one of the options to flag a group of photos.
Note: The 24 hours or 7 days options flag photos taken in those periods, as well as any undated photos.
![]() Tap Choose Photos to select multiple photos or a range of photos.
Tap Choose Photos to select multiple photos or a range of photos.
iPhoto flags the selected photos in a group.
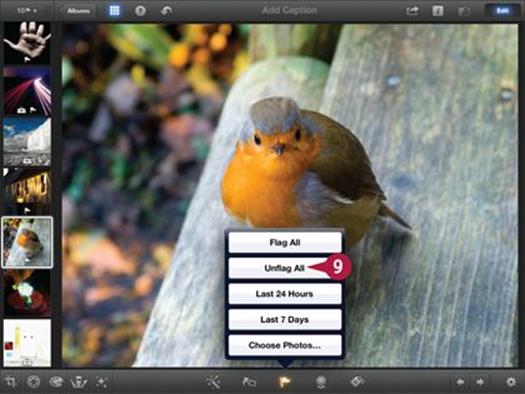
![]() Tap Unflag All to unflag a group of photos.
Tap Unflag All to unflag a group of photos.
Note: This option unflags all photos visible in the current thumbnails. It does not unflag other photos.
TIPS
Why do the Flag All and Unflag All options appear only in some albums?
There is no official explanation, but experiments suggest that the Flag All and Unflag All options appear in albums created with photos taken on an iPhone or iPad. The options are missing on albums created with photos taken with any other digital cameras.
Is there a quick way to unflag all photos?
Keep in mind that the Unflag All option unflags only the photos visible in the current thumbnails list, not all the flagged photos on your device. To unflag all photos on your device, open the Flagged album, tap and hold the flag icon (![]() ), and then tap Unflag All.
), and then tap Unflag All.
Create Favorites
You can tag photos as favorites. Tagging a photo as a favorite marks it with a rosette icon and automatically adds it to iPhoto’s Favorites album.
The Favorites feature is limited. You cannot share favorite photos directly or use favorites as a filter for thumbnails. But you can open the Favorites album, flag every photo in it, and then share the flagged photos.
Create Favorites

![]() Launch iPhoto.
Launch iPhoto.
![]() Open any album, event, or the photo list.
Open any album, event, or the photo list.
![]() Tap the Edit button at the top right if edit mode is not selected, and then tap any thumbnail to select it for viewing.
Tap the Edit button at the top right if edit mode is not selected, and then tap any thumbnail to select it for viewing.
Note: The steps in this section also work if you select a group of photos.
The thumbnail browser displays the photo.
![]() Tap the favorite icon (
Tap the favorite icon (![]() ) to favorite the photo.
) to favorite the photo.
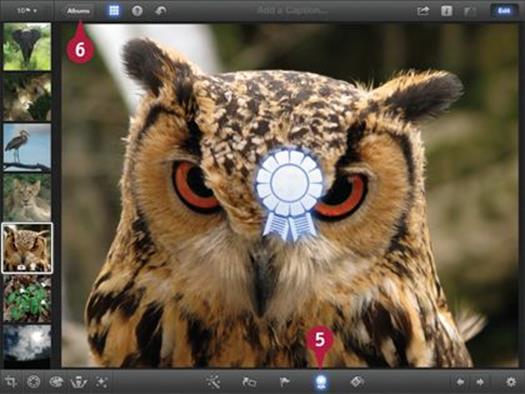
iPhoto flashes a brief animation of a rosette, adds the favorite symbol to the photo, and highlights the favorite icon in the toolbar.
![]() Tap the favorite icon (
Tap the favorite icon (![]() ) again to unfavorite the photo.
) again to unfavorite the photo.
iPhoto shows the rosette disappearing to the right, removes the small favorite symbol from the photo, and unhighlights the favorite icon on the toolbar.
![]() Return to the Albums page to view iPhoto’s albums.
Return to the Albums page to view iPhoto’s albums.
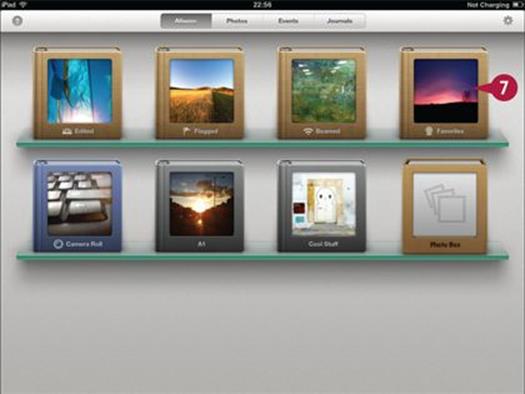
![]() Tap the Favorites album to open it.
Tap the Favorites album to open it.
Note: You must have at least one favorite photo to see this album.
iPhoto opens the album and displays your favorite photos.
![]() Tap the Albums button to return to the main thumbnails list.
Tap the Albums button to return to the main thumbnails list.
TIPS
Can I flag and favorite the same photo?
You can flag any photo, so you can flag and favorite the same photo. However, you cannot hide and favorite a photo at the same time. Hiding a photo unfavorites it — and vice versa.
Why do photos disappear from the Favorites album when I unfavorite them?
The Favorites album displays only photos with the favorites tag. If you remove the tag, the photo immediately disappears from the album. This makes sense in theory, but can be distracting in practice. To show the photo again, tap the undo icon (![]() ) in the top toolbar.
) in the top toolbar.
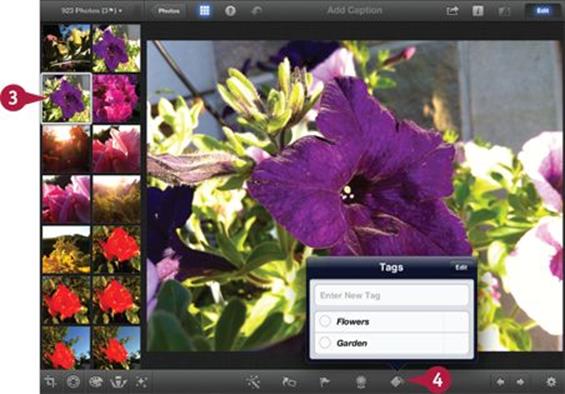
Add Custom Tags
You can add custom tags of your own words or phrases to your photos. Photos that share custom tags appear automatically in their own smart albums on the Albums page. You can also search for custom tags when you view photos.
The custom tag feature is easy to use but very powerful. For speed and convenience you can use the multiple selection features introduced in Chapter 4 to add a custom tag to many photos at once. You can create as many custom tags as you want, but too many tags can clutter the album page and search list.
Add Custom Tags
![]() Launch iPhoto.
Launch iPhoto.
![]() Open any album, event, or the photo list.
Open any album, event, or the photo list.
![]() Tap the Edit button at the top right if edit mode is not selected, and then tap any thumbnail to select it for viewing.
Tap the Edit button at the top right if edit mode is not selected, and then tap any thumbnail to select it for viewing.
Note: The steps in this section also work if you select a group of photos.
The thumbnail browser displays the photo.
![]() Tap and hold the custom tag icon (
Tap and hold the custom tag icon (![]() ).
).
A iPhoto displays a tag popover. If you have already created custom tags they appear in this list.
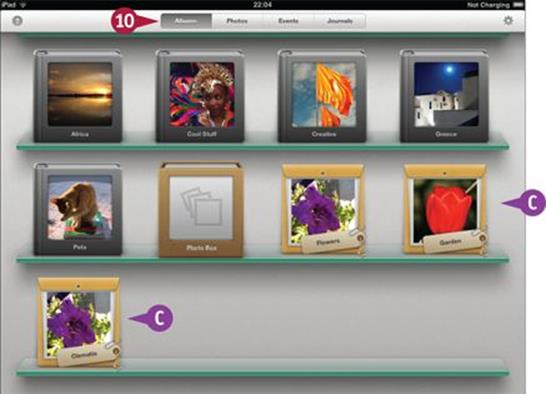
Note: This example shows two tags created earlier, Flowers and Garden.
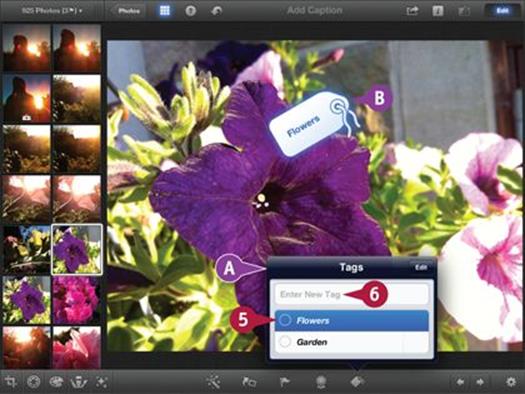
![]() Tap one of the tags to apply it to the photo.
Tap one of the tags to apply it to the photo.
B iPhoto flashes a brief tag animation and applies the tag to the photo.
Note: You can apply more than one tag to a photo.
![]() Tap the text box at the top of the popover to create a new custom tag.
Tap the text box at the top of the popover to create a new custom tag.
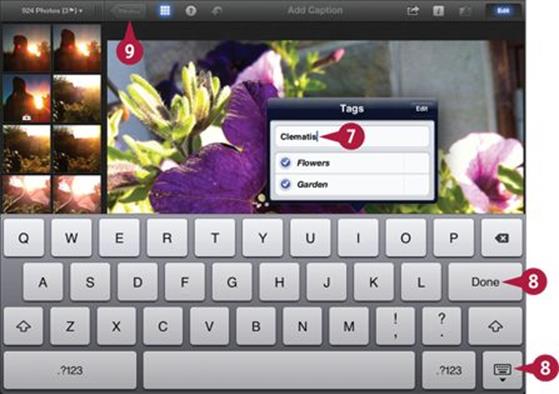
![]() When the keyboard appears, type your new tag into the box.
When the keyboard appears, type your new tag into the box.
![]() Tap Done or Hide Keyboard when finished.
Tap Done or Hide Keyboard when finished.
iPhoto saves the new tag to the tag list, applies it to the photo, and hides the keyboard.
![]() Tap the Albums, Events, or Photos button to the return to iPhoto’s main page.
Tap the Albums, Events, or Photos button to the return to iPhoto’s main page.
![]() Tap the Albums button to view the albums if they are not already visible.
Tap the Albums button to view the albums if they are not already visible.
C Every tag automatically creates a smart album in the album list. iPhoto displays a smart album for the photos tagged with every custom tag you create.
Note: The tagged smart albums appear with a wallet/pocket graphic to remind you they are not like iPhoto’s other albums.
TIPS
Can I delete a tag from the list?
You can only delete tags if no photos use them. To deselect all photos, use the multiple selection options introduced in Chapter 4 and use the tag popover to remove the tags. Tap the Edit button at the top right of the popover. Tap the red minus sign and the delete button to delete a tag. You can also use edit mode to change the order of the tags by dragging them up and down the list.
Is there a quicker way to tag photos?
When the popover is open, tap any tag in the column at the right. iPhoto selects a tag and displays a single gray tag icon in that column. Tap anywhere to close the popover. You can now select any photo or photos in the usual way and tag them with the tag you selected by tapping the custom tag icon (![]() ).
).
Hide Photos
You can use the hide tag in iPhoto to hide photos you do not like. Hiding a photo makes it disappear from the main photo list and from any albums and events that feature it. It also makes the photo disappear from the Camera Roll album in iPhoto.
However, hiding a photo does not delete the photo from your device. You can still see the photo in the Photos app and in any journals you added it to. Unlike iPhoto’s other tagging features, the Hide option is in a popover.
Hide Photos
![]() Launch iPhoto.
Launch iPhoto.
![]() Open the thumbnail browser from within an album, an event, or the general photos collection.
Open the thumbnail browser from within an album, an event, or the general photos collection.
![]() Tap the Edit button at the top right if edit mode is not selected, and then tap any thumbnail to select it for viewing.
Tap the Edit button at the top right if edit mode is not selected, and then tap any thumbnail to select it for viewing.
Note: The steps in this section also work if you select a group of photos.
The thumbnail browser displays the photo.
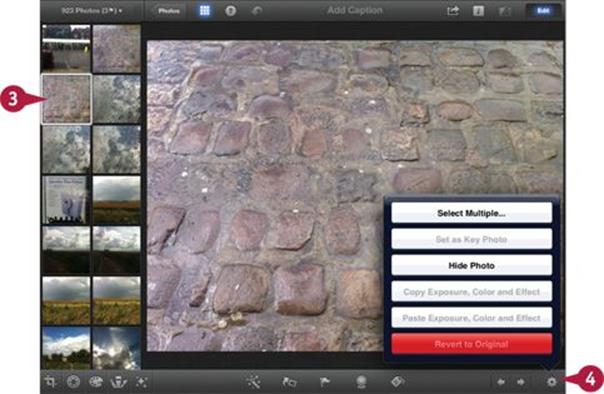
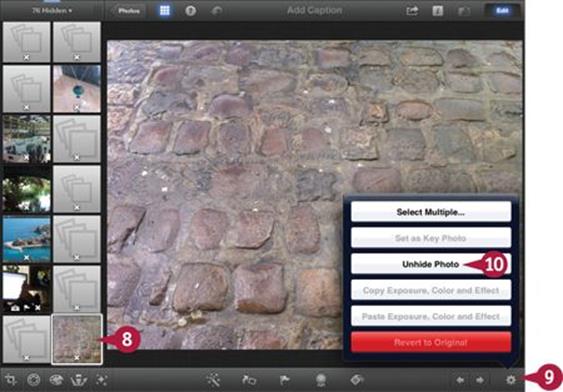
![]() Tap the settings (gear) icon (
Tap the settings (gear) icon (![]() ) to display a popover.
) to display a popover.
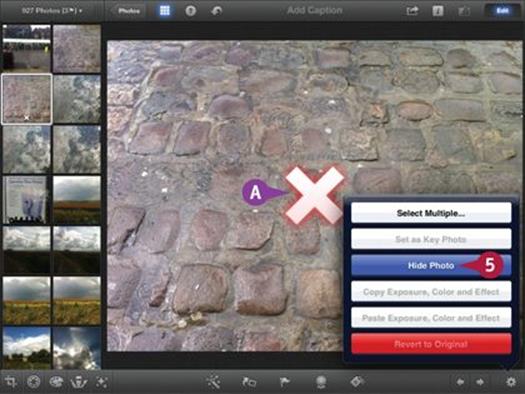
![]() Tap Hide Photo.
Tap Hide Photo.
A iPhoto flashes a red cross and hides the photo.
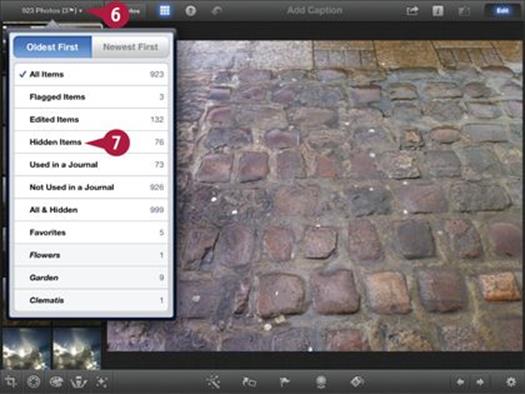
![]() Tap the disclosure triangle at the top of the thumbnails.
Tap the disclosure triangle at the top of the thumbnails.
iPhoto displays a popover with tag-related search and sort options.
![]() Tap Hidden Items to view the hidden photos in the currently selected album or event.
Tap Hidden Items to view the hidden photos in the currently selected album or event.
Note: To see all hidden photos on your device, select the Photos collection first and then open the popover and tap Hidden Items.
iPhoto displays the hidden photos in the current album, event, or photo list.
![]() Tap any photo to select it.
Tap any photo to select it.
![]() Tap the settings (gear) icon (
Tap the settings (gear) icon (![]() ) to show the popover.
) to show the popover.
![]() Tap Unhide Photo to unhide the photo.
Tap Unhide Photo to unhide the photo.
Note: Unhiding a photo removes it from the hidden thumbnails list. The photo reappears in its original location.
TIPS
Why is there no way to delete photos?
iPhoto does not duplicate features available elsewhere. Because you can delete photos in the Photos app, Apple apparently decided there was no need to include a delete option in iPhoto.
Is there a quick way to bulk delete a group of unwanted photos?
Only from the camera roll. On a Mac, you can use the Image Capture application to bulk delete photos. On a PC, you can connect the device over USB and delete files manually in Windows Explorer. For details, see Chapter 5. There is no easy way to bulk delete photos without a Mac or PC.
Search Tagged Photos
You can view tagged photos in two ways. Edited, Tagged, Beamed, and Favorite photos are automatically collected into albums. To view these photos, open their smart albums on the Albums page, as described earlier in this chapter.
When you are viewing any album or event or the photos list in the editor, you can use a popover to view only Flagged, Edited, or Hidden photos; photos with custom tags; and photos used, or not used, in journals. The popover includes a search order option so you view your selection in forward or reverse date order.
Search Tagged Photos
![]() Launch iPhoto.
Launch iPhoto.
![]() Open the thumbnail browser from within an album, an event, or the general photos collection.
Open the thumbnail browser from within an album, an event, or the general photos collection.
![]() Tap the disclosure triangle at the top of the thumbnail browser.
Tap the disclosure triangle at the top of the thumbnail browser.
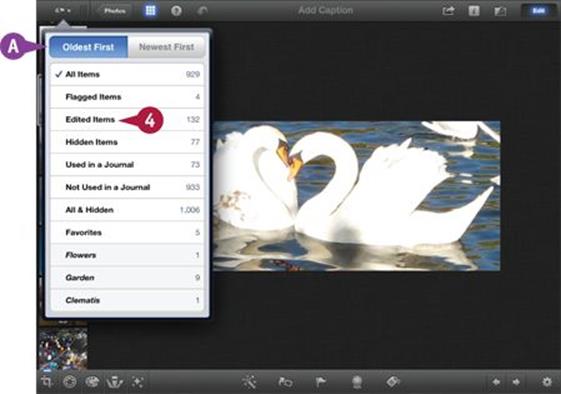
A iPhoto displays a popover with various search options for the thumbnails.
Note: The totals at the right show the number of each type of item.
![]() Tap any option to view the matching photos.
Tap any option to view the matching photos.
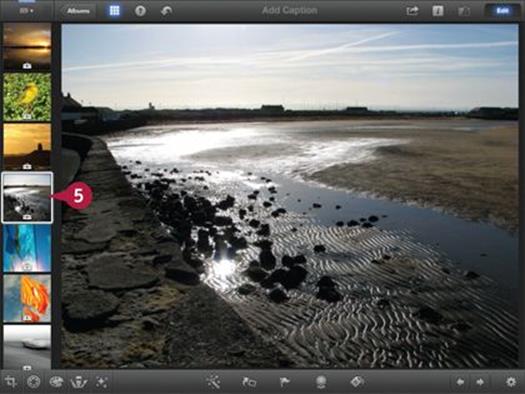
iPhoto displays only the photos with the tag you select from the current album, event, or collection.
Note: The example is showing edited photos. Note the toolbox symbol on every photo.
![]() Tap any photo to view it.
Tap any photo to view it.
Note: You can select and view multiple photos in the usual ways.
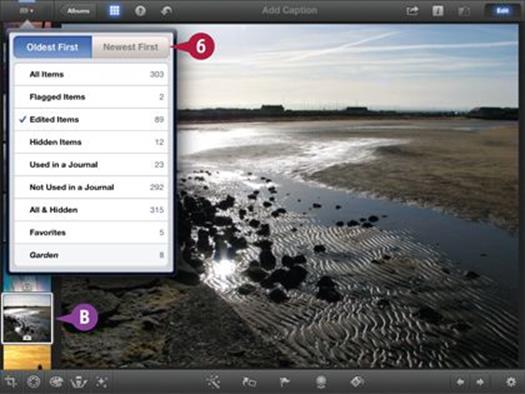
![]() Tap Oldest First or Newest First to show the oldest or newest thumbnails at the top of the list.
Tap Oldest First or Newest First to show the oldest or newest thumbnails at the top of the list.
B iPhoto changes the date order in the thumbnails list.
TIPS
Why are some photos missing when I view all hidden photos on my device?
Because they have been deleted manually in the Photos app or using a Mac or PC. iPhoto keeps a “slot” for every photo it shows. Empty slots remain after photos are deleted. iPhoto displays them as gray squares.
Why is there no way to select favorite photos in the popover?
This would be a useful option, but Apple has not included it. To view favorite photos, open the Favorites album. Unfortunately, there is no way to view only your favorite photos in an album or event.
Caption Photos
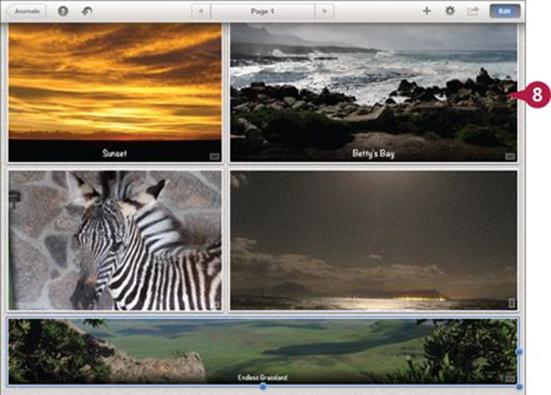
You can add short descriptive captions to your photos. A caption appears as a line of text above a selected photo, and is added to thumbnails rather like a tag. But captions are purely for decoration and description. You cannot search your photos for a caption.
When you add a photo to a journal, its caption appears on the photo automatically.
Caption Photos
![]() Launch iPhoto.
Launch iPhoto.
![]() Open the thumbnail browser from within an album, an event, or the general photos collection.
Open the thumbnail browser from within an album, an event, or the general photos collection.
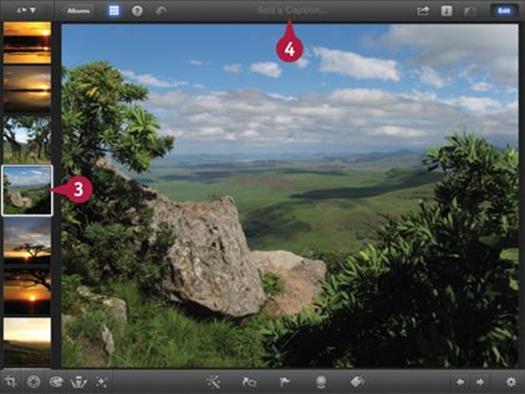
![]() Tap the Edit button at the top right if edit mode is not selected, and then tap any thumbnail to select it for viewing.
Tap the Edit button at the top right if edit mode is not selected, and then tap any thumbnail to select it for viewing.
![]() Tap Add a Caption above the photo.
Tap Add a Caption above the photo.
Note: The text lacks contrast and is easy to miss.
iPhoto shows the keyboard and a blank caption ready for editing.
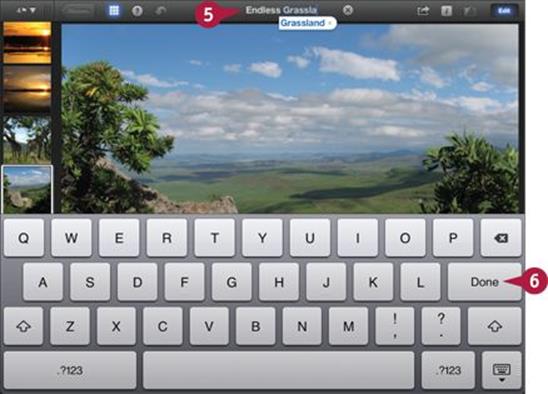
![]() Use the keyboard to type text into the caption.
Use the keyboard to type text into the caption.
Note: Text is auto-corrected as you type.
![]() Tap Done when finished.
Tap Done when finished.
A iPhoto adds the caption to the photo’s title bar and thumbnail.
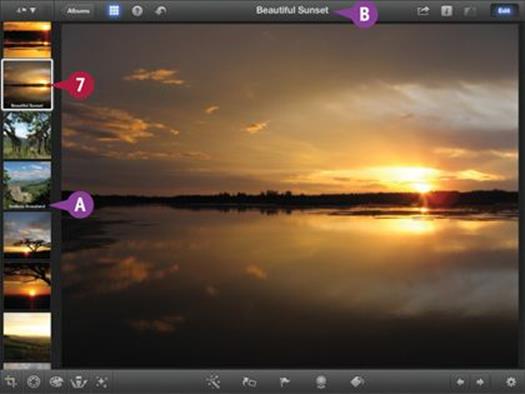
![]() Add more captions and select the thumbnail of a different captioned photo.
Add more captions and select the thumbnail of a different captioned photo.
B iPhoto displays the new photo’s caption in the title bar.
![]() Add a captioned photo to a journal (see Chapter 13) and open the journal.
Add a captioned photo to a journal (see Chapter 13) and open the journal.
iPhoto automatically displays the caption in the journal.
TIPS
Are captions visible in iPhoto for the Mac?
No. When you add a caption to a photo in iPhoto in iOS and import it to iPhoto on the Mac, the caption does not appear on the Mac. The description remains blank. This may — perhaps — be fixed in a future version of iPhoto for the Mac.
Is there a limit to the length of a caption?
Captions always appear on a single line. You can make the text as long as you want, but iPhoto displays only a short section of around 30 characters. If the text is very long, iPhoto automatically shrinks the font to make more of the text visible. Very long captions are still cut off.
All materials on the site are licensed Creative Commons Attribution-Sharealike 3.0 Unported CC BY-SA 3.0 & GNU Free Documentation License (GFDL)
If you are the copyright holder of any material contained on our site and intend to remove it, please contact our site administrator for approval.
© 2016-2025 All site design rights belong to S.Y.A.