Teach Yourself VISUALLY iPhoto for iPad (2013)
Chapter 7: Getting Started with Editing
You can use iPhoto’s editing tools to correct and improve your photos. There is a lot to learn about editing. This chapter introduces iPhoto’s simplest tools for very basic edits, which include cropping, rotating, and enhancing a photo. The next few chapters introduce further enhancement tools for more subtle and powerful corrections and creative applications.

Learn about Editing
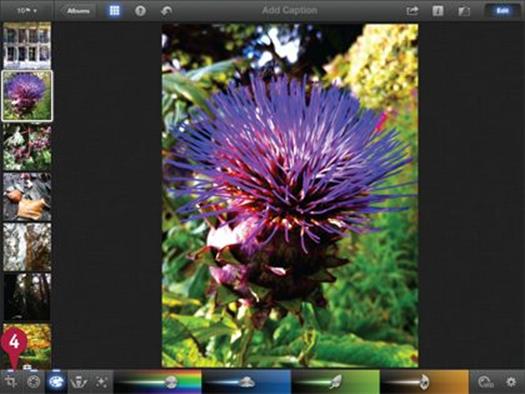
Using Auto-Enhance
Fix a Sideways or Inverted Photo
Fix the Horizon
Rotate a Photo Manually
Crop a Photo
View Edited and Unedited Photos
Using Undo and Redo
Learn about Editing
You can use iPhoto’s editing tools in two ways. You can apply simple corrections — for example, you can rotate a photo slightly to fix a slanted horizon. You can also crop a photo to remove features that distract from the person or scene you want a viewer to concentrate on. More complex corrections can improve the look and feel of a photo by changing the lighting, contrast, color, or exposure.
Most photos can be improved or enhanced. This chapter introduces iPhoto’s simplest editing tools. The following chapters introduce tools you can use to create more complex effects.
Understanding Auto-Enhance
You can use auto-enhance to improve the color and contrast in a photo. Auto-enhance is a “magic” single-click option with no settings. Technically, it increases the saturation and contrast in an image. If your photo has good saturation and contrast already, this tool does very little — in fact, you may not be able to tell the difference between the enhanced photo and the original. On most photos the effect is more obvious, but still subtle. You can use it as a good starting point before you add further edits.

Understanding Rotation
iPhoto includes two rotation tools. The first tool spins a photo in 90-degree steps. You can use this tool to correct photos that were taken upside down or with the camera on its side. The second tool is combined with the cropping tool. You can use it to fix slanted horizons, or to rotate photos for more creative reasons — for example, some photos do not have a clear horizontal marker, and look better when rotated slightly. The second tool always crops some of the detail at the edges of a photo to hide the empty areas that a rotation creates.

Understanding Cropping
The crop tool removes the edges around a photo. You can use cropping to change the relative height and width — the aspect ratio — of a photo to match the standard dimensions used for cards, prints, or posters. You can also crop a photo to a square frame, which is a popular option for web pages. Creatively you can use cropping to remove clutter and irrelevant detail around the edges of a photo to highlight the most important features. Cropping literally chops away the sides of a photo, so it always creates a smaller photo with a lower resolution. For best results start with the highest resolution you can. Otherwise you may be left with a tiny image too small to be printed.

Understanding Versions in iPhoto
Whenever you edit a photo, iPhoto keeps the original. You can use a compare tool to preview the original and edited versions. If you do not like your edits, iPhoto includes a Revert to Original option, which throws away your edits and restores the original. You can re-edit and restore a photo as many times as you want until you create an edited version you are happy with. No easy way exists to compare different edited versions within iPhoto itself. However, you can share both original and any edited versions to your camera roll. You can then review them, save them to a Mac or some other device, or edit them further.

Understanding Undo and Redo
When you revert to an original photo, you lose all edits. iPhoto includes an undo feature. You can use it to compare a photo before and after an edit and step back through a series of edits. If you do not like your edit, you can cancel it. You can also redo an edit to repeat it after undoing it, which is a good way to compare before and after views.

Using Auto-Enhance
Auto-enhance is a simple one-click photo improvement tool. You can use it to make colors brighter and more attractive, and to improve contrast.
Auto-enhance has no settings and you cannot control what it does. You either apply it or not. Although the effect is simple, it improves most photos, and works reliably on portraits. The results on more complex or abstract shots are less predictable, but usually worth trying.
Using Auto-Enhance
![]() Launch iPhoto.
Launch iPhoto.
![]() Open the thumbnail browser.
Open the thumbnail browser.
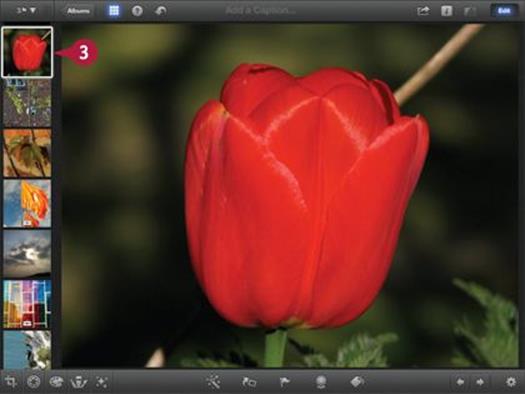
![]() Tap any thumbnail to select a photo for enhancement.
Tap any thumbnail to select a photo for enhancement.
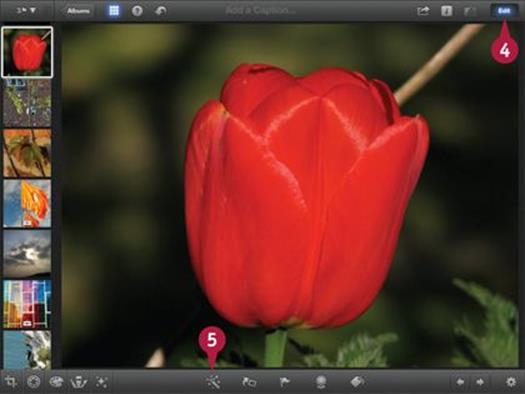
![]() If the bottom toolbar is not visible, tap the Edit button.
If the bottom toolbar is not visible, tap the Edit button.
iPhoto highlights the Edit button in blue and displays the bottom toolbar.
![]() Tap the Auto-Enhance icon (
Tap the Auto-Enhance icon (![]() ).
).
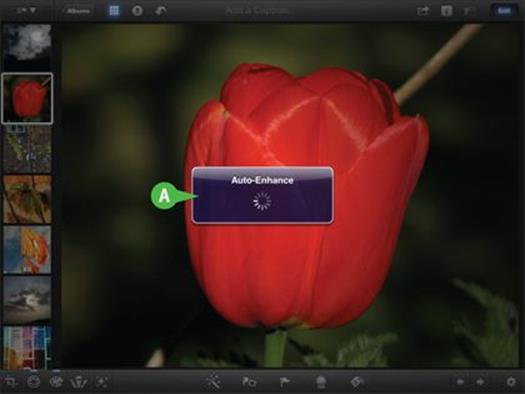
A iPhoto starts applying the effect. (Wait until the alert disappears.)
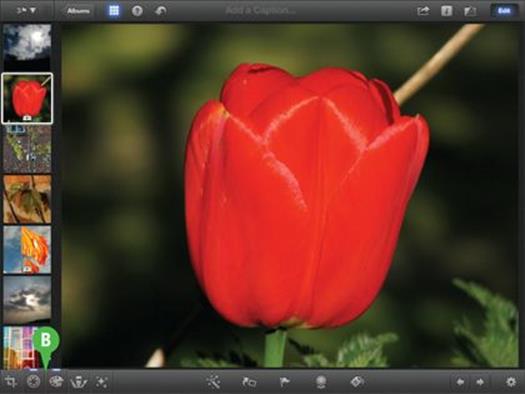
iPhoto enhances the colors in the original photo.
B iPhoto highlights the tools it applied.
Note: The effect is subtle. The changes are more obvious on the third-generation and later iPads because they have a better color display.
TIPS
What does auto-enhance really do?
The details are an Apple secret, but auto-enhance increases color saturation — that is, it makes colors brighter and more intense. As a useful side effect this also improves the contrast.
Can I apply auto-enhance more than once?
No. Auto-enhance is designed to create a subtle, natural-looking improvement. You cannot use it to create garish colors. The first time you apply it, it increases color as much as it can. Applying it again does nothing. If you want to create more dramatic color edits, use the tools introduced in Chapter 8.
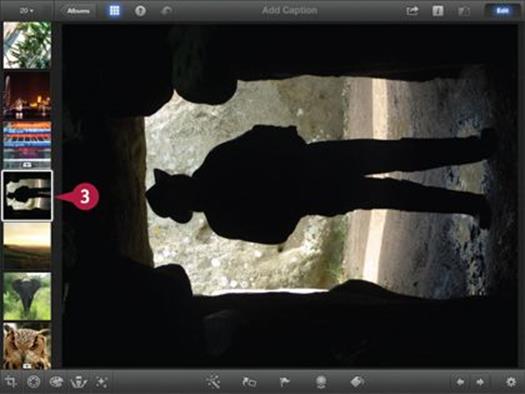
Fix a Sideways or Inverted Photo
Sometimes you may need to take a photo with an iPhone on its side or upside down. Occasionally you may forget which way is up.
iPhoto includes a simple quick-fix option for inverted photos. You can rotate a photo by 90 degrees by tapping the rotation tool, or by spinning the photo with two fingers. The rotation tool includes a hidden feature — if you tap and hold it, you can choose the rotation direction.
Fix a Sideways or Inverted Photo
![]() Launch iPhoto.
Launch iPhoto.
![]() Open the thumbnail browser.
Open the thumbnail browser.
![]() Tap any thumbnail to select a photo for enhancement.
Tap any thumbnail to select a photo for enhancement.
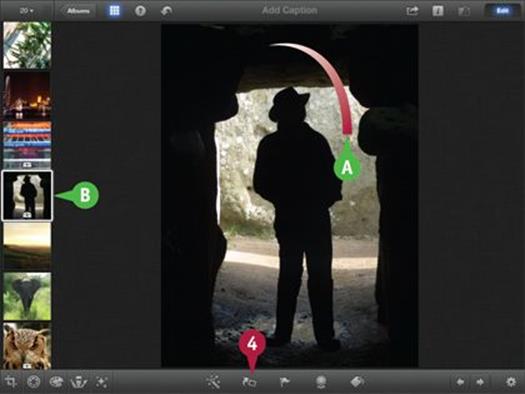
![]() Tap the Rotation icon (
Tap the Rotation icon (![]() ).
).
A iPhoto rotates the photo 90 degrees to the right (clockwise).
B iPhoto adds the toolbox marker to the photo’s thumbnail to show it has been edited.
![]() Tap and hold the Rotation icon (
Tap and hold the Rotation icon (![]() ).
).
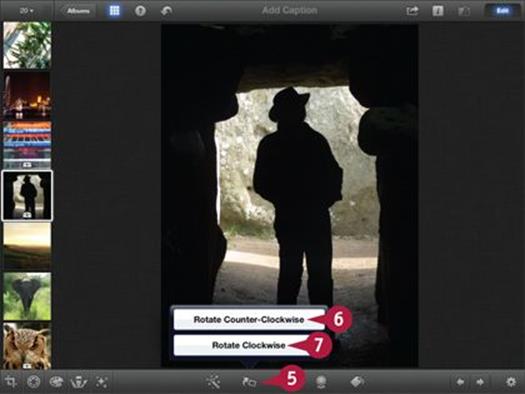
iPhoto displays a popover with options to rotate the photo clockwise or counterclockwise.
![]() Tap the counterclockwise option to rotate the photo to the left.
Tap the counterclockwise option to rotate the photo to the left.
![]() Tap the clockwise option to rotate the photo to the right.
Tap the clockwise option to rotate the photo to the right.
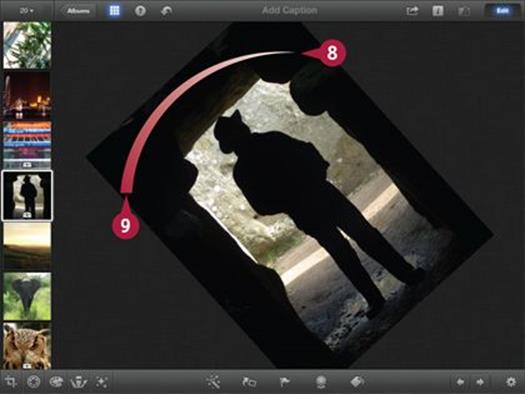
![]() Place two fingers on the photo.
Place two fingers on the photo.
![]() Rotate them to spin the photo.
Rotate them to spin the photo.
iPhoto “snaps” the rotation to the nearest 90 degrees — that is, you can only rotate a photo to the next whole side, and not by a smaller amount.
Note: Two-finger rotation is slightly tricky, so you may need to try this gesture a few times before it works for you.
TIPS
Does a rotation count as a permanent edit?
Spinning a photo with your fingers or with the photo rotation tool is a permanent edit. iPhoto marks the photo thumbnail with its toolbox marker, and the photo appears in the Edited smart album.
Does rotating a photo affect the image quality?
Rotation is not an exact science, and if you rotate a photo over and over the quality will eventually degrade. But you would need to repeat a rotation tens or even hundreds of times to see an obvious difference. So in practice, rotation has no effect.
Fix the Horizon
Many photographers, including professionals, find it difficult to take photos with a perfectly level horizon. iPhoto includes a quick-fix tool for obviously skewed photos. The tool is very easy to use — you can fix a horizon with two taps.
The tool is not infallible. It may miss a horizon that is obvious to a human viewer, or make a mistake in its estimate. You can fine-tune the rotation before applying it. You can also set it manually, as described in the next section.
Fix the Horizon

![]() Launch iPhoto.
Launch iPhoto.
![]() Open the thumbnail browser.
Open the thumbnail browser.
![]() Tap the thumbnail of a photo with a skewed horizon.
Tap the thumbnail of a photo with a skewed horizon.
![]() Tap the Crop icon (
Tap the Crop icon (![]() ).
).
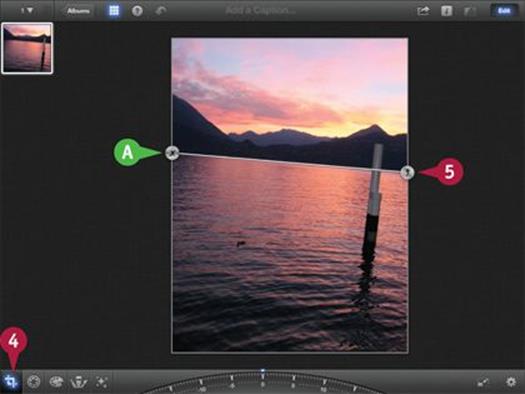
A If iPhoto can find a horizon, it displays an anchor point X and an arrow, joined by a line that estimates the angle of the horizon.
![]() Tap the arrow to fix the horizon.
Tap the arrow to fix the horizon.
Note: You can tap the X icon opposite the arrow to cancel.
iPhoto rotates the photo to fix the horizon.
![]() Drag the rotation control to fine-tune the rotation.
Drag the rotation control to fine-tune the rotation.
Note: You can use the grid as a reference.
![]() Tap the Crop icon (
Tap the Crop icon (![]() ) again to repair and set the horizon.
) again to repair and set the horizon.
TIPS
Can I force iPhoto to find a horizon?
If iPhoto cannot find a horizon, the anchor point X and arrow do not appear. You cannot force iPhoto to display them. If you can see the horizon but iPhoto cannot, you can rotate the photo manually to fix it.
If the horizon looks straight on the grid, why does my photo still look skewed?
Some camera and lens combinations cannot produce a straight horizon. For example, if you use a wide-angle lens, the horizon may be curved. In some photos, vertical lines may not be at right angles to the horizontal lines on the grid — for example, the sides of tall buildings may be angled because of perspective. iPhoto does not include tools to fix these advanced problems.
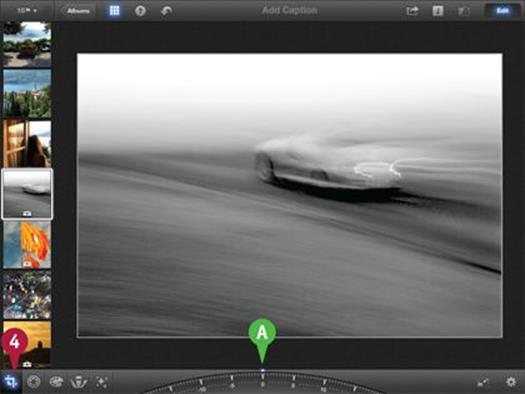
Rotate a Photo Manually
You can rotate a photo’s horizon manually or for creative effects. The rotation feature is built into the crop tool, but they are somewhat independent. You can crop a photo without rotating it, but for practical reasons rotating a photo always crops the edges.
Rotation is limited to 20 degrees left or right. You can use a rotation dial to set it very accurately. A grid appears automatically to help you align features in the photo. You can also tilt your device to control the rotation. This is called gyro-rotation. It is a clever feature, but can be tricky to control.
Rotate a Photo Manually
![]() Launch iPhoto.
Launch iPhoto.
![]() Open the thumbnail browser.
Open the thumbnail browser.
![]() Tap the thumbnail of a photo to select it for rotation.
Tap the thumbnail of a photo to select it for rotation.
![]() Tap the Crop icon (
Tap the Crop icon (![]() ).
).
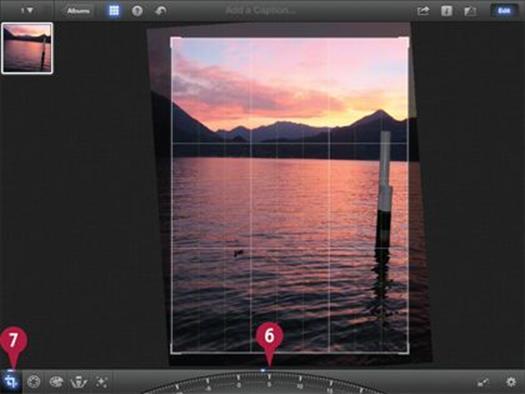
A iPhoto displays the rotation dial.
![]() Drag the dial left or right to rotate the photo.
Drag the dial left or right to rotate the photo.
B You can tap the dial to use gyro-rotation.
Note: When gyro-rotation is enabled, iPhoto outlines the dial in blue.
Note: Keep your device flat and rotate it horizontally to set the amount of gyro-rotation. Do not tilt it vertically.
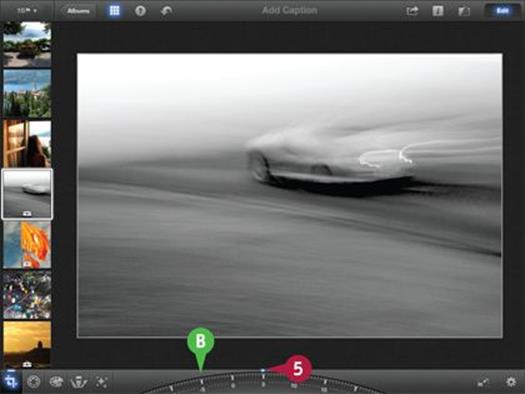
![]() Touch the photo with two fingers and spin them to rotate the photo.
Touch the photo with two fingers and spin them to rotate the photo.
Note: iPhoto displays a reference grid as you rotate the photo. It also displays the uncropped edges of the photo around the visible area.
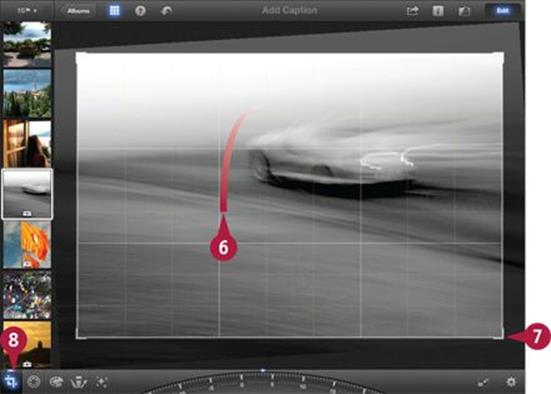
![]() Drag the cropped area to center it.
Drag the cropped area to center it.
Note: You can also resize it with a pinch zoom. You can zoom in or out.
![]() Tap the Crop icon (
Tap the Crop icon (![]() ) again to finish the rotation.
) again to finish the rotation.
TIPS
Why does rotating a photo always crop the edges?
If you rotate a photo without cropping it, it loses triangular “wedges” on each side. iPhoto resizes photos automatically to avoid this. You can use a pinch zoom to resize the photo manually if iPhoto is cropping too much, or too little, of the photo.
Why is the rotation limited to twenty degrees?
The rotation option is designed for corrections, not for creative effects. It would be useful to have a wider range, but unfortunately this option is not available.
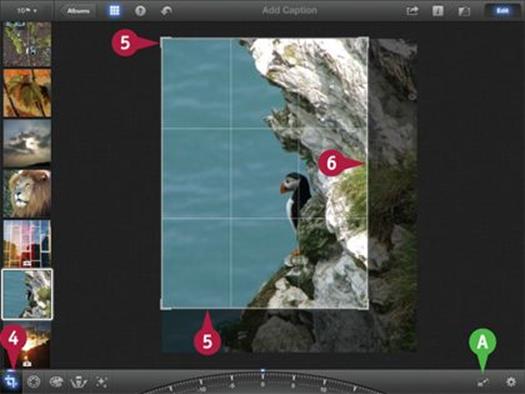
Crop a Photo
You can use cropping to prepare a photo for printing. For example, in the United States, small photo prints have standard sizes in inches — 4 × 6, 5 × 7, and so on. Many cameras produce prints that do not match these sizes exactly. You can use the crop tool to chop away the sides of a photo to make it fit a standard print size. iPhoto includes a selection of standard crop ratios. For creative applications, you can create your own ratio, or use cropping to highlight an area by removing unwanted features in a photo.
Crop a Photo
![]() Launch iPhoto.
Launch iPhoto.
![]() Open the thumbnail browser.
Open the thumbnail browser.
![]() Tap the thumbnail of a photo to select it for rotation.
Tap the thumbnail of a photo to select it for rotation.
![]() Tap the Crop icon (
Tap the Crop icon (![]() ).
).
![]() Tap and drag the corner and/or edges of a photo to change the crop.
Tap and drag the corner and/or edges of a photo to change the crop.
Note: You can repeat step 5 until the crop looks good.
A You can tap the Lock Aspect Ratio icon (![]() ) to lock the ratio before cropping.
) to lock the ratio before cropping.
Note: This example does not show a locked ratio.
![]() Use a two-finger pinch to zoom or expand the area within the crop.
Use a two-finger pinch to zoom or expand the area within the crop.
Note: You can also drag the image within the frame to reposition it.
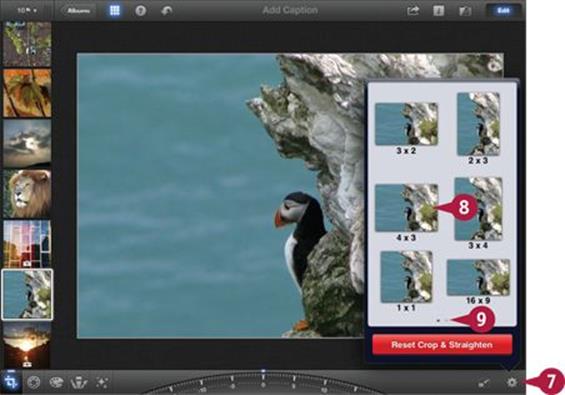
![]() To select a standard crop ratio, tap the settings (gear) icon (
To select a standard crop ratio, tap the settings (gear) icon (![]() ).
).
![]() Tap one of the standard crop ratios to select it.
Tap one of the standard crop ratios to select it.
iPhoto immediately resizes the crop frame around the photo.
![]() Tap the dot selector to see a further page of preset ratios.
Tap the dot selector to see a further page of preset ratios.
Note: After selecting a ratio, you can drag and zoom the photo within the crop frame to improve the composition.

B You can drag the rotation dial to rotate the photo within the crop frame.
C iPhoto shows a preview of the cropped photo.
![]() Tap the Crop icon (
Tap the Crop icon (![]() ) again to finish cropping.
) again to finish cropping.
iPhoto applies the crop and adds a toolbox edit marker to the photo’s thumbnail.
TIPS
How do I know which ratio to select?
Many of the ratios match standard print sizes, such as 5 × 7 inches. For others, divide the print size down until it is as small as it can be, and use that as the ratio. For example, 6 × 8 inches is the same as 3 × 4 — you can divide each number by two.
Can I crop too much?
If you take a distant photo of someone and use the pinch zoom feature to crop the photo around them and zoom it at the same time, you get a fuzzy result. You can tell you have cropped too much when a photo loses sharpness. Fuzziness can look fine on the screen, but is less appealing when printed.
View Edited and Unedited Photos
You can use the Show Original feature in iPhoto to compare an edited photo with the unedited original. You can also use a feature called Revert to Original to cancel all edits. Both features work with multiple edits, including the simple edits described in this chapter, and the more complex editing features introduced later in this book.
When you compare versions, iPhoto always displays the photo as it was taken or uploaded. The edited version shows every change you made to it. When you revert to original, all your edits are lost and you can start again from scratch.
View Edited and Unedited Photos
![]() Launch iPhoto.
Launch iPhoto.
![]() Open the thumbnail browser.
Open the thumbnail browser.
![]() Tap the thumbnail of any edited photo to select it for comparison.
Tap the thumbnail of any edited photo to select it for comparison.
A iPhoto displays the edited photo in the preview area.
![]() Tap the Show Original icon (
Tap the Show Original icon (![]() ) to show the original unedited photo.
) to show the original unedited photo.
B iPhoto displays the original photo.
![]() Tap the Show Original icon (
Tap the Show Original icon (![]() ) again to swap back the edited version.
) again to swap back the edited version.
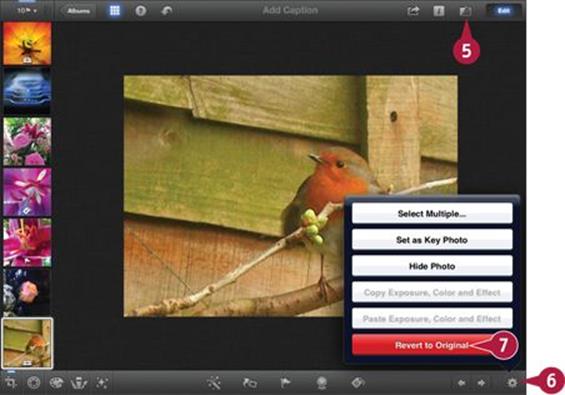
![]() Tap the settings (gear) icon (
Tap the settings (gear) icon (![]() ).
).
iPhoto displays extra options in a popover.
![]() Tap the Revert to Original option.
Tap the Revert to Original option.
Note: If you do not see the Revert to Original option, tap the Edit button at the top right twice.
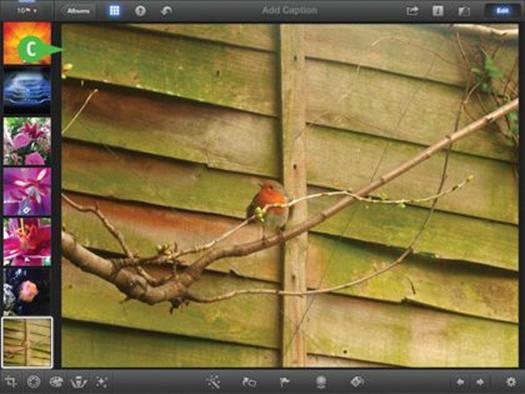
C iPhoto cancels all edits, displays the original photo, and removes the toolbox marker from the photo thumbnail.
Note: You can revert at any time, even after you preview other photos, potentially months or years after you finish editing.
TIPS
Can iPhoto show the original and edited versions at the same time?
No. You can view an edited photo or an original photo. One always replaces the other. However, you can share any photo to the camera roll to create a fresh independent copy at any time.
Can I revert and change my mind?
If you revert to original and tap the undo icon (![]() ) — described in the next section — iPhoto restores the original edits. You can use this option if you change your mind and decide you want to keep the edits after all. For quick comparisons, use the Show Original icon (
) — described in the next section — iPhoto restores the original edits. You can use this option if you change your mind and decide you want to keep the edits after all. For quick comparisons, use the Show Original icon (![]() ) instead.
) instead.
Using Undo and Redo
iPhoto saves a copy of your changes as you edit. You can then use the undo icon to step back through your edits, either to correct a mistake or to compare each change with the edits around it.
This means iPhoto supports multiple levels of undo. It also includes a feature called redo. After you undo edits you can step forward through them, repeating each edit you made originally. These are powerful options. You can use them to review changes as you work, correcting mistakes and keeping the changes that look good.
Using Undo and Redo
![]() Launch iPhoto.
Launch iPhoto.
![]() Open the thumbnail browser.
Open the thumbnail browser.
![]() Tap the thumbnail of any photo for editing.
Tap the thumbnail of any photo for editing.
![]() Edit the photo.
Edit the photo.
Note: You can use any of the editing features in this chapter or the following chapters.
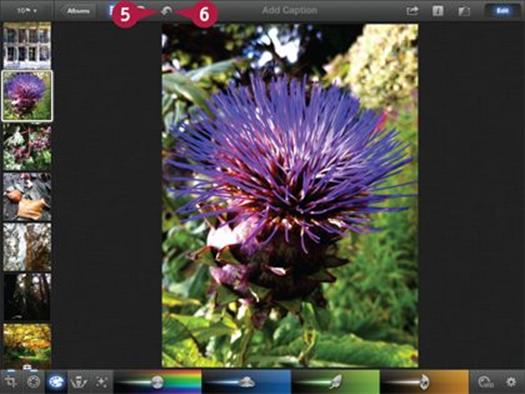
![]() Tap the undo icon (
Tap the undo icon (![]() ) to undo the last edit.
) to undo the last edit.
iPhoto undoes the last edit and displays the photo as it was before you changed it.
![]() Tap the undo icon (
Tap the undo icon (![]() ) repeatedly.
) repeatedly.
iPhoto undoes your edits one by one, stepping back through them and showing the photo as it was before each change.
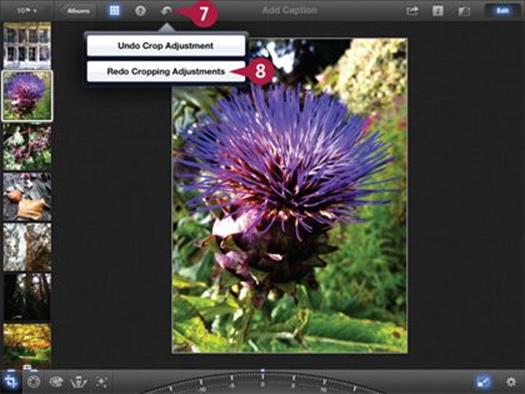
![]() Tap and hold the undo icon (
Tap and hold the undo icon (![]() ).
).
iPhoto displays a popover with undo and redo options.
![]() Tap the Redo option.
Tap the Redo option.
Note: iPhoto displays the name of each operation in the popover.
iPhoto redoes the edit.
Note: The popover stays visible after each operation. You can move in either direction through the undo list by tapping the undo or redo options as they appear.
TIPS
How many levels of undo are there?
Apple does not specify a limit. In practice, there seem to be many tens of steps, so you are unlikely to run out of steps if you use this feature. However, if memory is tight, iPhoto may run out of memory and crash. Note also that when you work on another photo, iPhoto forgets the first photo’s undo history.
What happens if I start editing midway through the undo list?
iPhoto throws away all subsequent edits in the list and keeps your new changes. You can still step back to the start of the undo list, but you can no longer step forward through your original edits. However, you can step forward through the new changes you make.
All materials on the site are licensed Creative Commons Attribution-Sharealike 3.0 Unported CC BY-SA 3.0 & GNU Free Documentation License (GFDL)
If you are the copyright holder of any material contained on our site and intend to remove it, please contact our site administrator for approval.
© 2016-2025 All site design rights belong to S.Y.A.