Teach Yourself VISUALLY iPhoto for iPad (2013)
Chapter 8: Correcting and Enhancing Photos
You can use iPhoto’s editing tools to fix mistakes in lighting, color, and contrast and to adjust photos to make them look better.
Learn about Enhancement
Control Enhancements by Dragging
Understanding Exposure
Enhance Shadows and Highlights
Work with Contrast and Brightness
Learn about Color
Add and Remove Color
Work with Different Colors
Understanding White Balance
Using a White Balance Preset
Fix White Balance Manually
Learn about Enhancement
The previous chapter introduced the crop tool and the auto-enhance tool. This chapter introduces the color and exposure tools. You can use these two tools to improve most photos by correcting and enhancing color and by changing the brightness and contrast.
After you enhance your photos, you can use the creative tools introduced in later chapters to make further changes or fix more specific problems.
Understanding Enhancement
Cameras always lie, because a photo always captures one of many possible views of a scene. A photo of a person shot outdoors at midday looks very different from a photo taken near sunset, or under cloud, or indoors. You can use enhancements to compensate for some of these distortions — for example, to remove the yellow coloring added to scenes lit by candles or incandescent bulbs. You can also use enhancements to change the mood of a photo in more creative ways, making it lighter or darker, and the colors more or less vivid and accurate. Like all edits in iPhoto, enhancements are nondestructive; you can always remove them to restore the original photo.
Understanding Exposure
Cameras work by measuring the light in a scene. For good results, a camera has to make a good estimate of the average brightness — the exposure — of a scene. Cameras do not always get this right. Semi-pro cameras have complicated exposure options. They work well with practice, but it can take beginners a while to master them. Budget pocket cameras usually guess the exposure correctly when the light is good, but may struggle when there is too little light, or too much light. You can use iPhoto’s Exposure tool to correct both kinds of errors.
Understanding Color
Color has a big impact on the mood of an image. Bright, bold colors can make a photo more appealing. Alternatively, you may want to tone down the color in a scene for special effects. iPhoto’s Color tool gives you both options. You can make the colors in a photo stronger or less vibrant. You can control the red, green, and blue shades separately for extra control. For example, you can make a blue sky more vibrant without changing the other parts of a scene.
Understanding White Balance
Most people do not notice the difference in color between indoor and outdoor lighting until they take a photo indoors and wonder why it looks so yellow. Your eyes compensate automatically for different types of lighting. Most cameras try to compensate too, using white balance, a process that tries to re-create the true colors however a scene is lit. iPhoto includes a white balance tool for fixing color errors, with various presets for common lighting types. You can also use a manual white balance option to try to fix the colors by hand.

Understanding Two-Axis Control
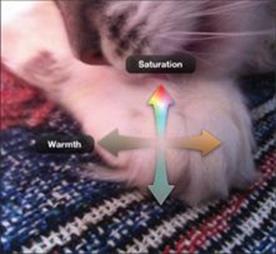
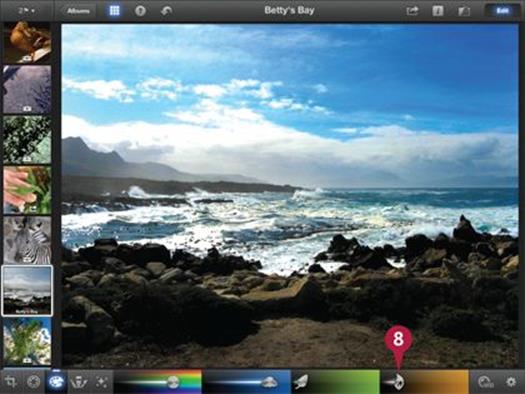
The enhancement tools have a unique editing option. If you tap and hold a finger on a photo, iPhoto displays four arrows. Moving your finger in the direction of each arrow changes the image in a different way. iPhoto labels the arrows so you can see what they do without having to look up the details in the help. This two-axis, one-finger editing gives you a quick and intuitive way to improve your photos.
Understanding the Limitations of Enhancement
You can use enhancements for simple corrections and for more extreme creative effects, but the enhancement tools cannot perform miracles. You cannot correct the exposure of a completely dark photo taken with too little light, or a photo that is so bright all the detail has been washed out. You cannot add colors to a scene that does not have them — for example, a snow field under heavy cloud does not have much color. The enhancement tools can work only with the detail you give them. You cannot fix very bad photos that should be taken again.

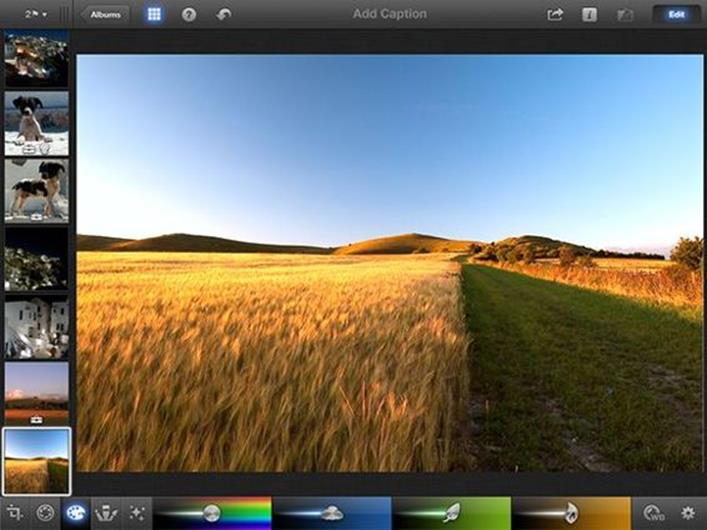
Control Enhancements by Dragging
You can control the color and enhancement tools with a selection of on-screen sliders. But both tools also include a hidden one-finger drag option that can change two settings at once.
To use this feature, select the Color or Enhancement tool and tap and hold anywhere on the photo. iPhoto displays four arrows, although a few options display two — one up, and one down. Keep your finger on the screen and drag it to make changes. The controls are contextual — iPhoto tries to guess what you are doing and displays the controls it thinks you need.
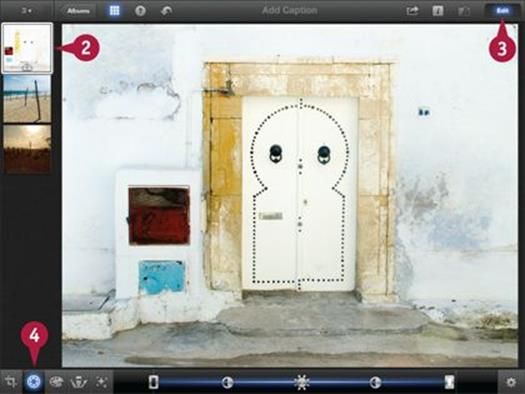
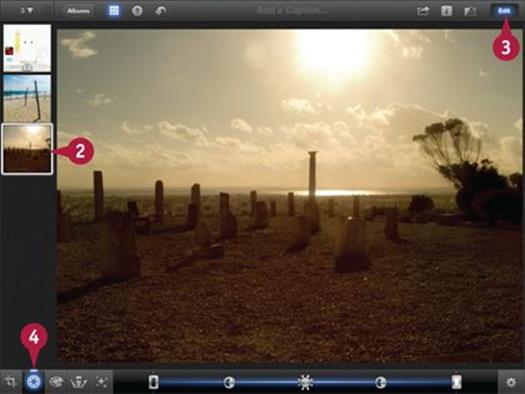
Control Enhancements by Dragging
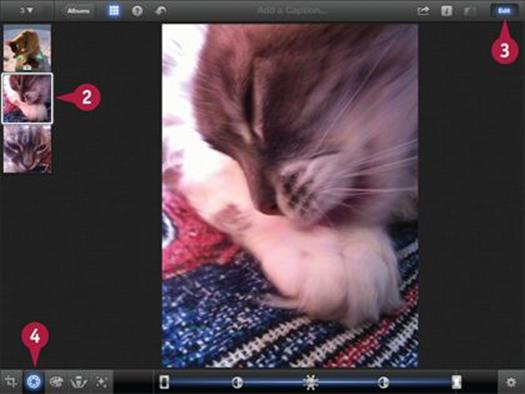
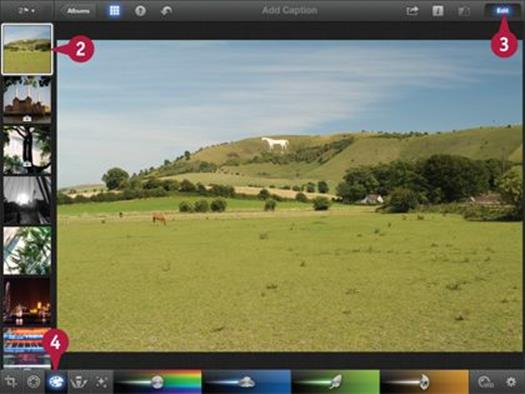
![]() Launch iPhoto and open the editor.
Launch iPhoto and open the editor.
![]() Tap a thumbnail to select it for editing.
Tap a thumbnail to select it for editing.
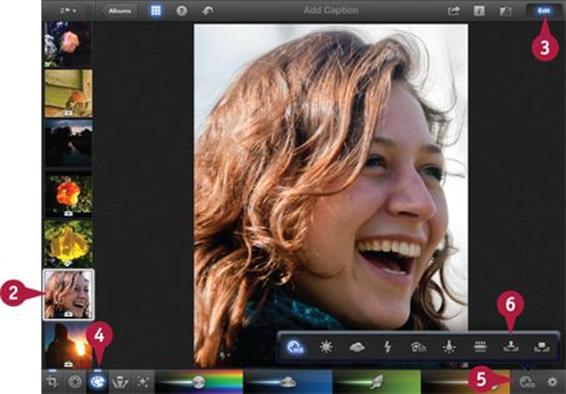
![]() If the Edit button is not selected, tap it to enter edit mode.
If the Edit button is not selected, tap it to enter edit mode.
![]() Tap the Exposure icon (
Tap the Exposure icon (![]() ).
).
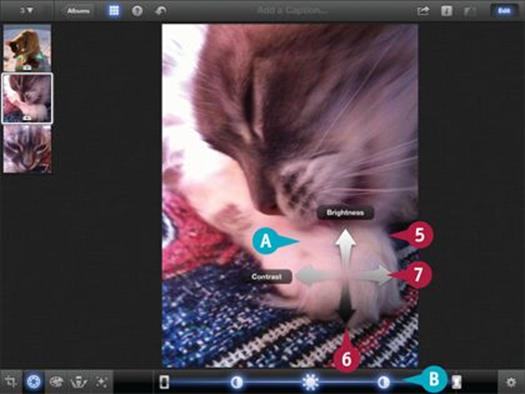
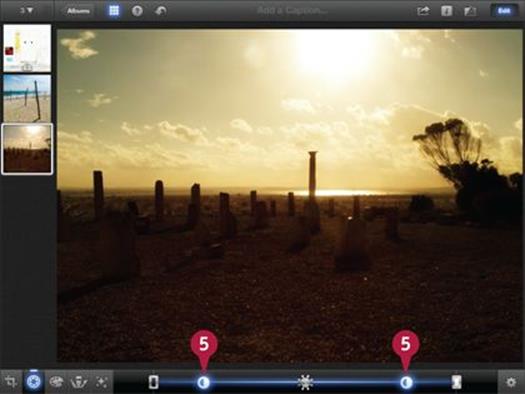
![]() Tap and hold a finger in the preview area.
Tap and hold a finger in the preview area.
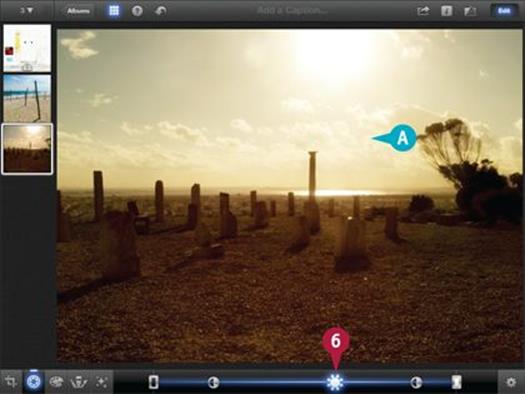
A iPhoto displays four arrows.
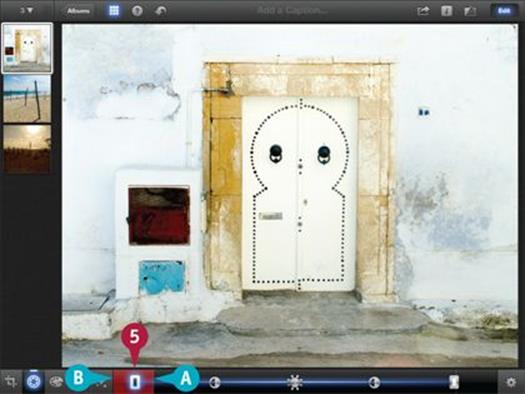
![]() Drag your finger up and down to set brightness.
Drag your finger up and down to set brightness.
![]() Drag your finger left and right to set contrast.
Drag your finger left and right to set contrast.
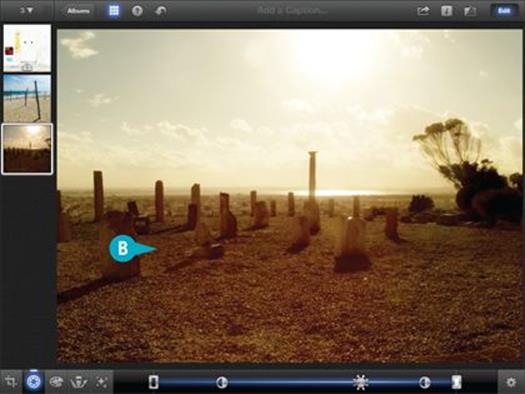
B iPhoto moves the main controls automatically as you drag your finger.
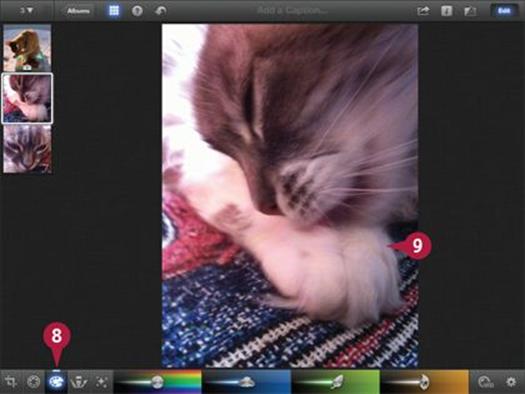
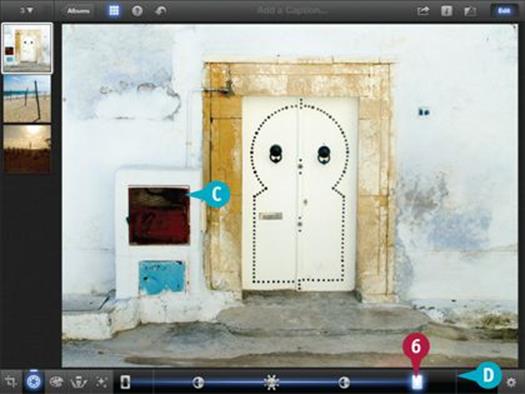
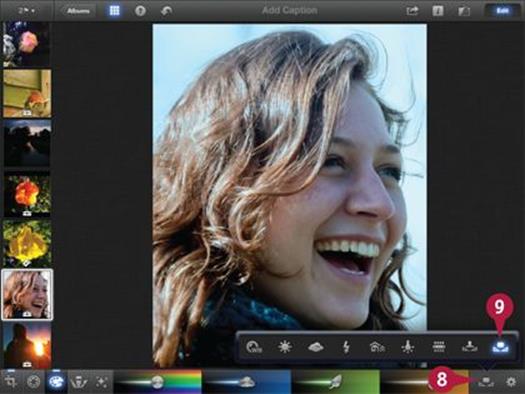
![]() Tap the Color icon (
Tap the Color icon (![]() ).
).
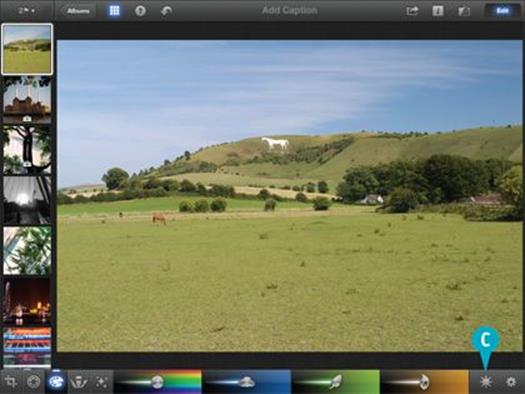
![]() Tap and hold a finger in the preview area.
Tap and hold a finger in the preview area.
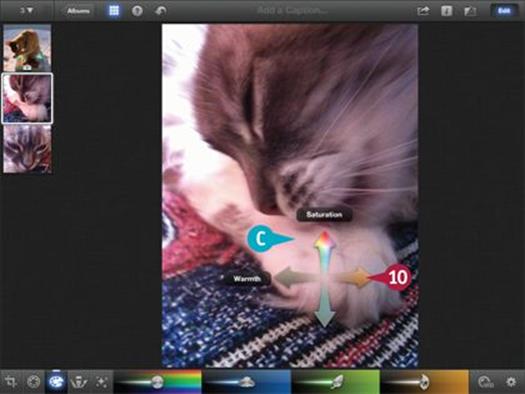
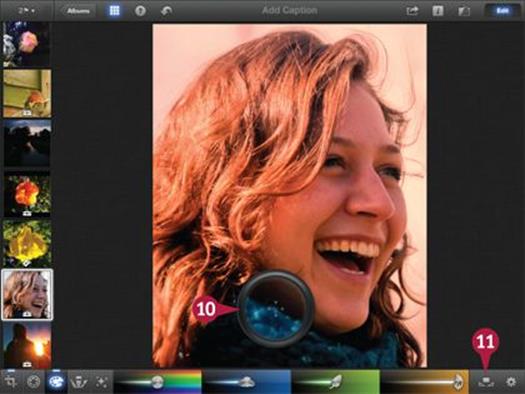
C iPhoto displays two or four arrows.
Note: The up/down Saturation arrow always appears.
Note: The left/right arrow displays Warmth, Blue Skies, or Greenery depending whether you tap a red/orange, blue, or green part of the image.
Note: If iPhoto does not recognize a color when you tap, the left/right arrow does not appear at all.
![]() Drag your finger up and down and left and right to change the color.
Drag your finger up and down and left and right to change the color.
TIPS
Does this feature appear elsewhere in iPhoto?
The arrows appear only in the color and exposure editors. The other editors and tools have different controls.
Can I force iPhoto to work with a color?
In the color editor, iPhoto picks the left/right arrow options from the color you tap. If you want to change one of the other colors, you can use the sliders in the usual way. For more information, see the section “Work with Different Colors” later in this chapter.
Understanding Exposure
When a photo’s exposure is correct, it has a good balance between highlights and shadows. The lightest and darkest areas of the scene reveal as much detail as possible. An overexposed photo looks washed out, with no detail in the highlights. An underexposed photo appears murky and dark, with no detail in the shadows.
iPhoto includes an Exposure tool. You can use the tool to repair photos with poor exposure. You can also use it to experiment with the brightness, contrast, and dark/light balance in a photo. This can change the mood in a creative way and enhance the visual impact.
Understanding Exposure
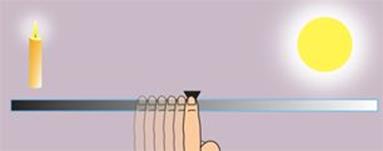
Digital cameras measure the light from each part of a scene. However, the available light is variable. A scene shot in bright sunlight is millions of times brighter than a scene lit by a candle. No camera can capture this extreme brightness range in a single shot. So cameras cheat with a trick borrowed from nature. The camera estimates the average brightness — the exposure — of a scene and captures a limited range of light and dark values around the average. (Your eyes adapt to brightness changes in the same way.) When the exposure is correct, the captured measurements match the brightness differences in the scene.

Understanding Exposure Settings
Like all digital cameras, the iPhone and iPad cameras estimate exposure automatically. However, you can use the neat trick described in Chapter 2 to override the camera’s guess about the available light to create special effects. More complex cameras always include an automatic exposure option. On some you can also set the exposure manually, often with the help of a built-in light meter. You can use this feature to correct the camera’s light estimate — for example, if the light is complex and you want to bring out the detail in one part of a scene.
Understanding Contrast
Contrast is the difference between the brightest and darkest areas in a scene. A shot of a plain gray sky has very little contrast because the brightness is even across the scene. Shots with the light source in front of the camera have a lot of contrast because there is a big brightness difference between the lightest and darkest areas. Cameras do not have a contrast setting because the light in a scene sets the contrast. But you can use iPhoto to modify the contrast in a shot for special effects or to improve the look of a photo.

Understanding Shadows and Highlights
Cameras have to adapt to the average brightness because the range of bright and dark measurements they can capture is limited. The darkest black in a scene is called the black point. The brightest white is called the white point. When the exposure is poor, the black point may be lighter than a pure black, and the white point may be darker than a pure white. The Exposure tool uses a pair of indicators to show you where the black and white points are in your photo. You can slide the indicators to correct obvious exposure errors. On some photos you can push the shadows and highlights to extremes to “pop” the colors.

Understanding Bracketing
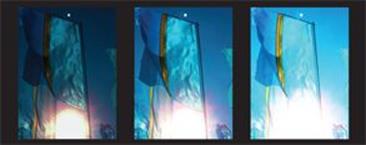
Because exposure is always a best guess, your camera sometimes gets it wrong. The easiest way to fix poor exposure is to retake a shot. If your camera has manual exposure control, you can use a professional technique called bracketing: Shoot the same scene three or more times starting with an exposure that is slightly too dark, and increasing it until the exposure is slightly too light. This gives you the best chance of capturing a good exposure you can work with. Some cameras have automatic bracketing, and take three or more photos with different exposures in less than a second. The iPhone and iPad cameras lack this feature, but you can often reshoot a scene manually.
Understanding Creative Exposure
You can control exposure creatively to create special effects and change the mood of a photo by controlling light and shadow. Black and white landscapes are often darker than usual to bring out the textures in a scene. Lifestyle photographs and portraits are often shot with a lighter exposure to create a bright and airy feel. You can dramatically improve your photography by looking at the bright and dark balance in professional photos.
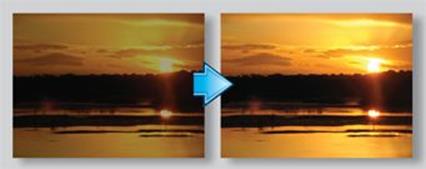
Enhance Shadows and Highlights
You can use the Exposure tool to adjust the shadows and highlights in a photo. The tool displays shadows and highlights sliders, and displays the “perfect” shadow and highlight points with a pair of fine lines at the left and right of the control area. It also displays sliders for contrast and brightness, which are described later in this chapter.
To work with the shadows and highlights, drag the two sliders to the left and right. You can ignore the “perfect” positions and experiment with other settings. The results may not be technically ideal, but some photos look better with “incorrect” settings.
Enhance Shadows and Highlights
![]() Launch iPhoto and open the editor.
Launch iPhoto and open the editor.
![]() Tap a thumbnail to select it for editing.
Tap a thumbnail to select it for editing.
![]() If the Edit button is not selected, tap it to enter edit mode.
If the Edit button is not selected, tap it to enter edit mode.
![]() Tap the Exposure icon (
Tap the Exposure icon (![]() ).
).
iPhoto displays controls for shadows, highlights, contrast, and brightness.
![]() Drag the shadows slider at the left to adjust the darkest point of the image and set it to black.
Drag the shadows slider at the left to adjust the darkest point of the image and set it to black.
A The thin line close to the slider shows the “perfect” position.
B The area to the left of the slider flashes red if shadows are too dark.
Note: You can ignore the warning if you think the photo still looks good.
C iPhoto adjusts the shadows to make them darker or lighter.
![]() Drag the highlights slider at the right to adjust the brightness of the highlights.
Drag the highlights slider at the right to adjust the brightness of the highlights.
D The fine line to the right indicates the “perfect” highlights exposure.
Note: The area to the right of the line flashes red if you make the highlights too bright, but you may want to do this deliberately.
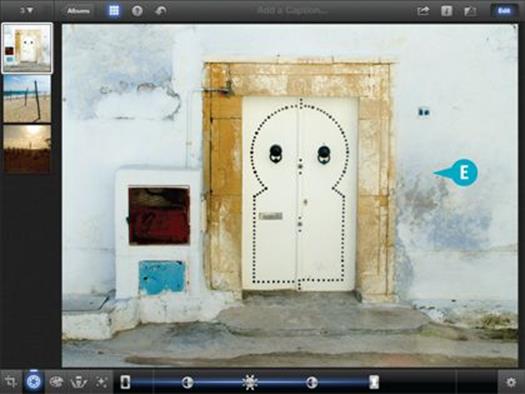
E iPhoto adjusts the shadows and highlights according to your settings.
Note: The highlights in this photo are deliberately underexposed to reveal the texture of the white wall around the door.
TIPS
Can I change the exposure in a small part of a photo?
The Exposure tool works on complete photos. To adjust parts of a photo, use the Lighten and Darken brushes described in Chapter 9. The brushes give you less control over shadows and highlights, but you can apply them selectively to create more complex effects.
How can I fix a very poor exposure?
All photos capture a narrow brightness range, so there is a limit to the magical power of the Exposure tool. If a photo is badly overexposed, detail in the highlights is lost forever. If a photo is underexposed, you can usually pull detail out of the shadows, but the corrected image will look grainy and the quality will be poor.
Work with Contrast and Brightness
You can use the exposure editor’s three central sliders to set contrast and brightness. iPhoto does not display any guides or warnings for these settings, nor does it estimate the “perfect” exposure. So it is up to you to experiment with the settings until your photo looks good.
Contrast and brightness can change the feel of a photo. Less contrast creates a lighter mood. More contrast creates deeper shadows and a darker and heavier mood. Automatic cameras often get the exposure approximately right, so you may not need to do much with these settings.
Work with Contrast and Brightness
![]() Launch iPhoto and open the editor.
Launch iPhoto and open the editor.
![]() Select a thumbnail for editing.
Select a thumbnail for editing.
![]() If the Edit button is not selected, tap it to enter edit mode.
If the Edit button is not selected, tap it to enter edit mode.
![]() Tap the Exposure icon (
Tap the Exposure icon (![]() ).
).
![]() Drag either of the contrast sliders left or right.
Drag either of the contrast sliders left or right.
Note: The sliders are linked and move in opposite directions. The closer the sliders, the lower the contrast.
Note: If you move the sliders too close together, some areas in the photo become gray.
A iPhoto modifies the contrast, changing the difference between bright and dark areas.
![]() Drag the brightness slider left or right.
Drag the brightness slider left or right.
Note: iPhoto moves the contrast sliders automatically.
B iPhoto adjusts the overall brightness, keeping the contrast unchanged.
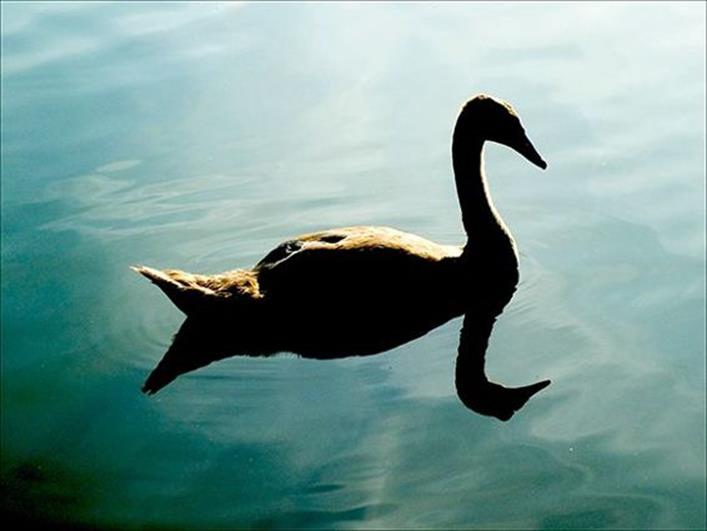
Note: The contrast in this photo has been increased to enhance the mood and compensate for the harsh light from the sun. The brightness has been increased to make the foreground stand out.
TIPS
Should I adjust brightness or contrast first?
You can start with either. The settings interact, and you can always undo your changes by tapping the undo icon (![]() ). There is no formula, but you may find it useful to look at your photo with fresh eyes after each edit and think about how you can improve it next.
). There is no formula, but you may find it useful to look at your photo with fresh eyes after each edit and think about how you can improve it next.
Can I reset the exposure if I make a mistake?
As with most tools in iPhoto, the settings (gear) icon (![]() ) displays extra options. You can reset the exposure by tapping the gear icon to show a popover then tapping the Reset Exposure menu item. You can also copy and paste the exposure settings to a different photo, although you usually get better results by adjusting the exposure of each photo separately.
) displays extra options. You can reset the exposure by tapping the gear icon to show a popover then tapping the Reset Exposure menu item. You can also copy and paste the exposure settings to a different photo, although you usually get better results by adjusting the exposure of each photo separately.
Learn about Color
Everyone loves photos with bright colors. iPhoto includes a selection of color editing options that can improve and enhance the color in all your photos. You can also use them to create black-and-white photos from color or to dial down or enhance the intensity of the colors in your shots.
This section introduces the color adjustment tool. You can use it to make colors more or less vivid and to change the color balance in a photo, making it warmer or cooler. The tool also includes special options for working with skin tones. You can use them to improve the look of your portraits, and to adjust colors around your subjects without making them look unnatural.
Understanding Digital Color
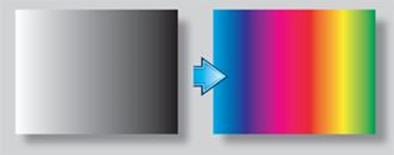
Digital cameras capture images by measuring the brightness of a scene on a grid of points called pixels. Cameras record color by measuring the amount of red, green, and blue in each pixel. The science of color is complex and cameras sometimes get colors wrong. For example, orange flames sometimes appear purple in photos, and some purple flowers appear blue. But most of the time combining red, green, and blue in different proportions captures most of the colors your eyes can see. If you could look inside a digital photo, you would see a long string of numbers grouped in threes — the red, green, and blue brightness values for each pixel.
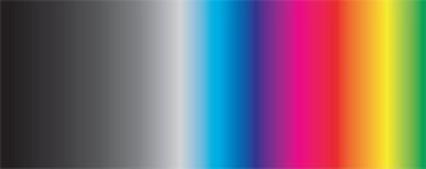
Understanding Saturation
Color saturation measures how punchy and bright colors are. Black-and-white photos have no saturation at all. A typical photo has medium saturation. Maximum saturation looks garish, blotchy, and unnatural. Many photographers deliberately boost saturation slightly because viewers love bright colors. Landscape photos often have unrealistic saturation, but many photos benefit from a slight boost. Alternatively, you can dial down saturation to create moody or vintage looks. iPhoto’s color tools can create both effects.
Edit Colors Individually
iPhoto’s color saturation tool controls how vivid the colors are in your photo. It includes extra sliders you can use to adjust the individual colors in a photo. But be careful — these sliders do not modify red, green, and blue in a simple way, so they may not create the results you expect. You can use them for independent adjustment of sky and cloud blues, foliage greens, and skin tone reds and pinks. The slider effects are designed to help you and make editing easier. But the results can be difficult to predict, especially if you are used to the more straightforward color editing in other software.

Work with Skin Tones
The skin tone adjustment increases the amount of pink/orange in a photo. It is a subtle effect that gives portraits a warmer and healthier look. You can also use it to add warmth to photos lit by bright blue skies. The effect on darker reds is less obvious. Usefully, the color adjustment tool includes a Preserve Skin Tones option. You can use it to try to keep skin tones lifelike as you adjust other colors.

Adjust Greenery
The foliage/green slider changes the brightness of mid-green foliage. You can use it to make grass and leaves stand out more in your photo. If you exaggerate the effect it creates an unnatural look because foliage appears to be lit differently from the rest of your photo.

Enhance Sky Blues
This slider creates a complex result. It does not just make blues brighter — it seems to vary the overall contrast and brightness of background lighting. White or gray parts of a scene become brighter even if they are not noticeably blue. Other colors become more saturated, and overall contrast increases. This slider has a very obvious effect, so take care when using it. Dialing down the blue slider while dialing up skin tones can add a subtle, interesting glow to the complexion of your models.

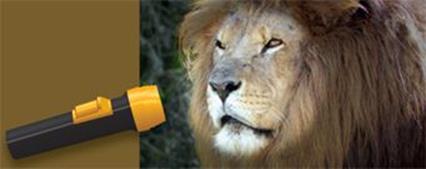
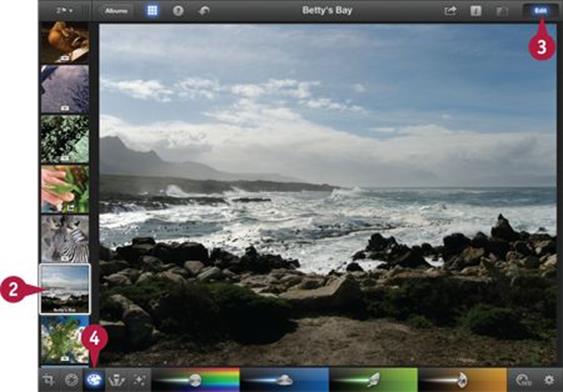
Add and Remove Color
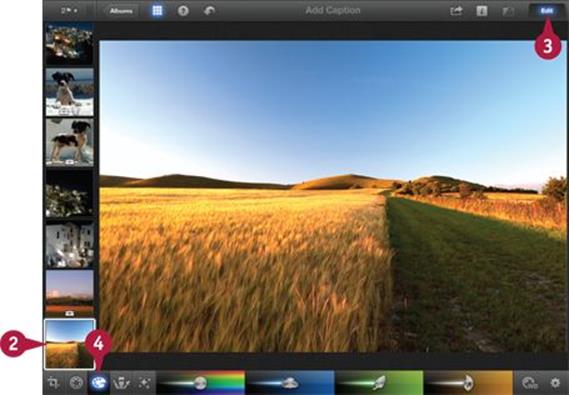
You can use the Color tool’s saturation slider to set the amount of color in your photo. Drag it to the left to make colors less vivid. Drag it to the right to make them more intense. At the far left the slider removes all color, leaving a black-and-white photo.
The slider is sensitive and small movements create big changes. For best results, fix the colors in your photo first using the white balance tool and the other color sliders. Adjust the saturation only after the colors look good.
Add and Remove Color
![]() Launch iPhoto and open the editor.
Launch iPhoto and open the editor.
![]() Tap a thumbnail to select it for editing.
Tap a thumbnail to select it for editing.
![]() If the Edit button is not selected, tap it to enter edit mode.
If the Edit button is not selected, tap it to enter edit mode.
![]() Tap the Color icon (
Tap the Color icon (![]() ).
).
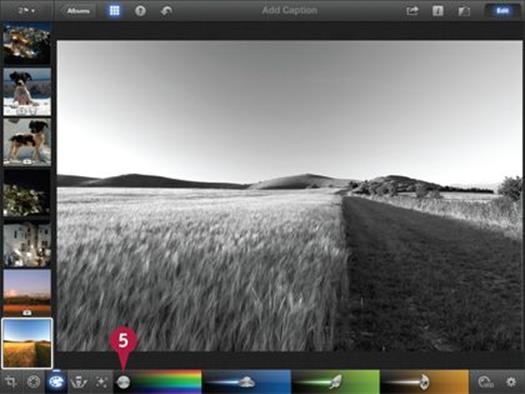
![]() Drag the saturation slider to the far left.
Drag the saturation slider to the far left.
iPhoto removes the color from the photo, leaving a black-and-white image.
![]() Drag the saturation slider to the far right.
Drag the saturation slider to the far right.
iPhoto exaggerates the colors and makes the look unnatural.
![]() Position the saturation slider slightly to the right of the middle.
Position the saturation slider slightly to the right of the middle.
iPhoto pops the colors slightly without making them too bright.
Note: This position works well on most photos.
TIPS
Can I make desaturation more dramatic?
Removing color by desaturating a photo can leave it looking bland. You can use the black-and-white effects introduced in Chapter 10 to create more complex results. The black-and-white effects give you more control over how colors are converted to black-and-white. For example, you can make blue skies darker or lighter.
Can I add color to a black-and-white photo?
Some cameras add special effects — for example, you can save black-and-white photos. iPhoto cannot add colors back to a black-and-white photo. You can hand-paint colors onto a black-and-white photo with a more complex editor such as Photoshop Elements for Mac/PC or Photoshop for iPad. iPhoto does not have this feature.
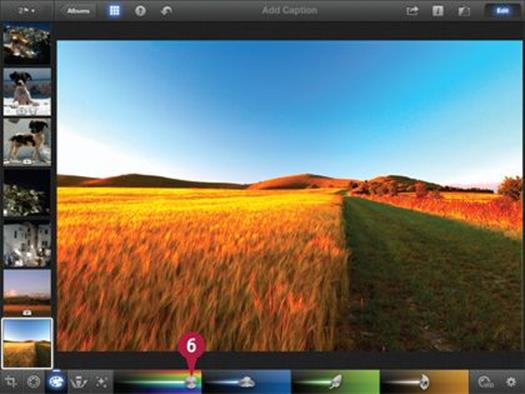
Work with Different Colors
You can use the three color sliders in the color editor to control the amount of skin tone warmth, the brightness of the sky and backgrounds, and the vividness of foliage.
If you are changing the colors in a portrait, you can also use a Preserve Skin Tones option to keep your subjects looking natural. The blue slider has the most vivid effect, so use it first. Experiment with the foliage slider if the photo needs it. Finish by adjusting the warmth slider.
Work with Different Colors
![]() Launch iPhoto and open the editor.
Launch iPhoto and open the editor.
![]() Select a thumbnail for editing.
Select a thumbnail for editing.
![]() If the Edit button is not selected, tap it to enter edit mode.
If the Edit button is not selected, tap it to enter edit mode.
![]() Tap the Color icon (
Tap the Color icon (![]() ).
).

![]() Move the saturation slider slightly to the right to highlight the changes you are about to make.
Move the saturation slider slightly to the right to highlight the changes you are about to make.
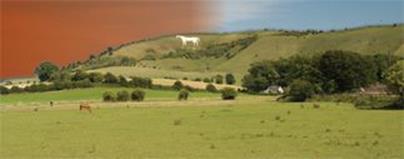
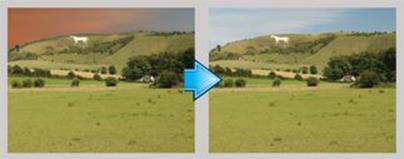
![]() Drag the blue skies slider slightly left or right to make the sky darker or brighter.
Drag the blue skies slider slightly left or right to make the sky darker or brighter.
Note: This slider has a big effect. Big movements create distorted results. Try small movements left and right and see which looks better.
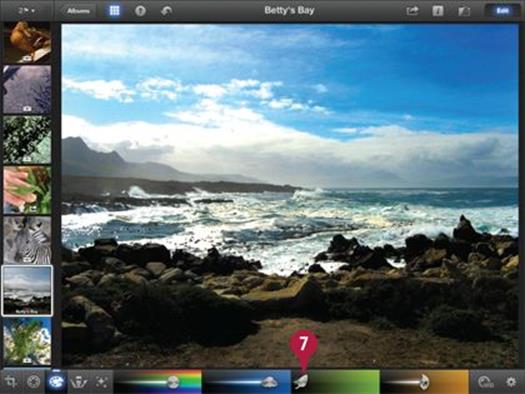
![]() Drag the greenery slider left and right to make foliage and grass more or less obvious.
Drag the greenery slider left and right to make foliage and grass more or less obvious.
Note: Moving the slider all the way to the right can make grass unnaturally bright. Try moving it in both directions to see which result looks best.
Note: This example deliberately makes the grass darker.
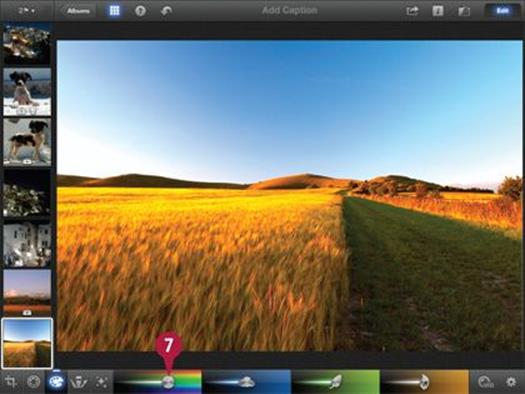
![]() Drag the warmth slider left and right to add or remove a subtle warm coloring.
Drag the warmth slider left and right to add or remove a subtle warm coloring.
Note: This slider has a very subtle effect. It is most obvious on skin tones in portraits. You may find it hard to see the difference on other photos.
Note: This example deliberately makes the photo cooler to emphasize the blue of the sky and the sea.
TIPS
Why do the color sliders work so differently?
Apple has tried to create an editing tool that does what users need. Color adjustments can be complex, and more powerful software has many options. The skies/warmth/foliage approach is effective for simple edits. It is not as flexible as more complex effects, but it is easy to use.
What other color editing options can I use?
The white balance tool described in the next three sections can create more complex color effects. Although it is designed to correct colors, you can use it creatively to change the mood and feel of your photos.
Understanding White Balance
Ideally, you would like all the colors in your photo to be accurate. In practice, lighting conditions vary, so all photos have slightly inaccurate colors. Cameras try to fix this problem automatically, but camera software does not always get it right, even when set up correctly.
You can fix color shifts after you take a photo with iPhoto’s white balance tool. You can compensate for specific kinds of light — indoor incandescent, outdoor shade, outdoor sunny, flash, and so on. You can also correct colors manually by pointing iPhoto at a gray or white feature in a photo and leaving it to correct the colors for you.
What Is White Balance?
If you take a photo of white paper you should get a white result. In practice you rarely do. The true color depends on the surrounding lights. Candles and incandescent bulbs have an orange and yellow cast — an all-over tint. Blue skies add a cool blue cast. White balance deliberately shifts the colors in your photo to compensate for the way the scene is lit. When you fix white balance errors, whites in your scene lose their tints and become white again, and all the other colors become more accurate.

Recognize White Balance Errors
When you know what to look for, white balance errors are easy to spot. Indoor scenes often look yellow. Outdoor scenes can be too cold and blue. Scenes taken in shade often have a slight brown and orange cast. If you are not sure if the colors in your photo are correct, look at the whites and grays. If they are tinted, the white balance is wrong and you may need to fix it.
Understanding White Balance Correction
White balance is a complex process and applies two different color corrections. Luckily, you do not need to understand the details to use it successfully. iPhoto’s correction tool makes it easy to fix color problems with a few taps. Note that you cannot fix white balance problems with iPhoto’s other color tools. White balance changes colors in a unique way, and no other tool produces exactly the same effect.
Understanding Camera White Balance
Cameras, including budget cameras, attempt to manage white balance as you take a photo. Most cameras are set to manage white balance automatically. Some include manual white balance options, so you can choose a setting that matches the lighting conditions to give your camera the best chance of getting an accurate result. Unfortunately, in-camera white balance does not always work as it should. Some cameras are set incorrectly, whereas others do not do a good job of correcting color errors. So even if your camera has this feature you may still need to correct your photos in iPhoto.
![]()
Fix White Balance Automatically
iPhoto includes a selection of white balance presets. You can fix white balance by applying a preset that matches the light you used to take the photo — for example, you can select sun, cloud, flash, shade, incandescent lighting, and fluorescent lighting. The presets are fixed, so you have no control over how they correct colors.
![]()
Fix White Balance Manually
If you need finer control over white balance, iPhoto includes two manual options. Both display a loupe — a graphic of a magnifying glass — which you can move to set a reference point for color correction. One option is designed to use skin tones as a reference, and the other works with any white/gray point in a photo.
Work Creatively with White Balance
Your eyes adjust white balance automatically, so you rarely notice the color differences between indoor, outdoor, and artificial lighting. Viewers looking at snaps are very tolerant of white balance errors. Few viewers care that an indoor snap posted on someone’s Facebook wall is slightly yellow. White balance is important for landscape, portrait, or nature photography, where colors should have maximum impact. However, photographers sometimes change the white balance incorrectly to change the mood of a scene, making scenes cooler or warmer with blue or orange. Feel free to keep photos that look good even if the colors are distorted.
Using a White Balance Preset
You can use one of the white balance presets to apply a standard white balance correction to your photo. For example, if you know your photo was taken under a cloudy sky, you can apply the Cloudy white balance preset.
You can apply a preset by tapping the White Balance icon in the toolbar and tapping one of the further icons in the popover. To see a list of names, tap the help button first. Note that although technically white balance is designed to correct colors, you can also use it creatively to apply an all-over color shift.
Using a White Balance Preset
![]() Launch iPhoto and open the editor.
Launch iPhoto and open the editor.
![]() Tap a thumbnail to select it for editing.
Tap a thumbnail to select it for editing.
![]() If the Edit button is not selected, tap it to enter edit mode.
If the Edit button is not selected, tap it to enter edit mode.
![]() Tap the Color icon (
Tap the Color icon (![]() ).
).
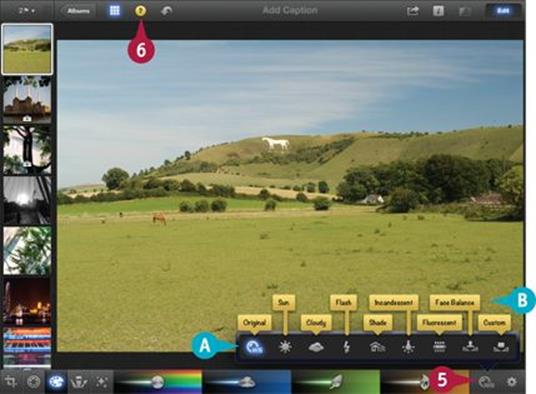
![]() Tap the White Balance icon (
Tap the White Balance icon (![]() ).
).
A iPhoto displays a popover with a list of white balance presets.
![]() Tap the help icon (
Tap the help icon (![]() ) to see the names of the presets.
) to see the names of the presets.
B iPhoto displays the names above the popover.
Note: Many users find it difficult to remember the meaning of each symbol, so remember that you can see their names if you tap the help icon (![]() ).
).
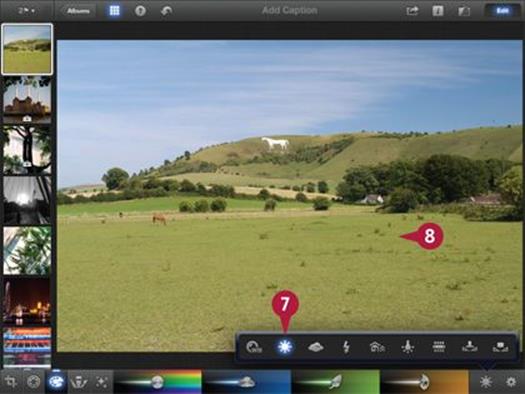
![]() Tap each preset in turn until you find the one that makes the colors look most natural.
Tap each preset in turn until you find the one that makes the colors look most natural.
Note: The WB preset matches the white balance estimated by the camera.
Note: In theory, the presets correct for different lighting conditions. In practice, try them all and use the one that works best.
![]() Tap anywhere outside the popover to hide it.
Tap anywhere outside the popover to hide it.
iPhoto adjusts the white balance in the photo.
C iPhoto displays the preset icon to remind you which preset you selected.
Note: In this example, the Sun preset brightens the blue in the sky and removes a slight orange cast, making the colors more accurate.
TIPS
Are these presets standard?
There are no official industry standard white balance presets. But many cameras and photo editing tools offer an identical selection. Cheaper cameras may lack a few of the presets, and expensive cameras and software may occasionally include a few more, including some you can specify yourself.
What is color temperature?
If you look up white balance online you may find references to color temperature, which is a measure of color in units called Kelvins (K) derived from physics. The theory is complex, but in outline iPhoto uses color temperature values when it fixes white balance errors.
Fix White Balance Manually
You can use two special modes to correct white balance manually. Both display a loupe — a virtual magnifying glass. To correct white balance, move the loupe to a point with a reference color. The white balance tool takes that color and corrects it, shifting all the other colors in the photo by the same amount.
The Face Balance loupe is designed to fix skin tones. Move it to a bright area of skin. The Custom loupe is designed to correct whites and grays. Both tools can create dramatic color shifts if you deliberately misplace them. The results often look surreal, but sometimes they can unexpectedly enhance a photo.
Fix White Balance Manually
![]() Launch iPhoto and open the editor.
Launch iPhoto and open the editor.
![]() Tap a thumbnail to select it for editing.
Tap a thumbnail to select it for editing.
![]() If the Edit button is not selected, tap it to enter edit mode.
If the Edit button is not selected, tap it to enter edit mode.
![]() Tap the Color icon (
Tap the Color icon (![]() ).
).
![]() Tap the White Balance icon (
Tap the White Balance icon (![]() ) to show the white balance popover.
) to show the white balance popover.
![]() Tap the Face Balance preset icon (
Tap the Face Balance preset icon (![]() ) in the popover.
) in the popover.

A iPhoto plays a sound and displays the loupe.
![]() Drag the loupe around the image to find a reference skin tone shade.
Drag the loupe around the image to find a reference skin tone shade.
B iPhoto estimates the white balance from the point you select.
Note: You may need to move the loupe over most of your subject’s face to find a good color.
![]() Tap the White Balance icon again.
Tap the White Balance icon again.
![]() Tap the Custom Balance preset icon (
Tap the Custom Balance preset icon (![]() ).
).
Note: This example demonstrates how to work with Face Balance and Custom Balance. In practice you apply one or the other — the order does not matter — and keep the one that looks best.
![]() Move the loupe until the color is good.
Move the loupe until the color is good.
![]() Tap the White Balance icon again to hide the loupe and lock in the change.
Tap the White Balance icon again to hide the loupe and lock in the change.
Note: The Custom Balance option creates more extreme color shifts. This example deliberately exaggerates the reds.
TIPS
What is the difference between Face and Custom mode?
Face mode is designed for portraits and creates small shifts, whereas Custom mode creates extreme color shifts. In theory, you should place the loupe on a white or gray area. In practice, you typically move the loupe around the scene until you find colors that look good.
How can I get more accurate colors?
Professional photographers use expensive white/gray/black or full-color reference cards with ideal colors. Simulate a white reference card with a sheet of paper. Take a shot with the paper close to your subject but off to one side, so you can crop it out later. Place the loupe on the paper in iPhoto, and you should get accurate color correction.
All materials on the site are licensed Creative Commons Attribution-Sharealike 3.0 Unported CC BY-SA 3.0 & GNU Free Documentation License (GFDL)
If you are the copyright holder of any material contained on our site and intend to remove it, please contact our site administrator for approval.
© 2016-2025 All site design rights belong to S.Y.A.