iPhoto: The Missing Manual, 1st Edition (2014)
Part 2. Editing and Sharing
Chapter 9. Books, Calendars, and Cards
At first, gift-giving is fun. During those first 10, 20, or 40 birthdays, anniversaries, graduations, Valentine’s Days, Christmases, and so on, you might actually enjoy picking out a present, buying it, wrapping it, and delivering it.
After a certain point, however, gift-giving becomes exhausting. What the heck do you get your dad after you’ve already given him birthday and holiday presents for 35 years?
If you have iPhoto, you’ve got an ironclad, perennial answer. The program lets you design and order a gorgeous, professionally bound photo book, printed at a real bindery and shipped to the recipient in a slipcover. Your photos are printed on glossy, acid-free paper, at 300 dots per inch, complete with captions (if you like). It’s a handsome, emotionally powerful gift guaranteed never to wind up in the attic, at a garage sale, or on eBay. These books ($30 and up) are amazing keepsakes—the same idea as most families’ photo albums, but infinitely classier and longer lasting (and not much more expensive).
And you’re not just limited to books. iPhoto also lets you create equally great-looking calendars (covering any year or group of months that works for you)—a fantastic yearly gift—postcards, and even letterpress greeting cards (cards that have inked designs pressed into the paper). Your projects arrive beautifully wrapped in elegant, Apple-logoed envelopes that are a sight to behold in and of themselves.
Fortunately, you use the same designing and ordering tools for all of these photo-publishing projects. The whole process is remarkably easy and more visually pleasing than you can imagine (see Figure 9-1). This chapter begins with a tour of the book-making process and follows up with calendars and cards.
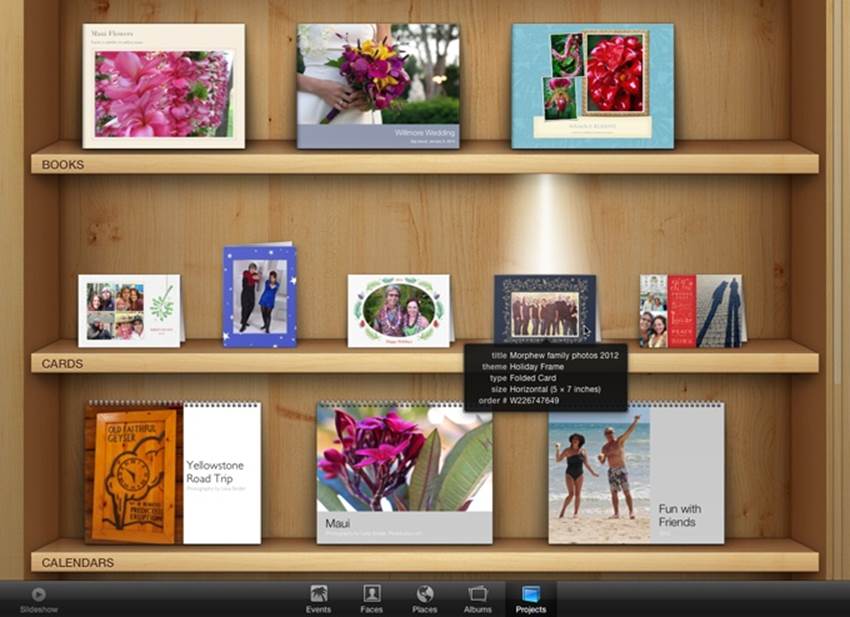
Figure 9-1. Once you’ve gotten a book, calendar, or card under your belt, Full Screen view reveals the world’s coolest project bookshelf. Click a project to see iPhoto illuminate it with a built-in shelf light. Point your cursor at a project to see its details.
Phase 1: Pick the Pix
The hardest part of the whole book-creation process is winnowing your photos to the ones you want to include. Many a shutterbug eagerly sits down to create his very first photo book—and winds up with one that’s 98 pages long (and well over $100).
In most of Apple’s ready-made book designs, each page can hold a maximum of six or seven pictures, though some designs (like Picture Book and Journal) can handle up to 16 pictures per page. Even the seven-per-page limit in most themes doesn’t necessarily mean you’ll get 120 photos into a 20-page book, however. The more pictures you add to a page, the smaller they have to be, and therefore the less impact they have (after all, you’re not looking to create a catalog or a yearbook). The best-looking books generally have varying numbers of pictures per page—one, four, three, two, whatever. So in general, the number of pictures you’ll fit in a 20-page book will likely be much lower than the maximum possible—50, for example.
Either way, sifting through your pictures and choosing the most important few can be an excruciating experience, especially if you and a collaborator are trying to work together. (“You can’t get rid of that one! It’s adorable!” “But, honey, we’ve already got 139 pictures in here!” “I don’t care. I love that one.”)
You can use any selection method to choose the photos you want to include in your book. You can open an Event, pick and choose among your entire library (Selecting Photos), or, better yet, file them in an album. You can even select a group of albums that you want to include, all together, in one book.
If you opt to start from an album, take this opportunity to set up a preliminary sequence by dragging the pictures around in the album to determine a rough order. You’ll have plenty of opportunities to rearrange the pictures on each page later in the process, but the big slide-viewer-like screen of an album makes it easier. Take special care to place the two most sensational or important photos first and last, as they’ll be the ones on the cover and the last page of the book. And if you’re making a hardbound book (which includes a paper dust jacket), then you need special photos for the inside front and back flaps, and the back cover, too.
Phase 2: Publishing Options
Once you’ve selected an album or a batch of photos, click Share in the toolbar and then choose Book (Figure 9-2). You can also choose File→New Book.
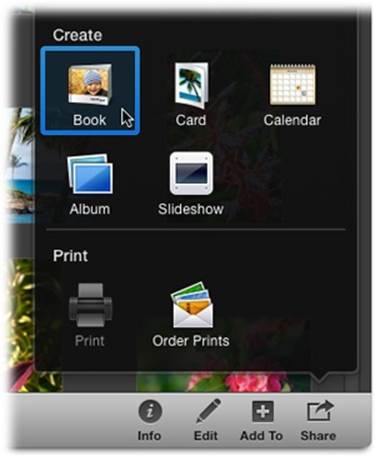
Figure 9-2. You can use the Share menu to begin any project discussed in this chapter. Creating a project is a fantastic excuse to use Full Screen view. Just click the ![]() at the top right of iPhoto’s window to gain tons of elbow room.
at the top right of iPhoto’s window to gain tons of elbow room.
Your screen changes into a giant desktop where you can specify exactly what you want your book to look like. It’s crawling with important design options.
Book Type
The Book Type buttons labeled in Figure 9-3 let you specify whether you want to publish your book as a hardbound volume (classier and more durable, but more expensive), as a paperback, or with a wire spiral binding. You also have a choice of sizes for each option using the buttons in the bottom left of the project-design workspace:
§ Hardcover. Your choices are 11 x 8.5 inches (large) or 13 x 10 inches (extra large). All hardcover books are printed with double-sided pages.
§ Softcover. Choose between 11 x 8.5 inches (large), which feels the slickest and most formal; 8 x 6 inches (medium), which is more portable; and 3.5 x 2.625 inches (small), the smallest option of any book type.
This last option gives you a tiny, wallet-size flipbook, with one photo filling each page, edge to edge. You have to order these in sets of three (for a total of $12), which suggests that Apple thinks of them as spontaneous giveaways to relatives, wedding guests, business clients, and so on. In any case, they’re absolutely adorable (the booklets, not the business clients).
§ Wire-bound. These books are available in 11 x 8.5-inch (large) or 8 x 6-inch (medium) sizes.
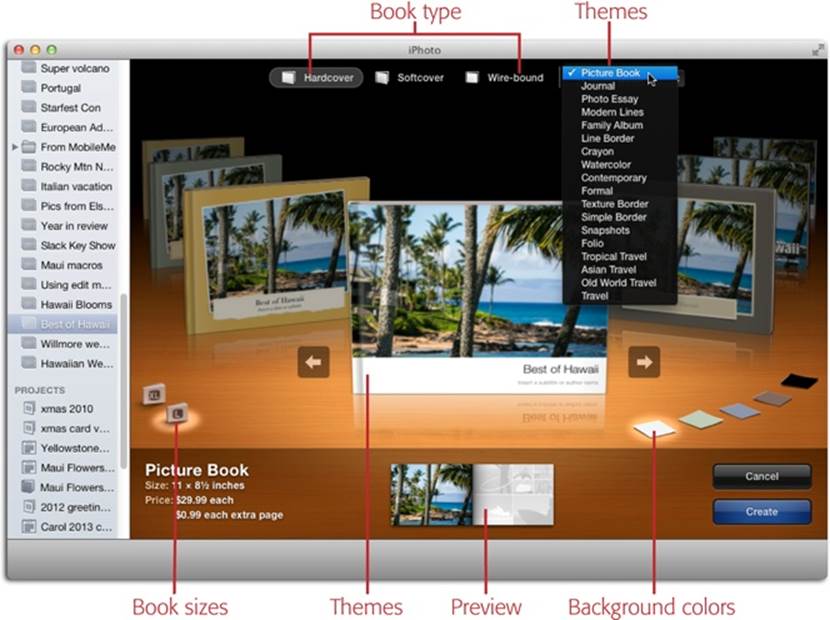
Figure 9-3. iPhoto’s project-design workspace is easy to use. You can change all of these settings later, even after you’ve started laying out book pages. But if you have the confidence to make these decisions now, you’ll save time, effort, and (if you want captions for your photos) a lot of typing. As you scroll through the designs (by pressing the arrow keys on your keyboard or by using gestures), the bottom of the window displays a preview of what your book would look like if you pick that theme.
Theme
And now, the main event: choosing a theme—a canned design, including typography and color scheme—for your book. The carousel in the center of your iPhoto window contains 18 professionally designed themes, each dedicated to presenting your photos in a unique way.
Apple’s book themes offer a variety of dynamic visual styles intended to make your photos pop off the page. Some have page backgrounds that include textures, shadows, passport stamps, ripped-out clippings, and other photorealistic simulations.
Here’s a brief description of each theme:
§ Picture Book, Photo Essay. The motto for these designs could be “maximum photos, minimum margins.” There’s little room for text and captions (save for on the book jacket), and the photos stretch gloriously from one edge of the page to the other—a full bleed, as publishers say. These dramatic designs can be emotionally compelling.
In the Picture Book theme, you can opt to have a single caption appear at the bottom or on the side of a page no matter how many photos—from one to 16—appear on it. But full pages of photos can often speak—if not shout—for themselves. Plenty of people start out believing that captions will be necessary. But once they start typing “Billy doing a belly flop” or “Dad in repose,” they realize they’re just restating the obvious.
The Photo Essay theme contains page layouts that can hold 1–12 photos and has a variety of roomier caption areas. It also has a more serious feel to it, which is sure to please even the most discerning photographer.
You can also add map pages to either theme for custom cartography. (Remember all those photos you geotagged back in Chapter 4? There’s another benefit on the horizon.) There are 10 map options in the Picture Book theme and a whopping 16 in Photo Essay.
§ Journal. This theme pairs bordered photos with full-page beauties and includes a variety of captioning options. It has six different map layouts, with page designs that can accommodate up to 16 photos. You can choose among eight background colors, or use a photo as a page background.
§ Travel, Asian Travel, Old World Travel, Tropical Travel. These festive themes make your photos look like they’ve been taped into a scrapbook, usually at a slight angle to the page. Five color choices are available for a variety of textured backgrounds, along with 17 different map layouts. (The texturing is just an illusion—the paper is the same acid-free, shiny stuff of every iPhoto book; it’s just printed to look like it’s textured.) Captions are optional; if you want them, they’ll appear on strips that look like they’ve been ripped from a piece of stationery, jagged edges and all.
These themes are casual and friendly—not what you’d submit to National Geographic as your photographic portfolio, of course, but great as a cheerful memento of a trip.
§ Simple Border, Line Border, Texture Border. These three are all variations on (ahem) a theme. They differ only in the kind of border that appears around each photo. These themes are characterized by plenty of “white space” (margins around each photo and each page); crisp 90-degree lines (no photos cocked at an angle); and up to four photos per page with one map layout. A caption can appear at the bottom of each page, if you like. And for the page backgrounds, you can choose from five colors or an image.
§ Snapshots. This layout goes for that scrapbook-done-in-a-hurry look. All the photos (up to six per page) are slightly askew and often overlap. The photos all have white edges, as though they’re bordered prints from the 1970s. You can pick from six textured backgrounds or use an image instead.
§ Modern Lines. Each page can have up to four photos on it, with plenty of white margin, plus fine gray “modern lines” that separate the pictures. You can add a one-line caption to the bottom of each page, or leave the pages text-free. This theme gives you a choice of 12 background colors or an image.
§ Formal. Think “wedding” or “graduation.” When you order this book, the photos are printed to look like they’ve been mounted onto or inset into fancy album pages. For each page, you can choose a textured, gray or pale-blue background. Up to six photos can occupy a page, and you have one map layout option. You can also add a short caption to the bottom of each page.
§ Watercolor. “Watercolor,” in this case, refers to the page backgrounds, which contain gentle, textured, two-toned pastel colors (you get five color combo choices). You can have up to six photos “mounted” on a page either slightly askew, for an informal look, or neatly parallel to the page edges, with one map layout. Note, though, that this design doesn’t let you add captions, so you’ll have to let the pictures tell the story.
§ Contemporary. The page backgrounds are gray or textured white, the photos are all clean and square to the page, and captions (if you add any) appear in light gray, modern type. The maximum number of photos on a page is three, ensuring that they remain large enough to make a bold statement. Apple is clearly hoping you’ll choose only one maximum-impact photo per page; it offers you four different “white-space” treatments for one-photo pages.
§ Folio. This design is among the most powerful of the bunch, primarily because of the jet-black page backgrounds. (You can also choose a softly textured white.) It looks really cool and allows up to two photos per page, with one map layout.
This template must have been some designer’s pet project, because it’s the only one that offers special layout designs for a title page, an About page, and an explanatory-text page, all done up in great-looking fonts in white, gray, and black. Caption space is also provided.
§ Family Album. This theme makes it official: Apple has gone nuts with making printed pages look like scrapbook pages. In this design, photos look as though they’ve been affixed to the page using every conceivable method: using “photo corners,” taped into photo montages made up of 25 smaller images, licked like giant postage stamps with perforated edges, fastened by inserting their corners into little slits in the page, and even inserted into one of those school-photo binders with an oval opening so your charming face peers out. Up to six pictures can occupy a page, with one map layout; a page caption is optional. Background choices include white (softly textured), olive green, or an image.
§ Crayon. Here’s another design where the page backgrounds are printed to look like they’re textured. For each page, you can choose either a photos-mounted-askew layout or—get this—a straight layout in which each photo has a frame “drawn” around it with a crayon. And to keep with that Crayola-ish theme, you can choose from any of six background colors for each page.
You can place up to six photos on a page, with one map layout, and can include a caption at the bottom of each page.
The buttons in the bottom-left corner of the window let you choose the book’s size (as explained in the previous section, different sizes are available for different book types). Once you pick a size, the area below the buttons fills you in on the details of the options you’ve selected, including the maximum number of pages, dimensions, and price. The buttons near the bottom right of the window look like little sheets of paper; they let you pick the background color of your book (you can always change it later in the creation process).
Once you’ve settled on a theme for your book, your initial spate of decision-making is mercifully complete. Click Create.
Phase 3: Design the Pages
When you click Create, two things happen. First, a new item appears in your Source list under the Projects heading, representing the book layout you’re about to create. You can work with it as you would other kinds of Source-list items. For example, you rename it by clicking its existing name, file it in a folder by dragging it there, delete it by selecting it and pressing the Delete key on your keyboard, and so on.
NOTE
Books (and all other iPhoto projects) aren’t tied to the album from which they sprang (if you used an album as the basis for your project, that is). So rearranging or reassigning photos in the original album doesn’t wreak havoc with the project that’s associated with it.
Second, you see the miniature page-layout program shown in Figure 9-4, which displays thumbnails of the individual pages. This is called All Pages view because you can see all the pages in the project.
You’ve already selected photos and a theme. Now the most time-consuming phase begins: designing the individual pages.
NOTE
If you change themes after you’ve started designing pages, you’ll lose most or all of your customization when iPhoto flows your photos into the new theme. A workaround is to duplicate your original project before changing themes; to do that, Control-click it in the Source list and choose Duplicate. That way, you can safeguard your page-design work on the other theme in case you change your mind.
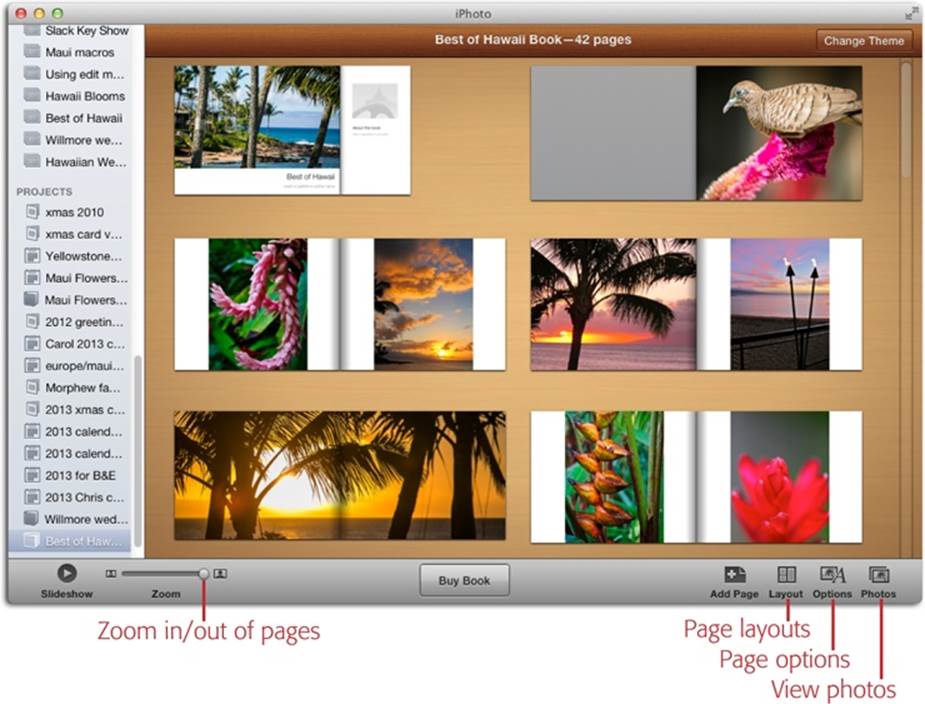
Figure 9-4. This is what iPhoto’s miniature page-layout program looks like in All Pages view. You can always swap themes—or even book type—by clicking Change Theme in the upper right. You can drag pages to reorder them, and use the Zoom slider to make the pages bigger or smaller. The options at the bottom right let you add pages, view different layout designs for each page, see page-specific options, or see all the photos you selected for your project.
You may be surprised to see your pages already filled with photos. iPhoto’s Autoflow feature automatically places your photos into the pages in the sequence you’ve set up; it also factors in Faces tags (it tries to center faces within frames) and ratings (Ratings). It’s a fast and easy way to lay out the pages of your book, but of course you may not agree with iPhoto’s choices. For example, the program may clump that prizewinning shot of you and Benedict Cumberbatch on the same page as three less-impressive photos.
Fortunately, you can always adjust the layout afterward, rearranging where necessary, as described on the following pages.
NOTE
If you want to place your pictures manually, you can clear iPhoto’s automatic placement by clicking Photos in the toolbar and choosing Clear Placed Photos. Now you’re free to place them however you wish, as discussed on Lay Out the Book.
Open a Page
In All Pages view, the first few miniature layouts represent the cover, the inside flap (for hardcover books), and an Introduction page. When you double-click one of the page thumbnails, a larger version of that two-page spread appears in the main editing area; this is called Single Page view. (To go back to viewing all your pages, click All Pages at the top left of the photo-viewing area or press ⌘-![]() .)
.)
In either view, when you click Photos in the toolbar, a panel opens on the right side of your screen that contains the photos you’ve selected for inclusion in your project (Figure 9-5). A checkmark on a thumbnail indicates that either you or iPhoto has placed that photo onto one of your pages.
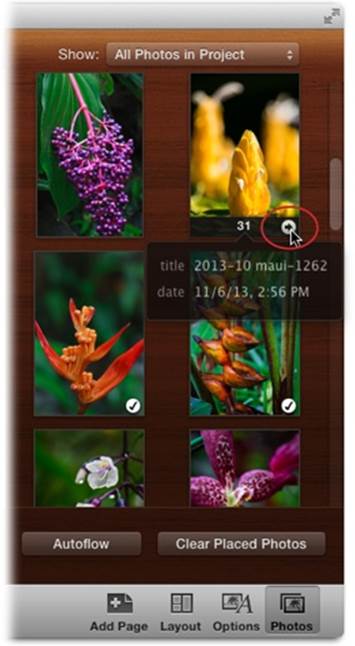
Figure 9-5. The Photos panel shows you the pictures in your project. You can use the Show pop-up menu at the top to switch between viewing all the photos in your project, only the ones that have been placed on a page, unplaced photos, or the photos in one of the Recent items in your Source list, like the last-viewed Event, Last Import, and so on. A checkmark on a thumbnail indicates that the photo is already in your book. If you point to a thumbnail, iPhoto displays a little number at the bottom indicating what page(s) it lives on. To visit that page, click the arrow to its right (circled). You can’t change the arrangement of photo thumbnails in the Photos panel. If you want your photos to appear in an order other than chronological, create an album and reorder the photos there before starting your book project.
Choose a Page Layout
If you flip through the page thumbnails, you can see that iPhoto has cheerfully suggested varying the number of photos per page. Depending on the theme, you may see two on the first page, a big bold one on the next, a set of four on the next, and so on.
If you approve of these photos-per-page proposals, great. You can go to work choosing which photos to put on each page, as described in the next section.
Sooner or later, though, there will come a time when you want three related photos to appear on a page that currently holds only two. That’s the purpose of the Layout panel shown in Figure 9-6, which shows you the different page layouts that can fit the number of photos you pick.
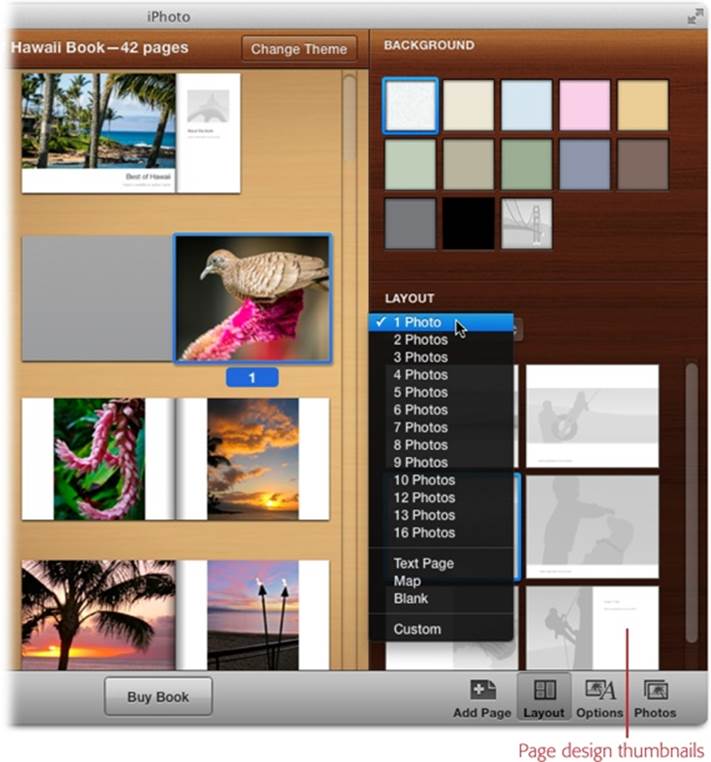
Figure 9-6. Top: Click a page in All Pages view, and then click Layout in the toolbar to reveal the panel shown here, which lets you specify the background color for certain pages (front and back cover, flaps, and pages that allow captions), and how many photos you want on the selected page. The Layout section changes to show you the different page designs for the quantity of photos you pick. Both the number of photos and page designs change according to the page type you’ve chosen on the left. (You get fewer options for specialized page types like Cover, Flaps, Maps, and Text Pages.)
NOTE
After you double-click a page to enter Single Page view—and before you’ve clicked to select a photo on the page—a little pop-up menu appears above the page preview that lets you switch layouts and backgrounds without opening the Layout panel. If this menu disappears, you can summon it by clicking the number displayed beneath each page.
The first page in your book is the cover, which offers fewer options in the Layout panel than most other page types. For a hardcover book, the cover appears on the glossy dust jacket and the cover of the actual book (yep, the book’s cover is actually a reprint of the dust jacket). You have a choice of six cover layouts that include one to four photos. For example, you’re usually offered a choice of one huge photo (and no text), a big photo with a title beneath, four smaller photos plus a title, and so on.
For the rest of your pages, the Layout menu gives you design choices aplenty:
§ 1 Photo, 2 Photos, 3 Photos… These items let you specify how many photos appear on the selected page. iPhoto automatically arranges the photos according to its own sense of symmetry. (Some themes offer up to 16 photos per page.) Use these options to create a pleasing overall layout for the book and to give it variety. Follow a page that contains one big photo with a page of four smaller ones, for example.
You can also use these options to fit the number of photos you have to the length of your book. If you have lots of pictures and don’t want to go over the 20-page minimum, then choose higher picture counts for most pages. Conversely, if iPhoto warns you that you have blank pages at the end of your book, then spread your photos out by putting just one or two on some pages.
§ Text Page. Satisfy your inner author by adding a Text Page to your book. In most themes, this special page design (which used to be named Introduction) has no photos at all. It’s just a big set of text boxes that you can type (or paste) into. This is where you can let the audience know about the trip, the company, or the family; tell the story behind the book; praise the book’s lucky recipient; scare off intellectual-property thieves with impressive-sounding copyright notices; and so on.
TIP
A Text Page doesn’t have to be the first page of the book after the cover—you can turn any page into a Text Page. Such pages make terrific section dividers. They’re especially useful in designs where no text accompanies the photos, where they can set the scene and explain the following pages of pictures.
§ Map. Although the Travel themes go to town with map styles, you can add an actual map page to any theme. (A map can’t be on a book’s cover or dust jacket, however.) Your photos don’t need to have location info embedded in them if you want to add a map, but if you’ve got geotagged photos in the mix, the map page automatically displays that area of the world.
You can fine-tune your map in a variety of ways, like dragging the map image around within the page until it shows the area you want. And you can summon lots of design options by double-clicking the map to open the Options panel. At the top of the map, a slider appears that lets you adjust the size of the area on display, and you can use the Option panel’s Location section to plot additional places, as shown in Figure 9-7.
TIP
Maps are a great way to illustrate the route you took on a cross-country trip or multi-destination vacation. To add Indiana Jones–style lines linking each location on the journey, choose Curved from the Option panel’s Line pop-up menu. iPhoto links the locations in the order they appear in the panel’s Places list, so to change the lines connecting each place, drag the location names to the correct spot on the list.
The various checkboxes let you show or hide titles and text, display location names, enhance the map’s look with textures and shadows, and even display a compass on the page. Control-click the map to get a shortcut menu with even more options, such as highlighting the region with a soft white glow and color change (visible in Figure 9-7), as well as centering the map on the Places info you enter in the panel’s Location section. If you want to start over, choose Restore Default Map in the shortcut menu.
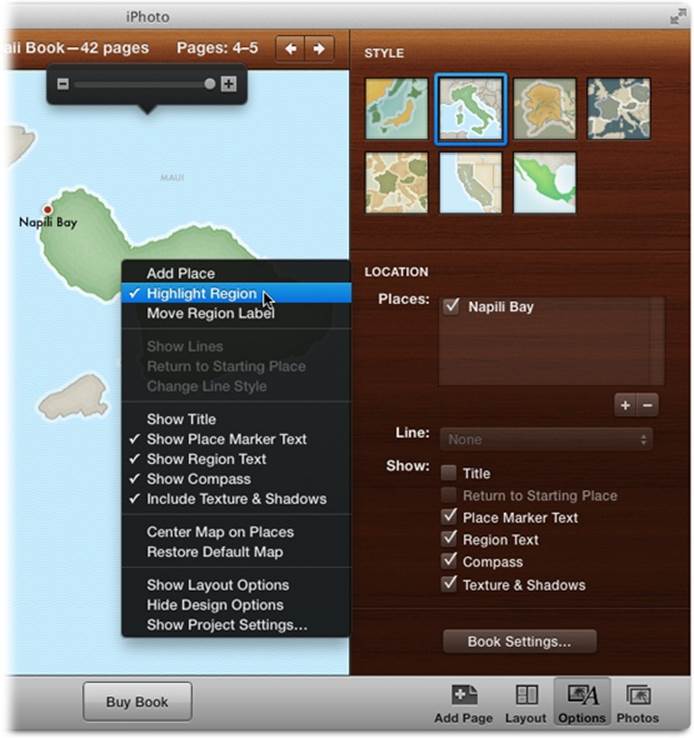
Figure 9-7. After adding a Map page, the customizing fun begins. In All Pages view, double-click the map page to enter Single Page view, and then double-click the map again to open the Options panel shown here. You can choose from a variety of map styles at the top of the panel and plot new points by clicking the + sign in the Places list. (To delete a location, select it and then click the – sign.) Control-clicking the map summons the shortcut menu shown here.
§ Spread. This absolutely gorgeous layout spreads your photos across two full pages in a variety of designs (one choice even makes a single photo fill both pages). It’s a great way to showcase your most beautiful pictures, and to break up pages that include captions. You can add text, though that can make iPhoto shrink your photos.
§ Blank. Here’s another way to separate sections of your book: Use an empty page. Well, empty of pictures, anyway; most of the themes offer different “looks” for a blank page, such as a choice of color, simulated page texture, or background image (the latter could even be your logo).
TIP
When choosing layouts, keep in mind that the book is published horizontally, in landscape mode. On pages with only one photo, a horizontal shot looks best, since it’ll fill the page edge to edge. On pages with two photos, two vertical (portrait-mode) shots look best; they’ll appear side by side, filling the page top to bottom.
Once you’ve chosen how many photos you want on a page, iPhoto displays thumbnail representations of the page designs available to you (labeled in Figure 9-6). If you choose 3 Photos, for example, the thumbnails offer you a few different arrangements of those three photos—big one on top, two down the side, or whatever. Click one to select it.
Lay Out the Book
The key to understanding iPhoto’s book-layout mode is realizing that pages and photos are draggable. Dragging is the key to all kinds of book-design fun. In fact, between dragging photos and using a handful of menu commands, you can perform every conceivable kind of photo- and page-manipulation trick imaginable.
NOTE
The view you’re in determines what’s draggable. For example, in All Pages view, you can drag the pages themselves—left, right, up, or down—to rearrange them. In Single Page view, you can drag photos—between pages or from the Photos panel onto a page. (To enter Single Page view, double-click a page.)
Ways to Manipulate Photos
iPhoto’s book-layout mode is crawling with tricks that let you move photos around, add them to pages, remove them, and so on. Once you double-click a page to enter Single Page view, you can move photos around in the following ways:
§ Enlarge a picture by clicking it. A tiny Zoom slider appears above the photo, which you can use to magnify the picture within its frame (Figure 9-8, top). This trick is helpful when you want to call attention to part of the photo, or to crop a photo for book-layout purposes without actually editing the original.
TIP
You may be pleasantly surprised to discover that iPhoto does a fairly smart job of placing photos within their frames when you zoom in. That’s face recognition at work—it tries to avoid lopping off parts of people’s heads.
FREQUENTLY ASKED QUESTION: RECYCLING PHOTOS
I want to use my cover photo as one of the pages in the book, just like they do in real coffee-table books. How do I do that?
Easy. iPhoto lets you use a single photo on as many different book pages as you like.
In other words, just because a thumbnail has a checkmark on it (meaning that you’ve already used it) doesn’t mean you can’t use it again. In fact, you absolutely should repeat a photo that appears on the cover of your book, or on one of the dust jacket’s flaps. Simply add the photo to all the desired pages just like you’d add an unplaced image: Drag it from the Photos panel into the spot where you want to use it. No big deal.
§ Swap two photos on the same page (or two-page spread) by dragging one directly on top of the other (the picture you’re dragging sprouts a blue border). When you let go of the mouse button, the two pictures swap places (see Figure 9-8, middle and bottom).
§ Move a photo to a different page of the book by dragging it from one page onto another.
§ Swap in a photo by dragging it out of the Photos panel and onto a photo that’s already on a page.
§ Add a photo to a page by dragging it from the Photos panel onto a blank spot of the page. iPhoto automatically increases the number of photos on that page, even changing the Layout pop-up menu to match.
NOTE
You can’t use this technique to create a layout that doesn’t exist. For example, if there are three photos on a page and you add a fourth, iPhoto switches to the next available layout in your theme, which might be one with six photos.
§ Remove a photo from a page by clicking it and then pressing the Delete key on your keyboard. In the Photos panel, the checkmark on the photo’s thumbnail disappears (if that was the only page it existed on).
§ Remove a photo from the book altogether by clicking its thumbnail in the Photos panel and then pressing the Delete key. It disappears from the Photos panel (and thus your project), but it’s still in your library.
§ Change how photos are stacked by Control-clicking an image and, from the shortcut menu, choosing “Move to Front” or “Send to Back.” Of course, this works only on page designs that have overlapping photo frames (such as Tropical Travel and Snapshots).
§ Add a border or effect to a photo by double-clicking the photo in Single Page view to open the Options panel shown in Figure 9-9. (You can also click Options in the toolbar.) A variety of border styles appear at the top of the panel. These vary according to your theme. For more on borders, skip ahead to Layout Strategies.
You can add a creative color treatment to your photo by clicking one of the thumbnails in the Options panel’s Effects section. Your choices include B & W (black and white), Sepia (brown tint), Antique (for a slightly faded, vintage look), and Original (removes any effects you’ve added previously). None of these effects alter the original photo. You can edit the same photos in different ways in every single book or project—all without touching the originals.
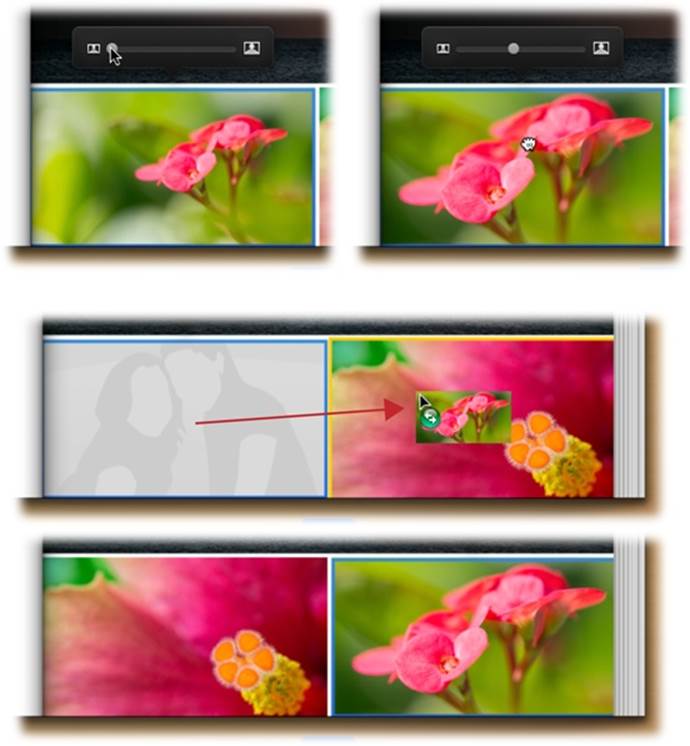
Figure 9-8. Top: Click a photo to make its Zoom slider appear (the blue border lets you know the photo is selected); drag the slider to enlarge the photo within its frame (left). Once you’ve enlarged a photo, you can drag it to adjust its position within its frame; your cursor turns into a tiny hand (right). Middle: To swap photos, click and drag one photo atop another. The photo you’re dragging disappears from its frame and appears as a miniature beneath your cursor. Bottom: When you release your mouse button, the two photos swap places.
§ Edit a photo by Control-clicking it and choosing Edit Photo from the shortcut menu. In a flash, iPhoto’s book-layout mode disappears, and you find yourself in Edit view (Chapter 5). When you’re finished editing, click the button at the top left of the editing window that’s labeled with the name of your book project (for example, “Best of Hawaii”). Poof! You return to book-layout mode, with your changes intact.
NOTE
Unlike effects you apply from the Options panel, the changes you make in Edit view do affect the original photo.
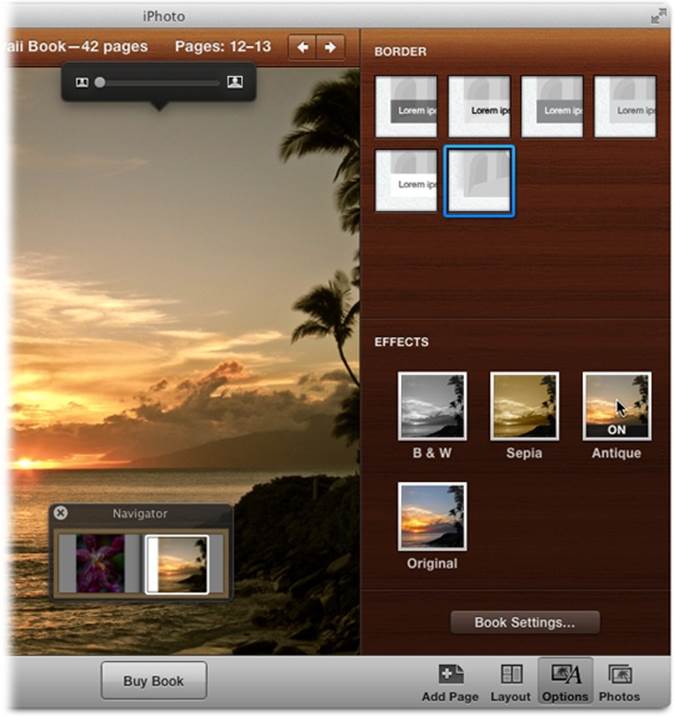
Figure 9-9. Double-click a photo in Single Page view to open the Options panel shown here (clicking Options in the toolbar works, too). The icons at the top of the panel let you add a border to your photo; you can add text to this border, if you like (see page 247). The buttons in the Effects section let you add treatments to the photo: Click an effect once to apply it; click it again to remove it. The Antique effect is applied in this example. You can use the Navigator panel (shown here at bottom left) to move around within a single page while you’re zoomed in.
Adding Pictures to the Project
To add pictures to the Photos panel, you have to add them to your book project. This means temporarily leaving your project by choosing another item in the Source list. For example, you can click any Event, album, smart album, or slideshow to see what photos are inside—and then drag the good ones onto your book’s icon in the Source list to add them to your project.
Alternatively, you can select some photos and then click Add To in iPhoto’s toolbar. In the menu that appears, click Book, and then click the project you want to add the pictures to.
Once the new photos arrive in the Photos panel, you can drag them onto individual pages as described in the previous section.
Manipulating Pages
Photos aren’t the only ones having all the customization fun. In All Pages view, you can rearrange, add, and remove the pages themselves; just click the All Pages button near the top left of your window or press ⌘-![]() . Then use these techniques:
. Then use these techniques:
§ Move pages around within the book by dragging their thumbnails horizontally in the photo-viewing area (see Figure 9-10). Shift- or ⌘-click to select multiple pages. (If you click a two-page spread that has a single photo that covers both pages, iPhoto automatically selects them both.)
TIP
It’s often easier to decide on page order after you’ve perfected the individual pages in your book.
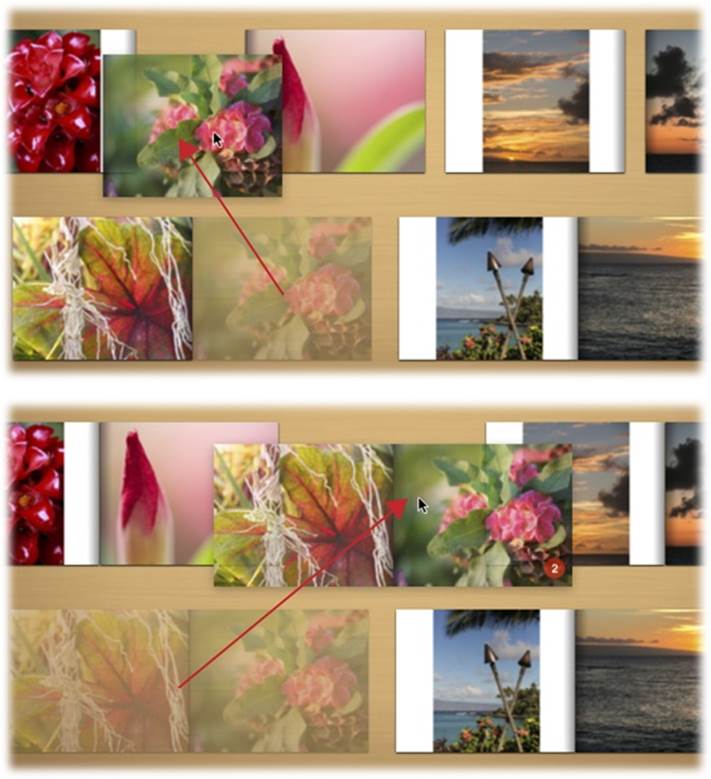
Figure 9-10. Top: All Pages view lets you rearrange the pages in your book however you want. In this example, one page is being dragged onto a two-page spread. Notice how iPhoto breaks apart the pages of the destination spread you’re pointing to in order to make room for the new one. Bottom: To select multiple pages, Shift- or c-click them, and then drag the pages wherever you want. When you move two or more pages, iPhoto makes room between the spreads to accommodate the ones you’re moving.
§ Remove a page from the book by clicking its icon and then pressing the Delete key. iPhoto asks if you’re sure you know what you’re doing, as Figure 9-11 (top) shows. (The minimum number of pages you can have in a book is 20.)
Note that removing a page never removes any pictures from the book project. You’re just removing the checkmark from that photo’s thumbnail in the Photos panel because it’s not used on a page anymore. However, removing a page does vaporize any captions you’ve typed in (so you might want to copy and paste them into a text document first).
§ Insert a new page into the book by clicking Add Page in the toolbar, or by Control-clicking a page and choosing Add Page from the shortcut menu. Before you go nuts adding pages, though, note that iPhoto inserts the new page after the currently selected page. So it’s helpful to begin by first clicking the desired page thumbnail in All Pages view, as shown in Figure 9-11 (bottom).
§ Change project (book) settings by clicking Options in the toolbar and then clicking Book Settings, or by Control-clicking a page and choosing Show Project Settings. In the resulting window, you can turn off Auto-layout pages, wherein iPhoto tries to factor in things like orientation when autoflowing pictures onto your pages. You can also turn off the Apple logo that’s automatically included on the last page of your book.
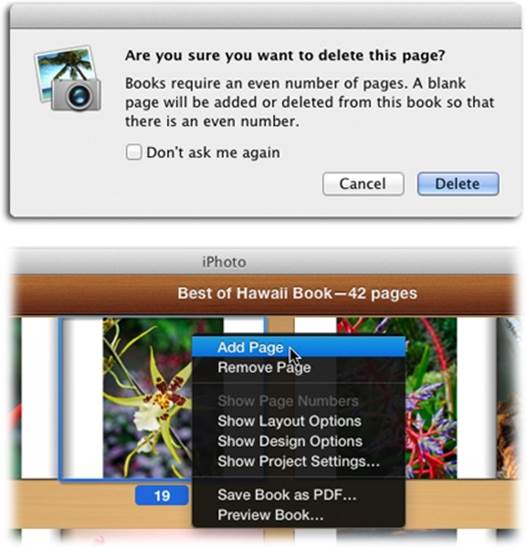
Figure 9-11. Top: iPhoto lets you delete as many pages as you want en masse; however, books require an even number of pages. So if you delete a page and end up with an odd number instead, iPhoto will add a blank page automatically to restore its even-numbered balance. Bottom: You can Control-click any page and, from the shortcut menu, choose Add Page or Remove Page. This menu also reveals other goodies like the ability to access project settings (described above), save the book as a PDF (page 257), or preview what the book will look like should you choose to order it (page 255).
Layout Strategies
Sometimes chronological order is the natural sequence for your photos, especially for memento books of trips, parties, weddings, and so on. Of course, nothing is stopping you from cheating a bit—rearranging certain scenes, say—for greater impact and variety.
As you drag your pictures into order, consider these effects:
§ Intersperse group shots with solo portraits, scenery with people shots, or vertical photos with horizontal ones.
§ On multiple-photo pages, exploit the direction your subjects face. On a three-picture page, for example, you could arrange the people in the photos so that they’re all looking roughly toward the center of the page, for a feeling of inclusion. You might put a father looking up toward a shot of his son, or siblings back-to-back facing outward, signifying competition.
§ Group similar shots together on a page.
Backgrounds and Borders
Some themes let you choose the background color of the pages, and others let you tweak photo or caption borders. You can change these design details by using the Layout and Options panels.
Backgrounds can be changed in either All Pages or Single Page view. Just select the page(s) you want to change and then click Layout in the toolbar. Any background options appear at the top of the Layout panel. Depending on the theme, you may have two choices (like black or white), or you may have a half-dozen (a range of pastels, say). Most intriguingly, you can use one of your photos as a background, and then adjust its transparency so that it forms a faded image behind the other photos (see the box on Creating Pro-Level Books for creative background ideas). Sunsets, sandy beaches, cobblestones, and so on can work well as backgrounds. Figure 9-12 has the details.
Borders, on the other hand, are editable only while you’re in Single Page view. Once you’ve double-clicked a page to enter Single Page view, click to select the photo (or text field) whose border you want to change, and then click Options in the toolbar. An array of border choices appear at the top right; your choices vary widely, as Figure 9-13 shows, and depend on which theme you’re using. Click one of the thumbnails to apply that border to the selected item.
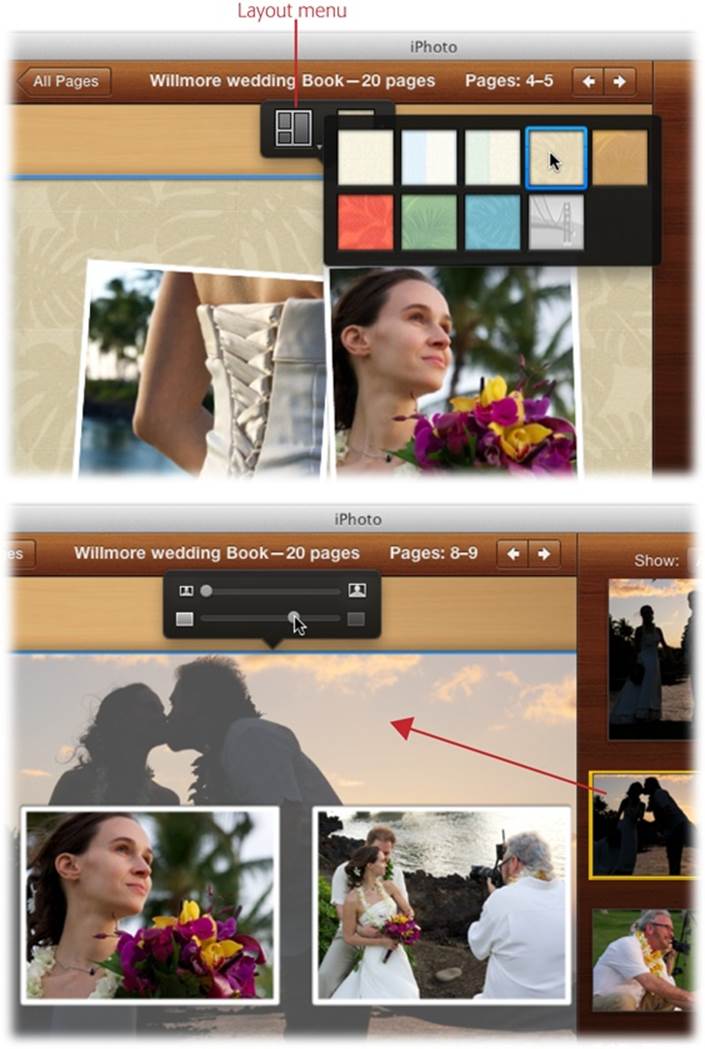
Figure 9-12. Top: In Single Page view, click the page number beneath any page to select the page and summon a Layout pop-up menu (labeled here). It lets you pick the number of photos per page and a design layout, and gives you quick access to available background choices (but not borders). Bottom: To use a picture as a backdrop, choose the last background option (the one with the Golden Gate Bridge on it) and then, with the Photos panel open, drag your picture onto the page’s background. The controls shown here appear automatically. Use the top slider to adjust the background photo’s zoom level, and the bottom slider to change its transparency (drag left to make it more see-through). The idea is that a background photo should be fainter and subtler than the foreground shots. If you really want to get creative, try using the same picture for both the background and the foreground. By enlarging the background shot and decreasing its transparency, you can create some neat effects.
Fitting Photos to Frames
iPhoto’s design templates operate on the simple premise that all of your photos have a 4:3 aspect ratio. That is, the long and short sides of the photo are in four-to-three proportion (four inches by three inches, for example).
In most cases, that’s what you already have, since those are the standard proportions of typical digital photos. If all your pictures are in 4:3 (or 3:4) proportion, they’ll fit neatly and beautifully into the page-layout slots iPhoto provides for them.
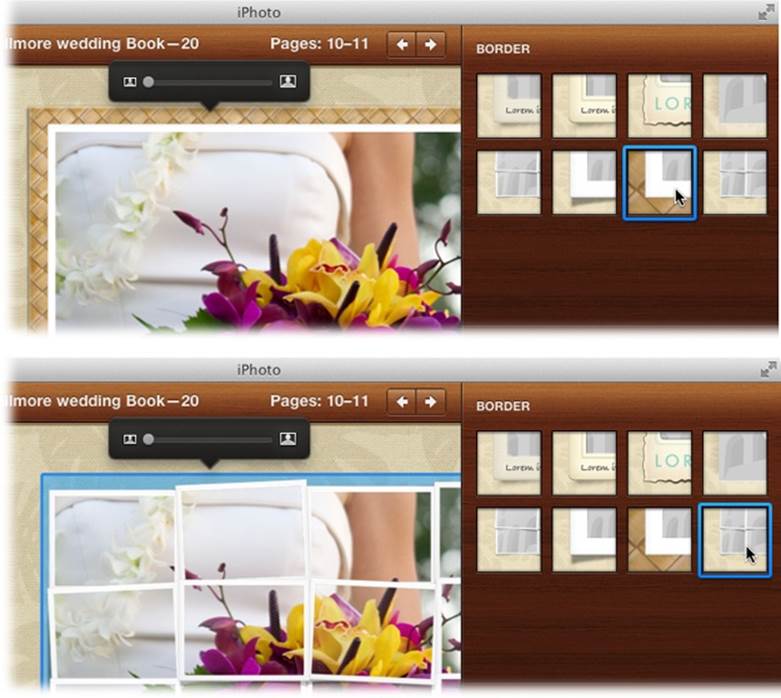
Figure 9-13. As you can see here, changing a photo’s border makes a big difference in the overall look of the page. A woven border is shown in the top image, while a photo mosaic is shown in the bottom one. (Tropical Travel book design theme was used in this example). Border choices with the placeholder text “lorem ipsum” include a text field that you can use for captioning. If you don’t see any border choices in the Options panel, then you probably don’t have anything selected. Also, some themes have way more choices than others.
But not all photos have a 4:3 ratio. You may have cropped a photo into some other shape. Or you may have a camera that can take pictures in 16:9 ratio (like a high-definition TV screen), or the more traditional 3:2 film dimension, which work better as 4 x 6-inch prints.
When these photos land in one of iPhoto’s page designs, the program tries to save you the humiliation of misaligned photos. Rather than leave unsightly strips of white along certain edges (therefore producing photos that aren’t aligned with one another), iPhoto automatically enlarges oddly cropped photos so they perfectly fill the 4:3 space allotted to them. Unfortunately, this solution isn’t always ideal. Sometimes, iPhoto lops off an important part of the picture in the process.
In that case, you have two alternatives. First, you can use the “Fit Photo to Frame Size” command shown in Figure 9-14. Second, you can crop your non-4:3 photos using the Constrain pop-up menu (How to Crop a Photo) set to “4 x 3 (Book).” This way, you get to decide which parts of the photo get lopped off. (Or just use the adjustment technique shown at the top of Figure 9-8.)
Page Limits
iPhoto books can have anywhere from 20 to 100 double-sided pages (in other words, 10 to 50 actual sheets of paper between the covers). Of course, if you have more than 100 pages’ worth of pictures, there’s nothing to stop you from creating multiple books. (Our Trip to East Texas, Vol. XI, anyone?)
Hiding and Formatting Page Numbers
Don’t be alarmed if iPhoto puts page numbers on the corners of your book pages—that’s strictly a function of the theme you’ve chosen (some have numbering, some don’t). In any case, you never have to worry about a page number winding up superimposed on one of your pictures. A picturealways takes priority, covering up the page number.
Even so, if your theme puts numbers on your pages and you feel that they’re intruding on the mood your book creates, you can eliminate them. You can also change their formatting.
POWER USERS’ CLINIC: CREATING PRO-LEVEL BOOKS
While iPhoto may seem like a tool for dabblers and hobbyists, opportunities abound for more pro-level uses, especially when creating book projects. Here are a couple of ideas for taking your book project to the next level:
Custom backgrounds. The ability to use a photo as a background gives you all manner of creative options. Try shooting your own textures with this use in mind. For example, if you like nature photography, you could take a close-up shot of rocks, grass, or tree bark and use that as a background. If you’re creating a book of your kids’ favorite sport, take a picture of the soccer ball, ballet shoes, or dirt bike and use that as a background on some pages.
If you’re a fine artist and paint on a specific medium (canvas, velvet, water-color paper, or whatever), you could take a close-up shot of that texture for use in a book that showcases your work. The possibilities are limited only by your imagination.
Branded intro or outro page. Let’s say you use iPhoto for organizing and processing personal stuff, but you also use Adobe Photoshop or Photoshop Elements for more serious projects. While you can make photo books in Photoshop Elements, it’s not a particularly pleasant process, and Photoshop won’t let you do it at all. (Adobe Photoshop Lightroom is a great alternative, but it has a $150 price tag.)
An easy solution is to save JPEGs of your masterpieces in the other program, and then import them into iPhoto and create your book there. You can even create branded logo pages in the other program and then import them into iPhoto for use as the first or last page of your book.
For example, if you’re creating an 11 x 8.5-inch book, create a new document in Photoshop or Elements that’s the same size, and then design it to include your logo and contact info. Since iPhoto doesn’t support transparency (see-through areas), you’ll need to think about what color background you want your logo to appear on and include that in the Photoshop document, too. Heck, you could even create testimonial pages in Photoshop, with a few words from adoring fans, and import those into iPhoto to sprinkle throughout your book.
And that’s not all. You can use the process described above to design a custom background image that includes your logo. To keep the logo from being distracting, put it at the bottom of the page in a small size, or position the logo so it hangs off a page’s edge, making a portion of it visible. Back in iPhoto, use its background opacity control (Fitting Photos to Frames) to keep the logo subtle.
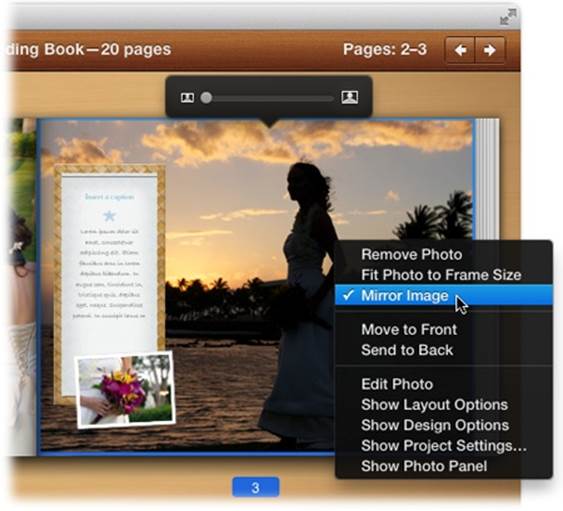
Figure 9-14. Control-click a photo in Single Page view and you get this handy shortcut menu. Not only can you use it to keep iPhoto from blowing up your photo so it fills the frame (by choosing “Fit Photo to Frame Size”), but you can also use it to flip a photo horizontally. iPhoto calls this trick “mirroring.” For example, in the original shot of this bride, she was on the left side of the photo, facing right. By choosing Mirror Image, iPhoto flips the photo so she’s on the right side instead, and facing left toward the book’s spine.
In All Pages or Single Page view, click Options in iPhoto’s toolbar, and then click Book Settings. You’ll see a “Show page numbers” setting that you can turn off. If you leave it on, you can change the way the page numbers look by using the first pop-up menu to change the font and the menu beneath it to adjust style (bold, italic, and so on). The numeric field lets you change the font size (use the up/down arrows or enter a new number in the field).
TIP
You can also Control-click anywhere in the photo-viewing area of All Pages view and, from the shortcut menu, choose Show Page Numbers to turn them on or off.
Phase 4: Edit the Titles and Captions
Depending on the theme and page-layout templates you’ve chosen, iPhoto may offer you any of several kinds of text boxes that you can fill with titles, explanations, and captions by typing or pasting text you’ve copied from somewhere else (Figure 9-15):
§ The book’s title. This box appears on the book’s cover. If it’s a hardbound book, it appears on the dust jacket (described next), too. When you first create a book, iPhoto proposes the album’s name as the book name, but you’re welcome to change it.
A second text box, set with slightly smaller type formatting, appears below the title. Use it for a subtitle: the date, “A Trip Down Memory Lane,” “Happy Birthday, Aunt Casey,” or whatever.
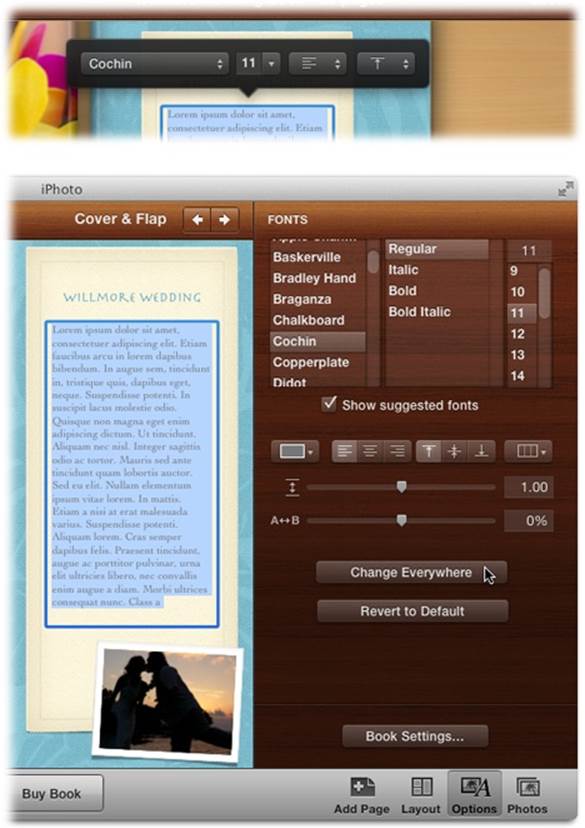
Figure 9-15. Top: As soon as you click some text, this pop-up menu of fonts, sizes, and alignment controls appears. Bottom: For more formatting power, click Options in your toolbar to open the Fonts panel, where you have a full arsenal of typographic controls. You can even alter the text’s alignment. To make your changes affect all the text in the book, click Change Everywhere. If your text doesn’t fit within a text box, iPhoto alerts you of impending doom by displaying a red triangle with an exclamation point inside. Either whittle down your text or reformat it so it fits.
§ The dust jacket. If you order a hardbound book, you’ve got that glossy dust jacket to consider. You can type up marketing blather or other descriptive material to appear on the inside front cover flap, just like on a book at Barnes & Noble. You’re also allowed a couple of lines of text on the back cover.
§ Captions. Apple really, really doesn’t want you adding a caption to each photo. Every theme lets you caption an entire page, but only the Folio theme lets you caption each photo—and it limits you to two photos per page, max. That said, some themes have border options that let you include text (Layout Strategies).
§ Text Page, About, Contact. Most themes let you add Text Pages, which are striking, simple, title-plus-text-block affairs that let you describe the book, chapter, or photo grouping. And the Folio theme—which is intended as a showcase for photographers to display their best work—offers two additional Text Page options: The About layout offers a text box as well as a big title and a subtitle. The Contact layout includes places to list your phone number, website, email address, and so on—along with the contact info for your agent.
Editing Text
In general, editing text on your book pages is mercifully straightforward. First, open a page in Single Page view, and then do the following:
§ Click inside a text box to place the insertion-point cursor in it so you can begin typing. Use the Zoom slider in the toolbar to zoom in on the page so the type is large enough to see and edit. Click outside a text box—on another part of the page, for example—when you’re finished.
§ Highlight some text and then use the Edit menu’s Cut, Copy, and Paste commands to transfer text from box to box. (You may find it easier to compose the text in a word processor where you can save it, copy it, and then paste it into iPhoto.)
§ You can move highlighted text within a text box by dragging it and dropping it. The trick is to hold down the mouse button for a moment before dragging. Add the Option key to make a copy of the selected text instead of moving it.
§ Double-click a word, or triple-click a paragraph, to select it.
§ Press Control-![]() or Control-
or Control-![]() to make the insertion point jump to the beginning or end of the current line.
to make the insertion point jump to the beginning or end of the current line.
§ To make typographically proper quotation marks (curly like “this” instead of straight like “this”), press Option-[ and Shift-Option-[, respectively. And to make a true long dash—like this—instead of two hyphens, press Shift-Option-hyphen.
Check Your Spelling
Taking the time to perfect your book’s text is extremely important. A misspelling or typo you make here will haunt you—and amuse the book’s recipient—forever.
You can ask iPhoto to check your spelling in several ways:
§ Show spelling and grammar. Perhaps the safest way to ensure that your book doesn’t include embarrassing spelling or grammatical mistakes is to click inside a text block or highlight some text, and then choose Edit→Spelling→“Show Spelling and Grammar” (or Control-click the text box and choose the same command from the resulting shortcut menu). OS X’s standard “Spelling and Grammar” dialog box appears, which lets you fix or ignore potential problems. This command’s keyboard shortcut is ⌘-colon (:).
§ Check spelling. This command does exactly the same thing, though without checking grammar (and without the dialog box). Click inside a text block or highlight some text, and then choose Edit→Spelling→Check Spelling (or press ⌘-semicolon). If the word is misspelled, in iPhoto’s opinion, then a red dotted line appears under it. Proceed as shown in Figure 9-16.
§ Check as you type. The trouble with the spelling commands described above is that they operate on only one text block at a time. So to check your entire photo book, you have to click inside each title or caption and invoke the spelling command again—there’s no way to have iPhoto sweep through your entire book at once.
Fortunately, the Edit→Spelling→Check Spelling While Typing command is turned on straight from the factory. It makes iPhoto flag words it doesn’t recognize as you type them.
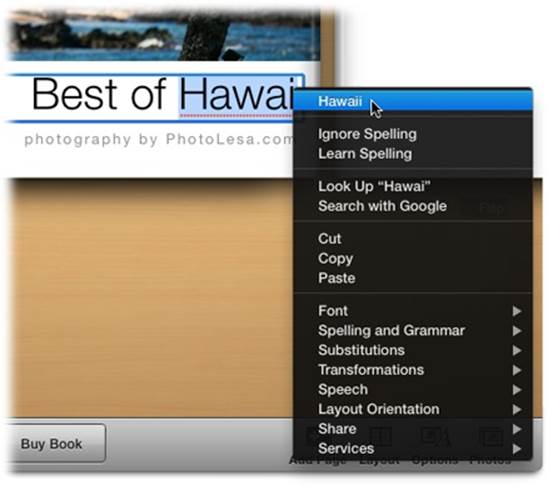
Figure 9-16. Control-click any word that’s underlined with a red dotted line. If the resulting shortcut menu contains the correct spelling, choose it. If the word is fine as is, click either Ignore Spelling (“Stop underlining this, iPhoto. It’s a word I want spelled this way, so let’s move on”) or Learn Spelling (“This name or word is not only correctly spelled, but it’s also one that I may use again. Add it to my OS X dictionary so you’ll never flag it again.”). As you can see, this menu is chock-full of useful options!
Sure enough, whenever you type a word that’s not in iPhoto’s dictionary, iPhoto adds a dashed red underline. (Technically, it underlines any word not in the OS X dictionary, since you’re actually using the standard OS X spell checker—the same one that watches over you in OS X’s Mail program, for example.)
To correct a misspelling that iPhoto has found in this way, Control-click it and proceed as shown in Figure 9-16.
§ Check grammar with spelling. This feature is an automatic version of the first item in this list. If iPhoto thinks you’ve made a spelling or grammatical mistake, it underlines the offending word(s) or phrase(s) in red. To turn it on, choose Edit→Spelling→Check Grammar With Spelling.
§ Correct spelling automatically. This option lets iPhoto fix your mistakes automatically. If you harbor an enormous amount of trust in the program’s dictionary, take a deep breath and choose Edit→Spelling→Correct Spelling Automatically.
Listen to Your Book
Unfortunately, even a spell checker won’t find missing words or really awkward writing. For those situations, what you really want is for iPhoto to read your text boxes aloud to you.
No problem: Just highlight some text and then Control-click the highlighted area. The shortcut menu shown in Figure 9-16 appears, containing the Speech submenu. From it, you can choose Start Speaking and Stop Speaking, which makes iPhoto start and stop reading the selected text aloud. It uses whatever voice you’ve selected in ![]() →System Preferences→Dictation & Speech.
→System Preferences→Dictation & Speech.
Phase 5: Preview Your Masterpiece
Ordering a professionally bound book is, needless to say, quite a commitment. Before blowing a bunch of money on a one-shot deal, you’d be wise to proofread and inspect it from every possible angle.
Print It
As any proofreader can tell you, looking over a book on paper is a sure way to discover errors that somehow elude detection onscreen. That’s why it’s a smart idea to print out your own, low-tech edition of your book at home before beaming it to Apple’s bindery.
While you’re in Book mode, choose File→Print to launch the standard OS X Print dialog box; fire up your printer and click Print. The result may not be wire-bound and printed on acid-free paper, but it’s a tantalizing preview of the real thing—and a convenient way to give the book one final look.
Slideshow It
Here’s a feature that might not seem to make much sense at first: After you’re finished designing a book, you can play it as a slideshow. Just click Slideshow in iPhoto’s toolbar; your screen goes black. Depending on the complexity of your book’s layout, it may take iPhoto a minute or two to compose itself and generate the slideshow.
Once the show starts in glorious full-screen mode, it uses the Classic slideshow theme (Using iPhoto’s Mail Command). To change the music or transitions, wiggle your mouse to display the mini toolbar and then click the Music or Settings icons. When you’re satisfied, the show kicks in, displaying the cover of your book before moving on to each individual page, one at a time, though you can also flip through the pages manually using your keyboard’s left and right arrow keys. (This is probably one of the easier ways to get a book turned into a movie.)
Viewing your book as a slideshow is primarily a proofreading technique. It presents each page at life size (or even larger than life) without the distractions of menus or other iPhoto window elements, so you can get one last, loving look before you place your order.
But book slideshows are also kind of cool for another reason: They present a more varied look at your photos than a regular slideshow. That is, your photos appear in page groupings, with captions, layouts, and backgrounds that there’d otherwise be no way to create in a slideshow.
You’ve almost certainly encountered PDF (Portable Document Format) files before. Many a software manual, Read Me file, and downloadable “white paper” come in this format. When you create a PDF document and send it to a friend, it looks exactly the same on the recipient’s screen as it did on yours, complete with the same fonts, colors, page design, and other elements. Your friend gets to see all of this even if he doesn’t have the fonts or the program you used to create the document. PDF files open on Mac, Windows, and even Linux machines—and you can even search the text inside them.
MEMORY LANE: GOODBYE, YELLOW EXCLAMATION POINTS
As you worked on your project designs in early versions of iPhoto (iPhoto ’09 and prior), you may have encountered dreaded yellow triangle exclamation points. They appeared on photos or individual pages of your book or calendar when photos didn’t have enough resolution to reproduce well in the finished book.
But these days, the only place you’ll spot a yellow triangle warning is on the order screen when you’re purchasing prints (shown on Ordering Prints Online).
Apple says that its photo-enlargement technology has gotten so good, your pictures will look fabulous regardless of their resolution. Plus, Apple figures you’re shooting with a camera that’s at least 3 megapixels (which includes the vintage iPhone 3GS), so you’ll have enough pixels to produce a nice print. (A 3-megapixel device can produce a high-quality 8 x 10-inch print, and a decent 10 x 13-inch print.)
Bottom line: Unless you’re using photos that you’ve snatched from the Web or received in an email—at a greatly reduced size—you don’t have anything to worry about.
That said, if a photo looks blurry after you place it in your project, it’ll print blurry, too (Apple’s photo-enlargement technology can’t work miracles). In that case, the easiest solution is to shrink the photo. And the simplest way to do that is to increase the number of pictures on that page. Or, if your page design has places that hold both large and small photos, drag the problem photo onto one of the smaller frames to swap it with a larger photo.
If that doesn’t work, then your only options are to eliminate the photo from your book or to cross your fingers and order the book anyway.
Turn It into a PDF File
If other people want to have a look at your photo book before it goes to be printed—or if they’d just like to have a copy of their own—a PDF file makes a convenient package (plus you can show it off on your iPad). Here’s how to create a PDF file:
1. With your book design on the screen in front of you, choose File→Print.
The Print dialog box appears.
2. Click PDF→Save as PDF.
The Save As sheet appears.
3. Type a name for the file, choose where you want to save it, and then click Save.
Your PDF file is ready to distribute. The easiest way to get the PDF onto your iOS device is by using Apple’s free iBooks program. Once you’ve downloaded and installed iBooks on both your iOS device and your Mac, launch the program on your Mac, and then drag and drop the PDF of your photo book onto the iBooks window. Next, fire up iTunes, connect your iOS device to your Mac, and then click its name at the upper right of the iTunes window. Click the Books tab, turn on the PDF’s checkmark, and then click Sync. Finally, on your iOS device, open iBooks to view your PDF.
TIP
You can also create a PDF by using the book-creation shortcut menu. Just Control-click an empty spot in the woodgrain background in either All Pages or Single Page view, and then choose “Save Book as PDF.” Give your PDF a name in the resulting dialog box and click Save.
If you want to see the PDF before saving it, choose Preview Book from the shortcut menu instead to open an unsaved version in OS X’s Preview program. To save the resulting PDF, choose File→Save As.
Phase 6: Send the Book to the Bindery
When you think your book is ready for birth, click Buy Book in iPhoto’s toolbar.
NOTE
If iPhoto discovers any issues with your book, it displays dialog boxes letting you know. These can include things like not filling in all the default text boxes, like the title and subtitle; that your book is “incomplete” (you didn’t fill in all the gray placeholder rectangles with pictures); and so on. You have to fix these things before you can print the book. Once everything looks good, click Buy Book again.
After several minutes of converting your design into an Internet-transmittable file, iPhoto displays a screen where you can enter a quantity, shipping info, and so on. At this stage, your tasks are largely administrative:
§ Inspect the charges. If you’ve gone beyond the basic 20 pages, you’ll see that you’re about to be charged between 30 cents and $1 per additional page, depending on the book type.
§ Indicate the quantity. You can order multiple copies of the same book. Indeed, after you’ve spent so much time on a gift book for someone else, you may well be tempted to order yourself a copy.
NOTE
Veteran iPhoto fans will notice that Apple no longer offers a choice of cover color for hardcover books. That’s because the cover is actually a reprint of the dust jacket.
§ Enter the Zip code where you want it sent. The book doesn’t have to come to you; it can go anywhere. Though in order for iPhoto to calculate the proper sales tax, it needs to know the destination Zip code.
§ Pick a shipping method. For U.S. orders, Standard shipping takes about four days and costs $6. Express means overnight or second-day shipping (depending on when you place the order) and costs $11. An additional copy sent to the same address doesn’t add anything to the shipping cost.
NOTE
You can order books if you live in Europe, Asia Pacific, Japan, or North America, but Apple offers shipping only to people in your own region.
Your Apple ID
You can’t actually order a book until you’ve signed up for an Apple account. You already have one if you’ve ever bought something from an online Apple store or the iTunes Store. Regardless of whether you have an Apple account, ordering your first iPhoto book requires you to complete some electronic paperwork:
1. Adjust the fields in the Your Order window as explained above, and then click Check Out.
2. On the Sign In screen that appears, enter your Apple account info or click “Create Apple ID now.”
If you’re an Apple aficionado, enter your Apple ID and password in the Returning Customer fields. (An Apple ID is your email or your iCloud address, if you have one.) Then click Sign In and skip to step 3.
If you’re an Apple newbie, click “Create Apple ID now” and enjoy a whirlwind tour through Apple’s account-signup screens. You’ll be asked for your contact info and credit card number, a password, and whether you want to receive Apple junk mail. You’ll also be offered the chance to enter addresses of people you may want books shipped to. Click Continue; you wind up right where you started: at the Your Order screen.
3. Click Check Out.
You’ve already stored your credit card information, so there’s nothing to do now but wait for your Mac to upload the book. After a few minutes, you’ll see a confirmation message.
4. From the Ship To pop-up menu on the next screen, choose the lucky recipient of your book.
If it’s you, choose Myself. If not, you can choose Add New Address from this pop-up menu.
5. Click Done, and then go about your life for a few days, holding your breath until the book arrives.
When it does, you’ll certainly be impressed. The photos are printed on Indigo digital presses (fancy, digital, four-color offset machines). The book itself is classy, handsome…and it smells really good!
Photo Calendars
Custom-made photo books? Old hat, dude. Nowadays, people are buzzing about the other custom stuff you can order: calendars, greeting cards, and postcards. (Mugs and bumper stickers will have to wait for future versions. In the meantime, you can order them from www.cafepress.com.)
WORKAROUND WORKSHOP: SECRETS OF THE APPLE BOOK-PUBLISHING EMPIRE
It’s no secret that when you order prints of your photos via the Internet using iPhoto, Kodak makes the prints. But neither temptation nor torture will persuade Apple to reveal who makes the gorgeous iPhoto books.
It didn’t take long for Mac fans on the Internet, however, to discover some astonishing similarities between iPhoto books and the books created by a firm called MyPublisher.com. The pricing, timing, and books themselves are all identical. (When asked if it’s Apple’s publishing partner, MyPublisher.com says, “We don’t discuss our partner relationships,” which means “Yes.”)
iPhoto-generated books are more elegantly designed than the ones you build yourself at MyPublisher.com (or anywhere else, for that matter). And it’s certainly easier to upload books directly from iPhoto, rather than to upload photo files one at a time using your web browser.
Still, you should know that building your books directly at MyPublisher.com offers greater design freedom than iPhoto does. You have a wider choice of cover colors and materials (even leather), you can add borders around the pages, and you have much more flexibility over the placement of photos and text.
In fact, it’s easy to get carried away with these options and produce something absolutely ghastly, which is probably why Apple chose to limit your options. This way, you simply can’t go wrong.
The calendars are absolutely beautiful—and huge (10.4 x 13 inches). As shown in Figure 9-17, each one is wire-bound, with a big Picture of the Month (or Pictures of the Month) above the date grid. You can customize each calendar with text, titles, national holidays, events imported from your iCal calendar, and even little thumbnail photos on the date squares.
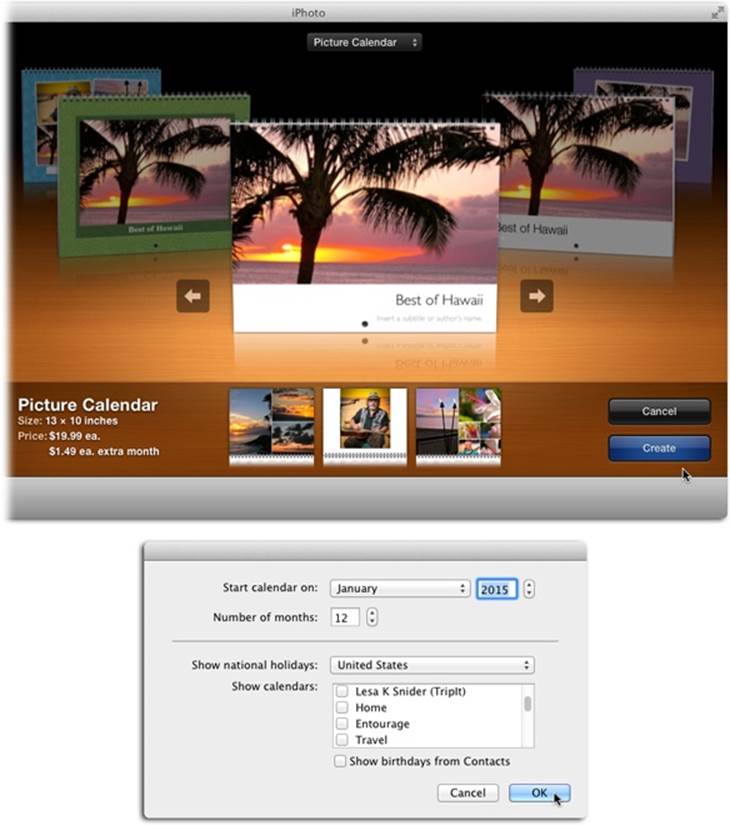
Figure 9-17. Top: iPhoto’s various calendar themes have different date sizes, photo placements, and background patterns. Bottom: Your calendar doesn’t have to start with January—you can pick any starting month you want. And the calendar can include up to 24 months (two years). The “Show calendars” box lets you include calendars you’ve set up in iCal—Work, Social, Star Trek Conventions, whatever—in your iPhoto calendar. It’s worth noting that several third-party entities, such as TripIt and Star Walk, may have added their own calendars to your Mac and, as a result, they’re available to add to your printed calendar, too. For the curious, TripIt is an excellent trip-planning program, and Star Walk is for identifying celestial bodies and viewing astronomical events.
If you’ve designed an iPhoto book, then designing an iPhoto calendar will give you an overwhelming sense of déjá vu. iPhoto’s calendar-design setup is identical to its book-design setup (and card-design setup, and so on). But since you’re usually dealing with 12 calendar pages instead of 20 book pages, they don’t take as long to assemble (and they make fantastic yet practical holiday gifts!).
Anyway, here’s the drill:
Phase 1: Choose the Photos
Pick out pictures for the cover photo, the “picture of the month” photos, and any pictures you want to drag onto individual date squares. You can select an Event, a full album, several albums, or any group of thumbnails in the viewing area to get started (though creating an album specifically for your calendar is more efficient).
Phase 2: Choose the Calendar’s Design
Click the Share button in iPhoto’s toolbar, and then choose Calendar.
iPhoto’s photo-viewing area changes to display miniature calendar designs in a carousel (Figure 9-17, top). These are the calendar themes, which are just like the book themes described earlier in this chapter. Scroll through them—either by pressing the ![]() and
and ![]() keys or by swiping a finger across your Magic Mouse or Magic Trackpad—to see a preview of each one. The designs differ in photo spacing, the size of the numbers marking the dates, the availability of captions, and so on. When the carousel settles on the theme you want, click Create.
keys or by swiping a finger across your Magic Mouse or Magic Trackpad—to see a preview of each one. The designs differ in photo spacing, the size of the numbers marking the dates, the availability of captions, and so on. When the carousel settles on the theme you want, click Create.
The dialog box shown at the bottom of Figure 9-17 appears so you can choose options such as what period you want the calendar to cover. The “Show national holidays” pop-up menu lets you fill your calendar with the dates your country’s government has deemed important. For example, the United States’ holidays include Valentine’s Day, Lincoln’s Birthday, and Thanksgiving; the French holidays include Whit Sunday, Assumption Day, and Bastille Day (in English); and the Malaysian holidays include Merdeka, Awal Ramadan, and Yang Di-Pertua of Sarawak’s Birthday (but you knew that).
If you keep your calendar in iCal (the OS X calendar program in your Applications folder), you can choose to have those events appear on your printed photo calendar, too (see Figure 9-17, bottom). You can also turn on “Show birthdays from Contacts.” That’s a reference to the OS X address-book program, which—along with names, addresses, and phone numbers—has a space to record each person’s birthday. Incorporating them into your printed calendar means you’ll never forget a loved one’s (or even a liked one’s) special day.
TIP
This isn’t the only chance you’ll have to adjust these settings. You can return to them at any time—when you’re moving to Italy, for example, and want to change the holidays—by following the instructions in Figure 9-18.
When you’re finished setting things up, click OK. You arrive in the calendar-design workspace, which looks like a big desktop (Figure 9-18), just like the book-design view. A new icon appears in your Source list to represent the calendar you’re creating; you can file it into a folder, rename it, or trash it just as you would a slideshow or a book.
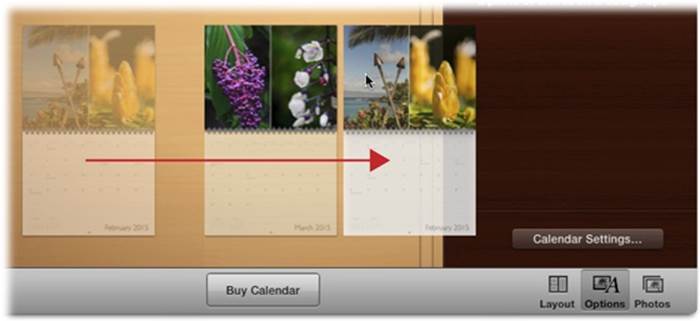
Figure 9-18. You can rearrange the pages of your calendar in this view; just click and drag the pages, as shown here. When you’re working on a calendar project in All Pages view, you can return to the calendar’s settings by clicking Options in the toolbar and then clicking Calendar Settings (it doesn’t matter whether you have any calendar pages selected).
Now you’re ready for the fun part: arranging photos on your calendar pages.
Phase 3: Design the Pages
Each of the calendar’s page spreads shows a “photo of the month” on the upper page (above the spiral binding) and a month grid on the lower page. iPhoto automatically populates your pages with photos and places them in chronological order according to when they were taken; it also attempts to factor in Faces tags (to center faces inside photo frames), orientation (landscape vs. portrait), and ratings.
However, once you double-click a page to enter Single Page view, you can replace iPhoto’s choices with your own by clicking Photos in the toolbar. When you do, the Photos panel opens, displaying thumbnails of the pictures you’ve selected for inclusion. To replace a photo, drag it from the Photos panel onto the photo frame or existing photo.
TIP
If you’re not a fan of iPhoto’s Autoflow feature—you’d rather place all the photos onto the calendar pages yourself—then open the Photos panel and click Clear Placed Photos. The photos are instantly replaced with generic gray boxes onto which you can drop photos of your choosing.
The design controls in Single Page view work exactly the same way as they do when you’re designing a book (Phase 3: Design the Pages). You can click a photo to reveal its zoom slider (Figure 9-19) and then reposition the photo within its frame by clicking and dragging (your cursor turns into a tiny hand).
NOTE
When you open the Photos panel, you see little numbers on some (or all) of the photo thumbnails. That number indicates which calendar page the photo is used on; click the arrow to the number’s right to see that page.
It’s worth noting that iPhoto counts each calendar page as 2, beginning with the first month (it excludes the front and back covers), so a one-year calendar has 24 pages.
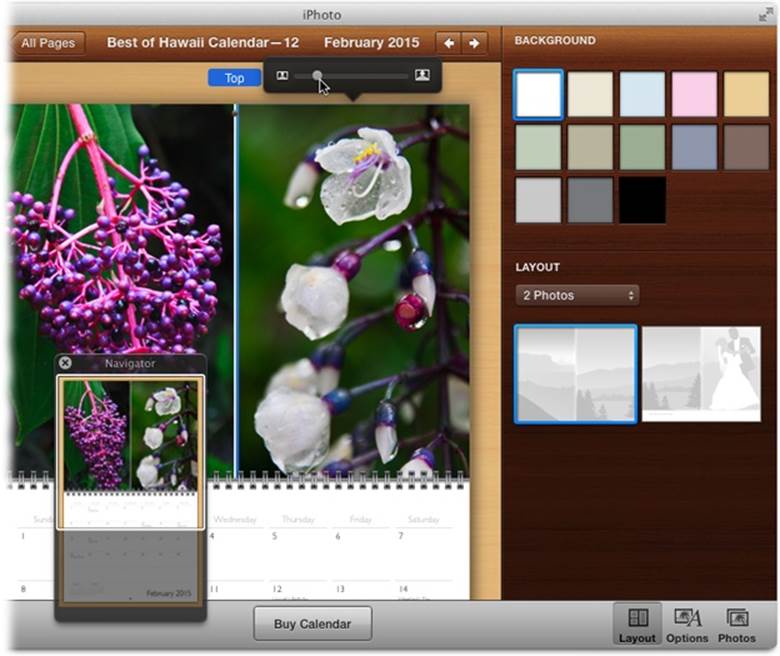
Figure 9-19. The Zoom slider shown here lets you zoom into/out of a photo. The Zoom slider in iPhoto’s toolbar, on the other hand, lets you zoom into/out of pages as you’re designing them. Zoom into a page and the Navigator appears (see lower left); use it to reposition the current page while zoomed in (or use gesturing on your Magic Mouse or trackpad). The white arrows near the top of this window let you view other pages. Change the number of photos per page by clicking Layout in the toolbar. Pick a number of photos from the Layout pop-up menu shown here, and then click a design thumbnail to apply it. The Background thumbnails at the top let you pick a color for any empty space on the page.
In Single Page view, you can drag pictures into the photo boxes exactly the way you do when you’re designing a book. If you don’t see the photo you want in the Photos panel, you can add it to your calendar project in a couple of ways. Once you’ve located the photo in your library, here’s what to do:
§ Select the photo, click Add To in the toolbar, choose Calendar, and then pick the calendar you’re working on.
§ Select the photo and drag it onto your calendar project’s icon in the Source list.
Either way, the photo lands in your Photos panel, ready to be (briefly) immortalized on a calendar page.
Speaking of placing photos, choose one really good shot to grace the calendar’s front cover; this is what the recipient (even if it’s you) is going to see when he unwraps the calendar. You’ll want to repeat the photo elsewhere in your calendar in order to fully enjoy it, though.
And of course you’ll want to illustrate each month with an especially appropriate photo—or more than one. Click Layout in the toolbar to open the Layout panel, and then use the pop-up menu to choose 2 Photos, 3 Photos, or whatever; some themes let you place as many as seven pictures above the spiral binding.
There’s one other place you can put photos that might not have occurred to you: the individual date squares (see Figure 9-20). You can put people’s faces on their birthday squares, for example, or vacation shots on the dates when you took them.
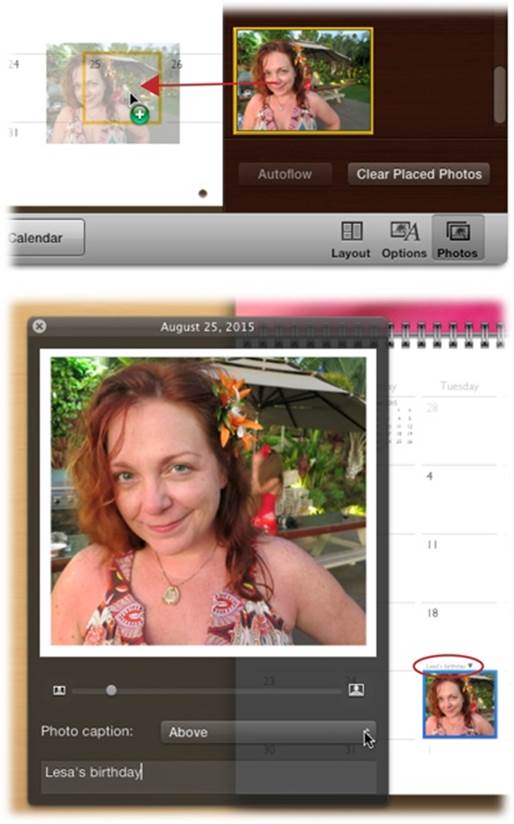
Figure 9-20. After you drag an image from the Photos panel onto a date square (top), double-click the photo in the calendar to display a handy panel (bottom). You can use the panel’s slider to enlarge the picture within its box or drag the picture to reposition it in the frame. To add a caption, choose a location from the “Photo caption” pop-up menu, and then enter some text. Since the photo fills the entire date square—hiding the date itself—captions have to live outside the square: above it, below it, or to its left or right. Once you’ve dropped a picture onto a date square, it’s hard to get rid of. Try selecting the date it lives on by clicking it (you see a blue border around the date square) and then pressing the Delete key on your keyboard. If that doesn’t work, then drag the photo from the date square into the Photos panel; you see a little puff of smoke as the photo disappears.
You can edit photos right on the calendar-page layouts. Once you’re in Single Page view, click Options in the toolbar and choose from three creative color effects: B & W, Sepia, and Antique. (These effects don’t change the photo in your library.) For more editing power, Control-click the image and choose Edit Photo from the shortcut menu. Just be aware that the changes you make in this way do affect the original photo in your library.
When you’re finished editing a particular month, you can move on to the next month by clicking one of the white arrows at the top of the window, to the right of the current page’s name (“August 2015,” for example).
Phase 4: Edit the Text
Once your calendar is photographically compelling, you can finish it off with titles, captions, and other text goodness. The cover, for example, offers both a main title and—in most themes—a subtitle.
Click the placeholder words to select and replace them with text of your own. You can also single-click any date square to open a caption box where you can type important events (like “Robin’s Graduation” or “New Avengers Movie”; see Figure 9-21). If the date has a photo on it, you need to choose a location from the Caption pop-up menu, as described in the previous section.
TIP
Once the caption box is open, you don’t have to close it and reopen it for another date. Each time you click a square on the calendar, the caption box automatically changes to show its text contents. (This trick also applies to the photo box shown in Figure 9-20.)
Just as with books, you can change the text formatting—either globally (for all pages) or for just some selected text:
§ To change the text globally, click Options in the toolbar. In the resulting panel, specify the fonts and sizes you want, and then click Change Everywhere. (If you decide that Apple’s original font assignments were actually better than what you’ve come up with, click “Revert to Default.”)
§ To change the formatting of a single word or sentence, highlight it and then use the formatting pop-up menu that appears. (If you’d rather use the Options panel’s controls, you can do that instead.)
Phase 5: Order the Calendar
When you’ve said to yourself, “I’m [your name here], and I approve of this calendar,” then, click the Buy Calendar button in the toolbar.
If you’ve left any gray photo boxes empty or if any caption placeholders are still empty, an error message appears. You won’t be able to order the calendar without filling in the photo boxes, although leaving captions empty is OK. (The calendar will simply print without any text there—not even the dummy placeholder text.)

Figure 9-21. Click any date square to open this caption box. iPhoto really wants to center your text vertically within the square, so you need to click a spot near the middle of the caption box to get the blinking insertion point. To change the vertical alignment—say, to make the text appear at the top or the bottom of the square—use the little pop-up menu at the bottom right of the caption box. For even more typographical controls, click Options in the toolbar to display the panel shown here.
After a moment, your Mac connects to the Internet, and you see an order screen. It looks and works just like the order screen for prints (Chapter 7) and books, except the pricing is a little different. A 12-month calendar costs an incredibly affordable $20. Each additional month adds $1.50 to the price, though there’s a 10% discount if you order 25 (!) or more at a time.
Assuming you’re all signed up as a certified Apple customer (Your Apple ID), all you have to do is specify how many copies you want, where you want them shipped, and via which method (Standard or Express). Click Check Out, and mark off the very few days on your old calendar as you wait for the new one to arrive.
NOTE
It’s worth noting that when you give custom calendars to loved ones, there’s no going back: They come to expect them yearly because they’re of such high quality (and people have been known to throw fits if they don’t get one). Consider yourself warned.
Greeting Cards and Postcards
Why stop at books and calendars? iPhoto also offers gorgeous greeting-card and postcard designs (Figure 9-22). These items are professionally printed and don’t cost an arm and a leg.
NOTE
You can also use iPhoto to create letterpress cards, which have inked designs pressed into beautifully textured paper. They’re spectacular—but cost $3 each.
Here’s how to create these custom goodies:
1. Select the photo(s) you want to use in your card, and then click Share in the toolbar and choose Card.
iPhoto’s familiar themes carousel appears, this time showing card designs (Figure 9-22).
TIP
Contrary to what you might think, it’s best to start with several photos—some card themes can hold up to seven pictures. So consider corralling card candidates into an album before starting the card-creation process.
2. At the top of the theme-choosing area, pick a card type—Letterpress, Folded, or Flat—and then use the arrow keys or pop-up menu to peruse the various designs.
iPhoto offers 31 different design themes for letterpress cards, and nine categories of themes for folded and flat cards. They include holiday themes (including Easter, Valentine’s Day, and Halloween), thank-you notes, baby announcements, birthday cards, invitations, and so on.
3. If you’re making a letterpress card (which has fewer customization options), click Create. If you’re making a folded or flat card, use the icons labeled in Figure 9-22 to choose a layout and background color for your card, and then click Create.
NOTE
If you choose Letterpress, you can watch a movie extolling this type of card’s many virtues; just click the Play icon that appears at the bottom of the window, next to the card preview.
You arrive at the now-familiar page-design screen (technically it’s Single Page view), where you can adjust the photo, background, and text (see Figure 9-23). You’ll see two rectangles: the inside and outside (for a greeting card) or front and back (for a postcard).
A new icon appears in your Source list representing your card-in-progress.
4. Adjust the photo(s).
Click a photo to enter the picture-adjustment mode described on Phase 4: Edit the Titles and Captions, where you can drag the slider to enlarge the photo, or drag the picture to adjust its position inside the frame.
You can also replace the photo. If you had the foresight to choose several candidates in step 1, then simply open the Photos panel (click Photos in the toolbar), and then drag thumbnails directly into the card’s photo frames to try them out.
If you didn’t think ahead, all is not lost. In the Source list, click the album that contains the photos you want to try as alternatives, and then drag their thumbnails onto the card’s Source list icon. Alternatively, select the photo(s), click Add To in the toolbar, choose Card, and then pick the one you’re working on.
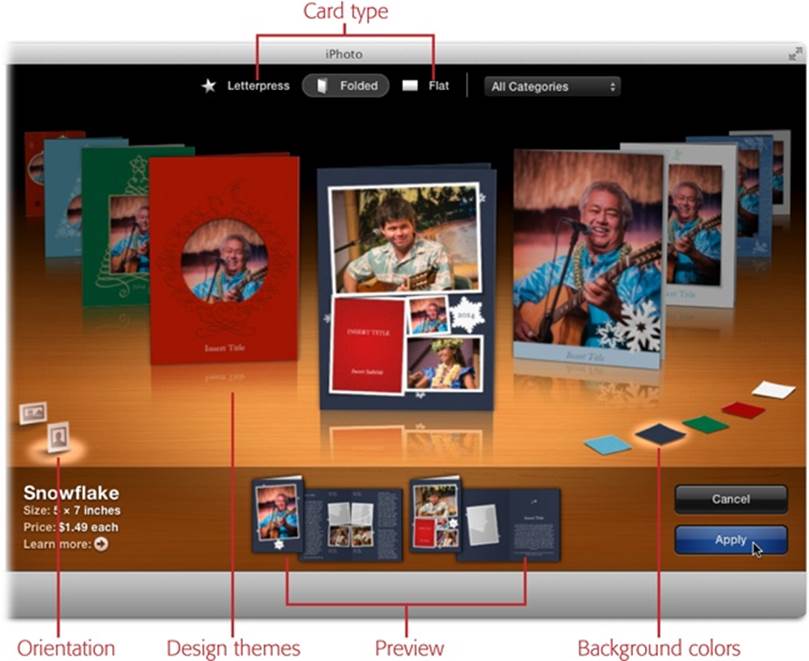
Figure 9-22. Choose a card type at the top of the window; the various design themes appear below in a spinning carousel. As of this writing, there are 31 letterpress themes. If you choose Folded or Flat (think postcard), you get a whopping nine categories, including tons of themes fit for every card-sending opportunity you can imagine (the Baby & Kids category alone contains 30 designs!). If you’ve read about how to create books or calendars, this section’s description of the card-ordering process will feel like déjá vu all over again—only simpler, because you have fewer pages to deal with.
5. Open the Layout panel to adjust the card’s background color and design.
Click Layout in the toolbar to see alternative design and color schemes, as shown in Figure 9-23.
The designs in the Layout panel change depending on whether you’ve clicked the front of the card or the inside/back. For the front, you get alternative text-and-photo layouts (like ones that let you put a caption on the front of the card, or round the corners of the photo). If you’ve clicked the back of a Flat card, then you get to choose a standard mailable postcard back (with lines where you can write in a name and address, for example), or a non-mailable design that looks more like the inside of a greeting card.
TIP
Some interior card designs were meant to be used as a yearly newsletter and have lots of room for text, as well as space for several small pictures.
The Layout and Background options for greeting cards vary based on which theme you choose; Holiday/Events cards have the most options. The Orientation pop-up menu lets you specify whether this card is folded at the top or the left side (Horizontal or Vertical, respectively).
Click a photo and then open the Options panel to give it a creative color effect (black and white, sepia, or antique), or click Edit Photo to pop into Edit view.
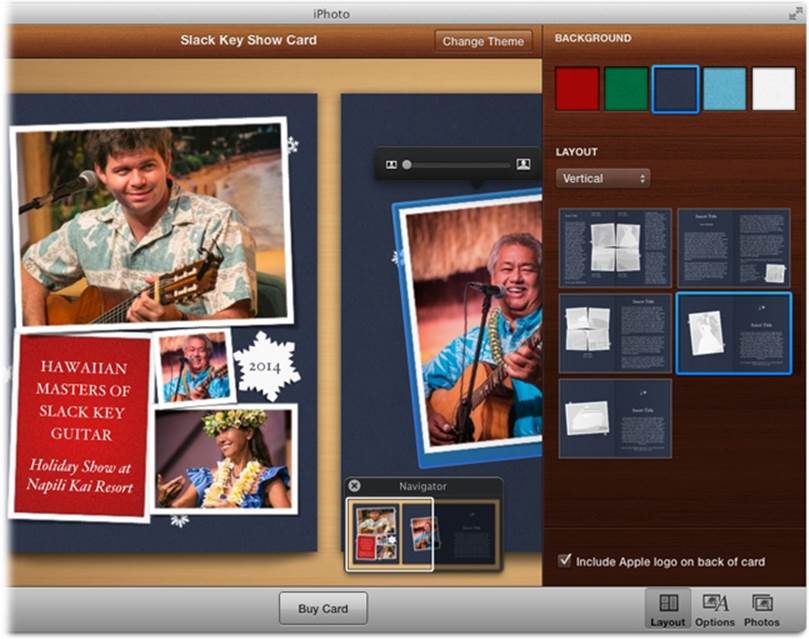
Figure 9-23. Depending on what side of the card is selected (outside/inside, or front/back), you’ll see different designs in the Layout panel. You also get to pick a color scheme (and, in some designs, a pattern) for the background and interior of the card, and a pop-up menu for choosing vertical or horizontal orientation. The Navigator panel shows which part of the card you’re viewing. With a photo selected, click Options in the toolbar to display Effects buttons that convert your photo to black and white, sepia, or antique. You also get an Edit button that transports you to Edit view.
6. Edit the text.
Click any bit of placeholder text to open its text box for editing. (It’s generally uncool to send out baby-announcement cards bearing the legend “Insert a name here.”)
TIP
Don’t forget that you can zoom in on any part of your card by dragging the Zoom slider in the toolbar, which is especially helpful when you’re adding text.
You can also edit the text styles and fonts as described on Phase 4: Edit the Titles and Captions.
7. Order the card.
When the card looks good, click Buy Card. Your Mac goes online, and the order screen appears. Happily, you can buy cards individually (you don’t have to buy, say, 12 at a time—thanks, Apple!).
Letterpress and Folded cards are 5 x 7 inches, come with matching envelopes, and cost $3 and $1.50 each, respectively. Postcards are 4 x 6 inches, also come with matching envelopes, and cost 99 cents each. Unfortunately, there are no discounts, no matter how many you order.
As you can see, these cards are affordable and impressive. You can consider making them part of your everyday arsenal of social graces. After all, you’re living in an era where very few other people can pull off such a thing—and you’ll be the one who gets credited with the computer savvy, design prowess, and thoughtfulness to actually put a physical card in the mail.