iPhoto: The Missing Manual, 1st Edition (2014)
Part 2. Editing and Sharing
Chapter 5. Editing Your Shots
Rare is the digital photo that doesn’t need a bit of correction. The shot might be too dark or too light, or the colors may have a blue or yellow cast. The focus may also be a little blurry, skin tones might look a little too red, the camera may have been tilted slightly, or the composition may be somewhat off.
Fortunately, one of the amazing things about digital photography is that you can use software to fine-tune your pictures in ways that, in the world of traditional photography, would require a fully equipped darkroom, several bottles of smelly chemicals, and an X-Acto knife.
While iPhoto is no Adobe Photoshop, it’s still a powerful photo editor with an incredible array of easy-to-use tools. In this chapter, you’ll learn how to use each one of those tools to perfect your photos, as well as how to send them over to other programs for more radical surgery.
NOTE
To perform stunts like removing whole objects from a photo or swapping backgrounds (even heads), you need a way to tell the editing program what portion of the image you want to change, usually by creating a selection, which you can’t do in iPhoto for Mac—the majority of the editing you do here affects the whole photo. However, the iPhoto for iOS app is another story; it includes a set of tools that let you paint changes onto your pictures. See Chapter 14 for the lowdown.
Editing in iPhoto
The good news is that iPhoto is equipped to handle the most common photo-fixing tasks, like rotating, cropping, straightening, removing red-eye and blemishes, reducing noise, creating special effects (like making a photo black and white or adding a sepia tone), adding edge vignetting (a soft oval fade around the photo’s edge), as well as tweaking brightness, contrast, saturation, color tint, white balance, exposure, shadows, highlights, and sharpness.
The not so great news is that you can’t add text (save for slideshow captions), make collages or otherwise combine images, create partial color effects, remove complex objects (like your ex), or apply special effects filters like you can with more expensive—and far more difficult to use—editing programs such as Photoshop or Photoshop Elements.
NOTE
When you edit a picture in iPhoto, your changes are visible wherever that particular photo appears—in every album, slideshow, calendar, or book project. But you can tweak the way a photo prints on your printer without having those changes appear anywhere else. Details on that trick lie in Chapter 7. However, the one place your changes never appear is in your iCloud photo stream, that is, unless you save them to your device’s Camera Roll, as the box on Copying Edited Photos to Your Computer explains.
In iPhoto’s Edit view, all the editing tools are conveniently parked in a panel on the right side of the window. But in the hopes of accommodating every conceivable working style and skill level, Apple has designed iPhoto to offer an alternate editing-window style, as well as a quick path to editing your images in other programs.
Choosing an Editing Setup
iPhoto gives you three ways to edit photos:
§ Right in the iPhoto window, in Edit view. Pros: You don’t lose your bearings; all the familiar landmarks, including the Source list, remain visible. Simple and reassuring. Cons: The picture isn’t very big, since it has to fit inside the main iPhoto window.
§ In Full Screen view. Pros: The photo fills your entire screen, as big and dramatic as it can be (at least without upgrading to a bigger monitor). The menu bar and Source list are hidden, giving you more screen real estate. Cons: It takes a little time to get the hang of using iPhoto’s buttons to navigate to other Events, albums, projects, and so on.
§ In another program. This is one of iPhoto’s slickest tricks: You can set things up so that clicking the Edit button opens the photo in a totally different program, such as Photoshop Elements. You edit, you save your changes, you return to iPhoto—and presto, the changes you made in the other program are visible. You can even use the “Revert to Original” command (Reverting to the Original) to bring back the original photo later, if necessary.
TIP
You can’t change the photo’s file name, location or file format (it has to be a JPEG file); if you do, the edited version won’t be visible in iPhoto.
Pros: Other programs have a lot more editing power than iPhoto. For example, the Auto Levels command in Photoshop and Photoshop Elements is a better color fixer than iPhoto’s Enhance button. And you need a Photoshop-type program if you want to scale a photo up or down to specific pixel dimensions, add text to a photo, combine several photos into a collage, do some head-swapping, whiten teeth, or adjust colors in just a portion of a photo.
Cons: You’re using two programs instead of one. And nobody ever said Photoshop was cheap—these days, it requires a subscription—although Photoshop Elements has much of the power with a lower price tag. Also, you lose the ability to back out of your changes edit by edit, because iPhoto can’t track individual edits made in the other program; your only choice is to revert to the original photo. And, when you’re editing a raw file, iPhoto opens a JPEG copy of it, meaning the changed version will show up in iPhoto only if you don’t change its filename or location. If, however, you choose to edit the original raw file by tweaking iPhoto’s preferences (External Raw Editors), the altered version won’t automatically show up in iPhoto; you have to reimport it.
NOTE
iPhoto veterans may notice that Apple retired yet another way of opening a photo for editing—in a floating window of its own. Evidently, enough was enough.
Getting into Edit View
When you switch to Edit view, you see three editing tabs at the top right of the iPhoto window with a series of buttons underneath, as Figure 5-1 shows. To use Edit view, select one or more photos and then do one of the following:
§ Click Edit in the toolbar.
§ Press Return (pressing Return again spits you out of Edit view).
§ Choose Photos→Edit Photo or press ⌘-E.
§ Control-click a thumbnail or a photo and, from the shortcut menu, choose “Edit in iPhoto.”
Using Full Screen View
Mac screens come in all sizes and resolutions these days, but one thing is for sure: Even the biggest ones usually can’t show you an entire digital photo at full size. A 5-megapixel photo (2784 x 1856), for example, is still too big to fit entirely on Apple’s 30-inch Cinema Display (2560 x 1600 pixels) without shrinking the photo (though the Retina 15-inch MacBook Pro comes close at 2880 x 1800 pixels).
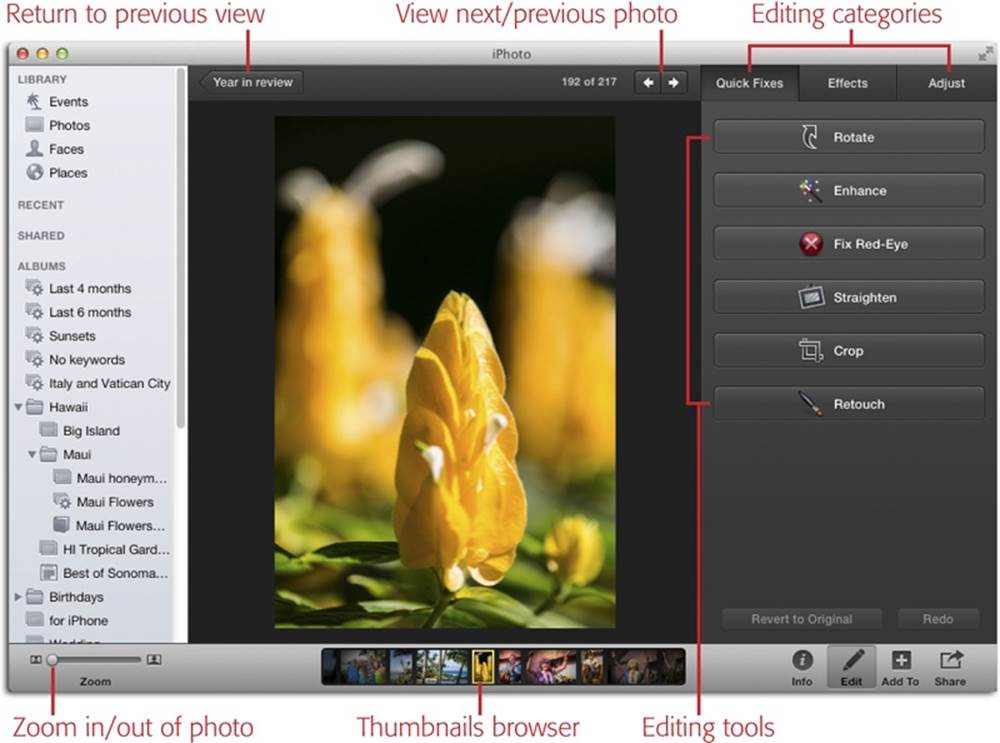
Figure 5-1. iPhoto’s fancy and easy-to-use Edit view. To exit Edit view and return from whence you came (the album, Event, or whatever), click Edit in iPhoto’s toolbar again, press Return, or click the arrow-shaped button at the top left of the photo-viewing area (its label depends on the item that was active in your Source list when you entered Edit view; in this screenshot, it’s labeled “Year in review”).
The bottom line: For most of your iPhoto career, you’ll be working with scaled-down versions of your photos. That’s a shame when it comes to editing those photos, when you need as much clarity and detail as possible. That’s why the addition of Full Screen view in iPhoto ’11 was such a big deal, and it’s a whole lot better in the current version. In this view, iPhoto magnifies the selected photo to fill your entire screen, (minus the Source list and toolbar). As Figure 5-2 illustrates, it’s awesome.
NOTE
Remember, the menu bar disappears when you’re in Full Screen view, but you can temporarily bring it back by moving your cursor to the very top of your screen.
To use Full Screen view when you’re already in Edit view, click the ![]() at the top right of the iPhoto window (or press Control-⌘-F); your photo takes over your entire monitor. (If you’re not in Edit view already, click the
at the top right of the iPhoto window (or press Control-⌘-F); your photo takes over your entire monitor. (If you’re not in Edit view already, click the ![]() and then click Edit at the bottom of your screen.) To exit Full Screen view, just click the same button again or tap the Esc key.
and then click Edit at the bottom of your screen.) To exit Full Screen view, just click the same button again or tap the Esc key.
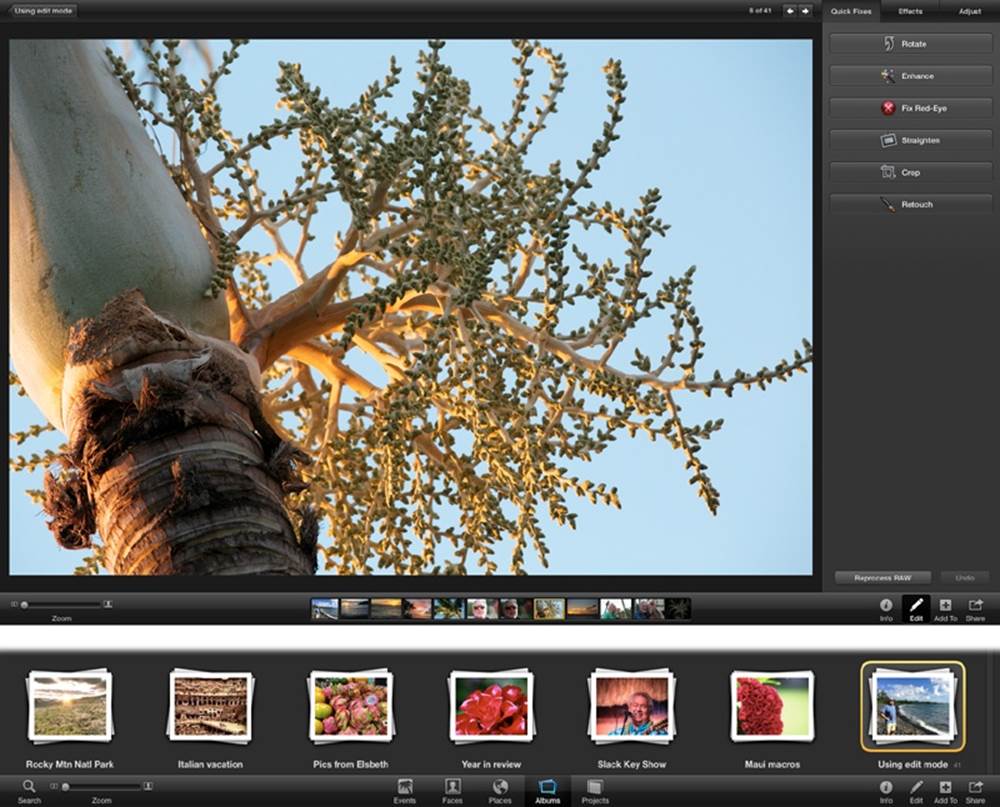
Figure 5-2. Top: Editing photos in Full Screen view makes them huge and removes distractions from view. You can jump back to your original Source list item (Events or Photos view, an album, project, or whatever) by pressing Return, double-clicking the photo you’re editing, clicking the arrow button at the top left of the screen, or pressing⌘-left arrow. Bottom: Go back two views and you see big Source icons at the bottom of your monitor for Events, Places, Faces, Albums, and Projects. When you click one, thumbnails of those items appear in a scrollable list (like the albums shown here).
Editing in Another Program
If you own another image-editing program such as Photoshop or Photoshop Elements, you can have iPhoto open your masterpieces there any time you enter Edit view. However, this requires a bit of prep work in iPhoto.
Choose iPhoto→Preferences→Advanced. From the Edit Photos pop-up menu, choose “In application…” as shown in Figure 5-3.
NOTE
In earlier versions of iPhoto, you could tweak the program’s Preferences to control what happened when you double-clicked a photo’s thumbnail. These days, double-clicking zooms in on the photo so you can take a closer look—period.
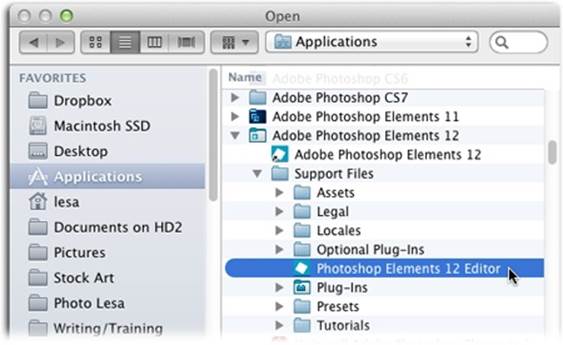
Figure 5-3. In the Advanced pane of iPhoto’s Preferences, you can use the Edit Photos pop-up menu to specify your favorite editor: “In iPhoto” or “In application….” Clicking the latter summons the Open dialog box shown here, where you can navigate to the other program (in this case, Photoshop Elements). Once you pick the program, iPhoto chooses it for you in the pop-up menu. From now on, entering Edit view will launch the other program (if it’s not already running) and open your photo as a new document there. While you can’t step back through the changes you make in the other program, iPhoto lets you revert to the original photo.
Using the Thumbnail Browser
Another useful feature in Edit view is the thumbnail browser parked at the bottom of your window or monitor (it appears in both the standard and full-screen versions of Edit views). You can use it to move to another photo for editing, or to choose multiple versions of the same shot in order to compare them and pick which one to edit.
TIP
If your camera is set to burst mode (consult your camera’s manual to learn how to turn it on), it fires off several shots each time you press the shutter button. This is handy for making sure at least one photo is nice and sharp, because the very act of pressing and releasing the shutter button can jiggle the camera. Unfortunately, shooting in burst mode also means having several versions of the same photo in your library. That’s why the ability to compare different versions in iPhoto while you’re editing is so useful.
Using the thumbnail browser is easy, as Figure 5-4 explains. To choose another photo to edit, click its thumbnail. To compare the original photo with a different shot, ⌘-click the comparison shot in the thumbnail browser; iPhoto opens it alongside the photo you were originally editing. (You have to be in Edit mode to compare photos.)
You’re not limited to comparing two photos side by side. You can compare three, four, or however many your screen can hold, though the thumbnails become smaller and smaller the more photos you select.
TIP
You can use the Zoom slider in iPhoto’s toolbar to see deeper into the photos you’re comparing, though the slider affects only one photo at a time. To zoom into all the photos you’re comparing, click each one individually in the photo-viewing area and then set the zoom level. To reposition the photo while zoomed in, use the Navigator panel discussed in the next section. To get the exact same zoom level for each photo, zoom numerically (also explained in the next section).
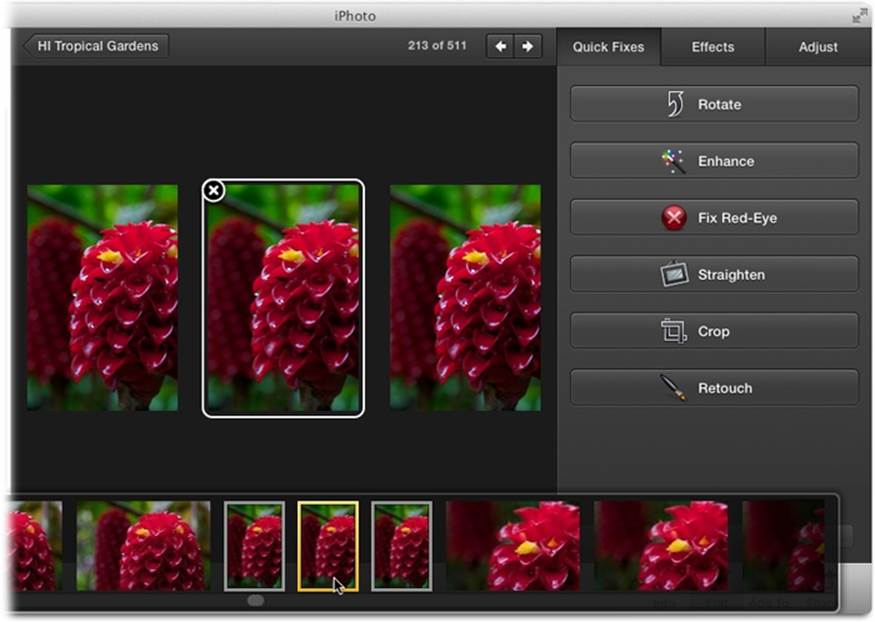
Figure 5-4. Worried that you can’t see the tiny thumbnails well enough to pick one? Don’t panic—the thumbnail browser enlarges when you point at it, as shown here. Use the gray scroll bar at the bottom to move back and forth through the thumbnails. When you’re done comparing photos, you can restore the single-photo view by ⌘-clicking the comparison shot’s thumbnail again, or by clicking the photo you want to dismiss and then clicking the X in its top-left corner.
If you’re already in Edit view, just ⌘-click or Shift-click to select additional photos in the thumbnail browser, and iPhoto makes room for all of them. (To remove a photo from the comparison, click the tiny X in its top-left corner or ⌘-click its thumbnail again.)
Notes on Zooming and Scrolling
Before you get deeply immersed in the editing process, it’s worth knowing how to zoom and scroll around, since chances are you’ll be doing quite a bit of both.
By now, you know that double-clicking an image (or pressing the space bar) gives you a closer look, and that you can then use the Zoom slider in the toolbar to go deeper. However, there are many other ways to adjust your point of view. The following methods work in both the standard and full-screen versions of Edit view.
NOTE
iPhoto is fully gesture-aware, meaning you can use a Magic Mouse, Magic Trackpad, or MacBook trackpad to pinch (move two fingers together) to zoom out of a photo, or spread (move two fingers apart) to zoom in.
Using the Navigator
The biggest problem with zooming way in on a photo is that it’s tough to know where you are in the photo. That’s where the Navigation panel comes in—it’s a little floating panel that appears the second you use the Zoom slider, or when you use the numeric shortcuts described below. The Navigation panel lets you reposition the enlarged photo while you’re zoomed in. Figure 5-5 has the scoop.
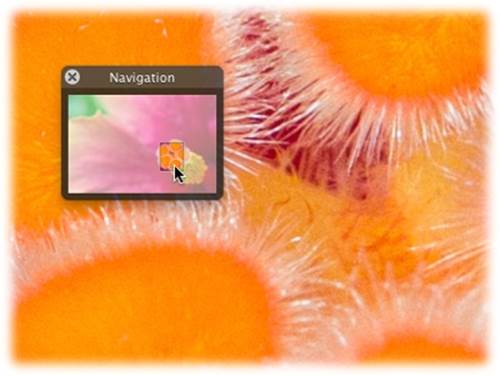
Figure 5-5. As soon as you touch the Zoom slider in iPhoto’s toolbar, the Navigation panel appears to help you find your way around the picture. To move to a different area of the photo (like the stamen of this flower), drag the tiny “You are here” rectangle within the Navigation panel. You can also scoot the Navigation panel around by clicking and dragging near its name. (If you’ve got two monitors, try dragging the Navigation panel to the second one.)
Zooming Numerically
Touch typists will love this one: In Edit view, you can press the number keys on your keyboard—0, 1, and 2—to zoom in or out of photos. Hit 1 to zoom in so far that you’re viewing every single pixel (every tiny colored square) in the photo; that is, one pixel of the photo occupies one pixel of your screen. The photo is usually bigger than your screen at this point, so you’re now viewing only a portion of the whole—but it’s great for detail work.
Hit 2 to double that magnification level. Now each pixel of the original picture consumes four pixels of your screen, a handy superzoom level when you’re trying to edit individual skin cells.
Finally, when you’ve had enough superzooming, tap the zero (0) key to zoom out again so the whole photo fits in the window.
Note that these numeric zooming tricks work in Edit view only; they do different things in All Events and Photos view. (For a secret decoder list of keyboard shortcuts, choose Help→Keyboard Shortcuts.)
Scrolling Tricks
Once you’ve zoomed into a photo, you can reposition your view in any direction by pressing the space bar as you drag the mouse (your cursor turns into a tiny hand). This method is a little more direct than fussing with the Navigator panel.
If your mouse has a scroll wheel (or a scroll pea, like Apple’s old Mighty Mouse), you can scroll images up and down while zoomed in on them by turning that wheel. To scroll the zoomed area horizontally, press Shift while turning.
TIP
If you’re using a laptop trackpad, an Apple Magic Mouse, or a Magic Trackpad, you can swipe to the left or right with two fingers to scroll in any direction while you’re zoomed into a photo (this is all controlled by your mouse or trackpad system preferences). Point your cursor at the thumbnail browser to scroll through it, too.
The “Before and After” Keystroke
After making any kind of edit, it’s incredibly useful to compare the “before” and “after” versions of your photo. So useful, in fact, that Apple has dedicated a whole key to that function: the Shift key on your keyboard. Hold it down to see your unenhanced “before” photo; release it to see the “after” image.
By pressing and releasing the Shift key, you can switch between the two versions of the photo to assess the results of your enhancement. This keyboard shortcut is well worth memorizing.
Backing Out
As long as you remain in Edit view, you can back out of your changes, one by one, no matter how many of them you’ve made. For example, if you’ve cropped a photo, you can uncrop it by choosing the Edit→Undo Crop command (or by pressing ⌘-Z).
The only catch is that you have to back out of the changes one at a time. In other words, if you rotate a photo, crop it, and then change its contrast, you have to use the Undo command three times—first to undo the contrast change, then to uncrop, and finally to unrotate.
But once you leave Edit view—either by choosing another photo in your thumbnail browser, or by returning to an album, or to All Events or Photos view—you lose the ability to undo individual edits one at a time. At this point, the only way to restore your photo is to click “Revert to Original” in Edit view or choose Photos→Revert to Original. Either way, iPhoto removes every edit you’ve made to the photo since you imported it.
The Quick Fixes
iPhoto’s editing tools are divided into three logical categories: Quick Fixes, Effects, and Adjust.
The Quick Fixes category contains the most commonly used editing tools. To see those options, pop into Edit view and then click the Quick Fixes tab in the top right of the iPhoto window.
TIP
You can also dive into the Quick Fixes panel by tapping the Q key while you’re in Edit view.
Rotating
Unless your digital camera has a built-in orientation sensor, iPhoto imports all photos in landscape orientation (wider than they are tall). To get all your photos right-side up (if you didn’t do so during your first perusal of them, as described in Chapter 1), just select the sideways ones and rotate them into position by clicking Rotate in the Quick Fixes panel.
TIP
The Quick Fixes panel’s Rotate button turns photos 90 degrees counterclockwise. If you want to turn them the other way, hold the Option key while clicking this button.
Remember, you don’t have to be in Edit view to rotate photos. You can also use one of the following methods to turn them right-side up:
§ Choose Photos→Rotate Clockwise (or Rotate Counterclockwise).
§ Press ⌘-R to rotate selected photos counterclockwise, or Option-⌘-R to rotate them clockwise.
§ Control-click a photo in Edit view and choose Rotate Clockwise (or Rotate Counter Clockwise) from the shortcut menu. (If you’re in any other view, you’ll see a Rotate button instead.)
TIP
Believe it or not, you can customize the direction in which iPhoto rotates your pictures. If you’re not in Edit view, clicking Rotate in a photo’s shortcut menu (or pressing ⌘-R) rotates photos counterclockwise, while Option-clicking that option (Option-⌘-R) rotates them clockwise. Now think about how you hold your camera when you take a vertical shot—do you rotate the camera to the right or to the left? If the answer is to the right, you can swap iPhoto’s rotation directions by choosing iPhoto→Preferences→General and changing the Rotate setting.
If you’ve just imported a batch of photos, you can save a lot of time and mousing around by selecting all the thumbnails that need rotating (by ⌘-clicking each, for example). Then use one of the rotation commands above to fix all the selected photos in one fell swoop.
Enhancing
The Quick Fixes panel’s Enhance option gives you a simple way to improve the appearance of less-than-perfect digital photos. You click this one button to make colors brighter, skin tones warmer, and details sharper (see Figure 5-6).

Figure 5-6. The Enhance command works particularly well on photos that are slightly dark and lack contrast, like the original photo on the top here. In some cases, a single click of the Enhance button may be all the picture needs.
Clicking Enhance makes iPhoto analyze the relative brightness of all the pixels in your photo and attempt to “balance” the image by dialing the brightness or contrast up or down and intensifying dull or grayish-looking areas. In addition to this overall brightness, contrast, and color adjustment, the program also makes a particular effort to identify and bring out the subject of the photo. Usually, this makes pictures look somewhat richer and more vivid than they did originally.
You’ll see the effects of your Enhance button–clicking in the histogram (Introducing the Histogram)—a great way to learn about what, exactly, the Enhance button is doing.
TIP
If clicking Enhance improves your photo somewhat but not quite enough, open the Adjust panel (The Adjust Panel) to see which sliders iPhoto moved and then tweak them slightly to amplify its effect. Because these sliders all have a uniform starting position—the first three sliders start out in the middle and the rest all the way to the left—it’s easy to see which ones iPhoto moved.
iPhoto’s image-correcting algorithms are just guesses at what your photo is supposed to look like. The program has no way of knowing whether you’ve shot an overexposed, washed-out picture of a vividly colored sailboat or a perfectly exposed picture of a pale-colored sailboat on an overcast day. So you may find that Enhance has no real effect on some photos and only minimally improves others. Remember, too, that you can’t enhance just one part of a photo—it’s all or nothing. If you want to selectively adjust specific portions of a picture, you need a true pixel-editing program like Aperture, Lightroom, or Photoshop Elements.
NOTE
iPhoto for iOS has a set of brushes you can use to edit certain portions of your photo. Skip ahead to Using Brushes for details.
If the Enhance button fails to coax the best possible results from your digital photos, you can use the Adjust panel instead, as described on The Adjust Panel.
Fixing Red-Eye
Let’s say you snap a near-perfect family portrait: The focus is sharp, the composition is balanced, and everyone is smiling. And then you notice that Uncle Bob, dead center in the picture, has glowing red eyes.
You’re the victim of red-eye, a common problem in flash photography (especially with older cameras). This creepy, possessed look has ruined many an otherwise-great photo (see Figure 5-7).
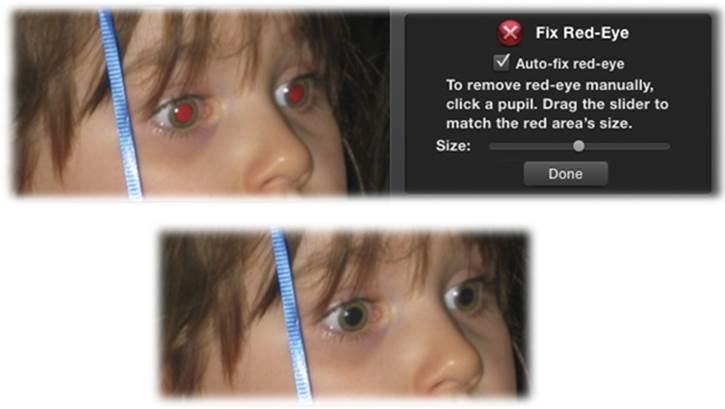
Figure 5-7. Top: When you click Fix Red-Eye in the Quick Fixes panel, instructions appear telling you what to do: Click carefully inside each affected pupil. Bottom: Friends and family members look more attractive—and less like Star Trek characters—after you touch up their phosphorescent red eyes with iPhoto.
Red-eye is caused by light reflected back from your subjects’ eyes. The bright light of your camera’s flash illuminates the blood-red retinal tissue in their eyes. That’s why red-eye problems are worse when you shoot pictures in a dim room: Your subjects’ pupils are dilated, allowing evenmore light from your flash to reach their retinas. Turning up the room’s lights or using the camera’s red-eye reduction feature can help prevent devil eyes. But if it’s too late for that, iPhoto can help digitally remove the unsettling red pixels. (It won’t fix pet eye problems, though, because animal eyes reflect white or green light instead.)
Truth be told, the red-eye tool doesn’t know an eyeball from a pinkie toe. It just turns any red pixels black, regardless of what body part they’re associated with. So your job is to tell iPhoto exactly what needs fixing. Start by opening your photo and zooming in, if necessary, so that you have a closeup view of the eye with the crimson problem. Then click Fix Red-Eye.
Most of the time, you can leave the Auto-fix checkbox turned on and, if iPhoto senses a face in the photo, it zaps the red eye for you. If it doesn’t, then use the crosshairs cursor to click inside each red-tinted eye; with each click, iPhoto neutralizes the red pixels, painting the pupils solid black. To adjust the size of the cursor, drag the Size slider. When everything looks good, click Done.
Straightening
Many a photographer has remarked that it’s harder to keep the horizon straight when composing images on a digital camera’s LCD screen than when looking through an optical (eyepiece) viewfinder. Whether that’s true or not, off-axis, tilted photos are a fact of photography, and especially of scanning—and iPhoto makes fixing them incredibly easy. Figure 5-8 shows the secrets of the Straighten slider.
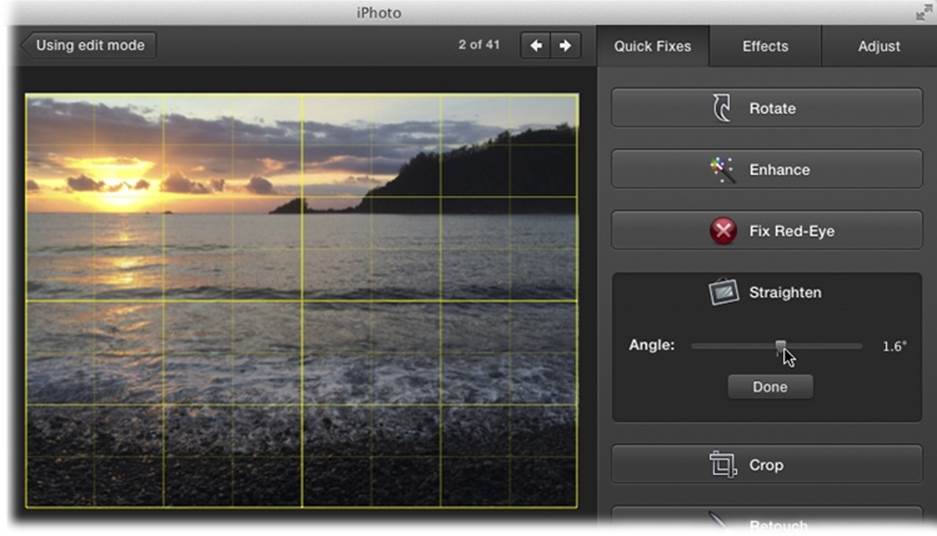
Figure 5-8. When you click the Straighten button, iPhoto superimposes a yellow grid on your picture, as shown here. By moving the Angle slider in either direction, you rotate the image. You can use the yellow grid to help you align the horizontal or vertical lines in your photo.
If you think about it, you can’t rotate a rectangular photo without introducing skinny empty triangles at the corners of its “frame.” Fortunately, iPhoto sneakily eliminates that problem by very slightly magnifying the photo as you straighten it. That means you lose skinny triangles at the corners, but at least you don’t see empty triangular gaps when the straightening is over.
In other words, the straightening tool isn’t a free lunch. Straightening an image decreases the picture quality slightly (by blowing up the picture, thus lowering the resolution) and clips off tiny scraps at the corners. You have to view the before and after pictures side by side at high magnification to see the difference, but it’s there.
So, as cool as the straightening tool is, it’s not a substitute for careful composition with your camera. However, it can help you salvage an otherwise wonderful image that’s skewed. (And besides—if you lose a tiny bit of clarity in the straightening process, you can always apply a little sharpening afterward. Read on to learn how.)
Cropping
Think of iPhoto’s cropping tool as a digital paper cutter. It neatly shaves off unnecessary portions of a photo, leaving behind only the part you really want.
You’d be surprised at how many photographs can benefit from selective cropping. For example:
§ Eliminate parts of a photo you just don’t want. This is a great way to chop your brother’s ex-girlfriend out of an otherwise perfect family portrait (provided she’s standing at the end of the lineup).
§ Improve a photo’s composition. Trimming a photo lets you adjust where your subject matter appears within the frame of the picture. If you inspect the professionally shot photos in magazines or books, you’ll discover that many pros get more impact from a picture by cropping tightly around the subject, especially in portraits.
§ Get rid of wasted space. You can eliminate huge expanses of sky (or grass) that add nothing to a photo, for example, keeping the focus on your subject.
§ Fit a photo to specific proportions. If you’re going to place your photos in a book layout (Chapter 9) or turn them into standard-size prints (Chapter 7), you may need to adjust their proportions. That’s because there’s often a substantial discrepancy between the aspect ratio (length-to-width proportions) of your digital camera’s photos and those of film cameras—a difference that will come back to haunt you if you order prints (though it’s fixable).
How to Crop a Photo
Here are the steps for cropping:
1. Open the photo in Edit view.
You can use any of the methods mentioned earlier in this chapter, like clicking a thumbnail and then pressing Return.
2. Press the C key on your keyboard or, in the Quick Fixes panel, click Crop.
The Constrain pop-up menu appears in the Quick Fixes panel, and a light-gray crop box appears around your photo (Figure 5-9).
You can adjust the crop box by dragging its edges. You can also create a new crop box, if you like, by dragging diagonally up or down.
As you drag, a tic-tac-toe grid appears, just in case you want to crop according to the Rule of Thirds. (The Rule of Thirds is a photographic guideline that imagines a photo divided into thirds, both horizontally and vertically. Better composition, the Rule contends, comes from putting the most interesting parts of the image at these four points, as shown in Figure 5-9.)
3. If you like, make a selection from the Constrain pop-up menu.
This menu controls the crop tool’s behavior. When the Constrain checkbox is turned off, you can draw a crop box of any size and proportions, in essence going freehand.
When you choose one of the options in this pop-up menu, however, iPhoto constrains the crop box you draw to preset proportions, which prevents you from coloring outside the lines, so to speak.
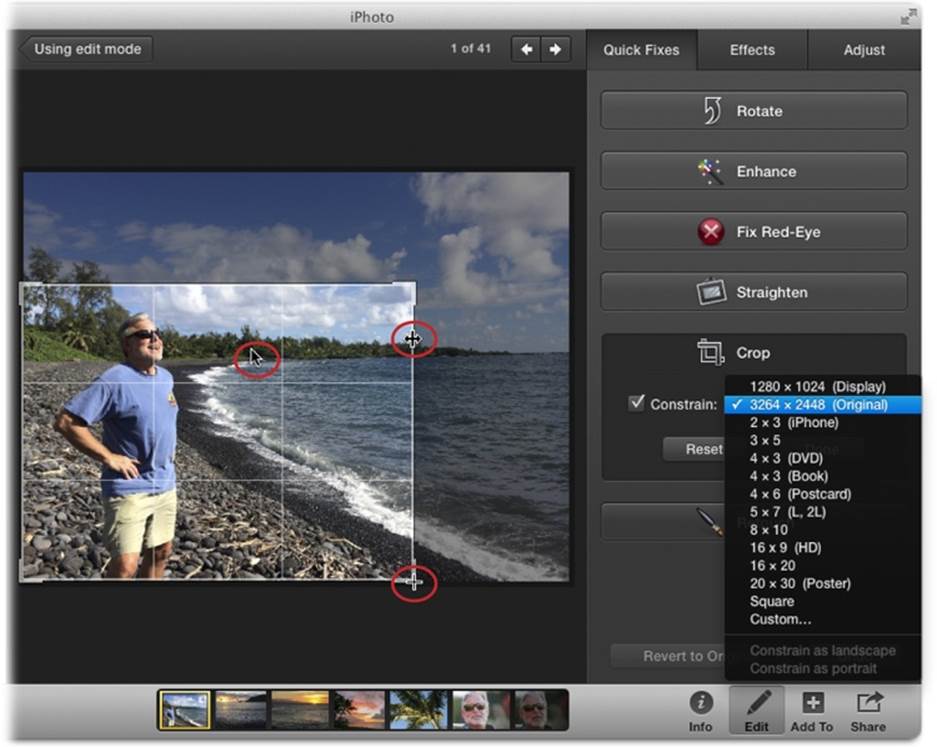
Figure 5-9. In this improbable illustration are the three different cursor shapes you may see, depending on where you move the pointer: the + crosshair for the initial drag, the double arrow for reshaping when you’re near a boundary, and the arrow pointer for sliding the entire crop box around the photo. Once you click Done, the excess margin falls to the digital cutting-room floor, enlarging your subject. (You can always get it back by clicking “Revert to Original.”)
The Constrain option is especially important if you plan to order prints of your photos (Chapter 7). Prints come only in standard photo sizes: 4 x 6, 5 x 7, 8 x 10, and so on. You may recall, however, that most digital cameras produce photos whose proportions are 4:3 (width to height). This size is ideal for DVDs and iPhoto books, because standard TV and book layouts use 4:3 dimensions, too—but it doesn’t divide evenly into standard print sizes for photographs.
That’s why the Constrain pop-up menu offers you canned choices like 4 x 6, 5 x 7, and so on. Cropping to one of these preset sizes guarantees that your cropped photos will fit perfectly into Kodak prints. (If you don’t constrain your cropping this way, Kodak—not you—will decide how to crop them to fit.)
Another crop-to-fit option in the Constrain menu lets you crop photos for use as a desktop picture; this option is named something like “1024 x 768 (Display)” (or whatever your actual monitor’s dimensions are). You’ll also find an Original option here (which maintains the proportions of the original photo even as you make it smaller), and a Square option.
TIP
Here’s a bonus feature: the Custom item in the Constrain pop-up menu. Select it and then, in the two text boxes that appear, you can type any proportions you want: 4 x 7, 15 x 32, or whatever your eccentric design calls for.
As soon as you make a selection from this pop-up menu, iPhoto draws a preliminary crop box—of the proper dimensions—on the photo, and darkens everything outside it.
By the way, iPhoto thinks hard about how to display this box—that is, whether it starts out in either landscape (horizontal) or portrait (vertical) orientation. The crop box always starts out matching the photo itself: landscape for landscape photos, portrait for portrait photos. You can, however, reopen the Constrain pop-up menu and choose “Constrain as landscape” or “Constrain as portrait” to flip the crop box 90 degrees. In order to use these two commands, you first have to choose an aspect ratio from the menu.
At this point, the cropping area that iPhoto suggests with its dark-margin rectangle may, as far as you’re concerned, be just right. In that case, skip to step 6. More often, though, you’ll probably want to give the cropping job the benefit of your years of training and artistic sensibility byredrawing the cropping area.
4. Drag the crop box to adjust its size and shape, or create a new crop box by starting at a point outside the current one and dragging diagonally across the portion of the picture that you want to keep.
As you drag, iPhoto dims the part of the photo that it will eventually trim away (see Figure 5-9).
TIP
Even if you turned on one of the Constrain options in step 3, you can override the constraining by pressing the Shift key after you start dragging.
Don’t worry about getting your selection perfect; iPhoto doesn’t actually trim the photo until you click the Done button.
5. Adjust the crop, if necessary.
If the shape and size of your crop box is OK, but you want to adjust which part of the image is selected, then you can move the crop box without redrawing it. Position your cursor inside the box so the pointer turns into an arrow, and then drag the box where you want it.
You can also change the box’s size. Point your cursor at any edge or corner so that it changes to a + shape (near the corner) or a double-headed arrow (near the edge)—see Figure 5-9—and then drag to reshape the box.
If you get cold feet, you can cancel the operation by tapping the Esc key or clicking Reset.
NOTE
Despite its elaborate control over the relative dimensions of your crop box, iPhoto doesn’t tell you the size, in pixels, of the end result. If you want to crop a photo to precise pixel dimensions, you have to use another program, like Photoshop Elements. Beyond iPhoto explains how to open photos in a different editing program.
6. When the crop box is just the way you want it, click Done or press Return.
If throwing away all those cropped-out pixels makes you nervous, relax. If you realize immediately that you’ve made a cropping mistake, then you can click the Undo or “Revert to Original” button, or choose Edit→Undo to go back one editing step. If you have regrets weeks later, on the other hand, then you can always select the photo and choose Photos→“Revert to Original.” After asking if you’re sure, iPhoto promptly reinstates the original photo from its backup, discarding every change you’ve ever made to it.
NOTE
When you crop a photo, you’re changing it in all the albums and projects in which it appears. If you want a photo to appear cropped in one album but not in another, you have to duplicate it (select it and then choose Photos→Duplicate), and then edit each version separately. (You can also Control-click a photo in Edit view and choose Duplicate from the resulting menu.)
UP TO SPEED: WHEN CROPPING PROBLEMS CROP UP
Remember that cropping always shrinks your photos. Remove too many pixels, and your photo may end up too small—that is, with a resolution too low to print or display properly. Resolution controls pixel size by determining how many pixels are in your photo per square inch (you’ve likely heard it expressed as ppi for “pixels per inch”).
Here’s an example: You start with a 1600 x 1200-pixel photo. Ordinarily, that’s large enough to be printed as a high-quality, standard 8 x 10 portrait.
Then you go in and crop the shot. Now the composition is perfect, but your photo measures only 800 x 640 pixels. You’ve tossed out nearly a million and a half pixels!
The photo no longer has a resolution high enough to produce a top-quality 8 x 10 print. The printer is forced to blow up the photo to fill the specified paper size, producing visible, jagged-edged pixels in the printout. The 800 x 640 pixel version of your photo would make a great 4 x 5 print (if that were even a standard-size print), but pushing the print’s size up noticeably degrades the quality because the pixels are big enough to see individually.
This is an example of a situation where having a high-resolution digital camera (at least 10 megapixels) offers a significant advantage. Because each shot starts out with such high pixel dimensions, you can shave away a few hundred thousand pixels and still have enough left over for good-sized, high-resolution prints.
Another way to avoid cropping problems is to turn off your camera’s digital zoom option (if it has one). If you use that feature, your camera crops photos before saving them to the memory card. You’ll get better results by cropping in iPhoto yourself.
Moral of the story: Know your photo’s size and intended use—and don’t crop out more photo than you can spare.
Retouching Blemishes, Scratches, and Hairs
Sometimes an otherwise perfect portrait is spoiled by the tiniest of imperfections—a stray hair or an unsightly blemish, for example. Professional photographers, whether working digitally or in a traditional darkroom, routinely remove such minor imperfections from their final prints—a process known as retouching, for clients known as self-conscious or vain. (Kidding!)
TIP
One of the most common retouching tasks is lightening teeth. You can’t do that in iPhoto for Mac, but you can do it in iPhoto for iOS. Using Brushes tells you how.
iPhoto’s Retouch brush lets you do the same thing with your digital photos. You can paint away scratches, spots, hairs, or any other small flaws with a few quick strokes.
The operative word here is small. The Retouch brush can’t completely erase somebody’s mustache. It’s intended for tiny touch-ups that don’t involve repainting whole sections of a photo. (For that kind of overhaul, you need a pixel-editing program like Photoshop Elements.)
The Retouch brush works its magic by blending the colors in the tiny area that you’re fixing. It doesn’t cover the imperfections you’re trying to remove, but rather blurs them out by softly blending them into a small radius of surrounding pixels. You can see the effect in Figure 5-10.
Using the Retouch Brush
Once you’ve clicked Retouch in the Quick Fixes panel, your cursor turns into a dashed circle. Find the imperfection and “paint” over it, either by dabbing or dragging to blend it with the surrounding portion of the photo. You can use the Size slider to make the Retouch brush’s size match the size of the item you’re fixing. When you’re finished, click Done.
TIP
You can adjust the size of the Retouch brush using your keyboard, too: Press the left bracket key ([) repeatedly to make it smaller, or the right bracket key (]) to make it bigger.
Don’t overdo it: If you apply too much retouching, the area you’re working on will look noticeably blurry and unnatural, as if someone smeared Vaseline on it. Fortunately, you can use the Undo button at the bottom of the panel to take back individual brushstrokes (you can also choose Edit→Undo or press ⌘-Z). When you’re finished, click Done. If you don’t like the results, click the Undo button a few times or click “Revert to Original” to obliterate all the edits you’ve made.

Figure 5-10. Top: As you use the Retouch brush, iPhoto marks the area you’ve painted across with a light brown overlay. Most of the time, the Retouch brush works like magic, but sometimes it creates bizarre results. In those cases, press ⌘-Z to undo your latest stroke. Bottom: Overall, though, the Retouch brush does a good job of removing the imperfections in this flower or, in the case of a portrait, hiding blemishes and softening wrinkles (like digital Botox!). The Retouch brush is particularly useful if your photo library contains pictures that you’ve scanned. In that case, you can use it to wipe away the dust specks and scratches that often appear on film negatives and prints, or those that are introduced by the scanner itself.
If you’ve used the Retouch brush in earlier versions of iPhoto, you’ll be amazed at how much better it works now. Apple borrowed from its professional photo-editing program (Aperture) to give iPhoto’s tools a huge upgrade; the Retouch brush in iPhoto is now very powerful indeed. You can paint out not just zits and wrinkles, but even entire shirt stains.
NOTE
On high-resolution photos (especially raw files), it can take a moment or two for iPhoto to process each individual stroke of the Retouch brush. If you don’t see any results, wait a second for iPhoto to catch up with you.
The Effects Panel
iPhoto offers three lighting effects, three effects that alter color intensity, five color effects, and three effects that soften a photo’s borders. These effects can be incredibly useful for creating artistic images or saving photos with terrible color that you can’t fix any other way.
No matter which version of Edit view you’re in (normal or full-screen), click the Effects tab or tap the E key on your keyboard to open the Effects panel (Figure 5-11).
TIP
In most cases, you can click an Effects panel button repeatedly to intensify its impact. Some effects (Antique, Matte, Vignette, Edge Blur, Fade, and Boost) even display a number to let you know how many times you’ve applied it (Figure 5-11 shows an example). You can use the left and right arrows on either side of the digit to decrease or increase the effect, respectively. You don’t see anything like that when you click the panel’s first two rows of buttons, but clicking them repeatedly still adds to the effect (watch your photo to see the change).
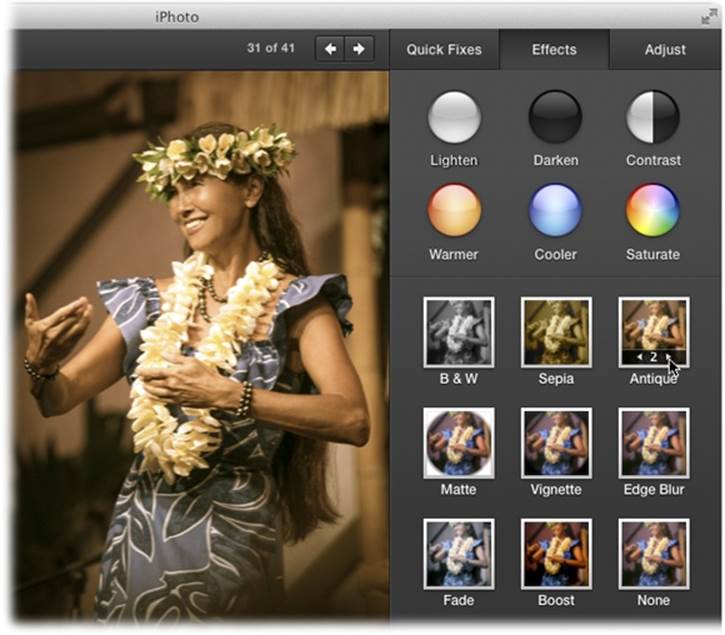
Figure 5-11. The Effects panel offers 14 different clickable effects, good for a solid 10 minutes of photo-editing fun. The Antique effect is shown here, at a strength of 2.
Applying these effects is probably the easiest thing you’ll ever do in iPhoto: Just click a button to apply its effect to your photo. Here’s what each one does:
§ Lighten. Brightens photos that are too dark (underexposed).
§ Darken. Darkens photos that are too light (overexposed).
§ Contrast. If your photo looks flat, use this effect to bring out details. It makes the dark parts of the photo a little darker and the light parts a little lighter.
§ Warmer. If your photo looks too blue (cold), use this effect to add golden tones and warm it up.
§ Cooler. Introduces more blue tones if your photo is riddled with red or gold.
§ Saturate. Want to make the colors in your flower photos pop off the page? Give this button a few clicks (up to 20) to intensify the color. Try not to use this effect on photos of people, though—it can turn their skin a very unflattering hot pink.
§ B & W (Black and White), Sepia. These effects drain the color from photos. B & W converts them into moody grayscale images (a great technique if you’re going for that Ansel Adams look); Sepia repaints them entirely in shades of antique brown (as though they were 1865 daguerreotypes). Click once to apply the effect; click again to remove it.
§ Antique. A heck of a lot like Sepia, but not quite as severe. It still makes photos light brownish, but preserves some of the original color—like, say, a photo from the 1940s. Figure 5-11 shows this effect in action.
§ Matte. This effect whites out the outer portion of the photo, creating an oval-shaped frame around the center.
§ Vignette. Same idea as Matte, except that iPhoto darkens the outer edges.
§ Edge Blur. Same idea again, except the outer edges lose focus rather than changing color. The central portion of the photo stays in focus.
§ Fade Color. The colors get faded quite a bit, like a photo from the 1960s.
§ Boost Color. Increases the color saturation, making colors more vivid.
§ None. Click this button to undo all the playing you’ve done so far, taking the photo back to the way it was when you first opened the Effects panel.
The Adjust Panel
For thousands of people, the handful of basic image-fixing tools described on the previous pages offer plenty of power. But power users don’t like having to hop over to a program like Photoshop to make more advanced changes to their pictures, like fiddling with exposure (the intensity of light), adjusting shadows and highlights, sharpening, and so on.
That’s where the Adjust panel comes in (Figure 5-12). To see it, click the Adjust tab in Edit view.
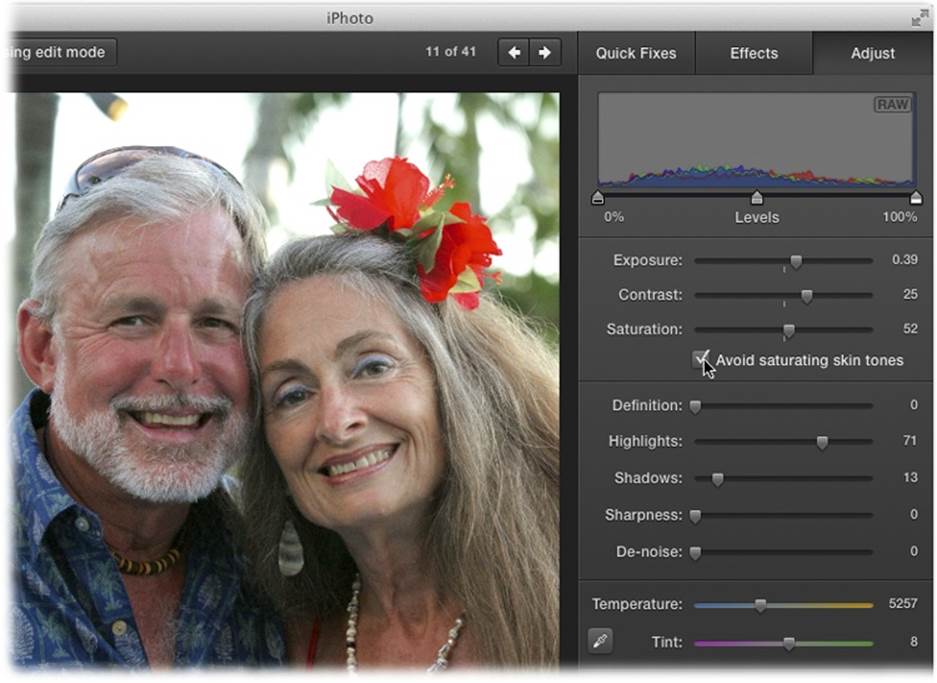
Figure 5-12. When the Quick Fixes panel’s Enhance option doesn’t do the trick, summon the Adjust panel, which gives you much finer control over color and lighting. There are two ways to manipulate the panel’s sliders, depending on the degree of fine-tuning you need to do. You can drag a slider’s handle or click the slider itself, which makes the handle jump to that spot.
Before you let the following pages turn you into a tweak geek, here are some preliminary words of advice concerning the Adjust panel:
§ When to use it. Plenty of photos need no help at all; they look fantastic right out of the camera. And others are ready for prime time after a single click of the Enhance button (Rotating).
The beauty of the Adjust panel, though, is that it permits infinite gradations of the changes that the Enhance feature makes. For example, if a photo looks too dark and murky, you can bring details out of the shadows without over-lightening the highlights. Or if the snow in a skiing shot looks too bluish, you can de-blue it. Or if the colors are blown out in your sunset shot, you can recover detail in the highlights without affecting the shadows.
In short, the Adjust panel can make fixes that no one-click magic button can touch.
§ How to play. You can fiddle with the Adjust panel’s sliders in two different ways, as explained in Figure 5-12.
§ Backing out. You can always click the panel’s “Revert to Original” or Undo buttons. The first one takes you back to the original photo you shot, while Undo lets you take back individual changes you made with the Adjust panel.
TIP
While in Edit view, press and hold the Option key to turn the Undo button into a Redo button. This lets you resurrect an edit after undoing it.
If you’ve tweaked the photo in one panel [say, Quick Fixes] and then you tweak it in another panel [Adjust] during the same editing session, the “Revert to Original” button changes to read “Revert to Previous.” This is handy if you succumb to the temptation of using the Adjust panel on a photo a second time and then decide it looked just fine before. Essentially the “Revert to Previous” button means “Undo all the Adjust-panel changes I’ve made during this editing session.”
Introducing the Histogram
While you can certainly make a bad photo look good by dragging the Adjust panel’s sliders to and fro, learning to use them effectively involves learning about its histogram: the colorful graph at the top of the panel.
The histogram is the heart of the Adjust panel. It’s a self-updating representation of the dark and light tones that make up your photograph. If you’ve never encountered a histogram before, this may sound complicated. But the histogram is a terrific tool, and it’ll make more sense the more you use it.
Within each of the histogram’s superimposed graphs (red, blue, and green), the scheme is the same: The amount of the photo’s darker shades appears toward the left side of the graph; the lighter tones are graphed on the right side.
So if you’re working on a very dark photograph—a coal mine at midnight, say—you’ll see big mountain peaks at the left side of the histogram, trailing off to nothing toward the right. A shot of a brilliantly sunny snowscape, on the other hand, will have lots of information on the right side of the histogram and very little on the left.
The peaks represent the areas in the photo where there’s a lot of information. A histogram with peaks throughout the graph indicates a photo that’s balanced, with no super-dark or super-light areas (which would cause steep peaks stacked against the left or right sides of the graph). These middle mountains are fine, as long as you have some visual information in other parts of the histogram, too.
The histogram for a bad photo, on the other hand—a severely under- or overexposed one—has mountains all bunched at one end or the other. Rescuing those pictures involves spreading the mountains across the entire spectrum, which is what the Adjust panel is all about.
TIP
Technically speaking, the histogram is a collection of tiny bar graphs; the taller the bar, the more pixels you have in the photo at that particular level of brightness and color. Another way to think of it is to imagine that your photo is a mosaic, and that the individual tiles have been separated into same-color stacks. The taller the stack, the more tiles you have of that particular color.
Three Channels
As noted above, the histogram actually displays three superimposed graphs at once. These layers—red, green, and blue—represent the three “channels” of a color photo.
When you make adjustments to a photo’s brightness values—by dragging the Exposure slider just below the histogram, for example—you’ll see the graphs in all three channels move in unison. Despite changing shape, they essentially stick together. Later, when you make color adjustments using, say, the Temperature slider, you’ll see those individual channels move in different directions.
Adjusting the Levels
If the mountains of your histogram seem to cover all the territory from left to right, you already have a roughly even distribution of dark and light tones in your picture, so you’re probably in good shape. But if the graph comes up short on either the left (dark) or the right (light) side of the histogram, you need to make an adjustment to spread out the photo’s information.
To do so, drag the right or left handle on the Levels slider inward, toward the base of the “mountain” (Figure 5-13). If you’re moving the right handle inward, for example, you’ll notice that the whites become brighter, but the dark areas stay pretty much the same; if you drag the left handle inward, the dark tones change, but the highlights remain steady.
TIP
Instead of dragging these handles, you can click the outer base of the mountain to move the handle to that location. It’s a tiny bit faster and gives you better control of the handle’s landing point.
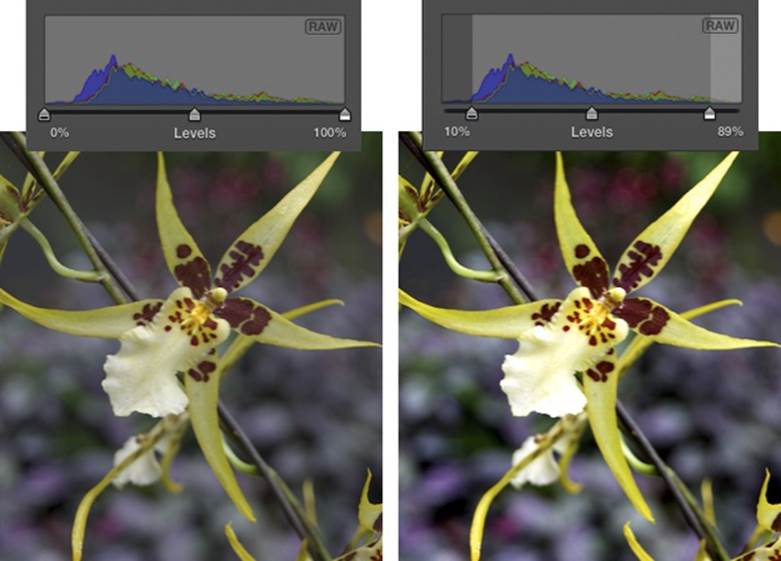
Figure 5-13. Left: One way to fix a photo that looks too “flat” is to adjust the Levels slider below the histogram. Notice how the tonal information is bunched up in the middle of this histogram, meaning the photo has no true highlights or shadows. Right: Move the slider’s left and right handles inward, toward the edges of the histogram data, to improve both highlights and shadows.
In general, you should avoid moving these endpoint handles inward beyond the outer edges of the histogram’s “mountains.” Doing so adds contrast, but it also throws away whatever data is outside the handles, which generally makes for a lower-quality printout.
Once you adjust the shadows and highlights handles, turn your attention to the middle handle, which controls the photo’s midtones. The general rule is that you center the midtone handle between the shadow handle on the left and the highlight handle on the right. Often, the result is a pleasing rendition of the photo. But you can adjust it to taste; inching the handle to the left lightens the midtones (and reduces contrast); moving it to the right darkens them (and increases contrast).
Exposure
In the simplest terms, the Exposure slider makes your picture lighter when you move it to the right and darker when you move it to the left. That said, its effects differ slightly depending on your photo’s file format:
§ When you’re editing a JPEG (that is, most photos from most cameras), the Exposure slider primarily affects the middle tones (as opposed to the brightest highlights and darkest shadows). If you’re used to Photoshop, you may recognize this effect as a relative of its gamma controls. (Gamma refers to the relationship between a pixel’s numerical brightness value and the brightness our eyes perceive.)
§ When you’re working with raw files (Raw Files), Exposure is even more interesting. It actually changes the way iPhoto interprets the dark and light information that your camera recorded when it took the picture. The effect is like changing the ISO setting (the camera’s sensitivity to light) before taking the picture—except that you can make this kind of change long after you snap the shutter.
This is one of the advantages of shooting in raw format: iPhoto has a lot more information to work with than in a JPEG. As a result, you can make exposure adjustments without sacrificing the photo’s overall quality.
Watch the histogram as you move the Exposure slider. Make sure you don’t wind up shoving any of the “mountain peaks” beyond the edges of the histogram box. If that happens, then you’re discarding precious image data; when you print, you’ll see a loss of detail in the darks and lights.
NOTE
If you’ve already adjusted your image using the Levels slider (as described in the previous section), then you probably won’t need to play with the Exposure and Contrast sliders. Most images can be fine-tuned with either set of controls (the three handles on the Levels slider, or the dynamic duo of Exposure and Contrast). But very few pictures require both approaches.
Contrast
The Contrast slider changes the shape of the histogram by pushing the data out in both directions. Contrast is the difference between the darkest and lightest tones in your picture. If you increase the contrast, you “stretch out” the shape of the histogram, creating darker blacks and brighter whites, as shown in Figure 5-13. If you decrease the contrast, you scrunch histogram’s data inward, shortening the distance between the dark and light endpoints. Since the image data now resides in the middle of the graph, the overall tones in the picture are duller. Photographers call this look “flat” or “muddy.”
Contrast works especially well on “flat” shots because this single slider moves the histogram in two directions at once (outward toward the edges). You can create a similar effect with the Levels slider by moving the outer handles inward toward the edges of the histogram.
Which approach is better? If the histogram data is centered in the middle of the graph, then Contrast is the easier adjustment because it pushes the data outward evenly. But if the histogram data is skewed to one side or the other, then Levels is the better choice because you can adjust the highlights and shadows independently.
Saturation
When you increase the saturation of a photo’s colors, you make them more vivid; essentially, you make them “pop.” You can also use this setting to improve photos that have harsh, garish colors by dialing down their saturation so the colors end up looking a little less intense. That’s a useful trick in photos whose composition is so strong that the colors are almost distracting (think super-bright objects, like ceramics or flowers). You can increase or decrease the intensity of a photo’s colors by moving the Saturation slider right or left, respectively.
The Adjust panel can save you from yourself, at least when it comes to saturation. If you’re trying to crank up the color of Cousin Jack’s orange shirt—but want to avoid drenching Uncle Jack’s face in hyped-up hues—then turn on the “Avoid saturating skin tones” setting before tweaking theSaturation slider. When you do, this setting becomes a vibrancy slider (even though its name doesn’t change) that intensifies the colors of pixels that aren’t already highly saturated. In fact, it works so well that you might consider leaving the “Avoid saturating skin tones” setting turned on indefinitely.
FREQUENTLY ASKED QUESTION: BATTLE OF THE SLIDERS
All right, first you said that I can create a well-balanced histogram with the Levels slider. Then you said that the Exposure and Contrast sliders do pretty much the same thing. So which should I use?
Photography forums everywhere are overflowing with passionate comments advocating one approach over the other.
The bottom line is, for most normal JPEG photos, you can use whichever you prefer, as long as you wind up creating a histogram whose peaks generally span the entire graph.
If you have no preference, you may as well get into the habit of using the Levels slider. One day, when you begin editing super-high-quality raw files (Raw Files), you’ll appreciate the clever way these controls interpret the data from the camera’s sensors with virtually no loss of quality.
NOTE
iPhoto’s Enhance feature (Rotating) automatically adjusts saturation, but it doesn’t give you a way to control the degree of its adjustment.
Definition
The result of moving iPhoto’s Definition slider is tough to describe. Dragging it to the right can make a hazy or muddy photo appear sharper, but it’s not the same as using the Sharpness slider (described below). The Definition slider has more in common with the Contrast slider, though it specifically increases contrast in the midtones, the parts of a photo that contain small details. In doing so, it makes your photo look sharper (if you’ve ever used the Unsharp Mask filter in Photoshop or Photoshop Elements, that’s the gist).
You’d be hard-pressed to find a photo that doesn’t benefit from at least a little extra definition, save for portraits (nobody needs extra definition in their skin!). Try moving this slider up to 20 or so and see what you think.
Highlights and Shadows
The Highlights and Shadows sliders are designed to recover lost detail in the highlights and shadows of your photos, turning what once might have been unsalvageably overexposed or underexposed photos into usable shots.
Sure, you can find these kinds of sophisticated adjustments in Adobe Camera Raw or Aperture—but in a program designed for regular folks?
Suppose you’ve got everything in the photo looking good, except that you don’t have any detail in either the brightest parts of the shot or in murky, dark areas. All you have to do is drag the appropriate slider and marvel as details magically appear. Suddenly, you’ll see texture in what was once a washed-out white wall or sky, or details in what used to be a nearly black shadow (Figure 5-14).
Be a careful, though: If you drag either the Highlights or Shadows slider too far, then everything takes on a strange, radioactive sheen. But used in moderation, these sliders work real magic, especially if you’re editing raw files.
Sharpness
The Sharpness slider seems awfully tempting. Can iPhoto really solve the problem of blurry, out-of-focus photos?
Well, no.
Instead, the Sharpness slider works by subtly increasing the contrast among pixels in your photo, which seems to enhance the crispness. In pro circles, adding a pinch of sharpening to a photo is a regular part of the routine.
To sharpen in iPhoto, drag the Sharpness slider to the right. If you don’t like what you see, drag the slider back to the left to reduce the effect. (There’s no way to remove sharpness captured in the original photo—in other words, there’s no Softness slider per se, though you could use the De-noise slider [described next] to blur the photo a little.)
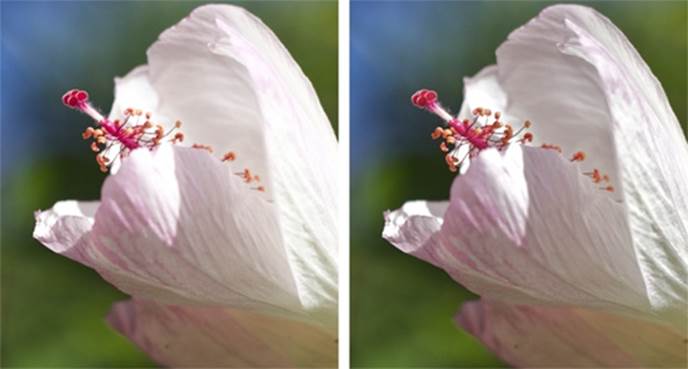
Figure 5-14. Left: The Highlights and Shadows sliders are just more examples of the power tucked into the Adjust panel. Even though the photo on the left looks pretty good, there’s a lot of detail that’s being lost in the highlights. Right: Drag the Highlights slider to the right and presto! A whole world of detail emerges.
Be careful, though: Too much sharpening can ruin a photo, since eventually the pixels become grainy and weird-looking. Fortunately, Apple has mostly protected you from this sort of disaster by keeping both the effects and the side effects of the Sharpness control to a minimum. You can help matters by moving the slider in small increments.
Generally speaking, sharpening should be the last Adjust-panel tweak you make to your photo. If you apply other corrections after sharpening, you may discover that you have to sharpen it again.
NOTE
Keep in mind that photos with a lot of hard lines—landscapes, architecture, or fur-filled pet photos—benefit from a stronger dose of sharpening than, say, portraits, where a lot of sharpening makes imperfections leap out of the photo.
And if you’re going to print the photo, it’s OK if it looks a little too sharp onscreen because the printing process will soften it a little.
De-noise
In photographic terms, noise means graininess—colored or grayscale speckles. Noise is a common problem in digital photography, especially in low-light shots taken with older cameras. Some cameras, for example, claim to have “anti-blur” features that turn out to be nothing more than goosed-up ISO (light-sensitivity) settings in low light. But go above ISO 800 or so, and the resulting digital noise can be truly hideous.
If a photo looks noisy (grainy), you can lessen the effect by moving the Adjust panel’s De-noise slider to the right, which blurs the photo slightly. To gauge how much, first zoom in on your image to 100 percent size (press the 1 key), and then keep an eye on a dark area or the sky as you move the slider. Generally speaking, moving the slider more than halfway softens your image too much.
The De-noise slider can’t work wonders. But by subtly smoothing neighboring pixels, it does a reasonable job of removing noise from low-light photos, which, on grainy shots, can be a definite improvement if your subject is worth saving.
TIP
The De-noise slider is also handy to use if you’ve lightened shadows, as described on Definition, which can introduce noise into the photo.
Color Balance
If all you ever shoot are black-and-white photos, then the Adjust panel’s Levels or Exposure/Contrast sliders may be all you ever need. But if you’re like most people, you’re concerned about a little thing called color.
Truth is, digital cameras (and scanners) don’t always capture color accurately. Digital photos sometimes have a slightly bluish or greenish tinge, producing dull colors, lower contrast, and sickly looking skin tones. In fact, the whole thing might have a faint green or magenta cast. Or perhaps you just want to take color into your own hands, not only to get the hues right, but also to create a specific mood. For example, maybe you want a snowy landscape to look icy blue so friends back home realize just how darned cold it was!
In addition to the Saturation slider (Saturation), the Adjust panel offers two other sliders that wield power over this sort of thing: Temperature and Tint. And it offers two ways to apply such changes: the manual way and the automatic way.
Manual Color Adjustment
The sliders at the bottom of the Adjust panel provide plenty of color-adjustment power. The Temperature and Tint sliders govern the white balance of your photo. Different kinds of light—fluorescent lighting, overcast skies, and so on—lend different color casts to photographs. White balance is a setting that eliminates or adjusts the color cast according to the lighting.
For best results, start with the Tint slider and then adjust the Temperature slider:
§ Tint. Like the tint control on a color TV, this slider adjusts the photo’s overall tint along the red-green spectrum. Nudge the slider to the right for a greenish tint, or left for red. As you go, watch the histogram to see how iPhoto is applying the color.
Adjusting this slider is particularly helpful for correcting skin tones and compensating for difficult lighting situations, like fluorescent lighting.
§ Temperature. This slider, on the other hand, adjusts the photo along the blue-orange spectrum. Move the slider to the left to make the image “cooler,” or slightly bluish. Move the slider to the right to warm up the tones, making them more orangeish—a particularly handy technique for breathing life back into subjects who have been bleached white with a flash. A few notches to the right on the Temperature slider, and their skin tones look healthy once again!
Professional photographers love having color-temperature control; in fact, many photographers can handle the bulk of their image correction with nothing but the Exposure and Temperature settings.
Automatic Color Correction
Dragging the Tint and Temperature sliders by hand is one way to address color imbalances in a picture. But there’s an easier way: Use iPhoto’s Automatic Color Adjustment tool to adjust both sliders automatically.
It relies on your ability to find, somewhere in your photo, an area of what should be medium gray or white (you can use either). Once you find the gray or white point, iPhoto takes it from there—it can adjust all the other colors in the photo accordingly, shifting color temperature and tint with a single click. This trick works amazingly well on some photos.
Before you use this feature, though, make sure you’ve already adjusted the photo’s overall exposure, using the techniques described on the previous pages.
Next, scan your photo for an area that should appear as a neutral gray or clean white (something that really is white, and not a white reflection). Slightly dark grays are better for this purpose than bright, overexposed grays.
Once you’ve found such a spot, click the eyedropper next to the Tint slider. Your cursor turns into a + that you can position over your gray or white sample, as shown in Figure 5-15 (left). Then simply click, and iPhoto automatically adjusts the color-balance sliders to balance the photo’s overall color (Figure 5-15, right).
If you don’t like the results, click the Undo button and then click a different neutral area. You can keep doing this until the photo looks good.
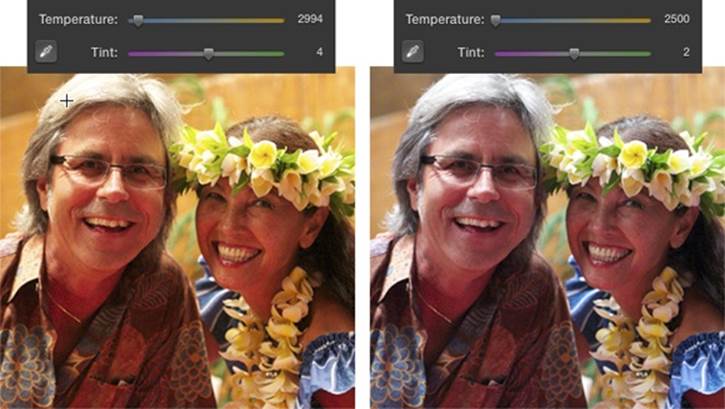
Figure 5-15. Left: Click the eyedropper to activate the Automatic Color Adjustment tool, and then position the + cursor on a neutral gray or white area and click once. Right: iPhoto adjusts the whole photo’s color for you, as shown here, and eradicates the yellow color cast.
Thankfully, there’s an easy way to check how well iPhoto corrected the photo. Take a look at an area that should be plain white. If it’s clean (no green or magenta tint), then you’re probably in good shape; if not, then undo the adjustment and try again.
TIP
If you’re a portrait photographer, here’s a trick for magically correcting skin tones. The key is to plan ahead by stashing a photographer’s gray card somewhere in the composition that can be cropped out of the final print. Make sure the card receives about the same amount of lighting as the subject.
Later, in iPhoto, click the gray card in the composition with the automatic color corrector, and presto: perfect skin tones! Now crop out the gray card and make your print, grateful for all the time you just saved.
Copy and Paste
Working an image into perfect shape can involve a lot of time and slider-tweaking. And, sometimes, a whole batch of photos require the same fixes—photos you took at the same time, for example.
Fortunately, you don’t have to recreate your masterful slider work on 200 photos individually, spending hours performing repetitive work. You can copy your adjustment settings from one photo and paste them onto others.
First, make sure you’re in Edit view, and then open a photo you’ve previously edited. Then choose Edit→Copy Adjustments or press Option-⌘-C. Now, move to the next shot (using the thumbnails browser, for example) and then choose Edit→Paste Adjustment or press Option-⌘-V, and iPhoto applies all your corrections to the new picture. You can apply those copied settings to as many photos as you wish.
This is a gigantic timesaver when you’re correcting several photos shot in the same lighting conditions.
POWER USERS’ CLINIC: COPING WITH FLUORESCENT LIGHTING
You can correct most pictures using iPhoto’s automatic color-correction tool or its Tint, Temperature, and Saturation sliders. Some images, however, will drive you insane—no amount of tweaking will seem to make their colors look realistic. Pictures taken under fluorescent lighting can be particularly troublesome.
The problem with fluorescent bulbs is that they don’t produce light across the entire color spectrum; there are, in effect, spectrum gaps in their radiance. Your best color-correction tool, the Temperature slider, works only on images where your camera captured a full spectrum of light, so it doesn’t work well on fluorescent-lit shots.
You’ll have some luck moving the Tint slider to the left to remove the green cast of fluorescent lighting. But the overall color balance still won’t be as pleasing as with pictures shot under full-spectrum lighting, such as outside on a sunny day.
The best time to fix fluorescent-light color-balance problems is when you take the picture. One solution is to use your camera’s flash, and to ensure that it’s the dominant light source where possible (its light helps to fill in the gaps in the fluorescent spectrum, making color correcting in iPhoto much easier). Another option is to change your camera’s white balance (the setting that controls the color of light) to fluorescent light. Consult your owner’s manual to learn how.
TIP
You can also Control-click a photo in Edit view and choose Copy Adjustments or Paste Adjustments from the shortcut menu that appears.
Beyond iPhoto
Thanks to the Adjust panel, iPhoto’s editing tools have come a long, long way. These days, there’s a lot less reason now to invest in a dedicated editing program.
But that doesn’t mean that there are no reasons left. The Auto Levels command (in Photoshop and Photoshop Elements) is still a better color-fixer than iPhoto’s Enhance button, and some people really like the “I’m Feeling Lucky” button in Picasa. You also need a Photoshop-type program to superimpose text on a photo, to combine several photos into one (a collage or a composite), to create partial-color effects (where everything but a single object is black and white)—the list goes on.
Adobe Photoshop is by far the most popular tool for the job, but these days it’s available only by subscribing to Adobe’s Creative Cloud, and it’s also one of the most complicated pieces of software known to man. Fortunately, you can save yourself a lot of money by buying Photoshop Elements instead. It’s an easier to use, trimmed-down version of Photoshop with all the basic image-editing stuff and just enough of the high-end features. It costs less than $100, is available without a subscription, plus you can get a free, 30-day trial version from www.adobe.com.
TIP
Looking to spend a little less? Another great editing program is Pixelmator ($30). You can download a free trial from www.pixelmator.com.
The Official Way
As noted at the beginning of this chapter, iPhoto makes it easy to open a photo in another program for editing: You can either use iPhoto’s Preferences to specify that you always want to edit photos in an external program, or you can Control-click a thumbnail whenever the spirit moves you, and then choose “Edit in external editor” from the shortcut menu.
Either way, the photo opens in the other program. After you make your changes, use the other program’s Save command—be sure to pick JPEG as the file format and don’t change the photo’s filename or location—and then return to iPhoto, where you see the changes. If, however, you’re editing a raw file, iPhoto opens a copy of the file as a JPEG instead (unless you’ve specifically told iPhoto to open the raw file, as External Raw Editors explains).
The Quick-and-Dirty Way
If you don’t want to bother with setting up an external editor in iPhoto’s Preferences, then you can also open a photo in another program by dragging its thumbnail right out of the iPhoto window and onto the other program’s Dock icon. In fact, you can drag several thumbnails at once to open all of them simultaneously.
Either way, they open in that other program, and you can happily edit away.
WARNING
When you edit a photo in another program the “quick-and-dirty” way, you’re essentially going behind iPhoto’s back; meaning you’re sacrificing your ability to use the “Revert to Original” command (described below) to restore your photo to its original state in case of disaster.
Reverting to the Original
iPhoto includes built-in protection against overzealous editing—a feature that can save you much grief. If you end up cropping a photo too much, cranking up the brightness of a picture until it seems washed out, or accidentally turning someone’s lips black with the red-eye tool, you can undo all your edits at once with the “Revert to Original” command. This command strips away every change you’ve ever made since the picture arrived from the camera, leaving you with your original, unedited photo.
The secret of the “Revert to Original” command: Whenever you use any editing tools, iPhoto—without prompting and without informing you—creates a list of your changes and records them in its database; those changes aren’t really applied to the image until you export it for use outside of iPhoto. With this system, you can remain secure in the knowledge that, in a pinch, iPhoto can always restore an image to the state it was in when you first imported it.
To restore an original photo (undoing all cropping, rotation, brightness adjustments, and so on), select a thumbnail and then choose Photos→“Revert to Original,” or Control-click a photo and choose “Revert to Original” from the shortcut menu. (When you’re editing a photo, the command reads “Revert to Previous” instead; choosing it removes the changes you’ve made during this editing session.) iPhoto swaps in the original version of the photo, and you’re back where you started.
As noted earlier, iPhoto keeps a running list of your changes whenever you edit your pictures (a) within iPhoto or (b) use a program that you’ve set up to open when you enter Edit view. It does not create a list of changes when you drag a thumbnail onto another program’s Dock icon. In that event, while you can still choose “Revert to Original,” nothing happens.
NOTE
In earlier versions of the program, unedited originals were stored in an Originals folder inside the iPhoto Library package (A Trip to the Library) and the edited versions (duplicates, really) were stored in a folder called Modified, which doesn’t exist anymore. These days, iPhoto tracks edits in its database, which is far more efficient than duplicating files.
Editing Raw Files
Happily, iPhoto can work with files shot in raw format—the special, unprocessed file type that takes up a lot of space on your memory card but offers astonishing amounts of control when editing. Raw is generally available on most newer cameras over $300, and all SLR cameras (those that can handle interchangeable lenses).
TIP
Don’t know which photos are raw files? You could pop open the Info panel to find out or take a peek at the top right of your histogram in the Adjust panel, but there’s a faster way. In fact, you can gather up all your raw files by creating a smart album. Choose File→New Smart Album and set the pop-up menus to “Filename,” “contains,” and, in the text field, type the file extension that your particular camera gives to raw files (Canon uses cr, Nikon uses nef, Olympus uses orf, and so on). When you click OK, iPhoto corrals all the raw files in your library into a single album.
Actually, iPhoto can do more than handle raw files. It can even edit them…sort of.
iPhoto is, at its heart, a program designed to work with JPEG files. Therefore, when it grabs a raw file from your camera, it creates a JPEG version of it. The raw file is there on your hard drive, deep within the labyrinth known as the iPhoto Library package. But when you open the photo in iPhoto, what you see onscreen is a JPEG interpretation of that raw file. (This conversion to JPEG is one reason iPhoto takes longer to import raw files than other formats.)
This trick of using JPEG look-alikes as stand-ins for your actual raw files has two important benefits. First, it lets you work with your photos at normal iPhoto speed, without the lumbering minutes of calculations you’d endure if you were working with the original raw files. Second, remember that your iPhoto photos are also accessible from within iMovie, Pages, and so on—programs that don’t understand raw files.
So the question naturally comes up: What happens if you try to edit one of these raw-file stunt doubles?
No problem. iPhoto accepts any changes you make to the JPEG version of the photo. Then, behind the scenes, it reinterprets the original raw file, applying your edits. Finally, it generates a new JPEG for you to view.
POWER USERS FORUM: THE SECRET RECOVERY SLIDER
As Chapter 1 explains, photos captured in raw format contain far more information than their JPEG brethren (Raw Files). And as you learned in this section, iPhoto was really built to handle JPEG files. Even so, a little more raw editing power seems to sneak into the program now and then.
Case in point: If you open a raw file in Edit view and then open the Adjust panel, you can hold down the Option key to make the Exposure slider change to a Recovery slider. If you continue to hold down Option as you drag the slider to the right, you can recover hidden details in the highlights that iPhoto didn’t initially display (alas, it doesn’t work on shadows). Who knew?!
External Raw Editors
It’s nice that iPhoto comes with such powerful editing tools, and that you can use them to work with raw files. Nevertheless, iPhoto doesn’t offer every conceivable editing tool. So what happens if you want to edit your raw files in another program, while still using iPhoto to organize them? Here, life can get a little complicated.
NOTE
iPhoto 9.5 shares its library with Aperture 3.3 and later (Apple’s pro-level photo editing program). That means you can share files between the two without having to import or export them. See the box on iPhoto and Aperture: The Uni-Library for more info.
First, choose iPhoto→Preferences→Advanced, and turn on “Use RAW when using external editor.” You’ve just told iPhoto that you want to work with raw files in a different program, probably Adobe Camera Raw (the raw-file editor that comes with Photoshop and Photoshop Elements), Lightroom, Aperture, or the raw editor that came with your camera (if you installed the manufacturer’s software, that is).
Now, when you open a raw file for editing, one of two things may happen:
§ If you’ve never edited the raw file, it opens in Adobe Camera Raw (or whatever raw-editing program you use), ready for editing.
§ If you have edited the file in iPhoto, then iPhoto sends the edited JPEG file to Camera Raw (or your raw editor of choice) instead of the raw file! And that’s probably not what you want.
You can correct this case of mistaken identity by closing the photo and returning to iPhoto. Click the raw file’s thumbnail and then choose Photos→Reprocess RAW. (This command replaces the “Revert to Original” command when you’re working with raw files.) iPhoto strips away your previous edits, and now you can double-click the picture to open it in your external raw editor.
But beware! You can’t just click the Save button and smile, confident that you’ll see the edited version of the photo when you return to iPhoto. That’s how things work with JPEG files, as described earlier in this chapter, but not with raw files.
Instead, you have to use Camera Raw’s Save As command to save the edited picture as a new file on your hard drive. You’ll probably want to export it as a JPEG file, because that’s the easiest format to work with in the iMovie, email, on the Web, and so on. (Remember, your original raw file is still tucked away safely in the iPhoto library if you want to revisit it. All you have to do is double-click its thumbnail again, and you’re right back in Camera Raw.)
When you click Save, a JPEG version of your edited raw file is waiting for you on the desktop. Click Done in Adobe Camera Raw to make it go away.
Your last step, believe it or not, is to reimport the edited JPEG file back into iPhoto. First, though, you may want to make sure that the file number (IMG_6268.jpg, say) is the same as the original raw version in iPhoto (IMG_6268.CR2). Why? Because you’re going to wind up with the edited JPEG and the original raw file side by side in your library.
This roundabout method of editing a raw file is not, ahem, the height of convenience. However, if you want to use high-level image controls for your raw files—in a program other than Aperture (Beyond iPhoto)—then this is the path you must take, Grasshopper.
16-Bit TIFF Files Instead of JPEGs
For some time, high-end iPhotonauts bearing fancy cameras and memory cards full of raw files have groused a bit about their choices. They could keep sending their raw files on that clumsy roundtrip to Photoshop, they could use Aperture (Beyond iPhoto), or they could work with iPhoto’s converted, lower-quality JPEG files instead.
But for a few versions now, there’s been a third option: They can tell iPhoto to convert those raw files into TIFF files instead of JPEGs.
TIFF is an extremely high-quality graphics format that’s frequently used in professional printing. (All the illustrations in this book, for example, are TIFF files.) If you intend to print high-quality enlargements directly from iPhoto, then it might be worth telling iPhoto to convert your raw files into TIFFs instead of JPEGs.
To make this switch, choose iPhoto→Preferences→Advanced, and then turn on “Save edits as 16-bit TIFF files.”
However, you pay a price for making this switch.
First, if you’ve already edited some of your raw files, then iPhoto has already converted them to JPEG format. You’ll have to strip away your edits by selecting the thumbnails and choosing Photos→Reprocess RAW (you’ll see that command only if you’ve edited raw files in another program or in an earlier version of iPhoto). Now when you open those files for editing, they’ll turn into fully editable 16-bit TIFF files within iPhoto.
Second, you’ll pay an enormous price in hard drive space.
Suppose that you start with a raw file that takes up about 8 megabytes of space in your iPhoto library. You make a few edits; iPhoto generates a working JPEG that adds another 1.2 megs; fine.
But then you decide to reach for the brass ring of quality, so you instruct iPhoto to reprocess that raw file and convert it into a TIFF instead. That TIFF version will add 62 megabytes to your library, just for that one picture!
The moral: Save the TIFF-conversion business for your most prized photos, the ones that really merit that file format and all that quality. And once you’ve finished working with them, return to the Preferences menu and turn off the checkbox.