iPad and iPhone Kung Fu: Tips, Tricks, Hints, and Hacks for iOS 7 (2014)
Chapter 1. A Crash Course in iOS 7
iOS is the name of the operating system at the heart of the iPad and iPhone, and this chapter presents a concise beginner’s guide.
Note that any references to onscreen buttons or icons in this book assume the iPad or iPhone is being held in portrait mode rather than landscape mode unless specified otherwise.
First-Time Setup
After removing your iPad or iPhone from the box for the first time, you should connect it to a power source via the USB cable, then switch it on by pressing and holding the Lock/Sleep button at the top of the device until the screen becomes active. Booting will then commence and take a minute or two, during which time you’ll see the Apple logo.
Once it’s booted you’ll be prompted to step through several configuration options. You’ll need to be within range of Internet-enabled Wi-Fi for these (except for iPhones and 3G/4G iPads, which can use their cellular data connection). Alternatively, you can connect to a Mac or Windows PC using a USB cable, as prompted during the setup steps.
After you’ve confirmed your location and region, the setup wizard will walk you through some options, as follows:
· Wi-Fi: The first option is to choose the Wi-Fi base station to connect to. You’ll need to enter its password, as shown in Figure 1, Setting up Wi-Fi on an iPad during initial setup—just tap your Wi-Fi base station’s entry within the list. As mentioned earlier, setup can’t continue unless you’re online in some fashion.
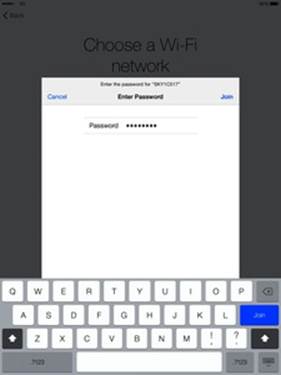
Figure 1. Setting up Wi-Fi on an iPad during initial setup
· Location Services: You’re invited to enable Location Services. All iPhones and iPads come with global positioning system (GPS) capabilities (see Location Services). Lots of apps use Location Services, not to mention Apple’s own Maps app, so enabling it is a good idea.
· Restoring from backup: You’re offered the choice of setting up the iPad or iPhone afresh, or restoring from a backup. If you’ve previously owned an iPad or iPhone, you can restore from a backup that was stored in iCloud, or on the hard disk of your computer via iTunes (which will require a USB connection). Restoring a backup is possible even if the backup was made on an older device and/or an older version of iOS.
· Apple ID: You’re prompted to enter your Apple ID, if you have one, or to create one. (See Apple ID, for more details about what an Apple ID is.) You can skip creating or inputting an Apple ID here, although you’ll be prompted as necessary when using the device, such as when you attempt to make App Store purchases.
· Terms and conditions: Be sure to read the full terms and conditions for using iOS.
· iCloud: iCloud is Apple’s technology that lets you seamlessly share and sync data and settings across all your devices and computers—see iCloud. Here you can choose whether to use it on this device.
· Find My iPhone/iPad: If your iPhone or iPad is lost or stolen, Find My iPhone/iPad lets you lock it, locate it, or remotely wipe its data, as discussed in Security. Enabling it is a very good idea.
· iMessage and FaceTime: As explained in Calls and Messaging, iMessage lets other iPhone, iPad, and Mac users communicate with you via short text messages (with file attachments), while FaceTime lets users communicate with you via video and audio calls sent over the Internet. Here you can choose which cell-phone number and email addresses you wish to be contacted via.
· Touch ID: If you’re using an iPhone 5s you’ll be invited to set up Touch ID fingerprint recognition, which will be used in the future to unlock the device (see Touch ID). Setup involves tapping the Home button several times from various angles and approaches with your chosen finger(s), as prompted, until a print is recorded and stored.
· Creating a passcode: Although users of the iPhone 5s can rely upon fingerprint detection to unlock a device, they’ll still need to enter a passcode, as will users of all other iPhones and iPads. A passcode is a four-digit PIN used to unlock non--Touch ID devices, and in certain other situations where important settings might be changed. Here you’ll be invited to create that PIN. Note that once the phone is up and running it’s possible to create longer passcodes—see Security.
· Siri: If you’re using an iPhone 4s or later, or an iPad third generation or later, you’ll be prompted to set up Siri, as shown in Figure 2, Setting up Siri on an iPad. Siri is Apple’s digital assistant, and you can activate it once you’ve set up the iPhone or iPad by pressing and holding the Home button. Because Siri sends your speech and personal details to Apple, there are some potential privacy issues.[1]
· Diagnostics: Apple improves its products based on reports from real-life users, and you can opt in to help Apple. Reports are sent automatically, virtually anonymously, and in the background.
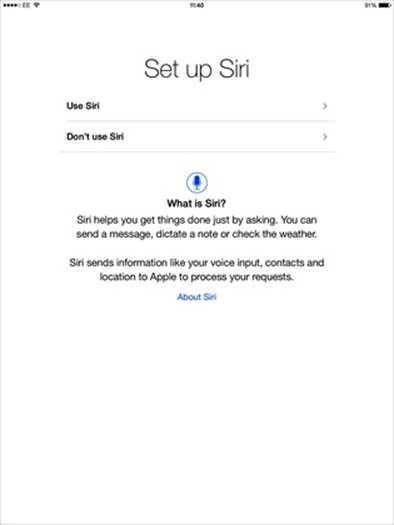
Figure 2. Setting up Siri on an iPad
Switching On and Off
iPads and iPhones are designed to spend all their time switched on, although when not being used they will go into sleep mode to conserve power. Depending on what services are activated on the phone, an iPad or iPhone can last up to two weeks during sleep mode.
An iPad or iPhone will automatically enter sleep mode after not being used for a moment (unless you’ve changed this setting), although you can manually put a device to sleep in the following ways:
Location Services
All iPads and iPhones come with Location Services, by which the device can be pinpointed on the globe with varying degrees of accuracy. Apps make use of this to provide mapping services, for example, or to track the device’s location over a period of time (useful for apps that track your running or walking). Social apps like Facebook use the information to automatically add your location to any postings you make, and the Find My iPhone/iPad service uses the information to locate the device if it’s stolen.
All iPhones and 3G/4G iPads capable of running iOS 7 come with global positioning system (GPS) hardware that, provided a clear signal is available, can accurately locate the device to within a few feet of its position. Additionally, a slightly less accurate system called the Wi-Fi Positioning System (WPS) is used to augment the GPS signal. WPS uses the location of the Wi-Fi base station to which you’re connected to discover your general location. This is possible because Apple maintains a database of the physical locations of most Wi-Fi base stations in the world—from those in cafés and offices to those in homes. It does this using a fleet of cars that drive across the country logging the information. Strange but true!
Non–3G/4G iPads and iPod Touch devices lack actual GPS hardware, so they use WPS exclusively to discover their location. This means their accuracy can be limited to simply placing you within a building or on a particular street, for example. If you’re not connected to a Wi-Fi base station, then the accuracy will be severely compromised and it can take several minutes to get a fix.
Location Services brings with it privacy concerns because it lets Apple and apps log places you visit.[2] For example, iOS 7 is designed to learn where you live and where you work, so it can automatically display transit times within Notification Center. You can control Location Services settings by opening the Settings app, tapping the Privacy heading, then selecting the Location Services option.
Bear in mind that, unlike with dedicated GPS devices, iOS 7 doesn’t store nationwide street-level map data on the iPad or iPhone. Instead, it’s looked up online when necessary. This means the Maps app is very likely to be useless if the Internet signal is lost—street-level maps for your local area might be viewable because the data is usually stored on your device for quick access but you won’t be able to search for destinations, or view detailed maps for locations even a relatively short distance away. However, some third-party mapping apps do store map data on the device, and this is usually made clear within an app’s description in the App Store.
· By pressing the Lock/Sleep button on top of the unit
· By placing the Smart Cover over the front of the device, in the case of an iPad or iPad Mini (or the cover of a Smart Case)
You can wake a device from sleep by pressing the Home button or the Lock/Sleep button, or by lifting the Smart Cover (or the cover of a Smart Case) for an iPad or iPad Mini. Usually a device will then need to be unlocked by providing a passcode, although on an iPhone 5s both waking and unlocking are achieved by simply pressing the Home button.
Additionally, an iPad or iPhone will automatically wake to show incoming calls, messages, and notifications, although you can use a feature called Do Not Disturb within the Settings app (see The Settings App) to stop the iPad or iPhone from alerting you in this way during particular periods, such as when you’re sleeping.
Because sleep mode is so effective at conserving battery life, there’s no need to completely power down devices when you’re not using them. However, should you legitimately need to turn off an iPad or iPhone, you can do so by pressing and holding the Lock/Sleep button for a few seconds until Slide to Power Off appears at the top of the screen. Sliding your finger across this will turn off the device. However, even when entirely powered down, an iPad or iPhone will still use a trickle of power and will therefore deplete its battery over time.
Setting Up Non-Apple Accounts
Although Apple sets up or creates your iCloud account automatically during setup, you can connect to your Google, Yahoo!, AOL, and Outlook.com (Microsoft Live) accounts with similar ease once the device is up and running.
Setup
Open the Settings app, then tap the Mail, Contacts, Calendars heading and tap the Add Account button. From there, all you need do for setup is select your desired provider and enter your username and password. You’ll then be able to choose which services to sync with your phone by tapping the switch alongside each (see Figure 3, Setting up a Yahoo! account on an iPhone 5). The services you can sync with are as follows:
· Gmail: Email, contacts, calendars, and notes
· Yahoo!: Email, contacts, calendars, reminders, and notes
· AOL: Email and notes
· Outlook.com: Email, contacts, calendars, and reminders
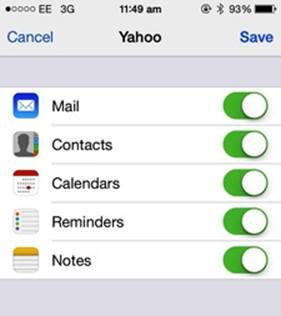
Figure 3. Setting up a Yahoo! account on an iPhone 5
You’ll send and receive email in a way that means the messages are still stored on the server so they can be accessed by other computers and devices.
You may have noticed that instant messaging and video calling were not listed there. Other than iMessage, which is part of iCloud, iOS 7 doesn’t let you add any chat accounts to the Messaging app or the FaceTime app. The only way to access messaging or video chat from other providers is to download dedicated apps via the App Store; most providers have supplied an app (including RIM, which provides a Blackberry Messaging app).
In addition to services from major providers, you can configure an account to access an Exchange server run by a business. You will need to consult your technical-services department to find out the server address and the domain name. You’ll be able to sync with email, contacts, and calendars stored on the server.
You can also manually add email accounts, provided you know the SMTP and IMAP/POP3 server addresses. Additionally, you can add LDAP and CardDAV accounts to sync contacts, and CalDAV accounts for calendar sharing. In each case you’ll need to know the server address and login details.
Clicking on a Calendar link file sent to you by email will also offer the opportunity to subscribe to a calendar. Such files typically have the extension .ics.
Push vs. Fetch
Once you’ve configured a third-party account, be sure to tap the Fetch New Data heading in the Mail, Contacts, Calendars section of the Settings app. Here you can set in what way the accounts are synced, and how frequently. Alongside a setting for configuring manual checking, there are two choices for the manner in which data is automatically retrieved: push and fetch. Push is the better choice because it uses less battery power and updates are near instantaneous—you’ll be notified of email almost as soon as it arrives in your inbox, for example. Unfortunately, not all providers offer push services, so instead data must be fetched from the server periodically. You can alter the frequency of attempts to fetch data under the Fetch heading, but beware that fetching too frequently can cause battery life to be depleted quickly.
Here’s how third-party accounts break down with regard to support for push and fetch:
· Gmail: Fetch and manual only (but see note after this list)
· Yahoo!: Push, fetch, and manual
· AOL: Push, fetch, and manual
· Outlook.com: Push, fetch, and manual
· Manually configured Exchange accounts: Push, fetch, and manual
· Manually configured POP3/IMAP accounts: Fetch and manual
Note that Gmail accessed as part of a paid-for Google Apps for Business account offers push support.[3] Consult your domain administrator for details.
Touch ID
The iPhone 5s is the first phone to make fingerprint recognition reliable enough for everyday use. Once it’s been set up, simply touching a finger against the Home button’s sensor will unlock the device within a second or two. Additionally, when purchasing apps through the App Store or iTunes Store, you can use your fingerprint as proof of your identity, with no need to enter your Apple ID password as you do on other Apple devices.
Touch ID is not foolproof. It requires a dry, relatively clean finger, although just wiping the fingertip on a tissue or garment should be enough to provide a usable scanning surface.
It might sound odd, but at no time does Touch ID record a photographic representation of your fingerprint. Instead, thousands of tiny sensors map the ridges and pits of your skin, and a mathematical algorithm creates an encrypted representation called a hash . This data is stored in a specially protected area of the main system-on-a-chip that forms the heart of every Apple device. In other words, it is literally impossible for a hacker to get an image of your fingerprint—it doesn’t exist.
Like all fingerprint ID systems, Touch ID is difficult to bypass, but not impossible. Hackers have a variety of methods of manufacturing fake fingerprints. Some do so using resins and glues, requiring just a high-resolution photograph of a fingerprint left on a glass surface. However, the expertise and effort involved in creating such a fake, as well as the difficulty of sourcing a fingerprint sample of sufficiently high quality, mean that bypassing Touch ID is unlikely to be an everyday occurrence.
You can disable Touch ID under the General heading of the Settings app, in which case your device will revert to using passcodes for authorization and you’ll be required to enter your Apple ID password when making purchases.
Status Bar
Running along the top of the iPad and iPhone screen is a status bar that shows the type of connection the device is using or the modes to which it’s been set. The icons are identical on the iPad and iPhone. The following figure shows an annotated example.
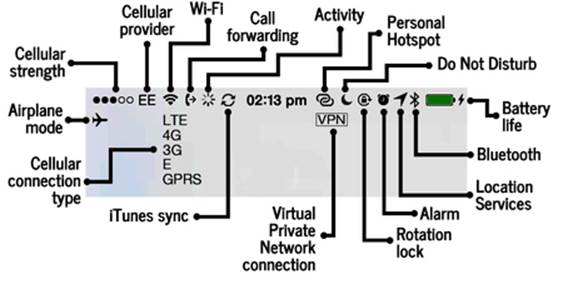
Figure 4. The iOS 7 status-bar icons
See the following list for details of what each icon indicates (The Settings App provides details of the technologies mentioned):
· Airplane mode: This status-bar symbol replaces the cellular information and indicates the iPad or iPhone is in airplane mode, in which cellular, Wi-Fi, and Bluetooth hardware inside the device are deactivated. See Control Center.
· Cellular strength: Indicates the strength of the cellular signal, ranging from one dot for a virtually nonexistent signal to five full dots for a strong signal. If there is no signal, “No service” will be shown.
· Cellular provider: This is the name of the cellular provider.
· Wi-Fi: Indicates the device is connected to a Wi-Fi base station. The three bars indicate the strength of the signal, ranging between one bar (weak) and three bars (strong).
· Cellular connection: If you’re not connected to Wi-Fi or if it’s deactivated, the type of cellular connection will be displayed. This helps you evaluate likely data speeds. There are several different types of cellular connection types, as follows, and which one your phone connects to depends on the contract you have with your cellular provider as well as what’s available in your locality:
o LTE: Indicates cellular communications are using Long-Term Evolution (LTE) speeds, which at present offer the fastest possible cellular data speeds. Use of LTE can be configured in the Settings app.
o 4G: Indicates 4G (High-Speed Packet Access; HSPA) cellular technology is being used for voice calls and data. HSPA is also sometimes referred to as 3.5G, 3.75G, or even 3.9G, depending on the technology utilized by the cellular carrier, and it offers significant speed benefits over the older 3G technology.
o 3G: Indicates 3G cellular technology is being used for voice calls and data, and data speeds will be fast, although not as fast as with LTE or 4G.
o E: Indicates Enhanced Data Rates for GSM Evolution (EDGE) is being used for voice calls and data. Data-transfer rates will likely be slow over cellular if EDGE is in use.
o GPRS: Indicates GPRS or 1xRTT (CDMA) technology is being used for voice calls and data. Data-transfer rates will likely be very slow over cellular if these technologies are being used—to the point of being unusable, especially if the cellular signal is weak. On some networks a circle symbol may be displayed instead.
· Call forwarding: This indicates that your iPhone is set to forward calls to another number. Note that this reflects only what’s been toggled in the Settings app, and not any call-forwarding setting configured independently using your cellular carrier.
· Activity: This rotating pinwheel pattern appears whenever the device is fetching data or, in some cases, working on a background task.
· iTunes sync: Indicates that the device is currently syncing with iTunes on a Mac or Windows PC.
· Personal Hotspot: Indicates the iPad or iPhone is connected to a Personal Hotspot provided by another iPad or iPhone. If the device itself is providing a Personal Hotspot for another computer or device, the icon will appear and the status bar will turn blue. An additional status bar will appear beneath, showing the number of devices connected.
· VPN: Indicates a virtual private network (VPN) connection is in use, by which secure connections can be made to Internet computers for the purposes of data transfer and logging into office networks.
· Do Not Disturb: Indicates Do Not Disturb mode is in use.
· Rotation lock: Indicates that the screen orientation has been locked to landscape or portrait mode.
· Alarm: Indicates that an alarm is set in the Clock app.
· Location Services (GPS): Indicates an app is using Location Services to discover the geographical location of the device.
· Bluetooth: When light-colored, indicates Bluetooth is activated; when dark, the iPad or iPhone is currently connected to a Bluetooth device, such as a headset or a keyboard.
· Battery: Gives a graphical representation of the battery strength. A lightning bolt appearing alongside indicates the battery is being charged.
Charging Your iPad or iPhone
To charge your iPad or iPhone, use the included USB cable and attach it either to a charger outlet or the USB connection of a computer. Beware that charging via a computer may take a long time, particularly in the case of an iPad. Additionally, it’s unlikely either an iPhone or iPad will charge at all when connected to an unpowered USB hub (that is, a hub that lacks a power supply of its own).
If using third-party chargers, remember that to charge in a reasonable amount of time an iPad requires a USB charger outputting at least 10 watts (that is, 5 volts at greater than 2 amps). This is usually more than the output of chargers designed for phones or other handheld devices, such as music players.
Apps
Everything you might want to do with an iPad or iPhone is done via an app, whether that’s making a phone call, sending a message, or performing sophisticated tasks like working out a route using the Maps app.
Home Screen
Apps are represented by icons on the home screens (see Figure 5, The home screen of an iPad just after first booting). You can move between home screens by swiping a finger left or right. Several important everyday apps are located on the Dock, at the bottom of the screen, which doesn’t change even when you scroll through the home screens.
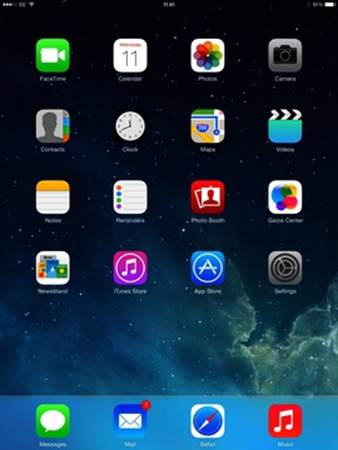
Figure 5. The home screen of an iPad just after first booting
All iPads and iPhones come with a complement of built-in apps, and you can download more to the device using the App Store app. Download and installation happen automatically once you opt to purchase an app, at which point you’ll need to provide your Apple ID password (or Touch ID authentication) to verify your identity. Although some apps are free, Apple still considers downloading them to be a purchase, and you’ll still need to enter your password (or provide Touch ID authentication).
Updates for apps are also provided via the App Store. A number set against the App Store’s home-screen icon indicates how many updates are available and you can view the list by opening the App Store and tapping the Updates icon at the bottom.
You can also view and buy apps via the App Store with iTunes on a Mac or Windows PC (click iTunes Store at the top right, then App Store on the top-middle tab bar). Apps will be copied to your iPad or iPhone the next time you sync via USB or Wi-Fi. Alternatively, you can activate automatic downloads under the iTunes & App Store heading of the Settings app on the iPad or iPhone, which will automatically download and install apps regardless of where or how you buy them. This will take place in the background, even if the device is in sleep mode.
Apple ID
Your Apple ID is your identity card in the Apple universe. It’s significantly more than a request to register your personal details, as with other manufacturers. An Apple ID provides three things in particular:
· Identification: Your Apple ID tells Apple who you are, especially online, although often in real life too. You’ll need an Apple ID to book an appointment with a Genius at an Apple Store, for example, and to track subsequent repairs. Your purchase history and a list of devices you own are stored against your Apple ID, and this can help Apple Store staff identify loyal customers, who sometimes receive preferential treatment.
· iCloud: An Apple ID brings with it iCloud access (see iCloud), although you only gain full iCloud access after one or more of your devices or Mac computers has signed in using the Apple ID—something that usually happens during the first-time setup. However, this means you can’t create an Apple ID on a Windows PC without owning an Apple device, for example, then log into the iCloud website.[4]
· iTunes and App Store: In addition to providing name and address details, creating an Apple ID usually requires registering a payment card, which lets you use your Apple ID to log into the iTunes and App Stores to make purchases. Using a registered payment card is the only way to make App Store/iTunes Store purchases other than using an iTunes gift card.[5]
Although Apple doesn’t recommend it, it’s possible to use two separate Apple IDs—one for payments, and one for iCloud use. Simply enter the iCloud address into the iCloud component of the Settings app (see The Settings App), and enter the payment Apple ID when prompted in the iTunes and App Store apps. Notably, Apple offers no facility to merge two or more Apple IDs, so it’s best in most circumstances to use a single Apple ID.
It’s also possible to create an Apple ID without registering a payment card, which can be useful for iPads or iPhones owned by children. An Apple support document explains the steps,[6] which you can take (using the App Store or using iTunes on a Mac or Windows PC) once an iPad or iPhone is up and running. Apple IDs that don’t have a payment card registered can be used to download and install free apps.
Uninstalling Apps and Rearranging Apps and Folders
To remove an app from an iOS device, begin by tapping and holding its icon until all the home-screen icons begin to wobble. Then tap the X at the top left of the icon to uninstall the app and its data from your device (it will remain installed on other iOS devices you own). Note that built-in apps provided as part of iOS cannot be uninstalled.
Uninstalling an app doesn’t mean you no longer own it. You can reinstall an app at a later date by finding its entry in the Purchased list within the App Store (click the Purchased icon on an iPad, or the Updates icon on an iPhone) and tapping the cloud icon.
While the icons are wobbling you can also rearrange their order on your home screen by tapping and dragging them, and create folders by hovering one icon over another. Folders are deleted by removing all the icons inside them; to remove the icons in a folder you can either uninstall the apps or move them to a new location on the home screen.
You can also rearrange the icons on the Dock when the device is in this mode, and in the case of the iPad add icons to the Dock to join the four that are there by default. Up to six icons can be kept in the iPad’s Dock, and up to four on the iPhone’s.
Click the Home button when you’ve finished.
Multitasking and Switching Apps
You can view which apps are open by double-clicking the Home button, which will show the multitasking screen. Figure 6, Opening the multitasking apps list on an iPhone shows an example taken from an iPad. You can switch to an app by tapping its icon or window preview.
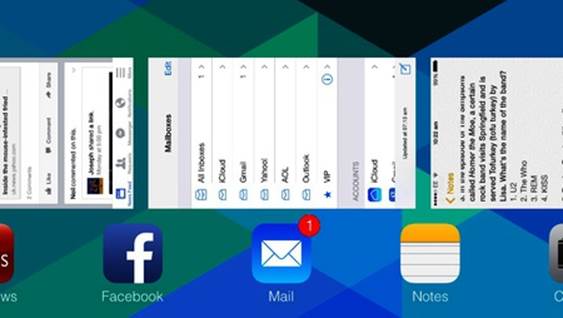
Figure 6. Opening the multitasking apps list on an iPhone
Swipe left or right to see other running apps—there are likely quite a few, and you can switch to any by tapping its icon or the window preview above it. You can quit apps by flicking the preview of the app window toward the top of the screen. Note that, unlike applications on a Mac or Windows PC, there’s usually no need to manually quit apps in iOS. Whenever you return to the home screen or a new app is launched, all other apps are moved to the background so that they consume negligible system sources. In theory, you could open every app installed on an iOS device without any impact on overall system performance.
However, iOS includes limited multitasking support; some apps can continue certain functions when you switch away from them. Some apps can continue to receive data, for example, so that they’re up to date the instant you switch back to them. The Clock app will continue any stopwatch or countdown that you’ve started, and music will continue to play when you switch away from the Music app. However, most apps will simply pause when you switch away from them—quite literally in the case of the Video app or games, where switching away effectively presses the pause button.
App Rules
Rules govern how apps can be bought and used.
Purchasing
A key feature of Apple’s App Store system is that an app purchase includes a license to install it on all iOS devices that you own and that are logged in with the same Apple ID (in a home environment; corporate and academic users managing a range of iOS devices require individual licenses).[7]
Purchase the popular Angry Birds game, for example, and you can install it on any iPhones, iPads, or iPod Touches that you own and on which you’re logged into the App Store with your Apple ID. This rule applies to music and movies you purchase via iTunes, too.
Versions
Often apps will work in different ways depending on whether they’re installed on an iPad or an iPhone. The increased screen size allows Pages on the iPad to show several toolbars that are not shown on the smaller iPhone screen, for example. However, some developers create separate apps for the iPhone and iPad, and sell them separately.
When it comes to app cross-compatibility, the following rules apply:
· iPhone apps: Some apps are specifically designed for an iPhone, without any thought to their being used on an iPad. In this case, the app can still be used on an iPad, although it will appear in an iPhone-sized window in the middle of the screen. Additionally, the onscreen keyboard will be that of an iPhone rather than an iPad. Tapping the 2x button will magnify the app so it almost fills the screen by simply blowing up the original pixels, although often this can make things look blocky. iPhone games work best in this mode; other apps look and feel a little odd, and it’s often better to see if an iPad-specific version is available.
· iPad apps: Apps designed specifically for an iPad cannot be used on an iPhone because they’re designed for a much larger screen size, so they simply won’t fit on the iPhone’s screen.
Once you’ve purchased and installed a cross-compatible app on one device, you can install it on another by opening the App Store app on that device and tapping the Purchased icon (tap Updates > Purchased on the iPhone). If automatic downloads are enabled in the Settings app, as discussed earlier, installation will take place automatically in the background.
Built-in Apps
Here’s a brief listing of the built-in apps, along with their key features:
Calls and Messaging
A modern Internet device would be lost without the core functionality of calls and messaging, and iOS includes several very powerful apps that meet this need:
· Phone (iPhone only): Make calls and access voicemail, and view a list of calls received, made, and missed via the Recents icon. You can access your contacts list to make calls, or use an onscreen keypad to dial numbers. The keypad can also be used for interactive services requiring dual-tone multifrequency tones, such as automated phone services. Once a call is in progress, tapping the Hide button will offer the options to switch to speakerphone, add another call, and mute the microphone for privacy.
· Messages: View or send iMessages to other iPad, iPhone, and Mac users, and send SMS/MMS messages to other cell-phone users (iPhone only; iPads equipped with cellular data cannot send SMS/MMS). Just select an existing conversation to send a message, or tap the New Message icon and then type the contact details in the To: field, and the message below. Messages will always default to iMessage if the recipient also uses iMessage (see Tip 15, Know when iMessage is being used). SMS/MMS messages are sent via the cellular network, as with any cell phone, while iMessages are sent via the Internet and can include image and video file attachments—just tap the camera icon to the left of the message area to choose.
· FaceTime: Make video and voice calls with other iPad, iPhone, and Mac users running OS X (Mavericks or later and iOS 7 or later are required for voice calls). Note that you can make FaceTime calls to only people in your contacts list, so when contacting somebody for the first time you may need to add or update an entry for that person within the Contacts app. FaceTime calls can be made to cell-phone numbers, Apple IDs, or email addresses, depending on which details the individuals you’re calling has registered with FaceTime on their devices (via the FaceTime heading within the Settings app). FaceTime calls take place over the Internet, so they won’t incur call charges with your provider (although they might incur data charges, of course).
AirPlay
AirPlay is Apple’s technology that lets users of iPads, iPhones, and Mac computers stream video and audio over the network to a TV or projector connected to an Apple TV or other compatible device. Additionally, audio output can be streamed to an AirPort Express Wi-Fi router, which includes audio outputs for connecting to audio equipment with line inputs, or an optical audio input. The entire screen of an iPad or iPhone can also be mirrored via AirPlay, which can be useful when watching movies or playing games, or when giving business presentations from apps like Keynote.
AirPlay is extremely easy to use. Whenever a device capable of receiving and playing back AirPlay streams is active and on the same network as your iPad or iPhone, you can open Control Center and select to use it for video or audio. Alternatively, when using the Video app on your iPad or iPhone you’ll see the AirPlay icon appear at the right of the playback controls. Tapping it will let you switch to using the device. Some third-party apps, like YouTube, also support AirPlay in this way.
Don’t forget to switch back afterward if you want playback to happen only on the iPad or iPhone—you can do this by again opening Control Center or tapping the AirPlay icon and selecting the device name from the list.
Note that because of copyright limitations it’s impossible to play certain purchased or rented TV shows and movies over AirPlay. However, you can simply download the purchased material directly to an Apple TV.
Entertainment and Creativity
iOS includes several tools that let you enjoy stuff created by others and put your own creativity into practice.
· Camera: Take pictures and record HD movies using either the camera on the back of the iPad or iPhone, or the FaceTime camera on the front (to switch between cameras tap the icon at the top right of the screen). Pictures can be taken at full resolution or in square format for use in social-media apps, and you can switch between modes by swiping left and right in the main picture area (or up and down on an iPad held in portrait mode). Images can also have filters applied to them on the iPhone 4s and later devices (tap the overlapping-circles icon), although these effects can also be applied later to photos using the Photos app on any iPhone or iPad—see the next list item.
· Photos: View albums of images you’ve taken, those you’ve shared, or those that have been shared with you. To see an overview of photos or videos stored on the device, click the Albums icon at the bottom, then select from the list. All photos and videos you create are saved to the camera roll. To specifically view and create photo streams (see Figure 7, Viewing images via the Photos app on an iPad and Photo Stream), tap the Shared button.

Figure 7. Viewing images via the Photos app on an iPad
To view your photos sorted by the date and time they were taken, or the location at which they were captured, tap the Photos icon. This will arrange the photos into Years, which collates photos by the year they were taken, or Collections, which are arranged by date and location. You can also create your own custom albums by switching to the Albums view and tapping the plus (+) icon. Once a photo has been opened for viewing, clicking the Edit button will let you tweak the photo to repair poor exposure, fix red-eye, apply photo filters, and crop. To create slideshows, open any image in an album you wish to turn into a slideshow, then tap the Slideshow button on an iPad, or the share button (a square with an upward-pointing arrow) then Slideshow on an iPhone. Perhaps counter-intuitively, the Photos app is also where you can view movies recorded with your device (movies are identified by a movie-camera icon at the bottom left of their thumbnails).
· Music: Better known as the “iPod” part of an iPhone or iPad, this app lets you access your music library—including tracks purchased from iTunes or synced from a computer—and listen into iTunes Radio channels (tap the Radio icon at the bottom left). To view all the music on the device, tap the Artists, Songs, or Albums button. Music you’ve purchased but that isn’t on the device is also listed, and tapping the cloud icon alongside each entry will download it. You can access and create playlists, including Genius playlists, which are automatically constructed based on your favorite music (tracks you play often and rate highly), coupled with Apple’s knowledge of what tracks work best together. Note that music will continue playing if you switch away from the app.
· Videos: Play video or music video files, whether you’ve purchased them via iTunes or downloaded them from a third party and synced them from a Mac or Windows PC via iTunes (in which case they’ll appear when you tap the Home Videos button). However, any videos you’ve recorded yourself via the Camera app are accessible only via the Photos app. Any movies you’ve previously purchased but that aren’t on the device will also be listed within each category, and clicking the cloud icon at the top right will download them. To play a video over AirPlay (seeAirPlay), start the movie playing, then tap the AirPlay icon to the right of the playback controls and choose the AirPlay device from the list.
Photo Stream
Photo Stream is Apple’s technology that uses iCloud to share pictures across multiple devices and computers, with the option to manually share videos too. All iCloud users have a personal photo stream to which images are automatically uploaded after being taken. These are then automatically downloaded by any other iOS devices they own, and suitably configured Macs and Windows PCs. (PCs need the iCloud Control Panel installed,[8] and Macs need to have either iPhoto or Aperture installed.[9][10]) Photo Stream means that, no matter where you take a photo, or with what Apple device, you can always access the pictures. However, there’s an important limitation—photos exist within iCloud for only 30 days. Once they’ve been downloaded to a device, they will remain until they’re manually deleted.
You can also opt to create shared photo streams. You can add both pictures and videos to a shared photo stream, and each picture or video can have comments added by anybody with access. Each can be “Liked” in a similar way to images on Facebook.
To add a photo or video to an existing shared photo stream or create a new one, open the photo or video for viewing in the Photos app and then tap the share button at the bottom left of the screen. Then tap the iCloud option in the list. Select the existing photo stream you want to use alongside the Stream heading, or tap the stream name alongside the heading to view the option of creating a new shared photo stream, at which point you’ll be prompted to provide the email address(es) of the other person(s) (entries will be automatically suggested when you type, based on your contacts list). You’ll be notified when those you invite have joined (see Notifications).
Other people can share photo streams with you, of course, in which case you’ll receive an email message and should click the button therein to confirm you wish to join.
· iTunes Store: Purchase music, audiobooks, music videos, and ringtones, or view Genius suggestions generated from Apple’s recommendations based on what you’ve bought in the past. You can also rent or purchase movies and TV shows. You can view or download any previous purchases you’ve made by tapping the Purchased button on an iPad, or More > Purchased on an iPhone.
· Newsstand: Browse and read magazines, newspapers, or other periodicals. Note that searching for new titles takes place within the App Store app, and clicking the Store icon in Newsstand will take you there. Tapping Install alongside a Newsstand title in the App Store will add it to Newsstand without charge, and subsequently the purchasing of individual issues or multiple-issue subscriptions will take place within the Newsstand app. Unlike traditional ebooks, each Newsstand title is actually a simple app, accessed via Newsstand, and often offers unique features. A household-lifestyle magazine may have a searchable recipe database, for example.
· 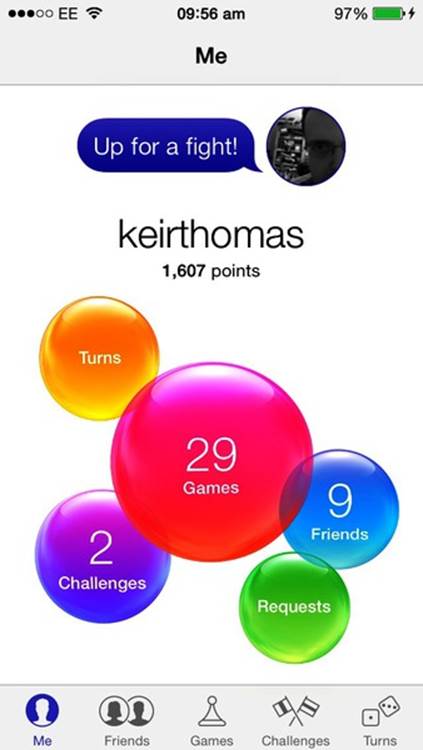
Figure 8. Game Center lets you challenge other iOS users.
Game Center: View achievements and high scores in games you’ve installed, along with high scores from other Game Center players (see the figure here). Challenge others in games that support turn-based play. The games must utilize Game Center (not all do) and your friend must also have an iOS device. To challenge a friend you’ll first need to “friend” that person within Game Center by tapping Friends > Add. An email message will then be sent to your potential new friend.
Internet and Email
Browsing the Web and receiving email are core functions of any Internet-equipped device, and iOS comes close to offering a desktop-like experience, even on the smaller screen of the iPhone:
· Safari: Browse the Web, including creating bookmarks that sync over iCloud with other iOS devices and the Safari browser on a Mac, or a Windows PC with the iCloud Control Panel installed.[11] Browser tabs are shown beneath the toolbar on an iPad (see Figure 9, Safari running on an iPad), and tapping the X at the right of each will close that tab, as with a desktop web browser.
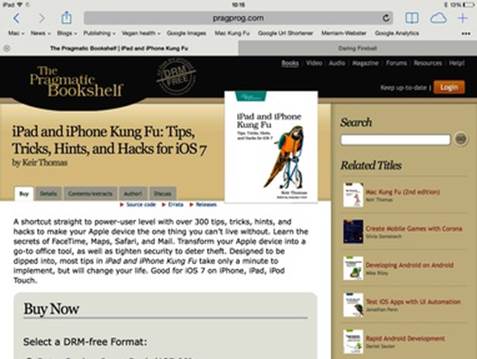
Figure 9. Safari running on an iPad
To switch between browser tabs on an iPhone, tap the bookmarks icon (overlapping squares) at the bottom right of the screen and swipe the tab preview left to discard that tab. Private browsing mode, by which browsing data isn’t stored, can be activated on an iPhone by opening the list of tabs as described previously and tapping the Private button at the bottom left. To access private browsing on an iPad, tap the plus (+) icon at the top right to create a new tab and then tap the Private button at the bottom left. You can also view what browser tabs are open on other Apple devices or Mac computers you own by clicking the cloud toolbar icon on an iPad, or opening the tab listing on an iPhone and scrolling to the bottom of the tab previews.
· Mail: Send and receive email using the @icloud.com or @me.com addresses that come as part of iCloud, or via other email providers (see Setting Up Non-Apple Accounts). To view the list of account mailboxes, swipe from the left on the message list, or tap the back button (labeled Mailboxes in this case). If you have multiple accounts configured, scroll to the Accounts heading below the main mailboxes listing and tap each account to view the individual mailboxes for each provider (that is, Sent, Spam, and so on). If you have only one account configured then only one inbox will be shown at the top of the mailbox listing. In addition, you can create a VIP mailbox, which filters important messages by who sent them and notifies you accordingly. To set up a VIP mailbox, return to the mailbox listing as described previously, then tap the Edit link at the top right and put a check alongside the VIP heading. Click Done, then tap the new VIP mailbox heading, and choose any contacts you wish to add. In order to add someone there must be an entry for that person in your contacts list.
System
When it comes to administering the system, the following two apps are all you need (however, see also Control Center):
· Settings: Configure hardware and software settings on your device. You can also administer your iCloud account. For more details see The Settings App.
· App Store: Browse and purchase new apps, along with Newsstand titles. To “purchase” a free app, simply tap its icon in the app listing so its detail window appears, then tap Free > Install. To purchase a pay title, tap the icon in the app listing to view the app’s details, then tap the button listing the price, then tap the Buy button. In either case you will need to provide your Apple ID password, or tap the Touch ID sensor in the case of an iPhone 5s. In addition to purchasing apps, you can review apps you’ve purchased; find them in the store, tap the Reviews tab, then tap Write a Review.
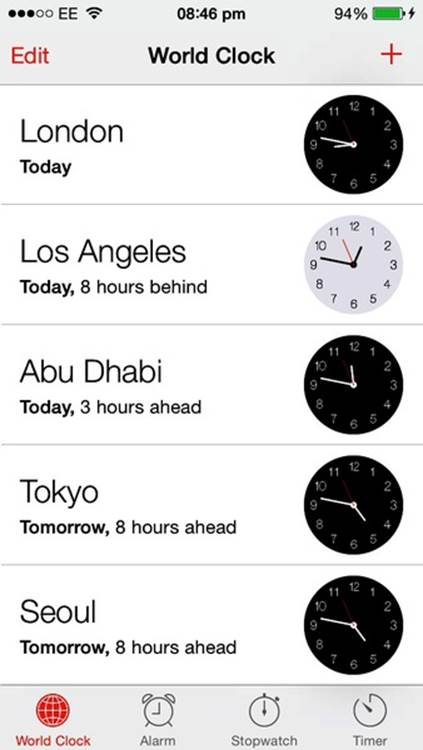
Figure 10. The Clock app showing worldwide time on an iPhone
Information and Office
iOS includes several personal-information-management tools that are equally adept for home use and office use:
· Calendar: Create and view appointments, complete with alert reminders. Click the plus (+) icon at the top left to create a new event, and swipe left or right to move between days, weeks, and months, depending on the view (hold an iPhone in landscape mode to switch to five-day-week view). Calendar events sync automatically over iCloud with other iOS devices and Macs, and with Windows PCs that have the iCloud Control Panel installed.[12]
· Clock: View the time in cities around the world, set alarms, time events using a stopwatch, and set timers to count down. Figure 10, The Clock app showing worldwide time on an iPhone shows an example taken from an iPhone.
· Maps: View a map of your local area in both traditional map and satellite views. Traffic information and construction work can be seen too—tap the (i) button at the bottom right to select what view mode you wish to use. Tap the direction arrow at the bottom left to switch instantly to your current location, and create routes for getting to a location—whether by driving or walking—by searching for the destination, then tapping the right-facing arrow of the pop-out window that appears over the destination. You can also create bookmarks of favorite locations by tapping and holding to drop a virtual pin on the map. Some geographic locations are covered by 3D maps, which let you “fly around” buildings and roads. In such a case, switch to satellite view, and an icon depicting high-rise buildings will appear at the bottom of the screen. Tapping it will let you switch in and out of 3D mode.
· Notes: Create simple text documents that sync via iCloud with your other iOS devices or Mac computers.
· Reminders: Create to-do-style reminders that can have alarms attached to them and be “geofenced,” which is to say a notification for the reminder will appear when you enter or leave a particular area (tap a reminder to switch it to edit mode, then tap the (i) symbol alongside a reminder to set notification options).
· Weather (iPhone only): Shows the weather where you are and in other areas that you add (tap the menu icon at the bottom right, then the plus icon—+—at the bottom). The data is provided by Yahoo!
· Contacts: View entries within your address book, and create new ones or edit existing entries (to edit an entry on the iPhone select it for viewing, then tap the Edit button). Your contacts list syncs automatically over iCloud with other iOS devices and Macs, and PCs that have the iCloud Control Panel installed.[13]
· Calculator (iPhone only): Do math on a facsimile of a standard calculator.
· Compass (iPhone only): Orient yourself with a facsimile of a compass.
· Voice Memos (iPhone only): Record voice memos of any length (limited only by free memory space), and then trim them to remove unneeded portions. You can also share recordings with other users. Once a voice memo has been recorded, you can access it in the list within the Voice Memos interface.
· Passbook (iPhone only): View or present any stored tickets, coupons, loyalty cards, passes, and so on that you’ve purchased via Passbook-compatible vendors and organizations. Add new passes by “scanning” a barcode using the camera.
· Stocks (iPhone only): View information and news about publicly traded organizations, with the data provided by Yahoo! To add a new stock, tap the menu icon, then the plus (+) icon at the top left, then enter its ticker code.
iCloud
iCloud automatically and invisibly stores data (including the following) and syncs settings with any other iPhones, iPads, Mac computers, and PCs that you might own (PCs must be running the iCloud Control Panel).[14]
· @icloud.com and @me.com email, including VIP mailboxes
· Your contacts list
· Calendar events
· Entries and lists added to the Reminders app
· Safari bookmarks, reading list, and currently open tabs on all devices
· Items created by the Notes app
· Passbook tickets, passes, and vouchers
· Usernames and passwords used on websites (also know as the Keychain )
· Photos and videos you take and choose to share via photo stream (see Photo Stream)
· Documents and data created by iCloud-compatible apps, including the iWork and iLife apps[15][16]
· Device backups (see The Settings App)
· Songs in your iTunes library via iTunes Match[17]
· iBook notes, bookmarks, and highlighting
Additionally, the Find My iPhone/iPad service (see Security) is part of iCloud, as is Back to My Mac, which allows Mac users to remotely access files on computers in their homes or workplaces.
5GB of storage is provided free of charge, although photo streams are not included in this limitation.
Using iCloud is optional, but even if you have only one Apple device it’s still a good idea to sign up because you can access many iCloud services via the iCloud website, using any computer and browser combination.
You can deactivate individual features of iCloud. For example, to deactivate the iCloud sharing of your Safari data, open the Settings app, tap the iCloud heading, then deactivate the switch alongside Safari within the list.
Other Apple Apps
In addition to the default apps, you might consider installing several Apple apps. All are available in the App Store and most are free for those who purchased an iOS device after September 1, 2013. For users of older devices, some of the titles can be purchased (the US price is indicated in parentheses in the following lists).
Entertainment and Creativity
Apple has managed to cram astonishing creative and learning potential into a small space with the following apps, most of which have desktop equivalents for Mac computers:
· GarageBand ($4.99): Create music complete with realistic instrument sounds, audio effects, and the ability to record vocals. The figure here shows an example taken from an iPad. Those who downloaded GarageBand free with a new iPad or iPhone can download additional instruments and sounds via in-app payments.

Figure 11. Creating music with GarageBand on an iPad
· iPhoto ($4.99): Edit photos you’ve taken with your iOS device and apply effects.
· iMovie ($4.99): Cut together video clips you’ve taken with your device into a complete movie or trailer. Projects can include title sequences and sound effects, and can be shared via iMovie Theater with other iOS devices and Macs running iMovie.
· iBooks: Purchase, read, and annotate ebooks.
· Podcasts: Browse, subscribe to, and listen to podcasts.
· iTunes U: Download free teaching materials from worldwide educational establishments and organizations.
· iTunes Festival: Watch recorded performances from the yearly iTunes Festival, or tune in live while the festival runs in September each year.
· Trailers: Watch movie trailers in high definition (1080p), and check nearby theaters for showtimes. You can even purchase tickets!
Office
Apple offers three iOS apps as part of its broader iWork range, which also includes desktop-equivalent applications for the Mac computer and online apps accessible via the iCloud website. All iWork apps automatically sync their files via iCloud with other iOS devices and Mac computers running desktop versions of the same app.
· Pages ($9.99): Create text-based documents ranging from simple to complex, with desktop-publishing features available too—see Figure 12, Editing a document within Pages on an iPad for an example of Pages on an iPad.
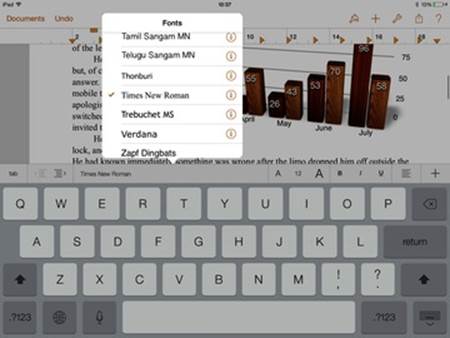
Figure 12. Editing a document within Pages on an iPad
· Numbers ($9.99): Create spreadsheets in this simple-to-use application, with a focus on layout and graphing.
· Keynote ($9.99): Create and give presentations using animations and multimedia.
· Keynote Remote ($0.99): Remotely control a Mac, iPad, or iPhone giving a Keynote presentation—via Wi-Fi when controlling a Mac or Bluetooth when controlling another iPad or iPhone.
Developer
App and content creators working with iOS will find the following apps useful:
· WWDC: Keep abreast of news and presentations during and after Apple’s yearly Worldwide Developers Conference.
· iAd Gallery: View some of the most effective advertising used on Apple’s iAd advertising network.
· iTunes Connect Mobile: Allows app developers and iBook creators to view sales and catalog data.
System and Security
Apple offers a handful of apps for controlling other hardware, along with an additional vital security tool:
· Find My iPhone/iPad: Locate lost or stolen Apple hardware that’s registered with the Find My iPhone/iPad service (see Security).
· Remote: Remotely control any network-connected Apple TV, Mac, or Windows PC running iTunes.
· AirPort Utility: Remotely configure Apple’s AirPort Wi-Fi router.
Miscellaneous
Apps that refuse to fall into other categories include the following:
· Find My Friends: Discover the locations of your friends who are also running the Find My Friends app on their iOS devices.
· Apple Store: View and purchase Apple products directly from your device, using the payment card registered with your Apple ID.
Gestures
In addition to tapping and dragging, you can use a number of gestures to quickly do things like switch between apps. Gestures involve dragging one or more fingers across the screen in various ways.
iPad and iPhone
The iPad and iPhone share the following gestures:
· Back and forward: Swipe a finger from the left edge of the screen to the right in apps including Settings, the App Store, and Safari to move back to the previous screen or website—the equivalent of tapping the back button in Safari or the previous-page button at the top left in apps such as the App Store. Swipe from the right of the screen to move forward in certain apps—the equivalent of tapping the forward button. Additionally, in some iPad apps, including Mail, swiping in from the left side of the screen will reveal additional menus and options.
· Double-tap to zoom: Double-tap in apps such as Safari or Photos to zoom in on the current area. Double-tap again to zoom back out.
· Pinch to zoom: Where thumbnails are displayed in apps such as Photos, you can hold a thumb and finger together over the thumbnail and slowly move them apart to enlarge the thumbnail to full size. Performing the gesture on an album’s thumbnail will open the album for viewing. Additionally, when viewing a photo full size the same gesture can be used to zoom in and out (to zoom out, bring the thumb and finger closer together again).
· Rotate: In some apps you can rotate an image by holding one finger on the surface and rotating another around it. Most frequently, the thumb and index finger are used to do this because it’s most convenient.
iPad Only
The bigger screen of the iPad allows additional gestures, as follows. These can be optionally deactivated by opening Settings, tapping the General heading, and deactivating the switch alongside Multitasking Gestures:
· Return to home screen: To quickly switch out of an app and return to the home screen, space apart four fingers and a thumb on the screen and then contract in a pinching motion.
· Activate the multitasking screen: Rather than double-clicking the Home button to access the multitasking feature of iOS, you can swipe up anywhere on the screen with four fingers. Swipe down again to cancel. Be careful not to start this gesture near the bottom of the screen, however, because this could activate Control Center (see Control Center).
· Switch between apps: To switch between currently open apps, place four fingers anywhere on the screen in a roughly horizontal fashion, and swipe right or left. As with the multitasking screen, apps are arranged in the sequence in which they were last used or activated.
Security
Three additional setup tasks immeasurably enhance the security of your iOS device:
· Setting a strong lock-screen passcode, in the case of non–iPhone 5s devices
· Enabling the Find My iPhone/iPad service if you didn’t during initial setup
· Deactivating lock-screen access to Siri, Control Center, and Notification Center
These settings can be changed as follows.
Lock-Screen Passcode
Because four-digit PINs can be surprisingly easy for attackers to guess, you can instead create a longer password or passphrase, involving numbers, letters, or symbols (see Figure 13, Using a longer passcode).
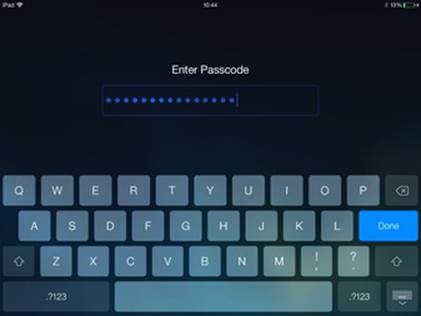
Figure 13. Using a longer passcode
To do so, open the Settings app then tap the General heading, then Passcode Lock. Enter your existing passcode when prompted, then tap the switch alongside Simple Passcode so that it’s deactivated, and follow the instructions that appear. You can create single-word passcodes or even type an entire phrase involving spaces, such as your favorite quotation (although bear in mind that longer sentences might be annoying to type each time you wake your device from sleep).
In the same Settings options list you can also set the iOS device to erase its data after 10 failed passcode attempts—tap the switch alongside Erase Data. This is potentially dangerous if you have young children in the house, or if anybody else uses your device and might struggle to remember the code. However, if nobody but you uses your iPhone or iPad, then it’s certainly worth considering.
Find My iPhone/iPad
The second vital security measure is to register the device with iCloud’s Find My iPhone/iPad system, if you didn’t during the initial setup steps. Despite the name of this service, iPod Touches and even Mac computers can be registered in addition to iPads and iPhones.
To register a device, open the Settings app, then tap the iCloud heading and tap the switch alongside the Find My iPhone/iPad heading so it’s activated.
Find My iPhone/iPad offers three very useful features when a phone is lost or stolen. These features are accessible via the iCloud website from any computer or smartphone, or the Find My iPhone (sic) app running on another iOS device:
· You can view a map showing the device’s location. Note that the location reported isn’t guaranteed to be accurate, and that the location can be spoofed using various apps and online services.[18]
· You can make the lost or stolen iOS device emit a sound, even if the volume is set to mute. This can help locate it if you’ve lost it in your home or workplace.
· 
Figure 14. An iPhone showing a “Lost mode” message via Find My iPhone
You can set the device to Lost mode which will cause a message to pop up on the screen to tell anybody who has the phone to call you to arrange return (see the figure here). The device will also lock and require the usual PIN/passcode before it can be used again.
· If the device is irretrievable, you can issue a remote wipe order that will wipe all the data off of it. Once a remote wipe has taken place it will be impossible to set up the device from scratch without inputting your Apple ID and password. This is designed to make stolen devices useless to thieves.
All of those enhancements assume the device is able to get online and hasn’t simply been switched off by a thief. They also assume the battery hasn’t run out of power. However, if the device is offline, all the aforementioned requests will be queued to take place as soon as the device comes back online again.
Deactivate Lock-Screen Feature Access
Although being able to access Control Center, Notification Center, and Siri from the lock screen is convenient, those all represent potential security issues if a device is stolen or lost. Apple works hard to limit what phone features and personal data can be accessed when the phone is in Lock mode but, upon the release of iOS 7, it was possible to use Siri to deactivate the Find My iPad/iPhone service without entering a passcode/using Touch ID to unlock the device. This has since been fixed.
To disable Control Center access from the lock screen, open the Settings app and tap Control Center, then deactivate the switch alongside Access on Lock Screen.
To disable Notification Center access from the lock screen, open the Settings app, then tap the Notification Center heading. Deactivate the switches alongside Notifications View and Today View under the Access on Lock Screen heading.
To disable Siri access when the device is locked, open the Settings app, then tap General > Passcode Lock, and type your passcode when prompted. Deactivate the switch alongside Siri under the Allow Access When Locked heading.
You might also choose to enable two-step authentication for your Apple account, as described in Tip 25, Enable two-step verification for extra security.
iTunes
iTunes is Apple’s application for Macs and PCs that lets users play and manage their audio and video collections, as well as purchase new titles through the iTunes Store.
Coupling your iPad or iPhone to iTunes on a Mac or Windows PC was a necessity just a few years ago in order to initially set up the device and sync music and video purchases, but nowadays using iTunes is not mandatory. Put simply, iOS devices are designed to be fully independent.
From an iPad or iPhone perspective, the primary use of iTunes today is to let you sync to your device any existing music or video files you might own (including tracks ripped from CD/DVD, or downloaded via non-Apple websites or services). You can also sync any playlists you create using iTunes, and iTunes offers access to the iTunes and iOS App Stores, circumventing the need to use the apps on your device.
iTunes can connect to your device via a USB cable or over Wi-Fi. The former is the more reliable and quicker of the two methods.
Perhaps iTunes’s most useful feature is its ability to create backups of your iOS device, which can offer a safeguard against problems when upgrading to a new release of iOS (it’s also possible to back up to iCloud—open the Settings app, then tap iCloud > Storage & Backup).
The only time iTunes is absolutely required is when the device becomes locked after too many incorrect PIN/passcode attempts.
Spotlight Search
iOS’s search tool is called Spotlight, and it lets you search by name for apps, music, videos, voice memos, audiobooks, and podcasts. Additionally, it lets you search for keywords within the content of your emails, notes, contacts, reminders, calendar events, and messages.
To access Spotlight, drag down in the app-icon area of the home screen. This will reveal a search field hidden at the top of the screen.
Can’t find the app icon for Pages on your home screens? If you have hundreds of apps installed it can be genuinely difficult. Just bring down the Spotlight search field and type “pages.” The results will appear immediately underneath the search field. Want to find any email messages that mention Chianti? Just bring down the Spotlight search field and type the word.
It’s handy to know that the search field within many apps is hidden in the same way—just above the default screen area—and you can reveal it by dragging down a small amount in the main screen area. Try doing so in the Notes app’s main listing, for example.
System Configuration
Settings within iOS can be configured using Control Center and the Settings app.
Control Center
We can swipe up from the bottom of the screen to reveal Control Center, which offers a way to activate and deactivate key hardware features as well as useful everyday apps (see Figure 15, Control Center on an iPhone).

Figure 15. Control Center on an iPhone
· Airplane mode: This deactivates all communication hardware within the device (that is, cellular, Wi-Fi, and Bluetooth). As the name suggests, this mode is designed for air travel, although it’s also useful for saving power when the battery is running low and you don’t mind being unable to receive calls and messages or access the Internet (if you’re playing games on a long journey, for example).
· Wi-Fi: If you’re using solely cellular data you can deactivate Wi-Fi by tapping this button. However, don’t forget to activate it again when in range of your home or office network!
· Bluetooth: You can switch Bluetooth on or off with this switch. If you don’t use Bluetooth, then leaving it permanently switched off is a good idea because that will save battery life. Bluetooth devices you might use with your iOS device include earpieces and headsets, speakers, keyboards, and “eyes-free” dashboard modes within vehicles.
· Do Not Disturb: Although Do Not Disturb is designed to work according to the schedule you establish in the Settings app (see The Settings App), you can force it to activate immediately by tapping this button. Tap again to deactivate it.
· Rotation lock: Tapping this button locks the iPhone’s display to a portrait orientation, and the iPad’s display to whichever orientation it is currently being held in (that is, if held in landscape then tapping the button will lock the display to landscape). Some apps are able to override the rotation lock—many games work only in landscape mode, for example.
· Ringer mute (iPad only): This mutes the ringer on an iPad, which is to say that audible notifications from apps like Messages are silenced (although notifications will still appear onscreen). Note that this does not mute the main volume, so it will not mute music or video playback, for example. On the iPhone the side switch performs an identical function.
· Brightness: Moving this slider adjusts the screen brightness, although if the device is set to auto-brightness within the Settings app then the brightness may immediately autoadjust to match ambient conditions (that is, it will be decreased or increased automatically).
· Playback controls: These are the same controls found in the Music app, and work in the same way.
· Volume: This slider controls the playback volume of audio, video, and games. Dragging all the way to the left will mute the volume.
· AirDrop: All iOS users can send files to other users via AirDrop—see the following sidebar. However, to receive a file via AirDrop you must activate AirDrop here.
AirDrop
AirDrop lets users instantly transfer files or links to other iPad or iPhone users and works via a combination of Bluetooth and Wi-Fi. Although there’s a similar technology in Mac OS X, AirDrop in iOS lets you transfer files only to other AirDrop-compatible iOS devices (the iPhone 5, 5s, and 5c; iPad Air and iPad fourth generation; iPad Mini (standard and Retina); and iPod Touch fifth generation).
For AirDrop to work the recipient must enable it in Control Center (see Control Center). The recipient will be able to choose whether to receive AirDrop files from only contacts, or from absolutely anyone. Choosing the latter option, of course, means that anybody in the same area could attempt to send a file or link to you—even somebody in another room or on a different floor of the building. The potential range is up to 30 meters.
The person sending the file should open the item she wants to share, then tap the share button and select the AirDrop option. The recipient will appear in a list of nearby AirDrop-activated devices, and tapping his entry in the list will initiate the transfer. Note that you may be prompted to activate Bluetooth if it isn’t already activated—you can do this via Control Center.
A dialog box that pops up on the recipient’s device will show a preview of the file. The recipient will be asked if he wants to accept it. If he does, the file transfer will complete within seconds.
· AirPlay: Here you can choose a device to which your iPhone can output audio and/or video, or on which the iPad or iPhone screen can be mirrored. See AirPlay. If no AirPlay devices are nearby (that is, there are none on the same network), then this option will not appear.
· Flashlight (iPhone only): This is a small applet found only in Control Center; it activates the camera flash as a flashlight. Tapping again will deactivate it.
· Clock: This is a shortcut to the standard Clock app, as described in Information and Office.
· Calculator (iPhone only): This provides a shortcut to the Calculator app, as discussed in Information and Office.
· Camera: This is a shortcut to the Camera app, as described in Entertainment and Creativity.
The Settings App
The Settings app provides access to all configurable hardware and software settings within iOS. See the following figure for an example.
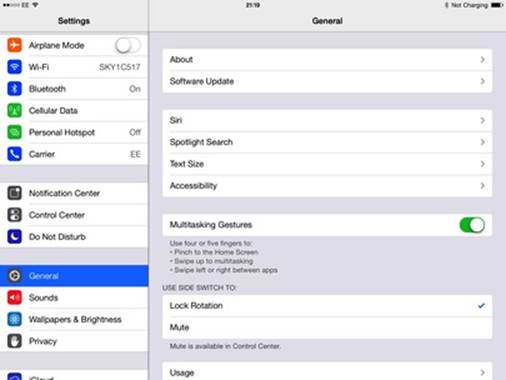
Figure 16. The Settings app on an iPad
The settings options are listed as a series of headings down the left side of the screen on an iPad, or down the center of the screen on an iPhone. Additionally, some apps add their own configuration options to the Settings app and these appear below the main headings.
The options within the Settings apps are as follows:
· Airplane mode: As with Control Center, this switch deactivates cellular, Wi-Fi, and Bluetooth functionality in order to abide by airline requests during take-off and landing.
· Wi-Fi: Here you can choose the Wi-Fi base station to connect to, and disconnect if you’re already connected. By tapping the (i) symbol alongside each you can view and adjust technical details about the connection and choose to “forget” particular networks, which will prevent your device from connecting automatically when the Wi-Fi base station comes within range.
· Bluetooth: You can switch Bluetooth on or off with this switch and choose which devices to pair with. As with the Wi-Fi heading, tapping the (i) icon will offer an option to let you “forget” the device so it won’t connect automatically whenever the device is in range.
· Cellular (iPhone and 3G/4G iPad): Here you can adjust various aspects relating to the cellular connection, including whether to use cellular data, LTE connections, and data roaming. If your cellular contract allows Personal Hotspot (see the next list item), you can also enable that here, and you can enable and disable the ability of individual apps to use cellular data.
· Personal Hotspot (iPhone and 3G/4G iPad): If your cellular contract allows the feature, you can activate iOS’s Personal Hotspot feature (otherwise known as data tethering) here. See Figure 17, Configuring Personal Hotspot on an iPad for an example from an iPad. Personal Hotspot allows you to connect other computers or devices to your iPad or iPhone via Wi-Fi, USB, and Bluetooth so they can share the cellular data connection.
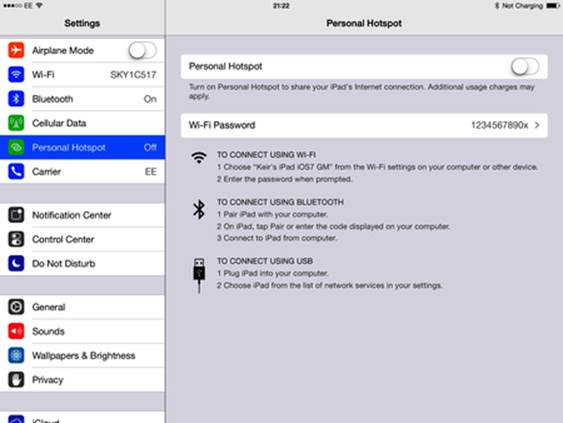
Figure 17. Configuring Personal Hotspot on an iPad
· Carrier (iPhone and 3G/4G iPad): Shows details of your cellular carrier and lets you choose a carrier manually, if necessary.
· Notification Center: Sets various aspects of Notification Center, including what apps are allowed to appear within it, and whether you want to receive AMBER and Emergency Government Alerts (USA only).[19]
· Control Center: Sets whether Control Center is accessible from an unlocked device and whether it’s accessible while an app is in use (that is, whether it should be accessible only when the user is accessing the home or lock screen).
· Do Not Disturb: Lets you turn off notifications and calls according to a schedule (overnight, for example) or manually (by activating the switch alongside the Manual heading). You can also create exceptions, and allow through calls that are repeated within a three-minute time frame (useful if somebody is urgently trying to contact you).
· General: An umbrella category containing the following subsettings:
o About: Shows technical details about your device, such as the amount of free storage space and the version numbers of various system components.
o Software Update: Checks for updates to iOS and, if there are any, starts the download and updating procedure.
o Siri: Activates or deactivates Siri and chooses voice and region settings. You can also deactivate voice feedback, which will stop Siri from speaking its responses.
o Spotlight Search: Controls what elements appear within Spotlight search results. You can also rearrange their order by dragging the handles at the right of each line.
o Text Size: Shrinks or enlarges the size of text in applications that support Dynamic Type, which is most if not all of Apple’s own apps and an increasing number of third-party apps. This is designed to assist with readability, and should be adjusted according to personal preference.
o Accessibility: Offers control over a host of specialized features for those who are sight, hearing, or physically impaired.
o Multitasking gestures (iPad only): Switches gestures on or off (see Gestures).
o Use Side Switch To (iPad only): Sets the function of the iPad’s side switch between muting the ringer and locking the rotation. Despite the fact that the iPhone has a side switch, this option is not available on iPhones.
o Usage: Lets you view how much storage space is free and what apps are using the storage space. You can also view how much iCloud storage space is used within your account, and delete iCloud data and backups. Additionally, you can set a switch to control whether the remaining battery charge is displayed as a percentage at the top of the screen, and view the amount of time the device has been active since the last charge.
o Background App Refresh: Controls whether compatible apps or Newsstand titles are able to go online for new content or use Location Services when the device is in sleep mode.
o Auto-Lock: Controls how quickly the device enters sleep mode after a period of inactivity.
o Passcode Lock: Sets various aspects of the Passcode security system, including setting a nonsimple passcode (see Security). Tapping the Require Passcode heading sets how quickly the device requires you to enter a PIN/passcode after it enters sleep mode—setting one minute, for example, means that should you wake your device less than a minute after it went into sleep mode, you won’t be prompted for your PIN/passcode.
o Restrictions: Switches features of iOS on and off, usually to deactivate them when somebody else, such as a child, is using your device. You can also set parental-control content filtering (including for Siri results) and control which apps are able to access features of your device such as Location Services and the microphone.
o Lock/Unlock (iPad only): Lets you set whether an iPad is locked or unlocked by use of a Smart Cover or the cover of a Smart Case.
o Date & Time: Lets you set the date and time manually if you wish (by default it’s set using Internet time servers). You can also adjust the time-zone setting, although this is automatically detected according to the location of your Wi-Fi base station. You can set the iPad or iPhone to display 24-hour time here, too.
o Keyboard: Sets various aspects of text entry on your device, such as whether words are capitalized automatically when they start sentences or new lines, and whether perceived typos are autocorrected. You can also choose additional international keyboard layouts and create shortcuts, which are words or abbreviations that when typed are automatically expanded into longer words or sentences (for example, you might type “omw” and it will automatically be expanded to “On my way!”).
o International: Sets various country-specific features such as interface language and which currency symbol and calendar (Gregorian, Japanese, or Buddhist) is used by default.
o iTunes Wi-Fi Sync: Automatically back up and sync to iTunes on a Mac or Windows PC over Wi-Fi. You need to set this up initially while the iPad or iPhone is connected to the computer via a USB cable (open iTunes on the computer, select the device from the list at the top right, click the Summary tab, and select the Wi-Fi choice in the Options list). Note that syncing over Wi-Fi can happen only if the Mac or Windows PC is powered up and is on the same network as the iPad or iPhone to be synced, and the iPad or iPhone is connected to a power source.
o VPN: Configure a virtual private network tunneling connection, usually to an office network. L2TP, PPTP, and IPSec technologies are supported.
o Profile: Lets you view any Wi-Fi profiles you’ve added that facilitate automatic signing in on public networks, including networks supporting 802.1X.
o Reset: Lets you reset all settings on your device or erase all content. You can also reset individual network settings, the keyboard dictionary, the home-screen layout, and location and privacy settings.
· Sounds: Configure ringtones and vibration alerts for various system apps, including incoming calls and texts, along with the ringer and alert volume. You can also configure what sound effects are used for other events, such as tweeting or Calendar alerts.
· Wallpaper & Brightness: As the name suggests, this lets you select what wallpaper you want to use on the lock screen and home screen. You can also set the screen brightness and activate auto-brightness, which will adjust the screen’s brightness based on ambient light levels and thereby save battery power.
· Privacy: Switch on or off various features of iOS that present potential privacy issues, such as Location Services, and control which apps can access those services. You can also control which apps are able to access your Facebook and Twitter accounts, if they’ve been set up on the device, and control advertising tracking (see Tip 116, Stop advertisers from tracking you).
· iCloud: Control which iCloud account you’re signed into, and switch on and off various iCloud services, such as Safari bookmark syncing and Find My iPhone/iPad. See Figure 18, Setting iCloud options on an iPad for an example. You can also view details of your iCloud account and upgrade if required, or even delete the entire account.
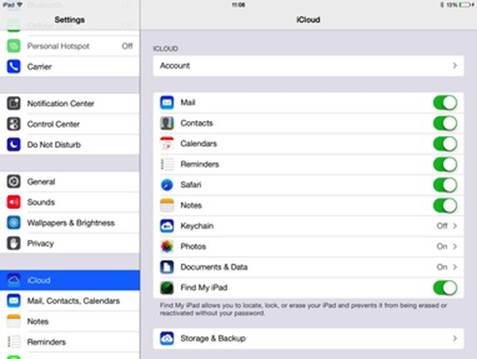
Figure 18. Setting iCloud options on an iPad
· Mail, Contacts, Calendars: Add non-iCloud email, messaging, and calendar accounts to iOS, as described in Setting Up Non-Apple Accounts. You can also configure settings for the Mail, Contacts, and Calendar apps, such as how messages are listed and with what amount of detail.
· Notes: Configure the default account that the Notes app uses.
· Reminders: Configure whether all reminders generated on the device are synced, or just those that are new. Select the default list to which Siri adds new reminders.
· Messages: Switch iMessage on or off and configure which email addresses and phone numbers are used to identify you when sending and receiving iMessages. Activate the function to send iMessages as SMS should iMessage not be available (if you’re unable to get a strong enough network connection, for example). Additionally, you can choose to block individuals so you won’t receive phone calls, messages, or FaceTime calls from them.
· FaceTime: Choose the Apple ID that you wish to use to make FaceTime calls, and indicate via which addresses/cell-phone numbers you wish to be contacted.
· Maps: Configure aspects of the Maps app, such as the volume of spoken directions and whether metric or imperial measurements are used.
· Safari: Configure Safari, such as the search engine it uses and whether pop-ups should be blocked. You can also clear the browser cache, cookies, and history here.
· iTunes & App Store: Controls aspects of the iTunes Store and App Store apps, including whether purchases and updates are automatically downloaded. You can also set whether cellular data is used to download new apps or updates and for iTunes Match,[20] a subscription service that allows you to access your music collection from all your devices via iCloud.
· Music: Controls aspects of the Music app such as audio equalization and iTunes Match activation. You can also configure Home Sharing, which lets you share the device’s music library over the network with other iOS devices (including an Apple TV) and computers running iTunes.
· Videos: Configure aspects of video playback via the Videos app, including whether to activate Home Sharing for the video library on the device, as mentioned previously.
· Photos & Camera: Controls functions of the Camera and Photos apps, such as whether to use photo stream and high dynamic range (HDR; see the following sidebar) when taking photos. Here you can also set the default slideshow settings.
High-Dynamic-Range Photography
HDR attempts to provide perfectly exposed photographs within the Camera app by taking several separate shots in quick succession and then automatically combining the best bits of each into one. Every source picture used for the HDR composite is exposed at a different light level, allowing the device to convey detail that with a single shot might be over- or underexposed.
You can activate HDR on an iPad or iPhone by tapping the HDR link before taking a picture. Note that the flash cannot be used at the same time as HDR, although one benefit of HDR is that it’s better at low-light photography.
Unless you change the setting under the Photos & Camera heading in the Settings app, taking photographs with HDR will result in two identical snaps—one shot that uses HDR, and one standard shot that doesn’t. This happens because HDR isn’t guaranteed to produce acceptable results every time.
Because of the way it takes several shots in quick succession, using HDR to shoot fast-moving action may result in blurred images, and you must remember to keep the camera still for a moment before and after you tap the button to take the picture.
· iBooks: Controls the layout of ebooks when using the iBooks app, and functions related to purchasing of ebooks.
· Podcasts (if installed): Lets you control overall subscription settings for podcasts, such as how frequently they’re refreshed.
· iTunes U (if installed): Lets you choose whether to sync details via iCloud.
· Game Center: Set the Apple ID that’s used to sign into Game Center, how game invitations are handled, and whether friend recommendations are made from your contacts list and your list of Facebook friends.
· Twitter: Configure one or more Twitter accounts to use when sharing content (see Sharing with Others).
· Facebook: Configure a Facebook account to use when sharing content (see Sharing with Others), and set which third-party apps are able to use the account for various purposes, such as identifying you, posting on your behalf, or accessing areas of your Facebook account.
· Flickr: Configure a Flickr account for photo sharing (see Sharing with Others).
· Vimeo: Configure a Vimeo account for video sharing (see Sharing with Others).
Beneath the default headings within the Settings app are configuration options for apps you’ve installed. Some offer significant options to modify how the app works, whereas others may simply present a software version number. You might be surprised by the options you find.
Cutting, Copying, and Pasting

Figure 19. Selecting text in the Notes app on an iPhone
There are various ways to select text and images, as follows.
Selecting and Copying Text
There are three methods to select words, sentences, and paragraphs for copying or cutting. Which of them you use depends on personal preference, as well as which app you’re using at the time:
· Tapping and holding: If you tap and hold a word or letter, it will be highlighted when you lift your finger. Subsequently dragging the handles to the left or right of the word will then let you change the selection area, with a magnifying glass showing a close-up view, as in the figure here. If you’re zoomed out from the text within apps such as Safari, tapping and holding may select the entire paragraph rather than a single word, depending on the web-page layout.
· Double-tapping: In apps in which the text is editable, you can double-tap the word. However, don’t lift your finger on the second tap. Instead, drag it to define the selection area. Beware, though: in some apps a double-tap is interpreted as a request to zoom in, so this method does not work universally.
· Tapping a word: When the onscreen keyboard is visible, moving the cursor to the word in question and then tapping it will show a pop-up menu in which you can tap Select to highlight the word, and then drag the handles at either end of the word to select more. Alternatively, tap Select All to select all the text within the note or document.
Whichever method you choose, once you’ve made your selection a pop-out menu will appear offering the ability to cut or copy the text (you can also tap the Delete button on the onscreen keyboard to delete the text). To paste the text into a new location once it’s been cut or copied, switch to the app or new location in the document in which you want to paste, then double-tap the screen when the keyboard is visible. A pop-up menu will appear, on which you can tap the Paste entry. Alternatively you can tap once and hold, then wait a moment until the menu appears.
Selecting and Copying Images
You can copy both photos and videos and then paste them into applications that support multimedia, such as the Messages or Mail app. To copy a photo or video, tap and hold when viewing the photo (or tap and hold its thumbnail within an album), and then select Copy from the menu that appears. Alternatively, open the photo or video for viewing, then tap the share button and tap the Copy option. Whichever copying method you use, you should then switch to the app in which you want to paste the item, tap once in a blank spot to place the cursor, and then tap again until a pop-up menu appears offering the chance to paste the item.
Notifications
Apps can tell you of important events or remind you when something needs doing by either popping up an alert box onscreen or folding down a notification message at the top of the screen. You can dismiss a dialog box by clicking the relevant button within it, and notifications will disappear by themselves after a few seconds (although you can help them on their way by flicking them up into the top of the screen).
Notification Center collates all notifications; you can open it by swiping down from the top of the screen.
You’ll see three tabs in Notification Center: Today, All, and Missed. Today is limited to showing a summary of the day’s events and the immediately upcoming weather. At the bottom you’ll also see a nonspecific summary of any events taking place tomorrow (such as “There is one event scheduled for 9am”).
The All tab shows notifications from all other apps, regardless of whether they occurred when you were using the phone or when the phone was in sleep mode. Tapping any entry in the list will open the app for further investigation.
The Missed tab filters the notification list for any events that took place when the device was in sleep mode.
You can modify Notification Center using the Settings app (see The Settings App), and dismiss it by dragging the handle at the bottom back up to the top of the screen.
Some apps display numbered notifications against their app icons on the home screen. The Mail app will show how many unread messages there are, for example, and the Phone app will show the number of missed calls and voicemail messages. Usually opening the app will clear these notifications, although in the case of the Phone app you may have to view the Recents list by tapping its icon at the bottom of the screen, and listen to (and possibly delete, depending on your cellular operator) any voicemail messages.
Sharing with Others
A key feature of iOS is the share button in various applications—see Figure 20, The share button (bottom left) within an iPhone's Photos app share button for an example from the Photos app on an iPhone, where the button is located at the bottom left. Depending on the app, once tapped this offers a way of sharing everything from emails to photos by various means, and performing tasks such as printing.
Depending on which app you’re sharing from, the options might include any of the following:
· AirDrop: Shares with other iOS 7 users who are nearby—see AirDrop.
· Message: Shares via an iMessage or SMS/MMS message using the Messages app. Tapping the button will switch you to the Messages app, with the file attached.
· 
Figure 20. The share button (bottom left) within an iPhone’s Photos app
Mail: Creates a new message within the Mail app, with the shared item attached or displayed within the body of the email.
· iCloud: Shares with others via a shared photo stream. See Photo Stream.
· Twitter: Shares via any Twitter accounts you have set up on the system, with the chance to add a message. You can add Twitter accounts via the Settings app.
· Facebook: Shares on your Facebook wall, with the chance to add a message (assuming you have an account set up within the Settings app). Unless you specify otherwise, images are added to an album called iOS Photos.
· Flickr: Shares photos and videos via the Flickr account set up on the system.[21]
· Vimeo: Shares video files via the Vimeo video-sharing site,[22] assuming an account has been added in the Settings app.
· Bookmark (Safari and Mail only): Adds a web-browser bookmark.
· Add to Reading List (Safari only): Adds items to your reading list; these items are similar to regular browser bookmarks, except a copy of the page is stored on the device so you can read it even if there isn’t an Internet connection.
· Add to Home Screen (Safari and Mail only): Adds a website as an app, complete with an icon on the home screen. Once tapped the “app” will open the site in a new Safari tab.
· Copy: Copies the item to the clipboard for pasting elsewhere.
· Slideshow: Displays the current image plus any others in the album in a slideshow.
· AirPlay: Sends the picture or video to an AirPlay device on the network.
· Assign to Contact: Opens the Contacts app so the selected picture can be used as the image for one of your contacts.
· Use as Wallpaper: Sets the image as the lock-screen or home-screen wallpaper (or both).
· Print: Prints to an AirPrint-compatible printer on the network (see the following sidebar).
AirPrint
AirPrint is Apple’s solution for printing from iOS devices. Put simply, if a printer is AirPrint compatible then an iOS device will automatically detect it when you tap Share > Print (in the Mail app you must tap the reply/forward button to see the Print option). Note that although AirPrint uses Wi-Fi, not all Wi-Fi–capable printers support AirPrint. Look for the AirPrint badge on the printer’s box or in the manual.
Although the quality of the output through AirPrint is virtually identical to that of a desktop computer, AirPrint is intentionally simple to use. Unlike when printing from a desktop computer, you won’t see a configuration panel where you can set the resolution or scaling. When printing via AirPrint the only option is how many copies you’d like.
See also Tip 81, Print to any printer connected to a Mac or Windows PC.
In addition to these choices, non-US users may find other options, depending on their country settings—Chinese users will see Sina and Tencent Weibo options, for example.
Usability Tips and Tricks
Three basic but not-quite-obvious tricks can be used within most apps, as follows:
· Deleting items: In apps that have lists, you can often remove an entry by swiping left across it, which will reveal a Delete, Trash, or Archive button that you can then tap.
· Fetching new content: With some apps that regularly download new data, such as the Mail app, tapping and dragging down on a list will force the app to see if there’s anything new available (assuming the list is already scrolled to the top, of course).
· Tap and hold: Tapping and holding an item onscreen will often reveal a pop-up menu showing additional options.
Jailbreaking
No book discussing iOS would be complete without at least a brief mention of jailbreaking , although it’s not recommended for most users and comes with a substantial number of caveats.
Jailbreaking is the process of gaining root powers on a device—to become an administrator so that new software can be installed without Apple’s authorization. It’s achieved using software that exploits a bug in iOS or the iPad or iPhone hardware.
Why would anybody do this? Apple keeps very tight control over which apps are listed in the App Store, and what they can do. This limits the options open to app developers and to users who desire more control over their devices. Apps are “sandboxed,” for example, which means they’re limited to running in their own space within the operating system and their interaction with other apps or the operating system is limited. Similarly, apps cannot modify how system components work, or even supply an alternative technology that would compete with a built-in system tool (although they can “wrap” underlying iOS technology to create a new app, which is why there are alternative web browsers in the app store).
Security and Legalities
The tight control is there for a reason: it’s extremely effective at preventing malware from appearing in iOS, and it helps maintain a consistent user experience. It means iOS is significantly more secure than the world of Android apps and the Wild West nature of Android’s Google Play,[23]where there’s significant malware and piracy.
Some people crave more control over their iOS devices, however, or would like the ability to install apps that Apple doesn’t approve of. Some people want to use alternative carriers. The solution in each case is jailbreaking.
Perhaps surprisingly, the US Copyright Office has deemed jailbreaking legal for iPhones, although not yet for iPads. In any case, Apple says that jailbreaking voids warranties, and outside the United States laws differ considerably.
Because jailbreaking exploits bugs, Apple plays a cat-and-mouse game with developers, patching security holes in software and hardware with new releases of iOS and within new devices, only to find that new holes have been spotted and exploited.
How to Jailbreak
There are two types of jailbreaking technology: tethered and untethered.
A tethered jailbreak requires the device to be booted each time via jailbreaking software on a Mac or Windows PC so that the jailbreak patch can be applied. In other words, the jailbreak will be lost if you restart your phone away from a computer. For various reasons, tethered jailbreaks are technologically easier to accomplish.
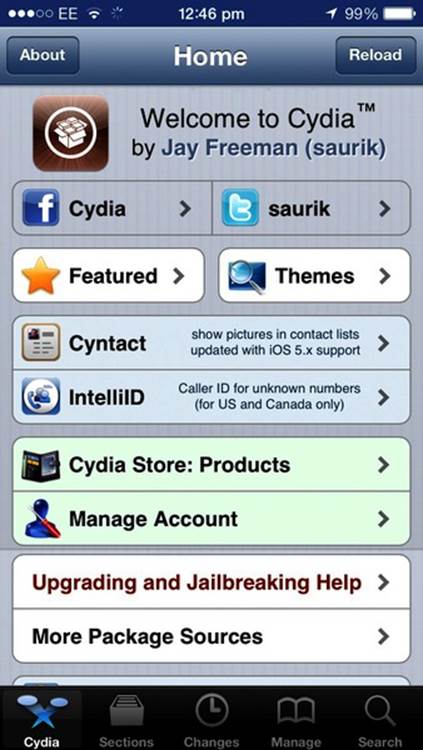
Figure 21. Cydia running on a jailbroken iPhone
An untethered jailbreak means that the software in the device is permanently patched and you can restart the device whenever needed without losing the jailbreak.
In both cases, updating iOS will very likely repair the system component exploited by the jailbreak, which is why many who jailbreak don’t upgrade as soon as an update is made available, but instead wait to see if the jailbreak is also updated.
However a jailbreak is achieved, the goal is to install an additional app store, and this is usually Cydia,[24] which we see in the figure here. Cydia allows the installation of apps and tweaks not authorized by Apple, although it works in a similar way to the official App Store—some apps are free and can be installed by tapping a button, and others have a price and can be purchased with a payment card.
Footnotes
|
[1] |
http://www.apple.com/apples-commitment-to-customer-privacy/ |
|
[2] |
https://www.eff.org/issues/location-privacy |
|
[3] |
https://www.google.com/enterprise/apps/business/ |
|
[4] |
https://icloud.com |
|
[5] |
https://www.apple.com/itunes/gifts/ |
|
[6] |
http://support.apple.com/kb/ht2534 |
|
[7] |
See http://www.apple.com/business/vpp/ and https://www.apple.com/education/ipad/volume-purchase-program/ . |
|
[8] |
https://www.apple.com/icloud/setup/pc.html |
|
[9] |
http://www.apple.com/mac/iphoto/ |
|
[10] |
http://www.apple.com/aperture/ |
|
[11] |
https://www.apple.com/icloud/setup/pc.html |
|
[12] |
https://www.apple.com/icloud/setup/pc.html |
|
[13] |
https://www.apple.com/icloud/setup/pc.html |
|
[14] |
https://www.apple.com/icloud/setup/pc.html |
|
[15] |
https://www.apple.com/creativity-apps/ios/ |
|
[16] |
https://www.apple.com/creativity-apps/ios/ |
|
[17] |
https://www.apple.com/itunes/itunes-match/ |
|
[18] |
See http://modmyi.com/info/fakemyi.php and http://www.locationholic.com . |
|
[19] |
See https://www.fcc.gov/guides/wireless-emergency-alerts-wea and http://www.amberalert.gov |
|
[20] |
http://www.apple.com/itunes/itunes-match |
|
[21] |
http://www.flickr.com |
|
[22] |
https://vimeo.com/ |
|
[23] |
See, for example, http://www.techrepublic.com/blog/google-in-the-enterprise/malware-in-the-google-play-store-enemy-inside-the-gates/ . |
|
[24] |
http://cydia.saurik.com/ |
All materials on the site are licensed Creative Commons Attribution-Sharealike 3.0 Unported CC BY-SA 3.0 & GNU Free Documentation License (GFDL)
If you are the copyright holder of any material contained on our site and intend to remove it, please contact our site administrator for approval.
© 2016-2026 All site design rights belong to S.Y.A.