Switching to the Mac: The Missing Manual, Mavericks Edition (2014)
Part IV. Putting Down Roots
Chapter 14. Accounts, Security & Gatekeeper
In an era when security is the hottest high-tech buzzword, Apple was smart to make security a focal point for OS X. It was already virus-free and better protected from Internet attacks than Windows. But OS X 10.9 is the most impenetrable Mac system yet, filled with new defenses against the dark arts. This chapter covers the whole range of them.
On the premise that the biggest security threat of all comes from other people in your home or office, though, the most important security feature in OS X is the accounts system.
Introducing Accounts
The concept of user accounts is central to OS X’s security approach. Like the Unix under its skin (and also like Windows these days), OS X is designed from the ground up to be a multiple-user operating system. That is, you can set up your OS X so that everyone must log in—click his name and type his password—when the computer turns on (Figure 14-1).
Upon doing so, you discover the Macintosh universe just as you left it, including these elements:
§ Your documents, files, and folders.
§ Your preference settings in every program you use: Web browser bookmarks and preferred home page; desktop picture, screen saver, and language; icons on the desktop and in the Dock—and the size and position of the Dock itself; and so on.
§ Email account(s), including personal information and mailboxes.
§ Your personally installed programs and fonts.
§ Your choice of programs that launch automatically at startup.
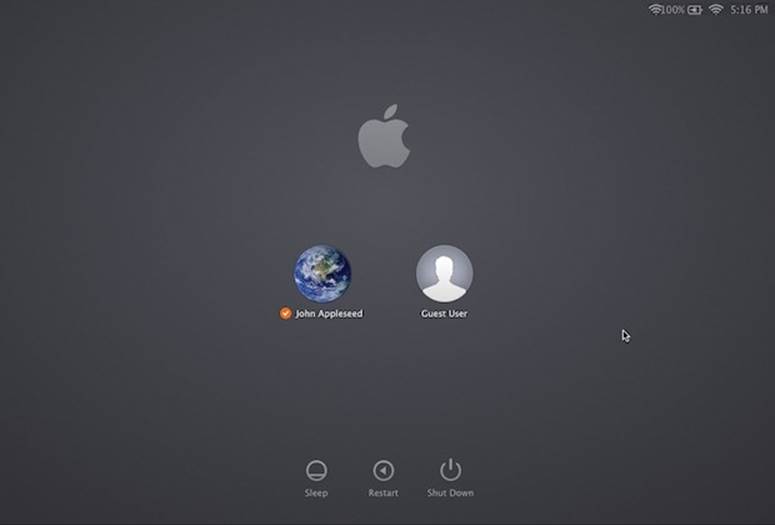
Figure 14-1. When you set up several accounts, you don’t turn on the Mac so much as sign into it. A command in the ![]() menu called Log Out summons this sign-in screen, as does the Accounts menu described later in this chapter. Click your own name, and type your password (if any), to get past this box and into your own stuff.
menu called Log Out summons this sign-in screen, as does the Accounts menu described later in this chapter. Click your own name, and type your password (if any), to get past this box and into your own stuff.
This system lets different people use it throughout the day, without disrupting one another’s files and settings. It also protects the Mac from getting fouled up by mischievous (or bumbling) students, employees, and hackers.
If you’re the only person who uses your Mac, you can safely skip most of this chapter. The Mac never pauses at startup time to demand the name and password you made up when you installed OS X, because Apple’s installer automatically turns on something called automatic login (Setting Up the Login Process). You will be using one of these accounts, though, whether you realize it or not.
Furthermore, when you’re stuck in line at the Department of Motor Vehicles, you may find the concepts presented here worth skimming, as certain elements of this multiple-user system may intrude upon your solo activities—and figure in the discussions in this book—from time to time.
TIP
Even if you don’t share your Mac with anyone and don’t create any other accounts, you might still be tempted to learn about the accounts feature because of its ability to password-protect the entire computer. All you have to do is turn off the automatic login feature described on Setting Up the Login Process. Thereafter, your Mac is protected from unauthorized fiddling when you’re away from your desk or if your laptop is stolen.
The First Account
When you first installed OS X, whether it was 10.9 or an earlier version, you were asked for a name and a password. You were creating the first user account on your Macintosh. Since that fateful day, you may have made a number of changes to your desktop—adjusted the Dock settings, set up your folders and desktop the way you like them, added some bookmarks to your Web browser, and so on—without realizing that you were actually making those changes only to your account.
You’ve probably been saving your documents into your own Home folder, which is the cornerstone of your account. This folder, generally named after you and stashed in the Users folder on your hard drive, stores not only your own work, but also your preference settings for all the programs you use, special fonts you’ve installed, your own email collection, and so on.
Now then: Suppose you create an account for a second person. When she turns on the computer and signs in, she finds the desktop exactly the way it was factory-installed by Apple—stunning outer-space desktop picture, Dock along the bottom, and so on. She can make the same kinds of changes to the Mac that you’ve made, but nothing she does affects your environment the next time you log in.
In other words, the multiple-accounts feature has two components: first, a convenience element that hides everyone else’s junk; and second, a security element that protects both the Mac’s system software and everybody’s work.
Creating an Account
Suppose somebody new joins your little Mac family—a new worker, student, or love interest, for example. And you want to make that person feel at home on your Mac.
Begin by opening System Preferences (Chapter 16). In the System Preferences window, click Users & Groups (which used to be called Accounts). You have just arrived at the master control center for account creation and management (Figure 14-2).
To create a new account, start by unlocking the Users & Groups panel. That is, click the ![]() at lower left, and fill in your own account name and password.
at lower left, and fill in your own account name and password.
Now you can click the ![]() button beneath the list of accounts. The little panel shown at bottom in Figure 14-2 appears.
button beneath the list of accounts. The little panel shown at bottom in Figure 14-2 appears.
Phase 1: Choose an Account Type
As though this business of accounts and passwords wasn’t complicated enough already, OS X offers several types of accounts. And you’re expected to specify which type each person gets at the moment you create an account.
To do that, open the New Account pop-up menu (Figure 14-2, bottom). Its five account types are described on the following pages.
Administrator accounts
If this is your own personal Mac, then just beneath your name on the Users & Groups pane of System Preferences, it probably says Admin. This, as you could probably guess, stands for Administrator.
Because you’re the person who originally installed OS X, the Mac assumes that you are its administrator—the technical wizard in charge of it. You’re the teacher, the parent, the resident guru. You’re the one who will maintain this Mac. Only an administrator is allowed to do the following:
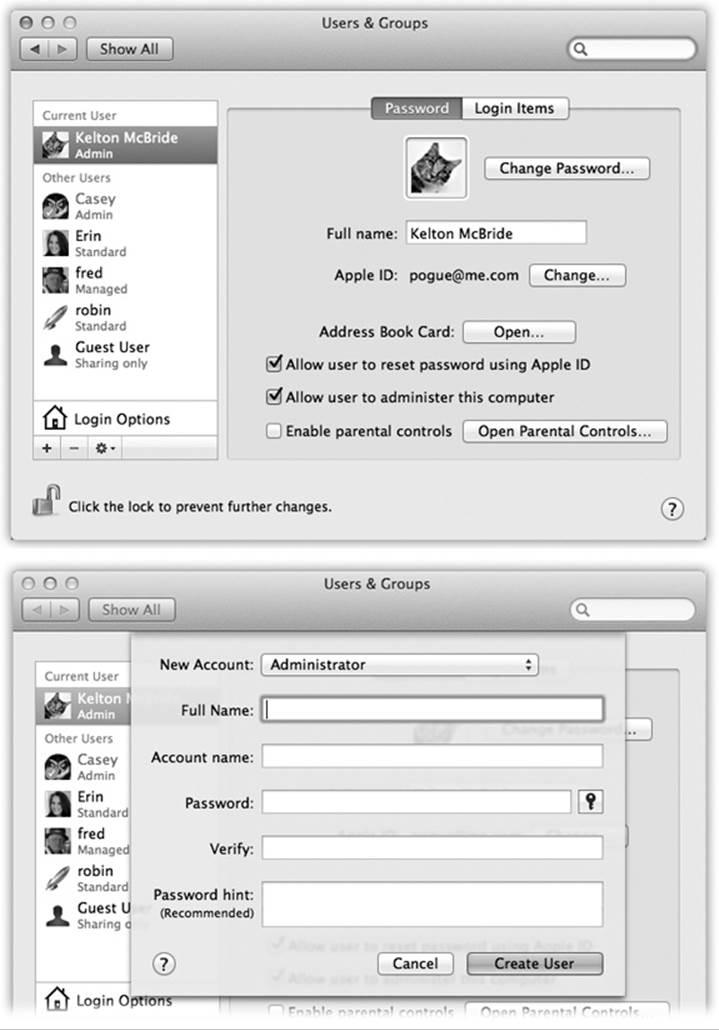
Figure 14-2. Top: The screen lists everyone who has an account. From here, you can create new accounts or change passwords. If you’re new at this, there’s probably just one account listed here: yours. This is the account OS X created when you first installed it. You, the all-wise administrator, have to click the ![]() to authenticate yourself before you can start making changes. Bottom: In the account-creation process, the first step is choosing which type of account you want to create.
to authenticate yourself before you can start making changes. Bottom: In the account-creation process, the first step is choosing which type of account you want to create.
§ Install new programs into the Applications folder.
§ Add fonts that everybody can use.
§ Make changes to certain System Preferences panes (including Network, Date & Time, Energy Saver, and Startup Disk).
§ Use some features of the Disk Utility program.
§ Create, move, or delete folders outside of your Home folder.
§ Decide who gets to have accounts on the Mac.
§ Open, change, or delete anyone else’s files.
§ Bypass FileVault using a recovery key (FileVault).
The administrator concept may be new to you, but it’s an important pill to swallow. For one thing, you’ll find certain settings all over OS X that you can change only if you’re an administrator—including many in the Users & Groups pane itself. For another thing, administrator status plays an enormous role when you want to network your Mac to other kinds of computers, as described in the next chapter. And, finally, in the bigger picture, the fact that the Mac has an industrial-strength accounts system, just like traditional Unix and recent Windows operating systems, gives it a fighting chance in the corporations of America.
As you create accounts for other people who’ll use this Mac, you’re offered the opportunity to make each one an administrator just like you. Needless to say, use discretion. Bestow these powers only upon people as responsible and technically masterful as yourself.
Standard accounts
Most people, on most Macs, are ordinary Standard account holders. These people have everyday access to their own Home folders and to the harmless panes of System Preferences, but most other areas of the Mac are off limits. OS X won’t even let them create new folders on the main hard drive, except inside their own Home folders (or in the Shared folder described starting on Sharing Across Accounts).
A few of the System Preferences panels display a padlock icon (![]() ). If you’re a Standard account holder, you can’t make changes to these settings without the assistance of an administrator. Fortunately, you aren’t required to log out so that an administrator can log in and make changes. You can just call the administrator over, click the padlock icon, and let him type in his name and password (if, indeed, he feels comfortable with you making the changes you’re about to make).
). If you’re a Standard account holder, you can’t make changes to these settings without the assistance of an administrator. Fortunately, you aren’t required to log out so that an administrator can log in and make changes. You can just call the administrator over, click the padlock icon, and let him type in his name and password (if, indeed, he feels comfortable with you making the changes you’re about to make).
Managed accounts with Parental Controls
A Managed account is the same thing as a Standard account—except that you’ve turned on Parental Controls. (These controls are described later in this chapter.) You can turn a Managed account into a Standard account just by turning off Parental Controls, and vice versa.
That is, this account usually has even fewer freedoms—because you’ve limited the programs this person is allowed to use, for example. Use a Managed account for children or anyone else who needs a Mac with rubber walls.
Sharing Only account
This kind of account is extremely useful—if your Mac is on a network (Chapter 15).
See, ordinarily, you can log in and access the files on your Mac in either of two ways:
§ In person, seated in front of it.
§ From across the network.
This arrangement was designed with families and schools in mind: lots of people sharing a single Mac.
This setup gets a little silly, though, when the people on a home or office network each have their own computers. If you wanted your spouse or your sales director to be able to grab some files from you, you’d have to create full-blown accounts for them on your Mac, complete with utterly unnecessary Home folders they’d never use.
That’s why the Sharing Only account is such a great idea. It’s available only from across the network. You can’t get into it by sitting down at the Mac itself—it has no Home folder!
Finally, of course, a Sharing Only account holder can’t make any changes to the Mac’s settings or programs. (And since they don’t have Home folders, you also can’t turn on FileVault for these accounts.)
In other words, a Sharing Only account exists solely for the purpose of file sharing on the network, and people can enter their names and passwords only from other Macs.
Once you’ve set up this kind of account, all the file-sharing and screen-sharing goodies described in Chapter 15 become available.
Group
A group is just a virtual container that holds the names of other account holders. You might create one for your most trusted colleagues, another for those rambunctious kids, and so on—all in the name of streamlining the file-sharing privileges feature described on Sharing Any Folder. The box on Creating Groups covers groups in more detail.
The Guest account
The Guest account is great for accommodating visitors, buddies, or anyone else who’s just passing through and wants to use your Mac for a while. If you let such people use the Guest account, your own account remains private and un-messed-with.
NOTE
The Guest account isn’t listed among the account types in the New Account pop-up menu (Figure 14-2). That’s because there’s only one Guest account; you can’t actually create additional ones.
But it’s still an account type with specific characteristics. It’s sitting right there in the list of accounts from Day One.
Any changes your guest makes while using your Mac are automatically erased when she logs out. Files are deleted, email is nuked, setting changes are forgotten.
As noted above, the Guest account is permanently listed in the Users & Groups panel of System Preferences. Ordinarily, though, you don’t see it in the login screen list; if you’re normally the only person who uses this Mac, you don’t need to have it staring you in the face every day.
So to use the Guest account, bring it to life by turning on “Allow guests to log into this computer.” You can even turn on the parental controls described earlier in this chapter by clicking Open Parental Controls, or permit the guest to exchange files with your Mac from across the network (Chapter 15) by turning on “Allow guests to connect to shared folders.”
POWER USERS’ CLINIC: CREATING GROUPS
Changing permissions settings on a networked Mac, or one with a lot of account holders, is a lot easier if you sweep all your minions into subsets called groups.
This process used to require a complicated series of Unixy steps that, if not performed carefully, could seriously foul up your Mac.
But in OS X, you can create a group as easily as you’d create an account. And in the same place: the Users & Groups pane of System Preferences.
Click the tiny ![]() in the lower-left corner. When prompted, type in your administrator’s name and password, and then click OK. The Mac is just making sure that somebody with a clue is at the helm.
in the lower-left corner. When prompted, type in your administrator’s name and password, and then click OK. The Mac is just making sure that somebody with a clue is at the helm.

Now click the ![]() button as though you were about to create a new account. But from the New Account pop-up menu (shown at bottom in Figure 14-2), choose Group. Type a name for the new group (Accounting, Kids, or whatever), and then click Create Group.
button as though you were about to create a new account. But from the New Account pop-up menu (shown at bottom in Figure 14-2), choose Group. Type a name for the new group (Accounting, Kids, or whatever), and then click Create Group.
Now you see something like the list shown here: checkboxes for all this Mac’s account holders. Turn on the checkboxes for the ones you consider worthy of being a part of this group.
You can create as many groups as you like. Later, when it comes time to share a folder or file, you’ll save time by choosing a group name instead of setting these permissions one person at a time.
Just remember to warn your vagabond friend that once he logs out (and acknowledges the warning), all traces of his visit are wiped out forever.
At least from your Mac.
Phase 2: Name, Password, and Status
All right. So you clicked the ![]() button. And from the New Account pop-up menu, you chose the type of account you wanted to create.
button. And from the New Account pop-up menu, you chose the type of account you wanted to create.
Now, on the same starter sheet, it’s time to fill in the most critical information about the new account holder:
§ Name. If it’s just the family, this could be “Chris” or “Robin.” If it’s a corporation or school, you probably want to use both first and last names.
§ Account Name. You’ll quickly discover the value of this Account Name, particularly if your name is, say, Alexandra Stephanopoulos. Before Lion, it was called the short name; it’s meant to be an abbreviation of your actual name.
When you sign into your Mac in person, you can use either your full name or account (short) name. But when you access this Mac by dialing into it or connecting from across the network (as described in the next chapter), the short version is more convenient.
As soon as you tab into this field, the Mac proposes a short name for you. You can replace the suggestion with whatever you like. Technically, it doesn’t even have to be shorter than the “long” name, but spaces and most punctuation marks are forbidden.
§ Password, Verify. Here’s where you type this new account holder’s password (Figure 14-2). In fact, you’re supposed to type it twice, to make sure you didn’t introduce a typo the first time. (The Mac displays only dots as you type, to guard against the possibility that somebody is watching over your shoulder.)
The usual computer book takes this opportunity to stress the importance of a long, complex password—a phrase that isn’t in the dictionary, something that’s made up of mixed letters and numbers. This is excellent advice if you create sensitive documents and work in a big corporation.
But if you share the Mac only with a spouse or a few trusted colleagues in a small office, you may have nothing to hide. You may see the multiple-users feature more as a convenience (keeping your settings and files separate) than a protector of secrecy and security. In these situations, there’s no particular urgency to the mission of thwarting the world’s hackers with a convoluted password.
In that case, you may want to consider setting up no password—leaving both password blanks empty. Later, whenever you’re asked for your password, just leave the Password box blank. You’ll be able to log in that much faster each day.
TIP
Actually, having some password comes in handy if you share files on the network, because Mac A can store your name and password from Mac B—and therefore you can access Mac B without entering your name and password at all. So consider making your password something very short and easy, like the apostrophe/quote mark—the ′ key. It’s a real password, so it’s enough for Mac A to memorize. Yet when you are asked to enter your password—for example, when you’re installing a new program—it’s incredibly fast and easy to enter, because it’s right next to the Return key.
§ Password Hint. If your password is the middle name of the first person who ever kissed you, for example, your hint might be “middle name of the first person who ever kissed me.”
Later, if you forget your password, the Mac will show you this cue to jog your memory.
When you finish setting up these essential items, click Create User. If you left the password boxes empty, the Mac asks for reassurance that you know what you’re doing; click OK.
You then return to the Users & Groups pane, where you see the new account name in the list at the left side.
Here, three final decisions await your wisdom:
§ Apple ID. Since the Apple ID (DVD Player) is growing in importance and features—App Store, iTunes Store, email address, Web site, iCloud, syncing, Back to My Mac, and so on—it’s convenient to associate each account with its own Apple ID.
TIP
“Allow user to reset password using Apple ID” is a handy feature. It means that if this person ever forgets his password, he’ll be offered, on the login screen, a chance to recover it by entering his Apple ID.
§ Allow user to administer this computer. This checkbox lets you turn ordinary, unsuspecting Standard or Managed accounts into Administrator accounts, as described above. You know—when your kid turns 18.
§ Enable Parental Controls. Parental Controls refers to the feature that limits what your offspring are allowed to do on this computer—and how much time a day they’re allowed to spend glued to the mouse. Details are on Parental Controls.
Phase 3: Choose a Picture
The usual sign-in screen (Figure 14-1) displays each account holder’s name, accompanied by a little picture.
When you click the sample photo, you get a pop-up menu of Apple-supplied graphics; you can choose one to represent you. It becomes not only your icon on the sign-in screen, but also your “card” photo in the Contacts program and your icon in Messages.
If you’d rather supply your own graphics file—a digital photo of your own head, for example—then choose Edit Picture from the pop-up menu. As shown in Figure 14-3, you have several options:
§ Drag a graphics file directly into the “picture well” (Figure 14-3). Use the cropping slider below the picture to frame it properly.
§ Click Choose. You’re shown a list of what’s on your hard drive. Find and double-click the image you want.
§ Take a new picture. If your Mac has a built-in camera above the screen, or if you have an external Webcam or a camcorder hooked up, then click the little camera button. The Mac counts down from 3 with loud beeps to help you get ready, and then takes the picture.
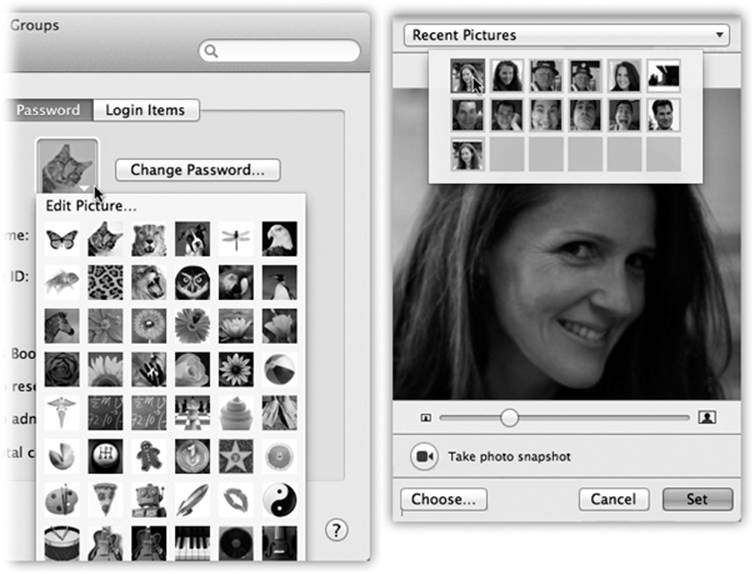
Figure 14-3. Once you’ve selected a photo to represent yourself (left), you can adjust its position relative to the square “frame” (right), or adjust its size by dragging the slider. Finally, when the picture looks correctly framed, click Set. (The next time you return to the Images dialog box, you can recall the new image using the Recent Pictures pop-up menu.)
In each case, click Set to enshrine your icon forever (or until you feel like picking a different one).
Phase 4: Login Items (Startup Items)
There’s one additional setting that your account holders can set up for themselves: which programs or documents open automatically upon login. (This is one decision an administrator can’t make for other people. It’s available only to whoever is logged in at the moment.)
To choose your own crew of self-starters, open System Preferences and click Users & Groups. Click your account. Click the Login Items tab. As shown in Figure 14-4, you can now build a list of programs, documents, disks, and other goodies that automatically launch each time you log in. You can even turn on the Hide checkbox for each one so that the program is running in the background at login time, waiting to be called into service with a quick click.
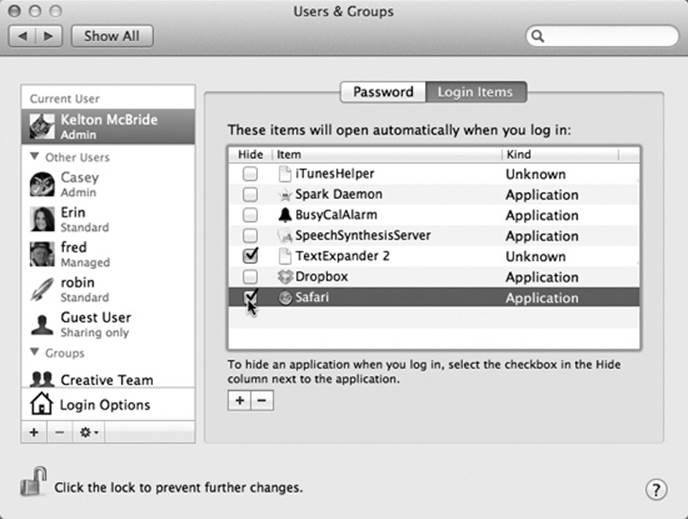
Figure 14-4. You can add any icon to the list of things you want to start up automatically. Click the ![]() button to summon the Open dialog box, where you can find the icon, select it, and then click Choose. Better yet, if you can see the icon in a folder or disk window (or on the desktop), just drag it into this list. To remove an item, click it in the list and then click the
button to summon the Open dialog box, where you can find the icon, select it, and then click Choose. Better yet, if you can see the icon in a folder or disk window (or on the desktop), just drag it into this list. To remove an item, click it in the list and then click the ![]() button.
button.
Don’t feel obligated to limit this list to programs and documents, by the way. Disks, folders, servers on the network, and other fun icons can also be startup items, so that their windows are open and waiting when you arrive at the Mac each morning.
TIP
Here’s a much quicker way to add something to the Login Items list: right-click (or two-finger click) its Dock icon and choose “Open at Login” from the shortcut menu.
Parental Controls
If you’re setting up a Standard/Managed account, the Parental Controls checkbox affords you the opportunity to shield your Mac—or its very young, very fearful, or very mischievous operator—from confusion and harm. This is a helpful feature to remember when you’re setting up accounts for students, young children, or easily intimidated adults. (This checkbox is available for Admin accounts, too, but turning it on produces a “Silly rabbit—this is for kids!” sort of message.)
You can specify how many hours a day each person is allowed to use the Mac, and declare certain hours (like sleeping hours) off-limits. You can specify exactly who your kids are allowed to communicate with via email (if they use Mail) and instant messaging (if they use Messages), what Web sites they can visit (if they use Safari), what programs they’re allowed to use, and even what words they can look up in the OS X Dictionary.
Here are all the ways you can keep your little Managed account holders shielded from the Internet—and themselves. For sanity’s sake, the following discussion refers to the Managed account holder as “your child.” But some of these controls—notably those in the System category—are equally useful for people of any age who feel overwhelmed by the Mac, are inclined to mess it up by not knowing what they’re doing, or are tempted to mess it up deliberately.
NOTE
If you apply any of these options to a Standard account, then the account type listed on the Users & Groups panel changes from “Standard” to “Managed.”
To begin, click Open Parental Controls at the bottom of the Users & Groups pane. Click Enable Parental Controls, if necessary. Now you should see the screen shown in Figure 14-5.
GEM IN THE ROUGH: LOGS
On the Web tab of the Parental Controls panel, you’ll find a button called Logs. That, my friends, is Big Brother Central. It gives you a complete rundown of what your kids have been up to. Its four categories—Websites Visited, Websites Blocked, Applications, and Messages—are extremely detailed. For example, in Applications, you can see exactly which programs your kids tried to use when, and how much time they spent in each one.
It’s spying, sure, but it’s for the good of the child. (Right?) Use the pop-up menus at the top to change the time period being reported (Today, This Week, or whatever) and how they’re grouped in the list—by date or by application/Web site.
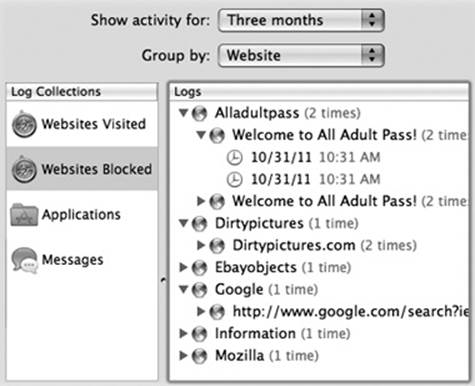
If you see something that you really think should be off limits—a site in the Websites Visited list, an application, a Messages session with someone—click its name and then click Restrict. You’ve just nipped that one in the bud.
Conversely, if the Mac blocked a Web site that you think is really OK, click its name in the list, and then click Allow. (And if you’re wondering what a certain Web page is, click it and then click Open.)
Apps Tab
On this tab (Figure 14-5), you can limit which programs your Managed-account flock is allowed to use. (Limiting what people can do to your Mac when you’re not looking is a handy feature under any shared-computer circumstance. But if there’s one word tattooed on its forehead, it would be “Classrooms!”)
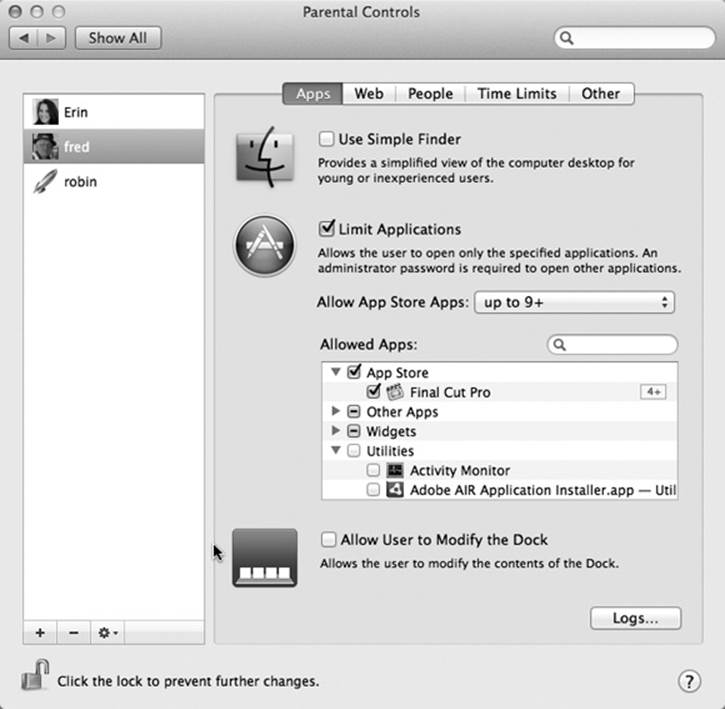
Figure 14-5. In the Parental Controls window, you can control the capabilities of any account holder on your Mac. If you turn on Limit Applications, then the lower half of the Apps tab window lets you choose applications (those from the Mac App Store and others), and even Dashboard widgets, by turning on the boxes next to their names. (Expand the flippy triangles if necessary.) Those are the only programs the account holder will be allowed to use. The search box helps you find certain programs without knowing their categories.
At the bottom of the dialog box shown in Figure 14-5, you see a list of all the programs you’ve bought from the Mac App Store, all other programs, all Dashboard widgets, and all the apps in your Utilities folder. Only checked items will show up in the account holder’s Applications folder. (If you don’t see a program listed, then use the search box, or drag its icon from the Finder into the window.)
NOTE
This panel gives special attention to programs you’ve bought from the App Store (see Chapter 4). The Allow App Store Apps pop-up menu even lets you specify an appropriate age group for the permitted apps. If you choose “up to 9+,” for example, your well-parented offspring will be allowed to use all App Store programs that have been rated for use by anyone who’s 9 or older.
Use Simple Finder
If you’re really concerned about somebody’s ability to survive the Mac—or the Mac’s ability to survive somebody—turn on Use Simple Finder. Then turn on the checkboxes of the programs that person is allowed to use.
Suppose you’ve been given a Simple Finder account. When you log in, you discover the barren world shown in Figure 14-6. There are only three menus (![]() , Finder, and File), a single onscreen window, no hard drive icon, and a bare-bones Dock. The only folders you can see are in the Dock. They include these:
, Finder, and File), a single onscreen window, no hard drive icon, and a bare-bones Dock. The only folders you can see are in the Dock. They include these:
§ My Applications. This folder holds aliases of the applications that the administrator approved. They appear on a strange, fixed icon view called “pages.” List and column views don’t exist. As a Simple person, you can’t move, rename, delete, sort, or change the display of these icons—you can merely click them. If you have too many to fit on one screen, you get numbered page buttons beneath them, which you can click to move from one set to another.
§ Documents. Behind the scenes, this is your Home→Documents folder. Of course, as a Simple Finder kind of soul, you don’t have a visible Home folder. All your stuff goes in here.
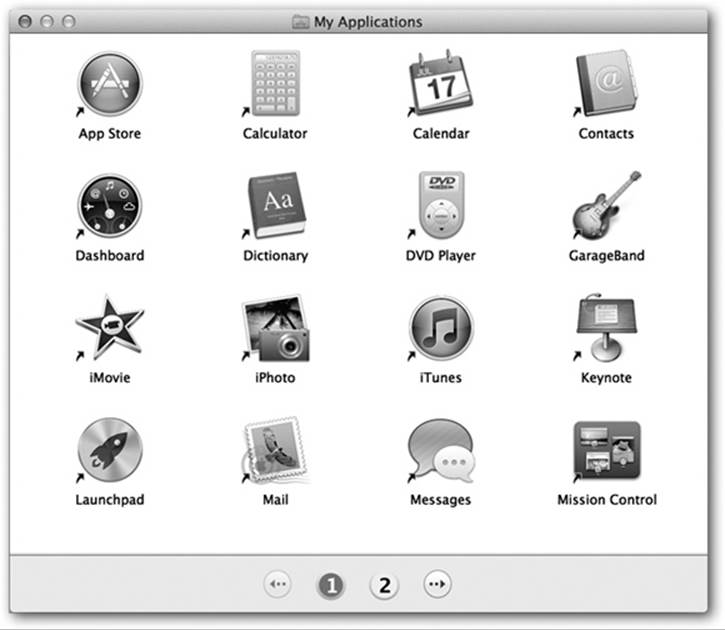
Figure 14-6. The Simple Finder doesn’t feel like home—unless you’ve got one of those Spartan, space-age, Dr. Evil–style pads. But it can be just the ticket for less-skilled Mac users, with few options and a basic one-click interface. Every program in the My Applications folder is actually an alias to the real program, which is safely ensconced in the off-limits Applications folder.
§ Shared. This is the same Shared folder described on Sharing Across Accounts. It’s provided so that you and other account holders can exchange material. However, you can’t open any of the folders here, only the documents.
§ Trash. The Trash is here, but you won’t use it much. Selecting or dragging any icon is against the rules, so you’re left with no obvious means of putting anything into your Trash.
The only program with its own icon on the Dock is the Finder.
To keep things extra-simple, OS X permits only one window at a time to be open. It’s easy to open icons, too, because one click opens them, not two.
The File menu is stunted, offering only a Close Window command. The Finder menu gives you only two options: About Finder and Run Full Finder. (The latter command prompts you for an administrator’s user name and password, and then turns back into the regular Finder—a handy escape hatch. To return to Simple Finder, just choose Finder→Return to Simple Finder.)
The ![]() menu is really bare-bones: You can Log Out, Force Quit, or go to Sleep. That’s it. And there’s no trace of Spotlight.
menu is really bare-bones: You can Log Out, Force Quit, or go to Sleep. That’s it. And there’s no trace of Spotlight.
Otherwise, you can essentially forget everything else you’ve read in this book. You can’t create folders, move icons, or do much of anything beyond clicking the icons that your benevolent administrator has provided. It’s as though OS X moved away and left you the empty house.
Although the Simple Finder is simple, any program (at least, any that the administrator has permitted) can run from Simple Finder. A program running inside the Simple Finder still has all its features and complexities—only the Finder has been whittled down to its essence.
In other words, Simple Finder is great for streamlining the Finder, but novices won’t get far combating their techno-fear until the world presents us with Simple iMovie, Simple Mail, and Simple Microsoft Word. Still, it’s better than nothing.
Web Tab
This feature is designed to limit which Web sites your kid is allowed to visit.
Frankly, trying to block the racy stuff from the Web is something of a hopeless task; if your kid doesn’t manage to get around this blockade by simply using a different browser, then he’ll just see the dirty pictures at another kid’s house. But at least you can enjoy the illusion of taking a stand, using approaches with three degrees of severity:
§ Allow unrestricted access to Web sites. No filtering. Anything goes.
§ Try to limit access to adult Web sites automatically. Those words—“try to”—are Apple’s way of admitting that no filter is foolproof.
In any case, OS X analyzes what’s on a Web page that you try to call up and filters out Web sites with naughty material. These sites won’t appear in Safari while this account holder is logged in. By clicking Customize and then editing the “Always allow” and “Never allow” lists, you can override its decisions on a site-at-a-time basis.
§ Allow access to only these Web sites. This is the most restrictive approach of all: It’s a whitelist, a list of the only Web sites your youngster is allowed to visit. It’s filled with kid-friendly sites like Disney and Discovery Kids, but of course you can edit the list by clicking the ![]() and
and ![]() buttons below the list.
buttons below the list.
People Tab
Here you can control your kid’s access to three realms of people: those on email, on Messages, and on Game Center. Turn on the checkboxes as you feel it’s necessary.
Then build a list of email and chat addresses, corresponding to the people you feel comfortable letting your kid exchange emails and chats with. Click the ![]() button below the list, type the address, and then press Return. Lather, rinse, repeat.
button below the list, type the address, and then press Return. Lather, rinse, repeat.
TIP
No, you can’t drag cards in from Contacts; that would be much too simple. But after clicking the ![]() button to create a new row in the list (in Edit mode), you can drag just the email address out of a Contacts card you’ve opened up. Or expand the resulting dialog box (click the
button to create a new row in the list (in Edit mode), you can drag just the email address out of a Contacts card you’ve opened up. Or expand the resulting dialog box (click the ![]() button) and double-click someone in your address book.
button) and double-click someone in your address book.
For reasons explained in a moment, turn on “Send permission requests to” and plug in your own email address.
POWER USERS’ CLINIC: PARENTAL REMOTE CONTROLS
It occurred to somebody at Apple that the Parental Controls feature might be especially useful in a classroom. That person further realized that it’d be very cool if you could adjust the settings for Macs A, B, C, and D while seated at Mac E. That is, the teacher might prefer not to have to scurry from kid’s desk to kid’s desk to make changes.
And that’s why you can operate Parental Controls from another Mac on the same network.
Phase 1: While seated at the first kid’s Mac, open System Preferences, open Parental Controls, click the ![]() , and then enter your password.
, and then enter your password.
Now click the name of the account you want to manage remotely. Then, from the ![]() menu below the list of accounts, choose Allow Remote Setup. Close System Preferences.
menu below the list of accounts, choose Allow Remote Setup. Close System Preferences.
Repeat for each account on each Mac that you’ll want to manage from afar.
Phase 2: Go back to your teacher’s desk. On your own Mac, choose Go→Connect to Server. In the resulting dialog box, click Browse.
Now you get a list of the other Macs on the network. Click one and enter an administrator’s name and password for that Mac.
Now open System Preferences, click Parental Controls, click the ![]() , and then enter your password again. This time, you’ll see a section in the Users & Groups list called Other Computers. Click the account name (on the kid’s Mac) whose settings you want to change. Enter the administrator name and password of the remote computer one more time, and off you go!
, and then enter your password again. This time, you’ll see a section in the Users & Groups list called Other Computers. Click the account name (on the kid’s Mac) whose settings you want to change. Enter the administrator name and password of the remote computer one more time, and off you go!
Now then: When your youngster uses Apple’s Mail program to send a message to someone who’s not on the approved list, or tries to chat with someone not on the list, she gets the message shown at top in Figure 14-7. If she clicks Ask Permission, then your copy of Mail shortly receives a permission-request message; meanwhile, the outgoing message gets placed in limbo in her Drafts folder.
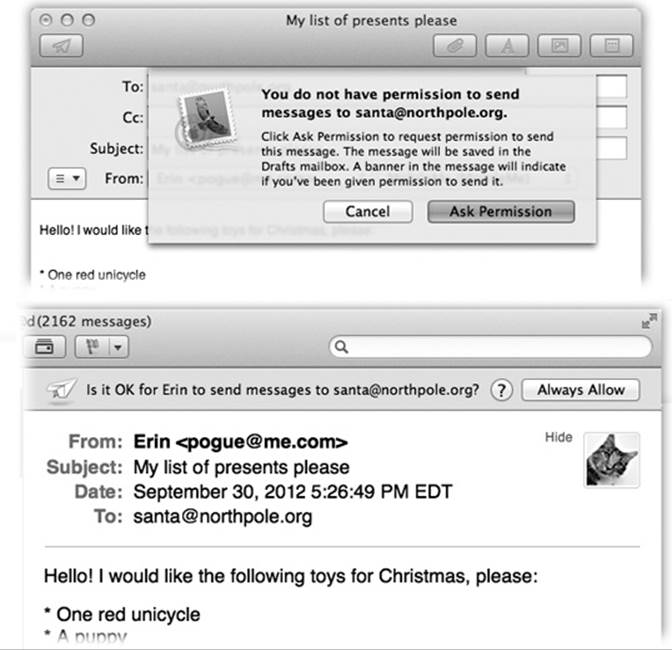
Figure 14-7. Top: If your kid tries to contact someone who’s not on the Approved list, she can either give up or click Ask Permission. Bottom: In the latter case, if you use Mail as your email program, you’ll know about your kid’s attempt. If you’re convinced that the would-be correspondent is not, in fact, a stalker, you can grant permission by clicking Always Allow. Your young ward gets the good news the next time she visits her Drafts folder, where the message has been awaiting word from you, the Good Parent.
If you add that person’s address to the list of approved correspondents (Figure 14-7, bottom), then the next time your young apprentice clicks the quarantined outgoing message in her Drafts folder, the banner across the top lets her know that all is well—and the message is OK to go out.
NOTE
This feature doesn’t attempt to stop email or chat using other programs, like Microsoft Outlook or Skype. If you’re worried about your efforts being bypassed, block access to those programs using the Permitted Applications list described above.
When your underling fires up Messages or Mail, she’ll discover that her Buddy List is empty except for the people you’ve identified.
Handling the teenage hissy fit is your problem.
Time Limits
Clever folks, those Apple programmers. They must have kids of their own.
They realize that some parents care about how many hours their kids spend in front of the Mac, and that some also care about which hours (Figure 14-8):
§ How much time. In the “Weekday time limits” and “Weekend time limits” sections, turn on “Limit computer use to,” and then adjust the slider.
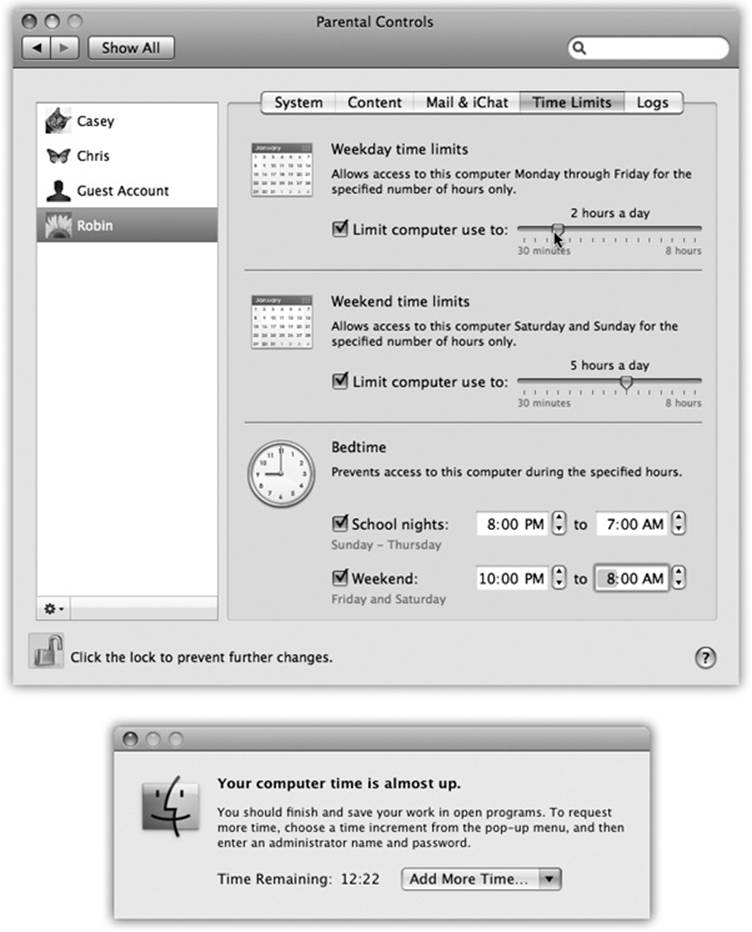
Figure 14-8. Top: If this account holder tries to log in outside the time limits you specify here, she’ll encounter only a box that says, “Computer time limits expired.” She’ll be offered a pop-up menu that grants her additional time, from 15 minutes to “Rest of the day”—but it requires your parental consent (actually, your parental password) to activate. Bottom: Similarly, as her time on the Mac winds down, she’ll get this message. Once again, you, the all-knowing administrator, can grant her more time using this dialog box.
§ Which hours. In the “Bedtime” section, turn on the checkbox for either “School nights” or “Weekend,” and then set the hours of the day (or, rather, night) when the Mac is unavailable to your young account holder.
In other words, this feature may have the smallest pages-to-significance ratio in this entire book. Doesn’t take long to explain it, but it could bring the parents of Mac addicts a lot of peace.
TIP
When Time Limits have been applied, your little rug rats can now check to see how much time they have left to goof off on the Mac before your digital iron fist slams down. When they click the menu-bar clock (where it now says the current time), a menu appears, complete with a readout that says, for example, “Parental Controls: Time Remaining 1:29.” Good parenting comes in many forms.
Other Tab
This tab offers a few miscellaneous options, including the following:
§ Hide profanity in Dictionary. OS X comes with a complete electronic copy of the New Oxford American Dictionary. And “complete,” in this case, means “it even has swear words.”
Turning on “Hide profanity in Dictionary” is like having an Insta-Censor™. It hides most of the naughty words from the dictionary whenever your young account holder is logged in.
§ Limit printer administration. When this checkbox is on, your underlings aren’t allowed to change your Mac’s printer settings. You wouldn’t want them deleting or installing any printers, would you?
§ Limit CD and DVD burning. When you first create Standard accounts, their holders are free to burn CDs or DVDs. But in a school lab, for example, you might want to turn off the ability to burn discs (to block software piracy). That’s why this box is here.
§ Disable changing the password. Pretty self-explanatory. This option prevents your unruly minions from changing their passwords. That’s your job, after all.
Editing Accounts
If you’re an administrator, you can change your own account in any way you like.
If you have any other kind of account, though, you can’t change anything but your picture, password, Apple ID, and login items. If you want to make any other changes, you have to ask an admin to log in, make the changes you want made to your account, and then turn the computer back over to you.
Deleting Accounts
Hey, it happens: Somebody graduates, somebody gets fired, somebody dumps you. Sooner or later, you may need to delete an account from your Mac.
When that time comes, click the account name in the Users & Groups list and then click the minus-sign button beneath the list. OS X asks what to do with all the dearly departed’s files and settings (Figure 14-9):
§ Save the home folder in a disk image. This option represents the “I’ll be back” approach. OS X preserves the deleted account holder’s folders on the Mac, in a tidy digital envelope that won’t clutter your hard drive and can be reopened in case of emergency.
In the Users→Deleted Users folder, you find a disk image file (.dmg). If you double-click it, a new, virtual disk icon named for the deleted account appears on your desktop. You can open folders and root through the stuff in this “disk,” just as if it were a living, working Home folder.
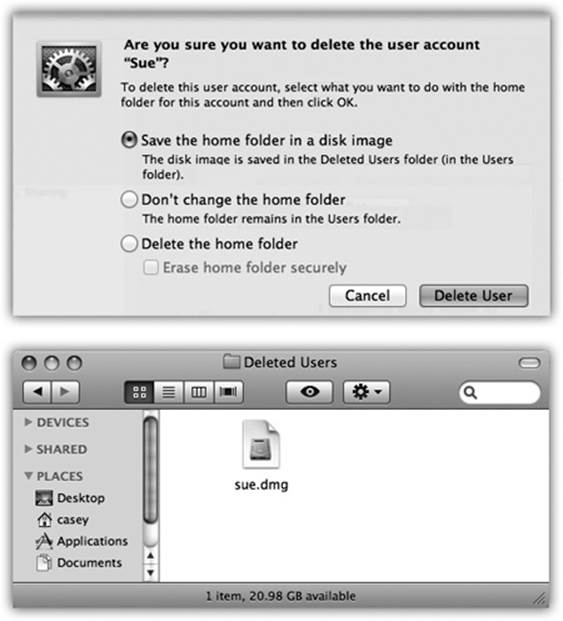
Figure 14-9. Top: This dialog box lets you know where to find the deleted account’s material, should the need arise. Bottom: The files and settings of accounts you deleted can live on in the Users→Deleted Users folder.
If fate ever brings that person back into your life, you can use this disk image to reinstate the deleted person’s account. Start by creating a brand-new account. Then copy the contents of the folders in the mounted disk image (Documents, Pictures, Desktop, and so on) into the corresponding folders of the new Home folder.
§ Do not change the home folder. This time, OS X removes the account, in that it no longer appears in the Login list or in the Users & Groups panel of System Preferences—but it leaves the Home folder right where it is. Use this option if you don’t intend to dispose of the dearly departed’s belongings right here and now.
§ Delete the home folder. This button offers the “Hasta la vista, baby” approach. The account and all its files and settings are vaporized forever, on the spot.
NOTE
If you delete a Shared Only account, you’re not offered the chance to preserve the Home folder contents—because a Shared Only account doesn’t have a Home folder.
Setting Up the Login Process
Once you’ve set up more than one account, the dialog box shown in Figure 14-1 appears whenever you turn on the Mac, whenever you choose ![]() →Log Out, or whenever the Mac logs you out automatically. But a few extra controls let you, an administrator, set up either more or less security at the login screen—or, put another way, build in less or more convenience.
→Log Out, or whenever the Mac logs you out automatically. But a few extra controls let you, an administrator, set up either more or less security at the login screen—or, put another way, build in less or more convenience.
Open System Preferences, click Users & Groups, click the ![]() and enter an admin password to prove your worthiness, and then click the Login Options button (Figure 14-10). Here are some of the ways you can shape the login experience for greater security (or greater convenience):
and enter an admin password to prove your worthiness, and then click the Login Options button (Figure 14-10). Here are some of the ways you can shape the login experience for greater security (or greater convenience):
§ Automatic login. This option eliminates the need to sign in at all. It’s a timesaving, hassle-free arrangement if only one person uses the Mac, or uses it most of the time.
When you choose an account holder’s name from this pop-up menu, you’re prompted for his password. Type it and click OK.
From now on, the dialog box shown in Figure 14-1 won’t appear at all at startup time. After turning on the machine, you, the specified account holder, zoom straight to your desktop.
Of course, everybody else must still enter their names and passwords. (And how can they, since the Mac rushes right into the Automatic person’s account at startup time? Answer: The Automatic thing happens only at startup time. The usual login screen appears whenever the current account holder logs out—by choosing ![]() →Log Out, for example.)
→Log Out, for example.)
§ Display login window as. Under normal circumstances, the login screen presents a list of account holders when you power up the Mac, as shown in Figure 14-1. That’s the “List of users” option in action.
If you’re especially worried about security, however, you might not even want that list to appear. If you turn on “Name and password” (Figure 14-10), then each person who signs in must type both his name (into a blank that appears) and his password—a very inconvenient, but more secure, arrangement.
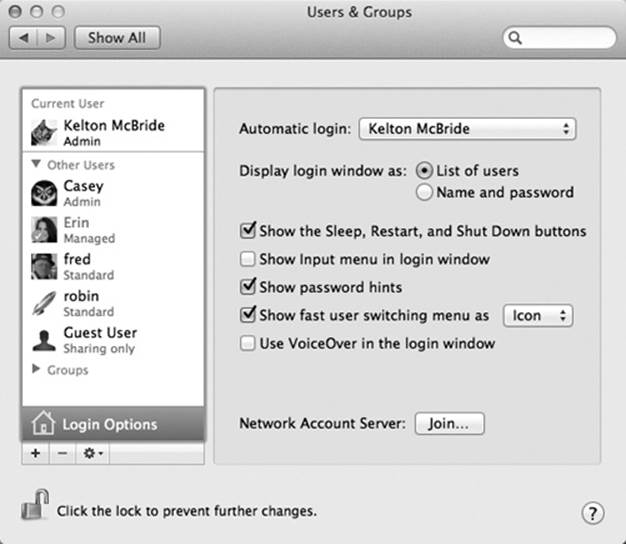
Figure 14-10. These options make it easier or harder for people to sign in, offering various degrees of security. By the way: Turning on “Name and password” also lets you sign in as >console, an advanced geeky troubleshooting technique. It’s also one way to sign in with the root account, if you’re Unixy enough to know what that is.
§ Show the Sleep, Restart, and Shut Down buttons. Truth is, the OS X security system is easy to circumvent. Truly devoted evildoers can bypass the standard login screen in a number of different ways: restart in FireWire disk mode, restart at the Unix Terminal, and so on. Suddenly, these no-goodniks have full access to every document on the machine, blowing right past all the safeguards you’ve so carefully established.
One way to thwart them is to use FileVault (FileVault). Another is to turn off this checkbox. Now there’s no Restart or Shut Down button to tempt mischief-makers. That’s plenty of protection in most homes, schools, and workplaces; after all, Mac people tend to be nice people.
But if you worry that somebody with a pronounced mean streak might restart simply by pulling the plug, then use FileVault, as described on FileVault.
§ Show Input menu in login window. If the Input menu is available at login time, it means that people who use non-U.S. keyboard layouts and alphabets can use the login features without having to pretend to be American. (You can’t use fancy non-Roman alphabets like Japanese or Russian for your password. But at least this option will let you enter your full name in the language of your choice. Greetings, Mr. Bond-san.)
§ Show password hints. OS X is kind enough to display your password hint (“middle name of the first person who ever kissed me”) after you’ve typed it wrong three times when trying to log in. This option lets you turn off that feature for an extra layer of security. The hint will never appear.
§ Show fast user switching menu as: The Fast User Switching feature lets you switch to another account without having to log out of the first one, as described on Fast User Switching.
If you do turn on Fast User Switching, a new menu appears at the upper-right corner of your screen, listing all the account holders on the machine. Thanks to this pop-up menu, you can now specify what that menu looks like. It can display the current account holder’s full name (Name), the short name (Short Name), or only a generic torso-silhouette icon (Icon) to save space on the menu bar.
§ Use VoiceOver in the login window. The VoiceOver feature (Saving a report) is all well and good if you’re blind. But how are you supposed to log in? Turn on this checkbox, and VoiceOver speaks the features on the Login panel, too.
TIP
Actually, there’s one more, rather secret login option—and if you’re a laptop lugger, you might really like it. You can create a message that appears on the login screen whenever you—or, rather, not you—turns on the computer. For example, it could be an “If found, contact…” message. Or a “$500 reward” message.
To set it up, open System Preferences→Security & Privacy→General. Click the ![]() , authenticate yourself, and then turn on “Show a message when the screen is locked.” Click Set Lock Message, and then type your message. (Press Option-Return to create a new paragraph.) And hope whoever finds your laptop has a conscience.
, authenticate yourself, and then turn on “Show a message when the screen is locked.” Click Set Lock Message, and then type your message. (Press Option-Return to create a new paragraph.) And hope whoever finds your laptop has a conscience.
Signing In, Logging Out
Once somebody has set up your account, here’s what it’s like getting into, and out of, an OS X machine. (For the purposes of this discussion, “you” are no longer the administrator—you’re one of the students, employees, or family members for whom an account has been set up.)
Identifying Yourself
When you first turn on the Mac—or when the person who last used this computer chooses ![]() →Log Out—the login screen shown in Figure 14-1 appears. At this point, you can proceed in any of several ways:
→Log Out—the login screen shown in Figure 14-1 appears. At this point, you can proceed in any of several ways:
§ Restart. Click if you need to restart the Mac for some reason. (The Restart and Shut Down buttons don’t appear here if the administrator has chosen to hide them as a security precaution.)
§ Shut Down. Click if you’re done for the day, or if sudden panic about the complexity of user accounts makes you want to run away. The computer turns off.
§ Log In. To sign in, click your account name in the list. If you’re a keyboard speed freak, you can also type the first letter or two—or press the up or down arrow keys—until your name is highlighted. Then press Return.
Either way, the password box appears now (if a password is required). If you accidentally click the wrong person’s name on the first screen, you can click Back. Otherwise, type your password, and then press Return (or click Log In).
You can try as many times as you want to type the password. With each incorrect guess, the entire password box shudders violently from side to side, as though shaking its head no. (If you see a strange ![]() icon in the password box, guess what? You’ve got your Caps Lock key on, and the Mac thinks you’re typing an all-capitals password.)
icon in the password box, guess what? You’ve got your Caps Lock key on, and the Mac thinks you’re typing an all-capitals password.)
If you try unsuccessfully three times, your hint appears—if you’ve set one up. And if even that safety net fails, you can use your Apple ID as the key to resetting your password. See the box on The Forgotten-Password Survival Guide.
Once you’re in, the world of the Mac looks just the way you left it (or the way an administrator set it up for you). Everything in your Home folder, all your email and bookmarks, your desktop picture and Dock settings—all of it unique to you.
Unless you’re an administrator, you’re not allowed to install any new programs (or, indeed, to put anything at all) into the Applications folder. That folder, after all, is a central software repository for everybody who uses the Mac, and the Mac forbids everyday account holders from moving or changing all such universally shared folders.
Logging Out
When you’re finished using the Mac, choose ![]() →Log Out (or press Shift-⌘-Q). A confirmation message appears; if you click Cancel or press Esc, you return to whatever you were doing. If you click Log Out or press Return, you return to the screen shown in Figure 14-1, and the entire sign-in cycle begins again.
→Log Out (or press Shift-⌘-Q). A confirmation message appears; if you click Cancel or press Esc, you return to whatever you were doing. If you click Log Out or press Return, you return to the screen shown in Figure 14-1, and the entire sign-in cycle begins again.
TIP
If you press Option as you choose ![]() →Log Out (or as you press Shift-⌘-Q), the confirmation box doesn’t appear.
→Log Out (or as you press Shift-⌘-Q), the confirmation box doesn’t appear.
Sharing Across Accounts
It’s all fine to say that every account is segregated from all other accounts. It’s nice to know your stuff is safe from the prying eyes of your coworkers or family.
But what about collaboration? What if you want to give some files or folders to another account holder?
You can’t just open up someone else’s Home folder and drop it in there. Yes, every account holder has a Home folder (all in the Users folder on your hard drive). But if you try to open anybody else’s Home folder, you’ll see a tiny red ![]() icon superimposed on almost every folder inside, telling you, “Look, but don’t touch.”
icon superimposed on almost every folder inside, telling you, “Look, but don’t touch.”
Fortunately, there are a couple of wormholes between accounts (Figure 14-11):
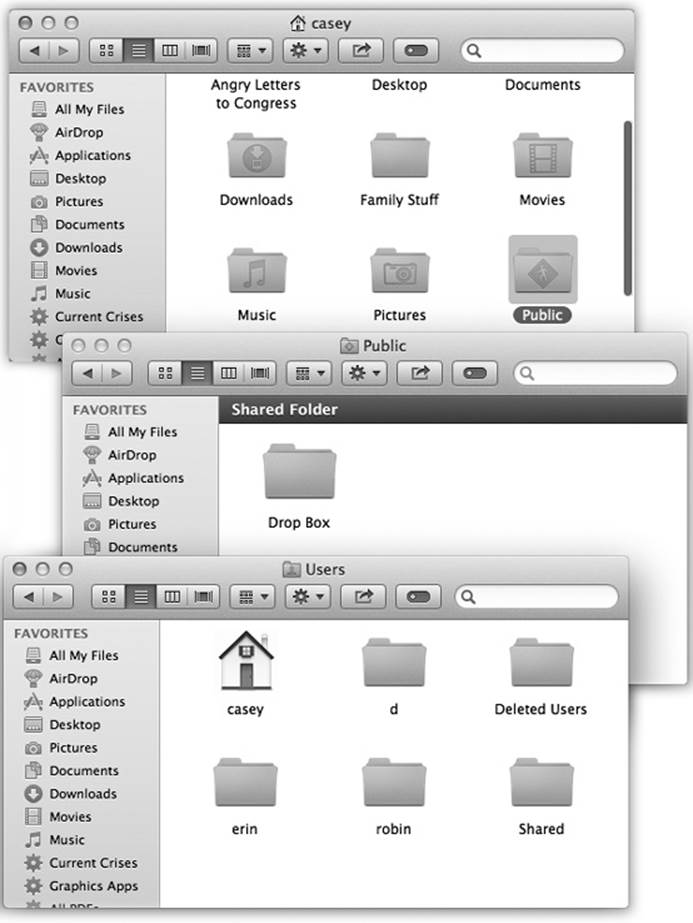
Figure 14-11. Top: In other people’s Home folders, the Public folder is available for your inspection. It contains stuff that other people have “published” for the benefit of their coworkers. Middle: In the Public folder is the Drop Box, which serves the opposite purpose. It lets anyone else who uses this Mac hand in files to you; they, however, can’t see what’s in it. Bottom: Inside the Users folder (to get there from a Home folder, press ⌘-![]() ) is the Shared folder, a wormhole connecting all accounts. Everybody has full access to everything inside.
) is the Shared folder, a wormhole connecting all accounts. Everybody has full access to everything inside.
§ The Shared folder. Sitting in the Users folder is one folder that doesn’t correspond to any particular person: Shared. Everybody can freely access this folder, inserting and extracting files without restriction. It’s the common ground among all the account holders on a single Mac. It’s Central Park, the farmers’ market, and the grocery-store bulletin board.
§ The Public folder. In your Home folder, there’s a folder called Public. Anything you copy into it becomes available for inspection or copying (but not changing or deleting) by any other account holder, whether they log into your Mac or sign in from across the network.
§ The Drop Box. And inside your Public folder is another cool little folder: the Drop Box (not to be confused with the free online Dropbox service). It exists to let other people give files to you, discreetly and invisibly to anyone else. That is, people can drop files and folders into your Drop Box, but they can’t actually open it. This folder, too, is available both locally (in person) and from across the network.
FREQUENTLY ASKED QUESTION: THE FORGOTTEN-PASSWORD SURVIVAL GUIDE
Help—I forgot my password! And I never told it to anybody, so even the administrator can’t help me!
No problem. Your administrator can simply open up System Preferences, click Users & Groups, click your account name, and then click Reset Password to re-establish the password.
But you don’t understand. I am the administrator! And I’m the only account!
Lucky for you, Apple has provided you with not one, not two, but three safety nets. None of them work, however, unless your friendly neighborhood administrator turned them on in advance.
First: On your third attempt to type your password correctly, the Mac shows you your password hint (if you have one, and if the administrator left the Hint option turned on).
Second: If the administrator has turned on the “Allow user to reset password using Apple ID” in System Preferences→Users & Groups, then you can click the ? button right there in the Password box when you’re logging in. A tiny message appears, letting you know that, “If you forgot your password, you can reset it using your Apple ID.”
To proceed, click the ![]() button to bring up the Reset Password dialog box. Enter your Apple ID and password, and then click Reset Password. A message appears to let you know that changing your account password will also create a new Keychain (The Keychain). (The old one is still around, ready to be unlocked if you remember the old password at some point.) Click OK. Now enter a new password (twice) and password hint, and then click Reset Password.
button to bring up the Reset Password dialog box. Enter your Apple ID and password, and then click Reset Password. A message appears to let you know that changing your account password will also create a new Keychain (The Keychain). (The old one is still around, ready to be unlocked if you remember the old password at some point.) Click OK. Now enter a new password (twice) and password hint, and then click Reset Password.
You’ve just reset your account password. Click Continue Log In to finish logging in with your new, improved, not-forgotten password.
Third: If the administrator has turned on FileVault, described later in this chapter, then you can use its recovery key to log in, in a pinch. Before Lion, it was called the master password, but the point is the same: It’s a last-ditch, emergency, backup password.
If you have your recovery key, read on. (If not, and you opted to store it with Apple, call Apple tech support; they’ll give it to you. If not, and you didn’t store it with Apple, you’re completely out of luck. Your hard drive is encrypted, and you can’t do anything but erase it and kiss your files goodbye.)
Anyway, restart the Mac. On the login screen, click your name; then click the ? button. If the hint appears and it helps you out, great. If not, click “Reset it using your Recovery Key,” type in your recovery key, and then praise the Apple gods that this final safety net actually worked.
Fast User Switching
The account system described so far in this chapter has its charms. It keeps everyone’s stuff separate, it keeps your files safe, and it lets you have the desktop picture of your choice.
Unfortunately, it can go from handy to hassle in one split second. That’s when you’re logged in, and somebody else wants to duck in just for a second—to check email or a calendar, for example. What are you supposed to do—log out completely, closing all your documents and quitting all your programs, just so the interloper can look something up? Then afterward, you’d have to log back in and fire up all your stuff again, praying that your inspirational muse hasn’t fled in the meantime.
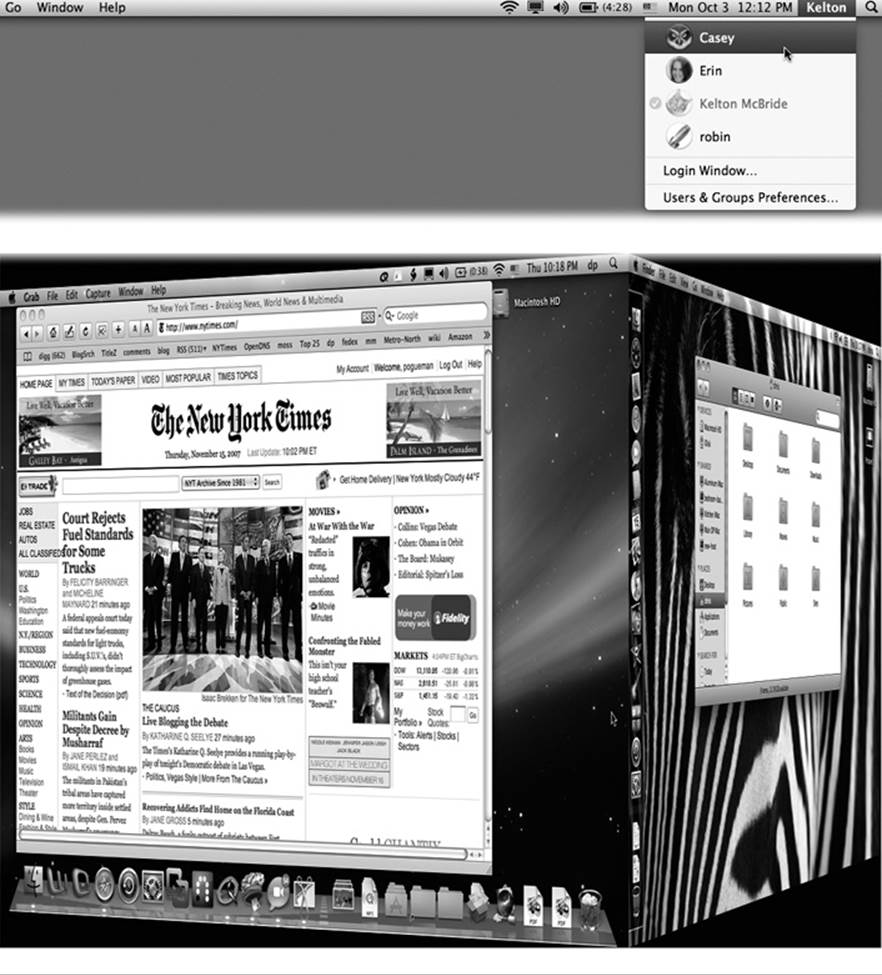
Figure 14-12. Top: The appearance of the Accounts menu lets you know that Fast User Switching is turned on. The circled checkmark indicates people who are already logged in, including those who have been “fast user switched” into the background. The dimmed name shows who’s logged in right now. Bottom: When the screen changes from your account to somebody else’s, your entire world slides visibly offscreen as though it’s mounted on the side of a rotating cube—a spectacular animation made possible by OS X’s Quartz Extreme graphics software.
Fortunately, that’s all over now. Fast User Switching lets Person B log in and use the Mac for a little while. All your stuff, Person A, simply slides into the background, still open the way you had it; see Figure 14-12.
When Person B is finished working, you can bring your whole work environment back to the screen without having to reopen anything. All your windows and programs are still open, just as you left them. (All of this works almost exactly as it does in modern versions of Windows.)
To turn on this feature, open the Users & Groups panel of System Preferences (and click the ![]() , if necessary, to unlock the panel). Click Login Options, and turn on the “Show fast user switching menu as” checkbox. (You can see this option in Figure 14-10.)
, if necessary, to unlock the panel). Click Login Options, and turn on the “Show fast user switching menu as” checkbox. (You can see this option in Figure 14-10.)
The only change you notice immediately is the appearance of your own account name in the upper-right corner of the screen (Figure 14-12, top).
That’s all there is to it. Next time you need a fellow account holder to relinquish control so you can duck in to do a little work, just choose your name from the Accounts menu. Type your password, if one is required, and feel guiltless about the interruption.
And now, the finer points of Fast User Switching:
§ Depending on how many programs are open and how much memory the Mac has, switching accounts may entail a delay and some hard drive activity. That’s OS X’s virtual memory scheme “setting down” what was in memory in your account to make room for the incoming account’s stuff.
§ To exit an open account, choose ![]() →Log Out as usual. Or just choose Login Window from the Accounts menu. It ensures that you can get to your own account no matter whose is running at the moment.
→Log Out as usual. Or just choose Login Window from the Accounts menu. It ensures that you can get to your own account no matter whose is running at the moment.
FREQUENTLY ASKED QUESTION: SHARED DATA FILES
My wife and my 8-year-old kid share my Mac. Over the years, we’ve amassed a fabulous collection of MP3 files, but at the moment, I’m the only one who sees them in iTunes. This business of separate environments for every account holder is all well and good, but what about when we want to access the same files—like our iTunes Library?
The problem is that the iTunes Library is stored in the Music folder of just one person. Fortunately, the solution is easy enough.
Whoever is the administrator—probably your 8-year-old—should move the iTunes Music folder (currently inside somebody’s Music→iTunes folder) to the Users→Shared folder. Now it’s available to everybody.
At this point, each account holder can log in, fire up iTunes, choose iTunes→Preferences→Advanced, and click the Change button to choose the relocated iTunes Music folder in the Shared folder. To update the list of songs, you should also drag the folder into each account holder’s iTunes window.
From now on, each person will be able to see and access the entire library of iTunes tunes. Your underlings won’t be able to rename songs, convert them to other formats, and so on, but they’ll still enjoy the flexibility to build individual playlists.
§ Weirdly enough, a bunch of account holders can be using the same program simultaneously in their own parallel universes.
§ You can’t make changes to accounts (in System Preferences) that are still logged in. Nor, as you’d expect, can you turn off Fast User Switching while other people are logged in. Can’t turn on FileVault, either.
§ If you try to shut the Mac down or restart it while other people are logged in, a dialog box tells you, “There are currently logged in users who may lose unsaved changes if you shut down this computer.” And you’re asked to type in an administrator’s name and password to establish that you know what the heck you’re doing.
Here’s a moral dilemma for the modern age: If you proceed by typing the password and clicking Shut Down, you shut down all accounts that were open in the background and any open documents. If you click Cancel, you can’t shut down the Mac until you hunt down the account holders whose stuff is still open in the background so they can log out.
TIP
You can avoid this awkward situation in either of two ways: (1) Trust one another completely, or (2) Save all your documents before you let anyone else cut in and send your account to the background.
§ Remember the Shared folder (in the Users folder on the hard drive)? It’s still the wormhole connecting all accounts. If you want to share a file with another account holder, put it there.
§ Your account isn’t anesthetized completely when it’s switched into the background. In fact, it keeps on doing whatever you set it to doing. If you were downloading some big file, for example, it keeps right on downloading when the next guy logs in.
Six OS X Security Shields
OS X has a spectacular reputation for stability and security. At this writing, there still hasn’t been a single widespread OS X virus—a spectacular feature that makes Windows look like a waste of time. There’s also no Windows-esque plague of spyware (downloaded programs that do something sneaky behind your back).
Part of the reason is that OS X was designed with security in mind from the very beginning. Listed below are a few of the many drafty corners of a typical operating system that Apple has solidly plugged:
§ OS X has always come from the factory with all its ports shut and locked.
Ports are channels that remote computers use to connect to services on your computer: one for instant messaging, one for Windows’ remote-control feature, and so on. It’s fine to have them open if you’re expecting visitors. But if you’ve got an open port that exposes the soft underbelly of your computer without your knowledge, you’re in for a world of hurt. Open ports are precisely what permitted viruses like Blaster to infiltrate millions of PCs in the Windows XP days.
§ In OS X, no program (like a virus) can install itself without your awareness. You’re notified at every juncture when anything is trying to install itself on your Mac. In fact, every time you try to download something, either in Safari or Mail, that contains executable code (a program, in other words), a dialog box warns you that it could conceivably harbor a virus—even if your download is compressed as a .zip file (Figure 14-13).
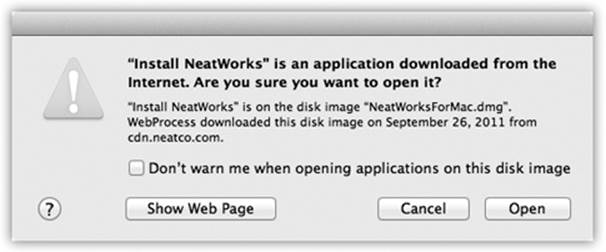
Figure 14-13. The Mac makes darned sure that no program ever runs without your knowledge (which is how Windows PCs get viruses and spyware). It tries to protect you, for example, when you open a new program or when you first double-click a program that came from the Internet.
§ Unlike certain other operating systems, OS X doesn’t even let an administrator touch the files that drive the operating system itself without pestering you to provide your password and grant it permission to do so. An OS X virus could theoretically wipe out all your files, but it wouldn’t be able to access anyone else’s stuff—and it couldn’t touch the operating system itself.
§ You probably already know about the Finder’s Secure Empty Trash option (The Spotlight Window). But an option on the Erase tab of the Disk Utility program can do the same super-erasing of all free space on your hard drive. We’re talking not just erasing, but recording gibberish over the spots where your files once were—once, seven times, or 35 times—utterly shattering any hope a hard-disk recovery firm (or spy) might have had of recovering passwords or files from your hard drive.
§ Safari’s Private Browsing mode means you can freely visit Web sites without leaving any digital tracks—no history, no nothing.
Those are only a few tiny examples. Here are a few of OS X’s big-ticket defenses.
Gatekeeper
This security feature is going to send every Eastern European teenage hacker into therapy.
Nasty programs aren’t very common on the Mac to begin with. But now, unless you turn Gatekeeper off, downloading a program that’s secretly designed to damage your Mac is virtually impossible.
Gatekeeper won’t even let you install programs that haven’t been proved to be safe (Figure 14-14).
There’s no Gatekeeper app or even a Gatekeeper System Preferences icon. Instead, to find Gatekeeper, you open System Preferences→Security & Privacy→General. At the bottom of this screen (Figure 14-14, top), you see three options. These three humble buttons are Gatekeeper.

Figure 14-14. Top: The “Allow applications downloaded from” options are, in fact, the face of Gatekeeper. Bottom: If you try to open a downloaded program that Apple can’t vouch for, you get this admonishing dialog box.
Your choices, under “Allow applications downloaded from,” are:
§ Mac App Store. This is the safest option. Every program that Apple allows into its Mac App store is safe. Each has been tested by Apple to make sure that, among other things, it’s both sandboxed (blocked from accessing parts of the Mac that it doesn’t need) and digitally signed (set up to notify that Mac if it’s been altered in any way since it left the software company).
So what happens if you try to download a program that didn’t come from the App Store? The Mac won’t let you install it, period.
§ Mac App Store and identified developers. This option, the factory setting, lets you download and install both App Store programs and those from “identified developers.” That means software companies that have registered with Apple and received, in turn, an encrypted code (a “certificate”) that’s embedded in their programs.
This certificate lets Apple track who created the app, and also digitally signs it, as described above. Now, Apple may not know this software company, and Apple doesn’t inspect its software. But if anybody reports that some program is actually a virus in disguise, Apple can instantly add that program to its blacklist—and prevent millions of other people from installing it. (Mavericks updates its blacklist once a day.)
§ Anywhere. This button turns Gatekeeper off (after presenting an “Are you sure?” message). You’re free to download and install any programs you want, with no checking for their hygiene.
TIP
Don’t turn on Anywhere just because there’s one particular non-kosher app you want to run. In that case, it’s smarter to leave Gatekeeper turned on—and override Gatekeeper just for that one app. To do so, right-click (or two-finger click) the program’s icon; from the shortcut menu, choose Open.
Gatekeeper is a pretty powerful disincentive for the world’s bad eggs; if millions of people leave Gatekeeper turned on, the bad guys might as well not even bother. Their apps will never be downloaded and can therefore never spread.
There are, however, some important limitations to note:
§ Gatekeeper doesn’t uninstall programs you’ve already installed. (Once you’ve run any program once, Gatekeeper never checks it again.)
§ Gatekeeper is intended to stop bad software that you get by downloading. It doesn’t do anything about programs you’ve installed from, for example, a DVD or USB drive.
§ It doesn’t stop Flash and Java programs.
Overall, Gatekeeper is a pretty convincing barrier to a Windows-like nightmare scenario, where some virus breaks out into the wild and takes down hundreds of thousands of computers. If most people leave the factory setting selected—and they will—that outcome is virtually impossible.
The Firewall
If you have a broadband, always-on connection, you’re open to the Internet 24 hours a day. It’s theoretically possible for some cretin to use automated hacking software to flood you with data packets or take control of your machine. OS X’s firewall feature puts up a barrier to such mischief. To turn it on, click the ![]() on the Firewall pane, authenticate yourself, and then click Start.
on the Firewall pane, authenticate yourself, and then click Start.
NOTE
You don’t need to turn on this firewall if your Mac connects to the Internet through a wired or wireless router (including the AirPort base station). Virtually every router already has a built-in firewall that protects your entire network. (Similarly, if you’re using the Internet Sharing feature described on WiFi Connections, turn on the firewall only for the first Mac, the one connected right to the Internet.)
In short: Use the firewall only if your Mac is connected directly to a cable modem, DSL box, or dial-up modem.
Fortunately, it’s not a complete barrier. One of the great joys of having a computer is the ability to connect to other computers. Living in a cement crypt is one way to avoid getting infected, but it’s not much fun.
Therefore, you can turn the firewall on by opening System Preferences→Security→Firewall tab, authenticating, and clicking Turn On Firewall. But you can also fine-tune the blockade.
To do that, click Firewall Options; you see something like Figure 14-15 at top. As you can sort of tell, OS X lets you allow or block Internet connections individually for each program on your Mac. Here’s what you’ll find there:
§ Block all incoming connections. This option might be better known as Paranoid Mode. You’re allowed to do email and basic Web surfing and a few other deep-seated services that OS X needs to get by. But all other kinds of network connections are blocked, including screen sharing, iTunes music sharing, and so on. This is a hard-core, meat-fisted firewall that, for most people, is more trouble than it’s worth.
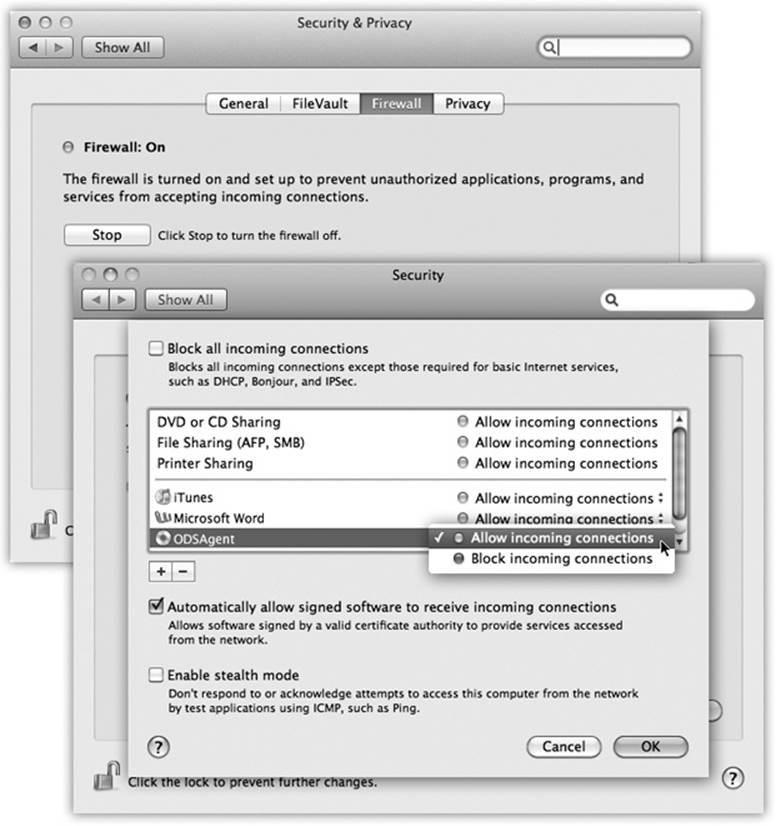
Figure 14-15. Top: The OS X firewall starts with a simple button click. The fun stuff doesn’t begin until you click Firewall Options at the bottom (it’s covered up in this shot, but it’s there). Bottom: This pane lists the programs that have been given permission to receive communications from the Internet. At any point, you can change a program’s Block/Allow setting, as shown here. You can also click the + button to navigate to your Applications folder and manually choose programs for inclusion.
TIP
As you can tell from the wording of this item, OS X’s firewall blocks only incoming connections, which covers most of the dangerous stuff. But if you’d also like your Mac to block outgoing Internet connections, you can install a shareware firewall program like LittleSnitch. It’s available on this book’s “Missing CD” page at www.missingmanuals.com.
§ [List of individual programs]. If the firewall is on but you haven’t turned on “Block all,” then the Mac uses this list of individual programs and features to determine what’s allowed to accept network connections.
Above the horizontal line (Figure 14-15, bottom), features of OS X itself are listed. They get added to this list automatically when you turn them on in System Preferences: File Sharing, Printer Sharing, and so on.
Non-Apple programs can gain passage through your firewall, too. You can add one to the list manually by clicking the ![]() button below the list and choosing it by hand; or you can simply respond to the request box that pops up whenever a new program wants to accept incoming Internet connections.
button below the list and choosing it by hand; or you can simply respond to the request box that pops up whenever a new program wants to accept incoming Internet connections.
Click Allow for each such request (unless, of course, you see a request for an app called SneakyPoisonVirus or something). As you do so, their names get added to the list of programs in this dialog box.
For each program, you can use the pop-up menu beside its name to specify either “Allow incoming connections” or “Block incoming connections,” depending on your level of paranoia.
NOTE
From time to time, some program will ask for permission to accept incoming messages from its mother ship online. If it’s a program you trust, click Allow.
§ Automatically allow signed software to receive incoming connections. Signed software means programs that Apple recognizes as coming from legitimate companies. Anything from Adobe or Microsoft, for example, has got to be OK, right? (Insert your own wisecrack here.)
NOTE
OK, technically, a signed program is one whose authenticity is confirmed by a third party—a “certificate authority” company like VeriSign or GoDaddy. A system of invisible keys (security numbers) confirms that the software did indeed come from the creators it claims it came from, no matter how many detours it took to reach you.
One more point: When you explicitly grant permission to a program, as described below, you’re signing that program.
If this checkbox is not turned on, then each time you run a new program for the first time, you’ll be interrupted so that the Mac can ask if it’s OK to permit Internet connections. The “signed software” box cuts down on the interruptions, since well-known apps are assumed not to be viruses or spyware.
§ Enable stealth mode. This is designed to slam shut the Mac’s back door to the Internet. See, hackers often use automated hacker tools that send out “Are you there?” messages. They’re hoping to find computers that are turned on and connected full time to the Internet. If your machine responds, and they can figure out how to get into it, they’ll use it, without your knowledge, as a relay station for pumping out spam or masking their hacking footsteps.
“Enable stealth mode,” then, makes your Mac even more invisible on the network; it means your Mac won’t respond to the electronic signal called a ping. (On the other hand, you won’t be able to ping your machine, either, when you’re on the road and want to know if it’s turned on and online.)
NOTE
You might have noticed that there doesn’t seem to be any option to turn on firewall logging, which creates a little text file where OS X records every attempt that anyone from the outside makes to infiltrate your Mac. Logging is available, though—in fact, it’s turned on all the time. To view the log, open the Applications→Utilities→Console program. In the left-side list, expand the/private/var/log heading, and click appfirewall.log.
FileVault
FileVault is one of OS X’s most powerful security features. Understanding what it does, however, may take a little slogging.
As you know, the accounts system is designed to keep people out of one another’s stuff. Ordinarily, for example, Chris isn’t allowed to go rooting through Robin’s email and files.
Until FileVault came along, though, there were all kinds of ways to circumvent this protection system. A sneak or a show-off could start up the Mac in FireWire disk mode, for example, or even remove the hard drive and hook it up to a Linux machine or another Mac.
In each case, they’d then be able to run rampant through everybody’s files, changing or trashing them with abandon. For people with sensitive or private files, the result was a security hole bigger than Oprah’s bank account.
FileVault is an extra line of defense. When you turn on this feature, your Mac automatically encrypts (scrambles) everything on your startup hard drive—not just what’s in your Home folder. Every time you create or save a new file, it, too, is insta-encrypted.
NOTE
FileVault uses something called XTS-AES 128 encryption. How secure is that? It would take a password-guessing computer 149 trillion years before hitting pay dirt. Or, in more human terms, slightly longer than the “Lord of the Rings” movie trilogy.
This means that unless someone knows (or can figure out) your password, FileVault renders your files unreadable for anyone but you and your computer’s administrator—no matter what sneaky tricks they try to pull. (You can, if you like, authorize other account holders to get in, too.)
You won’t notice much difference when FileVault is turned on. You log in as usual, clicking your name and typing your password. Only a slight pause as you log out indicates that OS X is doing some housekeeping on the encrypted files: freeing up some space and/or backing up your home directory with Time Machine.
TIP
This feature is especially useful for laptop owners. If someone swipes or “borrows” your laptop, they can’t get into your stuff without the password.
Here are some things you should know about FileVault’s protection:
§ It’s useful only if you’ve logged out. Once you’re logged in, the entire drive is unlocked and accessible. If you want the protection, log out before you wander away from the Mac.
§ An administrator can access your files, too. According to OS X’s caste system, anyone with an Administrator account can theoretically have unhindered access to his peasants’ files—even with FileVault on—if that administrator has the master password (the recovery key) described below.
§ FileVault 2 relies on the Recovery HD partition. You can read about this secret chunk of your hard drive on Recovery Mode: Three Emergency Disks. For now, the point is that if you’ve deliberately reformatted your hard drive in some nonstandard way, you may not be able to use FileVault 2.
§ FileVault can encrypt external drives, too—even flash drives. The controls to do this, though, are in a totally different place—not in System Preferences at all. Instead, open Disk Utility (in your Utilities folder). Erase the external drive using Mac OS Extended (Journaled, Encrypted) format. (And, yes, you have to erase the drive before you can encrypt it.)
NOTE
Pre-Lion machines won’t be able to access a drive you’ve encrypted in this way.
§ Old FileVault still works. If you upgraded your Mac from Snow Leopard, and you were using FileVault before, the protected accounts still work as they always have. But you won’t be able to use FileVault 2 unless you first turn the old FileVault off for those old accounts. That’s a good idea anyway, since FileVault 2 is so much better.
§ You can turn FileVault off at any time. Just revisit the FileVault pane in System Preferences. (It takes time to decrypt your drive, but you can keep right on working.)
§ If you forget your password and your administrator forgets the recovery key, you’re toast. If this happens, your data is permanently lost. You have no choice but to erase your hard drive and start from scratch.
To turn FileVault on, proceed like this:
1. In System Preferences, click Security & Privacy, and then click FileVault. Click the ![]() , authenticate yourself, and then click Turn On FileVault.
, authenticate yourself, and then click Turn On FileVault.
A list of account holders appears (Figure 14-16, top). The button next to each one, Enable User, might sound like you’re about to lead someone into drug addiction, but it’s actually your chance to specify who else can unlock the disk by logging in.
NOTE
If an account has no password, you have to add one first. Click the Set Password button that appears.

Figure 14-16. Top: You have to explicitly give permission to each person you want to allow to log in to your FileVault-protected Mac. Also, you won’t get away with no-password accounts for this trick; Kelton, shown here, won’t be able to unlock the disk at all. Click Set Password to add a password to this account. Bottom: Here’s your recovery key: a skeleton key that can get you into your encrypted Mac even if the idiot administrator forgets his password. (You have no idea how often this happens.)
2. For each person you want to be able to log into this Mac with her own password, click Enable User. Type in that person’s password and click OK. When you’re finished, click Continue.
(Anyone in this list to whom you don’t give access can still use the Mac—but only after persuading an administrator to come over and type in his name and password.)
Now, in huge type, the Mac displays your recovery key.
The recovery key is an override password that gives an administrator full power to access any account, even without knowing the account holder’s password, or to turn off FileVault for any account.
The thinking goes like this: Yeah, yeah, the peons with Standard accounts forget their account passwords all the time. But with FileVault, a forgotten password would mean the entire hard drive is locked forever—so Apple gave you, the technically savvy administrator, a back door. (And you, the omniscient administrator, would never forget the recovery key—right?)
3. Print or copy down the recovery key. Click Continue.
Because a forgotten password and recovery key could be absolutely devastating to your life, Apple handles this whole business like nuclear secrets (and so should you). Now, for example, a message appears that says, “Apple can store the recovery key for you.” It’s a really great idea to take advantage of this option.
If you click “Store the recovery key with Apple,” then the box expands and you’re asked to type in the answers to three security questions (you can choose the questions from the pop-up menus): “What’s your maternal grandmother’s middle name?” for example. Don’t mess this up; if you can’t remember the answers, you won’t get your recovery key from Apple.
4. After answering the “Store the recovery key” screen, click Continue. On the following screen, click Restart.
When you log in again, the Mac begins the process of encrypting your entire hard drive. This process takes a long time (the FileVault pane in System Preferences shows you the estimated remaining time), but you can keep using your Mac in the meantime; in theory, you won’t feel much of a slowdown at all while the encrypting is going on. You can even restart or shut down the computer.
You shouldn’t notice any speed hit as you work with an encrypted disk, either. You’ll notice only a few small security-related changes. For example, you’ll be asked for your password every time you wake the computer or exit the screen saver.
NOTE
Actually, there’s one more change. When FileVault is turned on, you won’t see the icon for the Recovery HD appear when you hold down the Option key at startup. It’s still there, though, and you can still start up with the Recovery HD by pressing ⌘-R as your Mac starts up.
Logout Options
As you read earlier in this chapter, the usual procedure for finishing up a work session is for each person to choose ![]() →Log Out. After you confirm your intention to log out, the login screen appears, ready for the next victim.
→Log Out. After you confirm your intention to log out, the login screen appears, ready for the next victim.
But sometimes people forget. You might wander off to the bathroom for a minute, but run into a colleague there who breathlessly begins describing last night’s date and proposes finishing the conversation over pizza. The next thing you know, you’ve left your Mac unattended but logged in, with all your life’s secrets accessible to anyone who walks by your desk.
You can tighten up that security hole, and many others, using the options in the Security & Privacy→General panel of System Preferences:
§ Require password [immediately] after sleep or screen saver begins. This option gives you a password-protected screen saver that locks your Mac when you wander away. Now, whenever somebody tries to wake up your Mac after the screen saver has appeared (or when the Mac has simply gone to sleep according to your settings in the Energy Saver panel of System Preferences), the “Enter your password” dialog box appears. No password? No access.
The pop-up menu here (which starts out saying “immediately”) is a handy feature. Without it, the person most inconvenienced by the password requirement would be you, not the evil snitch from Accounting; even if you just stepped away to the bathroom or the coffee machine, you’d have to unlock the screen saver with your password. It would get old fast.
Instead, the password requirement can kick in only after you’ve been away for a more serious amount of time—5 minutes, 15 minutes, an hour, whatever. You can still put the Mac to sleep, or you can still set up your screen saver to kick in sooner than that. But until that time period has passed, you’ll be able to wake the machine without having to log in.
POWER USERS’ CLINIC: VIRTUAL MEMORY, SECURITY, AND YOU
Virtual memory is a trick that computers use to keep a lot of programs open at once—more, in fact, than they technically have enough memory (RAM) for. How do they manage to keep so many software balls in the air? Easy: They set some of them down on the hard drive.
When you bring Photoshop to the front, OS X frees up the necessary memory for it by storing some of the background programs’ code on the hard drive. When you switch back to, say, Safari, OS X swaps Photoshop for the Safari code it needs from the hard drive, so that the frontmost program always has full command of your actual memory.
Sophisticated software snoopers could, in theory, sneak up to the Mac while you’re logged in but away from your desk. Using a built-in Unix command called strings, the no-goodniks could actually read what’s stored on the hard drive in that virtual-memory swap file—in particular, your passwords.
When you turned on the old FileVault, your virtual memory swap files were also encrypted.
But in Mavericks, your virtual memory swap files are encrypted all the time, automatically and invisibly, so nobody can read them.
(Super-geeky bonus fact: You can use a Unix command in Terminal, described on Saving a report, to specify any time interval—not just the canned choices in the pop-up menu. The magic command is defaults -currentHost write com.apple.screensaver askForPasswordDelay -int 1800, where the final number specifies how many seconds should elapse before a password is required.)
§ Disable automatic login. This is just a duplicate of the Automatic Login on/off switch described on Setting Up the Login Process. Apple figured that this feature really deserved some presence on a control panel called Security & Privacy.
§ Show a message when the screen is locked. Whatever you type into this box will appear on the login screen (where you click your name in the list) or the screen saver..
If you click the Advanced button (it’s at the bottom of the Security & Privacy pane of System Preferences), you get these three bonus tweaks:
§ Require an administrator password to access system preferences with lock icons. Ordinarily, certain System Preferences changes require an administrator’s approval—namely, the ones that affect the entire computer and everyone who uses it, like Date & Time, Users & Groups, Network, Time Machine, and Security & Privacy. If you’re not an administrator, you can’t make changes to these panels until an administrator has typed in her name and password to approve your change.
However, once Mr. Teacher or Ms. Parent has unlocked one of those secure preference settings, they’re all unlocked. Once the administrator leaves your desk, you can go right on making changes to the other important panels (Network and Time Machine and Security & Privacy) without the administrator’s knowledge.
Unless this “Require an administrator password” box is turned on, that is. In that case, an Administrative account holder has to enter her name and password to approve each of those System Preferences panes individually.
§ Log out after [60] minutes of inactivity. You can make the Mac sign out of your account completely if it figures out that you’ve wandered off (and it’s been, say, 15 minutes since the last time you touched the mouse or keyboard). Anyone who shows up at your Mac will find only the standard login screen.
§ Automatically update safe downloads list. This option refers to Apple’s master list of viruses and spyware, which Mail and Safari block automatically. That list, of course, is changing all the time as Apple discovers new nasties; this option tells your Mac to update itself with Apple’s master list automatically.
The Password Assistant
Plenty of software features require you to make up a password: Web sites, accounts, networked disks, and so on. No wonder most people wind up trying to use the same password in as many situations as possible. Worse, they use something easily guessable like their names, kids’ names, spouse’s names, and so on. Even regular English words aren’t very secure, because hackers routinely use dictionary attacks—software that tries to guess your password by running through every word in the dictionary—to break in.
To prevent evildoers from guessing your passwords, OS X comes with a good-password suggestion feature called the Password Assistant (Figure 14-17). It cheerfully generates one suggestion after another for impossible-to-guess passwords (recharges8@exchangeability, anyone?).
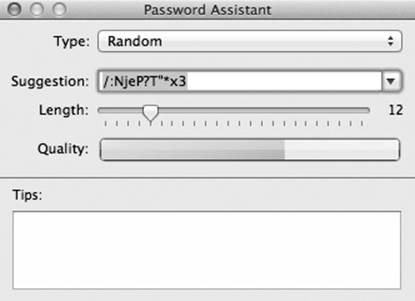
Figure 14-17. Anyplace you’re supposed to make up a password, including in the Users & Groups pane of System Preferences, a key icon appears. When you click it, the Password Assistant opens. Use the pop-up menu and the Length slider to specify how long and unguessable the password should be. The Quality graph shows you just how tough it is to crack this password. (In the Type pop-up menu, you might wonder about FIPS-181. It stands for the Federal Information Processing Standards Publication 181, which sets forth the U.S. government’s standard for password-generating algorithms.)
Fortunately, you won’t have to remember most of them, thanks to the Keychain password-memorizing feature described at the end of this chapter. (The only password you have to memorize is your account password.)
The Keychain
The information explosion of the computer age may translate into bargains, power, and efficiency, but as noted above, it carries with it a colossal annoyance: the proliferation of passwords we have to memorize. Shared folders on the network, Web sites, FTP sites—each requires another password.
UP TO SPEED: PASSWORD HELL
In OS X, you have quite a few different passwords to keep straight. Each one, however, has a specific purpose:
Account password. You type this password in at the normal login screen. You can’t get into anyone else’s account with it—only yours. Entering this password unlocks FileVault, too.
Administrator password. You’re asked to enter this password whenever you try to install new software or modify certain system settings. If you’re the only one who uses your computer (or you’re the one who controls it), your administrator password is your account password. Otherwise, you’re supposed to go find an administrator (the parent, teacher, or guru who set up your account to begin with) and ask that person to type in his name and password once he’s assessed what you’re trying to do.
Recovery key. Think of this password as a master key. If anyone with FileVault forgets her account password, the administrator who knows the master password can unlock the account. This master password also lets an administrator change an account’s password right at the login screen, whether FileVault is turned on or not.
Root password. This password is rarely useful for anything other than Unix hackery; you know who you are.
Apple has done the world a mighty favor with its Keychain feature. (It’s something like an earlier, not-Internet-based version of the iCloud Keychain described on Synchronized Passwords.) Whenever you log into OS X and type in your password, you’ve typed the master code that tells the computer, “It’s really me. I’m at my computer now.” From that moment on, the Mac automatically fills in every password blank you encounter, whether it’s a Web site in Safari, a shared disk on your network, a wireless network, an encrypted disk image, or an FTP (File Transfer Protocol) program like Transmit or Cyberduck. With only a few exceptions, you can safely forget all your passwords except your login password.
These days, all kinds of programs and services know about the Keychain and offer to store your passwords there. For example:
§ In Safari, whenever you type your name and password for a certain Web page and then click OK, a dialog box asks: “Would you like to save this password?” (See Figure 14-18, top.)
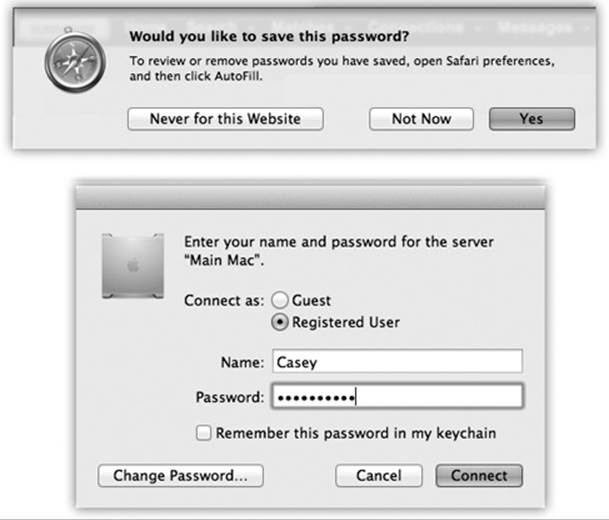
Figure 14-18. Top: Safari is one of several Internet-based programs that offer to store your passwords in the Keychain; just click Yes. The next time you visit this Web page, you’ll find your name and password already typed in. At any time, you can see a complete list of the memorized Web passwords by choosing Safari→Preferences→Passwords. Bottom: When you connect to a server (a shared disk or folder on the network), just turn on “Remember this password in my keychain.”
NOTE
This offer is valid only if, in Safari→Preferences→AutoFill tab, “User names and passwords” is turned on. If not, the “Would you like to save this password?” message never appears.
Note, too, that some Web sites use a nonstandard login system that also doesn’t produce the “Would you?” message. Unless the Web site provides its own “Remember me” or “Store my password” option, you’re out of luck; you’ll have to type in this information with every visit.
§ When you connect to a shared folder or disk on the network, the opportunity to save the password in your Keychain is equally obvious (Figure 14-18, bottom).
§ You also see a “Remember password (add to Keychain)” option when you create an encrypted disk image using Disk Utility.
§ Mac email programs, like Mail and Entourage/Outlook, store your email account passwords in your Keychain. So do FTP programs; check their Preferences dialog boxes.
§ Your iCloud account information is stored in the Keychain, too (as you entered it on the iCloud pane of System Preferences).
§ A “Remember password” option appears when you type in the password for a wireless network or an AirPort base station.
§ The iTunes program memorizes your iTunes Store password, too.
Locking and unlocking the Keychain
If you work alone, the Keychain is automatic, invisible, and generally wonderful. Login is the only time you have to type a password. After that, the Mac figures, “Hey, I know it’s you; you proved it by entering your account password. That ID is good enough for me. I’ll fill in all your other passwords automatically.” In Apple parlance, you’ve unlocked your Keychain just by logging in.
But there may be times when you want the Keychain to stop filling in all your passwords, perhaps only temporarily. Maybe you work in an office where someone else might sit down at your Mac while you’re getting a candy bar.
Of course, you can have OS X lock your Mac—Keychain and all—after a specified period of inactivity (The Password Assistant).
But if you want to lock the Keychain manually, so that no passwords are autofilled in until you unlock it again, you can use any of these methods. Each requires the Keychain Access program (in your Applications→Utilities folder):
§ Lock the Keychain manually. In the Keychain Access program, choose File→Lock Keychain “login” (⌘-L), or just click the big ![]() button in the toolbar (Figure 14-19).
button in the toolbar (Figure 14-19).
§ Choose Lock Keychain “login” from the Keychain menulet. To put the Keychain menulet on your menu bar, open Keychain Access, choose Keychain Access→Preferences→General. Turn on “Show keychain status in menu bar.”
§ Lock the Keychain automatically. In the Keychain Access program, choose Edit→Change Settings for Keychain [your name]. The resulting dialog box lets you set up the Keychain to lock itself, say, 5 minutes after the last time you used your Mac, or whenever the Mac goes to sleep. When you return to the Mac, you’re asked to re-enter your account password in order to unlock the Keychain, restoring your automatic-password feature.
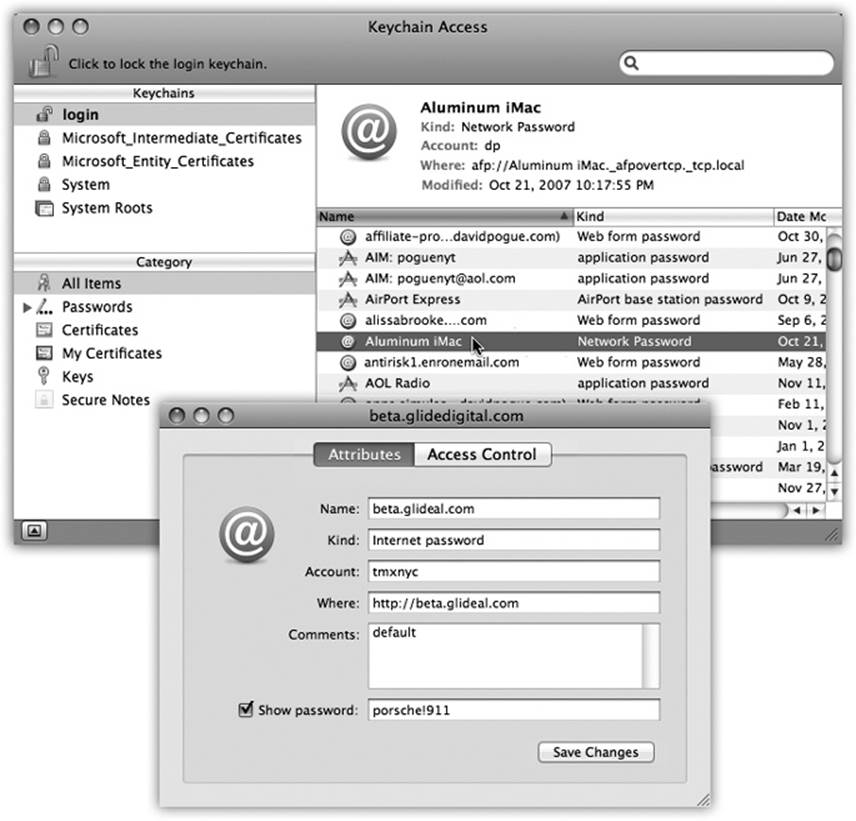
Figure 14-19. In the main Keychain list, you can double-click a listing for more details about a certain password—including the actual password it’s storing. To see the password, turn on “Show password.” The first time you try this, you’re asked to prove your worthiness by entering your Keychain password (usually your account password). If you then click Always Allow, you won’t be bothered for a password-to-see-this-password again.
Whenever the Keychain is locked, OS X no longer fills in your passwords.
NOTE
As noted above, you unlock your Keychain using the same password you use to log into OS X, but that’s just a convenience. If you’re really worried about security, you can choose Edit→Change Password for Keychain [your name], thereby establishing a different password for your Keychain, so that it no longer matches your login password.
Of course, doing so also turns off the automatic-Keychain-unlocking-when-you-log-in feature.
Managing Keychain
To take a look at your Keychain, open the Keychain Access program. By clicking one of the password rows, you get to see its attributes—name, kind, account, and so on (Figure 14-19).
Keychain files
Keychains are represented by separate files in your Home→Library→Keychains folder. Knowing that can be handy when you want to delete a Keychain or copy it to another Mac—your laptop, for example. (Then again, the File→Export command may be even more convenient.)
And Four Privacy Shields
In Apple’s mind, there’s a difference between security (protecting your Mac) and privacy (protecting your information from distribution).
The Privacy tab in the Security & Privacy pane of System Preferences harbors four fairly random privacy-related options:
Location Services
Location Services means “knowing where I am.” It’s the feature that lets your laptop figure out its own time zone automatically, for example, or that lets a weather Web site show your local weather the first time you visit.
Every time a program wants to use your current location for its own features, you’ll be asked about it. (The Mac figures out your location based on its proximity to known WiFi networks.) Each time you say OK, the program that did the asking installs its own name into the list here.
You can turn off the checkboxes of the programs you’d rather didn’t know where you are, or you can turn off location tracking altogether by turning off the “Enable location services” box.
Contacts
Some programs work better if you allow them to access your database of names and addresses. For example, Skype wants access so that it can incorporate your address book into its address book. This list shows all of the programs that access your Contacts—and offers checkboxes to turn off that access.
Twitter, Facebook
Here, you’ll see programs that want to access your Twitter and Facebook accounts. Once again, you can turn off their access, if you like.
Diagnostic and Usage Data
If you turn on this box, your Mac will automatically and quietly send data to Apple about what’s going on with your Mac (anonymously, of course—Apple won’t know it’s you). The transmissions include details about crashes and freezes, what programs and hardware you use, what software versions and peripherals you have, and so on.
None of this is transmitted unless you turn this box on.
Incidentally, you have another chance to turn on automatic reporting: when a program, or your Mac, crashes. At that time, a message invites you to send a crash report to Apple; you can click either OK or No Thanks. You can also turn on “Don’t ask me again,” which makes your OK or No Thanks decision permanent. (What you’re actually doing with that “Don’t ask me again” option, of course, is changing the status of this checkbox here in the Security & Privacy pane of System Preferences. That’s how you can change your mind later.
TIP
Want to see the sort of information being sent? Open the Console app in Applications→Utilities. In the toolbar, click Show Log List, if necessary. Next to Diagnostic and Usage Information, click Show, if necessary. Under the subheadings here, you can read the sort of reports that Apple gets if you permit automatic sending. (Understanding the gobbledygook is another story.)