Mac Tips, Tricks & Shortcuts in easy steps (2015)
12
Keeping your Mac Secure
Although there are few Mac-specific viruses, you need to be security conscious even on a Mac. Here we will explore various ways of keeping your information away from prying eyes, and also look at methods for preventing cyber attacks.
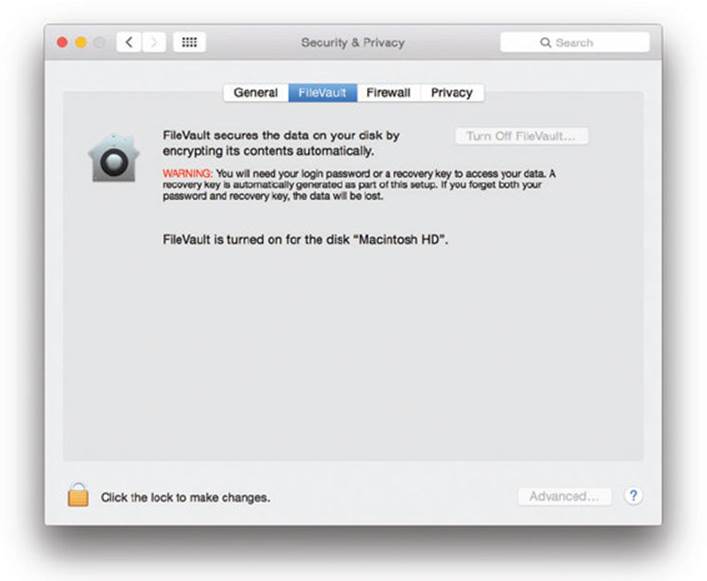
FileVault
This is one of OS X’s built-in security features. FileVault encrypts all the files in your home folder using 128-bit encryption. Once you activate FileVault you will not be able to open any of your files or folders unless you enter the correct password. If your Mac is stolen, the thief could access personal data on your Mac but if you have turned on FileVault, encrypted files will not be readable without the required password or security key.
Setting up FileVault
![]() Go to System Preferences > Security & Privacy and click FileVault
Go to System Preferences > Security & Privacy and click FileVault
![]() Click the lock icon on the lower left of the Security & Privacy window and enter your administrator password
Click the lock icon on the lower left of the Security & Privacy window and enter your administrator password
![]() Turn on FileVault
Turn on FileVault
![]() You will then see a security key which can be used to unlock your disk if you forget your password
You will then see a security key which can be used to unlock your disk if you forget your password
![]() Click Continue and choose whether to let Apple store your recovery key
Click Continue and choose whether to let Apple store your recovery key
![]() Click Continue
Click Continue
![]() Restart your Mac and start the encryption process
Restart your Mac and start the encryption process
Disable Automatic Login
If you are the sole user of your Mac you may have it configured such that when you switch on the Mac it automatically boots up and takes you straight to the Desktop. This may save you a few seconds but it means that if anyone steals your Mac they can have easy access to all your files and folders. It is a wise precaution to disable automatic login, which means that when you start your Mac you’re taken to the login screen which will show your account, a guest account and the accounts of any other users configured to use that Mac. Each person will have to log in using their own password. This stops prying eyes viewing your files.
Disable automatic login
![]() Go to System Preferences > Security & Privacy
Go to System Preferences > Security & Privacy
![]() Click the lock at the bottom left of the window to make changes and enter your password
Click the lock at the bottom left of the window to make changes and enter your password
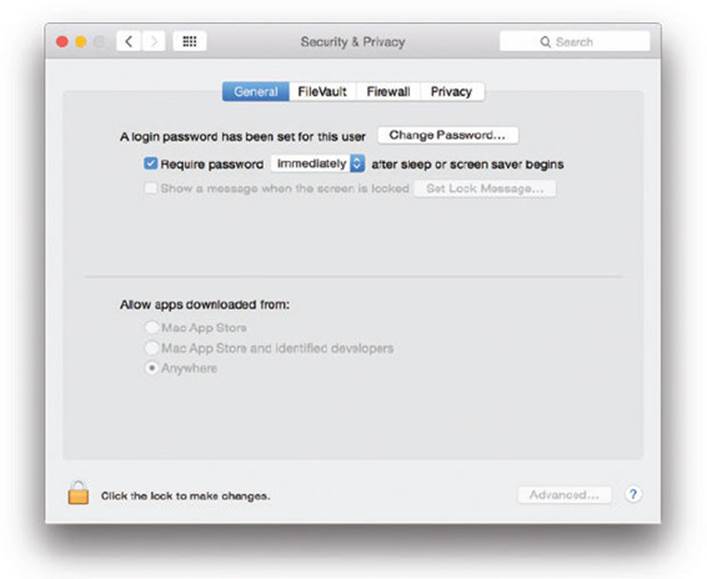
![]() Make sure there is a tick in the Disable automatic login box
Make sure there is a tick in the Disable automatic login box
![]() While you are there, make sure that Require password after sleep or screen saver begins is also checked as an extra security measure
While you are there, make sure that Require password after sleep or screen saver begins is also checked as an extra security measure
![]() Finally, if you intend to install software from third parties and elsewhere, rather than only from the Mac App Store or identified developers, click the Anywhere radio button
Finally, if you intend to install software from third parties and elsewhere, rather than only from the Mac App Store or identified developers, click the Anywhere radio button
![]() Click the lock to prevent further changes and close the window
Click the lock to prevent further changes and close the window
Secure Empty Trash
Normally, when you empty the Trash the file or folder disappears, which makes you think the file has been destroyed. In fact, all that has happened is that the Mac has removed that file’s name from your computer but the file actually still remains on the hard drive and could be accessed if somebody wanted to recover your data.
If you really want to remove the file completely along with its contents you need to empty the trash securely. Emptying the trash securely forces the Mac to overwrite your data with random system-generated data which makes it impossible to recover the file. Note of caution: only use secure emptying if you’re absolutely sure you will never want to recover the data.
Empty Trash securely
![]() Place your files or folders into the Trash
Place your files or folders into the Trash
![]() Go to Finder > Secure Empty Trash
Go to Finder > Secure Empty Trash
![]() Your file will now be deleted securely
Your file will now be deleted securely

If you place large amounts of data in the Trash the Secure Empty Trash procedure may take a long time because the system has to write random data to such a large file.
Empty Trash securely by default
You can also use Secure Empty Trash by default by using Terminal and typing:
defaults write com.apple.finder EmptyTrashSecurely -bool true
Activate OS X Firewall
Firewalls can be either software or hardware security barriers that monitor incoming and outgoing network traffic on your Mac. Firewalls determine whether either incoming or outgoing traffic should be allowed.
Most of us are using wireless routers which have firewalls built into them so it is a moot point as to whether you need to activate the Mac OS X-based firewall as well as your router’s firewall. Personally, I use the firewall in my router and have the firewall in Mac OS X switched off.
Switch on Mac OS X Firewall
![]() Go to System References > Security & Privacy
Go to System References > Security & Privacy
![]() Click the Firewall tab
Click the Firewall tab
![]() Click the lock at the bottom left of the window to make changes and enter password
Click the lock at the bottom left of the window to make changes and enter password
![]() Click Turn On Firewall
Click Turn On Firewall
![]() You can review the options available by clicking the Firewall Options… button (for example, you can block all incoming connections, enable stealth mode, etc.)
You can review the options available by clicking the Firewall Options… button (for example, you can block all incoming connections, enable stealth mode, etc.)
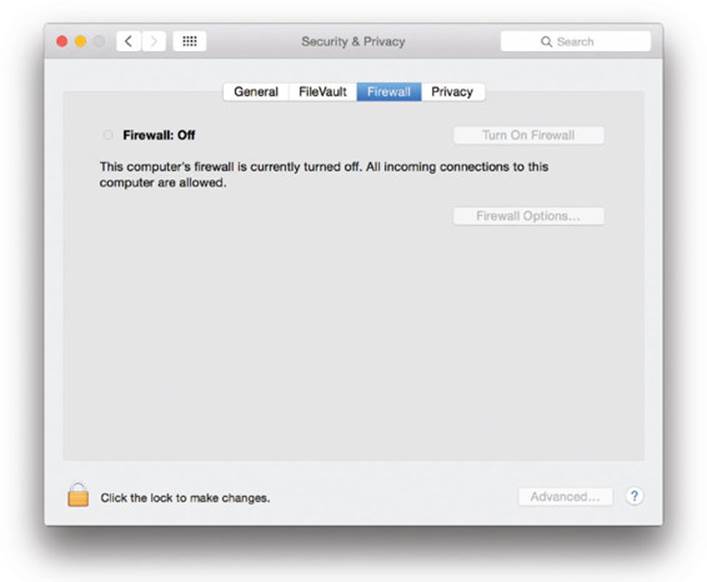

One firewall is enough. If your router has one (highly likely) you don’t need the OS X firewall as well.
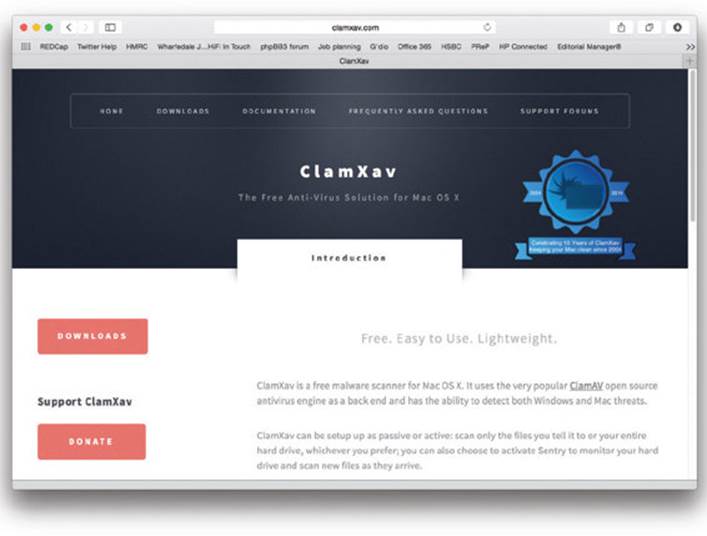
Install an Antivirus App
There are very few viruses which have been designed to attack the Mac. In part, this is because PCs are much more widely used and hackers are more interested in targeting the wider PC community than the more niche-based Mac OS X community. But as Macs become more popular, hackers will no doubt design viruses targeting the Mac.
There are many Mac antivirus programs available. Some are free and others are paid. The simplest to use is the excellent ClamXav (www.clamxav.com). But there is also Norton AntiVirus, McAfee, VirusBarrier and a number of others.
One of the benefits of having an antivirus program on your Mac is that if you receive an email containing a virus hidden within a file, your Mac will pick this up and you will not send the virus to another user. At the moment, the chance of any PC virus doing any harm to your Mac is negligible, so I would not worry if you receive a file which contains a virus.
Use Keychain Access
You will find Keychain Access within your Utilities folder on the Mac. The job of Keychain Access is to store web certificates, web form passwords, application passwords, private keys, and other data used to log in to applications and websites. By allowing Keychain Access to store these bits of information, it means you do not have to remember the individual passwords for the various websites and apps that you use.
Viewing Keychain Access
![]() Go to Utilities > Keychain Access and open the app by double-clicking
Go to Utilities > Keychain Access and open the app by double-clicking
![]() Scroll down through the list of logins and other data
Scroll down through the list of logins and other data
![]() To view or edit a password, double-click an entry and you will see the name of the entry along with the type of entry, in this case a web form password. You will also see the account associated with the entry and the URL of the website concerned. If I want to view the password, I can click the Show password: box. I will be prompted for my administrator password. After entering my administrator password I can view the password required to access that website
To view or edit a password, double-click an entry and you will see the name of the entry along with the type of entry, in this case a web form password. You will also see the account associated with the entry and the URL of the website concerned. If I want to view the password, I can click the Show password: box. I will be prompted for my administrator password. After entering my administrator password I can view the password required to access that website

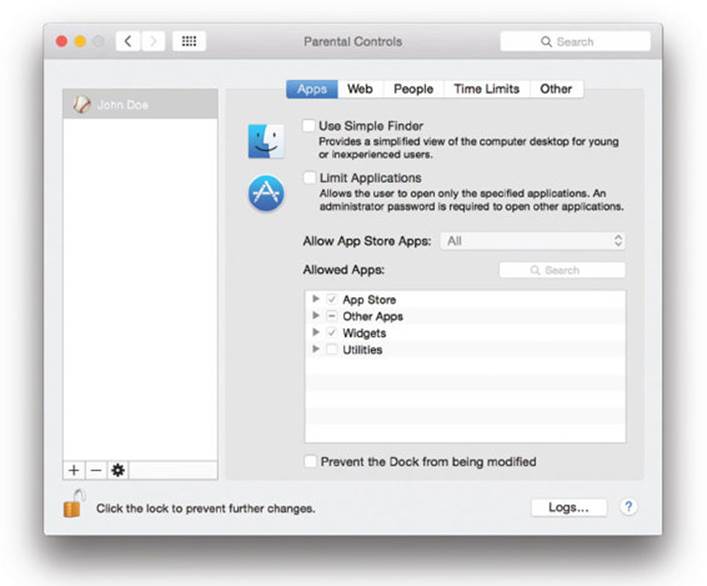
Parental Controls
If you have a family Mac and young children you will probably want to limit the things they can do on your Mac, for example install software or make changes to System Preferences. In addition, you will probably want to limit the programs they can open and the websites they can view. Mac OS X has parental controls built into the system, easily accessible via System Preferences.
Setting up Parental Controls
![]() Go to System Preferences > Parental Controls
Go to System Preferences > Parental Controls
![]() Click the lock at the bottom left and enter your administrator password to make changes
Click the lock at the bottom left and enter your administrator password to make changes
![]() Choose the account for which you wish to turn on Parental Controls
Choose the account for which you wish to turn on Parental Controls
![]() Click through the various tabs on the window on the right (Apps, Web, People, Time Limits, and Other) and activate the various controls as you work through the tabs and then click the lock to prevent further changes
Click through the various tabs on the window on the right (Apps, Web, People, Time Limits, and Other) and activate the various controls as you work through the tabs and then click the lock to prevent further changes
All materials on the site are licensed Creative Commons Attribution-Sharealike 3.0 Unported CC BY-SA 3.0 & GNU Free Documentation License (GFDL)
If you are the copyright holder of any material contained on our site and intend to remove it, please contact our site administrator for approval.
© 2016-2026 All site design rights belong to S.Y.A.