Teach Yourself VISUALLY MacBook Pro, 2nd Edition (2014)
Part III. Enjoying the Internet
A MacBook Pro is ideal for using the Internet. With iCloud, you can store your information online where all your devices can access the same data. Safari is OS X's excellent web browser. Using Mail, you can send, receive, and organize e-mail. To communicate with people near and far, you use FaceTime and Messages for text, audio, and even video chats.
Chapter 10. Using iCloud Online Services
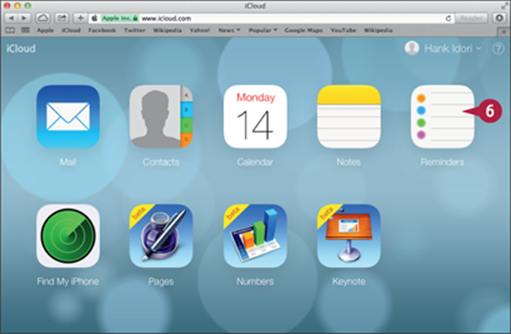
Explore iCloud
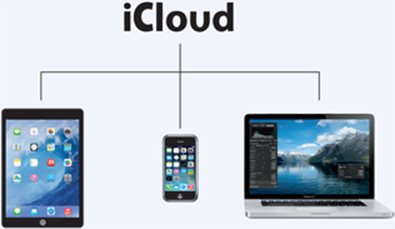
An iCloud account gives you access to a number of useful services and online applications. Because your iCloud account is integrated with OS X, iCloud extends your MacBook Pro's desktop onto the Internet.
You can use iCloud to keep information and documents in sync among several devices, such as your MacBook Pro, other Macs, an iPhone, an iPad, and even a Windows PC. An iCloud account provides you with online e-mail, calendars, contacts, documents, photos, and more. You can access this through applications on your MacBook Pro and through your iCloud website.
iCloud
iCloud gives you an online storage space you can access from many devices, keeping your information and documents in sync. For example, you can start a document in the Pages application on your MacBook Pro and save it to iCloud. You can make changes to the document in the Pages app on an iPad; those changes are also saved to iCloud, from where they are copied back to your MacBook Pro. Pages on the Mac has fuller features than Pages on the iPad, but the latter can still edit the document's content enough to be highly useful.
iCloud Account
To use iCloud, you must have an iCloud account. If you already have an Apple ID, you also have an iCloud account. If you do not, creating an iCloud account is simple. You can use many of iCloud's services for free, so you have no reason not to try it to see if it will be useful to you. After you have an iCloud account, you configure each of your devices to use it.
iCloud Website
In addition to being able to access iCloud data and services from your MacBook Pro and other devices, you can use the iCloud website to access your information through the online applications it provides. This is very useful for those times you might not have one of your devices with you. You can log into your account from any compatible web browser and check your e-mail, create an event on your calendar, and so on.

iCloud gives you an e-mail account, with an e-mail address on the @icloud.com domain; older accounts may use the mac.com and me.com domains. You can send and receive e-mail from your iCloud account, just like you do with other e-mail accounts that you may have, using an e-mail application such as Mail; using an iPhone, iPad, or iPod touch; or working directly from the Mail application on your iCloud website. You can also create e-mail aliases that enable you to use multiple addresses at the same time.
Calendars and Contacts

Similar to e-mail, iCloud enables you to store contact and calendar information on the cloud so that you can access it through applications on your MacBook Pro and iPads, iPhones, and iPod touches. You can also use the online applications to work with this information from any computer using a compatible web browser.
Notes
![]()
The Notes feature in iCloud provides an easy way to sync the notes you create in the Notes app on your MacBook, iPad, iPhone, or iPod touch. When you create a note in your iCloud account, your MacBook and iOS devices sync it automatically, so you always have your latest information at hand. You can also edit notes on the iCloud website by using a web browser.
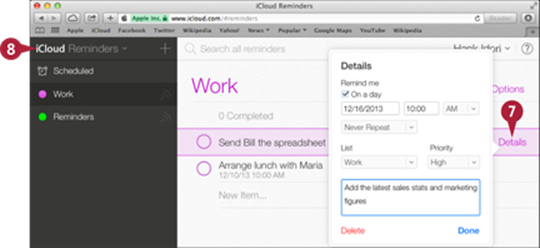
Reminders
![]()
In addition to your e-mail, contacts, calendars, and notes, your iCloud account can sync the reminders you create in the Reminders app. You can keep multiple lists of reminders, sync them among your MacBook and iOS devices, and update your to-do list anywhere you go. You can edit your reminders on the iCloud website by using a web browser.
Find My Mac

The Find My Mac feature, which appears on iCloud as Find My iPhone, can pinpoint the current location of your MacBook Pro through its network connection. This can be helpful if your MacBook is lost or stolen because you can identify where it is and you can take steps to protect the information stored on it, such as by erasing its drive.
iCloud and Windows PCs

iCloud works with Windows PCs, too. If you also use a Windows PC, you can configure its applications, such as Outlook, to access your iCloud account so that you can share information on a PC. You can download the iCloud Control Panel, the software necessary to configure iCloud on a Windows PC, from www.apple.com/icloud/setup/pc.html.
Set Up an iCloud Account on Your MacBook Pro
To use iCloud services, you need an iCloud account. An iCloud account is free, although some services or upgrades require a fee. If you have an Apple ID already, you also have an iCloud account, so you just need to set up your account on your MacBook Pro. To obtain or set up an iCloud account, you use the iCloud pane in the System Preferences application. This pane enables you to create a new account, log in, and configure your account.
Set Up an iCloud Account on Your MacBook Pro

![]() Control+click System Preferences (
Control+click System Preferences (![]() ) on the Dock.
) on the Dock.
The System Preferences contextual menu opens.
Note: You can also click Apple (![]() ) to open the Apple menu, select System Preferences to display the System Preferences window, and then click iCloud.
) to open the Apple menu, select System Preferences to display the System Preferences window, and then click iCloud.
![]() Click iCloud.
Click iCloud.
The System Preferences application opens and displays the iCloud pane.
Note: If you need to get an iCloud account, click Create an Apple ID and complete the steps in the Create an Apple ID dialog that appears.
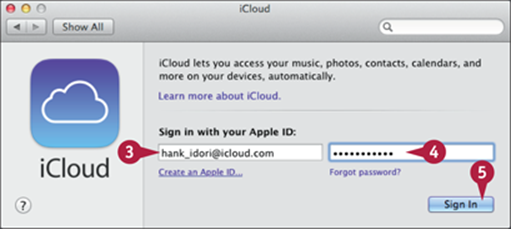
![]() Type your Apple ID.
Type your Apple ID.
![]() Type your password.
Type your password.
![]() Click Sign In.
Click Sign In.
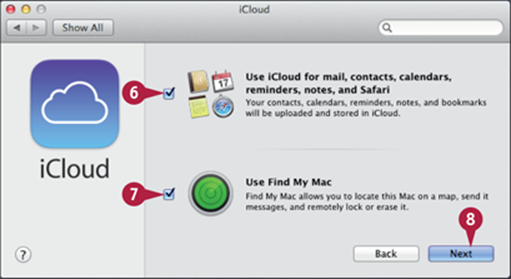
![]() Deselect the Use iCloud for mail, contacts, calendars, reminders, notes, and Safari check box (
Deselect the Use iCloud for mail, contacts, calendars, reminders, notes, and Safari check box (![]() changes to
changes to ![]() ) if you do not want your information synced on the cloud.
) if you do not want your information synced on the cloud.
![]() Deselect the Use Find My Mac check box (
Deselect the Use Find My Mac check box (![]() changes to
changes to ![]() ) if you do not want to be able to use Find My Mac to locate your MacBook Pro.
) if you do not want to be able to use Find My Mac to locate your MacBook Pro.
![]() Click Next.
Click Next.
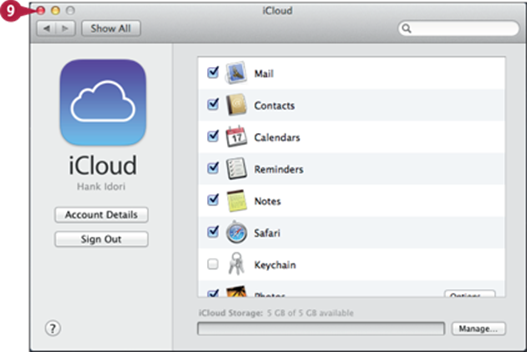
The iCloud pane displays controls for configuring your account further, as discussed later in this chapter.
![]() Click Close (
Click Close (![]() ).
).
The System Preferences window closes.
TIPS
How do I switch iCloud accounts?
To switch to a different iCloud account, open the iCloud pane and click Sign Out. You are prompted to keep or delete the information that has been synced on your MacBook Pro, such as contacts, calendars, and so on. After you have chosen to delete or keep each type of information, you return to the iCloud pane and can sign in to a different account.
How can I stream music to all my devices?
The iTunes Match service matches as many as possible of the songs in your iTunes library with existing iCloud versions and uploads the other songs to iCloud. From there, each of your devices can access, download, and play that music. This is useful because you do not have to bother with selecting only parts of your music collection to sync on a device. All your music is available all the time. You must subscribe to iTunes Match for a fee; see www.apple.com/itunes/itunes-match/ for more information.
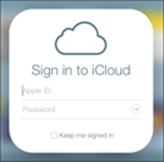
Access iCloud via a Web Browser
As well as using iCloud on your MacBook Pro and your iOS devices, you can also access your iCloud account and data using the applications and tools on Apple's icloud.com website. All you need to use the iCloud website is your Apple ID, your password, and a computer running a compatible web browser, such as Safari, Firefox, Internet Explorer on a Windows PC, or Google Chrome. After signing in to the iCloud website, you can work with your e-mail, contact information, calendar appointments, reminders, and notes. You can also use the Find My iPhone feature to locate your Macs and iOS devices.
Access iCloud via a Web Browser
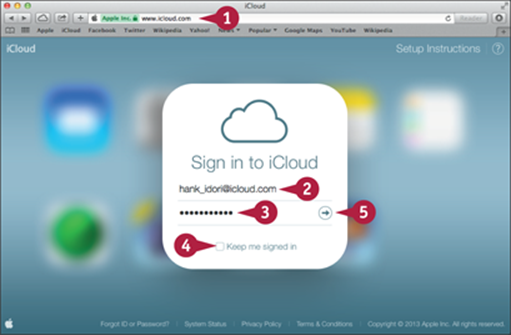
![]() Open a web browser and go to www.icloud.com.
Open a web browser and go to www.icloud.com.
The iCloud Login page appears.
![]() Type your Apple ID.
Type your Apple ID.
![]() Type your password.
Type your password.
![]() Select the Keep me signed in check box (
Select the Keep me signed in check box (![]() changes to
changes to ![]() ) if you want to remain logged into your account.
) if you want to remain logged into your account.
Note: Use the Keep me signed in feature only on your own computer, not on anybody else's computer or a public computer.
![]() Click Sign In (
Click Sign In (![]() ) or press
) or press ![]() .
.
iCloud signs you in.
Icons for the available iCloud applications appear.
![]() Click the icon for the application you want to use. For example, click Reminders to use the Reminders application.
Click the icon for the application you want to use. For example, click Reminders to use the Reminders application.
The application you selected opens.
![]() Work with the online application.
Work with the online application.
Note: The iCloud applications work very similarly to the OS X desktop applications.
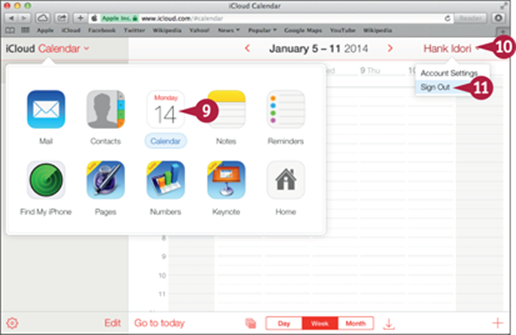
![]() To switch to a different application, click iCloud.
To switch to a different application, click iCloud.
The iCloud navigation panel appears, showing the application icons.
![]() To switch to a different application, click its icon.
To switch to a different application, click its icon.
Note: You can click Home on the iCloud navigation panel to return to the iCloud Home screen.
![]() To leave the iCloud website, click your user name.
To leave the iCloud website, click your user name.
The Account menu opens.
![]() Click Sign Out.
Click Sign Out.
iCloud signs you out and displays its sign-in screen again.
TIPS
How can I configure my iCloud account?
Click your name in the upper-right corner of the iCloud window and then click Account Settings on the pop-up menu. The Account dialog appears. Here you can add a photo, set the language and time zone, and choose which notifications to receive. Clicking your Apple ID displays the My Apple ID website, where you can reset your password and perform various administrative moves.
How can I add more disk space to my account?
Your iCloud account includes 5GB of storage space by default. This is typically enough for e-mail, calendars, and contacts. If you store a lot of documents on the cloud and need more room, open System Preferences, click iCloud, and then click Manage. ClickBuy More Storage and follow the on-screen instructions to increase the amount of online storage available to you. Note that content from the iTunes Store, App Store, iTunes Match, and Photo Stream does not count against your storage space.
Sync Information Across Your Devices with iCloud
You can use your iCloud account to keep your essential information synced on each of your Macs and your iOS devices. For example, you sync your contacts to your Mac and your iPhone, put your reminders on your iPad, and ensure that all your favorite bookmarks are available when you need them.
To get started, you need to configure each computer and iOS device to sync via iCloud. After you do that, the sync process happens automatically and you do not even have to think about it.
Sync Information Across Your Devices with iCloud
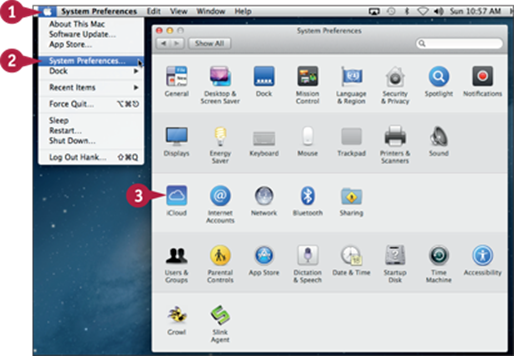
![]() Click Apple (
Click Apple (![]() ).
).
The Apple menu opens.
![]() Click System Preferences.
Click System Preferences.
The System Preferences window opens.
![]() Click iCloud.
Click iCloud.
The iCloud pane appears.
Note: If necessary, sign in to your iCloud account as described in the section “Set Up an iCloud Account on Your MacBook Pro.”
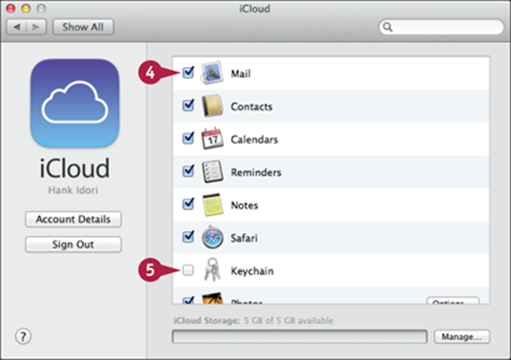
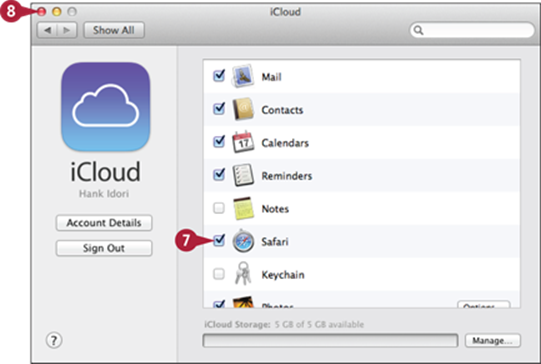
![]() Select the check box (
Select the check box (![]() changes to
changes to ![]() ) for each item you want to sync.
) for each item you want to sync.
![]() Deselect the check box (
Deselect the check box (![]() changes to
changes to ![]() ) for each item you do not want to sync.
) for each item you do not want to sync.
When you remove an item, OS X may display a dialog confirming that you want to remove the information from your MacBook Pro.
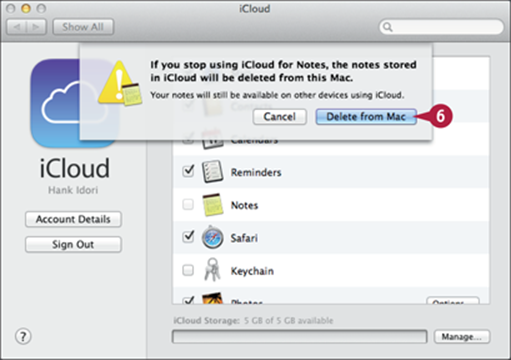
![]() Click Delete from Mac if you are sure you want to remove the information.
Click Delete from Mac if you are sure you want to remove the information.
![]() Repeat steps 4 to 6 until you have configured all the items available for syncing.
Repeat steps 4 to 6 until you have configured all the items available for syncing.
![]() Click Close (
Click Close (![]() ) or press
) or press ![]() +
+![]() to close the System Preferences application.
to close the System Preferences application.
Repeat steps 1 to 7 on each Mac that you want to keep in sync.
Note: You can only sync information from one iCloud account under each user account on your MacBook Pro. Each user account can — and normally should — use a different iCloud account.
TIP
How do I keep information synced on my iOS devices?
To use the same information on an iPhone, iPad, or iPod touch, configure your iCloud account on each of those devices. Press the Home button to display the Home screen, then tap Settings to open the Settings app. Tap iCloud, and enter your account information. Once your information is verified, set the status switch for each type of information you want to keep in sync, such as Mail, Contacts, and so on, to On (![]() ). This causes the data on the device to sync with iCloud, which in turn syncs with your Macs.
). This causes the data on the device to sync with iCloud, which in turn syncs with your Macs.
Using iCloud Photo Stream
Photo Stream provides online storage for your photos and other images, making it easy to have your photos available on all your devices. For example, with Photo Stream enabled, each photo you take with an iPhone is automatically uploaded to your Photo Stream. Your MacBook Pro and your iPad, configured to use Photo Stream, then automatically download the photo, so you can view and edit it on any of your devices. Photo Stream also provides a temporary backup for your photos. If you lose your iPhone, the photos you took with its camera and uploaded to Photo Stream are still available to download.
Using iCloud Photo Stream
Set Up Photo Stream in OS X
![]() Click Apple (
Click Apple (![]() ).
).
![]() Click System Preferences.
Click System Preferences.
The System Preferences window opens.
![]() Click iCloud.
Click iCloud.
The iCloud pane opens.
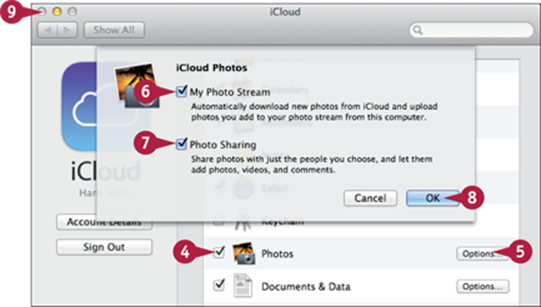
![]() Select the Photos check box (
Select the Photos check box (![]() changes to
changes to ![]() ).
).
![]() Click Options.
Click Options.
The iCloud Photos dialog opens.
![]() Select the My Photo Stream check box (
Select the My Photo Stream check box (![]() changes to
changes to ![]() ).
).
![]() Select the Photo Sharing check box (
Select the Photo Sharing check box (![]() changes to
changes to ![]() ) if you want to share your photos with others.
) if you want to share your photos with others.
![]() Click OK.
Click OK.
The iCloud Photos dialog closes.
![]() Click Close (
Click Close (![]() ) or press
) or press ![]() +
+![]() .
.
Set Up Photo Stream in iPhoto
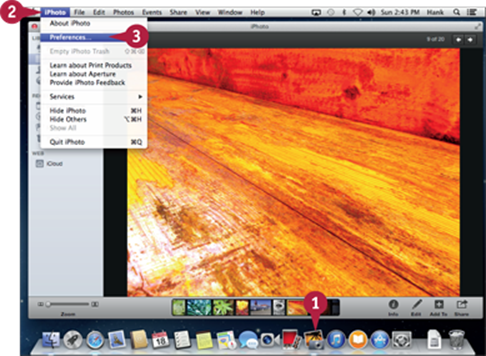
![]() Click the iPhoto icon (
Click the iPhoto icon (![]() ) on the Dock.
) on the Dock.
![]() Click iPhoto.
Click iPhoto.
![]() Click Preferences.
Click Preferences.
![]() Click iCloud.
Click iCloud.
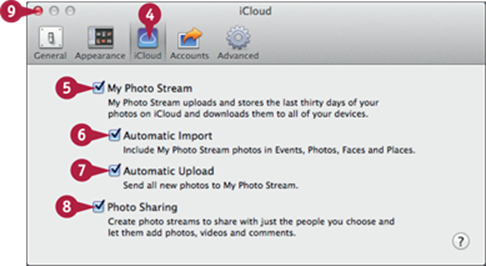
![]() Select My Photo Stream (
Select My Photo Stream (![]() changes to
changes to ![]() ).
).
![]() Select Automatic Import (
Select Automatic Import (![]() changes to
changes to ![]() ) if you want iPhoto to add your My Photo Stream photos to its list of Events, Photos, Faces, and Places.
) if you want iPhoto to add your My Photo Stream photos to its list of Events, Photos, Faces, and Places.
![]() Select the Automatic Upload check box (
Select the Automatic Upload check box (![]() changes to
changes to ![]() ) if you also want photos or other images you add to iPhoto to be uploaded to your Photo Stream.
) if you also want photos or other images you add to iPhoto to be uploaded to your Photo Stream.
![]() Select the Photo Sharing check box (
Select the Photo Sharing check box (![]() changes to
changes to ![]() ) if you want to create photo streams that you share with others.
) if you want to create photo streams that you share with others.
![]() Click Close (
Click Close (![]() ).
).
The Preferences window closes.
Any photos uploaded to your Photo Stream automatically download into iPhoto. If you selected the Automatic Upload check box in step 7, any photos or other images that you add to iPhoto automatically upload to your Photo Stream. From there, they automatically download to other devices accessing your Photo Stream.
TIP
How can I remove photos from my Photo Stream?
In iPhoto, click iCloud in the Sidebar. In the My Photo Stream view, Control+click the photo you want to delete, then click Delete from My Photo Stream on the contextual menu that appears.
Using iCloud to Store Documents Online
In addition to information, you can store documents in iCloud. The same documents are available on each device, so you can create a document on your MacBook Pro, edit it on your iPhone, and then finalize it on your iPad. Only those applications designed to use iCloud can store documents in iCloud. Currently, TextEdit, Preview, and the three iWork applications — Pages, Numbers, and Keynote — are among the Apple applications that support iCloud documents.
Using iCloud to Store Documents Online
Set Up Online Documents in OS X
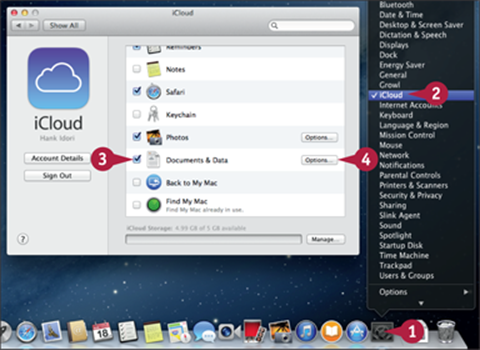
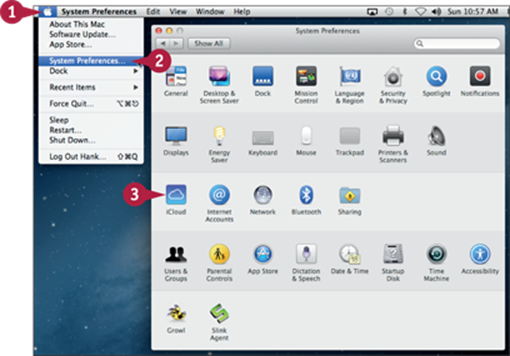
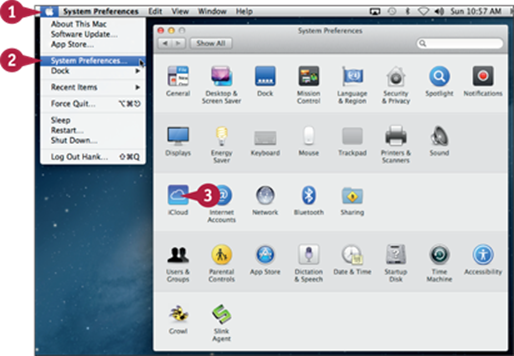
![]() Control+click System Preferences (
Control+click System Preferences (![]() ) on the Dock.
) on the Dock.
![]() Click iCloud.
Click iCloud.
![]() Select the Documents & Data check box (
Select the Documents & Data check box (![]() changes to
changes to ![]() ).
).
![]() Click Options.
Click Options.
The Documents & Data Options dialog opens.
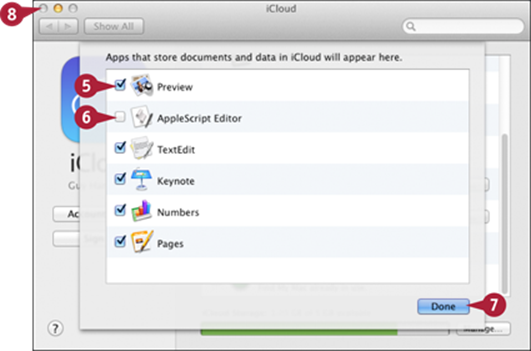
![]() Select a check box (
Select a check box (![]() changes to
changes to ![]() ) to enable an application to store documents and data in iCloud.
) to enable an application to store documents and data in iCloud.
![]() Deselect a check box (
Deselect a check box (![]() changes to
changes to ![]() ) to disable an application from storing documents and data in iCloud.
) to disable an application from storing documents and data in iCloud.
![]() Click Done.
Click Done.
The Documents & Data Options dialog closes.
![]() Click Close (
Click Close (![]() ).
).
The System Preferences window closes.
Work with Online Documents in Pages
![]() Click Launchpad (
Click Launchpad (![]() ) on the Dock.
) on the Dock.
![]() Click Pages.
Click Pages.
The Pages dialog opens.
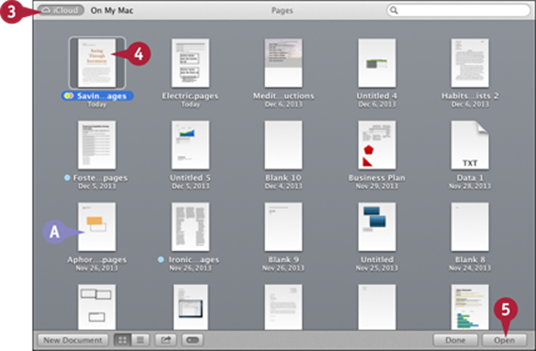
![]() Click iCloud.
Click iCloud.
A The list of Pages documents stored in your iCloud account appears.
![]() Click the document you want to work with.
Click the document you want to work with.
![]() Click Open.
Click Open.
B The document downloads to your MacBook Pro and opens.
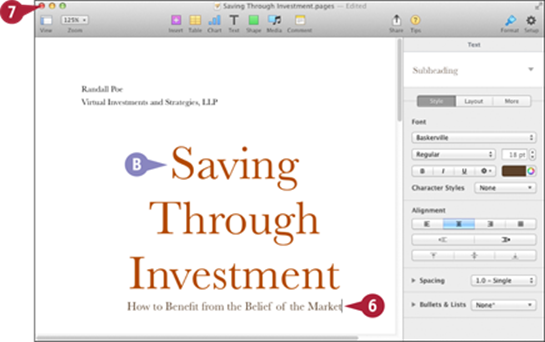
![]() Change the document.
Change the document.
![]() When you finish working with the document, click Close (
When you finish working with the document, click Close (![]() ).
).
The document closes.
OS X saves the updated version of the document in iCloud. You can open it from any device that can access your Pages documents, including other Macs, iPads, and iPhones.
TIP
How do I access my documents on an iPad or iPhone?
Press the Home button to display the Home screen, then tap Settings to open the Settings app. Tap iCloud, and then tap Documents & Data. Set the Documents & Data switch to On (![]() ). If you want documents to be synced even when you are using a cellular connection, set the Use Cellular Data switch to On (
). If you want documents to be synced even when you are using a cellular connection, set the Use Cellular Data switch to On (![]() ). Open an iCloud-enabled app on the device. Tap Use iCloud. You see the documents associated with that application stored on the cloud. Tap a document to work with it. Any documents you change or create are stored on the cloud from where they are synced onto other devices.
). Open an iCloud-enabled app on the device. Tap Use iCloud. You see the documents associated with that application stored on the cloud. Tap a document to work with it. Any documents you change or create are stored on the cloud from where they are synced onto other devices.
Secure Your Passwords with iCloud Keychain
iCloud Keychain gives you an easy way to store your passwords and credit card information securely on your Macs and iOS devices. Instead of having to remember the password for each website, or look at a credit card when you need to enter its details, you can have iCloud Keychain automatically provide the details. To use iCloud Keychain, you first set it up in the iCloud pane of System Preferences on your MacBook Pro. Once you have done this, you can access the information in your iCloud Keychain from browsers such as Safari.
Secure Your Passwords with iCloud Keychain
![]() Click Apple (
Click Apple (![]() ).
).
The Apple menu opens.
![]() Click System Preferences.
Click System Preferences.
The System Preferences window opens.
![]() Click iCloud.
Click iCloud.
The iCloud pane opens.
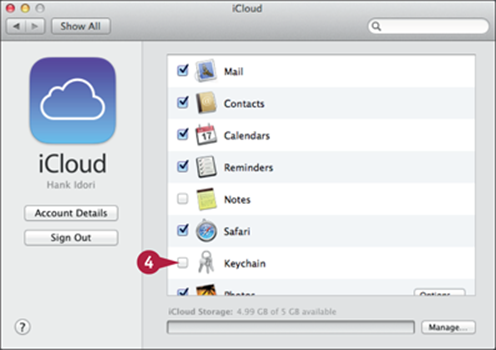
![]() Select the Keychain check box (
Select the Keychain check box (![]() changes to
changes to ![]() ).
).
The Enter your Apple ID password to set up iCloud Keychain dialog opens.
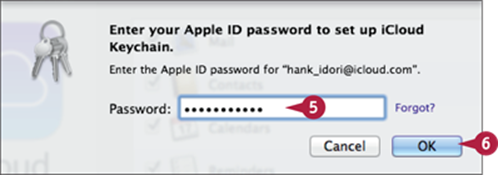
![]() Type your Apple ID password.
Type your Apple ID password.
![]() Click OK.
Click OK.
The Create an iCloud Security Code dialog opens.
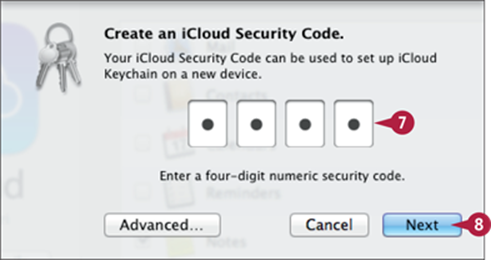
![]() Type the code you want to use.
Type the code you want to use.
![]() Click Next.
Click Next.
![]() Reenter the code when prompted.
Reenter the code when prompted.
![]() Click Next.
Click Next.
The Enter a Phone Number That Can Receive SMS Messages dialog opens.

![]() Click the Country pop-up menu (
Click the Country pop-up menu (![]() ) and select your country.
) and select your country.
![]() Type your phone number.
Type your phone number.
Note: Use a phone number that can receive text messages, not a landline.
![]() Click Done.
Click Done.
OS X enables the iCloud Keychain feature.
![]() Click Close (
Click Close (![]() ) or press
) or press ![]() +
+![]() .
.
The System Preferences window closes.
TIP
How can I make sure my iCloud Keychain information is secure?
You can secure your iCloud Keychain with a complex code instead of a four-digit numeric code. In the Create an iCloud Security Code dialog, click Advanced, and then click Use a Complex Security Code (![]() changes to
changes to ![]() ). Click Next and type the security code, and then click Next again and type the code once more to confirm it. By making the code longer and including numbers and symbols as well as upper- and lowercase letters, you can secure your iCloud Keychain more tightly.
). Click Next and type the security code, and then click Next again and type the code once more to confirm it. By making the code longer and including numbers and symbols as well as upper- and lowercase letters, you can secure your iCloud Keychain more tightly.
All materials on the site are licensed Creative Commons Attribution-Sharealike 3.0 Unported CC BY-SA 3.0 & GNU Free Documentation License (GFDL)
If you are the copyright holder of any material contained on our site and intend to remove it, please contact our site administrator for approval.
© 2016-2026 All site design rights belong to S.Y.A.