Teach Yourself VISUALLY MacBook Pro, 2nd Edition (2014)
Part III. Enjoying the Internet
Chapter 12. E-Mailing with Mail
Explore Mail
E-mail is a vital means of communication for most people today. Once you have connected your MacBook Pro to the Internet, you can use the Mail application included with OS X to send and receive e-mail. Mail is easy to get started with and to use, but it is also a powerful e-mail application that provides the features and capabilities you need to work efficiently and effectively with e-mail.
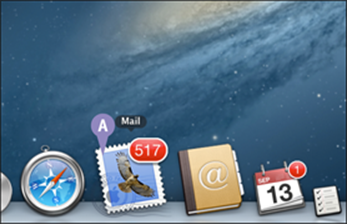
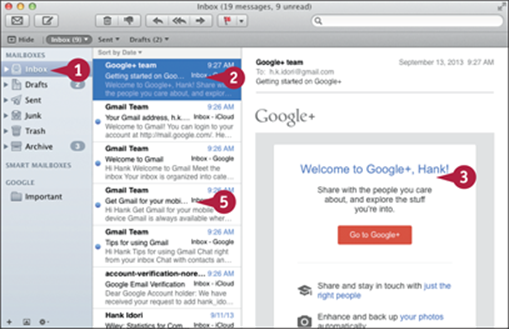
A Mail Icon
Click the Mail icon on the Dock to launch the Mail application. When Mail is running, the Dock icon also shows you how many new messages you have.
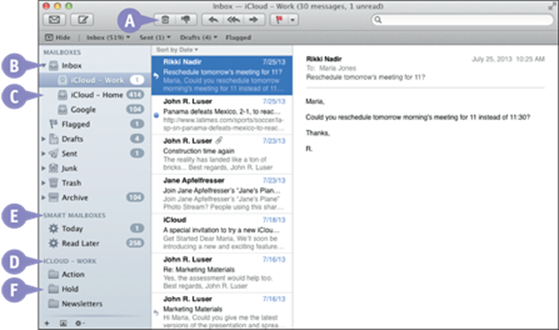
A Toolbar
Contains tools you can use to work with e-mail.
B Inbox
Contains mailboxes for each e-mail account.
C Account Mailboxes
Contain e-mail for the accounts you have configured in Mail.
D Account Mailbox Folders
Organize e-mail in different states, such as Sent or Drafts, for each account.
E Smart Mailboxes
Automatically organize e-mail based on criteria you define.
F Mailboxes
Folders in which you can store and organize e-mail.
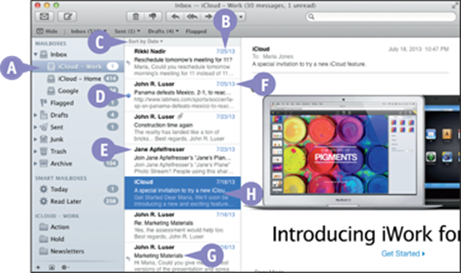
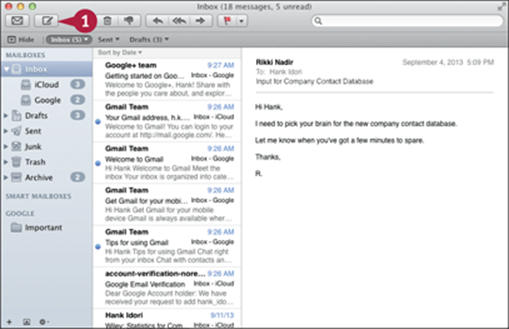
A Selected Source
The source of e-mails you want to work with, such as those you have received in a specific account.
B Message Pane
Shows the messages in the selected source.
C Sort Criteria
Shows how the list of messages is sorted, such as by Date.
D Read/Unread
A blue dot indicates a message that you have not read.
E From
The name of the person who sent the message to you.
F Date Received
The date or time you received the message. The time appears for the current day. The date appears for older messages.
G Subject
The subject of the message.
H Selected Message
The message pane shows the selected messages highlighted in blue.
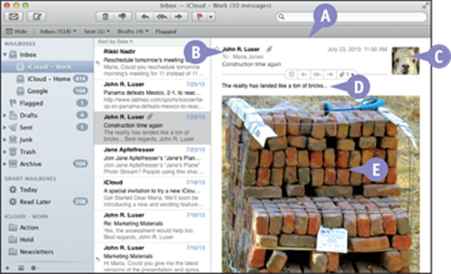
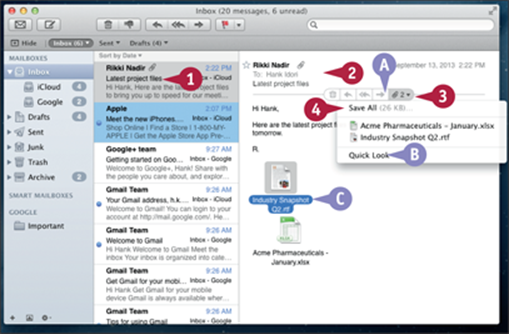
A Reading Pane
Displays the selected message.
B Message Details
Who the message is from, the subject of the message, when it was sent, and who the other recipients are.
C Sender's Image
Shows the image, if any, associated with the sender in Contacts.
D Body
The message's text.
E Attachments
Shows files attached to the message and enables you to save or view them. Image files may appear within the body of the message.
Set Up E-Mail Accounts
Before you can work with e-mail, you must obtain one or more e-mail accounts and configure Mail to access them. The details of configuring an e-mail account vary depending on the type of account. But for all types of accounts, you can set up the account by entering the configuration details in the appropriate fields in Mail. You can also use the Internet Accounts pane of the System Preferences application to set up accounts to use in Mail. See Chapter 6.
Set Up E-Mail Accounts
![]() Click Mail (
Click Mail (![]() ) on the Dock.
) on the Dock.
The Mail application opens.
![]() Press
Press ![]() +
+![]() or click Mail and then click Preferences.
or click Mail and then click Preferences.
The Mail Preferences window opens.
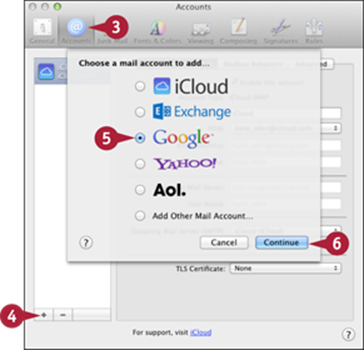
![]() Click Accounts.
Click Accounts.
The Accounts pane appears.
![]() Click Add (
Click Add (![]() ).
).
The Choose a mail account to add sheet appears.
![]() Click the account type. This example uses Google.
Click the account type. This example uses Google.
![]() Click Continue.
Click Continue.
A sheet for entering the account details opens.
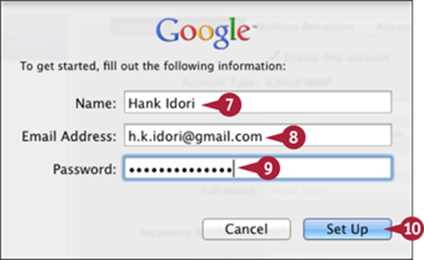
![]() Type your name the way it is to appear in your outgoing messages.
Type your name the way it is to appear in your outgoing messages.
![]() Type the e-mail address for the account.
Type the e-mail address for the account.
![]() Type the password for the account.
Type the password for the account.
![]() Click Set Up.
Click Set Up.
Note: If the Set Up button does not appear, click Continue and work through the following screens to specify additional details for the account.
Mail sets up the account.
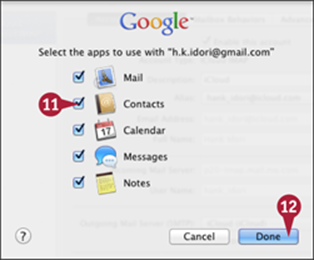
![]() Select the Contacts, Calendar, Messages, and Notes check boxes, as needed (
Select the Contacts, Calendar, Messages, and Notes check boxes, as needed (![]() changes to
changes to ![]() ).
).
![]() Click Done.
Click Done.
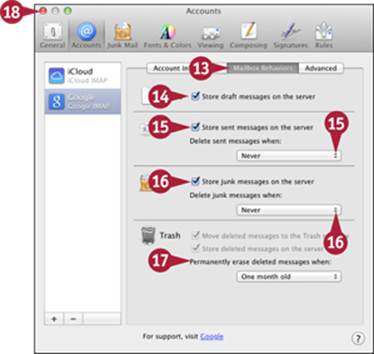
![]() Click Mailbox Behaviors.
Click Mailbox Behaviors.
![]() To store draft messages online so you can access them from other computers, select the Drafts check box (
To store draft messages online so you can access them from other computers, select the Drafts check box (![]() changes to
changes to ![]() ).
).
![]() To store sent messages online, select the Store sent messages on the server check box (
To store sent messages online, select the Store sent messages on the server check box (![]() changes to
changes to ![]() ). Click the Delete sent message when pop-up menu (
). Click the Delete sent message when pop-up menu (![]() ) and select when to delete the messages.
) and select when to delete the messages.
![]() To store apparent spam messages online, select the Store junk messages check box (
To store apparent spam messages online, select the Store junk messages check box (![]() changes to
changes to ![]() ). Click the Delete junk messages when pop-up menu (
). Click the Delete junk messages when pop-up menu (![]() ) and select when to delete the messages.
) and select when to delete the messages.
![]() Use the Trash check boxes and pop-up menu to determine how Mail deals with messages you delete.
Use the Trash check boxes and pop-up menu to determine how Mail deals with messages you delete.
![]() Click Close (
Click Close (![]() ) and save your changes at the prompt.
) and save your changes at the prompt.
The account is ready to use.
TIPS
An iCloud e-mail account was already set up when I launched Mail. How did that happen?
When you configure an iCloud account, either during the initial MacBook Pro setup or on the iCloud pane of the System Preferences application, OS X automatically sets up the iCloud e-mail account in Mail. See Chapter 10 for more information about iCloud online services.
Where can I get free e-mail accounts?
You can obtain a Gmail account at www.google.com. You can also get a free e-mail account at www.yahoo.com. Having at least two e-mail accounts is a good idea so that you can use one for activities more likely to draw spam. For more information, see the section “Reduce Spam.”
Read and Reply to E-Mail
When you receive e-mail messages, you will probably want to read them. With Mail, you can read e-mail in the reading pane, as described in the following steps, or you can double-click a message to open it in its own window. You can also easily reply to e-mail that you receive to start or continue an e-mail conversation, also called a thread.
Read and Reply to E-Mail
Read E-Mail
![]() Click the Inbox or a specific account.
Click the Inbox or a specific account.
![]() Click the message you want to read.
Click the message you want to read.
The message appears in the reading pane.
![]() Read the message.
Read the message.
If the message has images attached, they may appear in the message's body.
Note: After you have viewed a message in the reading pane, its blue dot disappears to indicate that you have read it.
![]() If the message is too long to fit into the current window, press
If the message is too long to fit into the current window, press ![]() to scroll down in the message.
to scroll down in the message.
![]() To open a message in its own window, double-click it.
To open a message in its own window, double-click it.
The message appears in a separate window.
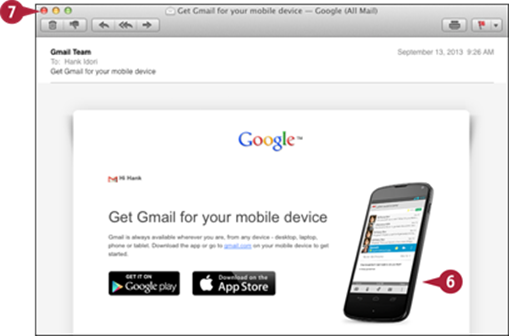
![]() Read the message and look at the images it contains.
Read the message and look at the images it contains.
![]() When you finish with the message, click Close (
When you finish with the message, click Close (![]() ).
).
The message window closes.
Reply to E-Mail
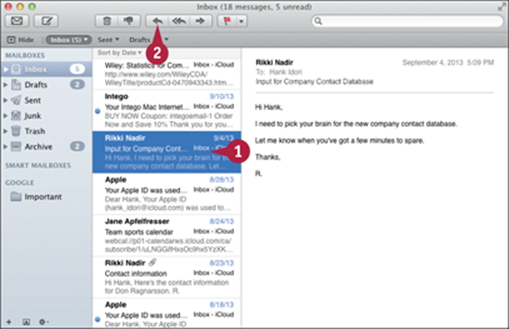
![]() Click a message.
Click a message.
![]() Click Reply (
Click Reply (![]() ).
).
Note: If more than one person is listed in the From or Cc field and you want to reply to everyone listed, click Reply All (![]() ) instead.
) instead.
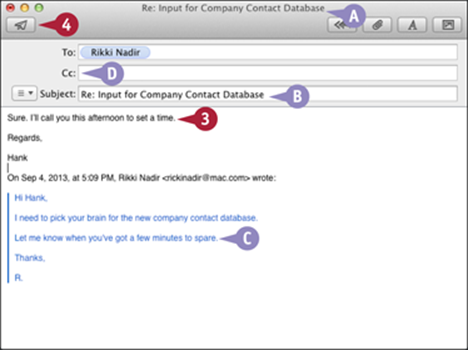
A A new message appears, addressed to the sender of the message. If you clicked Reply All, the message is addressed to all recipients except for any in the Bcc field, whose addresses you do not see.
B Mail adds “Re:” to the beginning of the subject to show that the message is a reply.
C Mail places the contents of the original message in the body in blue and marks it with a vertical line to indicate it is quoted text.
D Optionally, add other recipients to the To or Cc field.
![]() Type your reply.
Type your reply.
![]() Click Send (
Click Send (![]() ).
).
The window closes.
Mail sends the message, and you hear the sent mail sound effect.
TIP
How do I reply using a different e-mail account?
In the reply window, click Choose Fields (![]() ), and then click Customize on the pop-up menu. The window displays all the fields you can add to the message, including Bcc, Reply To, Account, and Priority. Select the Account check box (
), and then click Customize on the pop-up menu. The window displays all the fields you can add to the message, including Bcc, Reply To, Account, and Priority. Select the Account check box (![]() changes to
changes to ![]() ), which shows the account name, and then click OK. You can then click the Account pop-up menu and select the account from which to send the reply.
), which shows the account name, and then click OK. You can then click the Account pop-up menu and select the account from which to send the reply.
Send E-Mail
In addition to reading and replying to e-mail messages that you receive, you will want to create and send your own messages. When you want to e-mail someone, you create a new message, address it, add the contents, and then send it.
You can add addressees in three ways: To, Cc, and Bcc. You put the primary recipients in the To field and any secondary recipients in the Cc field. If you need to send the message to other people but hide the fact from the To and Cc recipients, you put them in the Bcc field.
Send E-Mail
![]() Click Compose New Message (
Click Compose New Message (![]() ).
).
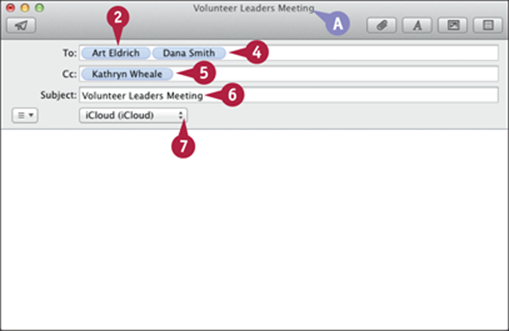
![]() Type the name or e-mail address of the first recipient in the To field.
Type the name or e-mail address of the first recipient in the To field.
As you type, Mail attempts to match a previously used e-mail address or an address in Contacts to what you type. Select an e-mail address to insert it.
![]() Press
Press ![]() .
.
Note: When it can, Mail replaces an e-mail address with the person's name.
![]() Type another e-mail address.
Type another e-mail address.
![]() Click in the Cc field or press
Click in the Cc field or press ![]() to move there, and type e-mail addresses of people who should receive a copy of the message.
to move there, and type e-mail addresses of people who should receive a copy of the message.
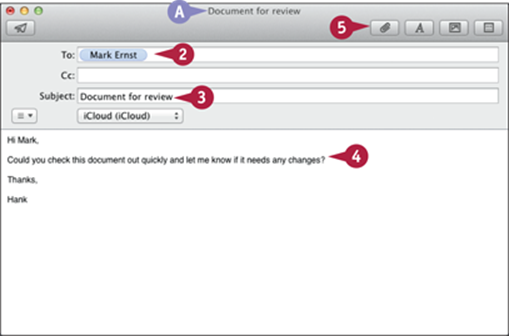
![]() Type the subject of the message in the Subject field.
Type the subject of the message in the Subject field.
A The subject appears in the title bar.
![]() If you have displayed the Account pop-up menu, click the Account pop-up menu and select the account to use.
If you have displayed the Account pop-up menu, click the Account pop-up menu and select the account to use.
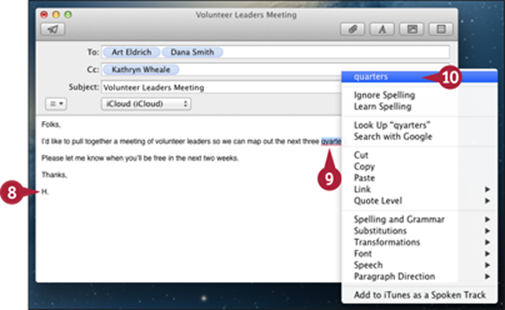
![]() Type the message in the body.
Type the message in the body.
Note: You can use Show Format Bar (![]() ) to display the Format toolbar. You can use the tools on this toolbar to format new messages.
) to display the Format toolbar. You can use the tools on this toolbar to format new messages.
As you type, Mail checks your spelling. Mail underlines misspelled and unrecognized words in red.
![]() To correct a misspelled word, Control+click it.
To correct a misspelled word, Control+click it.
![]() Click the correct spelling on the list.
Click the correct spelling on the list.
Note: If the word is spelled correctly and you want to add it to the dictionary so that Mail does not flag it as a mistake in the future, click Learn Spelling.
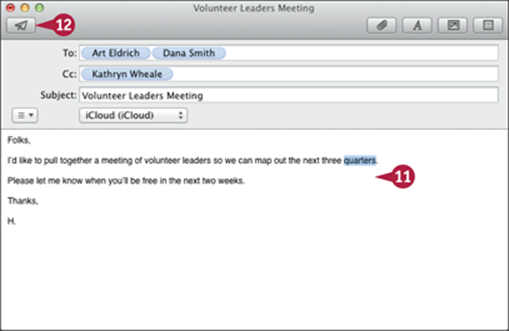
![]() Review your message and make sure it is ready for sending.
Review your message and make sure it is ready for sending.
![]() Click Send (
Click Send (![]() ).
).
The window closes.
Mail sends the message, and you hear the sent message sound effect.
TIPS
How do I avoid having to type e-mail addresses?
You can store e-mail addresses in Contacts so that you can type an e-mail address by typing a person's name, which is usually much easier to remember. As you type an e-mail address, Mail searches e-mail that you have sent, e-mail that you have received, and cards in Contacts to identify e-mail addresses for you. You can select one of these to easily address a message.
From where else can I start a new e-mail message?
When you are using an OS X application, such as Contacts, and you see an e-mail address, you can almost always start an e-mail message to that address by Control+clicking it and clicking Send Email on the contextual menu. Mail creates a new message to that address, and you can then complete and send it.
Work with Files Attached to E-Mail
E-mail is a great way to send files to other people, and for people to send files to you. You can send most types of files, but you must make sure the file size is not too large, because many e-mail servers reject messages larger than 5–10MB. Mail can display some file attachments, such as photos and PDF files, within an e-mail message. In all cases, you can save attachments on your MacBook Pro for your use. After saving attachments, you can click Message and Remove Attachments to remove them from the message so your mailbox does not grow too large.
Work with Files Attached to E-Mail
![]() Click a message containing attachments.
Click a message containing attachments.
![]() Move the mouse pointer (
Move the mouse pointer (![]() ) into the top of the reading pane.
) into the top of the reading pane.
A The floating toolbar appears just above the body of the message.
![]() Click the Save pop-up menu (
Click the Save pop-up menu (![]() ).
).
B To preview the attachments, click Quick Look.
C You can also work with the attachments by Control+clicking their icons in the body of the message and then using the commands on the contextual menu. Alternatively, you can drag an attachment to a Finder window or to the Desktop.
![]() Click Save All to save all the attachments, or click a specific attachment to save it.
Click Save All to save all the attachments, or click a specific attachment to save it.
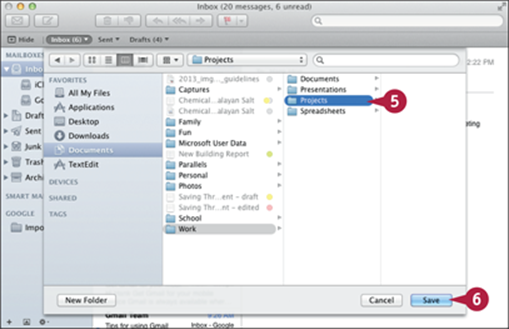
![]() Click the location in which you want to save the attachments.
Click the location in which you want to save the attachments.
![]() Click Save.
Click Save.
Attach Files to E-Mail
You can attach files to e-mail messages you send to share those files with other people. As long as the recipient has a compatible application, she can use the files you send.
Attaching files increases the size of the message by the size of those files plus some overhead for encoding the file. If you attach only one or two small files, you can attach them as is. But to attach many or large files, you should compress them and send the compressed file as an attachment instead. See Chapter 4 for instructions on compressing files.
Attach Files to E-Mail
![]() Click Compose New Message (
Click Compose New Message (![]() ) on the Mail toolbar.
) on the Mail toolbar.
A A New Message window opens.
![]() Address the message.
Address the message.
![]() Type the subject.
Type the subject.
![]() Type any body text needed.
Type any body text needed.
![]() Click Attach (
Click Attach (![]() ).
).
The Attach File sheet opens.
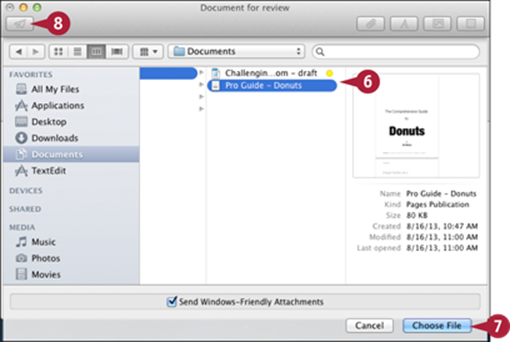
![]() Navigate to and select the files you want to attach.
Navigate to and select the files you want to attach.
Note: You can select multiple files to attach by clicking the first, and then holding down ![]() while you click each of the others.
while you click each of the others.
Note: You can also drag files from a Finder window or the Desktop into the message.
![]() Click Choose File.
Click Choose File.
![]() Click Send (
Click Send (![]() ).
).
When the recipients receive the message, they can work with the attachments you included.
Organize E-Mail
As you use Mail, you are likely to end up with a lot of e-mail messages. Mail provides two powerful tools to keep your e-mail organized: Mailboxes and Smart Mailboxes. Mailboxes are like folders in the Finder. Smart Mailboxes automatically collect aliases to e-mail messages based on rules that you create.
To keep your e-mail organized, delete any message you no longer need. The fewer messages you keep, the fewer you have to organize, and the less storage space your e-mail requires. Delete messages both from your MacBook Pro and from the mail server.
Organize E-Mail
Organize E-Mail in Mailboxes
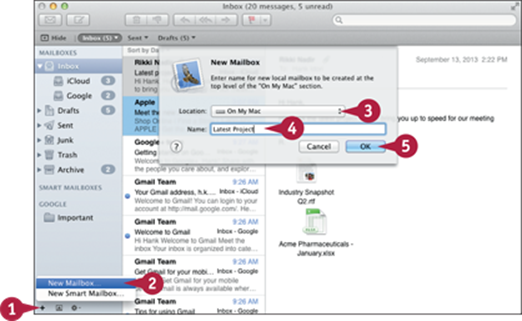
![]() To create a new mailbox, click New (
To create a new mailbox, click New (![]() ).
).
![]() Click New Mailbox.
Click New Mailbox.
![]() Click the Location pop-up menu (
Click the Location pop-up menu (![]() ), and select On My Mac.
), and select On My Mac.
This setting stores the folder on your MacBook Pro instead of on the mail server.
Note: If you want the messages you store in the mailbox to be available from other devices, choose a location accessible over the Internet, such as a folder in your iCloud account.
![]() Type the name for the mailbox.
Type the name for the mailbox.
![]() Click OK.
Click OK.
The New Mailbox sheet closes.

A The mailbox appears in the On My Mac section of the mailbox list.
![]() Drag a message from the Messages pane onto the new mailbox.
Drag a message from the Messages pane onto the new mailbox.
Mail moves the message to the mailbox.
Organize E-Mail with Smart Mailboxes
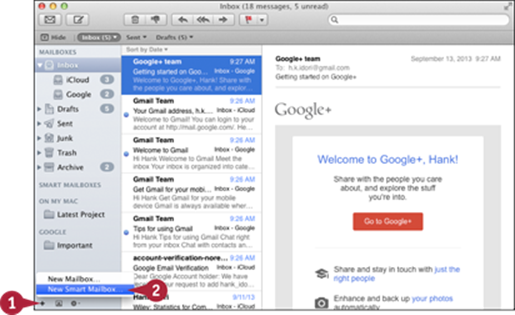
![]() Click New (
Click New (![]() ).
).
![]() Click New Smart Mailbox.
Click New Smart Mailbox.
The New Smart Mailbox sheet appears.
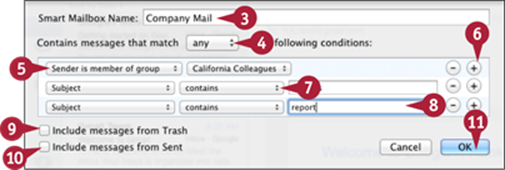
![]() Type the name for the new Smart Mailbox.
Type the name for the new Smart Mailbox.
![]() Click the Contains messages that match pop-up menu (
Click the Contains messages that match pop-up menu (![]() ), and select any.
), and select any.
![]() Use the first line of pop-up menus and fields to create the first condition.
Use the first line of pop-up menus and fields to create the first condition.
![]() To add another condition, click Add (
To add another condition, click Add (![]() ).
).
![]() Use the pop-up menus and fields to configure the condition.
Use the pop-up menus and fields to configure the condition.
![]() Repeat steps 6 and 7 until you have added all the conditions you want.
Repeat steps 6 and 7 until you have added all the conditions you want.
Note: To remove a condition, click Remove (![]() ).
).
![]() Select the Include messages from Trash check box (
Select the Include messages from Trash check box (![]() changes to
changes to ![]() ) if you want to include messages in the Trash.
) if you want to include messages in the Trash.
![]() Select the Include messages from Sent check box (
Select the Include messages from Sent check box (![]() changes to
changes to ![]() ) if you want to include messages in the Sent folder.
) if you want to include messages in the Sent folder.
![]() Click OK.
Click OK.
Mail creates the Smart Mailbox.
TIP
How do I change how the Messages list sorts messages?
Click the Sort by menu and choose how you want the list sorted. For example, click From to sort messages by the sender. To change the order of how the list is sorted, open the menu and click Ascending Order. You can also drag the right edge of columns to change their width.
Search E-Mail
You can use the Mail Search box to quickly find important messages. If the messages are stored on the server, you will need an Internet account to search; if the messages are on your MacBook Pro, you can search even when offline.
Search E-Mail
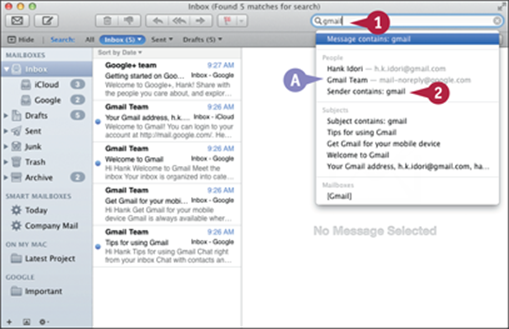
![]() Type the information for which you want to search in the Search bar.
Type the information for which you want to search in the Search bar.
A As you type, Mail presents search options that relate to your search. For example, when you search for a name, it may suggest messages containing the name or people with that name.
![]() Click the search option you want to use.
Click the search option you want to use.
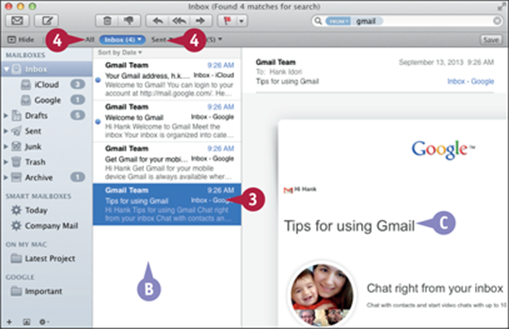
B Mail displays the messages that meet your criteria.
![]() To read a message, click it.
To read a message, click it.
C The message opens in the reading pane on the right side of the window.
Note: By default, Mail searches the currently selected mailbox, which is highlighted in blue. You can change the search location or just click the mailbox you want to search before you search.
![]() To search in all mailboxes, click All, or to search in the Sent folder, click Sent.
To search in all mailboxes, click All, or to search in the Sent folder, click Sent.
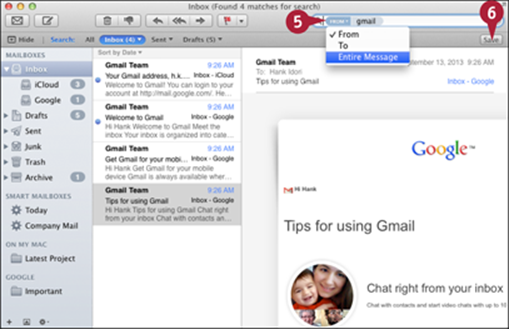
![]() Click the menu that appears next to your search term to indicate what part of the messages you want to search.
Click the menu that appears next to your search term to indicate what part of the messages you want to search.
For example, click To if you want to search for messages by recipient.
The results are refined, based on the choices you made.
Note: When you click Entire Message, Mail searches all parts of the messages.
![]() To save a search as a Smart Mailbox so that you can run it again, click Save.
To save a search as a Smart Mailbox so that you can run it again, click Save.
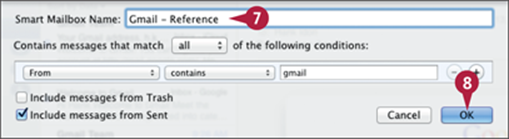
![]() Type the name for the Smart Mailbox.
Type the name for the Smart Mailbox.
![]() Click OK.
Click OK.
You can repeat the search at any time by selecting its folder in the Smart Mailboxes section of the Mailboxes pane.
TIPS
Do I have to be using Mail to search e-mail?
The OS X Spotlight feature enables you to search for information on your MacBook Pro no matter where that information is found, including files, folders, and e-mail. If you are sure the information you need is in an e-mail message, search in Mail. If not, use Spotlight instead, but be aware that Spotlight does not search e-mail messages stored on mail servers instead of on your MacBook Pro. To learn how to use Spotlight, see Chapter 4.
Can I have the same message in more than one mailbox?
A message can exist in only one mailbox in the same location, such as the mailboxes stored on MacBook Pro, unless you copy the message and place the copies in different locations. Because Smart Mailboxes contain aliases to messages rather than the actual messages, the same message can appear in multiple Smart Mailboxes as well as the mailbox that actually contains it.
Reduce Spam
One of the perils of receiving e-mail is spam. Spam is annoying at best, with messages that stream into your Inbox with advertising in which you have no interest. At worst, spam contains offensive or dangerous messages that promise all kinds of rewards for just a few simple actions, but usually attempt to steal your data or your identity. By using tools built into OS X, you can reduce the amount of spam you see. Sadly, it is not possible to eliminate spam or prevent it altogether.
Reduce Spam
![]() In Mail, press
In Mail, press ![]() +
+![]() .
.
The Mail Preferences window appears.
![]() Click Junk Mail.
Click Junk Mail.
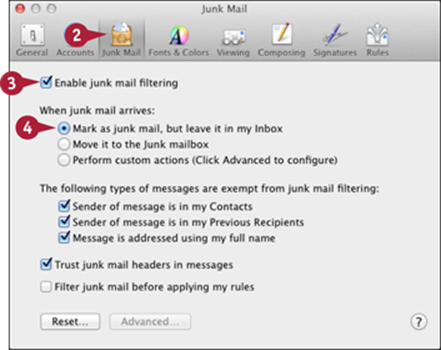
![]() Select the Enable junk mail filtering check box (
Select the Enable junk mail filtering check box (![]() changes to
changes to ![]() ).
).
![]() Select Mark as junk mail, but leave it in my Inbox (
Select Mark as junk mail, but leave it in my Inbox (![]() changes to
changes to ![]() ) if you want Mail to highlight junk e-mail, but not do anything else with it.
) if you want Mail to highlight junk e-mail, but not do anything else with it.
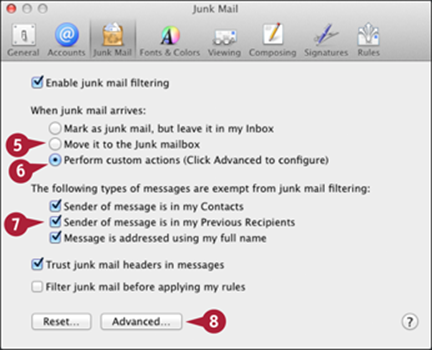
![]() Select Move it to the Junk mailbox (
Select Move it to the Junk mailbox (![]() changes to
changes to ![]() ) if you want Mail to move spam to the Junk mailbox.
) if you want Mail to move spam to the Junk mailbox.
![]() Select Perform custom actions (Click Advanced to configure) (
Select Perform custom actions (Click Advanced to configure) (![]() changes to
changes to ![]() ) if you want to define what Mail does using a mail rule.
) if you want to define what Mail does using a mail rule.
![]() Select the check boxes (
Select the check boxes (![]() changes to
changes to ![]() ) to specify e-mails that are exempt from junk mail filtering.
) to specify e-mails that are exempt from junk mail filtering.
![]() If you selected Perform custom actions (Click Advanced to configure) (
If you selected Perform custom actions (Click Advanced to configure) (![]() ), click Advanced. Otherwise, go to step 12.
), click Advanced. Otherwise, go to step 12.
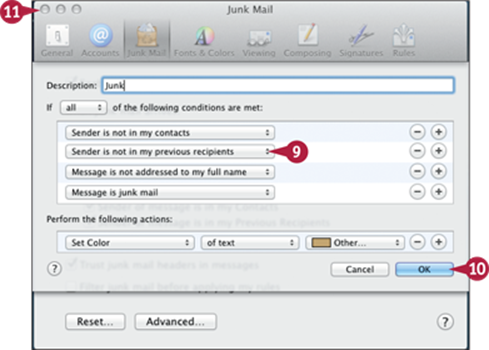
![]() Adjust the existing conditions as needed.
Adjust the existing conditions as needed.
Note: The Junk folder is a special Smart Folder. To adjust the conditions for the Junk folder, use the techniques explained in the section “Organize E-Mail.”
![]() Click OK.
Click OK.
![]() Click Close (
Click Close (![]() ).
).
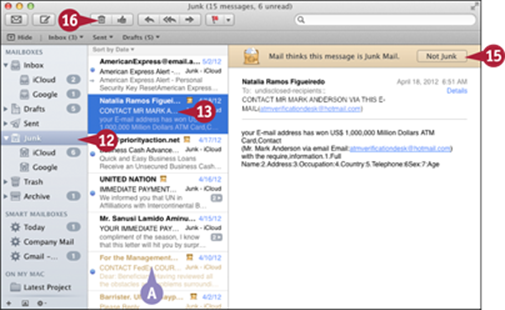
![]() Click the Junk folder.
Click the Junk folder.
A The contents of the Junk folder appear.
![]() Select and review each message.
Select and review each message.
![]() If a message is junk, do nothing; the message stays in your Junk folder.
If a message is junk, do nothing; the message stays in your Junk folder.
Note: By default, Mail does not load any images in junk mail, because spammers can use them to determine when and where you read a message.
![]() If a message is not junk, click Not Junk.
If a message is not junk, click Not Junk.
Any images in the message appear, and you can move the message to a different folder if you want to keep it.
![]() Click Delete (
Click Delete (![]() ) to delete junk messages.
) to delete junk messages.
TIP
I have received a message saying I need to update my account. What should I do?
One effective technique that criminals use is to model their spam e-mails to look like e-mail from legitimate companies. They usually mention that your account is out of date or compromised, and that you need to provide information to correct the situation. If in doubt about whether a message is spam, point to a link in it without clicking to make the URL pop up. If the first part of the URL shows a site nothing to do with the real company, you know the message is not legitimate.
Create and Use E-Mail Signatures
An e-mail signature is canned text that Mail can insert automatically in new messages or you can insert manually. A signature normally provides relevant information, such as your phone number or website address, a quote or thought, or advertising. You can configure Mail to make adding signatures easier and faster. You can create many different signatures and easily use the most appropriate one for a specific e-mail message that you send. You can also associate different signatures with different e-mail accounts and have Mail insert a signature into new messages automatically.
Create and Use E-Mail Signatures
Create Signatures
![]() In Mail, press
In Mail, press ![]() +
+![]() .
.

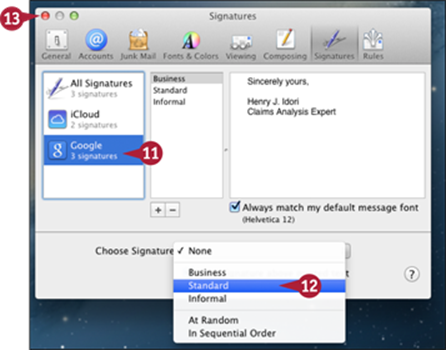
![]() Click Signatures.
Click Signatures.
![]() Click All Signatures.
Click All Signatures.
![]() Click Add (
Click Add (![]() ).
).
![]() Type a name for the signature and press
Type a name for the signature and press ![]() .
.
![]() Type the content of the signature in the right column.
Type the content of the signature in the right column.
![]() If you use a default font for your messages, select the Always match my default message font check box (
If you use a default font for your messages, select the Always match my default message font check box (![]() changes to
changes to ![]() ) so that the signature uses that font.
) so that the signature uses that font.
![]() If you use default quoting, select the Place signature above quoted text check box (
If you use default quoting, select the Place signature above quoted text check box (![]() changes to
changes to ![]() ).
).
![]() Repeat steps 4 to 7 to create as many signatures as you want.
Repeat steps 4 to 7 to create as many signatures as you want.
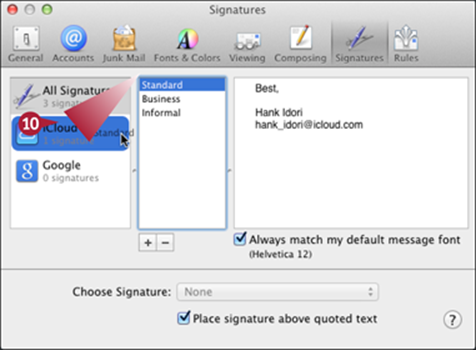
![]() Drag signatures from the center column onto the e-mail accounts with which you want to use them in the left column.
Drag signatures from the center column onto the e-mail accounts with which you want to use them in the left column.
![]() Click an e-mail account.
Click an e-mail account.
![]() Click the Choose Signature pop-up menu (
Click the Choose Signature pop-up menu (![]() ) and select the default signature for the account.
) and select the default signature for the account.
Whenever you send an e-mail from the account, Mail inserts the default signature automatically.
![]() Click Close (
Click Close (![]() ).
).
The Mail Preferences window closes.
Use Signatures
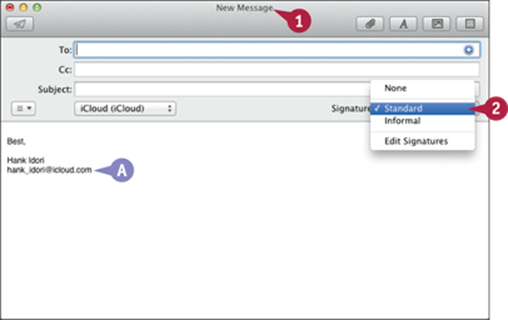
![]() Create a new message.
Create a new message.
A The default signature for the e-mail account, if you configured one, is pasted in the new message.
![]() To change the signature, click the Signature pop-up menu (
To change the signature, click the Signature pop-up menu (![]() ) and select the signature.
) and select the signature.
TIPS
What are the other choices on the Choose Signature pop-up menu on the Signatures tab?
If you choose At Random on the Choose Signature pop-up menu, Mail selects a signature randomly each time you create a message. If you choose In Sequential Order, Mail selects the first signature on the list for the first message, the next one for the second message, and so on.
Can I put images or links in my signature?
Yes. To add an image to a signature, drag the image file from the desktop onto the right pane of the Signatures tab. You can also add links to a signature by typing the URL in the signature block or by copying and pasting it in. Internet etiquette recommends that you keep signatures short — up to about four lines maximum — and that you not include images. If the recipient uses a plain-text e-mail client, any image comes as an attachment instead of in the message.
Create E-Mail Rules
If you find you perform the same tasks with certain kinds of e-mail, you can probably configure Mail to do those tasks for you automatically by configuring rules. Rules are automatic actions that Mail performs for you. To create a rule, you set up conditions for identifying suitable messages and then specify the action or actions to perform on them. The following steps describe how to create a rule to automatically file e-mails from specific people in a folder and to alert you that they have arrived. You can configure other rules similarly.
Create E-Mail Rules
![]() Press
Press ![]() +
+![]() .
.
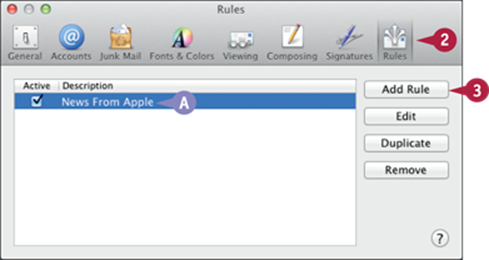
![]() Click Rules.
Click Rules.
A Mail includes the News from Apple rule by default.
![]() Click Add Rule.
Click Add Rule.
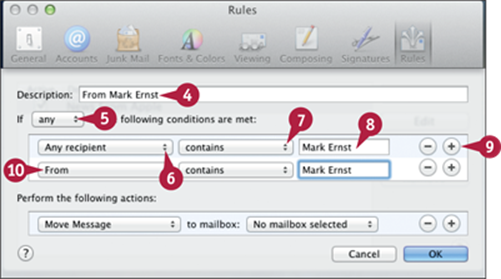
![]() Type the name for the rule.
Type the name for the rule.
![]() Click the If pop-up menu (
Click the If pop-up menu (![]() ) and select any if only one condition has to be true for the rule to apply. Select all if all of the conditions have to be true for the rule to apply.
) and select any if only one condition has to be true for the rule to apply. Select all if all of the conditions have to be true for the rule to apply.
![]() Click the left pop-up menu (
Click the left pop-up menu (![]() ) and select the attribute for the first condition.
) and select the attribute for the first condition.
![]() Click the center pop-up menu (
Click the center pop-up menu (![]() ) and select the operand for the condition, such as contains.
) and select the operand for the condition, such as contains.
![]() Type the condition value.
Type the condition value.
![]() Click Add (
Click Add (![]() ).
).
![]() Repeat steps 6 to 8 to set up the new condition.
Repeat steps 6 to 8 to set up the new condition.
Note: To remove a condition, click Remove (![]() ).
).
![]() Repeat steps 9 and 10 to add other conditions.
Repeat steps 9 and 10 to add other conditions.
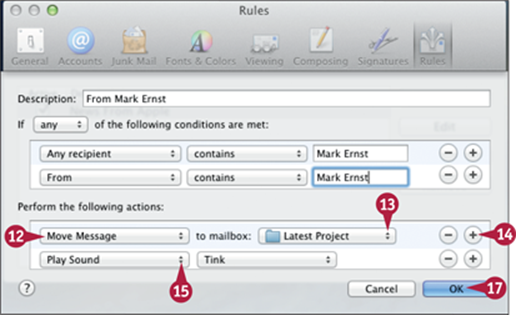
![]() In the Perform the following actions area, click the top-left pop-up menu (
In the Perform the following actions area, click the top-left pop-up menu (![]() ) and select the action.
) and select the action.
![]() Click the top right pop-up menu in the Perform the following actions area, and select the result of the action, such as a location or a sound.
Click the top right pop-up menu in the Perform the following actions area, and select the result of the action, such as a location or a sound.
![]() To add another action, click Add (
To add another action, click Add (![]() ).
).
![]() Repeat steps 12 and 13 to configure the new action.
Repeat steps 12 and 13 to configure the new action.
![]() Repeat steps 14 and 15 to add and configure more actions.
Repeat steps 14 and 15 to add and configure more actions.
![]() Click OK.
Click OK.
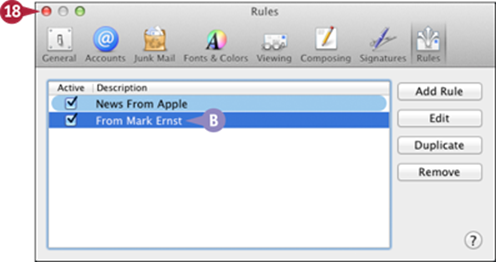
B The rule appears on the list of rules.
![]() Click Close (
Click Close (![]() ).
).
When messages arrive that meet the rule's conditions, Mail performs the rule's actions automatically.
TIPS
What are some examples of useful actions available for rules?
Move Message moves e-mail messages to specific locations, such as mailboxes that you have created on your MacBook Pro or even the Trash. Forward Message can be useful when you always want to forward messages to another address in specific situations. If you usually reply to a specific person's e-mail, Reply to Message can be useful.
How do I know a rule is working?
Click a message to which the rule should apply, click the Message menu, and then click Apply Rules. If the actions you expect happen, then the rule is working. You should also select a message to which the rule should not apply and do the same thing. If the rule's actions occur, then the rule is not configured correctly.
Set Mail Preferences
Mail has many preferences settings, including General, Fonts & Colors, Viewing, and Composing. You use the General tab to set general Mail preferences, such as sound effects and where attachments are stored.
Set Mail Preferences
Set General Preferences
![]() Press
Press ![]() +
+![]() to open the Preferences window.
to open the Preferences window.
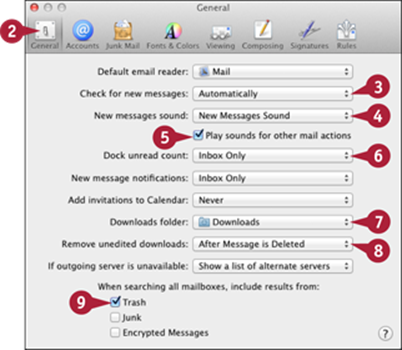
![]() Click General.
Click General.
![]() Choose how often to check for new messages.
Choose how often to check for new messages.
![]() Choose the sound to play when new messages arrive.
Choose the sound to play when new messages arrive.
![]() To mute sounds for other actions, deselect the Play sounds for other mail actions check box (
To mute sounds for other actions, deselect the Play sounds for other mail actions check box (![]() changes to
changes to ![]() ).
).
![]() Choose the mailboxes for which to display the number of unread messages on the Mail icon in the Dock.
Choose the mailboxes for which to display the number of unread messages on the Mail icon in the Dock.
![]() Choose the default folder for attachments.
Choose the default folder for attachments.
![]() Choose what you want Mail to do with attachments that you have not changed when you delete the associated message.
Choose what you want Mail to do with attachments that you have not changed when you delete the associated message.
![]() Select the check boxes (
Select the check boxes (![]() changes to
changes to ![]() ) to specify which items searches should include.
) to specify which items searches should include.
Set Fonts & Colors Preferences
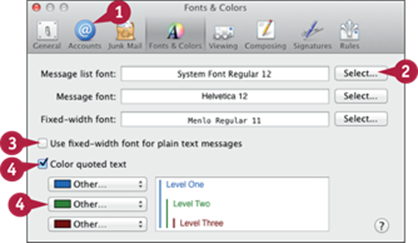
![]() Click Fonts & Colors.
Click Fonts & Colors.
![]() Click the Select button next to the fonts you want to format and use the resulting Fonts panel to configure that font.
Click the Select button next to the fonts you want to format and use the resulting Fonts panel to configure that font.
![]() If you want a fixed-width font for plain text messages, select the Use fixed-width font for plain text messages check box (
If you want a fixed-width font for plain text messages, select the Use fixed-width font for plain text messages check box (![]() changes to
changes to ![]() ).
).
![]() Select the Color quoted text check box (
Select the Color quoted text check box (![]() changes to
changes to ![]() ) and the pop-up menus to set the color for quoted text.
) and the pop-up menus to set the color for quoted text.
Set Viewing Preferences
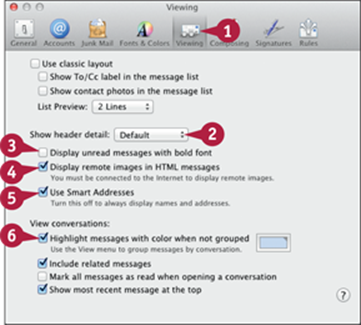
![]() Click Viewing.
Click Viewing.
![]() Choose the level of information at the top of e-mail messages.
Choose the level of information at the top of e-mail messages.
![]() To show unread messages in bold, select this check box (
To show unread messages in bold, select this check box (![]() changes to
changes to ![]() ).
).
![]() To suppress images not embedded in messages, deselect this check box (
To suppress images not embedded in messages, deselect this check box (![]() changes to
changes to ![]() ).
).
![]() If you prefer to see e-mail addresses and names, deselect this check box (
If you prefer to see e-mail addresses and names, deselect this check box (![]() changes to
changes to ![]() ).
).
![]() Select this check box (
Select this check box (![]() changes to
changes to ![]() ) to set how Mail indicates that messages are part of the same conversation.
) to set how Mail indicates that messages are part of the same conversation.
Set Composing Preferences
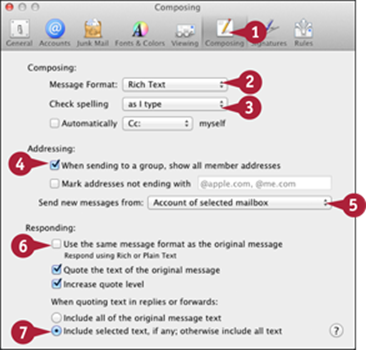
![]() Click Composing.
Click Composing.
![]() Click the Message Format pop-up menu (
Click the Message Format pop-up menu (![]() ), and select Rich Text or Plain Text.
), and select Rich Text or Plain Text.
![]() Click the Check spelling pop-up menu (
Click the Check spelling pop-up menu (![]() ) and select as I type, when I click Send, or never.
) and select as I type, when I click Send, or never.
![]() To see the individuals in a group when you address a message to the group, select this check box (
To see the individuals in a group when you address a message to the group, select this check box (![]() changes to
changes to ![]() ).
).
![]() If you have more than one e-mail address, click the Send new messages from pop-up menu (
If you have more than one e-mail address, click the Send new messages from pop-up menu (![]() ), and select the default account for new messages.
), and select the default account for new messages.
![]() To use the same format as the original message, select this check box (
To use the same format as the original message, select this check box (![]() changes to
changes to ![]() ).
).
![]() To select the text to be quoted when you reply to a message, select this option (
To select the text to be quoted when you reply to a message, select this option (![]() changes to
changes to ![]() ).
).
TIP
How else can I use threading?
Threading is a way to identify and group messages on the same topic (that have the same subject line), which is called a conversation in Mail. Click the View menu, and select Organize by Conversation to show these messages in groups that you can collapse or expand.
All materials on the site are licensed Creative Commons Attribution-Sharealike 3.0 Unported CC BY-SA 3.0 & GNU Free Documentation License (GFDL)
If you are the copyright holder of any material contained on our site and intend to remove it, please contact our site administrator for approval.
© 2016-2026 All site design rights belong to S.Y.A.