Teach Yourself VISUALLY MacBook Pro, 2nd Edition (2014)
Part I. Discovering MacBook Pro
Chapter 6. Personalizing Your MacBook Pro
Set Finder Preferences
The Finder is the application that controls the OS X desktop, how files and folders are managed, and many other aspects of the way your MacBook Pro operates. Like most applications, the Finder has a set of preferences you can configure to change the way it looks and works. You change Finder preferences using its Preferences command. The Preferences window has several tabs that you use to configure specific aspects of how the Finder looks and behaves.
Set Finder Preferences
![]() Click the Finder menu and select Preferences to open the Finder Preferences window.
Click the Finder menu and select Preferences to open the Finder Preferences window.
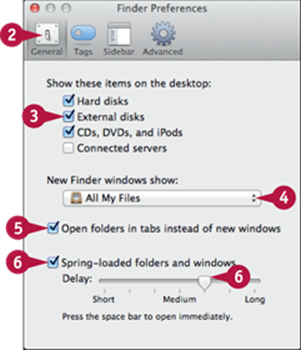
![]() Click the General tab.
Click the General tab.
![]() Select the Hard disks check box, the External disks check box, the CDs, DVDs, and iPods check box, or the Connected servers check box (
Select the Hard disks check box, the External disks check box, the CDs, DVDs, and iPods check box, or the Connected servers check box (![]() changes to
changes to ![]() ) if you want icons for these items to appear on the desktop.
) if you want icons for these items to appear on the desktop.
![]() Click the New Finder windows show pop-up menu (
Click the New Finder windows show pop-up menu (![]() ) and select the default location for new Finder windows. For example, click Documents to open your Documents folder.
) and select the default location for new Finder windows. For example, click Documents to open your Documents folder.
![]() If you want each folder to open in a new tab in the current window rather than in a new window, select the Open folders in tabs instead of new windows check box (
If you want each folder to open in a new tab in the current window rather than in a new window, select the Open folders in tabs instead of new windows check box (![]() changes to
changes to ![]() ).
).
![]() If you want folders to spring open when you drag icons onto them, select the Spring-loaded folders and windows check box (
If you want folders to spring open when you drag icons onto them, select the Spring-loaded folders and windows check box (![]() changes to
changes to ![]() ). Drag the slider to set the timing.
). Drag the slider to set the timing.
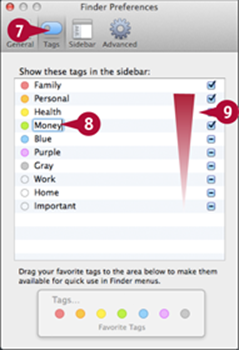
![]() Click the Tags tab.
Click the Tags tab.
Note: You can apply tags to files and folders to help you identify and organize them more easily. To apply a tag, Control+click the file or folder, and then select the color of the tag you want to apply.
![]() Type a name for each tag in the field next to its color.
Type a name for each tag in the field next to its color.
![]() Drag the tags into your preferred order.
Drag the tags into your preferred order.
Note: When you apply a tag to a file or folder, the color appears for quick reference.

![]() Click the Sidebar tab.
Click the Sidebar tab.
![]() Select each item to choose whether it appears in the sidebar (
Select each item to choose whether it appears in the sidebar (![]() changes to
changes to ![]() ) or not (
) or not (![]() changes to
changes to ![]() ).
).
Note: You can access all the items in Finder windows even if you do not display them in the Sidebar.
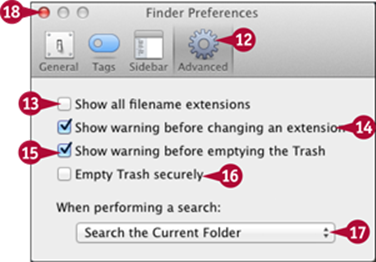
![]() Click the Advanced tab.
Click the Advanced tab.
![]() Select the Show all filename extensions check box (
Select the Show all filename extensions check box (![]() changes to
changes to ![]() ) if you want the Finder always to display all filename extensions.
) if you want the Finder always to display all filename extensions.
![]() Select the Show warning before changing an extension check box (
Select the Show warning before changing an extension check box (![]() changes to
changes to ![]() ) to receive a warning when you change a filename extension. This is normally helpful.
) to receive a warning when you change a filename extension. This is normally helpful.
![]() Select the Show warning before emptying the Trash check box (
Select the Show warning before emptying the Trash check box (![]() changes to
changes to ![]() ) if you want to confirm the Trash should be emptied.
) if you want to confirm the Trash should be emptied.
![]() Select the Empty Trash securely check box (
Select the Empty Trash securely check box (![]() changes to
changes to ![]() ) if you want the Trash to be emptied securely, making things you delete harder to recover.
) if you want the Trash to be emptied securely, making things you delete harder to recover.
![]() Click the When performing a search pop-up menu (
Click the When performing a search pop-up menu (![]() ) and select the default search scope. Choose Search This Mac to search your MacBook Pro, Search the Current Folder to search the active folder, or Use the Previous Search Scope to repeat your last search.
) and select the default search scope. Choose Search This Mac to search your MacBook Pro, Search the Current Folder to search the active folder, or Use the Previous Search Scope to repeat your last search.
Note: You can change the scope of any search regardless of the default scope setting.
![]() Click Close (
Click Close (![]() ).
).
TIPS
Which folder should I use as my start folder for new Finder windows?
Choose whichever folder you find most convenient — for example, the folder you keep your most important documents in. Click theNew Finder windows show pop-up menu (![]() ) and select Other. In the dialog that opens, click the folder you want to use, and then click Close.
) and select Other. In the dialog that opens, click the folder you want to use, and then click Close.
What is another way to apply tags to folders and files?
Open a Finder window showing the folder or file you want to label. Press ![]() +
+![]() . The Info window opens. Expand the General section. Click the tag color that you want to apply. You can apply as many tags as you want.
. The Info window opens. Expand the General section. Click the tag color that you want to apply. You can apply as many tags as you want.
Explore the System Preferences Application
The System Preferences application enables you to configure many different aspects of how your MacBook Pro looks and works. By using System Preferences, you can make OS X look and work the way you prefer. System Preferences is one application organized in many different panes, with each pane used to configure a specific aspect of your MacBook Pro. You open the pane you want to use to configure a specific area. For example, you use the Dock pane to configure the Dock, and the Network pane to specify how the MacBook Pro connects to a network.
Explore the System Preferences Application
Open and Use System Preferences
![]() Click Apple (
Click Apple (![]() ) on the menu bar.
) on the menu bar.
The Apple menu opens.
![]() Click System Preferences.
Click System Preferences.

A The System Preferences application opens, showing an icon for each pane it contains.
![]() Click the icon for the pane you want to open.
Click the icon for the pane you want to open.
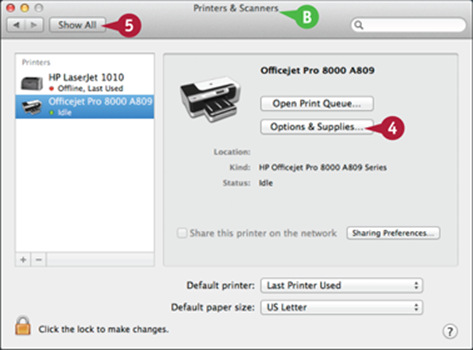
B The pane you chose appears.
![]() Use the controls on the pane to make changes to the way OS X works.
Use the controls on the pane to make changes to the way OS X works.
![]() When you finish making changes in the pane, click Show All.
When you finish making changes in the pane, click Show All.
The open pane closes and you see all the icons again.
Show Panes Alphabetically
![]() Click View on the menu bar.
Click View on the menu bar.
The View menu opens.
![]() Click Organize Alphabetically.
Click Organize Alphabetically.
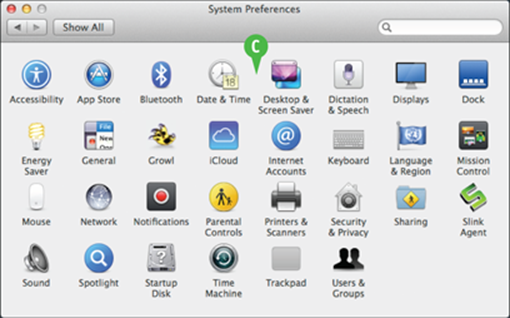
C System Preferences displays the icons organized alphabetically instead of by category.
Note: Click View and then click Organize by Categories to switch back to Category view.
Search for a Pane
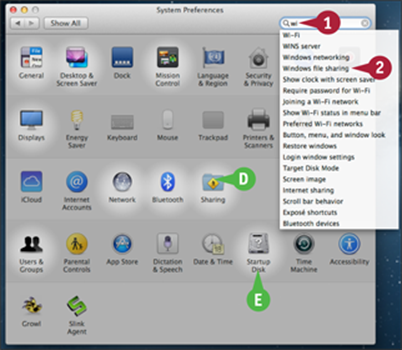
![]() To search for a pane, type text in the search bar.
To search for a pane, type text in the search bar.
D As you type, a highlight appears on each pane that meets or is related to your search criteria.
![]() Click the relevant topic.
Click the relevant topic.
E You can also click a highlighted icon to display its pane.
System Preferences displays the pane containing the settings.
TIPS
How can I change settings when they are disabled?
You must be an administrator to make some changes to settings using the System Preferences application. To determine who can change settings, look at the lower-left corner of a pane. If no lock icon appears, any user can change the pane. If a closed lock appears (![]() ), click it and verify that you are an administrator by entering your username and password. If an open lock appears (
), click it and verify that you are an administrator by entering your username and password. If an open lock appears (![]() ), you can already make changes.
), you can already make changes.
Why do I see a section called Other in my System Preferences application?
Some software you install, such as software for configuring hardware devices, includes a pane installed on the System Preferences application that you use to configure that software or hardware. OS X places all these additions in the Other category.
Change General Preferences
Using the General pane, you can configure the color of buttons, menus, and windows along with the color used when something is highlighted to show that it is selected. You can also configure how scrolling in windows works. You also use the Appearance pane to determine how many items are stored on Recent menus. You can also control how font smoothing works. Font smoothing makes the edges of large letters and numbers look smoother on the screen — they sometimes can look pixelated or “jaggy.”
Change General Preferences
Choose Finder Appearance and Colors
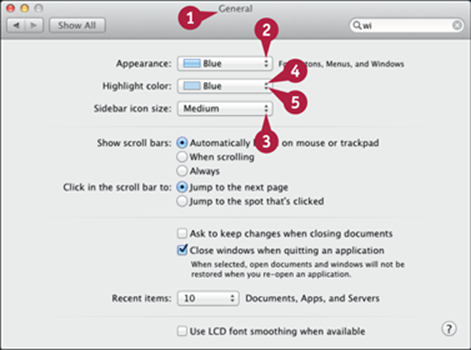
![]() Open the System Preferences application and click General.
Open the System Preferences application and click General.
![]() Click the Appearance pop-up menu (
Click the Appearance pop-up menu (![]() ) and select Blue to see the default button, menu, and window colors.
) and select Blue to see the default button, menu, and window colors.
Note: Click Graphite for a more subdued color for these items.
![]() Click the Sidebar icon size pop-up menu (
Click the Sidebar icon size pop-up menu (![]() ) and select Small, Medium, or Large.
) and select Small, Medium, or Large.
![]() Click the Highlight color pop-up menu (
Click the Highlight color pop-up menu (![]() ) and select the highlight color that appears.
) and select the highlight color that appears.
![]() To create your own highlight color, click Other on the Highlight color pop-up menu.
To create your own highlight color, click Other on the Highlight color pop-up menu.
The Colors window opens.
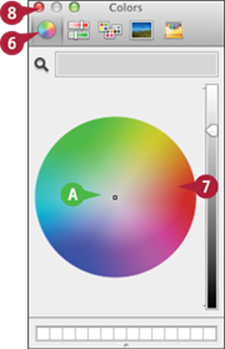
![]() Click the type of color picker you want to use, such as the Color Wheel.
Click the type of color picker you want to use, such as the Color Wheel.
A The controls for the color picker you selected appear in the window.
![]() Use the controls to choose the color you want to use.
Use the controls to choose the color you want to use.
![]() Click Close (
Click Close (![]() ).
).
Configure Scroll Tools and Document Behavior
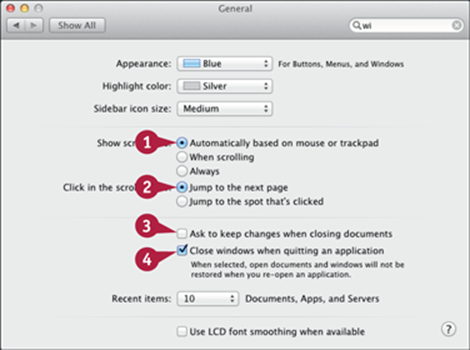
![]() In the Show scroll bars area, select Automatically based on mouse or trackpad, When scrolling, or Always (
In the Show scroll bars area, select Automatically based on mouse or trackpad, When scrolling, or Always (![]() changes to
changes to ![]() ).
).
![]() In the Click in the scroll bar to area, select Jump to the next page or Jump to the spot that's clicked (
In the Click in the scroll bar to area, select Jump to the next page or Jump to the spot that's clicked (![]() changes to
changes to ![]() ).
).
![]() Select the Ask to keep changes when closing documents check box (
Select the Ask to keep changes when closing documents check box (![]() changes to
changes to ![]() ) if you want to be prompted when you close a document without saving changes first.
) if you want to be prompted when you close a document without saving changes first.
![]() Select the Close windows when quitting an application check box (
Select the Close windows when quitting an application check box (![]() changes to
changes to ![]() ) if you want all the open windows in an application to close when you quit an application.
) if you want all the open windows in an application to close when you quit an application.
Set Recent Items and Font Smoothing

![]() Click the Recent items pop-up menu (
Click the Recent items pop-up menu (![]() ) and select the number of items you want to show on each of the Recent menus.
) and select the number of items you want to show on each of the Recent menus.
![]() To apply font smoothing, select the Use LCD font smoothing when available check box (
To apply font smoothing, select the Use LCD font smoothing when available check box (![]() changes to
changes to ![]() ).
).
TIP
Which color picker is the best?
The Colors window has different color pickers that change the way you choose colors. The easiest to use is the crayons picker because you simply choose colors by clicking a crayon. The other pickers offer more control and specificity. For example, you can use the color wheel picker to select any color in the spectrum by dragging the intensity bar up or down and then clicking in the wheel to choose a specific color. Other pickers offer different tools.
Set a Desktop Picture
As you use your MacBook Pro, you look at the desktop quite often. So why not look at something you want to see? To change what your desktop shows, you set the desktop picture. This picture fills the background on the desktop and you see it behind any open windows. Although it is called a desktop picture, you are not limited to pictures. You can use just about any kind of graphic file as a desktop picture.
Set a Desktop Picture
Set a Default Image as the Desktop Picture
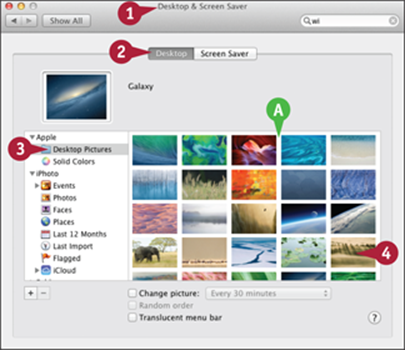
![]() Open the System Preferences application and click Desktop & Screen Saver.
Open the System Preferences application and click Desktop & Screen Saver.
![]() Click the Desktop tab.
Click the Desktop tab.
![]() Choose a source of images in the left pane of the window, such as the Desktop Pictures folder.
Choose a source of images in the left pane of the window, such as the Desktop Pictures folder.
A The images in that source appear in the right pane of the window.
![]() Click the image that you want to apply to the desktop.
Click the image that you want to apply to the desktop.
That image fills the desktop.
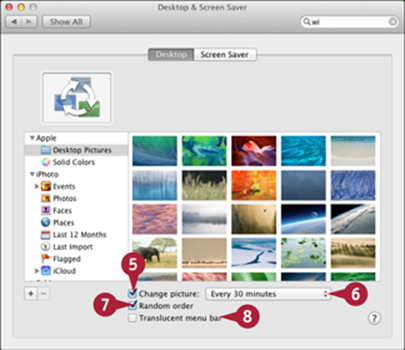
![]() To have the image change automatically, select the Change picture check box (
To have the image change automatically, select the Change picture check box (![]() changes to
changes to ![]() ).
).
![]() Click the pop-up menu (
Click the pop-up menu (![]() ) and select how often you want the picture to change.
) and select how often you want the picture to change.
![]() If you want images to be selected randomly rather than by the order in which they appear in the source, select the Random order check box (
If you want images to be selected randomly rather than by the order in which they appear in the source, select the Random order check box (![]() changes to
changes to ![]() ).
).
![]() If you want the menu bar to show the background through it, select the Translucent menu bar check box (
If you want the menu bar to show the background through it, select the Translucent menu bar check box (![]() changes to
changes to ![]() ).
).
Set a Photo as the Desktop Picture
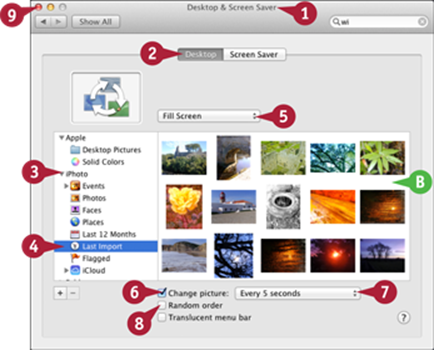
![]() Open the System Preferences application and click Desktop & Screen Saver.
Open the System Preferences application and click Desktop & Screen Saver.
![]() Click the Desktop tab.
Click the Desktop tab.
![]() Click the disclosure triangle (
Click the disclosure triangle (![]() ) to the left of iPhoto (
) to the left of iPhoto (![]() changes to
changes to ![]() ) to expand the sources it contains.
) to expand the sources it contains.
![]() Click the source of photos to use.
Click the source of photos to use.
B The images in the selected source appear in the right pane of the window.
![]() Click the pop-up menu (
Click the pop-up menu (![]() ) near the top of the window to choose how you want photos to be scaled to the screen.
) near the top of the window to choose how you want photos to be scaled to the screen.
![]() To have the image change automatically, select the Change picture check box (
To have the image change automatically, select the Change picture check box (![]() changes to
changes to ![]() ).
).
![]() Click the pop-up menu (
Click the pop-up menu (![]() ) and select how often you want the picture to change.
) and select how often you want the picture to change.
![]() If you want images to be selected randomly rather than by the order in which they appear in the source, select the Random order check box (
If you want images to be selected randomly rather than by the order in which they appear in the source, select the Random order check box (![]() changes to
changes to ![]() ).
).
![]() Click Close (
Click Close (![]() ).
).
C OS X applies a new desktop image according to the timing you selected.
TIPS
What is the Pictures folder source?
The Pictures folder is a folder in your user account's Home folder. By default, various applications store image files in the Pictures folder, so if you choose this folder in the source list, you see all the images the applications have added so far.
What if the location of the photos I want to use as the desktop picture does not appear on the source list?
You can choose any folder as a source of desktop pictures by clicking Add (![]() ) at the bottom of the source list. Use the resulting dialog to navigate to and select the folder containing the images you want. After you click the Choose button, that folder appears as a source in the list.
) at the bottom of the source list. Use the resulting dialog to navigate to and select the folder containing the images you want. After you click the Choose button, that folder appears as a source in the list.
Choose a Screen Saver
Your MacBook Pro can display various screen savers when you are not using the screen. While screen savers can provide entertainment, they are most useful for preventing other people from seeing what is displayed on-screen. You can require a password to stop the screen saver, which is a good security measure.
Choose a Screen Saver
Create a Photo Slideshow Screen Saver
![]() Open the System Preferences application and click Desktop & Screen Saver.
Open the System Preferences application and click Desktop & Screen Saver.
![]() Click the Screen Saver tab.
Click the Screen Saver tab.
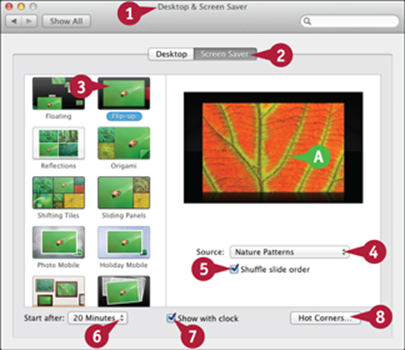
![]() Click the slide show screen saver you want to use.
Click the slide show screen saver you want to use.
A You see the selected screen saver run in the right pane of the window.
![]() Click the Source pop-up menu (
Click the Source pop-up menu (![]() ) and select the source of images for the screen saver.
) and select the source of images for the screen saver.
![]() Select the Shuffle slide order check box (
Select the Shuffle slide order check box (![]() changes to
changes to ![]() ) if you want to display the photos in random order.
) if you want to display the photos in random order.
![]() Click the Start after pop-up menu (
Click the Start after pop-up menu (![]() ) and select the amount of idle time to allow before the screen saver activates.
) and select the amount of idle time to allow before the screen saver activates.
![]() If you want the time to appear on the screen saver, select the Show with clock check box (
If you want the time to appear on the screen saver, select the Show with clock check box (![]() changes to
changes to ![]() ).
).
![]() Click Hot Corners.
Click Hot Corners.
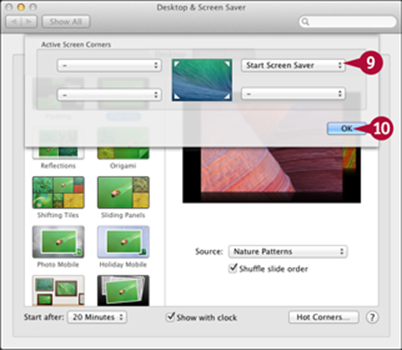
![]() Click the pop-up menu at the screen corner that you want to set as the hot corner for the screen saver and then click Start Screen Saver.
Click the pop-up menu at the screen corner that you want to set as the hot corner for the screen saver and then click Start Screen Saver.
![]() Click OK.
Click OK.
![]() Point to the hot corner you set.
Point to the hot corner you set.
You see the screen saver in action.
![]() Press a key or drag on the trackpad to stop the screen saver and go back to the System Preferences application.
Press a key or drag on the trackpad to stop the screen saver and go back to the System Preferences application.
Choose a Default Screen Saver
![]() Open the System Preferences application and click Desktop & Screen Saver.
Open the System Preferences application and click Desktop & Screen Saver.
![]() Click the Screen Saver tab.
Click the Screen Saver tab.
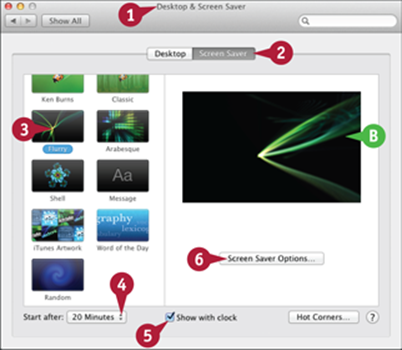
![]() Click the screen saver you want to use from the lower part of the list in the left part of the window.
Click the screen saver you want to use from the lower part of the list in the left part of the window.
B You see the selected screen saver run in the right pane of the window.
![]() Click the Start after pop-up menu and select the amount of idle time to allow before the screen saver activates.
Click the Start after pop-up menu and select the amount of idle time to allow before the screen saver activates.
![]() If you want the time to appear on the screen saver, select the Show with clock check box (
If you want the time to appear on the screen saver, select the Show with clock check box (![]() changes to
changes to ![]() ).
).
![]() Click Screen Saver Options.
Click Screen Saver Options.
The Screen Saver Options dialog opens.
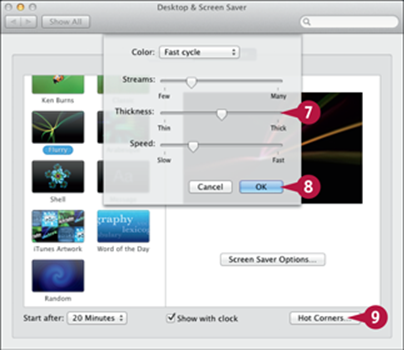
![]() Choose settings to configure the screen saver.
Choose settings to configure the screen saver.
![]() Click OK.
Click OK.
![]() Click Hot Corners and then set the hot corner for the screen saver.
Click Hot Corners and then set the hot corner for the screen saver.
![]() Point to the hot corner.
Point to the hot corner.
You see the screen saver in action.
![]() Press a key or drag on the trackpad to stop the screen saver and go back to the System Preferences application.
Press a key or drag on the trackpad to stop the screen saver and go back to the System Preferences application.
TIP
How can I manually activate the screen saver?
Use the hot corner you set. When you move the pointer to that corner, the screen saver starts. This is especially useful if you have set your MacBook Pro to require a password to stop the screen saver. You can start the screen saver and your MacBook Pro immediately becomes secured because it is protected with a password.
Set and Configure the Clock
OS X displays the current time at the right end of the menu bar for your reference; it also stamps all the files and folders you use with the time and date they were created, when they were changed, and when they were last opened. So it is important to make sure your MacBook Pro has the correct time set. You can set the time and date either manually or automatically using a time server.
Set and Configure the Clock
Set the Clock Automatically
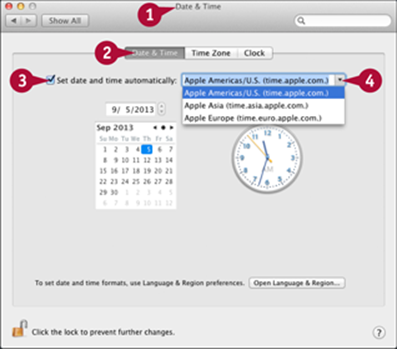
![]() Open the System Preferences application and click Date & Time.
Open the System Preferences application and click Date & Time.
![]() Click the Date & Time tab.
Click the Date & Time tab.
![]() Select the Set date and time automatically check box (
Select the Set date and time automatically check box (![]() changes to
changes to ![]() ).
).
![]() Click the pop-up menu and then click the time server you want to use. If you live in the United States, click Apple Americas/U.S.
Click the pop-up menu and then click the time server you want to use. If you live in the United States, click Apple Americas/U.S.

![]() Click the Time Zone tab.
Click the Time Zone tab.
![]() To have OS X determine your location automatically based on your Wi-Fi connection, select the Set time zone automatically using current location check box (
To have OS X determine your location automatically based on your Wi-Fi connection, select the Set time zone automatically using current location check box (![]() changes to
changes to ![]() ) and skip the rest of these steps. To manually set your location, deselect the Set time zone automatically using current location check box (
) and skip the rest of these steps. To manually set your location, deselect the Set time zone automatically using current location check box (![]() changes to
changes to ![]() ) and select the time zone you want to set on the Time Zone menu.
) and select the time zone you want to set on the Time Zone menu.
Note: If you select the automatic option, the rest of the controls are disabled.
A The time zone you select is indicated by the light band on the map and the text next to Time Zone.
![]() Open the Closest City pop-up menu and choose a city in the same time zone as your location.
Open the Closest City pop-up menu and choose a city in the same time zone as your location.
When your MacBook Pro is connected to the Internet, it sets the time and date automatically.
Configure the Clock's Options
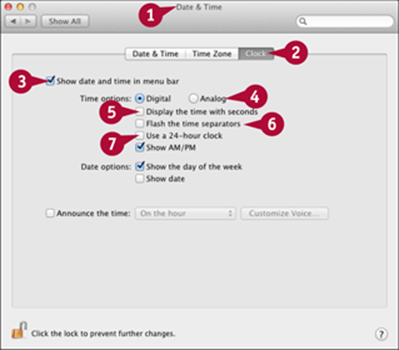
![]() Open the System Preferences application and click Date & Time.
Open the System Preferences application and click Date & Time.
![]() Click the Clock tab.
Click the Clock tab.
![]() If you want to see the clock on the menu bar, select the Show date and time in menu bar check box (
If you want to see the clock on the menu bar, select the Show date and time in menu bar check box (![]() changes to
changes to ![]() ).
).
![]() To see the time in the digital format, select Digital (
To see the time in the digital format, select Digital (![]() changes to
changes to ![]() ); to see it in analog format, select Analog.
); to see it in analog format, select Analog.
![]() If you want to see seconds in the time display, select the Display the time with seconds check box (
If you want to see seconds in the time display, select the Display the time with seconds check box (![]() changes to
changes to ![]() ).
).
![]() To flash the colon between the hour and minutes at each second, select the Flash the time separators check box (
To flash the colon between the hour and minutes at each second, select the Flash the time separators check box (![]() changes to
changes to ![]() ).
).
![]() To use the 24-hour format, select the Use a 24-hour clock check box (
To use the 24-hour format, select the Use a 24-hour clock check box (![]() changes to
changes to ![]() ).
).
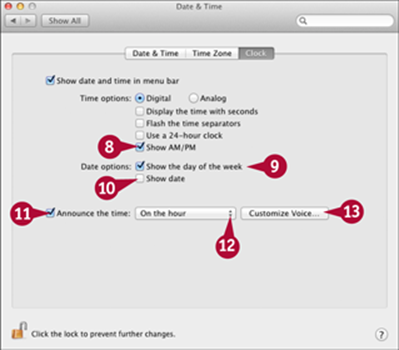
![]() To show the AM/PM indicator, select the Show AM/PM check box (
To show the AM/PM indicator, select the Show AM/PM check box (![]() changes to
changes to ![]() ).
).
![]() To show the day of the week, select the Show the day of the week check box (
To show the day of the week, select the Show the day of the week check box (![]() changes to
changes to ![]() ).
).
![]() To include the date, select the Show date check box (
To include the date, select the Show date check box (![]() changes to
changes to ![]() ).
).
![]() To hear an announcement of the time, select the Announce the time check box (
To hear an announcement of the time, select the Announce the time check box (![]() changes to
changes to ![]() ).
).
![]() Click the pop-up menu (
Click the pop-up menu (![]() ) and select On the hour, On the half hour, or On the quarter hour.
) and select On the hour, On the half hour, or On the quarter hour.
![]() Click Customize Voice and use the resulting sheet to select and configure the voice.
Click Customize Voice and use the resulting sheet to select and configure the voice.
TIP
What if I take my computer to a different time zone?
If you prefer to set the time manually, change it using the steps on this page. If you use the automatic setting, your MacBook Pro updates the time and date based upon the Wi-Fi network to which it is connected.
Save Energy
The Energy Saver pane in System Preferences provides several options you can use to minimize your MacBook Pro's power draw, thereby maximizing your work time on the battery. Your options include dimming the display on battery power and adjusting the time before the display goes to sleep. You can also turn on the Power Nap feature, which enables your MacBook Pro to wake up periodically to check for new information, and set up a schedule for your MacBook Pro to sleep and wake.
Save Energy
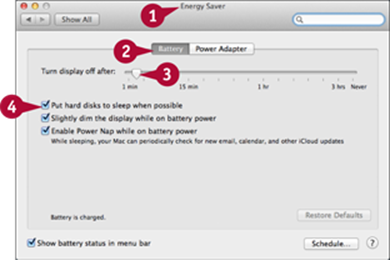
![]() Open the System Preferences application and click Energy Saver.
Open the System Preferences application and click Energy Saver.
![]() Click the Battery tab.
Click the Battery tab.
![]() Drag the Turn display off after slider to set the idle time before your MacBook Pro turns off its display.
Drag the Turn display off after slider to set the idle time before your MacBook Pro turns off its display.
Note: The display uses a lot of power. You should set it to sleep after a couple of minutes of inactivity to conserve battery power.
![]() Select the Put hard disks to sleep when possible check box (
Select the Put hard disks to sleep when possible check box (![]() changes to
changes to ![]() ) to have OS X put the disk to sleep when it is not in use.
) to have OS X put the disk to sleep when it is not in use.
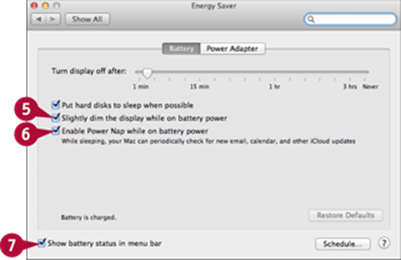
![]() Select the Slightly dim the display while on battery power check box (
Select the Slightly dim the display while on battery power check box (![]() changes to
changes to ![]() ) if you want the display to dim slightly while running on battery power.
) if you want the display to dim slightly while running on battery power.
![]() Select the Enable Power Nap while on battery power check box (
Select the Enable Power Nap while on battery power check box (![]() changes to
changes to ![]() ) to use the Power Nap feature.
) to use the Power Nap feature.
![]() Select the Show battery status in menu bar check box (
Select the Show battery status in menu bar check box (![]() changes to
changes to ![]() ) if you want to see the battery icon (
) if you want to see the battery icon (![]() ) in the menu bar.
) in the menu bar.
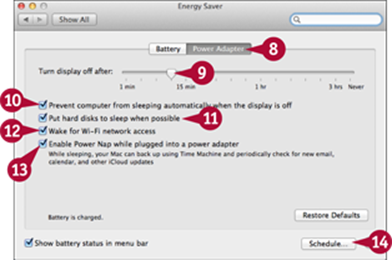
![]() Click the Power Adapter tab.
Click the Power Adapter tab.
![]() Drag the Turn display off after slider to set the idle time before your MacBook Pro turns off its display.
Drag the Turn display off after slider to set the idle time before your MacBook Pro turns off its display.
![]() Select the Prevent computer from sleeping automatically when the display is off check box (
Select the Prevent computer from sleeping automatically when the display is off check box (![]() changes to
changes to ![]() ) if you want to prevent OS X from putting your MacBook Pro to sleep automatically when the display is off.
) if you want to prevent OS X from putting your MacBook Pro to sleep automatically when the display is off.
![]() Select the Put hard disks to sleep when possible check box (
Select the Put hard disks to sleep when possible check box (![]() changes to
changes to ![]() ) to have OS X put the SSD to sleep when it is not in use.
) to have OS X put the SSD to sleep when it is not in use.
![]() Select the Wake for Wi-Fi network access check box (
Select the Wake for Wi-Fi network access check box (![]() changes to
changes to ![]() ) if you want to enable devices connected to your MacBook Pro through the Wi-Fi network to be able to wake it up.
) if you want to enable devices connected to your MacBook Pro through the Wi-Fi network to be able to wake it up.
![]() Select the Enable Power Nap while plugged into a power adapter check box (
Select the Enable Power Nap while plugged into a power adapter check box (![]() changes to
changes to ![]() ) if you want to use Power Nap while running on the power adapter.
) if you want to use Power Nap while running on the power adapter.
![]() Click Schedule.
Click Schedule.
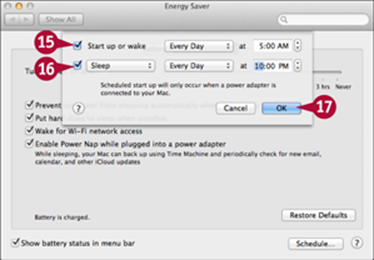
![]() Use the Start up or wake controls to have your MacBook Pro automatically start up or wake up at a specific time.
Use the Start up or wake controls to have your MacBook Pro automatically start up or wake up at a specific time.
![]() Use the lower controls to have your MacBook Pro automatically sleep, restart, or shut down at a specific time.
Use the lower controls to have your MacBook Pro automatically sleep, restart, or shut down at a specific time.
![]() Click OK.
Click OK.
TIP
How else can I make my battery last longer?
Put your MacBook Pro to sleep whenever you are not using it; close its lid, press the Power button, or click Apple (![]() ) and then click Sleep. Because the display is a major power drain, lower its brightness by pressing
) and then click Sleep. Because the display is a major power drain, lower its brightness by pressing ![]() until the screen is as dim as possible while you can still see it comfortably. Turn off Wi-Fi or Bluetooth when you are not using them.
until the screen is as dim as possible while you can still see it comfortably. Turn off Wi-Fi or Bluetooth when you are not using them.
Configure the Display
OS X automatically sets your MacBook Pro's bright and beautiful display to its default resolution. This resolution, also called the native resolution, is normally the best choice for general use, but you can change the resolution if you prefer. You can also change the resolution for any external display you connect to your MacBook Pro. When you change the resolution, OS X changes the size of each pixel, or picture element, that makes up the display's images. Larger pixels make the screen's contents appear zoomed in; smaller pixels make the screen's contents appear zoomed out, so more content fits.
Configure the Display
Configure the Display's Resolution
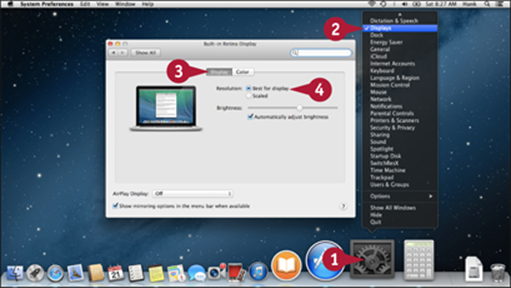
![]() Control+click System Preferences (
Control+click System Preferences (![]() ) on the Dock.
) on the Dock.
![]() Click Displays.
Click Displays.
![]() Click the Display tab.
Click the Display tab.
![]() Select Best for display (
Select Best for display (![]() changes to
changes to ![]() ) to use the native resolution.
) to use the native resolution.
If this setting works for you, skip to step 8.
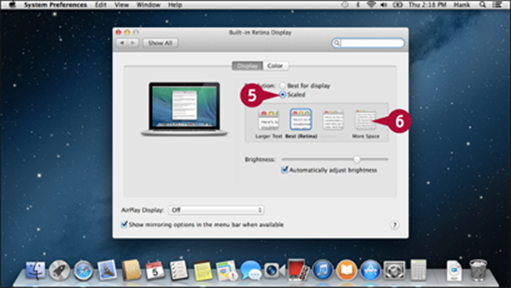
![]() Select Scaled (
Select Scaled (![]() changes to
changes to ![]() ).
).
![]() Click a resolution.
Click a resolution.
The MacBook Pro's screen updates to the selected resolution.
![]() Experiment with resolution settings until you find the scaling setting you find most comfortable to view.
Experiment with resolution settings until you find the scaling setting you find most comfortable to view.
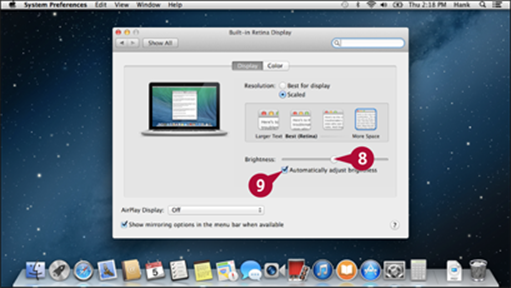
![]() Drag the Brightness slider to the right to make the screen brighter, or to the left to make it dimmer.
Drag the Brightness slider to the right to make the screen brighter, or to the left to make it dimmer.
![]() To have OS X automatically adjust brightness based on the lighting conditions in which you are using the computer, select the Automatically adjust brightness check box (
To have OS X automatically adjust brightness based on the lighting conditions in which you are using the computer, select the Automatically adjust brightness check box (![]() changes to
changes to ![]() ).
).
TIPS
How else can I set screen brightness?
The MacBook Pro includes two keys that you can use to change the screen's brightness. Press ![]() to lower the brightness or
to lower the brightness or ![]() to increase it. These do the same thing as the Brightness slider on the Displays pane. Each time you press one of the keys, an indicator appears on the screen to show you the relative brightness level you have set.
to increase it. These do the same thing as the Brightness slider on the Displays pane. Each time you press one of the keys, an indicator appears on the screen to show you the relative brightness level you have set.
How do I use the Color tab?
The Color tab is used to configure a color profile for the display. You will not likely need to do this unless you are doing very precise color printing work, in which case, you can configure a screen profile to match your printer output.
Control Sound
From sound effects to music and movies, sound is an important part of OS X. Additionally, you may want to use sound input for audio and video chats, to record narration for movies, and so on. The Sound pane of the System Preferences application is your primary stop for managing audio settings on your MacBook Pro. Here, you can configure sound effects, choose output settings, and select the input device you want to use.
Control Sound
Configure Sound Effects
![]() Open the System Preferences application and click Sound.
Open the System Preferences application and click Sound.
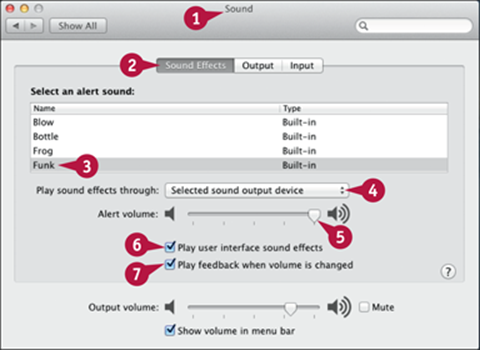
![]() Click the Sound Effects tab.
Click the Sound Effects tab.
![]() Click a sound on the alert sound list.
Click a sound on the alert sound list.
![]() Click the Play sound effects through pop-up menu and select the device through which effects should play.
Click the Play sound effects through pop-up menu and select the device through which effects should play.
![]() Drag the Alert volume slider to set the alert volume.
Drag the Alert volume slider to set the alert volume.
![]() To hear sound effects for system actions, such as when you empty the Trash, select the Play user interface sound effects check box (
To hear sound effects for system actions, such as when you empty the Trash, select the Play user interface sound effects check box (![]() changes to
changes to ![]() ).
).
![]() If you want audio feedback when you change the volume level, select the Play feedback when volume is changed check box (
If you want audio feedback when you change the volume level, select the Play feedback when volume is changed check box (![]() changes to
changes to ![]() ).
).
Configure Sound Out

![]() Open the System Preferences application and click Sound.
Open the System Preferences application and click Sound.
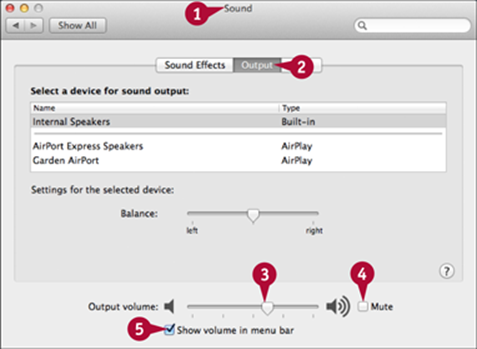
![]() Click the Output tab.
Click the Output tab.
![]() Select the output device for sound.
Select the output device for sound.
![]() Drag the Balance slider to set the left-right balance.
Drag the Balance slider to set the left-right balance.
Control System Volume
![]() Open the System Preferences application and click Sound.
Open the System Preferences application and click Sound.
![]() Click the Output tab.
Click the Output tab.
![]() Drag the Output volume slider to the right to increase the volume or to the left to decrease it.
Drag the Output volume slider to the right to increase the volume or to the left to decrease it.
![]() To mute all sounds, select the Mute check box (
To mute all sounds, select the Mute check box (![]() changes to
changes to ![]() ).
).
![]() To configure the volume menu on the menu bar, select the Show volume in menu bar check box (
To configure the volume menu on the menu bar, select the Show volume in menu bar check box (![]() changes to
changes to ![]() ).
).
Configure Sound Input
![]() Open the System Preferences application and click Sound.
Open the System Preferences application and click Sound.
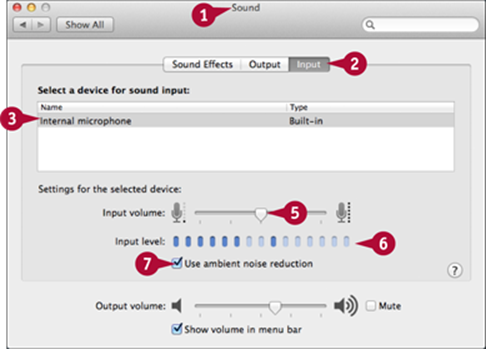
![]() Click the Input tab.
Click the Input tab.
![]() Click the input device you want to use.
Click the input device you want to use.
![]() Play the sound you want to input.
Play the sound you want to input.
![]() Drag the Input volume slider to the left to reduce the level of input sound or to the right to increase it.
Drag the Input volume slider to the left to reduce the level of input sound or to the right to increase it.
![]() Keep trying levels until the gauge looks about right, about three-fourths of the length of the bar.
Keep trying levels until the gauge looks about right, about three-fourths of the length of the bar.
![]() If the area you are in is noisy, select the Use ambient noise reduction check box (
If the area you are in is noisy, select the Use ambient noise reduction check box (![]() changes to
changes to ![]() ).
).
TIP
How can I use external speakers?
You can connect external speakers to your MacBook Pro's Headphone/Audio Out port. These can be powered computer speakers or you can use headphones. When you have speakers connected, click the Output tab and click the speakers you want to use. Sound will play from those speakers. You can use the controls to configure how it plays. See Chapter 8 for details.
Create and Configure User Accounts
OS X is a multiuser system, so you can create a user account for each person who uses your MacBook Pro. Each person who uses it then has a unique desktop, folders, files, and preferences so that the MacBook Pro is tailored specifically to her. For yourself, you will already have created an Administrator account, which gives you the power to perform administrative tasks, such as those discussed in this chapter. For most other users, you should create a Standard user account. This type of account can access all the MacBook Pro's resources, but it cannot perform administrator tasks.
Create and Configure User Accounts
Create a User Account
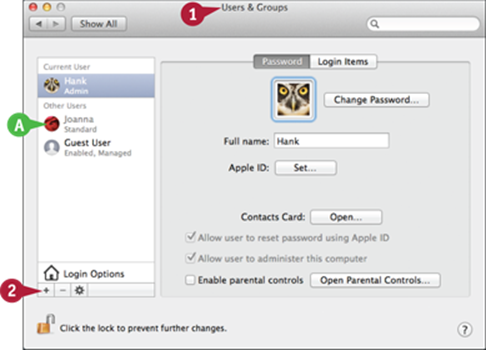
![]() Open the System Preferences application and click Users & Groups.
Open the System Preferences application and click Users & Groups.
A The Users & Groups pane appears. The accounts list on the left side of the window shows the accounts that currently exist.
![]() Click Add (
Click Add (![]() ).
).
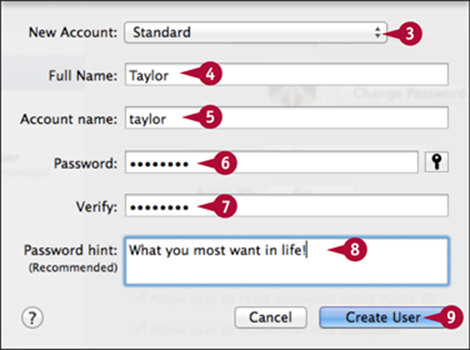
![]() Click the New Account pop-up menu (
Click the New Account pop-up menu (![]() ) and select the type of account. For example, click Standard.
) and select the type of account. For example, click Standard.
![]() Type a name for the account.
Type a name for the account.
OS X creates a shortened account name based on what you enter.
![]() Edit the account name as needed.
Edit the account name as needed.
![]() Click Password and type the password for the user.
Click Password and type the password for the user.
Note: Instead of choosing a password yourself, you can have Password Assistant suggest one. See the tip in this section for details.
![]() Click Verify and type the password again.
Click Verify and type the password again.
![]() Optionally, type a password hint to help the user remember the password.
Optionally, type a password hint to help the user remember the password.
![]() Click Create User.
Click Create User.
OS X creates the user account and assigns it a default picture.
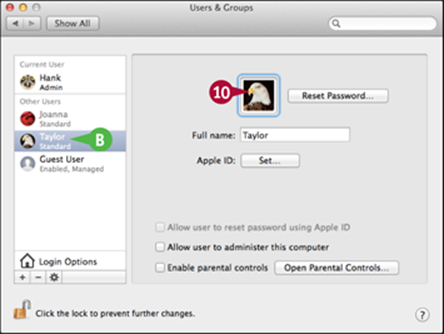
B The user account appears in the list of accounts.
![]() Click the image well, which contains the default picture OS X has assigned to the account.
Click the image well, which contains the default picture OS X has assigned to the account.
![]() Click the picture you want to use for the account.
Click the picture you want to use for the account.
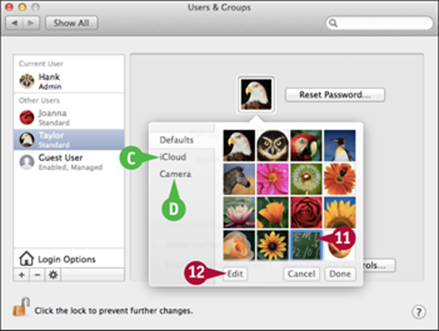
C Instead of using one of the default pictures, you can click iCloud to use one of the pictures you have stored in iCloud.
Note: You can also drag a picture to the image well from iPhoto, a Finder window, or your desktop.
D You can also click Camera and use the camera to take a picture of the person for whom you are creating the account.
![]() Click Edit.
Click Edit.
TIP
How can I create a hard-to-crack password?
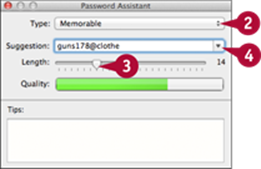
![]() Click Password Assistant (
Click Password Assistant (![]() ) in the New Account sheet.
) in the New Account sheet.
![]() In the Password Assistant window, click the Type pop-up menu (
In the Password Assistant window, click the Type pop-up menu (![]() ) and select the password type.
) and select the password type.
![]() Drag the Length slider to adjust the password length.
Drag the Length slider to adjust the password length.
![]() Click the Suggestion pop-up button (
Click the Suggestion pop-up button (![]() ) and select the suggested password you want to use.
) and select the suggested password you want to use.
Create and Configure User Accounts (continued)
You should have at least two user accounts for yourself. One should be an Administrator account that you use for your regular computing. This can be the account you created when you first set up your MacBook Pro. The other account should be an Administrator account that you create but do not use so that it remains in the default state. You use this second account during troubleshooting.
Create and Configure User Accounts (continued)
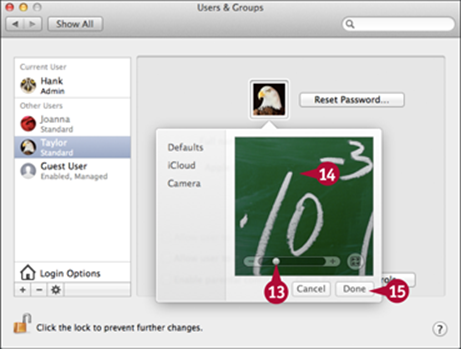
![]() Drag the Size slider to the right to zoom in on the image of the user's icon, or to the left to zoom out.
Drag the Size slider to the right to zoom in on the image of the user's icon, or to the left to zoom out.
![]() Drag the image within the selection box until the part of the image you want to use is enclosed in the box.
Drag the image within the selection box until the part of the image you want to use is enclosed in the box.
![]() Click Done.
Click Done.
E The image appears on the user's account record.
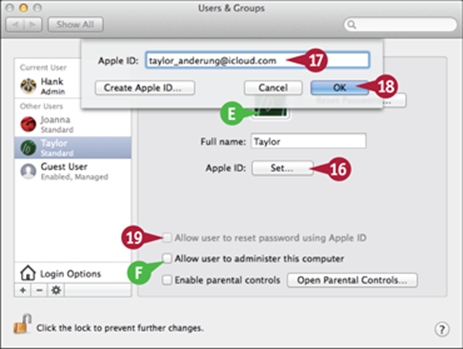
![]() If the user has an Apple ID, click Set.
If the user has an Apple ID, click Set.
![]() Type the user's Apple ID.
Type the user's Apple ID.
![]() Click OK.
Click OK.
![]() Select the Allow user to reset password using Apple ID check box (
Select the Allow user to reset password using Apple ID check box (![]() changes to
changes to ![]() ) if you set an Apple ID and want the user to be able to reset his OS X user account password based on his Apple ID.
) if you set an Apple ID and want the user to be able to reset his OS X user account password based on his Apple ID.
F You can select the Allow user to administer this computer check box (![]() changes to
changes to ![]() ) to change a Standard user to an Administrator user.
) to change a Standard user to an Administrator user.
![]() Tell the username and password you created to the person so he or she can start using your MacBook Pro.
Tell the username and password you created to the person so he or she can start using your MacBook Pro.
Configure Login Items for a User Account
![]() Log in under the user's account.
Log in under the user's account.
Note: You must be logged into an account to set Login Items for it.
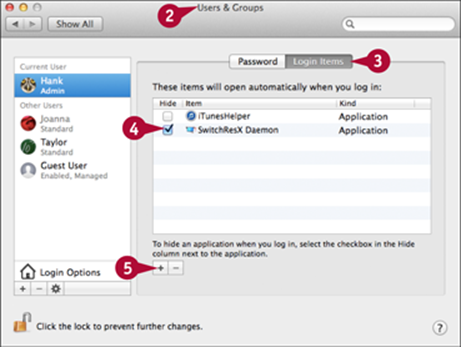
![]() Open the System Preferences application and click Users & Groups to open the Users & Groups pane.
Open the System Preferences application and click Users & Groups to open the Users & Groups pane.
![]() Click the Login Items tab.
Click the Login Items tab.
![]() Select the Hide check boxes (
Select the Hide check boxes (![]() changes to
changes to ![]() ) for any items you want to be hidden by default.
) for any items you want to be hidden by default.
![]() Click Add (
Click Add (![]() ).
).

![]() Navigate to locate and select the application or types of file, such as a document, that you want to open automatically.
Navigate to locate and select the application or types of file, such as a document, that you want to open automatically.
![]() Click Add.
Click Add.
The next time the user logs in, the items you configured open automatically.
TIP
Must I set a password for a user account?
No. If you leave the Password and Verify fields empty, you see a warning that an account without a password is not secure. If you are sure that is not a problem for you, clear the warning prompt and finish setting up the user. The user is able to log in to the MacBook Pro without entering a password, which can mean that anyone who has access to the MacBook Pro can use it. This leaves your computer vulnerable. If you need to let others use your MacBook Pro temporarily without using a password, have them use the Guest account.
Protect Users with Parental Controls
When you need to limit a user account, you can use the parental controls built into OS X. You can use parental controls to tailor any user's access to OS X features and the Internet. Further, you can set up a user account such that the user can use the MacBook Pro only during times you specify.
Protect Users with Parental Controls
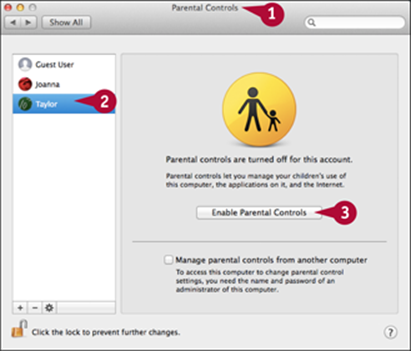
![]() Open the System Preferences application and click Parental Controls.
Open the System Preferences application and click Parental Controls.
![]() Select the Standard user account for which you want to configure Parental Controls.
Select the Standard user account for which you want to configure Parental Controls.
![]() Click Enable Parental Controls.
Click Enable Parental Controls.
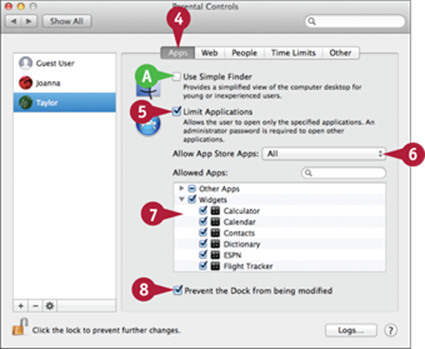
![]() Click the Apps tab.
Click the Apps tab.
A You can select the Use Simple Finder check box (![]() changes to
changes to ![]() ) to make OS X display a simplified version of the Finder for the user. Simple Finder is helpful for some beginners.
) to make OS X display a simplified version of the Finder for the user. Simple Finder is helpful for some beginners.
![]() To limit a user's access to specific applications, select the Limit Applications check box (
To limit a user's access to specific applications, select the Limit Applications check box (![]() changes to
changes to ![]() ).
).
![]() Click the Allow App Store Apps pop-up menu (
Click the Allow App Store Apps pop-up menu (![]() ) and select the level of apps you will allow the user — for example, click up to 12+ or All.
) and select the level of apps you will allow the user — for example, click up to 12+ or All.
![]() Deselect the check boxes (
Deselect the check boxes (![]() changes to
changes to ![]() ) for the groups or individual applications you do not want the user to be able to use.
) for the groups or individual applications you do not want the user to be able to use.
![]() Select the Prevent the Dock from being modified check box (
Select the Prevent the Dock from being modified check box (![]() changes to
changes to ![]() ) if you want to prevent the user from changing the Dock.
) if you want to prevent the user from changing the Dock.
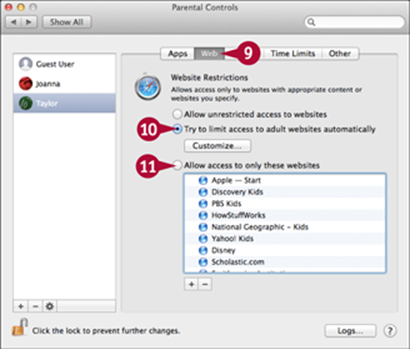
![]() Click the Web tab.
Click the Web tab.
![]() To attempt to prevent access to adult websites, select Try to limit access to adult websites automatically (
To attempt to prevent access to adult websites, select Try to limit access to adult websites automatically (![]() changes to
changes to ![]() ).
).
![]() To limit access to only specific websites, select Allow access to only these websites (
To limit access to only specific websites, select Allow access to only these websites (![]() changes to
changes to ![]() ). In the dialog that opens, click Add (
). In the dialog that opens, click Add (![]() ) and type the URLs to allow.
) and type the URLs to allow.
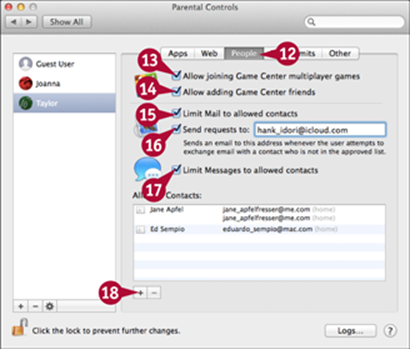
![]() Click the People tab.
Click the People tab.
![]() Deselect the Allow joining Game Center multiplayer games check box (
Deselect the Allow joining Game Center multiplayer games check box (![]() changes to
changes to ![]() ) if you do not want the user to be able to join multiplayer games in Game Center.
) if you do not want the user to be able to join multiplayer games in Game Center.
![]() Deselect the Allow adding Game Center friends check box (
Deselect the Allow adding Game Center friends check box (![]() changes to
changes to ![]() ) if you want to prevent the user from adding friends.
) if you want to prevent the user from adding friends.
![]() To limit e-mail with Mail, select the Limit Mail to allowed contacts check box (
To limit e-mail with Mail, select the Limit Mail to allowed contacts check box (![]() changes to
changes to ![]() ).
).
![]() If you want to receive an e-mail requesting permission to e-mail someone not on the Allowed Contacts list, select the Send requests to check box (
If you want to receive an e-mail requesting permission to e-mail someone not on the Allowed Contacts list, select the Send requests to check box (![]() changes to
changes to ![]() ) and enter your e-mail address.
) and enter your e-mail address.
![]() To limit messaging with Messages, select the Limit Messages to allowed contacts check box (
To limit messaging with Messages, select the Limit Messages to allowed contacts check box (![]() changes to
changes to ![]() ).
).
![]() Click Add (
Click Add (![]() ) and use the Contacts sheet to add contacts to the Allowed Contacts list.
) and use the Contacts sheet to add contacts to the Allowed Contacts list.
TIPS
What is the Time Limits tab for?
You can use the Time Limits tab to limit the amount of time the user can access the MacBook Pro. You can configure time on weekdays and weekends. You can also configure “bedtimes” during which the user is unable to access MacBook Pro.
What is the Other tab for?
On the Other tab, you can disable the MacBook Pro's camera, disable dictation, hide profanity in the Dictionary application, limit printer administration, disable password changes, and prevent CD or DVD burning.
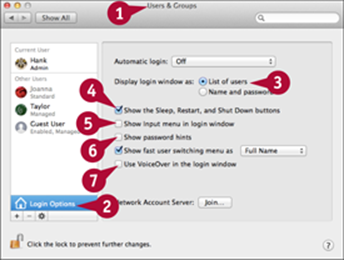
Set Login Options
By default, the OS X login window displays a list of users in which you click your user name, but you can configure it to display an empty username field instead for greater security. You can also choose whether to display the Sleep, Restart, and Shut Down buttons, and control whether the Input menu and password hints appear. Beyond these options, you can set up automatic login to save yourself the need to log in. You can also turn Fast User Switching on to enable multiple users to be logged into the MacBook Pro at the same time.
Set Login Options
Configure Automatic Login
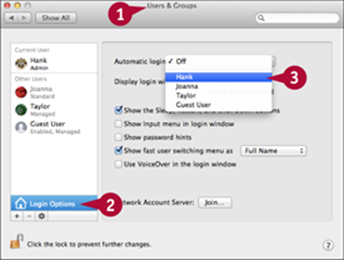
![]() Open the System Preferences application and click Users & Groups.
Open the System Preferences application and click Users & Groups.
![]() Click Login Options.
Click Login Options.
![]() Click the Automatic login pop-up menu (
Click the Automatic login pop-up menu (![]() ) and choose the name of the user that you want to be automatically logged in.
) and choose the name of the user that you want to be automatically logged in.
![]() Type the user's password.
Type the user's password.
![]() Click OK.
Click OK.
Configure the Login Window
![]() Open the System Preferences application and click Users & Groups.
Open the System Preferences application and click Users & Groups.
![]() Click Login Options.
Click Login Options.
![]() In the Display login window as area, select List of users or Name and password (
In the Display login window as area, select List of users or Name and password (![]() changes to
changes to ![]() ).
).
![]() Deselect the Show the Sleep, Restart, and Shut Down buttons check box (
Deselect the Show the Sleep, Restart, and Shut Down buttons check box (![]() changes to
changes to ![]() ) if you want to remove these buttons from the login window.
) if you want to remove these buttons from the login window.
![]() Select the Show Input menu in login window check box (
Select the Show Input menu in login window check box (![]() changes to
changes to ![]() ) if you want to be able to change the input type while logging in.
) if you want to be able to change the input type while logging in.
![]() Select the Show password hints check box (
Select the Show password hints check box (![]() changes to
changes to ![]() ) to show a hint when a user forgets her password.
) to show a hint when a user forgets her password.
![]() Select the Use VoiceOver in the login window check box (
Select the Use VoiceOver in the login window check box (![]() changes to
changes to ![]() ) if you want to have the MacBook Pro read the text in the Login window.
) if you want to have the MacBook Pro read the text in the Login window.
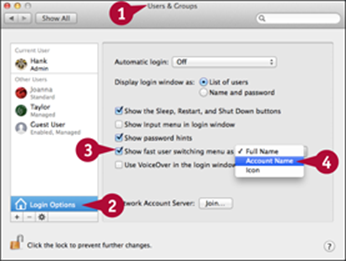
Configure and Use Fast User Switching
![]() Open the System Preferences application and click Users & Groups.
Open the System Preferences application and click Users & Groups.
![]() Click Login Options.
Click Login Options.
![]() Select the Show fast user switching menu as check box (
Select the Show fast user switching menu as check box (![]() changes to
changes to ![]() ).
).
![]() Click the pop-up menu (
Click the pop-up menu (![]() ) and select Full Name to see the current user's full name at the top of the Fast User Switching menu, Account Name to see the user's account name, or Icon to see a silhouette.
) and select Full Name to see the current user's full name at the top of the Fast User Switching menu, Account Name to see the user's account name, or Icon to see a silhouette.
The Fast User Switching menu appears on the menu bar.
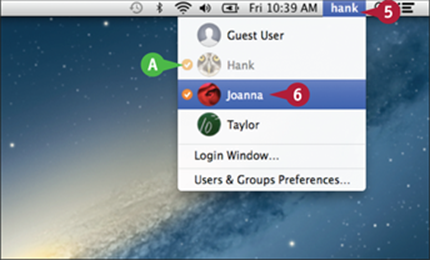
![]() Click the Fast User Switching menu.
Click the Fast User Switching menu.
All the user accounts on MacBook Pro appear. A check mark indicates a user is currently logged in.
![]() Click the user to switch to.
Click the user to switch to.
![]() Enter the user's password.
Enter the user's password.
![]() Press
Press ![]() .
.
The user is logged in and his or her desktop appears. The previous user remains logged in; select that user's account on the Fast User Switching menu to move back to it.
TIP
What happens to running applications when another user logs in using fast user switching?
Because a user does not log out when another one logs in using fast user switching, the applications and processes running under a user account continue to run in the background, even while another user is using the MacBook Pro. As soon as the previous user logs back in, the results of the activity that was ongoing appear, such as new e-mails and web pages.
Set Up Internet Accounts
Before you can use the Mail application, you need to set it up with the details of your e-mail account. Similarly, if you use online calendars, contacts, or social networking, you need to set up the accounts for the Calendar application, the Contacts application, or the social-networking application, such as Facebook, Twitter, LinkedIn, or Flickr. You can set up your accounts in the individual applications, but it is usually easier to manage them centrally using the Internet Accounts pane in the System Preferences application. After you set up an account here, other applications that need to access the account can pick up the details without you having to enter them again.
Set Up Internet Accounts
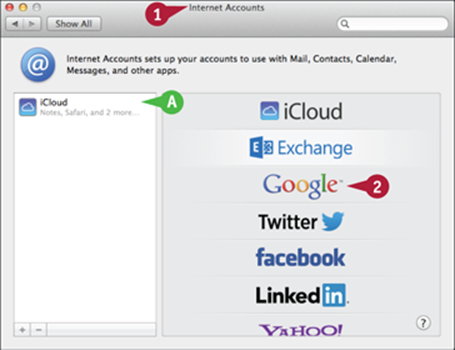
![]() Open the System Preferences application and click Internet Accounts.
Open the System Preferences application and click Internet Accounts.
A On the Accounts list, you see the accounts already set up. You may have set them up yourself using the process explained here, or you may have set them up using other applications, such as Mail.
Note: If you click an account to select it, the account's configuration information and tools appear in the right pane. Click Add (![]() ) to start adding an account, and then click the account type.
) to start adding an account, and then click the account type.
![]() Click the account type you want to add.
Click the account type you want to add.
Note: If the account you are creating is not one of those listed, select Other.
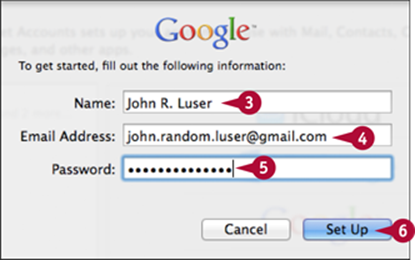
![]() Type your name as you want it to appear in the account.
Type your name as you want it to appear in the account.
![]() Type the e-mail address for the account.
Type the e-mail address for the account.
![]() Type the account's password.
Type the account's password.
![]() Click Set Up.
Click Set Up.
The application checks the information you entered.
If the information is valid, a configuration sheet appears. If not, you are prompted to correct it.
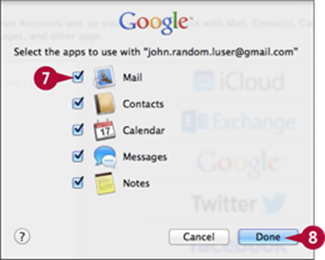
![]() Click each service (
Click each service (![]() changes to
changes to ![]() ) you want to use.
) you want to use.
Note: The services available vary depending on the account type, but they may include Mail, Contacts, Calendar, Reminders, Messages, and Notes.
![]() Click Done.
Click Done.
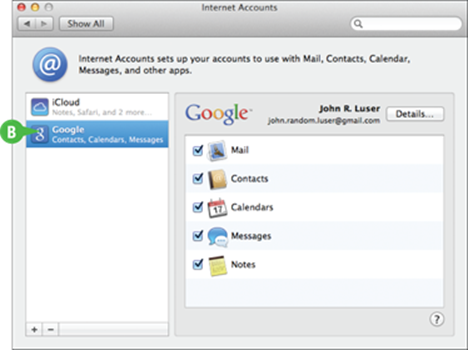
B The account appears in the Accounts list.
Other applications can now use its information.
TIPS
I do not see the accounts I created in my e-mail application. Why not?
Applications have to be written to obtain account information from the System Preferences application. All of Apple's applications that need it have this capability, but applications from other sources may not. If not, use that application's tools to create and manage accounts in it.
How can I change an account?
Click the account in the Accounts list to display its information in the right pane. Select the check boxes for the services to turn them on (![]() changes to
changes to ![]() ) or deselect them to turn the services off (
) or deselect them to turn the services off (![]() changes to
changes to ![]() ). Click Details and use the resulting sheet to change the account's information. To delete an account, select it and click Delete (
). Click Details and use the resulting sheet to change the account's information. To delete an account, select it and click Delete (![]() ) at the bottom of the Accounts list.
) at the bottom of the Accounts list.
All materials on the site are licensed Creative Commons Attribution-Sharealike 3.0 Unported CC BY-SA 3.0 & GNU Free Documentation License (GFDL)
If you are the copyright holder of any material contained on our site and intend to remove it, please contact our site administrator for approval.
© 2016-2026 All site design rights belong to S.Y.A.