Teach Yourself VISUALLY MacBook Pro, 2nd Edition (2014)
Part II. Getting Connected
Chapter 8. Connecting MacBook Pro to Other Devices
Expand Storage Space with an External Hard Drive
Your MacBook Pro includes a drive on which you store the operating system, applications, and your own files and folders. You can connect an external hard drive to provide more storage space or to back up your files using the OS X Time Machine feature. To get an external hard drive ready to work with your MacBook Pro, you first connect the drive to the computer. You then optionally use the Disk Utility application to format and partition the hard drive.
Expand Storage Space with an External Hard Drive
Connect and Power an External Hard Drive
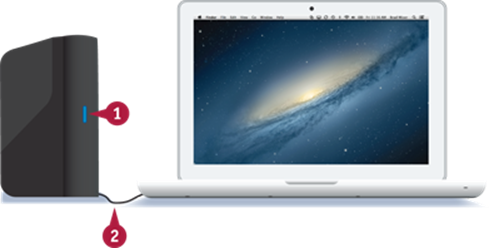
![]() Connect the hard drive to a power source and turn it on.
Connect the hard drive to a power source and turn it on.
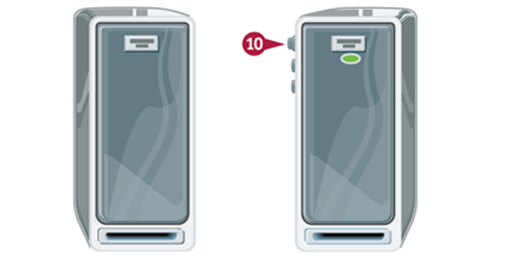
![]() Use the appropriate cable to connect the hard drive to the compatible port on the MacBook Pro.
Use the appropriate cable to connect the hard drive to the compatible port on the MacBook Pro.
Note: Most hard drives include the cable you need to connect to MacBook Pro. However, some do not. Check the package information to make sure the cable is included. If it is not, you have to buy a cable separately.
The hard drive is ready to format and partition.
Format and Partition an External Hard Drive
![]() Click Launchpad (
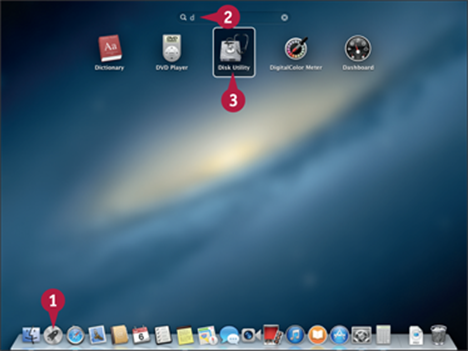
Click Launchpad (![]() ).
).
The Launchpad screen appears.
![]() Type d.
Type d.
Launchpad narrows the selection of applications to those that include a word beginning with d.
![]() Click Disk Utility (
Click Disk Utility (![]() ).
).
Disk Utility opens.

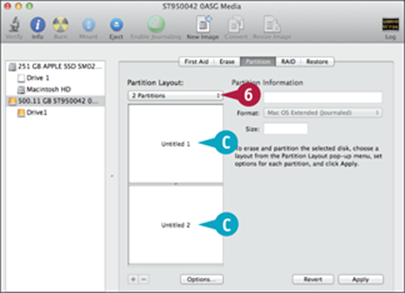
A The left pane shows all available disks.
![]() Click the external hard drive.
Click the external hard drive.
![]() Click the Partition tab.
Click the Partition tab.
B You see the number of partitions the disk currently has.
Note: A new disk typically has one partition.
![]() Click the Partition Layout pop-up menu (
Click the Partition Layout pop-up menu (![]() ) and select the number of partitions you want to create on the disk.
) and select the number of partitions you want to create on the disk.
C Disk Utility divides the space available into the number of partitions you selected, naming the partitions Untitled 1, Untitled 2, and so on.
TIPS
What kind of drive works with a MacBook Pro?
All current models can work with USB 2.0, USB 3.0, or Thunderbolt drives. For Time Machine, make sure the drive is at least twice as large as the drive in your MacBook Pro. You can also use either Mac- or Windows-compatible hard drives.
Which interface is best?
USB 2.0 is the least expensive, but also the slowest. USB 3.0 is faster and a bit more expensive. Thunderbolt is the fastest; you pay a premium for that speed. Another option is to use a FireWire drive with a Thunderbolt-to-FireWire adapter; this is especially useful if you already have a FireWire drive. If you are going to use the drive only for active projects, you want the fastest interface you can get, so go with Thunderbolt.
Expand Storage Space with an External Hard Drive (continued)
With an external hard drive, you can use the OS X Time Machine feature to back up your important data. You can also back up to an AirPort Time Capsule using Time Machine. Should something happen to the data on your MacBook Pro or to the MacBook Pro itself, you can easily recover the data from the external drive or the AirPort Time Capsule so that you do not lose files that you can never recover, such as your photos. For more information about Time Machine, see Chapter 17.
Expand Storage Space with an External Hard Drive (continued)
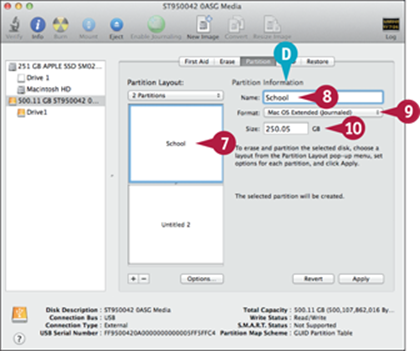
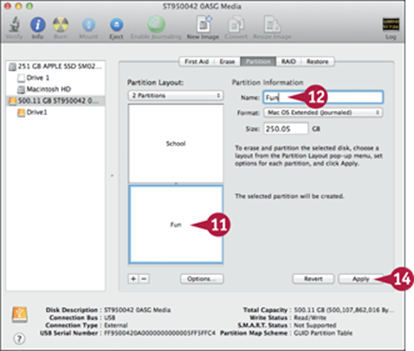
![]() Click the top partition.
Click the top partition.
D The Partition Information section shows the information for the partition.
![]() Type a name for the partition in the Name box.
Type a name for the partition in the Name box.
![]() Click the Format pop-up menu (
Click the Format pop-up menu (![]() ) and select Mac OS Extended (Journaled).
) and select Mac OS Extended (Journaled).
![]() Enter the size of the first partition in the Size box and press
Enter the size of the first partition in the Size box and press ![]() .
.
Disk Utility names and resizes the partition.
![]() Click the next partition.
Click the next partition.
![]() Repeat steps 8 to 10 to name, format, and size the partition.
Repeat steps 8 to 10 to name, format, and size the partition.
![]() Repeat steps 11 and 12 until you have configured each partition.
Repeat steps 11 and 12 until you have configured each partition.
![]() Click Apply.
Click Apply.
The partition warning appears.
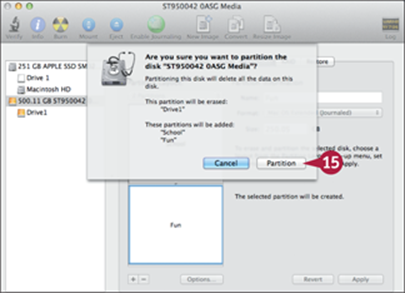
Note: Partitioning a disk erases all the data it contains, so make sure you do not need its data before continuing.
![]() Click Partition.
Click Partition.
![]() If the Time Machine dialog appears, click Decide Later.
If the Time Machine dialog appears, click Decide Later.
Note: See Chapter 17 for information about configuring Time Machine.
![]() Press
Press ![]() +
+![]() to quit Disk Utility.
to quit Disk Utility.
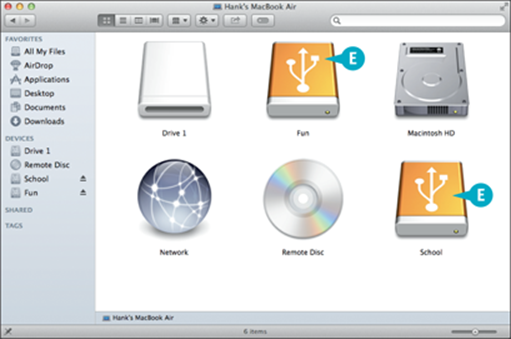
![]() Open a Finder window.
Open a Finder window.
Note: Before disconnecting a hard drive from MacBook Pro, click Eject (![]() ) next to its icon in the Sidebar or press
) next to its icon in the Sidebar or press ![]() and wait for the disk icon to disappear from the Sidebar.
and wait for the disk icon to disappear from the Sidebar.
E You see the partitions on the external drive, and they are ready to be used just like the MacBook Pro's internal drive.
TIPS
Why can I not partition a new hard drive?
Some drives come in a format incompatible with OS X, and the partition process fails while displaying an error message. Before you click Apply on the Partition tab of the Disk Utility application in step 14, click Options. On the resulting sheet, click GUID Partition Table and then click OK. The sheet closes. Continue with the rest of the steps as described.
What is a partition and how many should I create on my drive?
Partitions are logical volumes, which means that they behave as if each partition is its own drive, even though they are on the same physical device. You can create partitions for various purposes, such as to organize data. You should use only one or two partitions on a drive to avoid ending up with a lot of partitions too small to be usable.
Connect and Use an External Display
Your MacBook Pro screen is as large as will fit within its slim body, but you may need more screen space to spread out your documents and work with multiple windows at the same time. To add screen space to your MacBook Pro, you can connect an external display to it. This enables you to use the MacBook Pro's internal display and the external display at the same time. You can use both as a single large desktop, or you can mirror the displays, which means that each shows the same thing.
Connect and Use an External Display
Connect the External Display
![]() If required, purchase the Mini DisplayPort adapter needed for the external display.
If required, purchase the Mini DisplayPort adapter needed for the external display.
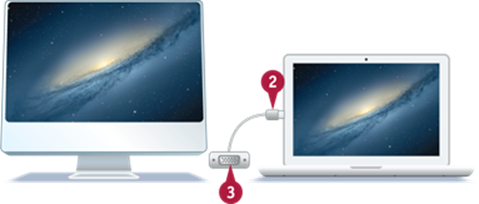
![]() Plug the small end of the adapter into your MacBook Pro.
Plug the small end of the adapter into your MacBook Pro.
![]() Connect the other end of the adapter to the display.
Connect the other end of the adapter to the display.
![]() Connect the display to a power source, and power it up.
Connect the display to a power source, and power it up.
Configure the External Display
![]() Open the System Preferences application and click Displays.
Open the System Preferences application and click Displays.
A Displays pane opens on the MacBook Pro display and on the external display.
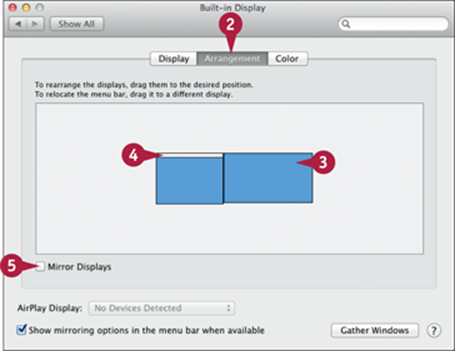
![]() Click the Arrangement tab on the Displays pane on the MacBook Pro screen.
Click the Arrangement tab on the Displays pane on the MacBook Pro screen.
![]() Drag the external display's thumbnail to match the physical location of the display compared to MacBook Pro — for example, left, right, up, or down.
Drag the external display's thumbnail to match the physical location of the display compared to MacBook Pro — for example, left, right, up, or down.
![]() If you want the external display to be the primary display, drag the menu bar from the MacBook Pro display's thumbnail onto the external display's thumbnail.
If you want the external display to be the primary display, drag the menu bar from the MacBook Pro display's thumbnail onto the external display's thumbnail.
![]() If you want the displays to show the same information, select the Mirror Displays check box (
If you want the displays to show the same information, select the Mirror Displays check box (![]() changes to
changes to ![]() ) and skip the rest of these steps.
) and skip the rest of these steps.
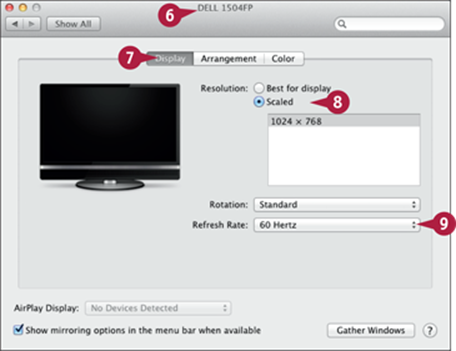
![]() Click the Displays window on the external display.
Click the Displays window on the external display.
![]() Click the Display tab.
Click the Display tab.
![]() Select Best for display (
Select Best for display (![]() changes to
changes to ![]() ) if you want OS X to set the resolution. Otherwise, select Scaled (
) if you want OS X to set the resolution. Otherwise, select Scaled (![]() changes to
changes to ![]() ) and then click the resolution to use.
) and then click the resolution to use.
![]() If the Refresh Rate pop-up menu (
If the Refresh Rate pop-up menu (![]() ) appears, click it, and select the highest rate available.
) appears, click it, and select the highest rate available.
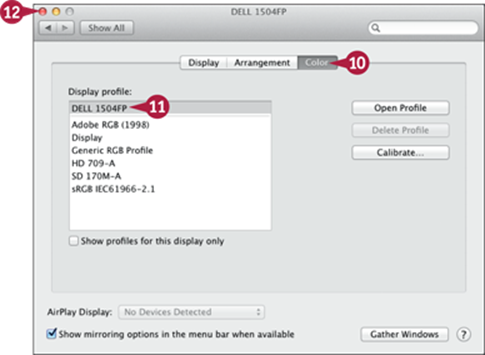
![]() Click the Color tab.
Click the Color tab.
![]() Select the color profile for the display you are using.
Select the color profile for the display you are using.
![]() Click Close (
Click Close (![]() ) or press
) or press ![]() +
+![]() to quit the System Preferences application.
to quit the System Preferences application.
You now can use the external display. When video mirroring is off, the two displays act as a single, large desktop area. You can move windows onto either display. For example, you might keep a document on which you are working on one display and Mail on the other.
When video mirroring is on, you see the same information on both screens.
TIP
What kind of external display should I get for my MacBook Pro?
The three most important considerations are interface, size, and cost. An Apple Thunderbolt Display gives you a huge screen with great performance and connectivity, but it is expensive. HDMI and DVI displays give a digital picture, whereas VGA translates the signal to analog. Larger displays are better because they give you more working space. They also tend to be more expensive, although that depends on the specific brand you choose.
Using an Apple TV to Display on an HDTV
With a second-generation or later Apple TV, you can wirelessly broadcast your MacBook Pro's display on the device to which the Apple TV is connected. This is great for watching movies or videos on a big-screen TV, enjoying a shared web-browsing session, or giving presentations from your MacBook Pro to a group of people. To broadcast to an Apple TV, your MacBook Pro uses AirPlay. This technology enables Macs and iOS devices to send a signal to an Apple TV for it to display on a television.
Using an Apple TV to Display on an HDTV
Set Up the Apple TV for AirPlay
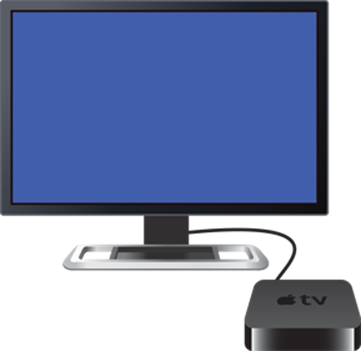
![]() Connect the Apple TV to a power outlet and to your television.
Connect the Apple TV to a power outlet and to your television.
![]() Connect the Apple TV to a wireless network.
Connect the Apple TV to a wireless network.
![]() Open the Apple TV's Settings screen.
Open the Apple TV's Settings screen.
![]() Select AirPlay.
Select AirPlay.
![]() Turn AirPlay on if it is not on already.
Turn AirPlay on if it is not on already.
Broadcast from a MacBook Pro to an Apple TV
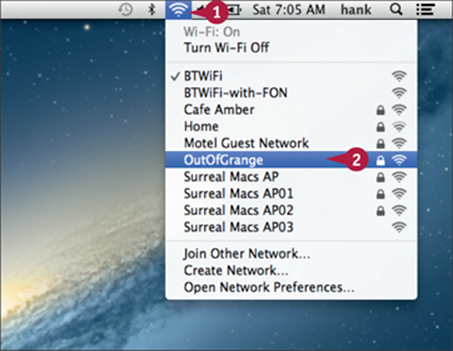
![]() Click Wi-Fi (
Click Wi-Fi (![]() ) on the menu bar.
) on the menu bar.
The Wi-Fi menu opens.
![]() Click the network to which you connected the Apple TV in step 2 in the previous section.
Click the network to which you connected the Apple TV in step 2 in the previous section.
Note: Your MacBook Pro and the Apple TV must be on the same network for AirPlay to work.
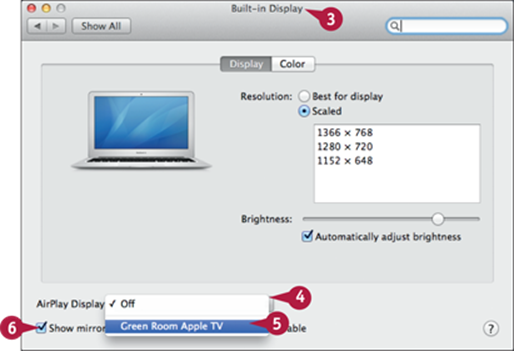
![]() Open the Displays pane of the System Preferences application. For example, Control+click System Preferences (
Open the Displays pane of the System Preferences application. For example, Control+click System Preferences (![]() ) on the Dock and then click Displays.
) on the Dock and then click Displays.
![]() Click the AirPlay Display pop-up menu (
Click the AirPlay Display pop-up menu (![]() ).
).
![]() Click the Apple TV you want to use.
Click the Apple TV you want to use.
Your MacBook Pro's desktop appears on the television to which the Apple TV is connected. By default, the same image appears on your MacBook Pro and on the television.
![]() Select the Show mirroring options in the menu bar when available check box (
Select the Show mirroring options in the menu bar when available check box (![]() changes to
changes to ![]() ).
).
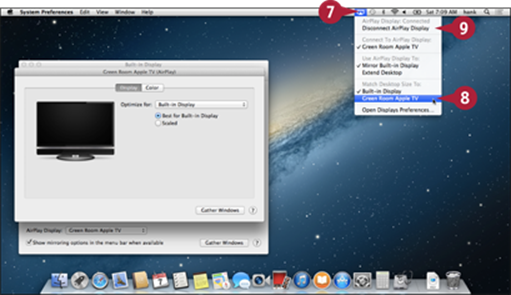
![]() Click AirPlay (
Click AirPlay (![]() ) on the menu bar.
) on the menu bar.
The AirPlay menu opens.
![]() To match the MacBook Pro's desktop to the Apple TV, click the Apple TV's name on the menu.
To match the MacBook Pro's desktop to the Apple TV, click the Apple TV's name on the menu.
Your MacBook Pro's display adjusts to match the resolution of the Apple TV.
![]() When you want to stop broadcasting to the Apple TV, click Disconnect AirPlay Display.
When you want to stop broadcasting to the Apple TV, click Disconnect AirPlay Display.
TIP
Why do I not see any AirPlay devices available on my MacBook Pro?
First, check the network configuration of each device to make sure all devices are on the same network. Second, the network you are using may not support the protocols AirPlay uses; in some public areas, networks are designed to prevent streaming of content. If you cannot use a different network, see if the available one can be reconfigured to support AirPlay.
Connect and Use Bluetooth Devices
Although your MacBook Pro comes fully equipped for mobile computing, you will likely want to connect other devices to it sometimes. When you want to connect a device such as a keyboard, a mouse, or speakers, a wireless technology called Bluetooth is often the easiest and most flexible choice. To connect and manage Bluetooth devices, you use the Bluetooth pane in the System Preferences application. To connect a Bluetooth device for the first time, you pair the device with your MacBook Pro. Once you have paired the devices, you can quickly disconnect and reconnect the device as needed.
Connect and Use Bluetooth Devices
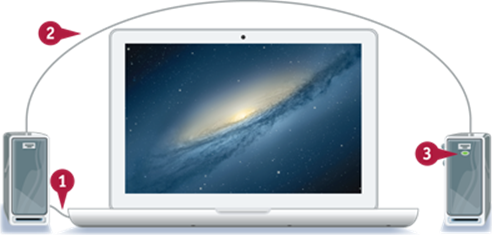
![]() Turn on the Bluetooth device.
Turn on the Bluetooth device.
![]() Place the Bluetooth device in discovery mode.
Place the Bluetooth device in discovery mode.
Note: Consult the Bluetooth device's documentation for instructions on placing the device in discovery mode.
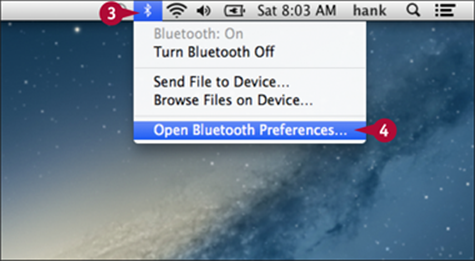
![]() Click Bluetooth (
Click Bluetooth (![]() ) on the menu bar.
) on the menu bar.
The Bluetooth menu opens.
![]() Click Open Bluetooth Preferences.
Click Open Bluetooth Preferences.
The System Preferences application opens, showing the Bluetooth pane.
Note: If the readout in the left pane says Bluetooth: Off, click Turn Bluetooth On.
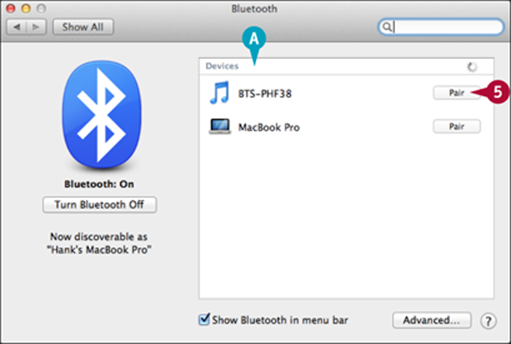
A The Devices list shows the Bluetooth devices available.
![]() Click Pair for the Bluetooth device you want to use.
Click Pair for the Bluetooth device you want to use.
Note: Pairing with some devices may require you to type a code on your MacBook Pro's keyboard or on the device itself.
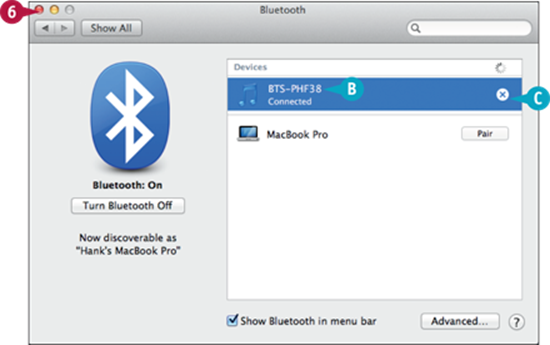
B The Connected readout appears when your MacBook Pro has established the connection. You can now use the Bluetooth device.
C You can click Remove (![]() ) if you want to remove the device's pairing from your MacBook Pro. This action unpairs the device.
) if you want to remove the device's pairing from your MacBook Pro. This action unpairs the device.
![]() Click Close (
Click Close (![]() ).
).
The System Preferences app closes.
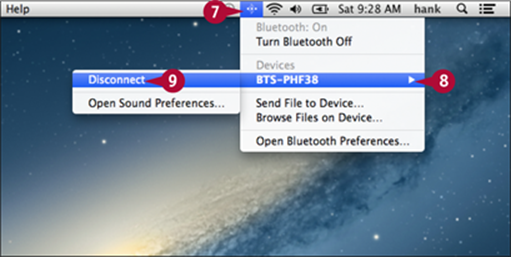
![]() When you want to disconnect the Bluetooth device, click Bluetooth (
When you want to disconnect the Bluetooth device, click Bluetooth (![]() ) on the menu bar.
) on the menu bar.
![]() Highlight the device's name.
Highlight the device's name.
![]() Click Disconnect.
Click Disconnect.
OS X disconnects the device.
TIP
Why does my Bluetooth device not appear in the Bluetooth pane even after I turn on discovery mode?
If you have previously paired the Bluetooth device with another computer or device, you may need to unpair it from that device before your MacBook Pro can discover it. For example:
• In OS X, open the Bluetooth pane in the System Preferences application, move the mouse pointer (![]() ) over the device in the Devices list, and then click Remove (
) over the device in the Devices list, and then click Remove (![]() ). Click Remove in the confirmation dialog that opens.
). Click Remove in the confirmation dialog that opens.
• In iOS, touch Settings on the Home screen to display the Settings app, and then touch Bluetooth. In the Devices list, touch the Info button (![]() ), touch Forget This Device, and then touch Forget Device in the confirmation dialog.
), touch Forget This Device, and then touch Forget Device in the confirmation dialog.
Connect and Use External Speakers
Your MacBook Pro has speakers built in, but they are limited by their tiny size. With iTunes, streaming video, and all the other great applications for which sound is vital, you will likely want to use external speakers with your MacBook Pro. You can use a variety of speakers with MacBook Pro. The easiest arrangement is usually to use powered speakers, also called computer speakers. You can also play back audio through speakers connected to an AirPort Express or Apple TV, or connect your MacBook Pro to a receiver that drives speakers or connect a pair of analog headphones.
Connect and Use External Speakers
![]() Connect the speaker input to the Audio port.
Connect the speaker input to the Audio port.
![]() Make the connections between the speakers, such as between the left and right speaker and the subwoofer.
Make the connections between the speakers, such as between the left and right speaker and the subwoofer.
![]() Connect the speakers to power and turn them on.
Connect the speakers to power and turn them on.

![]() Open the System Preferences application and click Sound.
Open the System Preferences application and click Sound.
The Sound pane appears.
![]() Click the Output tab.
Click the Output tab.
![]() In the Select a device for sound output list, click the speakers you want to use.
In the Select a device for sound output list, click the speakers you want to use.
Note: The Audio port appears as Headphones in the Select a device for sound output list even when you attach a set of speakers.
![]() If controls for the speakers appear, use them to improve the sound.
If controls for the speakers appear, use them to improve the sound.
For example, you might be able to set a balance level and system volume level.
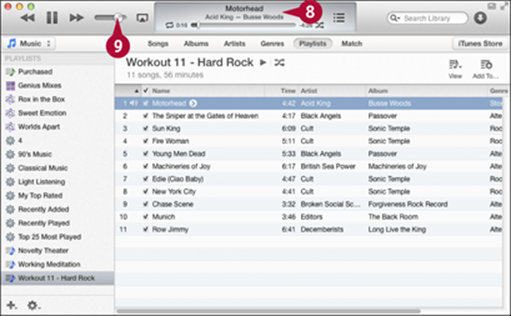
![]() Play sound with an application such as iTunes.
Play sound with an application such as iTunes.
Note: For more information about iTunes, see Chapter 18.
![]() Use the application's controls to set the specific volume level.
Use the application's controls to set the specific volume level.
![]() Adjust the volume level and other settings using the speaker system's controls.
Adjust the volume level and other settings using the speaker system's controls.
TIPS
Does a MacBook Pro support digital audio?
Yes. The Audio port on the MacBook Pro supports both analog and digital audio. Use a TOSLINK adapter to connect the Audio port to the digital audio cable. When you connect the other end to the speaker system, you can enjoy the benefits of digital, such as surround sound coming from multiple speakers.
How can I play audio on an Apple TV or other devices?
You can use AirPlay to broadcast your MacBook Pro's audio to an Apple TV, to AirPort Express base stations to which you have connected speakers, or directly to AirPlay-enabled speakers. Set up the AirPlay device and then choose the AirPlay device on the Output tab or in the AirPlay menu in iTunes or another audio source.
Connect to and Use a USB Hub
Many devices use USB to connect to a computer. The MacBook Pro has only two USB ports, so you can connect only two devices to it at a time — at least, using direct connections.
For situations in which you want to connect more than two USB devices to your MacBook Pro at the same time, you can use an external USB hub. You connect the hub to your MacBook Pro and then connect USB devices to the ports on the hub. Your MacBook Pro can access these devices just as if they are connected to its USB port. Usually, it is best to get a USB hub with an external power supply, but for travel you may prefer a hub that draws power from the MacBook Pro.
Connect to and Use a USB Hub
Obtain an External USB Hub
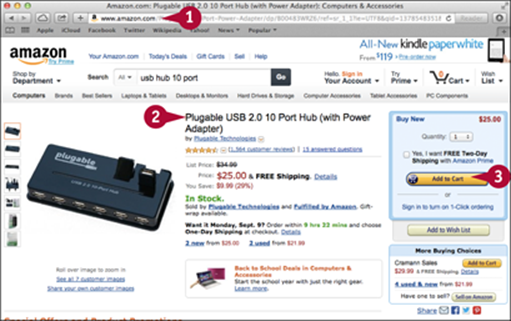
![]() Visit your favorite retailer, either online or in the real world.
Visit your favorite retailer, either online or in the real world.
![]() Look for a USB 2 or USB 3 hub with as at least as many ports as the number of devices you want to connect at the same time.
Look for a USB 2 or USB 3 hub with as at least as many ports as the number of devices you want to connect at the same time.
![]() Purchase a hub.
Purchase a hub.
Install a USB Hub
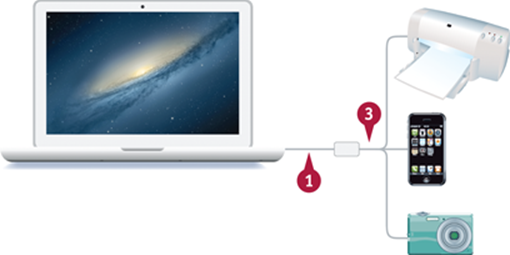
![]() Connect the input port on the hub to a USB port on the MacBook Pro.
Connect the input port on the hub to a USB port on the MacBook Pro.
![]() Connect the hub to a power source, if required.
Connect the hub to a power source, if required.
![]() Connect USB devices to the hub.
Connect USB devices to the hub.
The devices are ready to use.
Connect to and Use Ethernet Devices
Your MacBook Pro is designed to be wireless when it comes to connecting to many devices — most important, local networks and the Internet. But Ethernet, a wired technology, offers tempting benefits over wireless connections. Ethernet is faster, and so achieves the best network performance. Ethernet is also more secure than wireless because you have to be physically connected to a network to access it.
To connect to a network or a device with Ethernet, you can use a Thunderbolt-to–Gigabit Ethernet adapter or a USB-to-Ethernet adapter. Use an Ethernet cable to connect the adapter to an AirPort, network switch or router, or other Ethernet device, such as a printer.
Connect to and Use Ethernet Devices
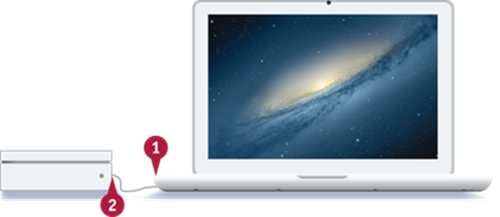
![]() Connect an Ethernet cable to the Ethernet port on your MacBook Pro.
Connect an Ethernet cable to the Ethernet port on your MacBook Pro.
![]() Connect the other end of the cable to an Ethernet device, such as an AirPort Extreme Base Station.
Connect the other end of the cable to an Ethernet device, such as an AirPort Extreme Base Station.
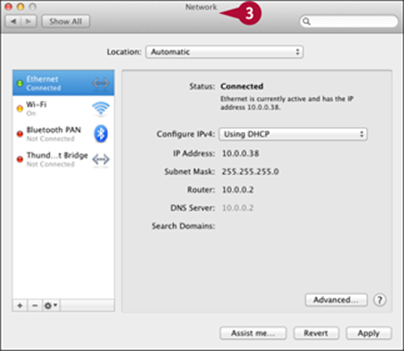
![]() If your MacBook Pro does not establish an Internet connection automatically through the Ethernet cable, open the Network pane in the System Preferences application and configure it.
If your MacBook Pro does not establish an Internet connection automatically through the Ethernet cable, open the Network pane in the System Preferences application and configure it.
For example, whereas many Ethernet networks use DHCP, for others you may need to click the Configure IPv4 pop-up menu (![]() ), select Manually, enter network details, and then click Apply.
), select Manually, enter network details, and then click Apply.
All materials on the site are licensed Creative Commons Attribution-Sharealike 3.0 Unported CC BY-SA 3.0 & GNU Free Documentation License (GFDL)
If you are the copyright holder of any material contained on our site and intend to remove it, please contact our site administrator for approval.
© 2016-2026 All site design rights belong to S.Y.A.