Take Control of Apple Mail (1.0) (2014)
Take Control of Your Inbox
Does your Inbox contain hundreds of messages? Thousands? Tens of thousands? If so, you may find it nearly impossible to tell which messages you’ve dealt with and which still require action, and finding a particular message in that long list may be a daunting challenge. You need to take control of your Inbox!
Although everyone’s different, I’d like to offer some suggestions in this chapter that will help you manage the flow of incoming messages. I don’t particularly care whether you do things my way, but please think carefully about the types of messages you receive and come up with a plan to deal with them that works for you.
I begin this chapter with a series of pointers that apply equally to Mavericks (and other desktop platforms) and iOS. Then I discuss specific approaches for each platform in Develop an Email Strategy.
Take Responsibility
The first step to taking control of your Inbox is recognizing that you, and only you, bear the responsibility for making your own email manageable. If you feel overwhelmed by email, don’t point the finger at email as a medium—or at Apple Mail, your email provider, or your correspondents. You can make email work for you, but as with a diet or fitness program, it requires time, effort, and perhaps discomfort on your way to success. No app, service, or technique can do all that for you magically, even though such things can certainly help a bit.
As I said in my TidBITS article It’s Not Email That’s Broken, It’s You, email as such isn’t the problem, but rather the bad habits many people have gotten into when it comes to dealing with email. Perhaps your mother, like my mother, was fond of saying, “This room isn’t going to clean itself up!” By the same token, I can assure you that elves will not appear overnight and answer all your delinquent email, file it away for you, and leave you with an empty Inbox. If you want to feel in control of your Inbox, that’s going to require some reflection, experimentation, and changes in habit.
So, although I can’t solve this problem for you, I can offer some tips and suggestions that, I hope, will point you in the right direction. That’s what the remainder of this chapter is about.
Consolidate Your Accounts
Since you’re reading this book, I assume you have at least one email account. Maybe you have two (personal and work)—or maybe, like me, you have more than a dozen. My excuse is that I need to have accounts for each major type and provider (including IMAP, POP, iCloud, Exchange, Gmail, AOL, Outlook.com, and Yahoo) for testing purposes because I write about email. But I know lots of people who accumulate accounts (especially free accounts) for no particular reason and then end up wasting time and effort checking, managing, and maintaining them all.
So, allow me to make a few suggestions to make your life simpler and to make Mail in OS X and iOS work better.
Begin by choosing one account to be your primary personal email account. (Of course, you may need to keep work email separate, and that’s entirely reasonable.) Then, rather than send out change-of-address notices to anyone who might have each of the other addresses—assuming you can even remember who has which one—visit the Web interfaces for all other accounts, set them up to forward incoming messages to your central account, and disable those accounts in Mail on your Macs and iOS devices. Once you’ve performed this one-time procedure, your correspondents can keep using your old addresses, but you benefit by having just one place to check for incoming mail and one place to store the messages you want to save. Having fewer accounts to check will make Mail peppier, too.
If you have numerous providers from which to choose, which one should you pick for your main email account? Here are my opinions:
· Choose an account that supports either IMAP or Exchange—not a POP-only account.
· Choose an account that lets you use your own custom domain name. For example, I own the domain name alt.cc, and my main email address is in that domain. Because the domain name is under my control, I can move my email from one provider to another with minimal fuss—and have done so several times. If you don’t own your domain name, you’re stuck with a single provider forever—whether that’s Gmail, iCloud, your local ISP, or whatever—even if the provider has security or reliability problems, lacks features you want, or raises its prices.
· All things being equal, look for a provider that offers a generous storage quota, good server-side filtering and, preferably, server-side spam filtering. You’ll appreciate the flexibility of these features in the long run.
Optimize Your Mailboxes
For both email messages and files, I prefer a hierarchical organization method to one based solely on tagging/labeling and searching. However, I used to take this to extremes, with more than a hundred intricately nested mailboxes—and at a certain point, that made it harder, rather than easier, to sort and find email. Although I haven’t gone so far as to use a single Archive mailbox for all saved messages, as some people do, I’ve deliberately reduced the number of mailboxes I use, and I hope before long to end up in the single digits. Having fewer mailboxes makes it quicker to file messages and involves a lot less scrolling, especially on iOS devices.
I explain why and how I optimized my mailboxes in a Macworld article called Simplify your email. The short version is: use as few mailboxes as possible, and make the categories they represent as broad, distinct, and unambiguous as possible.
Once you’ve done that, and assuming you’re using an IMAP or Exchange email account (so your server-based folders are synced between all your devices), I suggest taking two additional steps to make life easier for yourself in Mail for iOS, which always displays mailboxes in alphabetical order and which has no controls for collapsing or expanding hierarchical mailboxes:
1. If any of your most frequently used mailboxes aren’t already at the top level of your mailbox hierarchy, move them there—you’re looking for a flat structure without sub-mailboxes, or at least with as few as possible.
2. Rename your most frequently used mailboxes so they appear alphabetically before the rest of your mailboxes. One easy way to do this is to put a punctuation character at the beginning of each name. For example, change Work to _Work. Characters such as the underscore (_), hyphen (-), and period (.) work well. (Some mail servers won’t accept a space at the beginning of a mailbox name.)
3. You can further adjust the names to put them in a specific order.
For example, if you started with this:
_Apple
_Family
_Recreation
_Work
You might rename them like this to force a particular sort order:
_1 Recreation
_2 Family
_3 Work
_4 Apple
Now, when viewing your account’s mailboxes, you can quickly access the most commonly used ones in Mail in both OS X and iOS.
Use Rules
Rules, sometimes referred to as filters, process messages as they come in. Each rule looks for certain conditions (criteria such as a sender, subject, or words in the message body), and then takes one or more actions whenever a match is found (moving the message into a certain mailbox, sending an automatic reply, deleting the message, or whatever).
If you’re trying to keep your Inbox under control, rules are one of the most powerful tools available. Because I presort my email with rules, tons of messages that don’t require immediate attention never reach my Inbox at all; instead, they’re safely shunted to other mailboxes where I can review them at my convenience. Creating a good set of rules requires a bit of thought and effort, but once you’ve done that, those rules operate invisibly in the background.
Rules can operate either in Mavericks Mail or directly on your incoming mail server. The huge advantage to server-based rules is that they can presort messages before you see them—which also cuts down on the amount of mail you need to process on your iOS devices—and they do so even if Mail isn’t running on your Mac. On the other hand, rules running in Mavericks Mail can do several tricks that server-based rules can’t, such as running user-defined AppleScripts on matching messages, and moving messages to mailboxes in other accounts.
Depending on your needs (and the capabilities of your email provider), you may want to use a combination of server-based and local rules.
Use Server-based Rules
Many email providers with webmail interfaces—including iCloud and Gmail—offer ways to create server-based rules or filters. These are often more limited than the rules available in Mail, but I still recommend starting with server-based rules if possible and then using Mail only for actions you can’t accomplish on the server.
You’ll need to check with your email provider to see whether it offers rules or filters, and if so, what the procedure is to configure them. To offer just two examples:
· iCloud: Log in to your account at iCloud.com. Click Mail, and then click the gear ![]() icon in the lower-left corner and choose Rules from the pop-up menu. Click Add a Rule to configure your first rule.
icon in the lower-left corner and choose Rules from the pop-up menu. Click Add a Rule to configure your first rule.
· Gmail: Log in to your Gmail account (using this link or whichever URL you normally use for a Google Apps account with a custom domain). From the gear ![]() pop-up menu at the top of the page, choose Settings, and then click Filters. Click Create a New Filter to begin setting up a custom filter.
pop-up menu at the top of the page, choose Settings, and then click Filters. Click Create a New Filter to begin setting up a custom filter.
For local rules in Mavericks Mail, read on.
Use Rules in Mavericks Mail
Whether or not you use server-based rules, Mail in Mavericks has an excellent rule capability. Mail applies rules automatically to messages as they are delivered to your Inbox. I wanted to spell that out explicitly because Mail does not apply rules to messages that arrive in other mailboxes, even if they’re unread—for instance, if you have a server-based rule that moves a message to your Family mailbox, that message bypasses your Inbox and is therefore exempt from being processed by Mail’s rules.
(You can manually apply rules to selected messages, wherever they reside, by choosing Message > Apply Rules—for example, if you want Mail to use rules to re-sort messages that were moved into the wrong mailbox by the server. However, note that that command applies all your rules, not just a specific rule. If you want more control over after-the-fact rules, try the Mail Act-On plug-in.)
Create a Rule
To create a basic rule, follow these steps:
1. Go to Mail > Preferences > Rules and click Add Rule.
A dialog appears showing the condition(s) the rule checks for and the action(s) Mail takes if the conditions match.
2. Enter a name for the rule in the Description field.
3. Set a condition to check for. Start by choosing something from the left-hand pop-up menu in this area; depending on what you choose, you may now see a second pop-up menu, a text field, or both. Here are some examples of a completed condition:
[From] [Contains] apple.com
[Subject] [Begins with] Take Control
[Date Sent] [Is Less Than] 3 days old
[Message Content] [Does not contain] Mavericks
4. From the provided pop-up menus, choose the action you want the rule to perform on a message if (and only if) it matches the condition you just specified. (Just ahead I explain how to handle rules that include multiple actions.)
Here are some examples:
[Move Message] to mailbox: [Filed]
[Set Color of Message] [of background] [Blue]
[Reply to Message] (Click the button and fill in your reply)
[Mark as Read]
(If you use a rule to move a message, choose your target mailbox carefully. In general, unless you mean to specifically archive the message to a local mailbox, you’ll want to move it to a server-based mailbox—most likely in the same account—so the message will be available on all your iOS devices and other Macs.)
5. Click OK.
An alert appears, asking if you want to apply your rules (including the one you just created) to messages in selected mailboxes.
6. Click Apply or Don’t Apply, as you prefer, but I generally suggest clicking Don’t Apply, because applying new rules to messages in open mailboxes can have unexpected and potentially unpleasant results.
7. If you’re finished creating rules, close the Preferences window.
Your new rule now checks all incoming messages for matches and performs the actions on them that you set.
Rules can get quite elaborate. For example, you can click the plus ![]() button to add multiple conditions and choose Any or All from the pop-up menu at the top of the dialog to specify whether the rule is triggered if at least one condition is met (any) or if they must all be (all). Likewise, a rule can perform several consecutive actions, such as marking a message as read, replying to it, and moving it to a mailbox.
button to add multiple conditions and choose Any or All from the pop-up menu at the top of the dialog to specify whether the rule is triggered if at least one condition is met (any) or if they must all be (all). Likewise, a rule can perform several consecutive actions, such as marking a message as read, replying to it, and moving it to a mailbox.
VIPs and Notifications in Rules
Two features of rules (one condition and one action) can work together in useful ways:
· Sender Is VIP: This is a condition that rules can check for. When the sender is in your current list of VIPs, the condition is triggered. Unfortunately, there’s no way to specify [Sender Is Not VIP], so you can’t, for example, send a canned reply only to people who aren’t VIPs.
· Send Notification: If you don’t already use notifications for all your incoming messages, this action is a handy way to make sure only messages matching special criteria appear as notifications. One of those criteria, of course, could be [Sender Is VIP]—giving you special notifications for VIP senders.
Rule Examples
One of the most common uses for rules is to process repetitive messages. If you find yourself filing, flagging, or deleting a certain type of message at least once a week, you can save time and effort by setting up a rule to do it for you. Examples are mailing lists, utility bills, bank statements, newsletters, travel discount offers, and jokes forwarded by friends or family members.
Here are a few rules of this type I’ve used:
TidBITS issues:
If Any of the following conditions are met:
[From] [Contains] editors@tidbits.com
Perform the following actions:
[Move Message] to mailbox: [Lists]
Any public Apple mailing list:
If Any of the following conditions are met:
[From] [Contains] @lists.apple.com
[Cc] [Contains] @lists.apple.com
Perform the following actions:
[Move Message] to mailbox: [Lists]
Feedback about this book:
If Any of the following conditions are met:
[Subject] [Is] Take Control of Apple Mail
Perform the following actions:
[Move Message] to mailbox: [Mail Book Feedback]
Tip: To ensure that a message matched by a given rule isn’t also processed by other rules, add the Stop Evaluating Rules action as the final action for any rule. Doing this improves Mail’s performance and avoids potential rule conflicts.
Control Spam
According to recent estimates, about 70 percent of all email is spam. Despite government crackdowns, technological improvements, and a public that’s less likely to fall for spam than was once the case, spam continues to be a menace. I don’t tolerate junk mail in my Inbox, and you shouldn’t either. I’ve written several books and articles about spam, but I’d like to summarize my advice on stopping spam with four main points, which will get most people most of the way there.
Stop Spam at the Server
You shouldn’t have to wait until your email arrives in Mail to filter out spam. Most responsible email providers now offer server-side spam filtering—either as an option or as an automatic, built-in feature. Letting the mail server identify spam means less spam in your Inbox—and not just on your Mac! If you use an iOS device, which doesn’t offer spam filtering, you’ll appreciate the help with sorting out bad messages before they’re downloaded.
Gmail, to take a prominent example, offers excellent spam filtering—not perfect, it’s true, but mighty good. You don’t have to configure anything; just use Gmail and all the filtering happens behind the scenes. If you find a message in your Junk mailbox that Gmail has incorrectly marked as spam, you can simply drag it to your Inbox and Gmail will then be less likely to filter out a similar message in the future.
iCloud also includes spam filtering, but it’s both more aggressive and more opaque—filtered messages simply disappear altogether, and you, as the recipient, may never know what happened to them (or, even worse, that they were ever sent!). I’ve had friends send email to my me.com address that I never received, and the only explanation we can find is that iCloud must have decided they were spam and vaporized them. (Some people may consider the occasional false positive—a good message misidentified as spam—a small price to pay for an otherwise valuable service.)
Whichever email provider you use, check if server-side spam filtering is an option. If it requires you to turn it on, do! If it requires your provider to turn it on, ask them to. If it’s not offered, you might consider switching providers or forwarding your mail to a service such as Gmail that will handle that mess for you—some people even forward all their email to Gmail, and then have Gmail forward it to their preferred account, just to take advantage of Gmail’s spam filtering. You can then have Mail check just the account to which the messages were forwarded.
Yet another option is to use a cloud-based service such as MailRoute, which you can configure to check your incoming mail for spam before it reaches your regular mail server.
Set Mail’s Junk Mail Filter Correctly
For spam that does make it as far as your Mac, Mail’s built-in junk mail filter is your next line of defense. But you have to turn it on and set it correctly for it to be of any use.
By default, Mail is set to identify potential spam but not move it; when Mail sees a suspicious message in your Inbox, Mail colors its sender, subject, and date brown. This forces you to wade through all that likely junk mail to view your legitimate mail. A better option is to have Mail automatically move suspected junk mail into your Junk mailbox. And while you’re at it, I strongly recommend setting the other junk mail options correctly, as Apple’s default values may not give the best results. Follow these steps:
1. Go Mail > Preferences > Junk Mail.
2. Make sure Enable Junk Mail Filtering is checked.
3. Under “When junk mail arrives,” select Move It to the Junk Mailbox.
4. Make sure these checkboxes are checked:
§ Sender of Message Is in My Contacts
§ Sender of Message Is in My Previous Recipients
These will help prevent Mail from misidentifying legitimate messages as spam.
5. Uncheck Message Is Addressed Using My Full Name.
Unfortunately, many spammers probably know your full name, and having this checked would exempt the messages they send from being filtered out.
6. Check Trust Junk Mail Headers in Messages.
As I mentioned earlier, many email providers have server-based spam filters. Some add a special header to messages that appear to be spam rather than move messages to a Junk mailbox themselves. Since server-side filters are likely to be more powerful and up to date than Mail’s, it’s a good idea to make use of that extra hint.
Your Junk Mail preferences should look like Figure 17.
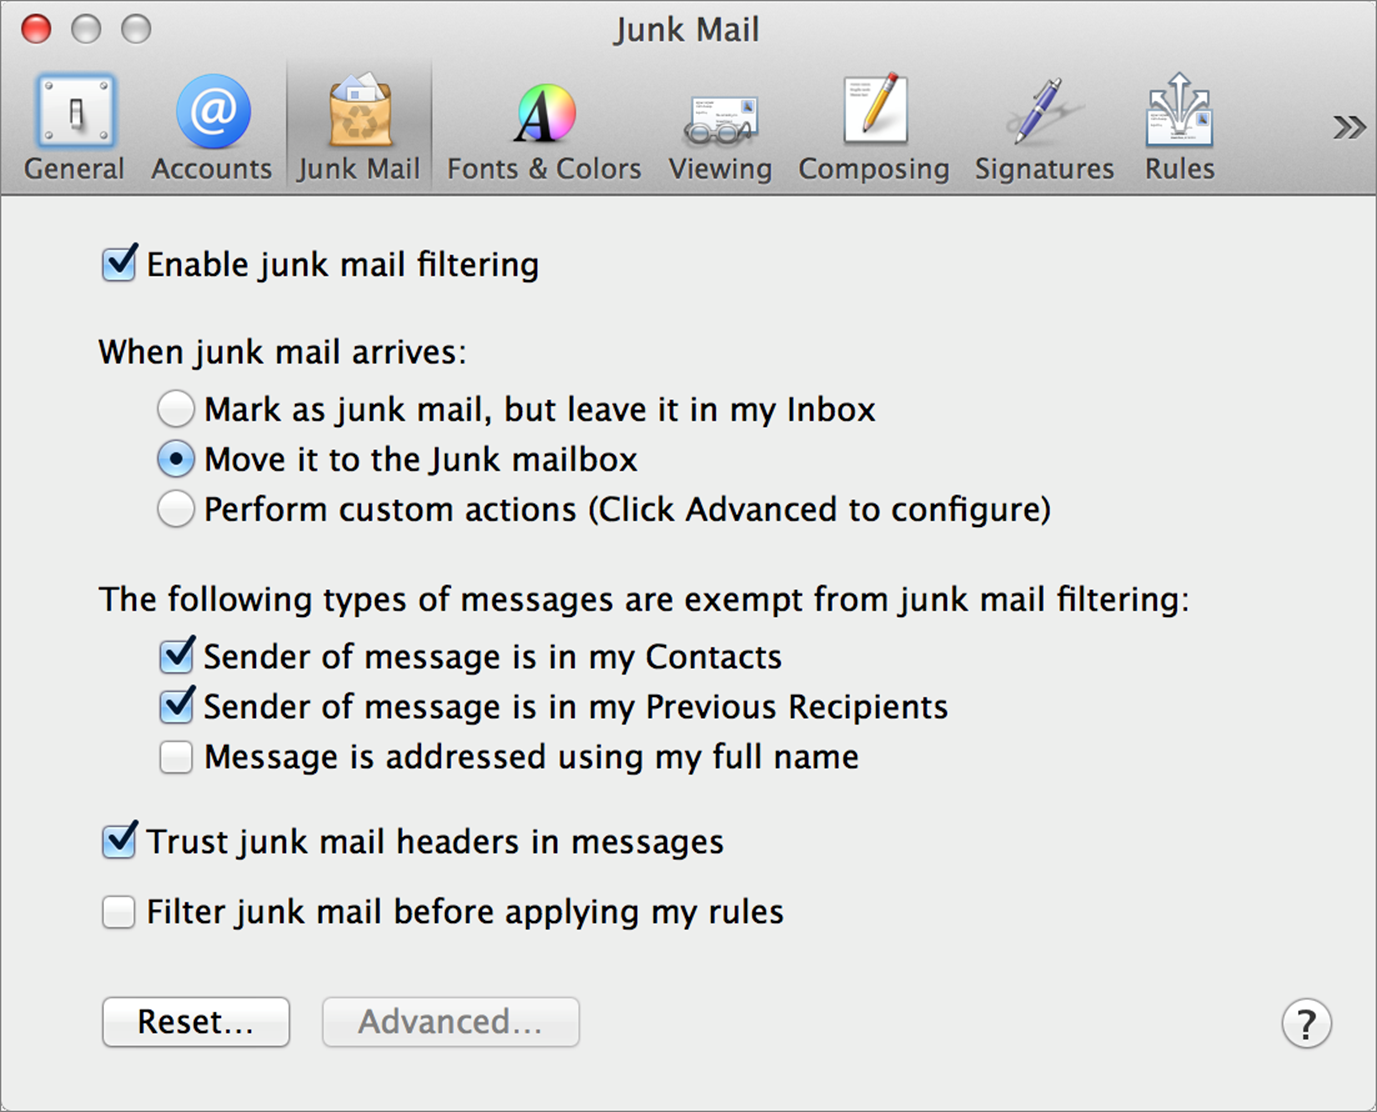
Figure 17: These are what I consider to be the optimal Junk Mail settings in Mail.
A word about that last checkbox, Filter Junk Mail before Applying My Rules. Ordinarily, the Junk Mail filter runs after your rules, meaning your rules process all incoming spam messages and therefore may move some of them before the spam filter gets a chance to put them in the Junk mailbox. Checking this box makes the Junk Mail filter run first, which reduces that problem while possibly producing a higher number of false positives. I’m going to assume that you’ve set up good rules—so messages processed by your rules are usually “real” mail—and suggest leaving this unchecked.
Train Your Junk Mail Filter
Mail’s Junk Mail filter gets smarter and more accurate as you use it—but only if you tell it the truth! That means always correcting it when it makes a mistake. If Mail fails to move a spam message to your Junk mailbox, select it and click the Junk ![]() button on the toolbar. In addition, scan your Junk mailbox every few days or so to make sure Mail hasn’t mistakenly marked a good message as spam. If you find a legitimate message, select it, click the Not Junk
button on the toolbar. In addition, scan your Junk mailbox every few days or so to make sure Mail hasn’t mistakenly marked a good message as spam. If you find a legitimate message, select it, click the Not Junk ![]() button on the toolbar, and drag the message back to your Inbox.
button on the toolbar, and drag the message back to your Inbox.
Bring In the Big Guns
If, despite following these instructions—using server-based filtering, properly configuring Mail’s junk mail settings, and diligently training Mail’s Junk Mail filter for weeks—you get too much spam in your Inbox, you need a third-party anti-spam utility to beef up Mail’s defenses. There are several good choices, but my favorite is Michael Tsai’s SpamSieve. It’s freakishly accurate and, for heavy email users, money well spent.
Develop an Email Strategy
All right, suppose you’ve consolidated your accounts, optimized your mailboxes, set up some rules, and brought spam under control—but you still get too much email in your Inbox. What to do?
I’ve read (and written) about many different approaches to dealing with email overload. I find I’m happiest and most efficient when I keep my Inbox empty, or nearly so. It’s not as hard as it may sound, but it requires adopting new habits when dealing with incoming mail. Of course, part of the solution involves creating additional mailboxes and filing messages there, but if you want a lasting solution, you need to do more than just move the problem from one place to another!
I described one way to do this in my (award-winning!) Macworld article Empty Your Inbox, and you should feel free to use that—or adapt it to your needs—if you like it. But the truth is, my own system is even simpler, and it comes down to four main things:
· Stopping the flow of non-essential incoming email (such as mailing lists)
· Using rules to automatically move less-crucial messages out of my Inbox
· Reading and processing incoming messages (that is, answering them, filing them, or doing whatever else is required to get them out of my Inbox) as soon as possible after they arrive
· Not using my Inbox as a to do list
Take Control publisher Adam Engst uses an entirely different approach, which he describes in a series of TidBITS articles called Zen and the Art of Gmail. I could never stand to use Adam’s approach and he could never stand to use mine, yet both of us feel that our email is under control. That’s because we each thought deeply about which parts of our email experience were bothering us and worked out solutions that fit our respective needs and personalities. So, as I said in Take Responsibility, the point is not to do things myway but to figure out what your way is, and stick to it.
Another factor to consider is how and when you process new incoming messages. Some people find they’re most productive if they keep Mail closed most of the time, opening it just once or twice a day and dealing with all their email in batches. For me, the opposite is true—having to process so many messages at once makes me anxious, and I feel more relaxed if I notice and address messages as they come in, so that I never get behind. (I say more about this in my Macworld article Simplify your email.) Even so, I dislike notifications popping up on the screen when I’m trying to concentrate. So I restrict Mail’s notifications (in both OS X and iOS) to badging the Dock icon.
Even though I get tons of email, the techniques I’ve just mentioned enable me to stay in control of my Inbox. In some situations, however, a bit of technology can help overcome frustrations with developing a manual strategy. For example, a service called SaneBoxwill, for a monthly fee, perform an automated analysis of your incoming messages, determine what’s likely to be less important to you, and move it out of your Inbox (providing only a brief summary). It can do other tricks too, such as providing server-based rules—even if your email provider doesn’t offer them—and automatically moving attachments to cloud storage such as Dropbox. Although SaneBox doesn’t fit my model of email management, many people find it immensely helpful.
One final tip for iOS users. I already urged you to Consolidate Your Accounts, but if you can devise a scheme whereby you have just one account (iCloud, Gmail, IMAP, or Exchange) on your iOS device, do so. It’ll save battery life and network bandwidth—and it’ll make reading and organizing your messages much simpler, given iOS Mail’s limited interface. Even if you can’t achieve this ideal, set up as few accounts as you can—for example, one for work email and one for personal—and avoid POP, if possible.
Back Up and Restore Your Email
Are your email messages valuable to you? I know mine are. I’ve spent years saving them, and they’re the only record I have of certain kinds of information. So you’d better believe I back up my email along with the rest of my files, and I recommend that you do, too. See my book Take Control of Backing Up Your Mac for guidance.
If you use Time Machine to back up your Mac, you have the advantage of being able to restore individual messages in Mail—just click the Time Machine Dock icon while Mail is the frontmost app, navigate back to a time when your message was there, select the message, and click Restore. Other backup systems make it more challenging to find individual messages to restore, but even restoring your entire Mail archive from an earlier time is better than losing a crucial message.
Whichever backup software you use, make sure it backs up all the following items (Time Machine does so by default):
· ~/Library/Mail: This folder contains all your mailboxes, rules, junk mail settings, and most of the other data Mail uses.
· ~/Library/Keychains: This folder contains all your keychains, which store your usernames and passwords.
· ~/Library/Application Support/AddressBook: This folder contains your Contacts entries and your Previous Recipients list.
· ~/Library/Preferences: This folder contains your preference files, among which is the one Mail uses.
If your iOS device is set up to use either iCloud or iTunes for automatic backups, those will include your email too, but beware—that works only for messages already downloaded to your device, not all the messages from a server-based account.
It’s also possible to use an app or cloud service to back up messages from your email provider to either your Mac or a cloud-based service. Examples of Mac apps include BackupGoo, Gmail Backup, Gmvault Gmail Backup, and Horcrux; services include Backupify for Google Apps, Dropmyemail, and Spinbackup. I have no experience with any of these, so be sure to study the fine print to see if one of them will meet your needs. And remember: if you’re backing up your email to your Mac, you’ll also need to back up those backups to another location!
All materials on the site are licensed Creative Commons Attribution-Sharealike 3.0 Unported CC BY-SA 3.0 & GNU Free Documentation License (GFDL)
If you are the copyright holder of any material contained on our site and intend to remove it, please contact our site administrator for approval.
© 2016-2026 All site design rights belong to S.Y.A.