Pro Office for iPad: How to Be Productive with Office for iPad (2014)
Chapter 11. Becoming Expert with PowerPoint for iPad
PowerPoint for iPad brings the most widely used presentation app to your Apple tablet. At this writing, PowerPoint for iPad offers only a subset of the features in the full desktop versions for Windows and Mac, but it has enough features for you to build powerful presentations, either from scratch or by editing existing presentations, and to deliver them directly from your iPad.
Understanding PowerPoint for iPad’s Features and Limitations
PowerPoint for iPad is a smaller app than the desktop versions, PowerPoint for Windows and PowerPoint for the Mac, and doesn’t aim to offer all their features. In this section, you will learn about the features that PowerPoint has, about those features that are partially implemented or missing, and about what happens to content that PowerPoint for iPad doesn’t support.
Which Features Does PowerPoint for iPad Have and Lack?
The following list highlights the main features that are present in PowerPoint for iPad, mentioning those areas in which they fall short:
· Presentation themes: PowerPoint for iPad comes with a wide selection of presentation themes in both widescreen and standard formats.
· Slide types: Each presentation theme contains a set of different slide types, ranging from title slides to slides with specific types of content and blank slides for you to arrange content however it is needed.
· Slide content: Apart from text (with your choice of formatting), PowerPoint for iPad enables you to populate your slides with tables, pictures and videos, shapes, and text boxes. You can also insert a chart by copying and pasting it from Excel.
· Slide notes: You can create and edit notes for each slide, and then view the notes as needed while delivering the presentation.
· Transitions: PowerPoint for iPad provides a good range of transitions that you can apply to animate or dramatize the changeover between slides.
· Comments: You can review existing comments and toggle the display of comments as a whole, but you cannot add comments, edit them, or delete them.
· Slideshow features: PowerPoint for iPad includes a solid basic set of features for giving a slideshow. These include Presenter view, which enables you to see the upcoming slides; the ability to display hidden slides as needed; a black screen for when you need to give the audience nothing to look at (for example, when you need to draw their attention back to yourself); and tools for drawing on the screen, plus a simulated laser pointer for highlighting key points.
Note If PowerPoint on your iPad is lacking any of the features explained here, run the App Store app and update to the latest version. Microsoft has added many features to PowerPoint since the original release. In particular, Version 1.1 was a big improvement, bringing features including Presenter View, Presenter Tools, the ability to add videos from your iPad’s storage and to play media during presentation, and cropping for pictures.
These are the main items that PowerPoint for iPad is missing at this writing:
· Views: The desktop versions of PowerPoint include Slide Sorter view, which gives you an easy way to get an overview of a presentation and move slides to different positions, either singly or in groups.
· Outlines: The desktop versions also include an Outline view in the Navigation pane that helps you to create the text outline of a presentation and enables you to rearrange paragraphs or slides as needed.
· Themes and masters: The desktop versions enable you create themes, which PowerPoint for iPad doesn’t. In the desktop versions, you can also edit the slide masters, handout masters, and notes masters.
· Animations and transitions: The desktop versions enable you to animate individual objects on a slide. They also provide more configuration options for transitions between slides.
· Review tools: The desktop versions of PowerPoint provide full commenting features, enable you to compare two versions of a presentation and integrate those changes you want to keep, and protect a presentation against changes.
· Macros and VBA: The desktop versions enable you to use macros written in Visual Basic for Applications (VBA) to automate tasks. You can also create user forms (custom dialog boxes) to add a user interface to your VBA macros.
What Happens to Content That PowerPoint for iPad Does Not Support?
If you open a presentation that contains content PowerPoint for iPad doesn’t support, the app deals with that content as smartly as possible. Usually, you won’t see a problem.
First, PowerPoint for iPad can display many content items that it cannot create or edit at this writing. For example, if you open a presentation that contains object animations, you’ll find they normally play back correctly when you run the slide show, even though you cannot edit them on the iPad.
Tip PowerPoint for iPad’s ability to play back content it cannot create or edit is helpful but makes it doubly important to check through a presentation before delivering it. Only by running a slide show of the presentation can you see the details of object animations that the app’s user interface does not display.
Second, PowerPoint for iPad ignores any content that it truly cannot handle, such as VBA code and user forms. But it leaves these items in the file when you edit the presentation.
Creating a New Presentation on Your iPad
You can create a new presentation on your iPad quickly by following these steps.
1. Tap the New tab of the file management screen. The presentation designs appear.
2. In the upper-right corner, see if the Slide Size readout shows the size you want—either Widescreen (16:9) or Standard (4:3). If not, tap the existing size to display the Size pop-up panel (see Figure 11-1), and then tap the size you want. The screen displays the presentation designs available in that size.
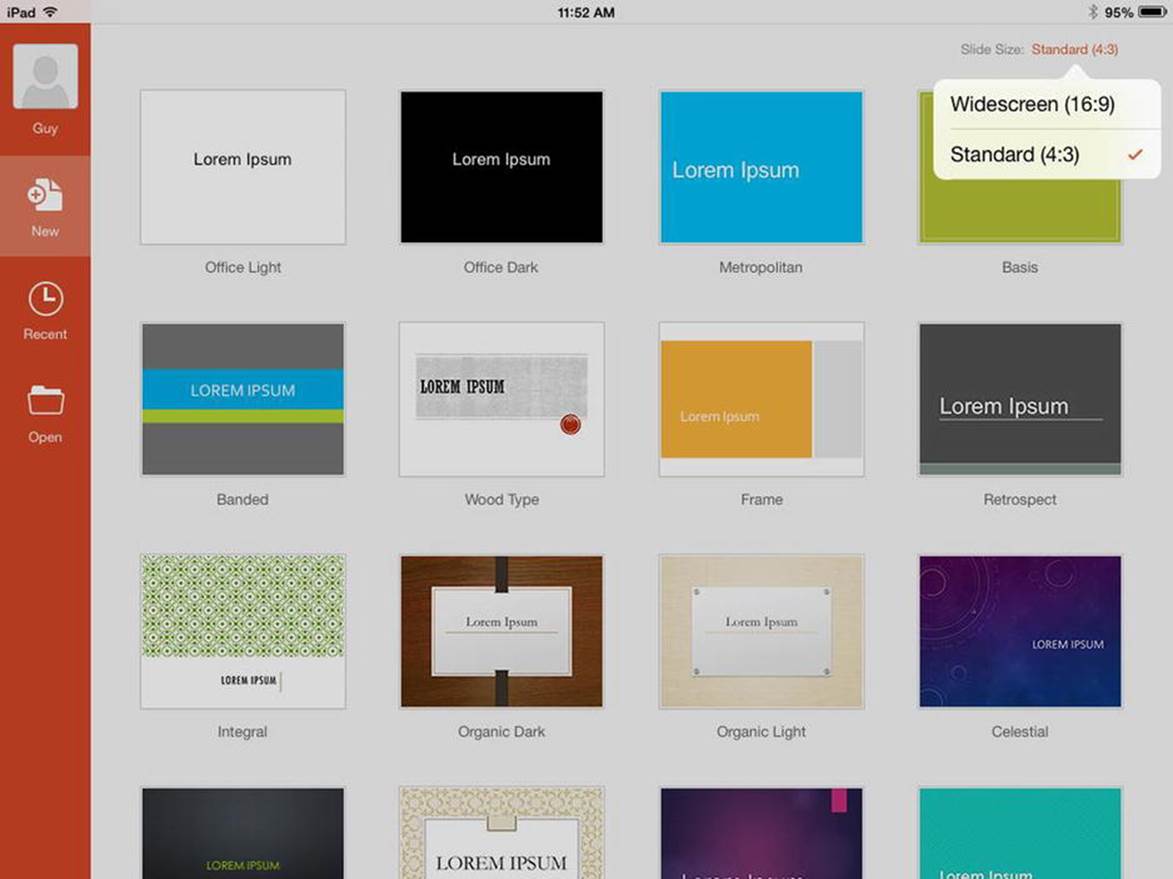
Figure 11-1. Choose the slide size in the upper-right corner of the New screen, and then tap the design you want to use for your new presentation
3. Tap the presentation design you want. PowerPoint opens a new presentation that uses the design.
Note Most presentation templates for PowerPoint for iPad start you off with a single slide, leaving you to add all the rest; other templates include all the slides that form the framework for a standard presentation, which you can customize as necessary. If you need to add another slide to your presentation at this point, tap the New Slide button and then tap the slide type on the New Slide pop-up panel. You’ll look at this process in more detail a little later in this chapter.
Opening a Presentation
You can open a presentation by using the file management screen as usual. The presentation can be stored either on your iPad or on an online service to which you have connected your iPad, such as your OneDrive account or a SharePoint server.
DEALING WITH THE “DOCUMENT TOO BIG” ERROR WHEN OPENING A PRESENTATION
If PowerPoint displays the Document Too Big dialog box when you try to open a presentation, you’ll know that the presentation needs more memory than your iPad can provide at present. Tap the OK button—it’s the only choice—to close the dialog box, and then try the following suggestions to fix the problem.
If you’ve opened this presentation successfully on this iPad in the past, and nothing has happened to vastly increase the presentation’s file size since you last opened it, the issue is most likely that your iPad is low on memory. Double-press the Home button to bring up the app-switching screen, and then close as many apps as possible by dragging or swiping them upward off the screen. You can swipe three at once if you’re handy with your fingers.
After closing all the apps you don’t need, power your iPad down by pressing and holding the Sleep/Wake button until the Slide to Power Down slider appears, and then sliding that slider. After your iPad shuts down, give it 10 seconds to contemplate nothingness, and then press and hold the Sleep/Wake button until the Apple logo appears on the screen. When the lock screen appears, unlock the iPad, launch PowerPoint, and then try opening the presentation. It should be okay this time.
If not, chances are that the presentation has become bloated. Perhaps one of your colleagues has edited it and inserted a video file of an unwise length. In this case, you’ll need to get the presentation back down to a size that your iPad can handle. Open the presentation in a desktop version of PowerPoint, identify the bloat, and remove it. Use the Save As command to save the presentation under a new file name if your colleague will still need the full-fat version. Then try opening the slimmed-down presentation on your iPad.
In passing, if the iPad you have is an older one, but you have access to a newer iPad, you could try using the newer one to open a presentation that produces the “Document Too Big” dialog box. Newer iPads have more RAM than older ones, so (all other things being equal) they can open larger documents. The original iPad has 256MB RAM; the second-generation iPad and first-generation iPad mini have 512MB; and the third-generation and fourth-generation iPad, the iPad Air, and the second-generation iPad mini have 1GB.
Navigating the PowerPoint Interface
The PowerPoint interface is easy to navigate. Figure 11-2 shows PowerPoint with a presentation open that contains several slides.
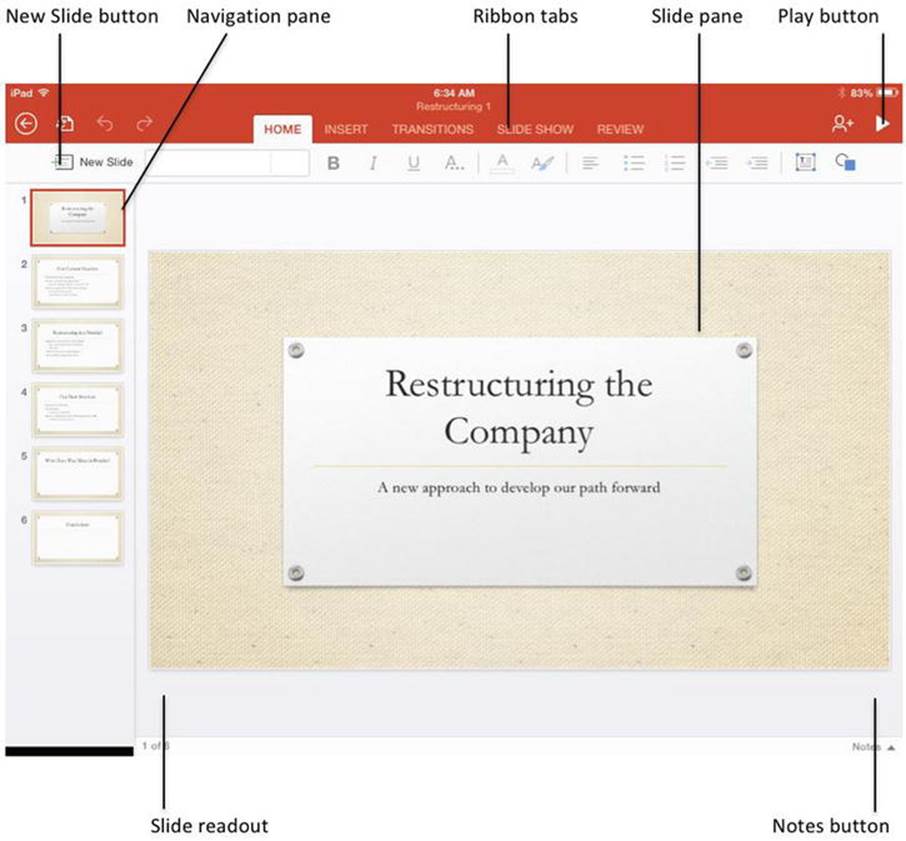
Figure 11-2. The PowerPoint interface
The PowerPoint interface has these seven main components:
· Ribbon: PowerPoint’s Ribbon contains five static tabs—Home, Insert, Transitions, Slide Show, and Review—plus various contextual tabs that appear when you are working with an object that requires a contextual tab. For example, when you select a picture, the Picture tab appears; and when you select a table, the Table tab appears.
· New Slide button: Tap this button to display the New Slide pop-up panel, which contains the slide types available in the presentation design.
· Navigation pane: This pane on the left side of the screen shows a thumbnail for each slide in the presentation in their start-to-finish order. You tap a slide in the Navigation pane to display it for editing in the Slide pane.
· Slide pane: This pane is where you edit your slides or admire their brilliance. This pane takes up most of the user interface.
· Play button: Tap this button to start playing the presentation from the current slide.
· Slide number: This readout in the lower-left corner of the Slide pane shows the number and position of the slide displayed—for example, 1 of 6.
· Notes button: Tap this button in the lower-right corner of the PowerPoint interface to display the Notes pane for the current slide. You can then add notes to the slide to help you or whoever delivers the presentation.
Adding, Deleting, and Rearranging Slides
To get your presentation into shape, you’ll need to add new slides, delete existing slides, and rearrange the remaining slides into the right order for the presentation.
Adding a Slide
Here’s how to add a slide to a presentation.
1. In the Navigation pane, tap the existing slide after which you want to add the new slide. If the right slide is already displayed in the Slide pane, you’re all set.
2. Tap the New Slide button to display the New Slide pop-up panel (see Figure 11-3). The selection of slide types varies depending on the template on which you based the presentation. Table 11-1 explains some of the widely used slide types.
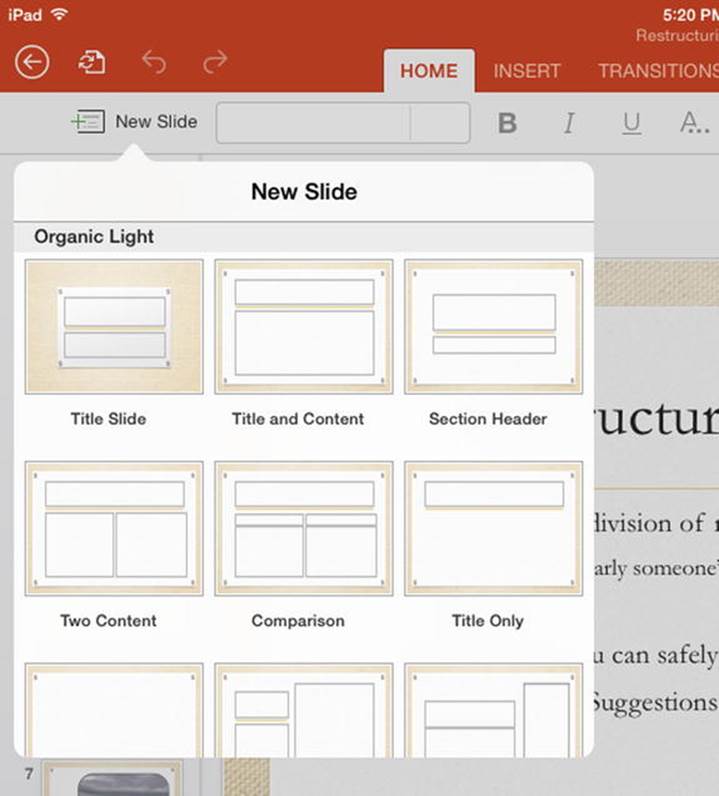
Figure 11-3. In the New Slide pop-up panel, tap the slide type you want to add to the presentation
3. Tap the slide design you want to use for the new slide.
Table 11-1. Widely Used Slide Types in PowerPoint Presentations
|
Slide Type |
Contents and Usage Notes |
|
Title Slide |
A title placeholder on a theme background. |
|
Title and Content |
A title placeholder, usually at the top of the page, with a content placeholder below it. |
|
Section Header |
Two text placeholders, designed to contain the section heading of the upcoming section and text briefly explaining its contents. |
|
Two Content |
A title placeholder across the top, with side-by-side portrait-shape placeholders below it, for positioning two types of content side by side. |
|
Comparison |
A title placeholder across the top, with side-by-side portrait-shape placeholders below it, for positioning content you intend the audience to compare directly. |
|
Title Only |
A title placeholder only, with no other content. |
|
Blank |
Nothing—a blank canvas for whatever you need to add. |
|
Content with Caption |
A placeholder for content of your choice (such as text or a table) with a text placeholder beside it. |
|
Picture with Caption |
A placeholder for a portrait-format picture with a text placeholder beside it. |
|
Panorama Picture with Caption |
A placeholder for a wide-format picture, such as a panorama or a photo cropped to a shallow depth, with a text placeholder beneath it. Some templates contain multiple versions of this slide type with different layouts. |
|
Title and Caption |
A title placeholder and a caption placeholder |
|
Quote with Caption |
A title placeholder with double quotation marks around it, for entering a motivational quote, with a text placeholder below it for entering an explanation, follow-up, or the like. |
|
Name Card |
A title placeholder for the person’s name and a text placeholder for the person’s position or description. |
|
Quote Name Card |
A title placeholder with double quotation marks around it, for entering an inspiring quote, with two text placeholders below it, the first for the name of the person you’re quoting and the second for the person’s title or description. |
|
Title and Vertical Text |
A horizontal title placeholder across the top of the slide with a text placeholder under it in which the text runs vertically, as if the text placeholder has been rotated 90 degrees clockwise. |
|
Vertical Title and Text |
A vertical title placeholder and a vertical text placeholder—the text runs vertically in both placeholders. This slide type is mostly useful for delivering in portrait orientation rather than landscape orientation. |
The new slide appears in the presentation, and you can add content to it as discussed in the section “Adding Content to a Slide,” earlier in this chapter.
Deleting a Slide
To delete a slide, double-tap it in the Navigation pane, and then tap Delete on the Edit menu. There’s no confirmation of the deletion.
Tip If you need to recover a slide you’ve deleted, you can tap the Undo button on the Ribbon one or more times to get the slide back. If you’ve gone too far to retrieve the slide by using Undo, and you’re prepared to lose the changes you’ve made since deleting the slide, tap the File button to display the File pop-up panel, tap Restore, and then tap the latest version available. If that version doesn’t contain the deleted slide, restore the second latest version, and so on until you find the slide.
If you have made extensive changes since deleting the slide, use the Duplicate command on the File menu to duplicate the new version of the presentation, saving your changes in it. Then restore the latest version of the old file so that you can retrieve the deleted slide from it and paste it into the new version.
Rearranging Slides
To rearrange the slides in a presentation, go to the Navigation pane and double-tap the slide you want to move. When the slide becomes mobile, drag it to its destination and drop it there.
Duplicating a Slide
When you’ve created a slide that looks exactly the way you want it to, you may want to base other slides on that slide rather than creating them from scratch using the New Slide pane. You can duplicate a slide easily by tapping and holding it and then tapping Duplicate on the Edit menu.
PowerPoint adds the duplicate slide directly after the original slide in the presentation. PowerPoint selects the duplicate slide automatically, so you can start editing it immediately in the Slide pane.
Cutting and Copying Slides
PowerPoint enables you to cut and copy slides in a presentation. By cutting a slide, you can easily move it either to another presentation or simply to another point in the same presentation. By copying a slide, you can paste a copy in either another presentation or the same presentation.
To cut or copy a slide, double-tap the slide to display the Edit menu, and then tap Cut or Copy, as needed. You can then move to the destination, either in another presentation or the same presentation, double-tap a slide, and tap Paste on the Edit menu.
Hiding a Slide
When you need to keep a slide in reserve, you can hide it so that it doesn’t appear in the slide show. Double-tap the slide in the Navigation pane, and then tap Hide on the Edit menu.
PowerPoint displays an icon showing a circle with a diagonal line across it to indicate a hidden slide, as you can see in the second slide in Figure 11-4.
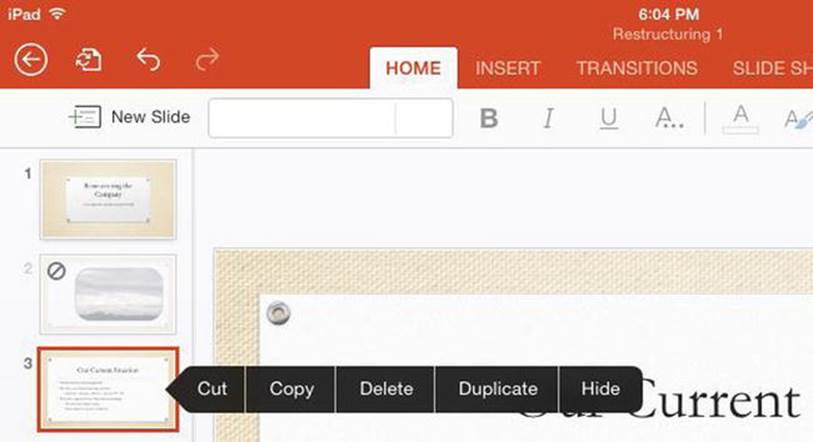
Figure 11-4. To hide a slide, double-tap it in the Navigation pane and then tap Hide on the Edit menu. A hidden slide bears a gray circle with a diagonal line across it, as you can see in the second slide here
As you’d imagine, you unhide a slide by tapping it in the Navigation pane and then tapping Unhide on the Edit menu.
Adding Content to a Slide
You can quickly build your slides by adding text, pictures, and tables to it. You can also add other objects such as shapes, text boxes, and even charts from Excel.
Adding Text
Many slide types contain text placeholders positioned and formatted so that you can add text easily. A text placeholder displays the prompt “Double tap to add text,” where text is the text type, such as “title,” “subtitle,” or “text.” When you double-tap the placeholder, the prompt disappears and the insertion point appears. You can then type the text for the placeholder.
Note If you’ve cut or copied text to the Clipboard, you can paste it by double-tapping at the appropriate place in the placeholder and then tapping Paste on the Edit menu.
After adding text to a placeholder, you can change it as needed. Tap the placeholder to select it, and then tap Edit Text on the Edit menu (see Figure 11-5).
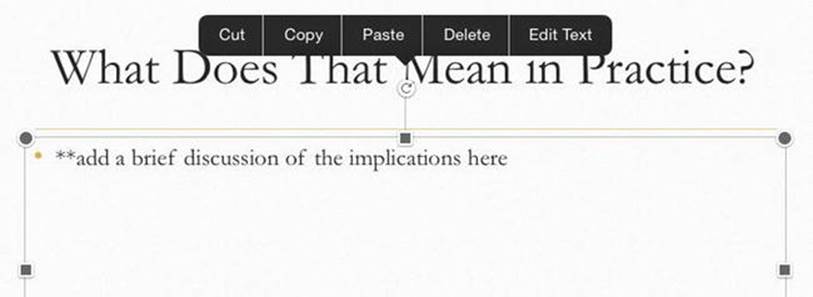
Figure 11-5. You can easily edit the text in a placeholder by tapping the placeholder and then tapping Edit Text on the Edit menu
Tip You can also double-tap in a placeholder to open it for editing. Double-tap after the end of the existing text to place the insertion point at the end of the text. Double-tap a word to select it.
The quick way to format the text in a placeholder is to format the entire placeholder. Tap the placeholder to select it, and then tap the appropriate controls on the Home tab of the Ribbon. For example, tap the Font box and then tap the font you want to apply to all the text in the placeholder.
Tip Triple-tap to select an existing paragraph of text in a placeholder.
To format just some of the text in the placeholder, open the placeholder for editing, select the text, and then apply the formatting. For example, double-tap a word to select it, tap the Home tab of the Ribbon (if it isn’t already displayed), and then tap the Underline button to apply underline to the word.
Adding Text Boxes to Slides
When you need to add text to part of a slide that doesn’t contain a suitable placeholder, you have two choices:
· Insert a text box: Tap the Home tab on the Ribbon, and then tap the Text Box button near the right end (see Figure 11-6); alternatively, tap the Insert tab on the Ribbon, and then tap Text Box. Either way, PowerPoint inserts a standard-size text box bang in the middle of the slide. You can then drag the text box to where you need it and drag its handles to resize it. To enter text in the text box, open it for editing either by double-tapping it or by tapping it and then tapping Edit Text on the Edit menu. After entering the text, you can select the text box and format it as needed.
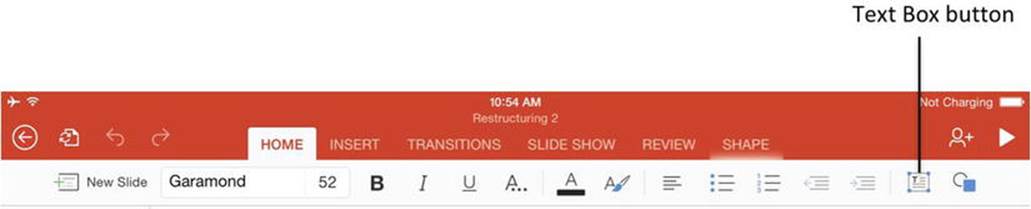
Figure 11-6. You can insert a text box by tapping the Text Box button on the Home tab of the Ribbon
· Copy a text placeholder and paste it: The advantage to this method is that you can pick up the contents and formatting of the placeholder, so you don’t need to duplicate the formatting if the new text needs the same look as the existing text. Copying and pasting a text placeholder sometimes fails if the placeholder is empty, so either copy a placeholder that already contains “real” text or add some dummy text to the placeholder, copy and paste it, and then replace the dummy text.
Adding Pictures to Slides
You can add pictures to slides by displaying the Insert tab of the Ribbon and using the Pictures command as usual. You use this command even when you’ve selected a picture placeholder—the picture placeholder doesn’t have a shortcut for invoking the Insert ![]() Pictures command.
Pictures command.
After inserting a picture, you can resize it proportionally by dragging a round corner handle, stretch or shrink the picture by dragging a square side handle, or rotate the picture by dragging the rotation handle at the top. But PowerPoint also enables you to reshape the corners of a picture you insert in a picture placeholder. To reshape the picture corners, drag the yellow handle that appears (see Figure 11-7).

Figure 11-7. Drag the yellow handle on a picture placeholder to reshape the corners
Adding Videos to Slides
PowerPoint enables you to add videos to your slides. Video can be a great way to enliven a presentation, but you need to be careful not to overuse it.
Note At this writing, you can insert only those videos that are stored in the Photos app—you can’t reach across your iPad’s file system and insert videos from elsewhere. Any videos you shoot using the Camera app go into the Photos app automatically, as do any videos you save from e-mail messages, instant messages, web pages, or social-media apps. From your computer, you can sync videos by connecting your iPad and using the Photos category in iTunes. If you are using automatic syncing, make sure you select the Include Videos check box on the Photos screen.
To insert a video on the current slide, display the Insert tab of the Ribbon, and then tap Videos. In the Videos pop-up panel, tap the appropriate photography source. For example, to add a video you’ve just taken using your iPad’s camera, tap Videos. In the pop-up panel that opens, tap the video and then tap the Use button.
The video appears on the slide, showing the first frame as a still photo. To reposition the video, tap it and drag it to where you need it. To resize the video, tap it and then drag a corner handle or a side handle, just as for a picture. To view the video, tap the Play button at the right end of the Ribbon to launch the slide show, and then tap the Play button for the video to set it playing.
Tip PowerPoint automatically compresses videos you insert in your presentations. But even so, adding long videos can greatly increase the size of a presentation. When working on a presentation that uses a lot of video, save it on your iPad rather than on OneDrive or SharePoint to minimize the amount of data PowerPoint needs to transfer across the Internet connection.
Adding Tables, Shapes, and Text Boxes to Slides
You can add tables, shapes, and text boxes to slides by using the standard techniques you learned in Chapter 2. After adding the objects, you can reposition, resize, and arrange them as usual.
Here are three suggestions for using these objects effectively in PowerPoint:
· Tables: When you use tables on slides, make them large and easy to read—otherwise, your audience may struggle to read the table’s contents during the presentation or to process the information.
Tip Be careful when copying tables from Word and pasting them into PowerPoint. Technically, the copy-and-paste process could hardly be easier, but often the result doesn’t deliver information effectively, because tables in Word are often complex and contain large amounts of information. Often, it’s better to take your existing tabular information and break it down into multiple tables for your slides, so that each table makes a single point.
· Shapes: Callout shapes can be a good way to draw attention to particular points on your slides. Similarly, you may sometimes need to use shapes to create objects that contain text.
· Text boxes: Use text boxes when you need to create complex layouts or intricate arrangements of text. As mentioned earlier, you can rotate a text box to display its contents at an angle or upside down. For regular text, you’re usually better off using text placeholders.
Adding a Chart from Excel to a Slide
If your presentation needs a chart on a slide, you can create the chart in Excel, copy it, and then paste it onto the slide. You can then resize the chart object on the slide as needed.
When you select the chart on the slide, PowerPoint displays the Chart tab of the Ribbon. You can then format the chart as explained in the “Copying and Pasting a Chart” section in Chapter 10.
Adding Notes to Slides
To add notes to a slide, tap the slide in the Navigation pane to display it, and then tap the Notes button in the lower-right corner of the screen. The Notes pane appears (see Figure 11-8), and you can type or paste the notes for the slide.
Figure 11-8. Type or paste the notes for a slide into the Notes pane. Tap the Notes button in the upper-right corner when you’re ready to return to the slide’s content
When you finish the notes for this slide, you can tap another slide to display its notes. When you’re done with notes for now, tap the Notes button at the upper-right corner of the Slide pane to return to the slide’s content.
Adding Transition Effects Between Slides
To smooth—or enliven—the changeover from one slide to another, you can add a transition effect. PowerPoint provides a wide variety of transition effects that it breaks up into three categories: Subtle, Exciting, and Dynamic Content.
PowerPoint considers the transition to belong to the incoming slide rather than the outgoing slide, so to get a transition effect between the first and second slides, you apply the transition effect to the second slide.
Here’s how to apply a transition.
1. Tap the slide to which you want to apply the transition—the second slide in the pair, as it were.
2. Tap the Transitions tab of the Ribbon to display its controls.
3. Tap the Transition Effect button to display the Transition To This Slide pop-up panel (see Figure 11-9).
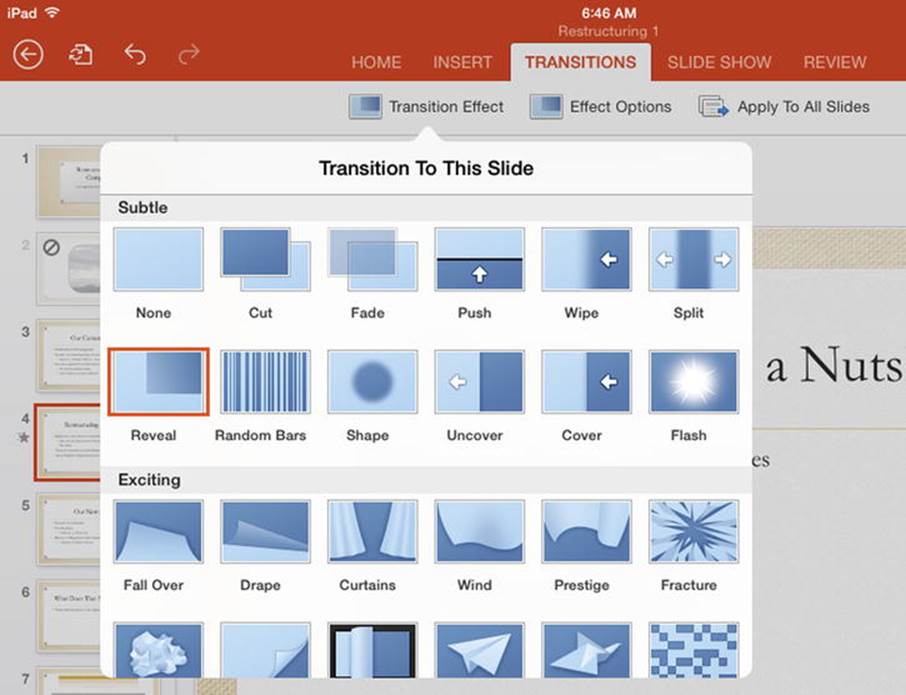
Figure 11-9. Tap the slide in the Navigation pane, tap Transition ![]() Transition Effect, and then tap the transition you want to apply
Transition Effect, and then tap the transition you want to apply
4. Scroll up or down as necessary to locate the transition effects category you want:
a. Subtle: This category includes transitions such as Fade, which fades the incoming slide in as the outgoing slide fades out; Push, in which the incoming slide pushes the outgoing slide off the screen in the direction you choose; and Split; which splits the outgoing slide in the middle to reveal the incoming slide underneath it, and then moves the halves of the outgoing slide off the screen.
b. Exciting: This category includes transitions such as Honeycomb, which displays a honeycomb lattice that it turns and zooms toward the viewer to enliven the changeover between slides (see Figure 11-10); and Origami, which folds up the current slide into an origami bird and then flutters it away.

Figure 11-10. The Exciting category includes transition effects such as Honeycomb, which provides in-your-face changeovers between slides
c. Dynamic Content: This category contains transition effects that animate the slides’ content rather than simply animating the slide as a whole. For example, the Rotate transition effect rotates away the content of theoutgoing slide, replacing it with the content of the incoming slide.
5. Tap the transition you want to apply. PowerPoint displays a star to the left ofthe slide’s thumbnail in the Navigation pane to indicate that the slide has a transition applied.
6. If the Effect Options button on the Ribbon is available, tap it to display the Effect Options pane (see Figure 11-11), and then tap the option you want to use. The options available depend on the transition effect, but many transition effects let you choose the direction in which they work. Some transition effects have no options; in this case, the Effect Options button is dimmed to indicate it’s not available.
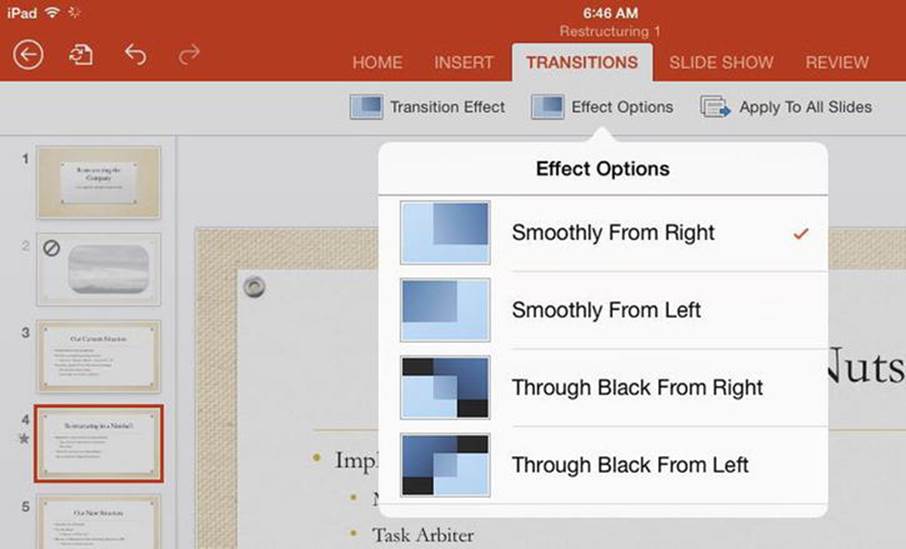
Figure 11-11. Tap the Effect Options button and then tap the appropriate option on the Effect Options panel
After applying a transition effect, review it and see how well it works. Tap the slide before the slide to which you’ve applied the transition effect, and then tap the Play button at the right end of the Ribbon to start the presentation playing from that slide. Swipe left to advance the presentation, and the transition effect will play.
Tip For some presentations, you may want to use the same transition effect for most of the slides. The quick way to do this is to apply the transition effect, and the effect option if appropriate, to one of the slides and then tap the Apply To All Slides button on the Transitions tab of the Ribbon. PowerPoint briefly displays a readout saying that the effect has been applied to all the slides. You can then apply another transition effect to any slide that needs different treatment.
To remove the existing transition, tap the slide, tap the Transitions tab, tap Transition Effect, and then tap the None “effect” in the Subtle category on the Transition To This Slide pane.
Reviewing Comments
If a presentation contains comments (for example, ones added using a desktop version of PowerPoint), you can review them by tapping the Review tab of the Ribbon and using its controls:
· Show Comments switch: Set this switch to On to display any comments on the slides. Set the switch to Off when you don’t need to see the comments.
· Previous button: Tap this button to go back to the previous comment and display its contents in a balloon.
· Next button: Tap this button to go to the next comment and display its contents in a balloon.
Note At this writing, PowerPoint for iPad doesn’t enable you to create, edit, or delete comments, but it seems likely that Microsoft will add these capabilities soon.
Instead of using the Previous button and Next button to move through the comments in sequence, you may prefer simply to tap the comment indicators to work through the comments in whichever order suits you. Tapping a comment indicator opens the comment balloon (see Figure 11-12) so you can see what the commenter had to say.
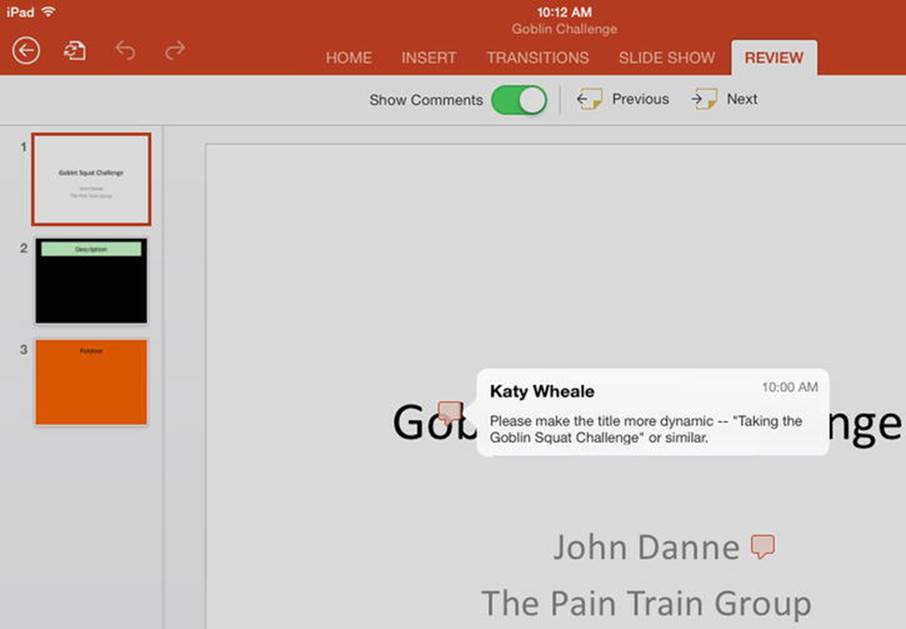
Figure 11-12. Tap a comment indicator to display the comment text in a balloon
Giving a Presentation from Your iPad
Your iPad is a great tool not only for creating and editing presentations but also for delivering them. PowerPoint for iPad enables you to deliver a slide show either on your iPad’s screen or on a connected screen. You can pause the presentation as needed, draw on your slides or display a black screen, and display hidden slides if the audience requires them.
Ways of Giving a Presentation from Your iPad
You can deliver a presentation from your iPad in three main ways:
· Deliver the presentation on your iPad’s screen: This is the most straightforward way to give the presentation, but it works only for the smallest of audiences. It’s great for giving the presentation one on one—for example, on a sales call—because you can stop and start the presentation as needed. You can also jump easily from slide to slide, or summon up hidden slides, to tailor the presentation to the audience.
· Connect the iPad to a projector or display: By connecting your iPad to a project or a display, you can give the presentation much as you would using a laptop or desktop computer, except that PowerPoint for iPad offers fewer presentation features. You’ll look at the details of making the connection a little later in this chapter.
· Use AirPlay to send the presentation output to a display connected to an AirPlay receiver: AirPlay is Apple’s technology for streaming content wirelessly from a device to a receiver—in this case, streaming the PowerPoint slide show from your iPad to an AirPlay receiver connected to a device that can display it. You’ll look at the details of this too shortly.
Setting Up the Presentation
If you’re going to give the presentation from your iPad, you should set it up with the presentation hardware beforehand. That means connecting to any external screen or projector you’ll be using, either via a cable or via AirPlay, and making sure that all looks well both on the screen and in Presenter view on your iPad.
Let’s dig into each step.
Connecting Your iPad to a Monitor or Projector with a Cable
To connect your iPad directly to a monitor or a projector, you’ll need a cable with a suitable connection at one end for the iPad and at the other end for the monitor or projector.
For all recent iPads, such as the iPad Air or the iPad mini, you’ll need a Lightning connector at the iPad’s end of the cable. The Lightning connector is the little connector smaller than the nail on a typical little finger. For older iPads, such as the iPad 2 or iPad 3, you’ll need a Dock Connector, the wider, flat connector.
For the monitor or projector, you’ll typically need an HDMI connector, a DVI connector, or a VGA connector.
Tip If the monitor or projector gives you a choice of ports for connecting your iPad, choose HDMI first, DVI second, and VGA last. HDMI and DVI are digital ports, so the signal stays digital all the way, maintaining quality. By contrast, VGA is an analog port, so your iPad’s digital output needs to be converted to analog for the VGA port, losing quality.
Connecting Your iPad to a Monitor or Projector via AirPlay
Apple’s AirPlay feature enables you to stream a presentation from your iPad to an AirPlay receiver device connected to a project or display. This is a great way to give a presentation because your iPad isn’t tethered to the display device via a cable, so you can move freely around the room as needed carrying the iPad.
These are your choices of AirPlay device:
· Apple TV: Apple’s Apple TV streaming device connects to a TV or display via an HDMI cable. If the TV or display has a different type of input, you’ll need an adapter or cable to convert HDMI to that input.
· AirPlay adapter: You can buy various adapters that receive an AirPlay stream and output it to a suitable port. For example, you can get an AirPlay-to-VGA adapter for converting an AirPlay stream to VGA output suitable for a projector or monitor.
· Projector with built-in AirPlay: Some projectors have a built-in AirPlay feature. If you’re using such a projector, AirPlay is an easy choice.
· Mac or PC running the Reflector app: If you don’t have an Apple TV to use for AirPlay, but you have a Mac or PC, consider using the Reflector app from Squirrels (www.airsquirrels.com; $12.99, but give the trial version a spin before buying). This app enables your Mac or PC to act as an AirPlay receiver. On your iPad, open the Control Center, tap the computer’s entry in the AirPlay list, and set the Mirroring switch to On. Your iPad’s screen then appears mirrored in the Reflector window.
Here’s how to connect to the presentation device using AirPlay:
1. Connect your iPad to the same network that the AirPlay device is on. Your iPad must connect to the network via Wi-Fi, but the AirPlay device can connect either via Wi-Fi or via Ethernet.
2. Swipe up from the bottom of the screen to open Control Center.
3. Tap the AirPlay button to display the AirPlay dialog (see Figure 11-13).
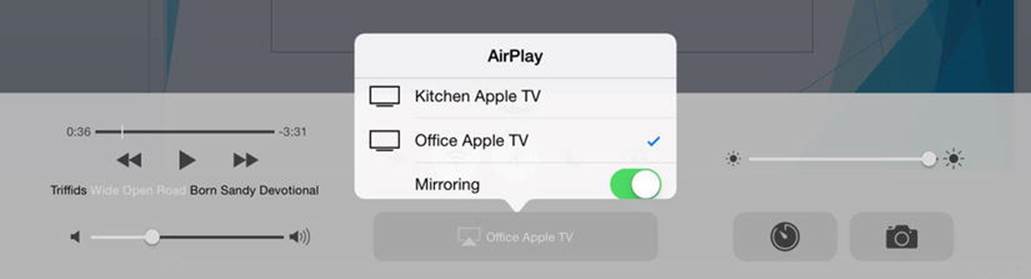
Figure 11-13. Tap the AirPlay button in Control Center and then tap the appropriate button in the AirPlay dialog box
4. Tap the button for the AirPlay device, placing a check mark on the right of the button.
5. Set the Mirroring switch to On. This switch appears in the AirPlay dialog only when you’ve selected a device that supports mirroring. (Devices such as the AirPort Express don’t support mirroring because they stream only audio, not video.)
6. Tap outside the AirPlay dialog to close the dialog.
Note When you want to stop using AirPlay, open Control Center again, tap the AirPlay button, and then tap the iPad button in the AirPlay dialog.
TROUBLESHOOTING AIRPLAY
AirPlay is great when it works, but it can give you a headache when it doesn’t. If you’re having trouble with AirPlay, try the following moves, stopping as soon as AirPlay is working:
· Connect to the right wireless network: If the AirPlay icon doesn’t appear in Control Center, press the Home button, tap Settings, and check the Wi-Fi readout to see which network your iPad has connected to. Change the network if necessary.
· Make sure that AirPlay is enabled on an Apple TV: If you’re using an Apple TV, you may need to turn on AirPlay. Display the Home screen, open the Settings app, and select AirPlay. On the AirPlay screen, make sure the AirPlay button says On; if not, highlight the AirPlay button and press the Select button to toggle AirPlay’s status. While you’re in the Settings app, you may want to make sure the Apple TV is connected to the right network. To do so, select the General button on the Settings screen, and then look at the Network readout.
· Restart the AirPlay device: If your iPad is connected to the right Wi-Fi network, but either the AirPlay button doesn’t appear in Control Center or the AirPlay button appears but the AirPlay dialog doesn’t list the device, restart the AirPlay device. How you do this depends on the device. For example, on an Apple TV, display the Home screen, open the Settings app, and select General. On the General screen, scroll all the way down to the bottom and select Restart.
· Turn Wi-Fi off and on: If your iPad still can’t see the AirPlay device, try turning Wi-Fi off and then back on again. You can do this directly from Control Center, but you may need to make sure that your iPad connects to the right network after you restart Wi-Fi. To check which network it’s using, and to change the network if necessary, look in the Settings app.
· Update iOS to the latest version: Press the Home button to display the Home screen and tap the Settings icon to open the Settings app. Tap General in the left column, and then tap the Software Update button. If the Software Update screen shows an update, tap the Download and Install button.
· Update Apple TV’s firmware: If you’re using an Apple TV, it’s a good idea to update its firmware to the latest version too. Display the Home screen, open the Settings app, and select General. On the General screen, select Software Updates to display the Software Updates screen. On the Software Updates screen, select the Update Software button.
One word of warning—updating iOS or the Apple TV firmware can take a while, so it’s best to avoid these moves if you must deliver the presentation soon.
Testing Presenter View and Your Presentation
Once you’ve connected your iPad to the projector or monitor via either a cable or AirPlay, go into Presenter view and test that all is working as it should. Tap the Slide Show tab on the Ribbon to display its contents, and then tap the Presenter View button.
Presenter view (see Figure 11-14) has the following components and controls:
· Current slide: Use this slide to present the information.
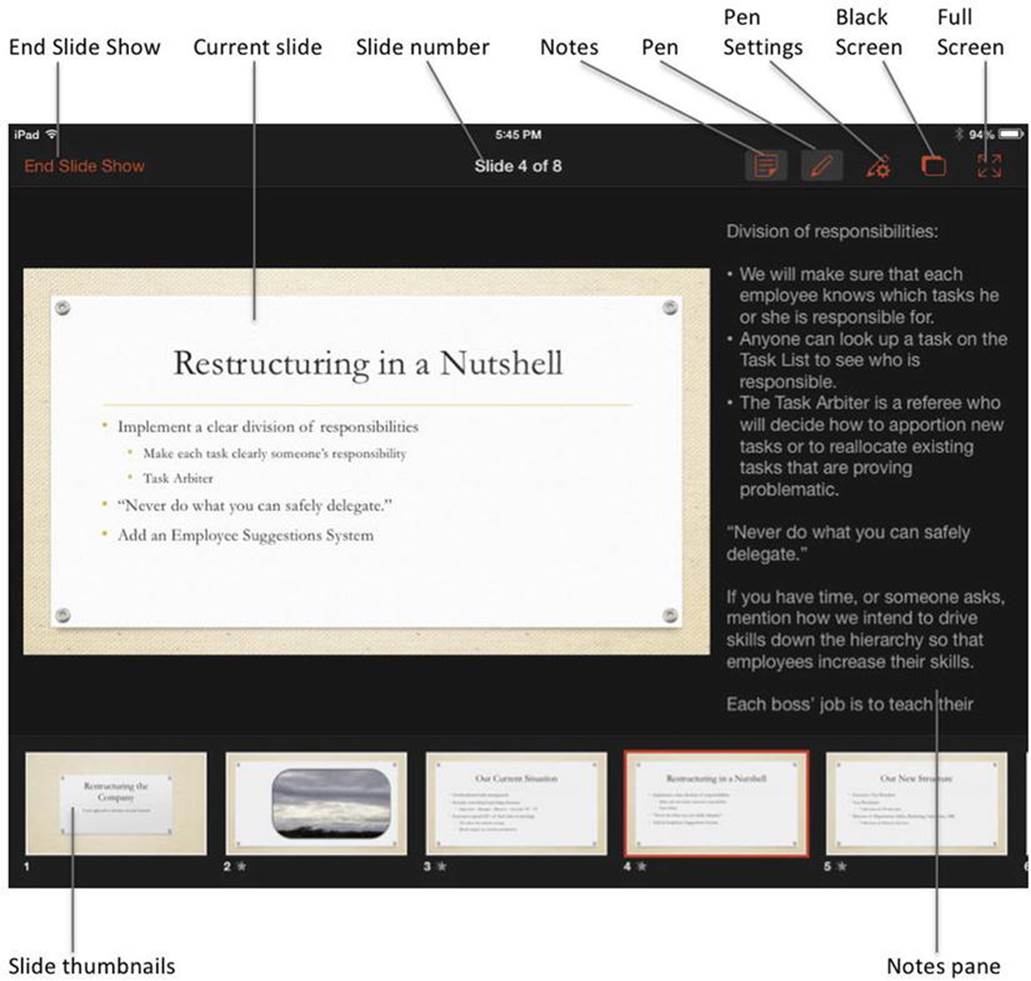
Figure 11-14. Presenter view includes thumbnails for easy navigation and the Notes pane for reference
· Slide thumbnails: Tap a thumbnail to display the slide.
· Notes button: Tap this button to toggle the display of the Notes pane.
· Pen button: Tap this button to toggle the pen on and off. With the pen turned on, you can draw on the screen with your fingertip or a stylus.
· Pen Settings button: Tap this button to display the Pen Settings pop-up panel (see Figure 11-15). You can then tap the pen color and thickness you want, or tap an eraser thickness to erase some of the pen markings. Tap the Clear Pen Markings button if you want to get rid of all the pen markings in the presentation (not just on the current slide).
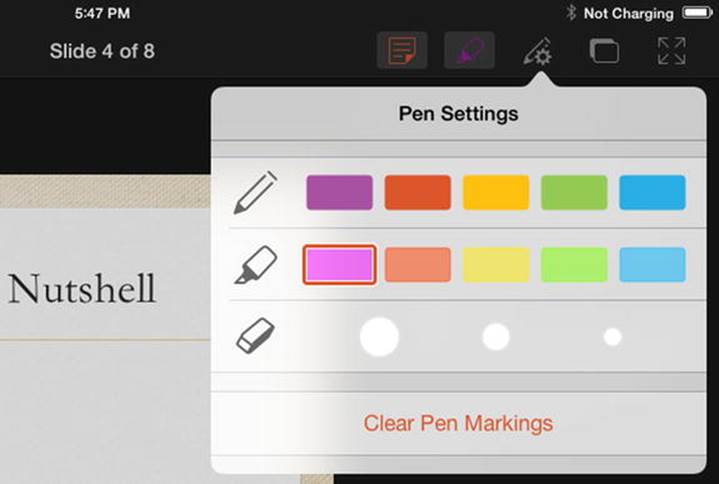
Figure 11-15. Use the Pen Settings pop-up panel to select your pen color and thickness, to choose an eraser, or to clear all pen markings from the presentation
· Black Screen button: Tap this button to blank the screen, displaying a black screen instead. Tap again to display the slide once more.
· Full Screen button: Tap this button to display the current slide as large as it will go, hiding the slide thumbnails and the Notes pane (if it’s displayed). Tap this button again to go back to your previous display.
· End Slide Show button: Tap this button when you’re ready to end the slide show.
Delivering the Presentation
To start the slide show from the beginning, tap the From Start button on the Slide Show tab of the Ribbon. If you want to start the slide show from a particular slide other than the first, tap that slide in the Navigation pane, and then tap the From Current button on the Slide Show tab or the Play button at the right end of the Ribbon.
Whichever way you start the slide show, PowerPoint switches to full-screen slide-show view and displays the first slide (or the slide you chose). You can then move through the presentation easily via these motions:
· Next slide: Swipe left.
· Previous slide: Swipe right.
· End the slide show: Swipe left on the last slide, and PowerPoint displays a slide saying “End of slide show.” Swipe left to exit the full-screen view and return to editing the presentation. (You can also swipe to the right to go back to the previous slide if you want.)
Using the Slide Show Control
If you’re not using Presenter view, your slides appear full-screen on your iPad and on any connected presentation device. When you start the presentation, PowerPoint displays the slide show controls at the top of the screen for a moment and then hides them if you don’t use them for a few seconds. You can display these controls at any point by tapping near the top of the screen.
The slide show controls bar has the End Slide Show button at its left end, the slide number readout in the middle, and the Pen button, Pen Settings button, Black Screen button, and Full Screen button at its right end—in other words, all the controls from Presenter view except for the Notes pane, which you don’t get to use.
Working with Hidden Slides
Any slides you’ve hidden in your presentation appear in the slide thumbnails pane in Presenter view grayed out, as you see for the third slide in Figure 11-16. If you advance through the presentation by swiping, you pass over the hidden slides, but you can display a hidden slide by tapping it.
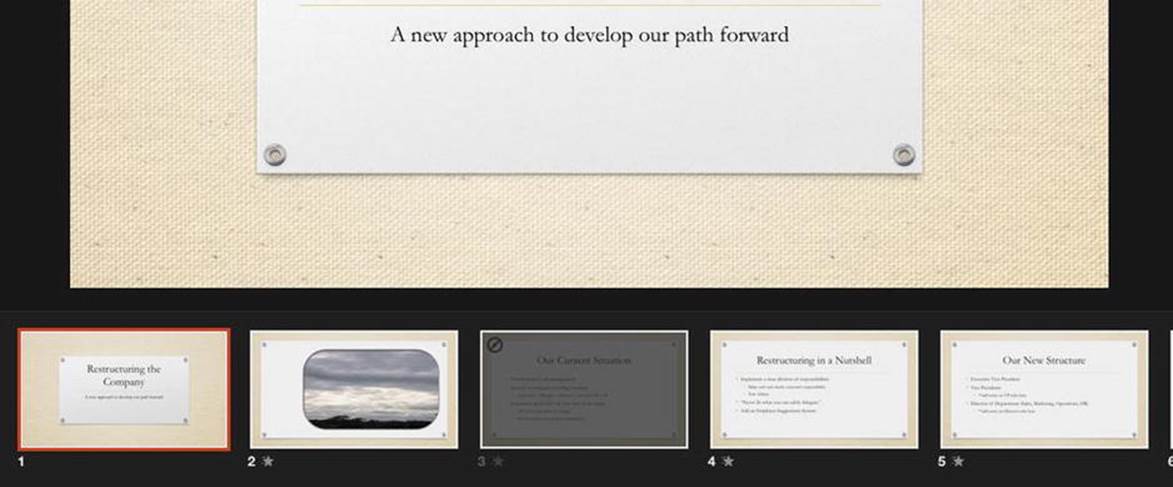
Figure 11-16. Presenter view displays hidden slides as grayed out, like Slide 3 here, but you can tap a hidden slide to display it on screen
Using the Laser Pointer
When you need to draw your audience’s attention to a particular point on the screen, use the laser pointer. Tap and hold the screen until the red circle appears. You can then move your finger around the screen to highlight the points that need the audience’s attention.
Ending the Slide Show Short of the End
To end the slide show before the end, swipe down from the top of the screen to display the control bar if you’re not in Presenter view, and then tap End Slide Show.
Caution While the slide show is running, you can display the Home screen by pressing the Home button or (if you have Multitasking Gestures enabled) by pinching inward with four or five fingers. You can also display the app-switching screen by double-pressing the Home button or swiping upward with four or five fingers, and then tap another app to display it. The problem with doing this is that when you return to PowerPoint, the app may go back to the file management screen and re-download the presentation before displaying it again. You’ll then need to restart the slide show at the slide where you want to resume. This means that you can’t switch away from the slide show and go back to it seamlessly—even for a presentation stored on your iPad rather than online.
Summary
In this chapter, you learned how to make the most of PowerPoint for iPad. You now know the app’s features and limitations, so you’re in a good position to judge how to use it most effectively. You learned to navigate the PowerPoint interface, create a presentation, and add slides to it; how to add, delete, and rearrange the slides; and how to add transition effects to them. You also discovered how to give a presentation from your iPad, either on the iPad’s screen or on a projector or monitor connected either via a cable or via AirPlay.
All materials on the site are licensed Creative Commons Attribution-Sharealike 3.0 Unported CC BY-SA 3.0 & GNU Free Documentation License (GFDL)
If you are the copyright holder of any material contained on our site and intend to remove it, please contact our site administrator for approval.
© 2016-2026 All site design rights belong to S.Y.A.