Pro Office for iPad: How to Be Productive with Office for iPad (2014)
Chapter 1. Up and Running with Office for iPad
If you need to use Office professionally on your iPad, you’re probably raring to get going. This brief chapter provides the essentials to get you up and running with the Office apps on your iPad. The chapter starts by making sure we’re on the same page by recapping what Office for iPad is and what you can do with the apps. It then goes through how to download, install, and activate the apps on your iPad. The chapter then covers essential moves such as launching apps, switching among apps, and closing apps when necessary. You’ll also learn how to choose settings for the apps and how to reset them when you run into problems. At the end of this chapter, I’ll suggest an approach to the thorny problem of sharing an iPad with other people.
Understanding What Office for iPad Is and What You Can Do with It
Microsoft Office for iPad brings Microsoft’s market-leading productivity suite to the iPad. At this writing, Office for iPad includes four apps:
· Word: Word is a word-processing app that enables you to create a wide range of documents—anything from a single-page letter to a fully laid-out book.
· Excel: Excel is a spreadsheet app that you use to record, calculate, and analyze data. Excel also includes features for creating many different types of charts.
· PowerPoint: PowerPoint is an app for creating and delivering presentations. Each presentation consists of slides, to which you can add any data from straightforward text to tables, pictures, and shapes. You can also add transition effects to provide visual interest. You can deliver a presentation directly from PowerPoint for iPad.
· OneNote: OneNote is an app for capturing, organizing, and sharing information. You can create a single notebook or as many notebooks as you need, add to each notebook a wide range of types of digital information (such as text, tables, and pictures), and organize that information into different tabs, sections, and folders.
Each app works similarly to the desktop versions of the Office apps, so if you’re familiar with the desktop versions, you’ll be able to get started with the iPad versions easily. You’ll find that the iPad apps have many fewer features than the desktop versions but that they contain the essential features you need to get your work done. To access these features, use the controls on the tabbed Ribbon that appears at the top of the screen (see Figure 1-1).
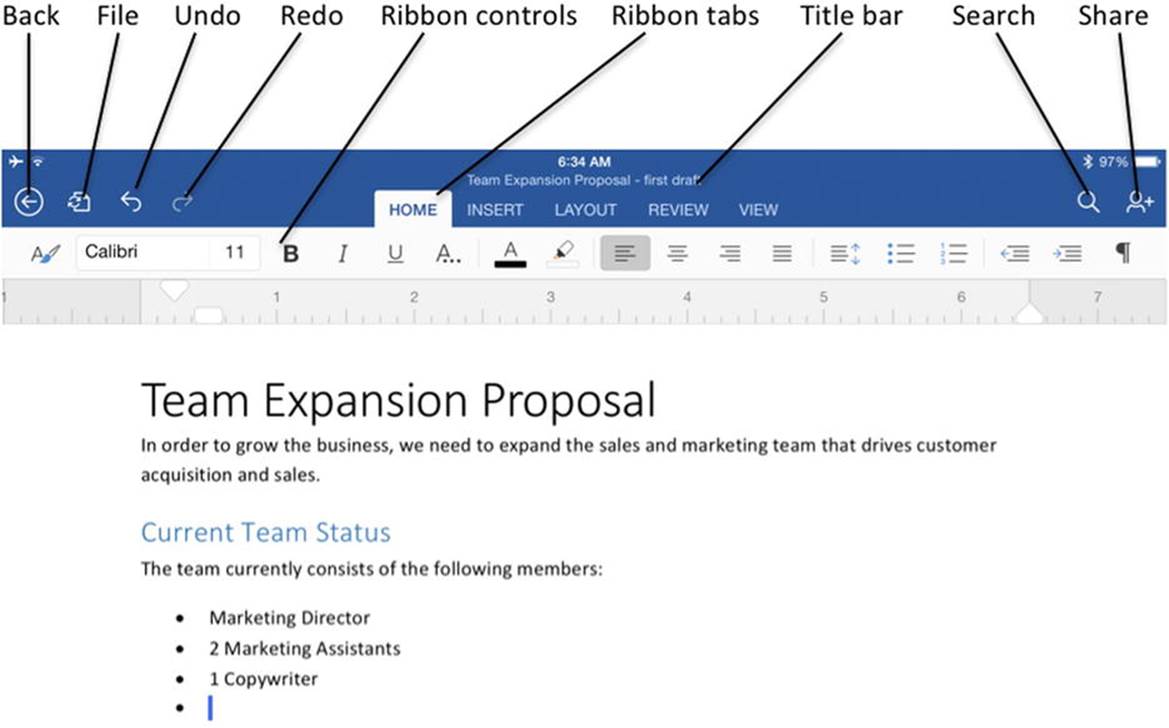
Figure 1-1. Each of the Office apps has a Ribbon that contains controls on various tabs, such as the Home tab and the Insert tab. The Ribbon area also contains essential buttons, such as the File button and the Share button
Note The chapters on the individual apps dig into the details of which features each iPad app includes and which features it is missing. See Chapter 4 for Word, Chapter 7 for Excel, Chapter 11 for PowerPoint, and Chapter 12 for OneNote.
You can use Word, Excel, and PowerPoint as standalone apps on your iPad, creating documents on the iPad and keeping them there. But the apps also integrate with Microsoft’s OneDrive and OneDrive for Business online services, enabling you to store your documents online and work on them from your iPad or a computer. You can also store your documents on a SharePoint server. You can set the apps to automatically sync the changes you make on your iPad to OneDrive, so when you open a document from another computer, you see the latest version of it and can pick up work where you left off.
Unlike Word, Excel, and PowerPoint, OneNote offers online storage only. You must save your OneNote databases online, on OneDrive or SharePoint; you cannot save an OneNote database to your iPad.
Getting Office for iPad
Before you can get started with Office for iPad, you must install the apps on your iPad. You will almost certainly want to buy an Office 365 subscription to enable yourself to use all the features of the apps rather than the limited subset that you can use for free, which enable you to open and read documents but not edit them or create new ones. If you do buy an Office 365 subscription, you use the subscription to activate the apps on your iPad, unlocking the full features.
Downloading and Installing the Office Apps
You can download and install the Office apps in one or other of two ways:
· Using your iPad: You use the App Store app to access the App Store.
· Using your computer: If you sync your iPad with a computer, you can use iTunes on that computer to download the apps from the App Store. You can then sync the apps to your iPad.
Either approach works fine, so use whichever you find easier. The main advantage to using your computer comes if you sync multiple iPads with it. In this case, you can download the apps once and install them on all your iPads. Otherwise, you’ll need to download the apps separately to each iPad, using more bandwidth.
Downloading and Installing the Office Apps Directly to Your iPad
Here’s how to download and install the Office apps using your iPad.
1. Press the Home button to display the Home screen.
2. Tap the App Store icon to launch the App Store app.
3. Tap the Search box in the upper-right corner.
4. Type microsoft office for ipad. The search results appear.
5. Tap the Free button on the app you want to install first. The Install button appears in place of the Free button.
6. Tap the Install button.
7. If the Sign In to iTunes Store dialog box opens, type your password and tap the OK button.
8. After the App Store app downloads and installs the app, the app appears on the Home screen, and you can launch it by tapping it.
9. Repeat steps 5 and 6 to download and install the other Office apps that you want.
Downloading and Installing the Office Apps Using Your Computer
Here’s how to download the Office apps using your computer.
1. Launch iTunes as usual. For example, in Windows, click the iTunes icon on the Start screen; on the Mac, click the iTunes icon on the Dock.
2. Open the iTunes Store by clicking the iTunes Store button in the navigation bar across the top of the window.
3. Click the Apps button in the navigation bar across the top of the window.
4. Click in the Search Store box in the upper-right corner of the iTunes window.
5. Type microsoft office for ipad and press Enter or Return. The search results appear.
6. Click the Free button for the app you want to install.
7. If the Sign In to iTunes Store dialog box opens, type your password and click the Sign In button. iTunes then downloads the app.
After downloading one or more of the Office apps to your computer, you can install them on your iPad as follows.
1. Connect your iPad to your computer via USB. iTunes normally opens automatically when your computer detects the iPad; if not, launch iTunes manually by clicking its icon on the Start screen or the Dock.
Note If you have turned on wireless syncing for your iPad, you can sync it and install the apps without using USB. To start the sync manually, press the Home button, tap the Settings icon to open the Settings app, and then tap General. On the General screen, tap the iTunes Wi-Fi Sync button, and then tap the Sync Now button on the iTunes Wi-Fi Sync screen. Alternatively, you can allow your iPad to sync automatically, which occurs on a schedule when the iPad is connected to a power source.
2. Display the contents of the iPad. How you do this depends on whether iTunes is displaying the Sidebar or not.
o Sidebar: In the Sidebar, first expand the Devices category if it is collapsed: move the mouse pointer over the Devices heading and then click the word Show that appears to the right of Devices. Then click the iPad’s entry in the Devices list.
o Without the sidebar: Click the iPad button toward the right end of the navigation bar across the top of the iTunes window. If you have multiple iOS devices or iPods connected to your computer, click the Devices button, and then click the iPad’s entry on the Devices pop-up menu.
3. Click the Apps tab to display the Apps screen (see Figure 1-2).
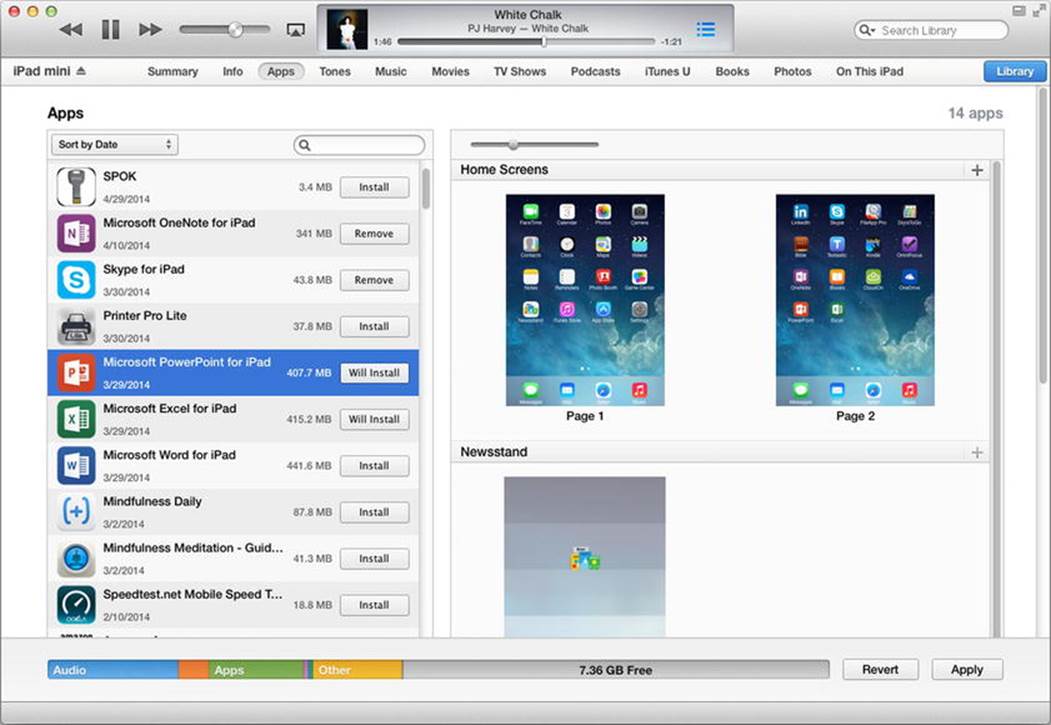
Figure 1-2. On the Apps screen for the iPad, click the Install button for each app you want to install. The button changes to Will Install
4. In the Apps list on the left, click the Install button for each app you want to install. iTunes replaces each Install button you click with a Will Install button.
Note You can also drag an app from the Apps list to the appropriate screen in the Home Screens box. This method has the advantage of enabling you to choose which screen the app’s icon lands on. You can create a new Home screen by clicking the + button in the upper-right corner of the Home Screens box.
5. Click the Apply button. iTunes syncs the apps to your iPad.
6. When the sync is complete, disconnect your iPad.
KEEPING YOUR OFFICE APPS UP TO DATE
Microsoft released the Office apps without various features that most people would regard as essential, such as printing documents. But Microsoft is continuing to develop the Office apps quickly and is adding features to them. So to get the most out of the Office apps, it’s important to install updates to them.
You can download and install updates either directly on your iPad or by using the computer with which you sync your iPad. Working on the iPad is usually easier unless you need to install the updates on multiple devices, in which case you may prefer to download them to your computer and then sync them to each iPad.
On your iPad, open the App Store app and tap the Updates button on the tab bar at the bottom to display the Updates page. You can then tap the Install button to download and install an available update.
If you want your iPad to download updates automatically, open the Settings app, tap iTunes & App Store in the left column, and then set the Updates switch in the Automatic Downloads section to On. If you have a cellular iPad with a meager data plan, you may want to set the Use Cellular Data switch on the iTunes & App Store screen to Off if you set the Updates switch to On. Otherwise, large app updates can eat through your data plan quickly. The Use Cellular Data switch also controls whether your iPad uses the cellular connection for iTunes Radio and iTunes Match.
To check for updates on your computer, click the Apps button on the navigation bar in iTunes, and then click the Updates tab that appears. If updates are available, click the Update All Apps button to download the updates. You can also click an individual app to display a pop-up panel showing the details and then click the Update button to download only the update for that app.
After downloading the updates, connect your iPad to your computer and sync the updates to the iPad.
Buying an Office 365 Subscription
You can download the Office apps for free from the App Store. If you need only to be able to read existing Office documents on your iPad, you can use the apps for free. But if you want to be able to create new documents and edit existing ones, you must buy a subscription to Microsoft’s Office 365 service and activate the apps to use it.
Microsoft offers enough Office 365 plans to be confusing: Office 365 Home, Office 365 Personal, Office 365 Small Business, Office 365 Small Business Premium, Office 365 Midsize Business, three Office 365 Enterprise plans, Office 365 ProPlus, and then three Office 365 Education Plans. The following list suggests a straightforward approach to this morass of versions. But because Microsoft compounds the confusion by often changing the details of the plans, make sure you check online at office.microsoft.com to find the latest information.
· If you’re a home user, buy Office 365 Home ($9.99 per month or $99.99 per year). This allows you to install Office on up to five PCs or Macs, use Office on up to five iPads or Windows tablets, and gives you 20GB extra storage for each of up to five users. This is a much better deal than Office 365 Personal ($6.99 per month or $69.99 per year, which covers a single PC or Mac, a single iPad or Windows tablet, and gives 20GB extra storage for a solitary user.
Note If you have a Mac and run Windows on it using Boot Camp, you can install Office on Windows as well as on OS X. These count as separate installs even though they’re on the same physical computer, so you’d normally want to buy Office 365 Home. Installing Office on a Windows or OS X virtual machine (running on top of Windows, OS X, or another operating system) also counts as a separate installation.
· If you’re a small-to-medium business user, you’ll need to decide between Office 365 Small Business Premium ($12.50 per user per month) and Office 365 Midsize Business ($15.00 per user per month). The main difference between the two is that Office 365 Small Business Premium is limited to a maximum of 25 users and does not have Active Directory integration, whereas Office 365 Midsize Business does have Active Directory integration and goes up to 300 users.
Caution Office 365 Small Business looks like a great bargain at $5.00 per user per month, but it doesn’t include Office for iPad. You need to go up to Office 365 Small Business Premium ($12.50 per user per month) to get Office for iPad.
· If you’re an enterprise user, look at the Office 365 Enterprise E3 plan and Office 365 Enterprise A4 plan, which both include Office for iPad.
· If you’re in education, see if your institution has signed up for any of the Office 365 Education plans. The Office 365 Education A3 plan and Office 365 Education A4 plan include Office for iPad, whereas the Office 365 Education A2 plan does not.
Activating the Office Apps on Your iPad
Now that you have your Office 365 subscription, you’re ready to activate the Office apps on your iPad. You activate the apps by linking them to your Office 365 subscription. You need perform the activation sequence on only one of the apps.
To activate the apps, follow these steps.
1. Press the Home button to display the Home screen.
2. Navigate to the Home screen that contains one of the apps.
3. Tap the icon for the app. The Office screen appears.
4. Scroll through the screens, reading the information until you reach the Sign in now screen (see Figure 1-3).
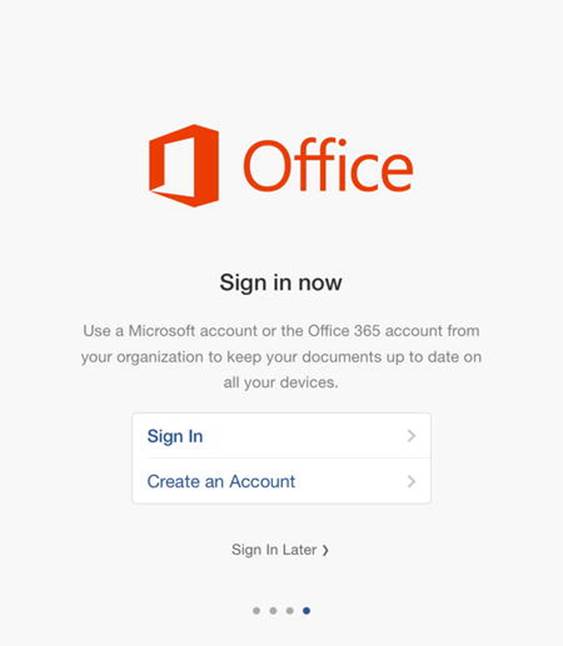
Figure 1-3. On the Sign In Now screen, tap the Sign In button to sign in to your account and activate the Office apps
Note If you don’t yet have an Office 365 account, you can tap the Create an Account button on the Sign In Now screen to take you to a page for creating one. But if you have a computer available, you may prefer to use that instead to create your account so that you can enter your information more easily. If you just want to use Office to view documents, tap the Sign In Later button.
5. Tap the Sign In button. The Sign In screen appears.
6. Type the e-mail address associated with your Office 365 subscription.
7. Tap the Next button. The OneDrive screen appears.
8. Type your password.
9. Tap the Sign In button. The Help Us Improve screen appears.
Note The error message “You need to do something extra before we can sign you in” normally indicates that the Office 365 account type you have does not include Office for iPad. The “something extra” involves signing up for an account that does include Office for iPad (and paying more). This error message may also mean that your password has expired, in which case the fix is to change the password.
10.Tap the Send (Recommended) button or the Don’t Send button, depending on whether you want to send anonymized usage information to Microsoft.
Note The You’re All Set! screen includes buttons you can tap to download the other Office apps than the one you are using. This is handy if you haven’t already downloaded the other apps you want. The buttons appear even if you have already downloaded and installed the other apps.
11.Tap the Continue button. The You’re All Set! screen appears.
12.Tap the Start Using App button (where “App” is the app’s name). The app opens, and you can begin using it.
Activating the Office apps on your iPad links them to your Office 365 account and sets up the service associated with the Office 365 account, enabling you to connect to your account on the OneDrive service or the OneDrive for Business service.
Note OneDrive used to be called SkyDrive. Microsoft renamed the service to OneDrive after a trademark dispute. You can use the OneDrive app to manage files on OneDrive.
DELETING THE OFFICE APPS FROM YOUR IPAD
You can delete the Office apps from your iPad using the standard technique for any app you have installed on it. Deleting an app deletes all its data, including documents you have saved on your iPad in the app and unsynced changes to online documents. So before you delete an app, you should sync any recent changes to online documents and copy to your computer any documents saved on the iPad that you want to keep. See Chapter 2 for instructions on copying files to your computer using iTunes.
Here’s how to remove an Office app from your iPad.
1. Press the Home button to display the Home screen.
2. Navigate to the Home screen that contains the app you want to remove.
3. Tap and hold the app’s icon until the icons start jiggling. An X appears on the upper-left corner of each app you can remove.
4. Tap the X button on the app. The Delete dialog box opens, warning you that deleting the app will also delete all its data.
5. Tap the Delete button. iOS deletes the app and its data.
6. Press the Home button again to stop the icons from jiggling.
Opening and Closing the Apps
On your iPad, as on most computers, you open an app you want to use. You can then switch to other apps as needed. When you no longer need an app you’ve opened, you can close it manually.
Opening an App from the Home Screen
The most straightforward way to open is by tapping its icon on the Home screen. Follow these steps.
1. Press the Home button to display the Home screen.
2. If the app’s icon doesn’t appear on the first home screen that appears, scroll left or right until you find it.
Tip If your iPad is packed with apps, you can search for the app by tapping and pulling down on the Home screen to display the search box and the keyboard, and then starting to type the app’s name.
3. Tap the app’s icon to launch the app.
Launching an App by Opening a Document
You can also launch an app by opening a document of a type associated with the app. For example, if you receive a Word document attached to an e-mail message, you can open the document in Word like this.
1. In the Mail app, tap the message to open it.
2. Tap and hold the attachment’s icon to display the Share sheet.
3. Tap the Open in Word icon on the Share sheet.
Tip If you want to preview the document before opening it in Word, tap the attachment’s icon in the message to open the attachment in the document viewer. You can then tap the Share button to display the Share sheet and tap the Open in Word icon (or the Open In icon for another app) if you want to open the document.
Switching Among Apps
You can return to a running app by pressing the Home button and then tapping the app’s icon on the Home screen, but you can save time by using the app-switching feature.
1. Press the Home button twice in quick succession to display the app-switching screen.
2. Scroll left or right to find the app you want (see Figure 1-4). The Home screen appears at the left end of the list of apps on the app-switching screen, with the apps you’ve used most recently following it, so you can go to the Home screen by swiping right to scroll left.
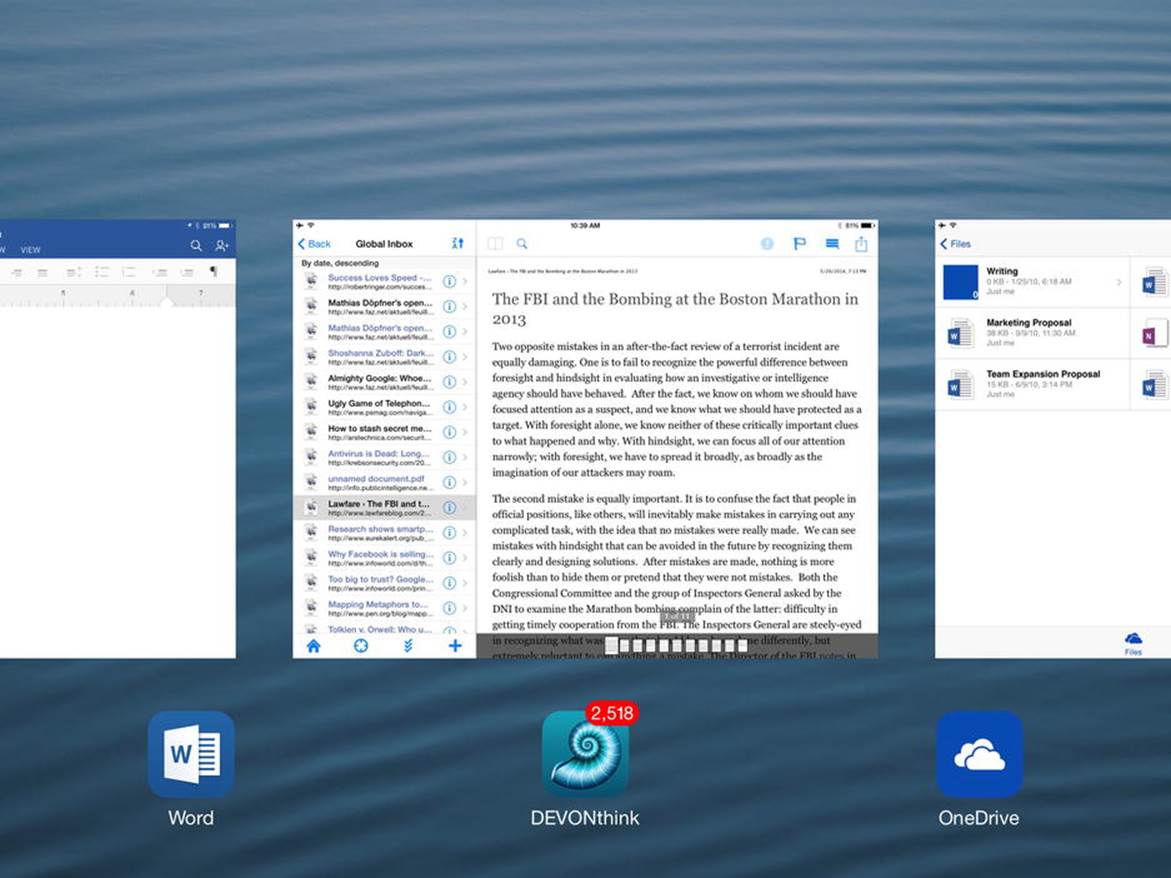
Figure 1-4. Use the app-switching screen to switch quickly from one app to another without displaying the Home screen
3. Tap the app you want to use.
Making the Office Apps’ Icons Easy to Access
To make launching the Office apps easier, place them either on the first Home screen or on the favorites tray. Here are the moves you can use.
· Unlock the Home screen for customization: Tap and hold any icon until the icons start jiggling.
· Move an icon: Drag an icon to where you want it to appear. To move an icon from one screen to the previous screen, drag it to the left edge of the screen, hold it until the previous screen appears, and then continue the drag operation. To move an icon to the next screen, drag it to the right edge of the screen.
· Create a folder: Drag an icon onto another icon. iOS creates a folder containing the two icons. You can then rename the folder and add further apps to it.
· Add apps to the favorites tray: The favorites tray can contain up to six apps. To add an app, drag it to the favorites tray, wait for the other icons to make space for it, and then drop it. To remove an app, drag it off the favorites tray.
· Add a folder to the favorites tray: After creating a folder on a Home screen, you can drag it to the favorites tray. You can’t create a folder directly on the favorites tray.
Closing an App
On the iPad, an app keeps running unless you close it. iOS manages the memory efficiently enough that, in general, you can simply leave apps open and then return to them as needed.
But if your iPad starts running more slowly, or if you find a particular app is no longer responding to the touchscreen, you can close it manually. To close the app, follow these steps.
1. Press the Home button twice in quick succession to display the app-switching screen.
2. Scroll right to find the app you want to close.
Tip Your current app appears as the left icon on the part of the app-switching screen that appears first. To the left of this app is the Home screen; to its right are the other apps that are running, sorted from those you’ve used most recently to those you haven’t used for longest. You can’t close the Home screen.
3. Drag or flick the app up off the app-switching screen. iOS closes the app.
WHAT HAPPENS WHEN YOU POWER DOWN YOUR IPAD?
Apple designed your iPad to keep running iOS continuously unless a problem occurs, so you don’t normally need to restart your iPad in order to keep it working well. But if your iPad starts acting oddly or running unstably, restarting it is a good troubleshooting move. A restart forces your iPad to clear all the running processes out of memory, so it can resolve various types of minor instabilities.
To restart your iPad, press and hold the Power button until the “slide to power off” prompt appears, and then drag the slider to the right. Your iPad displays a progress indicator onscreen as it powers down; when the iPad turns off, the indicator disappears, and the screen goes dark. You can then restart the iPad by pressing and holding the Power button until the Apple logo appears on the screen. When the lock screen appears, slide your finger across the screen to start unlocking it, and then enter your passcode or other unlock method.
One thing that’s confusing is that when you restart your iPad like this, iOS automatically preloads all the apps that were running when you gave the power-off command. This behavior is great if you actually want to have those apps running because it means you don’t have to launch each of them manually after the restart. But if the reason you’re restarting your iPad is to free up memory, close all the apps before you restart it. To close the apps, press the Home button twice in quick succession to display the app-switching screen, and then swipe each app upward to close it. After you close the last app, press and hold the Power button, and then drag the “slide to power off” slider to shut down the iPad.
Choosing Settings and Resetting the Apps
Unlike the desktop versions of the Office app, each of which has hundreds of settings you can configure to make the app work the way you prefer, the Office for iPad apps have almost no settings. In fact, the main features of the Settings screen for each app are the version number and the Reset button, which you can use to reset the app if things go wrong.
Choosing Settings
To choose settings for one of the apps, open the Settings app and display the screen for the app. Follow these steps.
1. Press the Home button to display the Home screen.
2. Tap the Settings icon to open the Settings app.
3. Scroll down in the left column, and then tap the app’s name in the last group to display the Settings screen.
Figure 1-5 shows the Settings screen for OneNote.
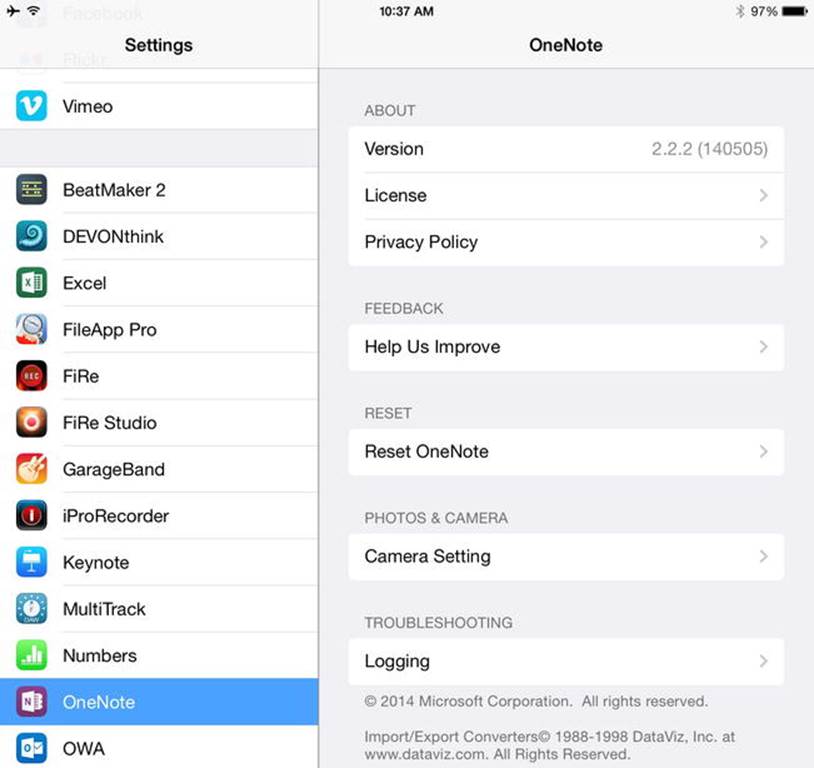
Figure 1-5. Open an app’s screen in the Settings app to view the version number, choose any available settings, or reset the app
Here’s what you can do on the Settings screen for each of the apps:
· Version: Look at this readout to learn the version number, which you may need to know when troubleshooting the app.
· License: Tap this button to display a link to the app’s license.
· Privacy Policy: Tap this button to display a link to the app’s privacy policy.
· Help Us Improve: Tap this button to display the Help Us Improve screen, on which you can set the Send Usage Data switch to the On position or to the Off position, as appropriate. The apps send the usage data only over Wi-Fi (so they don’t use up your data plan on a cellular iPad) and anonymously, so turning this feature on is a good idea.
· Reset: Tap this button to display the Reset screen for the app. The next section explains how to reset an app.
These are the extra settings you can choose in OneNote and Word:
· Camera Setting (OneNote): Tap this button to display the Camera Setting screen, on which you can set the Use Office Lens switch to the On position or to the Off position, as needed. Office Lens is a feature for straightening out photos that you take at an angle, such as when photographing a whiteboard in a meeting.
· Logging (OneNote): Tap this button to display the Logging screen, on which you can set the Enable Logging switch to the On position or to the Off position. Keep logging turned off unless you are working with Microsoft Support to resolve an issue.
· AutoFormat As You Type (Word): Set the AutoFormat As You Type switch to the On position if you want Word to automatically apply formatting as you type (see Chapter 4 for the details). If you prefer not to use automatic formatting, set this switch to the Off position.
Resetting an Office App
If things go wrong with one of the Office apps, you may need to reset the app to get it working again properly. These are the two things that are most likely to go wrong:
· The documents in your document cache become corrupted: The Office apps store documents you download from OneDrive or SharePoint in an area called the document cache. If problems occur when you are syncing documents, the copies in the document cache may become corrupted. The solution to this problem is to clear the document cache and download the files again. You can clear the document cache for each app separately, so clearing the document cache for Excel doesn’t affect the document cache for Word.
Caution Before clearing the document cache, it is a good idea to back up the files it contains to your computer. You may also need to download the recovered files to your computer after clearing the cache. I’ll explain how to perform both these moves in Chapter 3.
· The apps start refusing your login credentials: After you activate your Office account, your iPad caches your credentials, so you don’t normally need to enter them again when the apps check that you’re authorized to use them. But sometimes the apps will refuse your login credentials. When this happens, you need to delete the credentials and then sign in again, making your iPad cache the credentials once more.
Note If you had OneNote installed on your iPad before you installed the other Office apps, you may get an error saying that you have no subscription. This occurs because the iPad is using the credential it has cached for OneNote for the other apps, but the credential is not valid for these apps. To resolve this problem, delete your login credentials for Word, Excel, or PowerPoint, and then sign in again.
Here’s how to reset an Office app on your iPad.
1. If the app is running, close it.
a. Double-press the Home button to display the app-switching screen.
b. Swipe the app up off the list.
2. Press the Home button to display the Home screen.
3. Tap the Settings icon to open the Settings app.
4. Scroll the left column down to the bottom.
5. Tap the app you want to reset. This example uses Word. The app’s screen appears. Tap the Reset button; for example, tap the Reset Word button. The Reset screen for the app appears (see Figure 1-6).
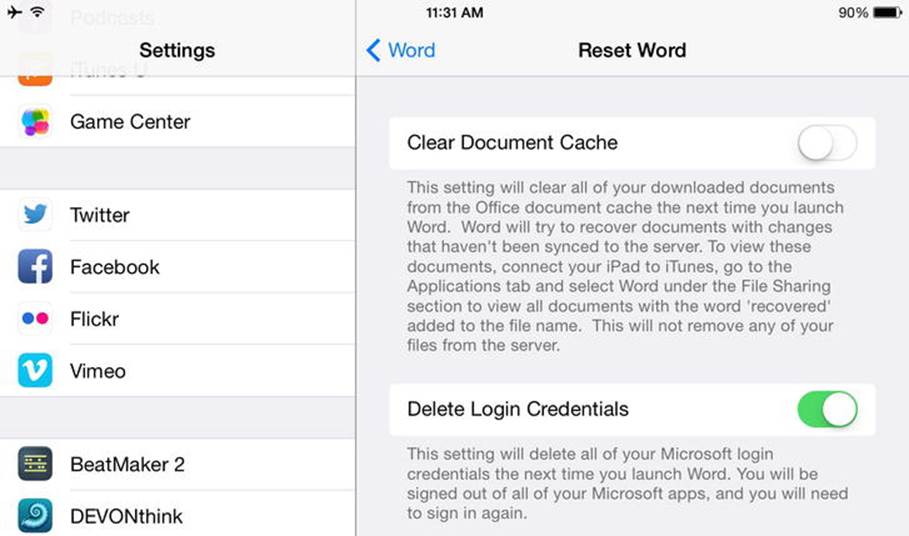
Figure 1-6. On the Reset screen for the app, set the Clear Document Cache switch, the Delete Login Credentials switch, or both to the On position
6. Set the Clear Document Cache switch to the On position if you want to clear your document cache.
7. Set the Delete Login Credentials switch to the On position if you want to delete your login credentials.
8. Press the Home button to display the Home screen.
9. Tap the app’s icon to launch the app. For example, tap the Word icon.
Note If you set the Clear Document Cache switch to the On position, you’ll see the message “Clearing document cache” briefly as the app clears the document cache. The file-management screen appears as usual, and you can open a document.
If you set the Delete Login Credentials switch to the On position, the app deletes your login credentials and displays the introductory screens. Scroll through these as before until you reach the Sign In Now screen, tap the Sign In button, and sign in to your account.
Note After clearing the cache, deleting your login credentials, or both, the app automatically sets the relevant switch or switches in the Settings app to the Off position. You don’t need to reset the switches manually.
Using Gestures to Navigate Your iPad
If you’ve used the Office apps extensively on either Windows or the Mac, you probably use a dozen or more keyboard shortcuts to save time by giving commands accurately using the keyboard instead of moving your hand to the mouse. Lacking a physical keyboard, your iPad doesn’t offer keyboard shortcuts, but it supports plenty of gestures. By configuring and using the gestures that you find the best fit, you can navigate your iPad quickly and smoothly.
Turning on Gestures for Multitasking
If you want to use gestures for multitasking, first turn them on. Follow these steps.
1. Press the Home button to display the Home screen.
2. Tap the Settings icon to open the Settings app.
3. In the left column, tap General to display the General screen (see Figure 1-7).
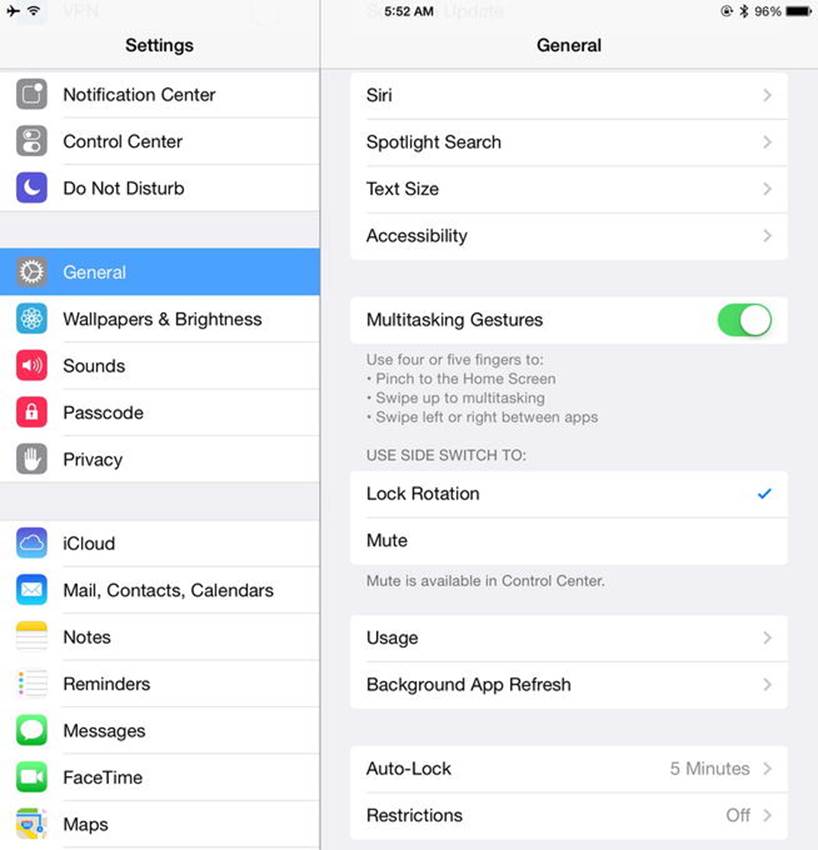
Figure 1-7. To use multitasking gestures, display the General screen in the Settings app and set the Multitasking Gestures switch to the On position
4. Tap the Multitasking Gestures switch and set it to the On position.
Tip While you’re on the General screen in the Settings app, you might want to make sure you’ve chosen a suitable setting in the Use Side Switch To box. Tap the Lock Rotation button, placing a check mark on it, if you want to be able to use your iPad’s side switch to lock the screen rotation. Tap the Mute button if you want to use the switch for muting the sound instead. If you choose Lock Rotation, the Mute button appears in Control Center; if you choose Mute, the Lock Rotation button appears in Control Center, so you can easily access both.
Using Gestures for Multitasking
After setting the Multitasking Gestures switch to the On position, you can use these three gestures to multitask:
· Display the Home screen: Pinch inward with four or five fingers (whichever you find easier).
· Display the app-switching screen: Swipe up with four or five fingers.
· Switch from app to app: Swipe left or right with four or five fingers.
Locking the Screen Orientation
Your iPad automatically rotates the screen to display the content in the appropriate orientation for the way you’re holding the device, so if you are holding the iPad in portrait orientation (taller than wide) and turn it to landscape orientation (wider than tall), the screen changes to landscape to match. This normally works well, but if you are holding the iPad very flat, you may find the orientation changing when you don’t want it to.
When you need to prevent the orientation changing, you can lock it. You can lock and unlock the orientation in two ways:
· Side switch: If you’ve selected the Lock Rotation button in the Use Side Switch To box on the General screen in the Settings app, move the side switch to turn rotation locking on or off.
· Control Center: If you’ve selected the Mute button in the Use Side Switch To box on the General screen in the Settings app, swipe up from the bottom of the screen to open Control Center, and then tap the Rotation Lock button.
SHARING AN IPAD WITH OTHER PEOPLE
Normally, an iPad is a single-user device, like an iPhone and most other smart phones. iOS provides no mechanism for multiple users, unlike the Android operating system, which enables you to set up multiple user accounts on a single tablet, giving each user a separate area for their own content and settings.
Arguably, it’s best to have an iPad of your own rather than sharing one with other people, but you may not always have the choice. So if you need to share your iPad with other people, you will need to find a way to work around the limitations. For example, if your company provides a pool of iPads to workers as needed, you will want to make sure that your accounts and data are no longer on the iPad when you hand it back in to the pool for the next person to use.
If time permits, you can erase all the content and settings on the iPad, enabling the next user to set it up from scratch. This approach is useful if each user has the iPad for a substantial period of time—say, at least several days—rather than just for an hour or two.
Here’s how to erase all the content and settings.
1. Press the Home button to display the Home screen.
2. Tap the Settings icon to open the Settings app.
3. Tap the General button in the left column to display the General screen.
4. Tap the Reset button to display the Reset screen.
5. Tap the Erase All Content and Settings button.
6. Tap the Erase button in the first Erase iPad dialog box.
7. Tap the Erase button in the second Erase iPad dialog box.
Setting the iPad up again after erasing all content and settings takes a while, especially the time needed to install all the apps on it. For shorter usage terms, you may be content to take a faster and less robust approach to removing one user’s settings and data and replacing them with the next user’s settings and data. For example,
· Use the iCloud screen in the Settings app to add or remove the user’s iCloud account from the iPad. Adding the iCloud account makes the account’s mail, contacts, calendars, reminders, Safari bookmarks, notes, and other items available to the iPad; removing the account removes these items.
· Use the Mail, Contacts, Calendars screen in the Settings app to add or remove other Internet accounts. Adding an account makes its various items available, such as an Exchange account can include mail, contacts, calendars, reminders (tasks), and notes. Removing the account removes these items.
· Use one of the Office app’s screens in the Settings app to delete a user’s credentials and document cache, as discussed earlier in this chapter. The next user can then log into her own Office 365 account and access her documents.
Note If you’re sharing an iPad in a situation where you administer the iPad, such as sharing the device with other members of your family, use the Restrictions feature to prevent other people from using features that you don’t want them to use. For example, you can turn off the Facebook and Twitter apps if you need to clamp down on social networking.
Summary
In this chapter, you learned the basics of the Office for iPad apps: what they are, what you can do with them, and how to get them up and running on your iPad. You know how to launch apps and switch among them, and how to choose settings for the apps and reset them when necessary.
In the next chapter, I’ll cover how to use common tools in the Office apps—everything from text to pictures, shapes, and printing.
All materials on the site are licensed Creative Commons Attribution-Sharealike 3.0 Unported CC BY-SA 3.0 & GNU Free Documentation License (GFDL)
If you are the copyright holder of any material contained on our site and intend to remove it, please contact our site administrator for approval.
© 2016-2026 All site design rights belong to S.Y.A.