Pro Office for iPad: How to Be Productive with Office for iPad (2014)
Chapter 5. Formatting and Laying Out Your Documents
As you saw in the previous chapter, Word for iPad makes entering text in your documents easy, especially if you connect a hardware keyboard. Once you’ve put the text in place, you’ll likely want to format the text of your documents and lay out the pages so that they have the desired look.
This chapter will tell you what you need to know to format your documents effectively. The chapter will start by showing you how to set the page size, orientation, and margins for a document. You will then learn about the different types of formatting that Word provides, how to use styles to apply formatting swiftly and consistently, and how to add direct formatting for special effects when needed. You will then explore Word’s extra features for tables, investigate how to use sections and create columns of text, and learn your options for wrapping text around objects.
Setting the Page Size, Orientation, and Margins
Each new document you create is based on a template, including the New Blank Document type of document. The document receives a wide range of settings from the template, including its page size, orientation, and margins. If necessary, you can change the page size, orientation, and margins at any point by using the controls on the Layout tab of the Ribbon.
To change the page size, tap the Layout tab of the Ribbon, tap the Size button, and then tap the appropriate button on the Size pop-up panel (see Figure 5-1).
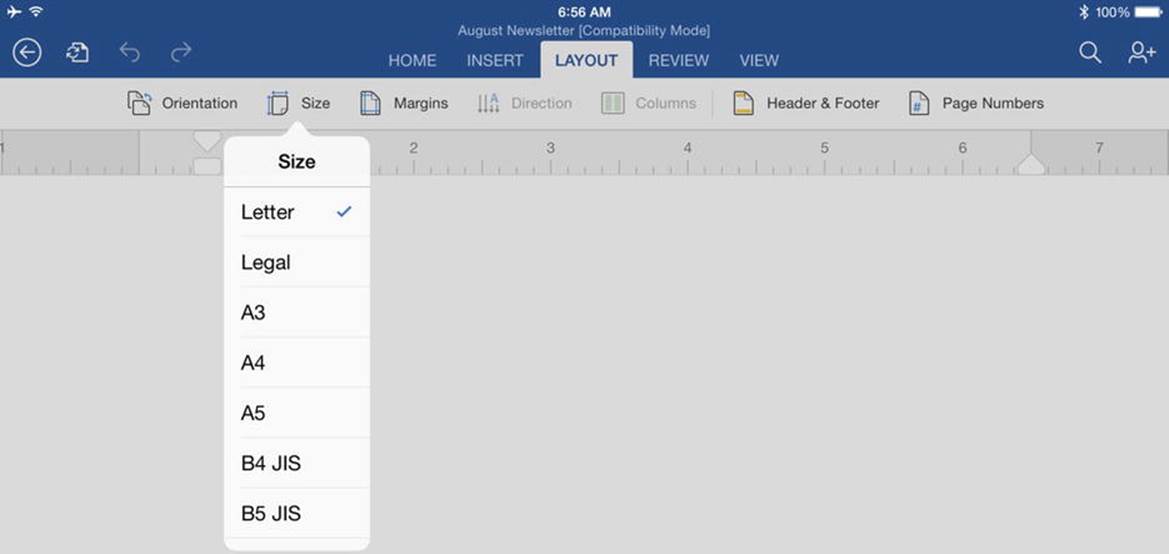
Figure 5-1. Use the Size pop-up panel to set the page size for the document
Note If you need different page sizes for different pages in the document, create a separate section for each page that needs a different size from its predecessor. See the “Using Sections to Create Complex Documents” section for coverage of sections.
To change the page orientation, tap the Orientation button on the Layout tab, and then tap the Portrait button or the Landscape button on the Orientation pop-up panel (see Figure 5-2).
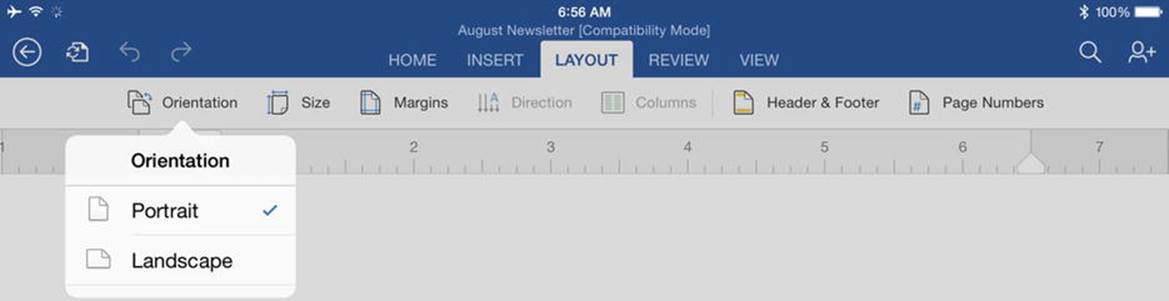
Figure 5-2. You can change the orientation quickly between portrait and landscape by displaying the Orientation pop-up panel on the Layout tab and tapping the appropriate button
To change the margins, tap the Margins button on the Layout tab, and then tap the appropriate button on the Margins pop-up panel (see Figure 5-3). These are your choices:
· Normal: Tap this button to set standard-width margins for the page size, such as 1.25-inch margins on 8.5×11-inch paper.
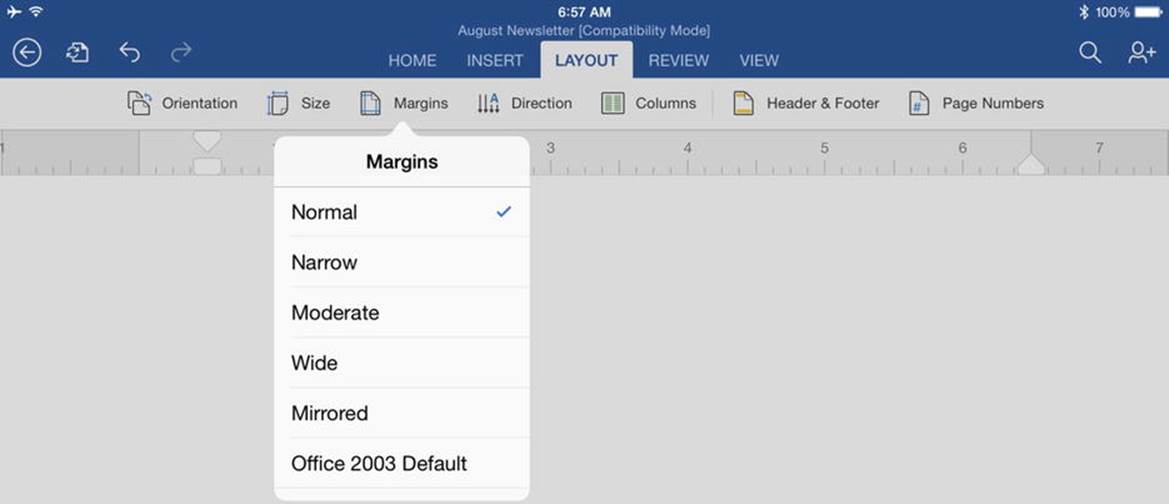
Figure 5-3. Use the Margins pop-up panel to quickly set the margin width. Alternatively, drag the margin markers on the Ribbon to the appropriate positions
Note You can also set exact margins by dragging the margin markers on the ruler. If the ruler is hidden, tap the View tab of the Ribbon and set the Ruler switch to the On position.
· Narrow: Tap this button to set the margins to a narrow but printable width, such as 0.5-inch margins on 8.5×11-inch paper.
· Moderate: Tap this button to set the margins between the Narrow setting and the Normal setting, such as 1.0-inch margins on 8.5×11-inch paper.
· Wide: Tap this button to set wide margins, such as 2-inch margins on 8.5×11-inch paper.
· Mirrored: Tap this button to create mirrored margins for facing pages. With mirrored margins, the two outside margins (the left margin on the left page and the right margin on the right page) are the same width as each other, and the two inside margins (the right margin on the left page and the left margin on the right page) are the same width as each other.
· Office 2003 Default: Tap this button to set the margins to their default settings for Office 2003. This setting can be useful if your company or organization is still using Office 2003 as a standard. If not, you’re usually better off choosing one of the other width settings.
Understanding the Different Types of Formatting
Word gives you such a wide variety of formatting that it’s easy to waste time by using the wrong ones for your needs. This section explains the different types of formatting and shows you the best and fastest way to use them.
Understanding Direct Formatting and When to Use It
Direct formatting is the kind of formatting that you can apply by using the controls on the Home tab of the Ribbon. For example, you can create a heading paragraph by changing to a different font, increasing the font size, changing the font color, giving it an “outdent” so that it sticks out into the margin, and increasing the line spacing. Figure 5-4 shows the controls you can use to make these changes.
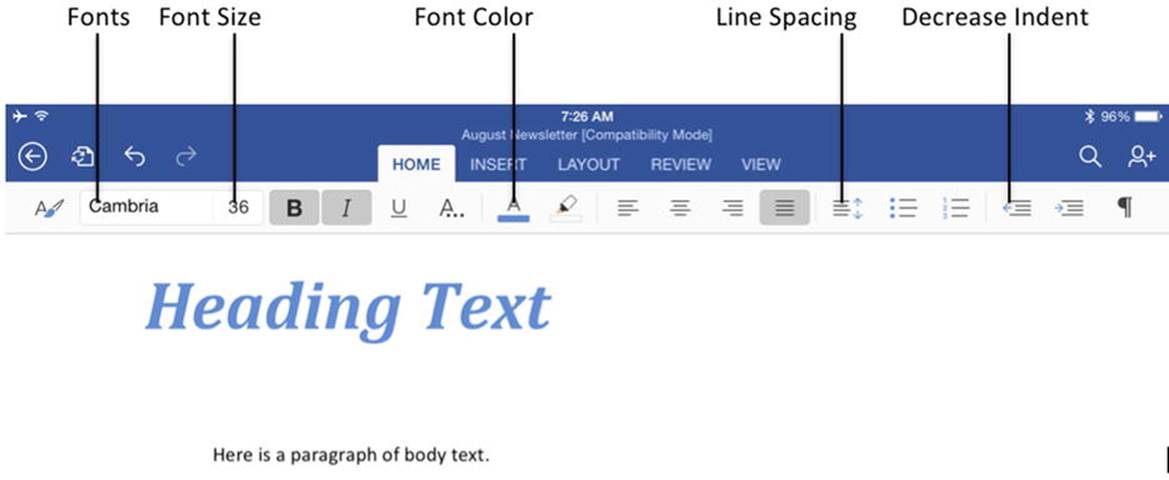
Figure 5-4. You can apply direct formatting by using the controls on the Home tab of the Ribbon
Each part of this formatting is easy enough to apply—tap this button, tap that button, and then tap the other button—but it takes time. And if you need to create another heading of the same type, you need to do it all over again. Or you can copy and paste the formatted text and type the new heading over it (as many people do) or use the Paste Format feature to paste the formatting that you’ve copied from one heading onto the text for a new heading you’ve typed.
Because direct formatting takes extra time and effort, you’ll do best to apply it only when you have formatted your documents almost completely using styles, which are discussed next.
Understanding Styles and When to Use Them
To save you from having to apply large amounts of formatting manually, Word includes a feature called styles. A style is a collection of formatting that you can apply all at once. On the iPad, you apply a style by tapping the Styles button on the Home tab of the Ribbon and then tapping the appropriate style on the Styles pop-up panel (see Figure 5-5).

Figure 5-5. You can format text or an object more quickly and consistently by applying a style from the Styles pop-up panel on the Home tab of the Ribbon
Word’s templates come with styles built in and ready for you to use. If you use a desktop version of Word, you can edit the styles in a template or document, or create new styles of your own, to make them suit your needs better. On Word for iPad, you can’t edit the existing styles or create new styles.
Note In the desktop versions of Word, styles enable you not only to apply formatting quickly and easily but also to change it quickly. You can switch among different sets of styles called Quick Styles to change the look of each paragraph to which you’ve applied one of the styles in the Quick Styles set. You can modify a style (for example, by changing the font or the indentation) and see Word implement the change immediately on each paragraph that uses the style. And you can use the Find and Replace feature to search for one style and replace it with another style. These capabilities are not available on Word for iPad at this writing.
UNDERSTANDING THE FIVE TYPES OF STYLES
Word uses five different types of styles. Word for iPad blurs the distinctions among the different types, but knowing about the different types can be helpful when you’re troubleshooting formatting issues, especially in the desktop versions of Word.
These are the five types of styles:
· Paragraph style: This is a style you apply to a whole paragraph at a time; you can’t apply it to just part of a paragraph. A paragraph style contains a full range of formatting for that paragraph—everything from the font name, size, and color through to the indentation and spacing for the paragraph, and the language used. For example, many documents use a Body Text style that gives the distinctive look to the body paragraphs. A paragraph can have only one paragraph style applied at a time.
· Character style: This is a style you apply to individual characters within a paragraph, usually to make it look different from the style of the rest of the paragraph. For example, within a paragraph that uses the Body Text style, you can apply the Emphasis character style to a word to make it stand out. You can apply only one character style at a time—applying a second character style removes the first character style.
· Linked paragraph and character style: This is a style that works either for a paragraph as a whole or for individual characters within a paragraph. Word applies the linked style as a paragraph style if you either place the insertion point in the paragraph or select the whole of the paragraph. If you select just part of the paragraph, Word applies the style as a character style. Both the paragraphs formatted with the paragraph style and the text formatted with the character style appear at the same level in the table of contents.
· Table style: This is a style you can apply to a Word table. Like a paragraph style, the style can contain font and paragraph formatting, but it can also contain table formatting such as borders and shading.
· List style: This is a style you can apply to one or more paragraphs to make them into a list—a numbered list, a bulleted list, or a multilevel list. A list style usually contains font formatting and numbering formatting.
Formatting Your Documents the Best Way
The best way to format your documents is by applying styles first and then applying direct formatting afterward as needed for tweaks. For a straightforward document, you may not need to apply any direct formatting.
Start by applying a paragraph style to each paragraph. You can then apply a character style to any text within the paragraphs that needs special treatment. For example, you can apply the Book Title style to the name of a book title or other work to make it stand out from the text.
The selection of styles available in a document varies depending on the template, and in some cases on the document itself. Word for iPad enables you to use the styles saved in either the document itself or in the template attached to the document. Most documents include styles for titles, headings, and different types of emphasis. As an example, Table 5-1 explains the styles available in the New Blank Document template.
Table 5-1. Styles in the New Blank Document Template
|
Style Name |
Style Type |
Use This Style For |
|
Normal |
Paragraph |
Any paragraph that doesn’t need another paragraph style. In templates that have no Body Text styles, such as this template, use Normal for body text. |
|
No Spacing |
Paragraph |
A paragraph that needs no space above it or below it, and no extra indents. |
|
Heading 1–9 |
Paragraph |
Top-level headings, second-level headings, third-level headings, and so on. |
|
Title |
Paragraph |
The title at the top of the document. |
|
Subtitle |
Paragraph |
The document’s subtitle, if it has one. |
|
Subtle Emphasis, Emphasis, Intense Emphasis |
Character |
Adding differing degrees of emphasis to words or phrases. Typically, the Emphasis style is the equivalent of applying italics with direct formatting. The Intense Emphasis style typically involves a change of color as well. |
|
Strong |
Character |
Making words or phrases stand out. Typically, the Strong style is the equivalent of applying boldface with direct formatting. |
|
Quote |
Paragraph |
Quotations that you need to have stand out from the main text. |
|
Intense Quote |
Paragraph |
Quotations that you want to pop out from the main text. |
|
Subtle Reference, Intense Reference |
Paragraph |
References that you want to make clear (Subtle Reference) or emphasize (Intense Reference). Intense Reference usually changes the color as well. |
|
Book Title |
Character |
Making the title of a book, movie, or other work stand out. Typically, the Book Title style is the equivalent of applying italics and boldface with direct formatting. |
Note At first, the Styles pop-up panel displays the heading styles Heading 1 through Heading 4. Once you use the Heading 4 style, Word adds the Heading 5 style to the Styles pop-up panel. When you use Heading 5, Word adds Heading 6, and so on up to Heading 9.
Applying Styles
Here’s how to apply a style.
1. Select the text to which you want to apply the style.
o If you’re applying a paragraph style to a single paragraph, you can tap to place the insertion point in the paragraph. You don’t need to select the whole paragraph, because Word applies to style to the whole paragraph.
o If you’re applying a paragraph style to multiple paragraphs, select those paragraphs. You don’t need to select the beginning of the first paragraph and the end of the last paragraph, so you can make a “messy” selection if that’s easier.
o If you're applying a character style to a single word, you can place the insertion point in the word. But you may find it easier to double-tap the word to select it than to move the insertion point so that it is inside the word.
2. Tap the Home tab of the Ribbon to display its controls.
3. Tap the Styles button to display the Styles pop-up panel.
4. Tap the style you want to apply.
Applying Direct Formatting
After applying styles—or if you decide not to use styles for whatever reason—you can apply direct formatting to it. The Home tab of the Ribbon gives you instant access to font formatting, paragraph formatting, and bulleted and numbered lists.
Applying Font Formatting
To apply font formatting, select the text you want to format, and then use the controls on the left side of the Home tab of the Ribbon (see Figure 5-6).
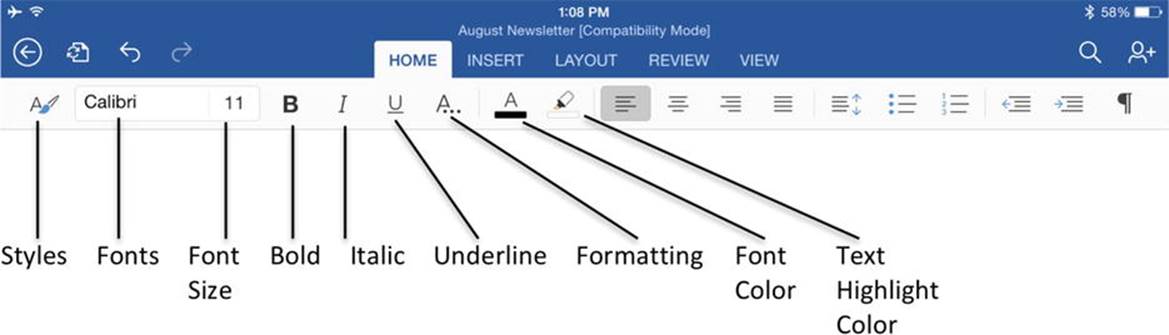
Figure 5-6. The font-formatting controls appear on the left side of the Home tab of the Ribbon
Tip If you want to format the word in which the insertion point is currently positioned, you don’t need to select the word. This works only if the insertion point is within the letters of the word, not before the word or after it.
To change the font, tap the Fonts button to display the Fonts pop-up panel (shown on the left in Figure 5-7). You can then tap the font you want to use. To pick a particular font weight and style, tap the i button to the right of the font’s name, and then tap the appropriate button on the font’s pop-up panel (shown on the right in Figure 5-7).
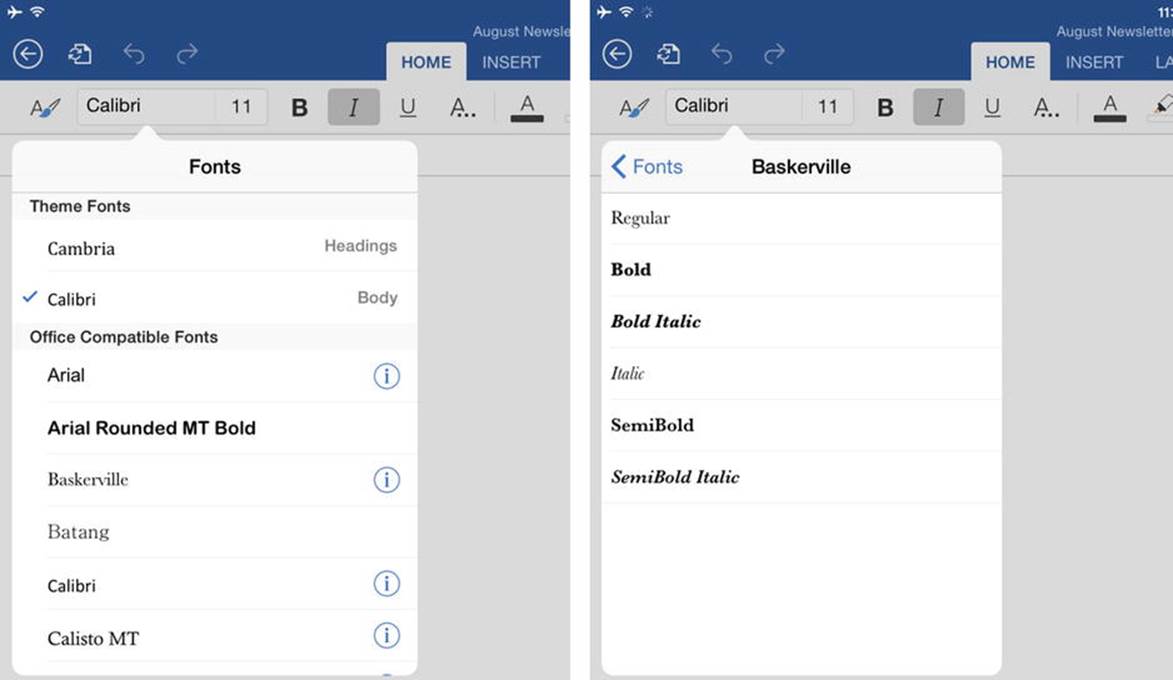
Figure 5-7. On the Fonts pop-up panel (left), tap the font you want to apply. To choose the font weight and style, tap the i button, and then tap the appropriate option on the font’s pop-up panel (right)
To change the font size, tap the Font Size button to display the Font Size pop-up panel (see Figure 5-8). You can then either tap the font size you want or tap the + button and – button to adjust the font size one point at a time.
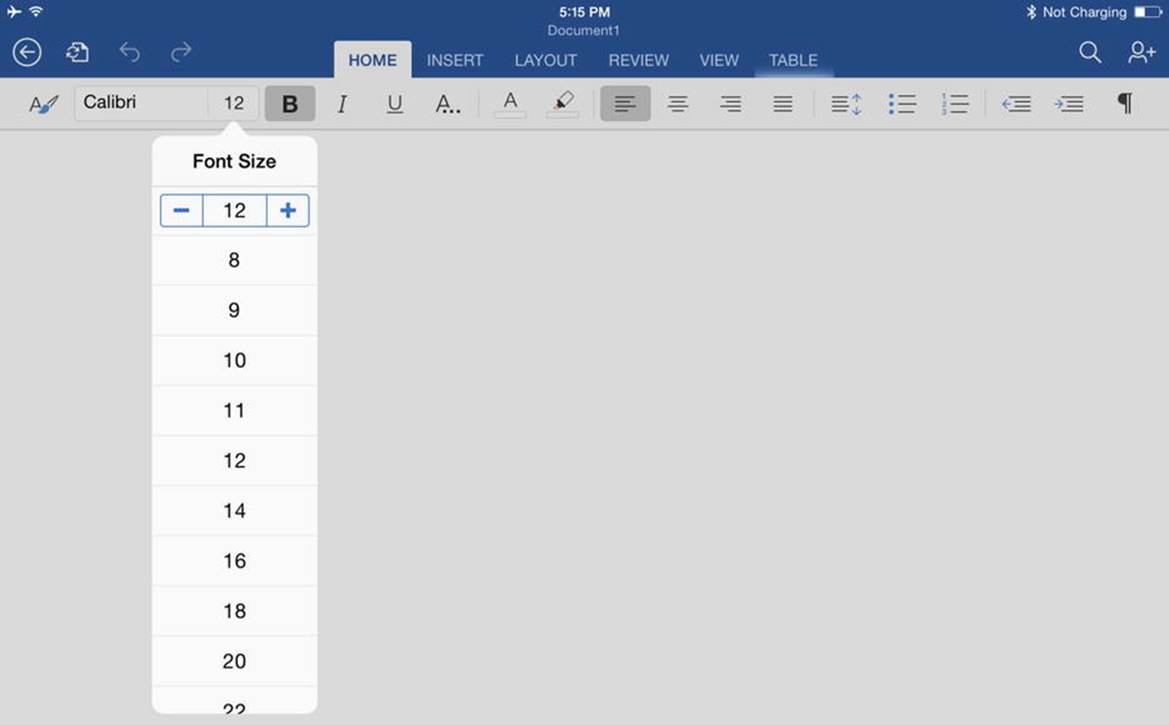
Figure 5-8. On the Font Size pop-up panel, either tap the button for the font size you want or tap the + button and – button
Tip The + button and – button in the Font Size pop-up panel are especially useful when you’ve selected text that uses different font sizes. By tapping the + button or the – button, you can make each of the sizes used one point larger or one point smaller.
To toggle boldface, italic, or underline on or off for the selection, tap the Bold button, the Italic button, or the Underline button.
Tip If you’ve connected a hardware keyboard that has a Command key, you can use keyboard shortcuts to toggle bold (press Command+B), italics (press Command+I), or underline (press Command+U).
To apply strikethrough, subscript, or superscript, or text effects, tap the Formatting button to display the Formatting pop-up panel (see Figure 5-9). You can then tap the Strikethrough button, the Subscript button, or the Superscript button to apply one of those types of formatting. To apply a text effect, tap the Text Effects button to display the Text Effects pop-up panel (see Figure 5-10), and then tap the effect you want.
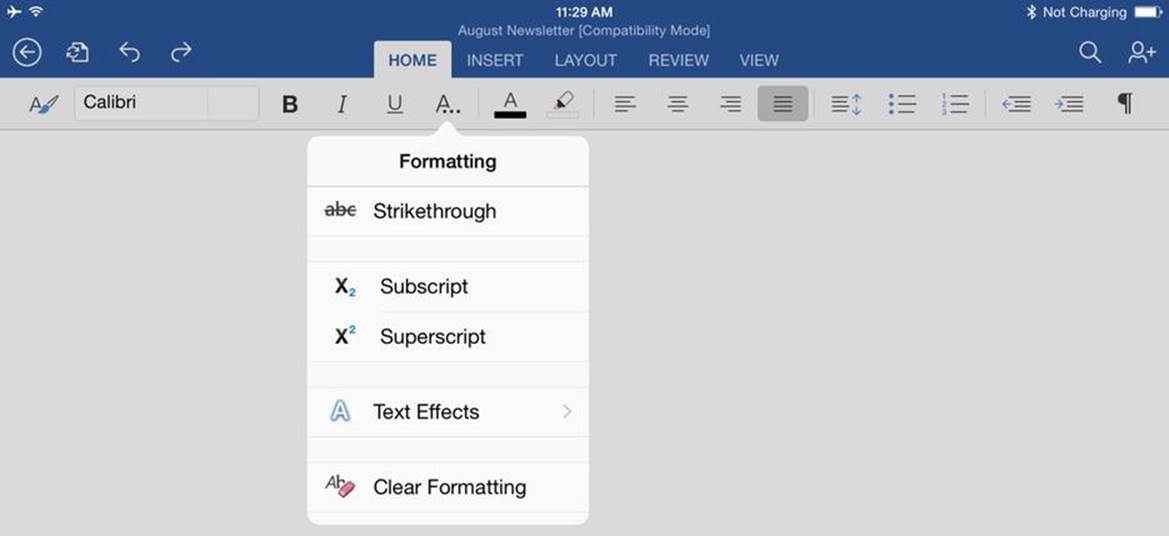
Figure 5-9. From the Formatting pop-up panel, you can apply strikethrough, superscript, subscript, or text effects. You can also clear existing direct formatting from the selection
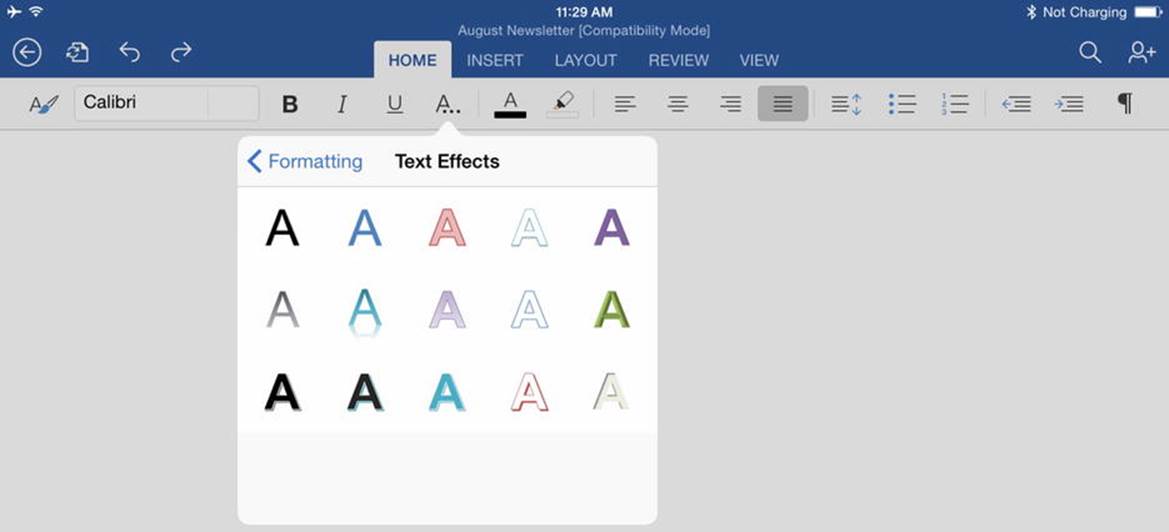
Figure 5-10. You can apply text effects to selected text from the Text Effects pop-up panel
Note Tap the Clear Formatting button on the Formatting pop-up panel to remove any existing direct formatting from what you’ve selected. This move is helpful both for standardizing formatting and for troubleshooting formatting problems caused by direct formatting that you can’t see (or can’t easily see).
UNDERSTANDING HOW OFFICE FOR IPAD SUBSTITUTES FONTS
When you look at the Fonts pop-up panel, you’ll see that it contains three sections: Theme Fonts, Office Compatible Fonts, and iOS Fonts.
The Theme Fonts section contains a pair of fonts chosen to work well together, one for headings and one for body text. For example, in the New Blank Document template, the Headings font is Cambria and the Body font is Calibri. Cambria is a serif font (the serifs are the little projections that finish off the strokes of letters), whereas Calibri is a sans-serif font, one that doesn’t have serifs (“sans” is French for “without”).
The Office Compatible Fonts list shows fonts that you can use in your documents and have them look the same in a desktop version of the Office apps.
The iOS Fonts list shows fonts from iOS that aren’t directly compatible with all desktop versions of the Office apps. Many of the fonts are available in Word on the Mac but not usually available in Word on Windows. If you use these fonts in a document in an Office for iPad app, and then open that document on your computer, the Office app will substitute any iOS fonts that are not available with similar fonts that are available. If using the exact fonts is important to you, and you will use both Windows and OS X as well as your iPad for creating your documents, you’ll need to check the font list on each platform to make sure Word doesn’t have to substitute fonts.
You may also run into font substitutions the other way. When you open a document on your iPad that has been created in a desktop version of the Office app, you may see the message “Text may look different, because this file use fonts that aren’t available.” In this case, the Office for iPad app substitutes available fonts for those that aren’t available.
Font substitutions change the look of text and may alter the layout, but unless the document is very precisely laid out, they’re not usually a big problem. If a substitution results in text using a font that’s unreadable or that you don’t like, you can simply apply another font from those available.
To change the font color of selected text, tap the Font Color button. In the Font Color pop-up panel, tap the Theme Colors tab (see Figure 5-11) or the More Colors tab as needed, and then tap the color you want. From the More Colors tab, you can tap the Custom Color button and use the resulting color picker to get exactly the shade you want; tap the Apply button when you’re satisfied with the color.
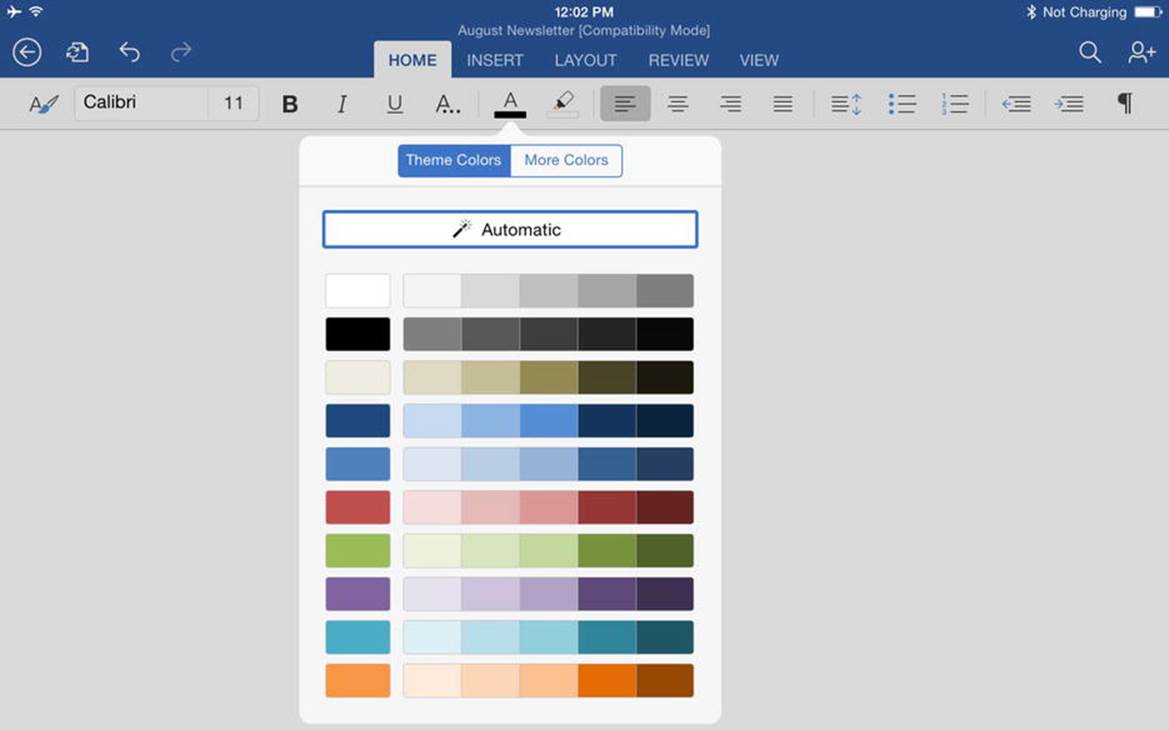
Figure 5-11. On the Font Color pop-up panel, tap the Theme Colors tab or the More Colors tab, and then tap the color you want
Note Tap the Automatic button on the Theme Colors tab of the Font Color pop-up panel to apply the automatic theme color. This makes Word apply a color that contrasts with the background, such as black font on a white background. If you change the background to a dark color, Word changes the font color to keep the text readable.
If you need to highlight selected text, tap the Text Highlight Color button, and then tap the color to apply on the Text Highlight Color pop-up panel (see Figure 5-12). Tap the No Color button to remove an existing highlight.
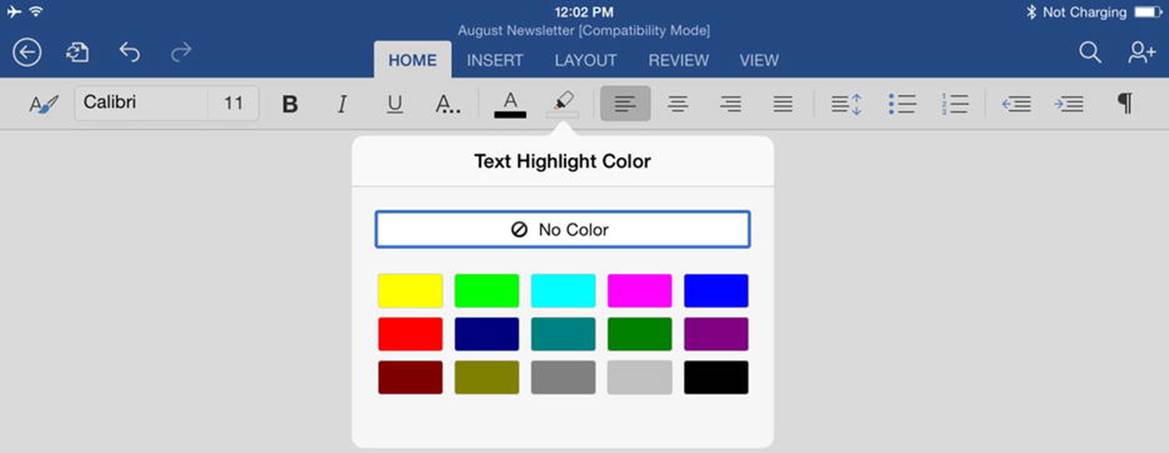
Figure 5-12. On the Text Highlight Color pop-up panel, tap the highlight color to apply to selected text
Applying Paragraph Formatting
To change the look of a paragraph, you can alter its paragraph formatting. If you’ve used the desktop versions of Word, you know that they offer a large number of settings for paragraph formatting. Word for iPad narrows these down to the essentials, enabling you to adjust alignment, line spacing, bullets and numbering, and indentation by using the controls on the right side of the Home tab of the Ribbon and (for first-line indents) the ruler.
Selecting the Paragraphs to Format
As usual, you first select the paragraphs you want to affect. If you want to affect only a single paragraph, tap to place the insertion point in it. Because the paragraph formatting applies to entire paragraphs, you don’t need to select the beginning of the first paragraph in the selection or the end of the last paragraph—as long as you’ve selected part of the paragraph, that’s fine.
Setting Paragraph Alignment and Indents
To change the alignment, tap the appropriate button on the Home tab of the Ribbon (see Figure 5-13): Align Left, Center, Align Right, or Justify. Justify aligns the text on both margins, so it can create uneven amounts of space between words. For lines with few words, justified text may appear awkwardly spaced.

Figure 5-13. Tap the appropriate alignment button to align the selected paragraphs. Tap the Increase Indent button or the Decrease Indent button to alter the indentation
Tap the Increase Indent button or the Decrease Indent button to set the indentation of the selected paragraphs. You can decrease the indent only up to the position of the left margin marker. To “outdent” the paragraph further, drag the left margin marker on the Ribbon to the left.
To set a first-line indent, drag the first-line indent marker on the Ribbon to the appropriate position. A pop-up readout shows you the exact position, such as 0.94" (see Figure 5-14).
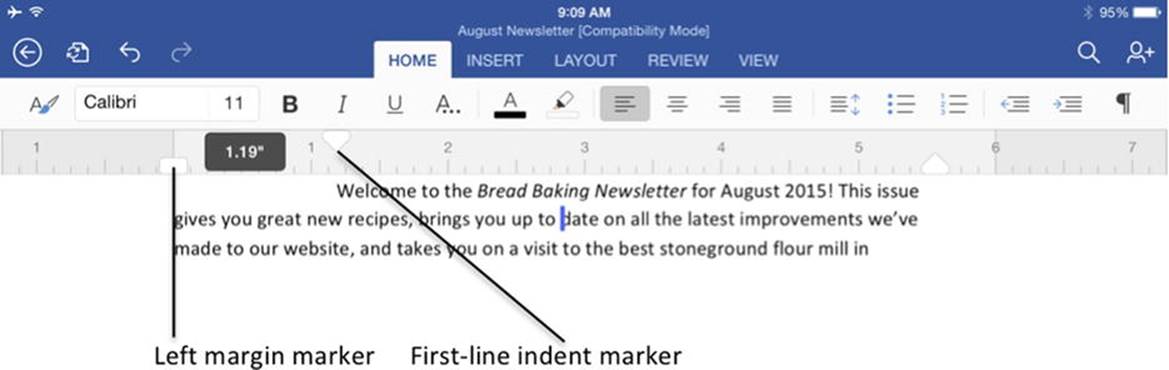
Figure 5-14. Drag the first-line indent marker on the Ribbon to set the first-line indent. Drag the left margin marker to set the left margin
Tip You can drag the first-line indent marker to the left past the left margin marker to create a hanging indent, an indent in which the first line sticks out to the left of the rest of the paragraph.
Changing the Line Spacing
To change the line spacing for the selected paragraphs, tap the Line Spacing button and then tap the appropriate button on the Line Spacing pop-up panel (see Figure 5-15). Your options are 1.0, 1.15, 1.5, 2.0, 2.5, and 3.0.
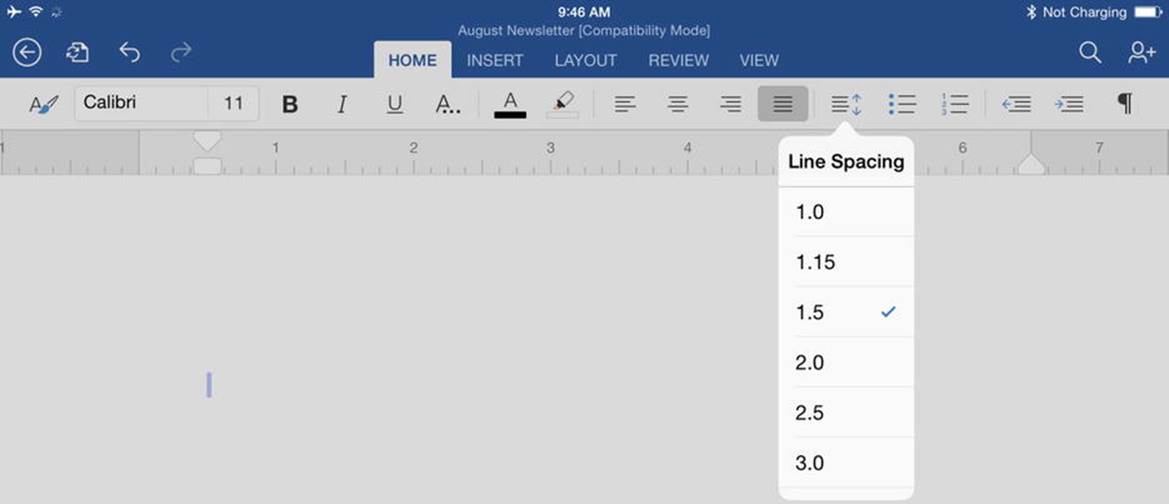
Figure 5-15. Tap the appropriate button on the Line Spacing pop-up panel to change the line spacing for the selected paragraphs
Tip Use the 1.15-line spacing to give a paragraph a “close but not too close look.” This setting is useful where single spacing looks too tightly packed together and 1.5-line spacing looks looser than you want.
Note The 1.0 setting in Word for iPad corresponds to the Single setting in desktop versions of Word. Similarly, the 1.5 setting corresponds to the 1.5 Lines setting and the 2.0 setting corresponds to the Double setting. The 1.15 setting, 2.5 setting, and 3.0 setting on the iPad correspond to the Multiple setting in desktop versions with the appropriate number (1.15, 2.5, and 3.0) specified. Word for iPad offers no way to set other line spacings, such as Exactly and At Least, that the desktop versions provide. Word for iPad also does not enable you to adjust the Before setting and After setting for a paragraph. (You use these settings in the desktop versions to increase or decrease the amount of space after a paragraph. For example, you might add 6 points after a body text paragraph to create a small gap between paragraphs without changing the line spacing.)
Applying Bullets and Numbering
Word for iPad enables you to apply standard bullets and numbering quickly from the Home tab of the Ribbon.
Caution Word for iPad doesn’t offer custom bullets and numbering as the desktop versions of Word do. Nor does Word for iPad provide multilevel lists, such as numbered lists with subnumbered items. But if you set custom bullets or custom numbering in a document using a desktop version of Word, the bullets or numbering will appear correctly when you open the document on Word for iPad. You can add items to the existing levels of the list, but changing list paragraphs to different levels (for example, promoting a subnumbered item to a main numbered item) tends to wreck the formatting of the whole list. The list’s formatting may not change until you save the document, so try making minor changes, then close the document and reopen it to see if the formatting remains stable, before you devote time and effort to changing the list.
To apply bullets, tap the Bullets button to display the Bullets pop-up panel (shown on the left in Figure 5-16), and then tap the button for the style of bullet you want. To apply numbering, tap the Numbering button to display the Numbering pop-up panel (shown on the right in Figure 5-16), and then tap the button for the numbering style to use.
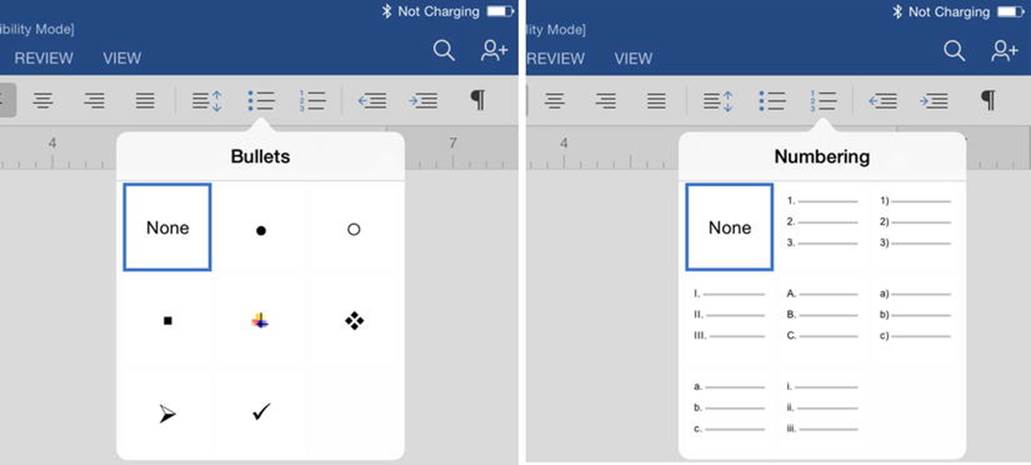
Figure 5-16. You can apply bullets quickly from the Bullets pop-up panel (left) or numbering from the Numbering pop-up panel (right)
Tip You can start a bulleted list by typing a frequently used bullet character, such as an asterisk (*), followed by a tab or space, at the beginning of a line. Similarly, you can start a numbered list by typing any of several numbering formats (such as 1, 1), or 1.) at the beginning of a line and then typing a tab or a space.
Note Bullets and numbering you apply by using the Bullets pop-up panel and the Numbering pop-up panel are paragraph formatting rather than characters typed in the document. To remove bullets or numbering, select the paragraph or paragraphs, open the Bullets pop-up panel or the Numbering pop-up panel, and then tap the None button.
Tip To enter an actual bullet character in text, tap and hold the – (hyphen) key on the onscreen keyboard until the pop-up panel of alternate characters appears, and then tap the bullet button.
Pasting Formatting
When you’ve applied exactly the direct formatting that you need to some text or to an object, you can use the Paste Format feature to apply that formatting to other objects that need it. Follow these steps.
1. Select the text (or the object) that has the formatting you want to copy. The Edit menu appears automatically when you make the selection.
2. Tap the Copy button on the Edit menu. This copies both the text (or object) and its formatting to the Clipboard.
3. Select the text (or object) to which you want to apply the formatting. Again, the Edit menu appears automatically (see Figure 5-17).
4. Tap the Paste Format button. Word pastes the formatting onto the text or object.
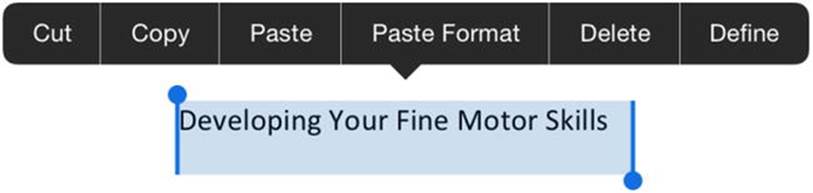
Figure 5-17. Tap the Paste Format button on the Edit menu to paste onto the selection the formatting of the material you’ve copied to the Clipboard
Tip The copied material and formatting remains on the Clipboard until you copy or cut something else, so you can paste the formatting onto other text or objects until then.
Using Word’s Extra Table Features
Tables in Word can be a great way of laying out text in rows and columns in order to make the information easy to read. Word for iPad includes several extra table features over those included in the other Office for iPad apps, including converting existing text to a table and making header rows repeat on each page that a multipage table covers.
Converting Existing Text to a Table
When creating a document, you may find that you need to turn some text you’ve written into a table. For example, you may have started to create a list separated by tabs but then found that some items require multiple lines, which makes using tabs a nightmare.
Word for iPad enables you to create tables from existing text separated with either tabs or commas. Tabs are usually easier unless you happen to have comma-separated text to work with.
CONVERTING TAB- OR COMMA-SEPARATED MATERIAL INTO A TABLE SUCCESSFULLY
When converting tabbed material into a table, you must make sure of three things:
· Each paragraph contains the same number of tabs or commas: If the paragraphs you convert contain different numbers of tabs or commas, Word creates enough columns for the paragraph with the most tabs or commas. You’ll then need to move cell contents around and get rid of the surplus cells.
· Each item is separated by only one tab: When you’re laying out text with tabs, it’s easy to use two or three tabs between items, especially when you’re working with default tab stops rather than custom tab stops placed where you need them. But if you convert material separated by multiple tabs, you’ll get the wrong number of columns. (You can create the same problem with commas, but it’s less likely that you’ll add extra commas for layout purposes.)
· Each cell’s material consists of a single paragraph, not multiple paragraphs: Make sure that no cell’s material is broken onto multiple paragraphs—otherwise, you’ll get the wrong number of rows.
Tap the Show/Hide button at the right end of the Home tab of the Ribbon if you need to see the tabs and paragraph marks in the document.
You can convert such text into a table by following these steps.
1. Look through the text you want to turn into a table and make sure the items that will become columns are separated consistently using tabs or commas. See the nearby sidebar for more detail.
2. Select the text.
3. Tap the Insert tab on the Ribbon to display its controls.
4. Tap the Table button.
Tip Word doesn’t provide an easy way to convert a table into text. Your best option is to cut the table to the Clipboard and then paste it where you need the text. Word pastes in the table as a table. Tap the Paste Options button that appears at the lower-right corner of the pasted material, and then tap the Keep Text Only button to convert the material to paragraphs of text with the contents of the cells separated by tabs.
Using AutoFit
Word includes an AutoFit feature that you can use to adjust column width to fit the column width to the contents of the cells. Here’s how to use AutoFit.
1. Tap anywhere in the table.
2. Tap the Table tab on the Ribbon to display its controls.
3. Tap the AutoFit button to display the AutoFit pop-up panel (see Figure 5-18).
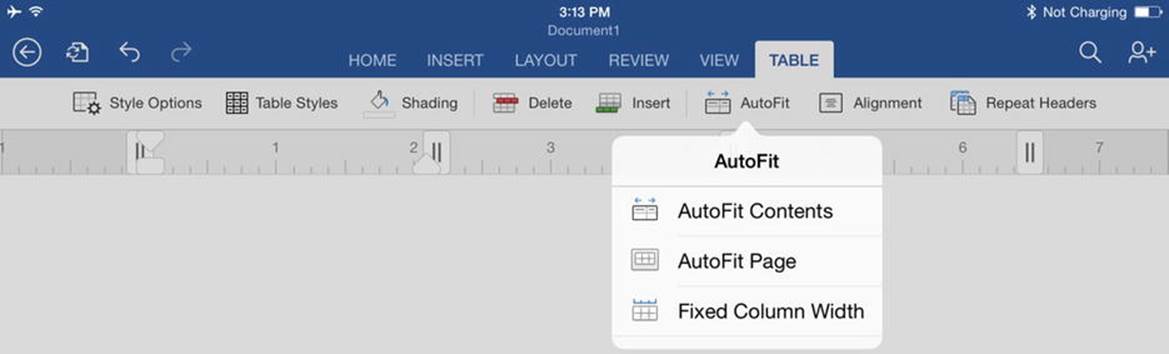
Figure 5-18. Use the buttons on the AutoFit pop-up panel to tell Word how to fit column width to contents
4. Tap the appropriate button:
a. AutoFit Contents: Tap this button to adjust the width of each column to best fit its contents. Word may change the table’s width.
b. AutoFit Page: Tap this button to fit the table to the page on which it falls.
c. Fixed Column Width: Tap this button to turn off AutoFit, fixing each column’s width at its current width. You can adjust the column width manually as needed.
Repeating Table Headers on Each Page
If you create a table that runs from one page to the next (or to multiple pages), make Word continue the table’s headers on each page. This is much better than creating a table header row manually on each page, because such rows can move from page to page as you create or edit your document.
Here’s how to turn on repeat headers.
1. Tap in the header row. If you want to use multiple rows of headers, select the rows.
2. Tap the Table tab of the Ribbon to display its controls.
3. Tap the Repeat Headers button so that its background turns gray and it appears pushed in.
Using Sections to Create Complex Documents
When you need to create documents that use multiple layouts, you have to put each layout in a separate section. Here are examples of documents that use multiple layouts:
· A newsletter may need different numbers of columns on different pages (or on the same page).
· A report may require different headers and footers for different chapters.
· A business letter may need to contain an envelope page as well.
Word’s sections are essential for creating complex documents, but they’re tricky both to see and to grasp. Word makes matters worse by automatically creating sections when your documents need them—for example, when you apply columns to part of a document, as discussed later in this chapter—but not making clear what it’s doing.
Here are the essentials:
· Each new blank document has a single section at first: When you create a new blank document, Word creates it as a single section until you add further sections. By contrast, documents you create based on a template contain however many sections the template has.
· When you need to give part of the document a different layout, you create a new section: For example, if you need to create a landscape page in a document that uses portrait orientation, you put the landscape page in a separate section so that you can change the layout.
· A section can start on the same page or on a different page. Word gives you four kinds of section breaks:
o Continuous: The new section starts on the same page as the previous section. This type of break is useful for creating multi-column layouts on part of a page that also has one or more single-column layouts.
o Next page: The new section starts on the next page after the previous section ends. This is the kind of break you use for putting a new chapter on a new page or for changing layout from portrait to landscape.
o Even page: The new section starts on the next even page after the previous section ends. This may mean having a blank page in the printed document.
o Odd page: The new section starts on the new odd page after the previous section ends. This too may mean a blank page appears in the printed document.
· A section break divides one section from the next: When you create a section (or Word creates one automatically for you), you add a section break to the document. A section break is normally hidden, but if you display paragraph marks and other invisible characters, it appears as a dotted double line with the words Section Break and the type in the middle—for example, Section Break (Continuous).
Once you know all this, inserting a section break is simplicity itself.
1. Place the insertion point where you want the new section to start. It’s best to put the insertion point at the beginning of a paragraph.
2. Tap the Insert tab of the Ribbon to display its controls.
3. Tap the Breaks button to display the Breaks pop-up panel (see Figure 5-19).
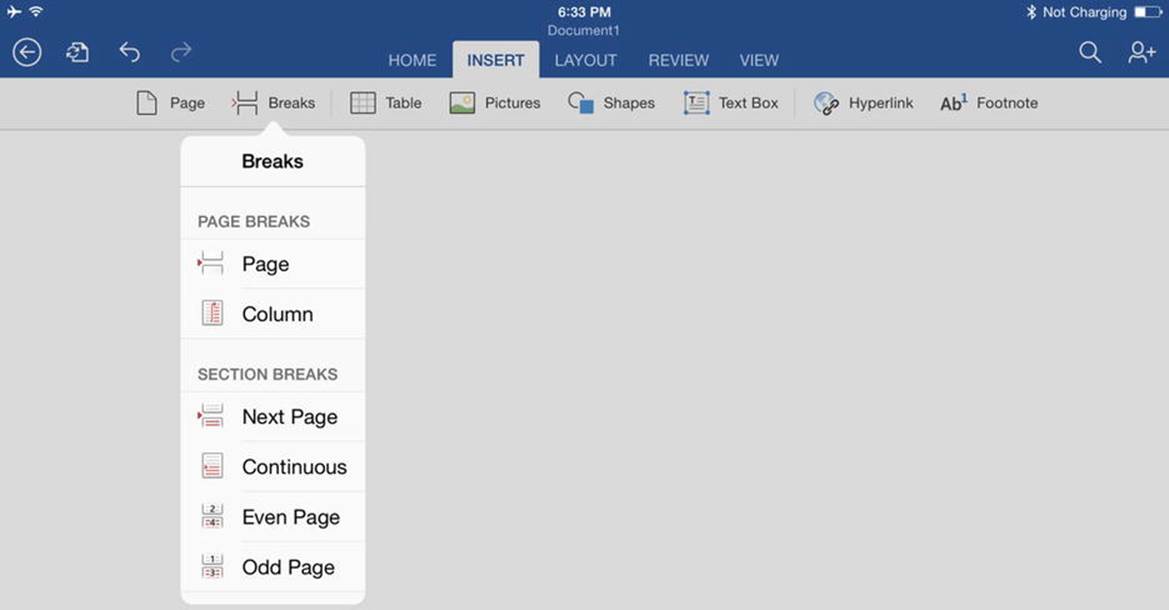
Figure 5-19. You can insert any of the four types of section breaks from the Section Breaks pop-up panel
4. Tap the Next Page button, the Continuous button, the Even Page button, or the Odd Page button, as needed. Word inserts the break.
To see the break, tap the Show/Hide button at the right end of the Home tab of the Ribbon.
Creating Columns of Text
When you’re creating a publication such as a newsletter, you may find it useful to create columns of text like those used in newspapers or magazines, where the text runs all the way down one column and then starts at the top of the next column.
Note Some templates have columns already set up, so you can simply add text to create the layout. For example, the Business Newsletter template includes a three-column layout.
Here’s how to create columns of text.
1. Select the part of the document you want to affect.
a. If you want to use columns for the entire document, you don’t need to make a selection. Just place the insertion point anywhere.
Tip Word uses sections to implement different numbers of columns in different parts of the document. So if you have a document that’s a single column at first, then has three columns, and then goes back to one column, it must have at least three sections: one for each single-column section and one for the three-column section. Again, if the template you’re using has the columns and sections already set up, you don’t need to worry about this.
b. If the document already contains the text you want to turn into columns, select that text.
Note Most documents that use multicolumn layouts also have single-column sections, as in the example shown in this section. If you use a multicolumn layout all the way through a document, you can use the header (or the footer) to implement a single-column section if needed.
c. If you want to create columns at the end of the document, select a paragraph at the end of the document. (If there is no blank paragraph at the end of the document, create a new paragraph and then select it.)
2. Tap the Layout tab of the Ribbon to display its controls.
3. Tap the Columns button to display the Columns pop-up panel (see Figure 5-20).
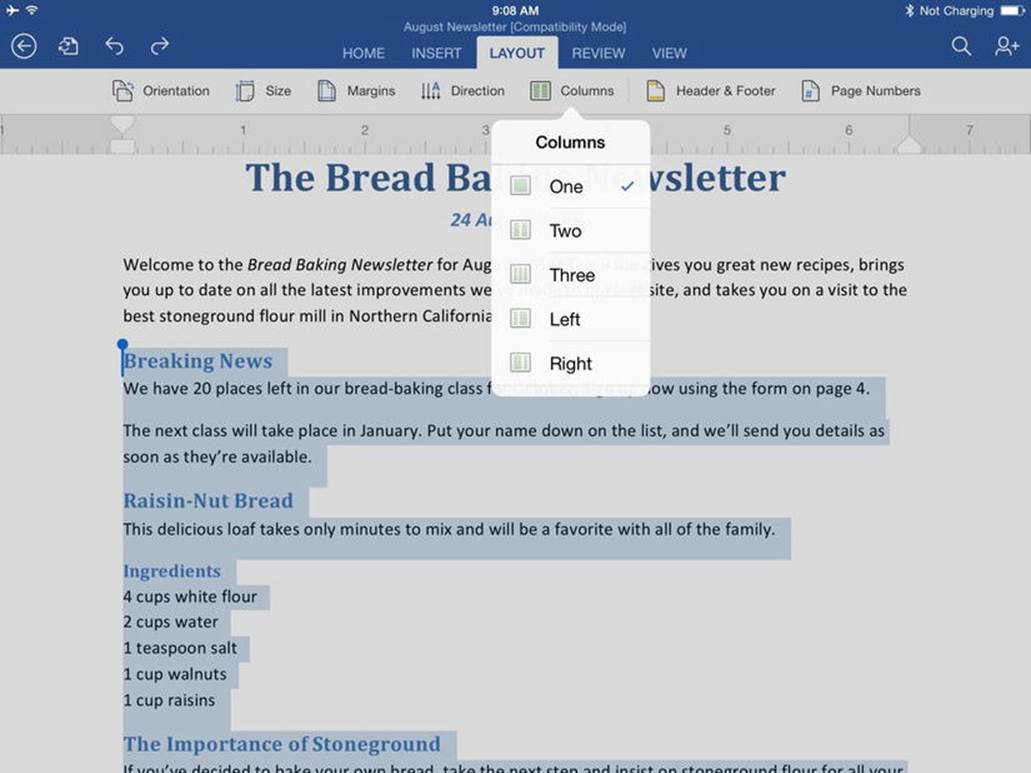
Figure 5-20. Tap the Columns button on the Layout tab of the Ribbon to display the Columns pop-up panel, and then tap the number of columns to use
4. Tap the appropriate button:
a. One: Tap this button to change back from a multi-column layout to a single-column layout.
b. Two: Tap this button to create two columns of the same width.
c. Three: Tap this button to create three columns of the same width.
d. Left: Tap this button to create a narrower column to the left of a wider column.
e. Right: Tap this button to create a narrower column to the right of a wider column.
The columns appear in the document (see Figure 5-21), and you can judge how well they work.
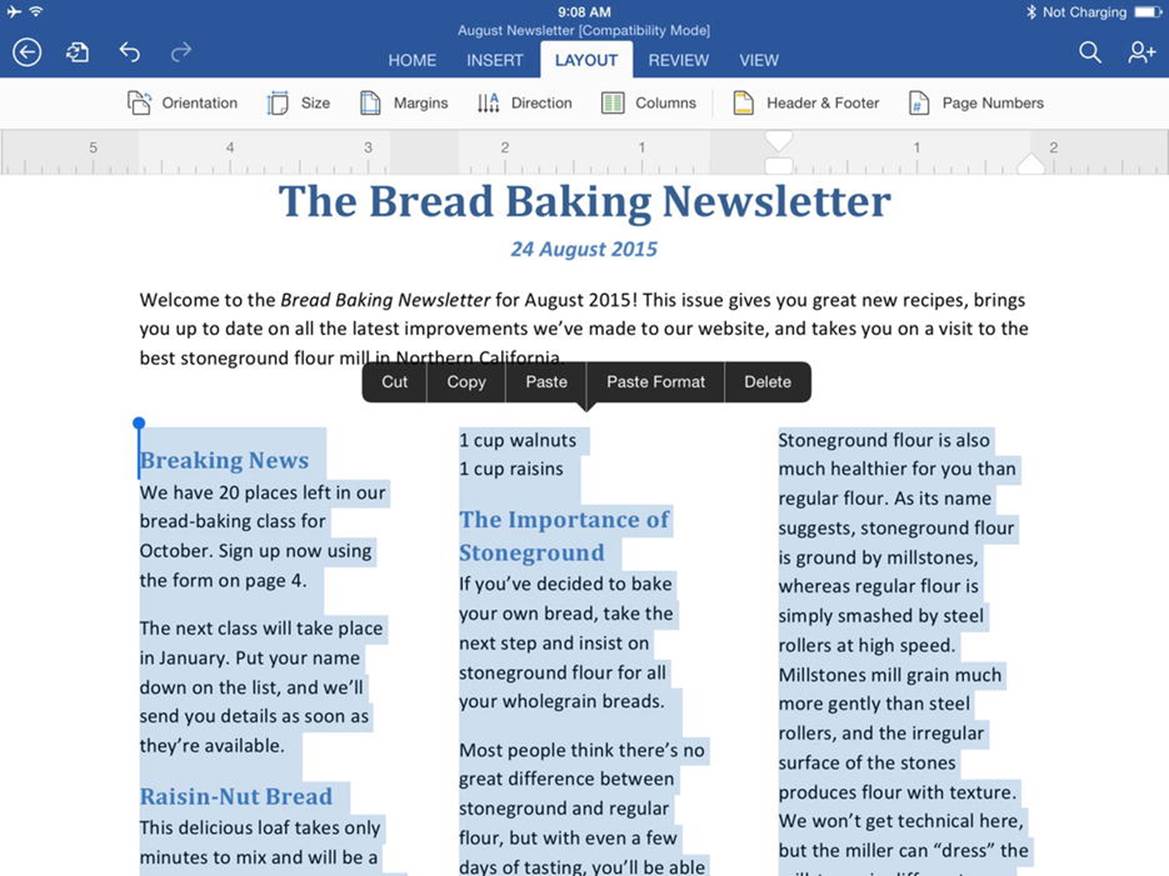
Figure 5-21. Word converts the selected text to newspaper-style columns
Note You can change the indents of the paragraphs in columns by tapping the paragraph you want to affect and then dragging the Left Indent marker, the First-Line Indent marker, or the Right Indent marker, as needed. If you don’t have the ruler displayed, tap the View tab of the Ribbon and then set the Ruler switch to the On position to display it.
Wrapping Text Around Objects
You can insert objects, such as photos or shapes, in your documents by using the techniques explained in Chapter 2. After inserting an object, you can change the text wrapping if necessary by tapping the Wrap Text button on the Picture tab or Shape tab of the Ribbon and then tapping the wrap type you want on the Wrap Text pop-up panel (see Figure 5-22).
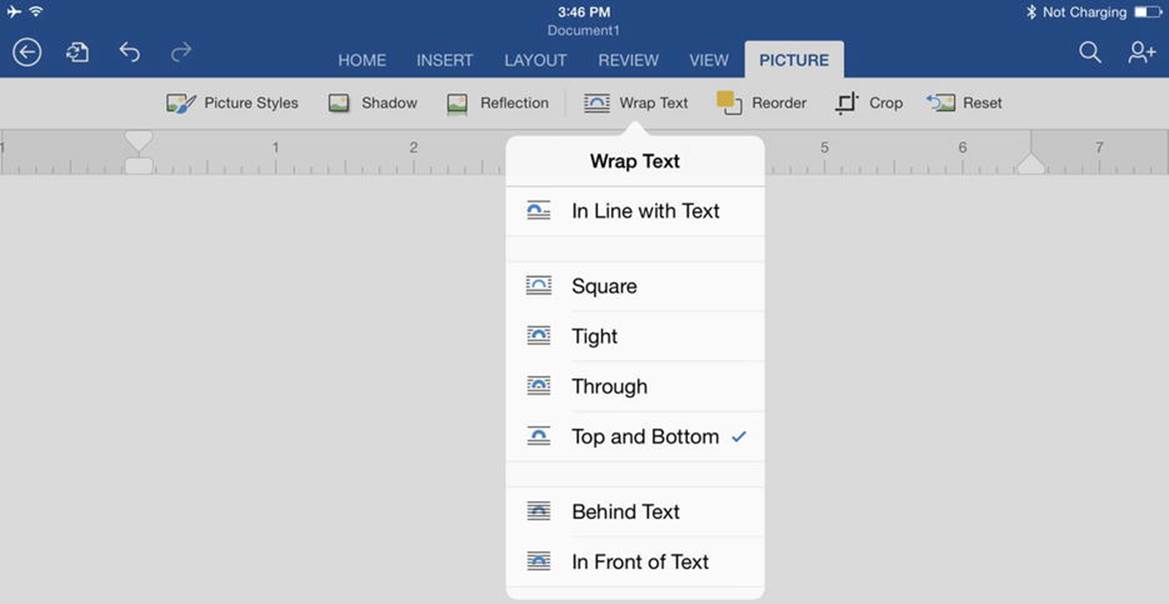
Figure 5-22. Use the Wrap Text pop-up panel on the Picture tab of the Ribbon to control text wrapping around a picture. For shapes and text boxes, the Wrap Text button appears on the Shape tab
These are the wrap types:
· In Line with Text: Choose this wrap type to place the object in the text layer, making Word treat the object as a character. Word moves the object with the text stream, so if you insert a character before the object, the object moves to the right. Inline placement is mostly useful for small objects.
· Square: Choose this wrap type to wrap the text around the border of the object. This is the wrap type you’d normally use for wrapping around an object.
· Tight: Choose this wrap type to wrap the text tightly around the border of the object. This wrap type is useful for irregularly shaped objects.
· Through: Choose this wrap type to wrap the text tightly around the border of the object and in any white space. Figure 5-23 shows a shape that uses the Through wrap type.
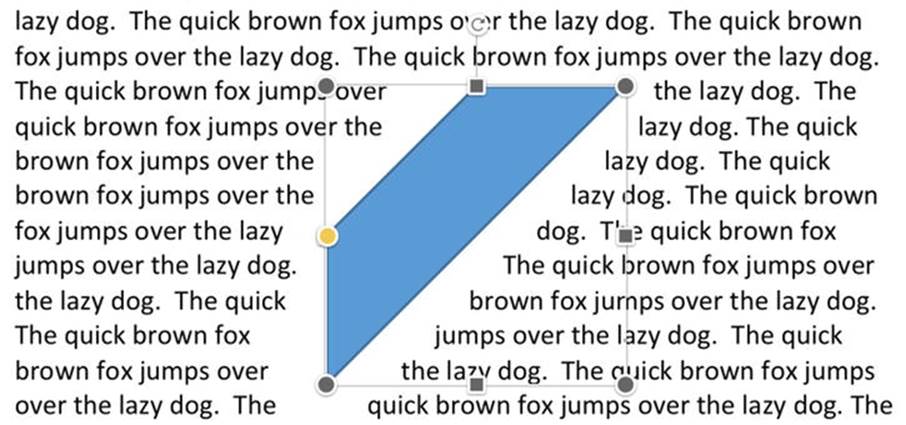
Figure 5-23. Choose the Through wrap type to wrap the text through any white space around the object
· Top and Bottom: Choose this wrap type to have the object appear with the text above it and below it but not at its sides.
· Behind Text: Choose this wrap type to position the object behind the text layer. You can then move the object freely so that it appears where you want it. If text appears in front of the object, it obscures it.
· In Front of Text: Choose this wrap type to position the object in front of the text layer. You can then move the object freely so that it obscures or enhances the text.
Summary
In this chapter, you learned how to lay out your documents and format them. You now know how to set page size, orientation, and margins and how to format using styles and direct formatting. You can also use Word’s features for tables, create newspaper-style columns, divide your documents into sections, and make the most of Word’s tricks with wrapping text around objects.
All materials on the site are licensed Creative Commons Attribution-Sharealike 3.0 Unported CC BY-SA 3.0 & GNU Free Documentation License (GFDL)
If you are the copyright holder of any material contained on our site and intend to remove it, please contact our site administrator for approval.
© 2016-2026 All site design rights belong to S.Y.A.