The Unauthorized Guide to iPhone, iPad, and iPod Repair (2013)
Chapter 4. iDevice Repair Best Practices
This chapter takes care of some literal and figurative housecleaning that any self-respecting iDevice technician should undertake before performing any DIY work on iDevices.
I’m talking about answers to questions such as the following:
![]() How can I determine whether an iDevice is in or out of warranty?
How can I determine whether an iDevice is in or out of warranty?
![]() What do those strange acronyms like IMEI and ICCID mean?
What do those strange acronyms like IMEI and ICCID mean?
![]() What’s the difference between an iDevice Model Number and an Order Number?
What’s the difference between an iDevice Model Number and an Order Number?
![]() What do the strange hieroglyphics on the back of my iDevice represent?
What do the strange hieroglyphics on the back of my iDevice represent?
![]() How can I maximize the safety effectiveness of my repair workshop?
How can I maximize the safety effectiveness of my repair workshop?
Those are some juicy questions, don’t you agree? What are you waiting for? Let’s get to work!
Checking iDevice Warranty Coverage
Whenever you are presented with an iDevice and are asked to perform an out-of-warranty repair, the first thing you should do is definitively verify the actual warranty status of the device. Fortunately, you can easily find an answer to this question in ways that we will discuss now.
If you can’t start the iDevice, then you can obtain the serial number, from the original product packaging or in iTunes. (You can find instructions for locating the serial number in iTunes in the sidebar later in this section.)
Note: Check the Back of the Device
Some older iDevice models have their serial numbers printed on the back case.
You can check your iDevice serial number in iOS 6 by navigating to Settings, tapping General, and then tapping About. This interface is shown in Figure 4.1.
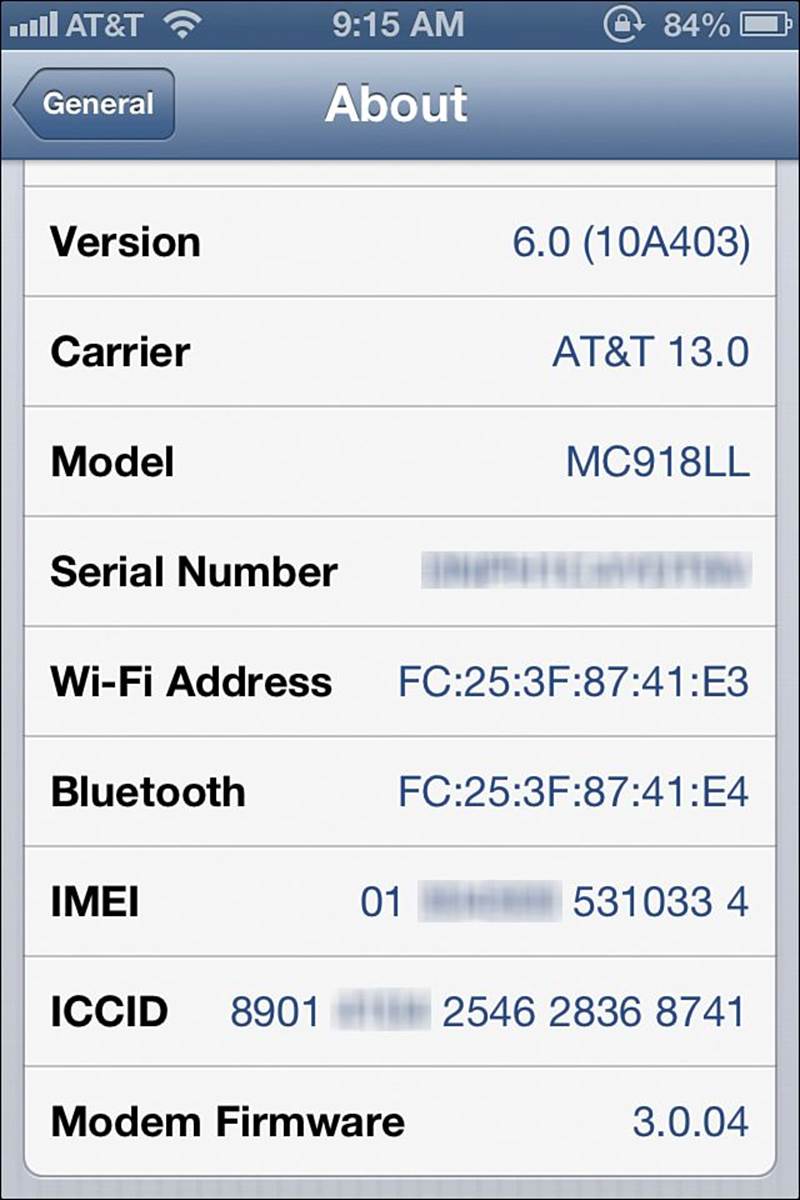
FIGURE 4.1 We can determine an iDevice serial number from within iOS.
You can also submit the device’s serial number to Apple’s Check Your Service and Support Coverage page (https://is.gd/C8pEzh). The resulting web page, shown in Figure 4.2, provides you with the following information about the given device:
![]() Device purchase date
Device purchase date
![]() Telephone technical support status, along with expiration date
Telephone technical support status, along with expiration date
![]() Repair and service coverage status, along with expiration date
Repair and service coverage status, along with expiration date
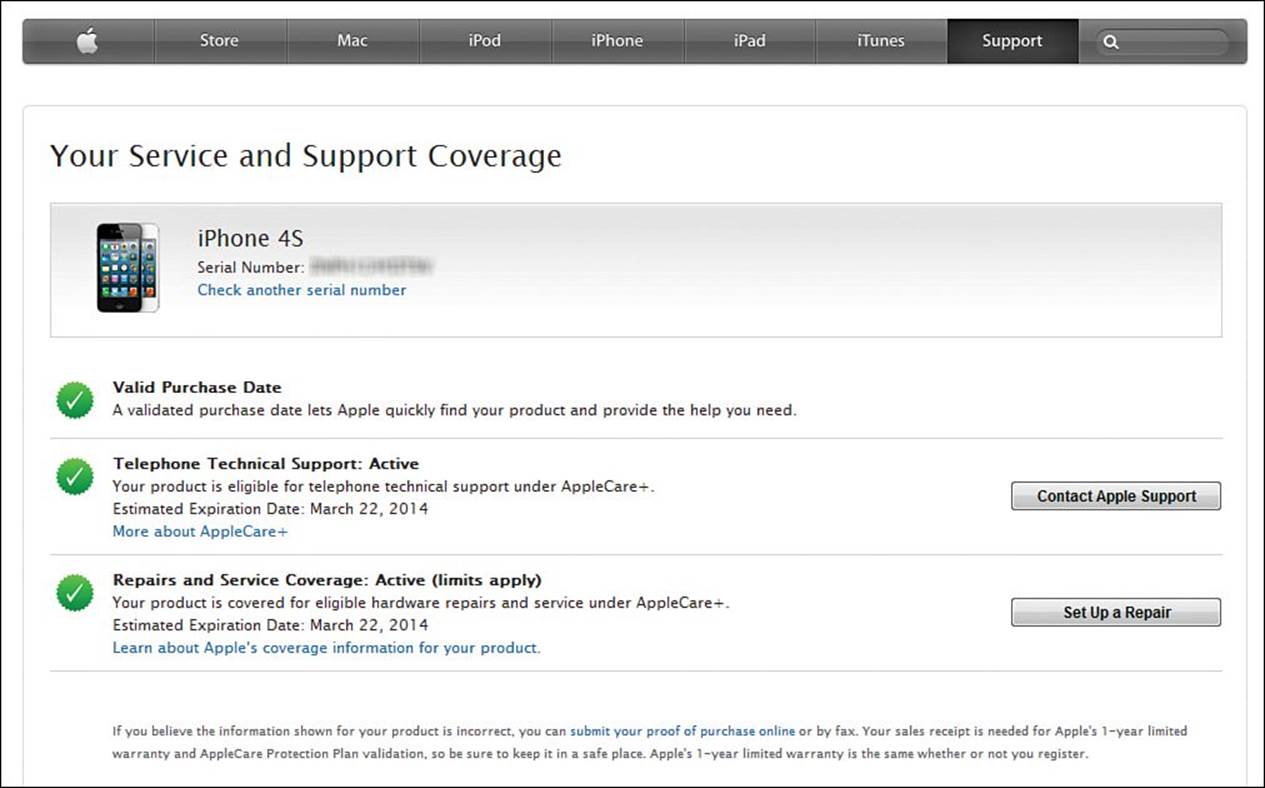
FIGURE 4.2 You can determine iDevice warranty coverage by visiting Apple’s website.
Finding the Serial Number in Itunes
Locating your iDevice serial number in iTunes 11 is easy. Plug in your iDevice and navigate to the device’s Summary page in iTunes. The serial number is plainly displayed next to the small icon image of your device. Protip: Click the serial number value to toggle between the serial number and the unique identifier (UDID).
The format of the iDevice serial number is a combination of non-unique and unique information. It really does not behoove you to attempt deciphering Apple’s serial number format because (surprise, surprise) Apple changes the format on a semiregular basis.
Instead, if you would like a breakdown of a given iDevice’s serial number then I suggest that you visit the Dutch website Chipmunk International BV (http://is.gd/8BnvUi) or EveryMac.com (http://is.gd/wNrlgV). You can submit your device’s serial number and obtain a list of detailed metadata concerning the origins of the device. This metadata includes the following:
![]() Year the model was introduced
Year the model was introduced
![]() Production year
Production year
![]() Production week
Production week
![]() iDevice model name
iDevice model name
![]() Order Number
Order Number
![]() CPU speed
CPU speed
![]() Screen size
Screen size
![]() Screen resolution
Screen resolution
![]() Case color
Case color
![]() Capacity
Capacity
![]() Factory of origin
Factory of origin
To quote Miguel de Cervantes from his wonderful novel Don Quixote, “Forewarned, forearmed; to be prepared is half the victory.” With that in mind, let’s continue on the journey to iDevice metadata enlightenment.
Verifying iDevice Version Info
As you know, Apple has historically not been precise, much less consistent, in its product naming. For instance, consider the iPad. These are the official product names for the three generations of iPad:
![]() iPad
iPad
![]() iPad 2
iPad 2
![]() New iPad
New iPad
Give me a break! What makes matters worse is that all three generations have simply iPad etched on the back panel.
The same goes for iPhones; remember our previous discussion of iPhone 3G, 3GS, and iPhone 4S? What relationship do those product names have with 3G or 4G carrier network connectivity? You have to consult a reference table to answer that question.
The most reliable method for identifying a particular iDevice model is to ascertain its model number. This alphanumeric string is printed on the rear case of the device (see Figure 4.3).
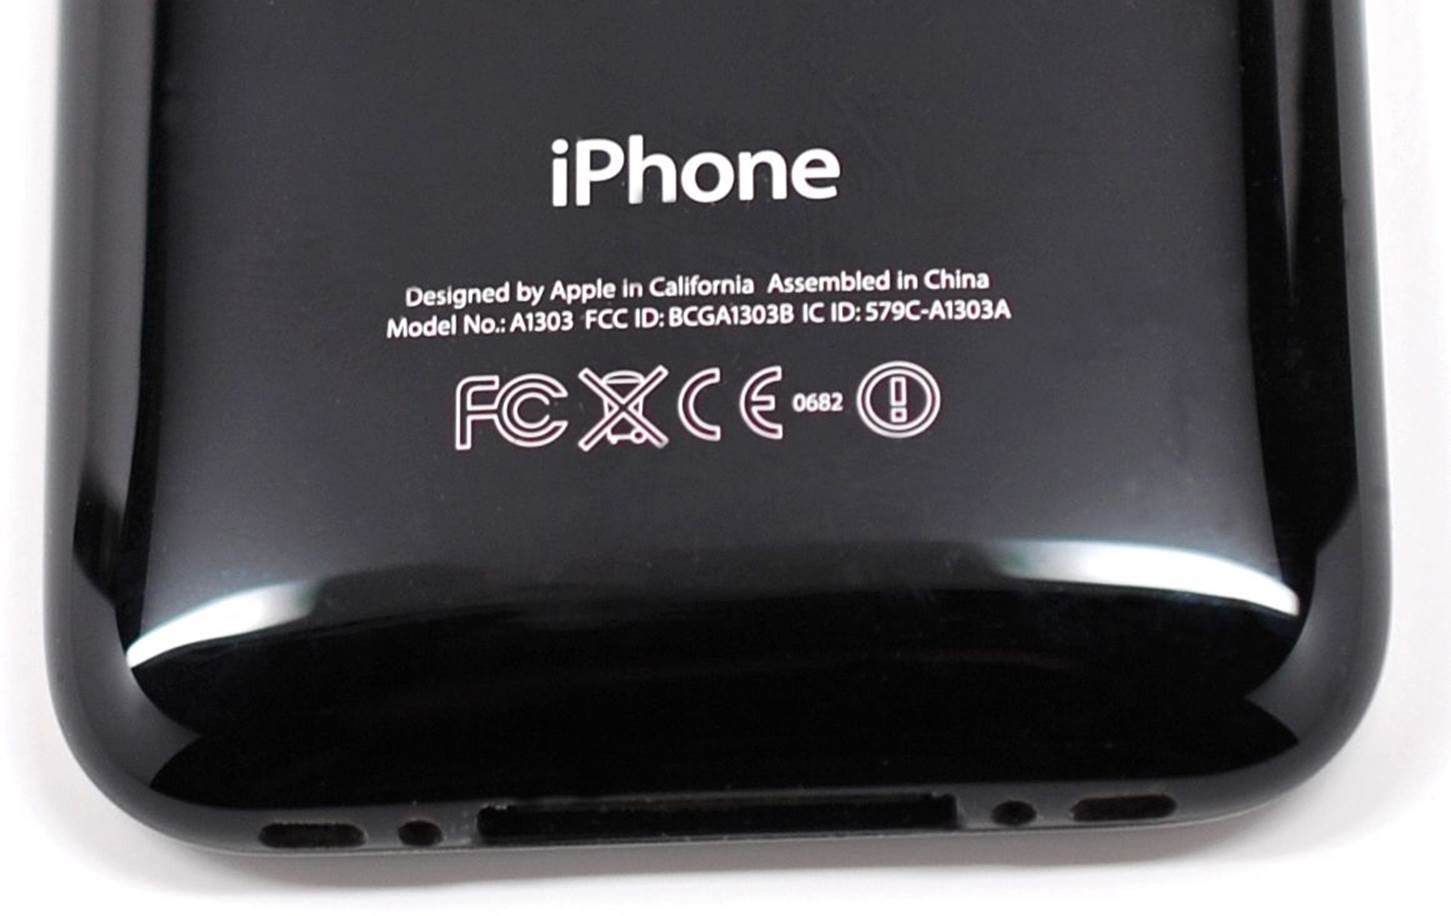
FIGURE 4.3 You can determine the iDevice model number and other metadata by viewing the rear case.
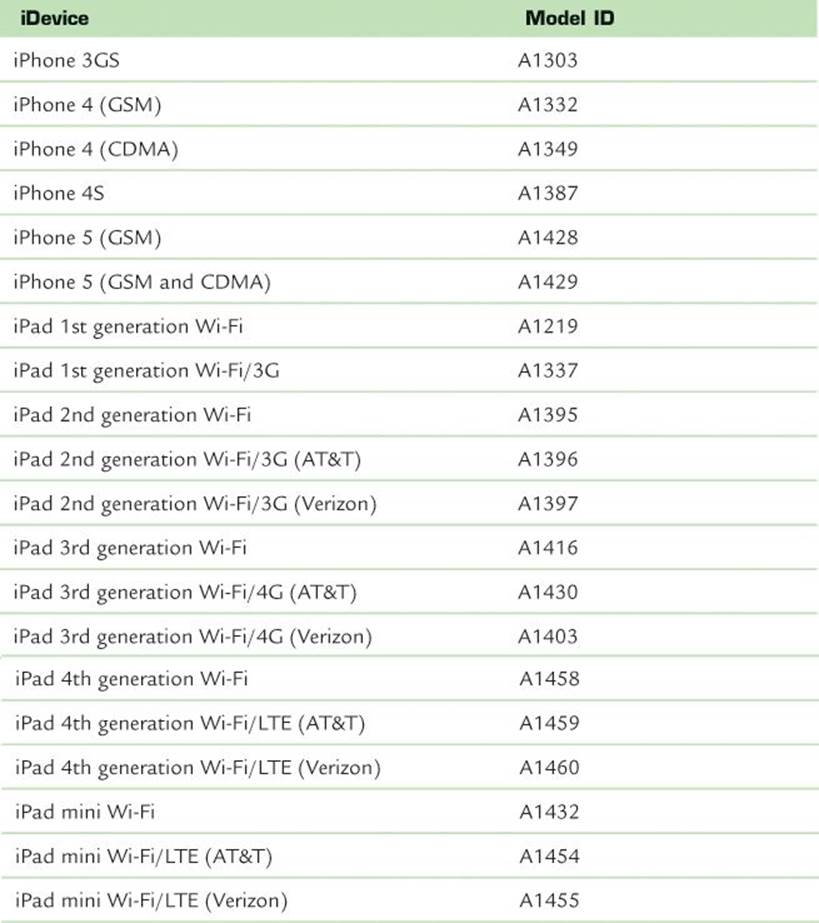
Use Table 4.1 as a reference to determine a model number.
TABLE 4.1 iDevice Model ID Reference Table
What Are Order Numbers?
Order numbers are unique identifiers for iDevices that describe a unit’s configuration, capacity, and color. These identifiers are alphanumeric strings that typically begin with MC or MD. For instance, the order number of one of my iPhone 4S devices is MC918LL. If you submit the order ID to a site such as EveryMac.com’s Ultimate Lookup utility (http://is.gd/wNrlgV) you can learn the following about the device that has that ID:
![]() Specific date of manufacture
Specific date of manufacture
![]() RAM
RAM
![]() Storage capacity
Storage capacity
![]() Model number
Model number
![]() Model ID
Model ID
![]() Order number
Order number
You can obtain a comprehensive list of iDevice order numbers from various sources on the Web. For instance, try the iPhone Wiki’s Models page at http://is.gd/QyN3Ox.
In contrast to the model number that is etched on the back case of your iDevice, you determine the order number from within iOS. Navigate to Settings, General, About and scroll to the Model field. You can see this field in Figure 4.1.
Yes, yes, yes: We have hit a huge point of confusion here. Apple calls the order number by the term Model in iOS. No, you aren’t crazy. This is one example of Apple’s occasional (and frustrating) inconsistency within its iDevice family.
The reason I have spent so much time discussing iDevice identifiers is that most customers seem never to be quite sure that they have the iPad, iPod touch, or iPhone that they wanted. I can’t say I blame them. After all, if I laid down $600 for a 3rd generation iPad then I want to ensure that I do indeed have the latest and the greatest model. From arm’s length, the 2nd generation and 3rd generation iPads look virtually identical.
Deciphering iOS Speak
If you have spent some additional time nosing around the About screen in your iDevice’s iOS or the home page in iTunes then you doubtless noticed some additional acronyms that may tickle your fancy.
![]() The International Mobile Equipment Identity (IMEI) is a globally unique identifier for GSM iPhones or iPads.
The International Mobile Equipment Identity (IMEI) is a globally unique identifier for GSM iPhones or iPads.
![]() The Integrated Circuit Card Identifier (ICCID) is a globally unique identifier for SIM cards.
The Integrated Circuit Card Identifier (ICCID) is a globally unique identifier for SIM cards.
![]() The Electromagnetic Compatibility (EMC) number is defined in electrical engineering (Reference: http://is.gd/e8JE43) as the “ability of electronic equipment to be a ‘good electromagnetic neighbor’: It neither causes, nor is susceptible to, electromagnetic interference (within the limits of applicable standards).”
The Electromagnetic Compatibility (EMC) number is defined in electrical engineering (Reference: http://is.gd/e8JE43) as the “ability of electronic equipment to be a ‘good electromagnetic neighbor’: It neither causes, nor is susceptible to, electromagnetic interference (within the limits of applicable standards).”
![]() The Integrated Circuit Card ID (ICCID) is a yet another globally unique identifier associated with a GSM iDevice’s SIM card. What’s interesting is that you can run an ICCID through a mathematical formula in order to yield the subscriber’s IMSI (International Mobile Subscriber Identity) number.
The Integrated Circuit Card ID (ICCID) is a yet another globally unique identifier associated with a GSM iDevice’s SIM card. What’s interesting is that you can run an ICCID through a mathematical formula in order to yield the subscriber’s IMSI (International Mobile Subscriber Identity) number.
![]() The Unique Device ID (UDID) is a globally unique identifier associated with your iDevice that is used by iOS app developers to provision apps prior to their approval and availability at the Apple App Store.
The Unique Device ID (UDID) is a globally unique identifier associated with your iDevice that is used by iOS app developers to provision apps prior to their approval and availability at the Apple App Store.
As I mentioned in the earlier sidebar “Finding the Serial Number in iTunes,” you can toggle through your iDevice’s unique identifiers from within iTunes.
Okay, friends: Time for another experiment. Take your nearest iPhone, iPod touch, or iPad and turn it over. At this point you should feel proud of yourself inasmuch as you understand most of the information that is etched there.
However, the vast majority of iDevice users have no earthly idea what the collection of symbols (I affectionately refer to them as “hieroglyphics”) means. Take another look at Figure 4.3 that shows an iDevice rear case and then read the meaning of each symbol, which is explained in the following list (working from left to right).
A: Approval seal of the US Federal Communications Commission (FCC). Note that the iPhone carries the FCC ID (grantee code) on the back case as well.
B: Compliance seal with the Waste Electrical and Electronic Equipment (WEEE) directive. This signifies that the iDevice can be disposed of in an environmentally responsible way.
C: Conformité Européene (CE) approval mark. This signifies that the device may be sold legally in the European Union (EU).
D: Refers to the body that approved the device for CE certification. 0682 refers to Cetecom ICT Services in Germany.
E: Alerts you of the iDevice’s status as a Class II wireless device, which means that the iDevice may attempt to operate on wireless frequency bands that some countries disallow.
Whew—that was a heavy slog through acronymville, wasn’t it? It’s time to lighten things up by covering how warranty repair orders work for iDevices. Next we’ll describe some aspects of an electrostatic discharge (ESD)-friendly workspace. After that I share some best practices, won through hard-earned experience, for organizing that workspace.
How Do Warranty Repair Orders Work?
I have to hand it to Apple in how they architected their Apple Retail Stores—it is a pretty slick operation.
Assume that your iPhone is malfunctioning somehow and you make an appointment to visit an Apple Genius at your local Genius bar by visiting the website at https://www.apple.com/retail/geniusbar/. What happens after you hand the Genius your iDevice?
1. The Genius uses Safari to access Apple’s online iOS Diagnostics web app at https://iosdiags.apple.com. Apple Stores may alternatively use a hidden app on iOS devices called iOS Diagnostics or Behavior Scan.
2. The Genius opens a session ticket and sends a link to your iDevice.
3. After you agree to the process, the iOS Diagnostics web app runs a series of scans on your iDevice and generates a report.
The results of an iOS Diagnostics scan are pretty robust; they are generally broken into the following categories:
![]() Battery Health
Battery Health
![]() Usage Statistics
Usage Statistics
![]() Call Statistics
Call Statistics
![]() Thermal Statistics
Thermal Statistics
![]() Detailed Analysis
Detailed Analysis
The “Detailed Analysis” also scrubs your iDevice for diagnostic log entries that may reveal the past installation of jailbreak apps. Remember that if the Apple Store technician discovers evidence of jailbreaking, your AppleCare warranty will be voided.
If, by contrast, the problem with your iDevice is definitely hardware-based, the Genius might (at the most) remove the bottom screws and remove the rear panel. You won’t find that any Apple Store staffer field-strips your iDevice.
If your warranty claim is approved, you receive a replacement device—period. I sometimes wonder to myself if any Apple Store has an employee who knows how to completely disassemble an iDevice.
Apple Store personnel use a number of proprietary, internal iOS apps. It’s far beyond our scope to consider these, but if you want to practice your Google-fu to learn more about them on your own, here is a not-at-all comprehensive list of internal app names:
![]() Apple Employee Directory
Apple Employee Directory
![]() AppleConnect
AppleConnect
![]() Behavior Scan
Behavior Scan
![]() Chatterbox
Chatterbox
![]() Concierge
Concierge
![]() Espresso
Espresso
![]() Merlin
Merlin
![]() MobileGenius
MobileGenius
![]() RFA
RFA
![]() speX
speX
![]() Switchboard
Switchboard
Creating an ESD-Safe Workspace
Chapter 2, “The Tools of the Trade,” covers the dangers of ESD. It also explains how you can protect yourself and your iDevice equipment against ESD by using an antistatic wrist strap and an ESD work mat.
At this time I’d like to share with you some additional tips and tricks to minimize the possibility of ESD causing damage to iDevice components.
Wear Appropriate Clothing and Protect Your Workspace
Please don’t even think of wearing polyester clothing (such as a jogging suit) while you work on iDevices. Polyester is an absolute haven for ESD buildup.
Moreover, never introduce vinyl, Styrofoam, or plastic (except for your ESD-safe plastic work tools) into your workspace environment. Surely you’ve felt a static zap from vinyl, or had Styrofoam packing peanuts stick to your hands? These materials sound a potential death knell to IC components.
Believe it or not, you should strongly consider investing in ESD-safe, antistatic gloves. The reason for this suggestion is that the oils from your fingers can transfer all too easily to the tiny IC components and conductive contacts inside your iDevice. When this happens, you can unintentionally create extra resistance and potential short circuits. This is obviously not a desirable outcome, and it’s difficult to troubleshoot these problems to boot.
ESD-safe gloves also carry the advantage of not leaving fingerprints on your pretty iDevice cases.
Handle IC Components Appropriately
Never place iDevice parts on a metal surface. Instead, place the parts on your antistatic work mat. For that matter, be sure that you have a supply of static-shielding storage bags on hand for easy parts transport. When you order an iDevice replacement part, the component should ship in a static-shielding bag. Don’t throw them out! You’ll be glad to have a stockpile of them on hand in your workspace for future use.
Handle all IC components only at their edges and never by their contact points. As I just mentioned, you need to ward against the transfer of your body oils to the contacts. You also don’t want to create an inadvertent circuit bridge between the delicate contacts, which might very well short-circuit and fry them. It should go without saying, but here I go, saying it: Never touch another person who is working on IC components, and vice versa.
Condition the Air in Your Workspace
Industry best practice guidelines suggest that you keep the humidity of your workspace between 70 and 90 percent. You can achieve this level of humidity by measuring the humidity and then using a humidifier or dehumidifier in the room. Why leverage higher humidity? Because ESD charge levels are reduced (but not eliminated) in a higher-humidity environment.
You should also consider installing an ionized air generator in the room to add another layer of defense against the dreaded ESD.
Figure 4.4 shows a bench-top blower. Bench-top ionizers, such as the minIOS2 ionizing air blower (http://www.esdproducts.biz/Ionization/BenchtopIonizers/minION2/minion2.html) cost about $400. However, you must weigh this investment against the peace of mind of insuring against damaging iDevice components and risking dissatisfied customers who face unnecessary delays in parts shipments due to ESD damage.
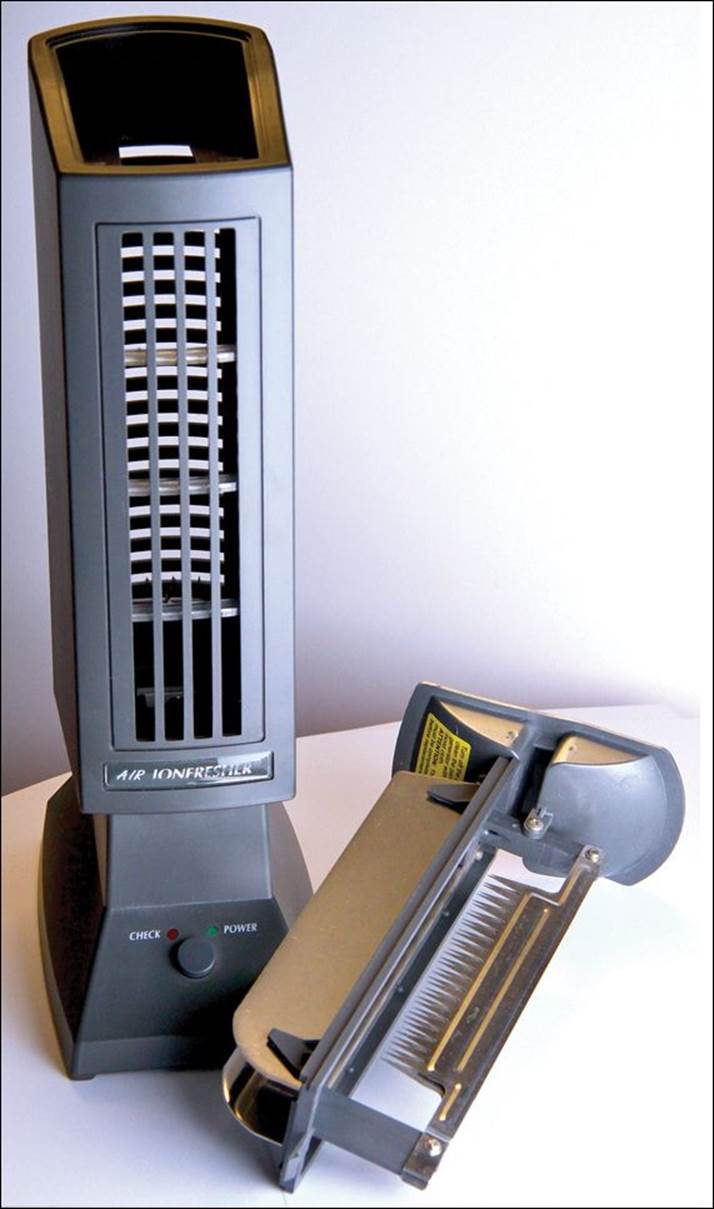
FIGURE 4.4 A representative bench-top ionizing blower. (Image courtesy of Morn via a Creative Commons License: http://is.gd/tNxYFM)
Documenting and Securing Your iDevice Components
The worst-case scenario for any aspiring iDevice technician is to get well into a disassembly and having to ask, “Wait a minute. Which screws go with which part?” This is a rookie mistake that nearly all of us make in the beginning. However, you are reading this book to benefit from my experience. It is my sincere hope that you can skip merrily over many, if not most, of those beginner’s pitfalls.
The very best screw and parts organizer I’ve ever used comes from our friends at iFixit. As you can see in Figure 4.5, the 8″ × 12″ magnetic work mat is divided into 20 squares on the magnetic side, and 16 cutout wells on the non-magnetic side.
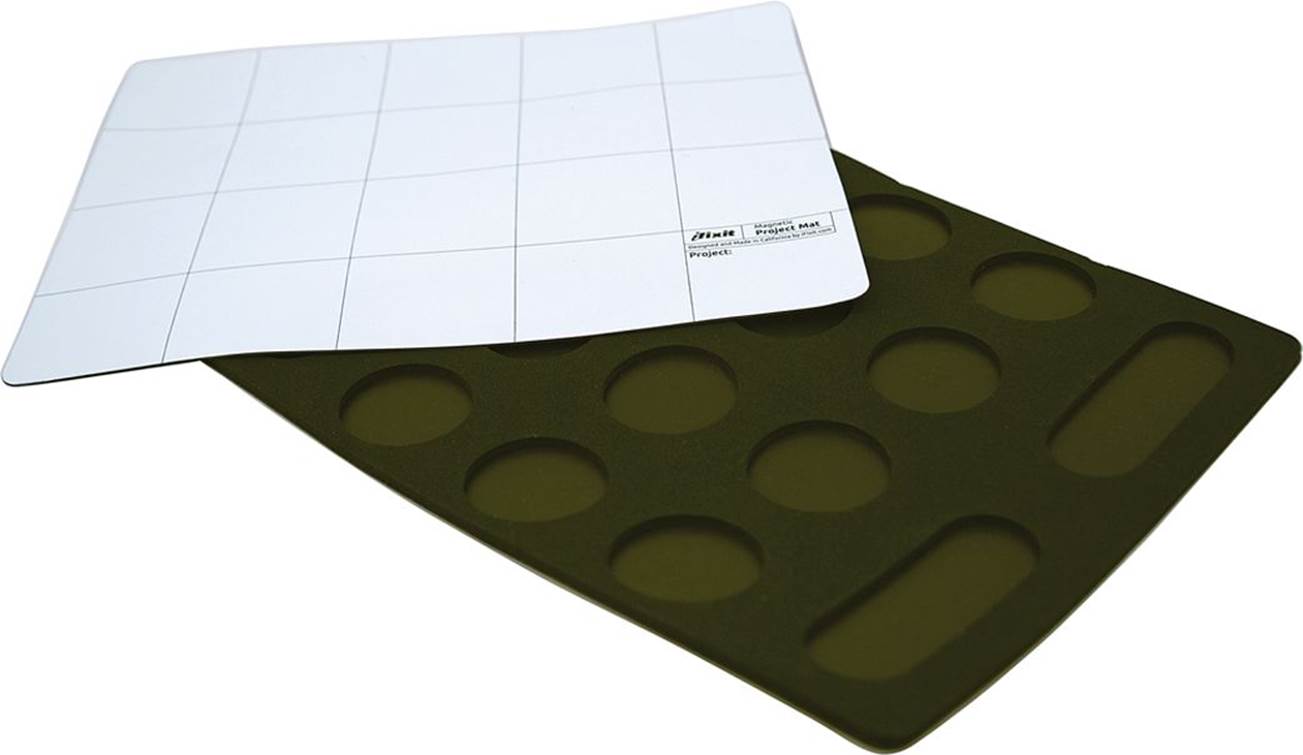
FIGURE 4.5 iFixit magnetic work mats.
The idea is that you can use a dry-erase marker to number the magnetic squares, and for each step of a disassembly procedure you can store the associated screws and parts accordingly. The magnetism of the mat keeps those tiny screws in place.
The non-magnetic side creates an excellent organization space for larger, non-magnetic parts. Honestly, as an iDevice tech you will use the magnetic side of the work mat almost exclusively.
All materials on the site are licensed Creative Commons Attribution-Sharealike 3.0 Unported CC BY-SA 3.0 & GNU Free Documentation License (GFDL)
If you are the copyright holder of any material contained on our site and intend to remove it, please contact our site administrator for approval.
© 2016-2026 All site design rights belong to S.Y.A.