The Unauthorized Guide to iPhone, iPad, and iPod Repair (2013)
Chapter 5. iPhone 3GS Disassembly and Reassembly
In many respects, using the iPhone 3GS as your first disassembly project is a great idea. The phone does not have as much “stuff” inside of it, for one. Another nice advantage is neither the battery nor any other internal components are soldered to the logic board (disassembling the iPod touch is an utter nightmare in this regard).
Finally, and I have no idea why Apple stopped doing this, the primary connectors inside the case are actually labeled, which assists in disassembly. Oh yeah—THAT’S why they stopped the practice.
Actually, I almost forgot what a blissful convenience it is that the display assembly for the 3GS pops off during the first couple steps of the disassembly. As you’ll soon learn that replacing a display assembly for subsequent iPhones requires that you strip the dadgum device down to the chassis.
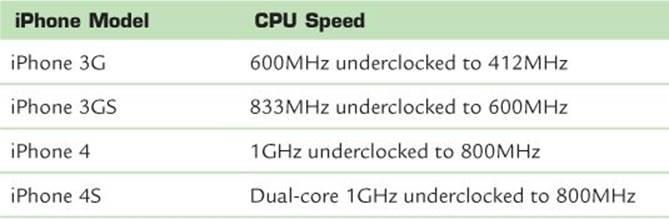
By way of trivia, you might have wondered what the S in iPhone 3GS (and iPhone 4S, for that matter) signifies. The generally accepted answer is that the S stands for speed. For proof of this, consider Table 5.1 that compares the CPU speed of the S and non-S iPhone models.
TABLE 5.1 iPhone CPU Speed Comparison
Note: A Word About Underclocking
Apple configures iPhone Central Processing Units (CPUs) to run slower than they are capable in order to reduce the device’s power consumption and heat emission, as well as to increase system stability. You might have also observed that the iPhone 4 and iPhone 4S have the same listed processor speeds and underclock ratios. However, the dual-core nature of the iPhone 4S A5 processor makes the 4S perform noticeably faster than the original iPhone 4, which sports the A4 processor.
Some Apple enthusiasts insist that the S stands for one of the following; I’ll let you be the judge:
![]() Siri
Siri
![]() Slim
Slim
![]() Steve Jobs
Steve Jobs
![]() Same Design
Same Design
The way I approach iDevice repairs is consistent for all hardware covered in this book. First, I review the iDevice’s external anatomy. Second, I list the technician tools that are required to complete the disassembly. Third, I proceed through the disassembly step by step with lots of annotated pictures.
As you might (correctly) surmise, reassembly can be accomplished simply by following the disassembly steps in reverse order. However, with iDevice repairs and parts replacements there are almost always “gotchas” with reassembly. To that end, you’ll find that I include a section called (appropriately enough) “Reassembly Notes” to assist you in that effort.
Now, without any further ado, I give you the iPhone 3GS!
iPhone 3GS External Anatomy
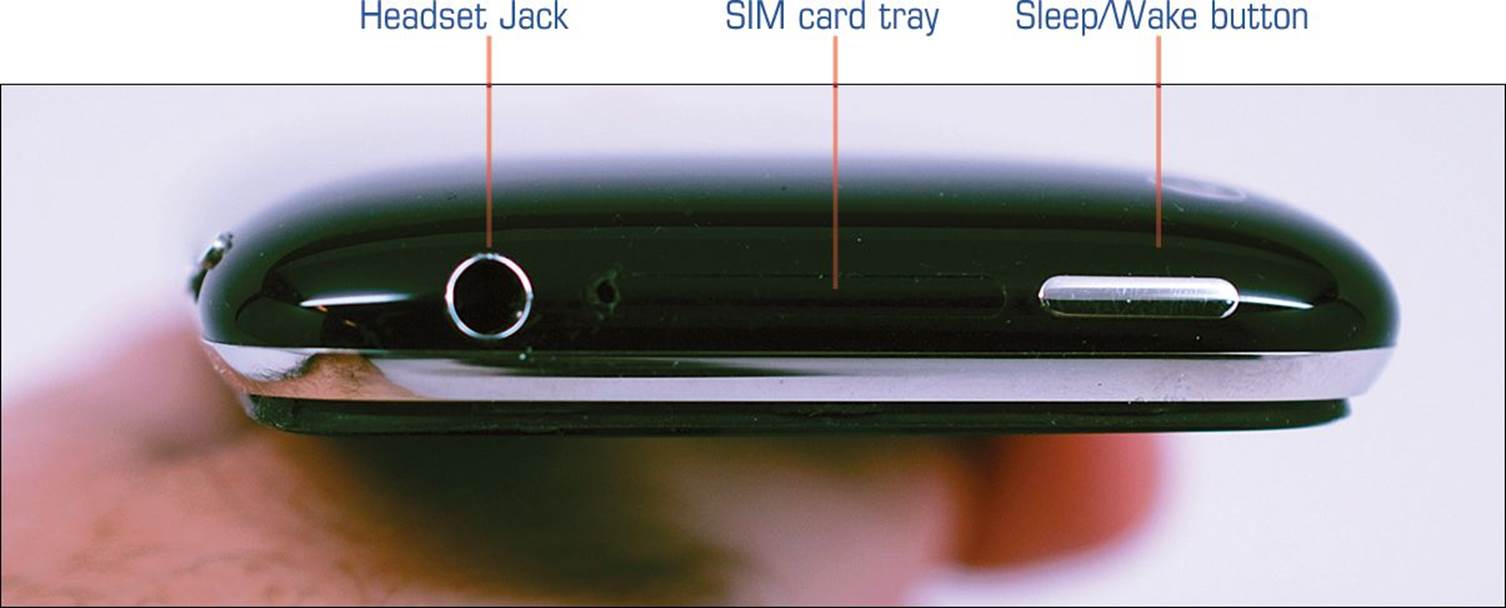
FIGURE 5.1 iPhone 3GS top view.
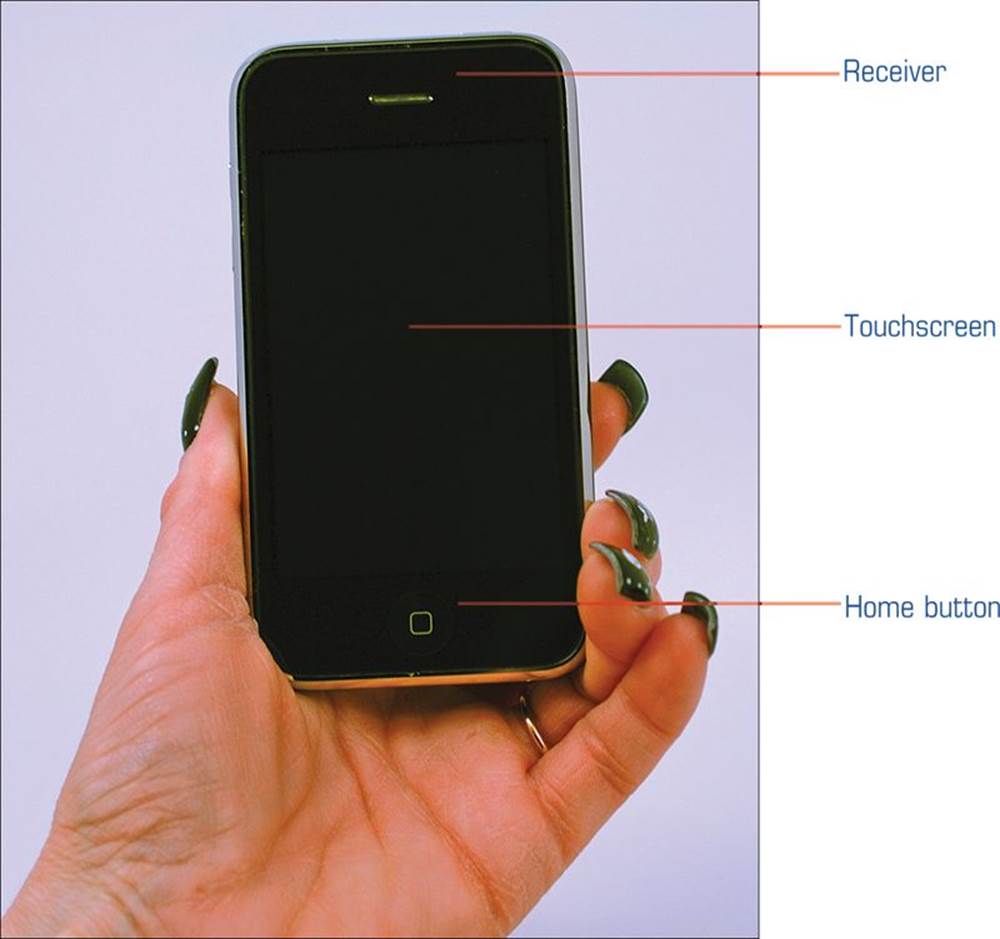
FIGURE 5.2 iPhone 3GS front view.
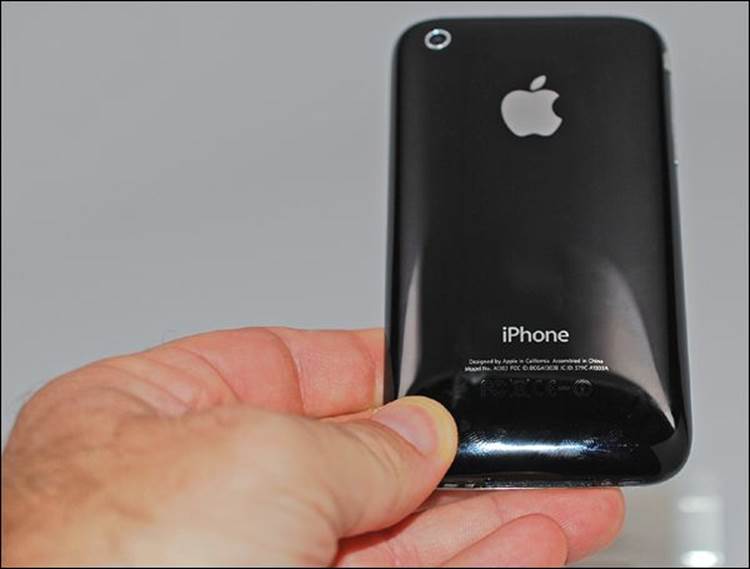
FIGURE 5.3 iPhone 3GS rear view.
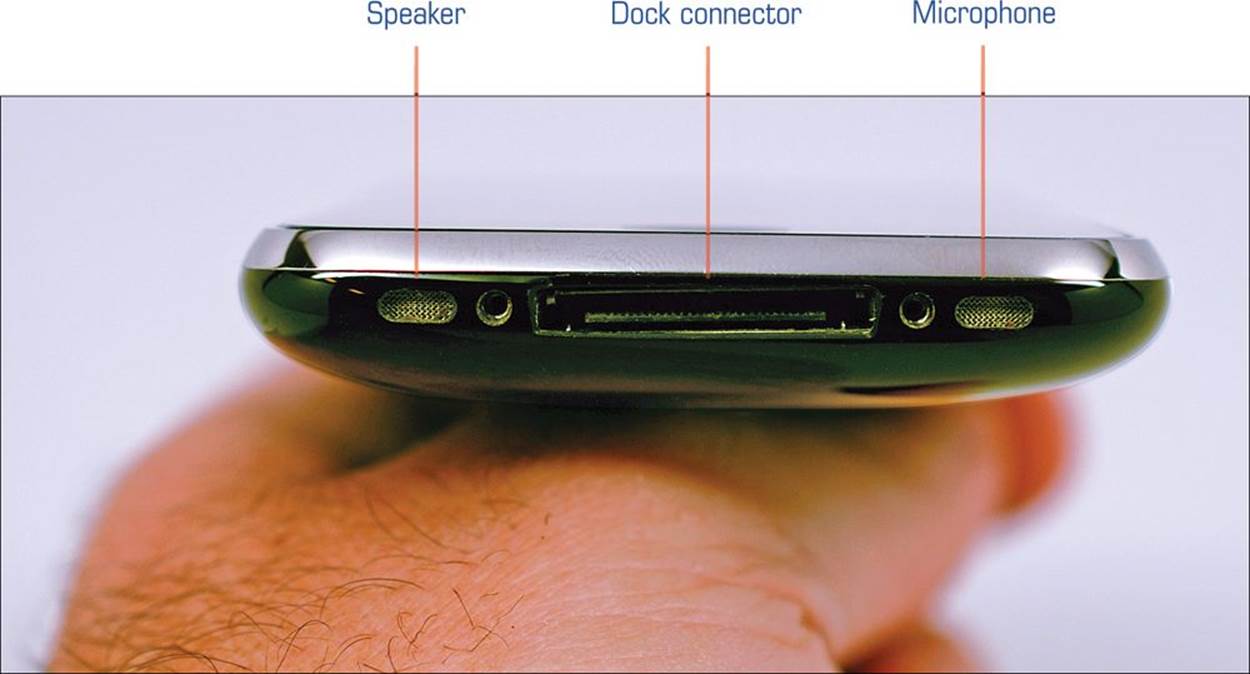
FIGURE 5.4 iPhone 3GS bottom view.
Disassembly Procedure
1. You use an iPhone SIM card eject tool or a paper clip to remove the SIM card tray from the iPhone. Insert the SIM card eject tool or paperclip into the hole located next to the headphone jack. Press down on the tool until the SIM card tray pops out (see Figure 5.5). You need to apply a fair amount of force to release the tray from the phone. At this point, if you want to remove the SIM card from the tray you may do so.
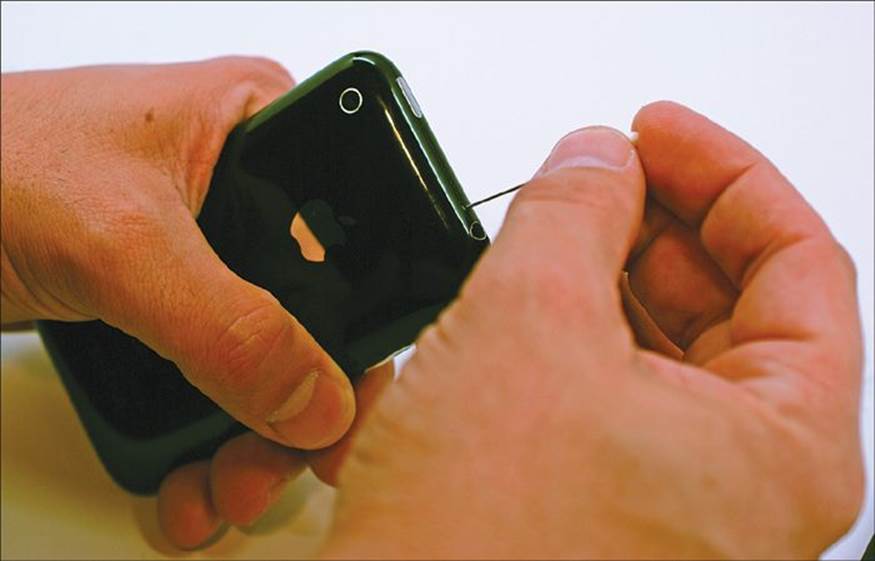
FIGURE 5.5 Removing the SIM card tray to access the SIM card.
Required Tools
![]() Heat gun
Heat gun
![]() Small suction cup
Small suction cup
![]() Phillips #00 screwdriver
Phillips #00 screwdriver
![]() Spudger
Spudger
2. Remove the two Phillips #00 screws located on the bottom (near the Dock connector) of the iPhone (see Figure 5.6).
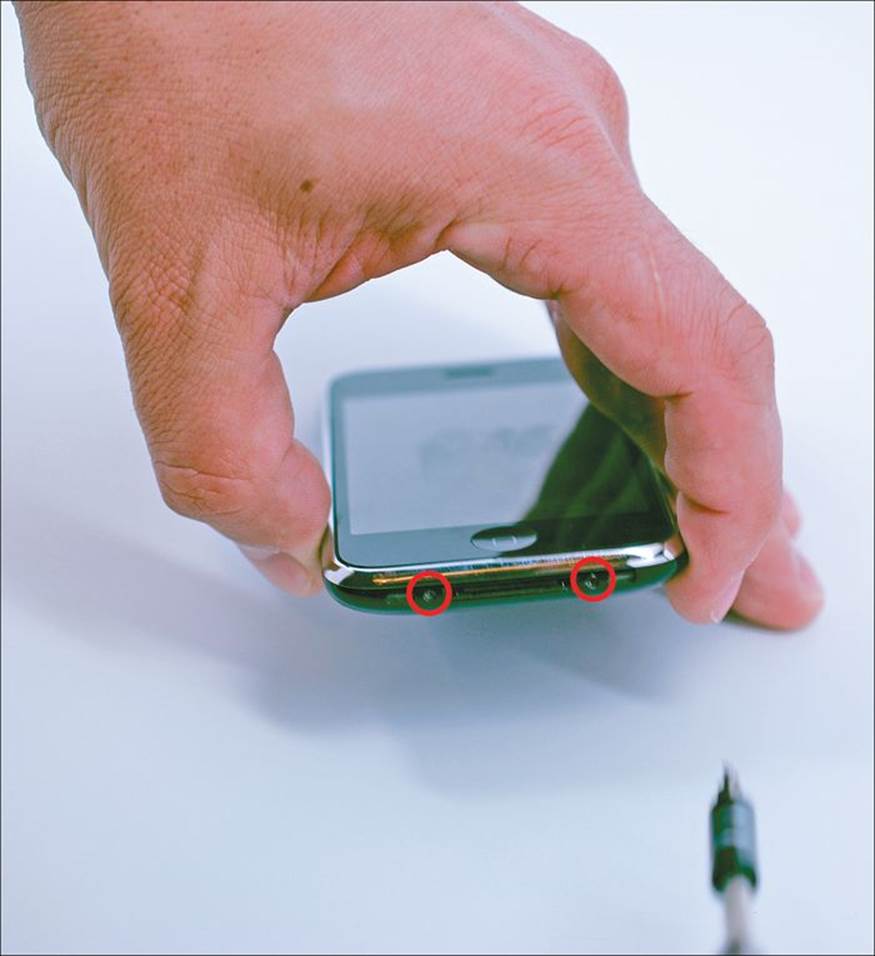
FIGURE 5.6 Removing the rear case screws.
Note: Be Gentle
Please be very gentle when you turn iDevice screws. If you use undue pressure, you’ll strip the screw heads and render the screws worthless.
3. Lay down the phone with its display glass facing down. Use the heat gun on the low setting to loosen the adhesive holding the display assembly to the chassis (see Figure 5.7). Be gentle with the heat, and never focus the heat directly on the glass.
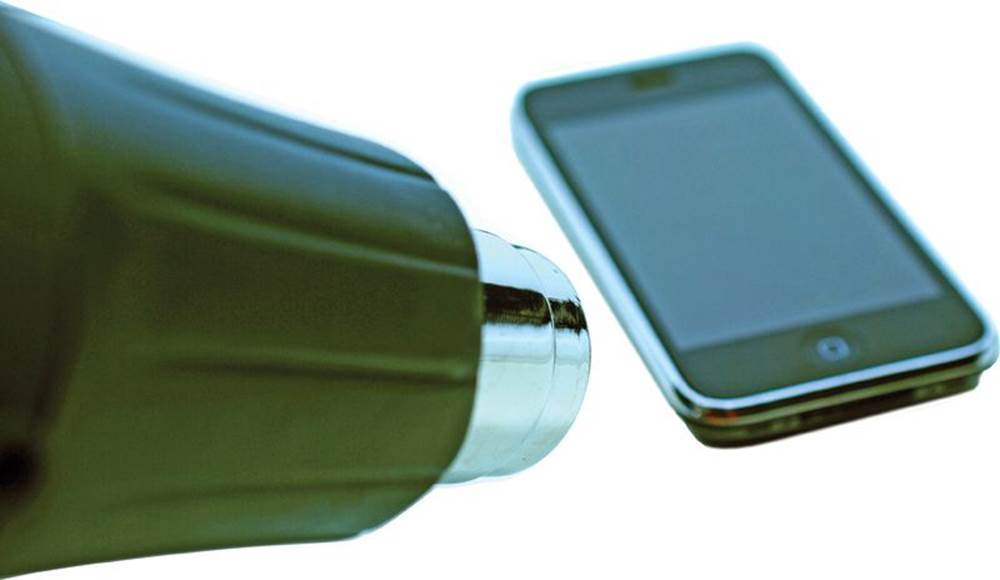
FIGURE 5.7 Heating up the iPhone 3GS to loosen adhesive.
4. Place a small suction cup directly above the Home button. Gently pull up the bottom portion of the display assembly but do not remove it just yet. Reminder: Do not yank the display assembly away from the rest of the case! There are three cables connecting the display assembly to the logic board. Instead, hold the display at a 45-degree angle from the rest of the unit (see Figure 5.8).
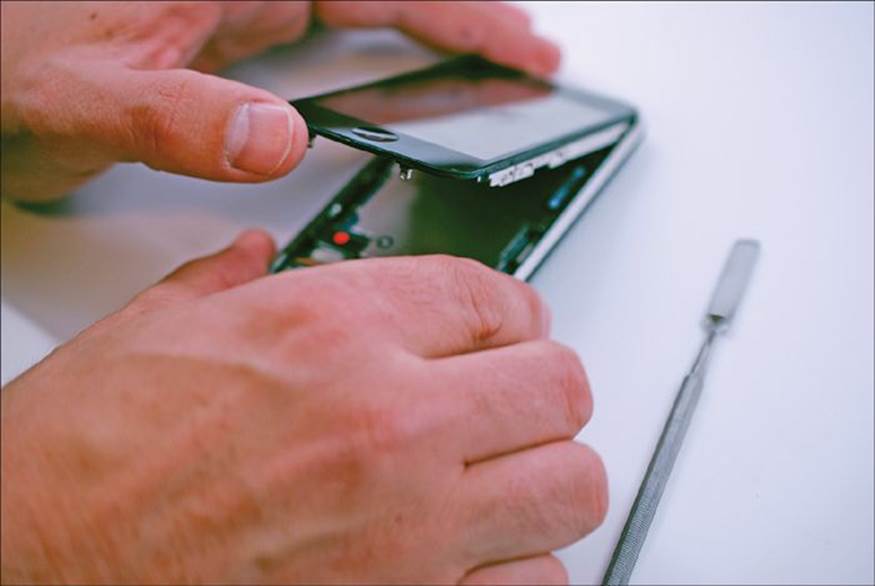
FIGURE 5.8 Removing the display assembly.
Caution: No Yanking!
Do not yank the display assembly away from the rest of the case! There are three cables connecting the display assembly to that case. Instead, hold the display up at a 45-degree angle from the rest of the unit.
5. Use a spudger to carefully pry the ribbon cables labeled 1 and 2 from their respective sockets on the iPhone’s logic board. The third ribbon cable labeled 3 is a ZIF (Zero Insertion Force) connector. Use the tip of a spudger to flip up the retaining flap on the third cable’s ZIF socket. Make sure you are flipping up on the retaining flap and not the socket itself. Use the tip of the spudger to pull the third ribbon cable out of its socket. As we stated earlier, Apple helpfully labeled these connectors (see Figure 5.9).
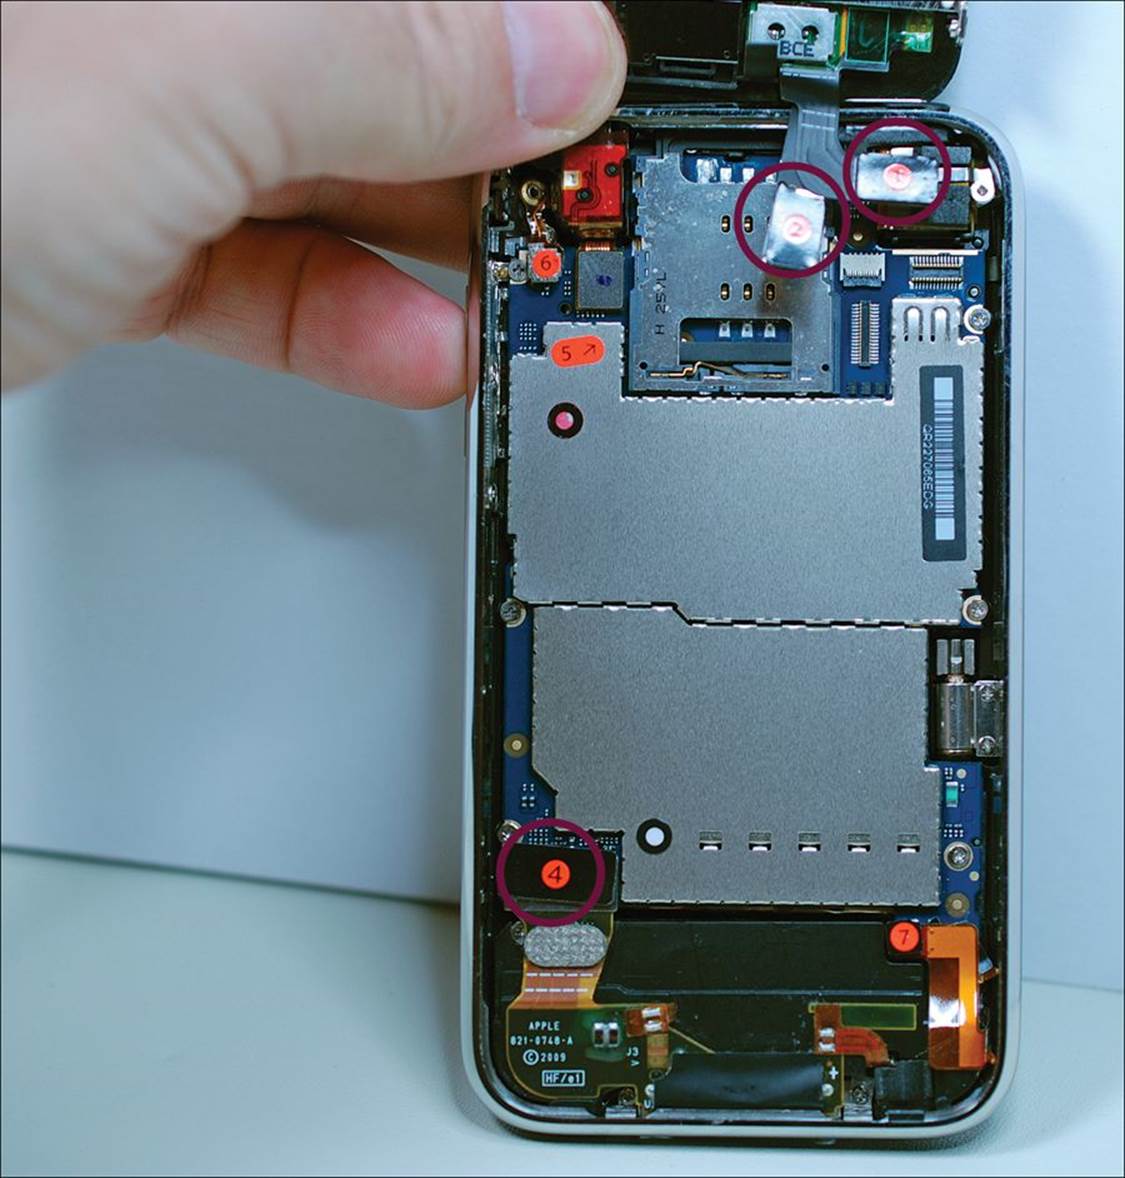
FIGURE 5.9 The iPhone 3GS display assembly has three labeled ribbon cable connectors. Cable #3 is located directly beneath Cable #2 in the image.
Tip: Handy Trick for Prying the Cables
I’ve found that the easiest way to pry up the ribbon cable connectors is to start at a corner, as shown in Figure 5.10.
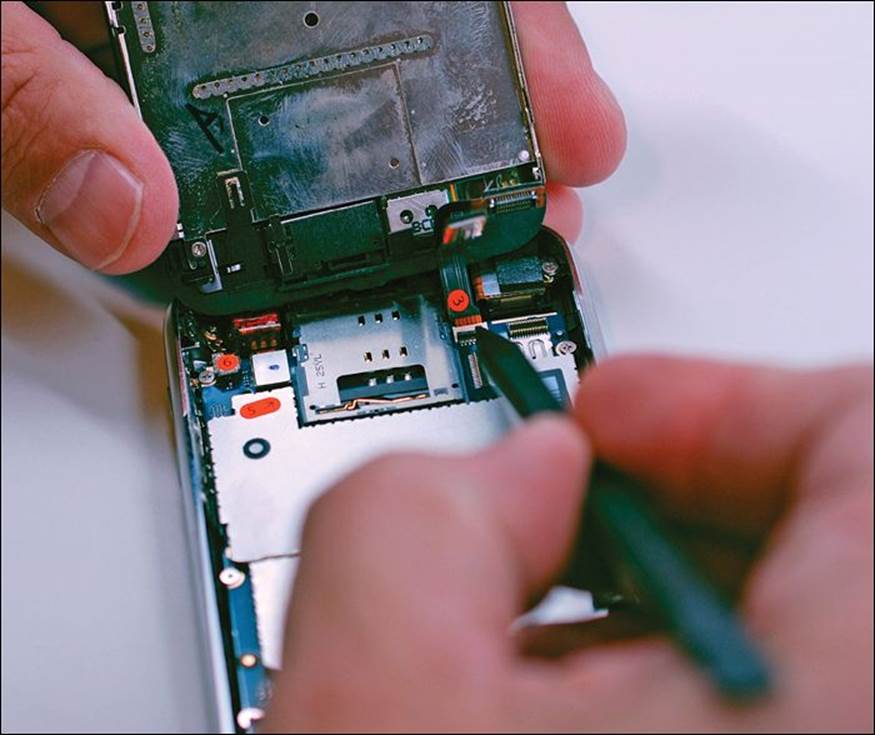
FIGURE 5.10 The proper method for removing a ribbon cable connector.
After you’ve removed the three ribbon cables (#1–#3), you can carefully remove the display assembly from the rest of the rear case.
6. Continue disconnecting the remaining ribbon cables (#4–#7) in the same manner as previously described. There is a hidden screw located under the Do Not Remove sticker. Make sure to carefully peel this sticker (peeling it most definitely voids your warranty). Remove the eight Phillips #00 screws securing the logic board and the rear-facing camera to the rear case that are shown in Figure 5.11. There are three different screw sizes; make sure to note the differences and keep track of them.
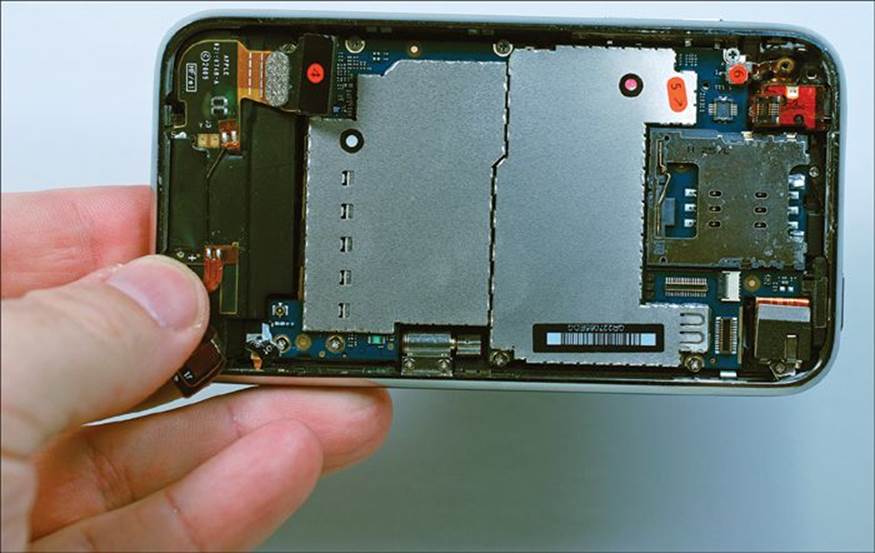
FIGURE 5.11 Removing the iPhone 3GS logic board screws.
Note: Organization Will Set You Free
Now is a great time to make use of whatever method for organizing screws and parts you’ve decided upon.
7. Use the flat end of a spudger to gently remove the rear-facing camera retaining clip (see Figure 5.12). Gently pry the camera out of its housing in the rear case. Do not remove the rear-facing camera. It is still connected to the logic board. The rear camera shoots at 3 megapixels (3MP) and also can do 30 frame-per-second (FPS) video at VGA (640×480) resolution.

FIGURE 5.12 Prying but not removing the camera.
8. Use the spudger to gently pry up the top edge of the logic board closest to the Dock connector. When it’s loosened, you can slide the logic board toward the Dock connector and out of the iPhone (see Figure 5.13). At this point, if you want to disconnect the camera from the logic board you may do so freely by using the flat end of a spudger.
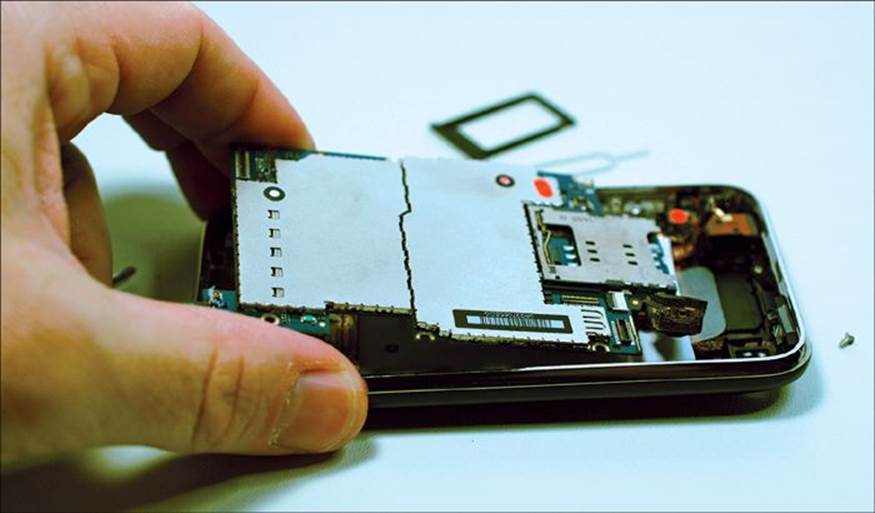
FIGURE 5.13 Removing the logic board.
Note: Those Apple Folks Are Clever
The two white paper dots on the EMI shield that covers the logic board are Liquid Contact Indicators (LCIs). All iDevices include several externally visible LCIs to help Apple Store Geniuses determine whether an iDevice has suffered water damage that would invalidate the warranty. I cover this subject thoroughly in Chapter 14, “Addressing Water Damage,” later in this book.
More On Emi Shields and Logic Boards
Apple makes extensive use of electromagnetic interference (EMI) shields in its iDevices. What is the importance of these metal covers? Well, the shields actually have a couple distinct reasons for being.
Primarily, EMI shields serve as a barrier between the logic board and other iDevice components. This barrier prevents electrical current from flowing between those components and thereby avoids electrical shorts.
Moreover, electromagnetic interference is simply a bad thing for portable electronics. The coupling of radio waves and/or electrostatic fields inside an iDevice results in signal reduction, which clearly is not desirable for the end user. Thus, you can clearly see the vital importance of these sheet metal shield components in isolating these various unseen forces from one another. The logic board is Apple’s way of referring to the motherboard or main board of an iDevice. The logic board is truly the brains and heart behind the iDevice operation, and it consists of the following components (among many others, trust me):
![]() CPU (central processor) and GPU (graphics processor)
CPU (central processor) and GPU (graphics processor)
![]() Flash memory (permanent storage, analogous to a hard drive)
Flash memory (permanent storage, analogous to a hard drive)
![]() Random Access Memory (RAM, temporary storage space that is cleared every time the device is powered off or restarted)
Random Access Memory (RAM, temporary storage space that is cleared every time the device is powered off or restarted)
The logic board is also the central point of connectivity in an iDevice. In other words, all other components are somehow linked to the logic board.
What’s important to note is that in iDevices the processor is not a monolithic unit. Instead, iDevice processors are as system-on-a-chip, or SoC, devices. The reason for this is that the SoC binds together most of the core functions of a computer motherboard (as shown in the previously given list) into a single, modular component.
9. To remove the Dock connector/speaker assembly, remove the three Phillips #00 screws; two on either side of the Dock connector and one near the #4 ribbon cable. Lift the Dock connector/speaker assembly out of the iPhone (see Figure 5.14).
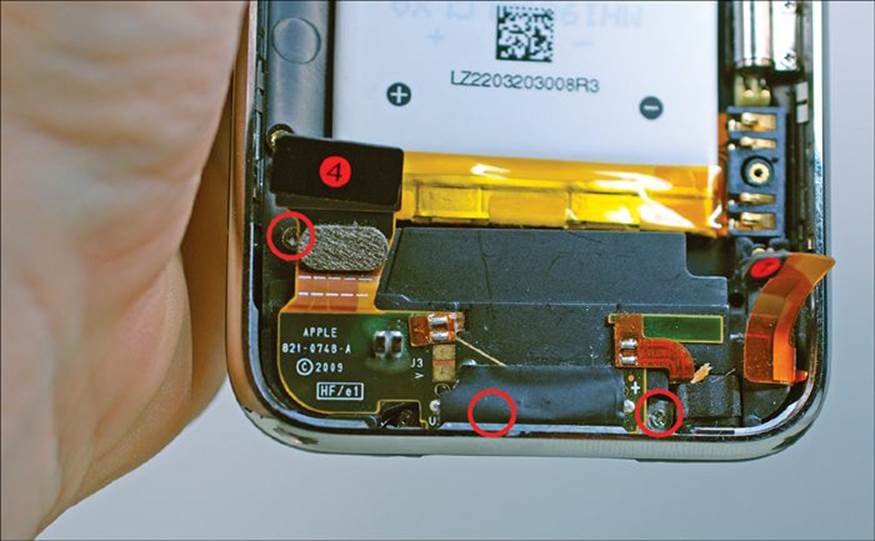
FIGURE 5.14 Removing the Dock connector/speaker assembly.
10. Use the spudger to gently pry the battery up from the iPhone 3GS’s rear panel (see Figure 5.15). Apple stuck the battery to the inside of the rear case by using a mild adhesive. One idea you might want to consider is using the heat gun against the outside of the rear case to loosen the adhesive indirectly. If you do this, please be sure to use the lowest heat setting of your heat gun.
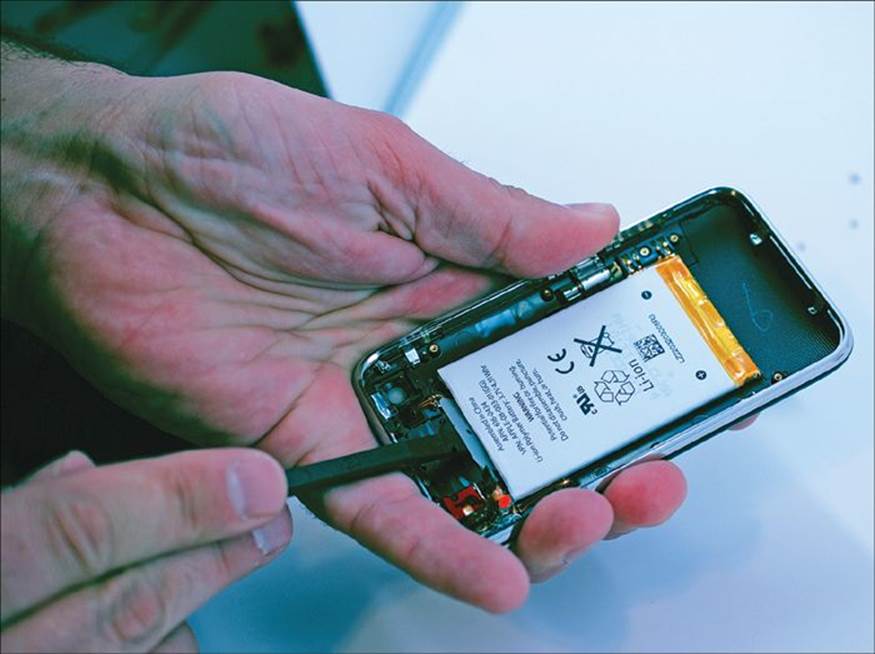
FIGURE 5.15 Removing the battery.
You know, it is truly a big deal that Apple decided not to solder the battery to the logic board. As I mentioned earlier, you’ll see what a royal pain in the behind that is when you get to the iPod touch disassembly.
Figure 5.16 (courtesy of ifixit.com) shows the iPhone 3GS completely field stripped and laid out for the entire world to see.
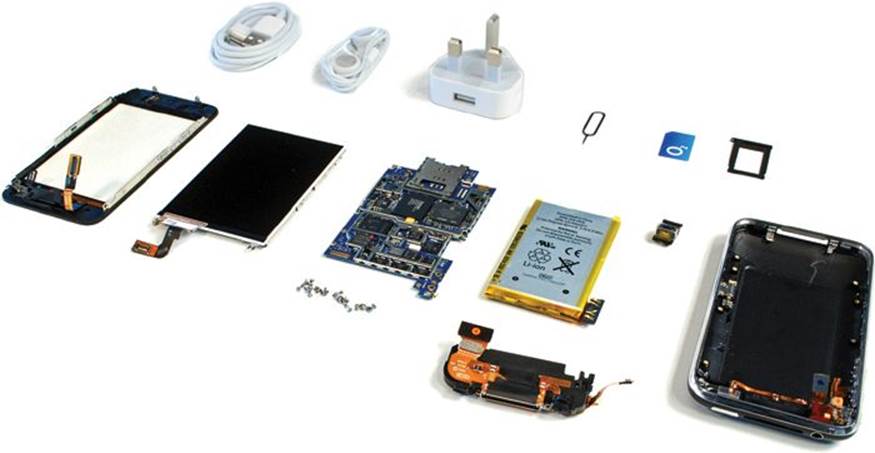
FIGURE 5.16 iPhone 3GS complete teardown. (Photo courtesy of ifixit.com)
Reassembly Notes
You might need to procure some adhesive or make use of 3M double-sided tape (http://is.gd/8hsZuc) to secure the battery (especially a replacement) to the interior of your iPhone 3GS.
Technically, any double-sided tape may work. However, I suggest the 3M type as it appears to be the standard that is used by iDevice techs.
Reconnecting the ribbon cable connectors is challenging at first. You have to exert quite a bit of force to get the connector to “stick.” What makes matters worse is that you almost never hear the audible “snap” that ordinarily lets you know of a solid connection between cable end and logic board interface.
A Few Words About iOS 6
Believe it or not, you can install iOS 6 on an iPhone 3GS, but you cannot install iOS 6 on the 1st generation iPad. The reason for the iPad 1st gen not allowing iOS 6 probably has to do with its relatively light allotment of RAM (256 MB). Although the iPhone 3GS has the same amount of RAM and a similarly clocked processor, the iPhone 3GS needs to produce only 480×320 pixels on screen as compared to 1024×768 pixels for the iPad 1st gen.
At any rate, iOS 6 behaves surprisingly well on the now-ancient iPhone 3GS hardware. The biggest thing you will notice is that iDevice and iOS features that post-date the iPhone 3GS simply do not appear in the interface. I’m referring to things like fly-over 3-D maps in the Maps app, Panorama mode photos, FaceTime, and the like.
All in all, though, I suggest you stay with iOS 5.x if you plan to actually use the iPhone 3GS for any reason.
All materials on the site are licensed Creative Commons Attribution-Sharealike 3.0 Unported CC BY-SA 3.0 & GNU Free Documentation License (GFDL)
If you are the copyright holder of any material contained on our site and intend to remove it, please contact our site administrator for approval.
© 2016-2026 All site design rights belong to S.Y.A.