The Unauthorized Guide to iPhone, iPad, and iPod Repair (2013)
Chapter 6. iPhone 4S Disassembly and Reassembly
If the iPhone 3GS represents the easiest take-apart in this book then I submit that the iPhone 4S is the most fun. What I think you’ll discover when you disassemble the iPhone 4S is just how much “stuff” Apple was able to pack into a slim package. You’ll be even more impressed by this space-consciousness when you take apart the iPhone 5 later in this book.
Before beginning the procedure, I thought it was apropos to briefly compare the iPhone 4 and the iPhone 4S in Table 6.1.
TABLE 6.1 Comparison Between iPhone 4 and iPhone 4S
As you can see, the iPhone 4 and the iPhone 4S are virtually identical devices. Apple’s big selling points for the 4S are that the 4S is faster (both in terms of carrier network speed and hardware performance) and has Siri (although the Siri aspect became less compelling with the release of iOS 6).
The inclusion of Siri in iOS 6 is a minor bone of contention with me, actually. The primary reason I upgraded from the iPhone 4 to the iPhone 4S was for Siri. My understanding at the time was that the 4S was the only iOS device capable of running Siri.
Of course, I (along with many other customers) fell victim to Apple’s marketing spin. Oh, well.
External Anatomy
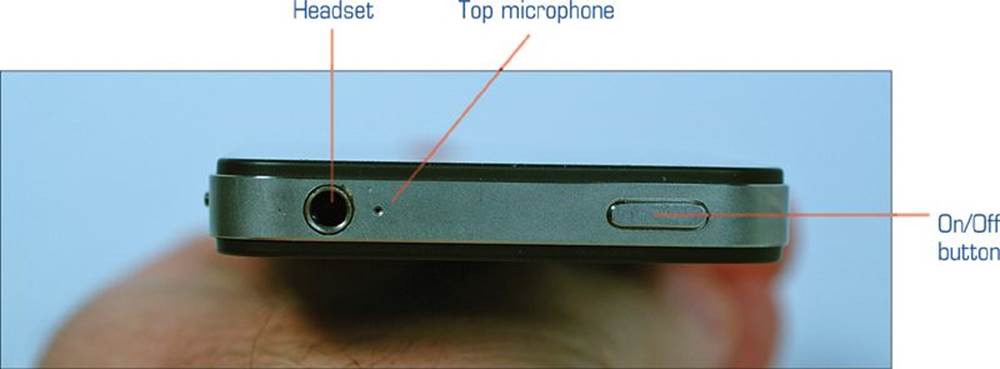
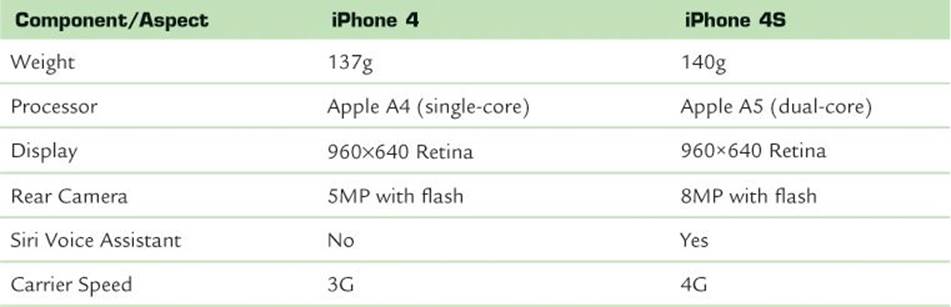
FIGURE 6.1 iPhone 4S top view.
FIGURE 6.2 iPhone 4S front view.

FIGURE 6.3 iPhone 4S rear view.
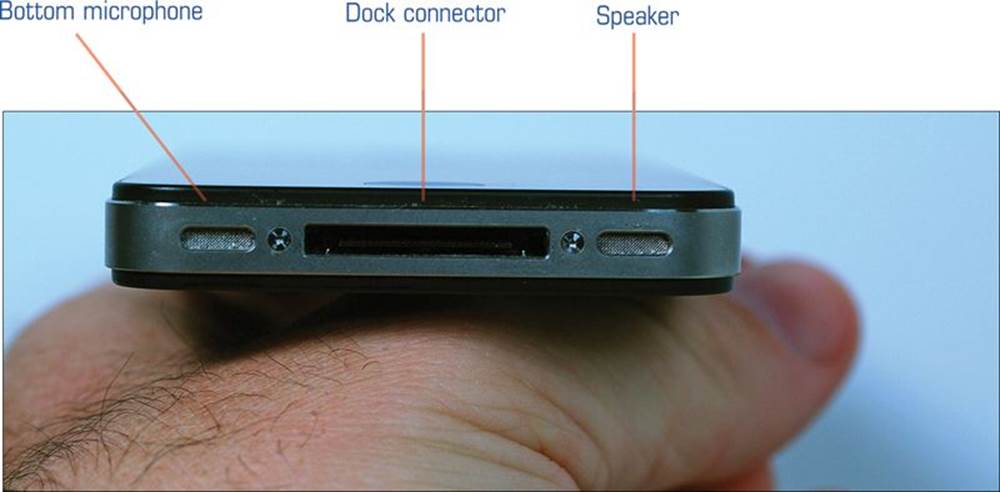
FIGURE 6.4 iPhone 4S bottom view.
Required Tools
![]() Phillips #00 screwdriver
Phillips #00 screwdriver
![]() Pentalobe screwdriver
Pentalobe screwdriver
![]() Tiny flathead screwdriver
Tiny flathead screwdriver
![]() Plastic opening tools
Plastic opening tools
![]() Tweezers
Tweezers
Frankly, this is a teardown that is made much easier if you purchase the screwdriver kit and plastic opening tools from iFixit prior to beginning the procedure. You can probably guess why Apple saw fit to use at least four different sizes of near-microscopic Phillips screws in the design of the iPhone 4S; namely to deter rogue repair techs from performing DIY procedures on iDevices.
The good news, however, is that I am able to take the phone apart just fine with the pentalobe, Phillips #00, and the tiniest flathead I have in my kit.
Without further ado, let’s get started!
Disassembly Procedure
Use the following steps to disassemble an iPhone 4S:
1. Remove the two 3.6 mm pentalobe screws located on the bottom of the iPhone (see Figure 6.5). These screw heads are delicate; please be careful in your work so you don’t strip the heads.
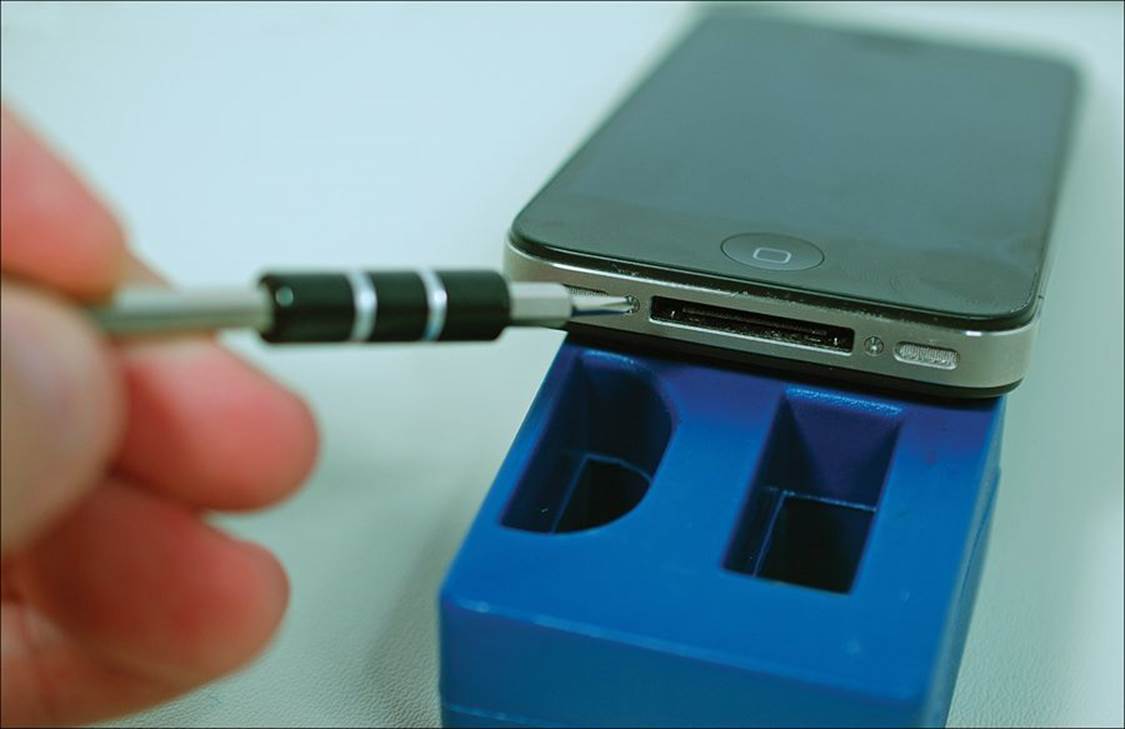
FIGURE 6.5 Removing the two Pentalobe bottom screws.
Tip: Penta-What?
In case you don’t remember what the pentalobe screw is, I talked about it in Chapter 2, “The Tools of the Trade.” The pentalobe is a custom screw head that Apple designed in an attempt to keep non-Apple techs from monkeying around inside the hardware. Beginning with the iPhone 4, Apple began using these custom-designed tamper-resistant screws to protect the outer case of iDevices. The first figure in Chapter 2 shows a close-up of this custom screw head.
2. After wrestling with opening the iPhone 3GS case, you will doubtless be surprised at how easy it is to remove the rear panel of the iPhone 4S. Simply use your thumbs to push the rear panel upward toward the top of the iPhone, as shown in Figure 6.6. The panel moves about 2mm or so. You can then lift the rear panel away from the rest of the iPhone.
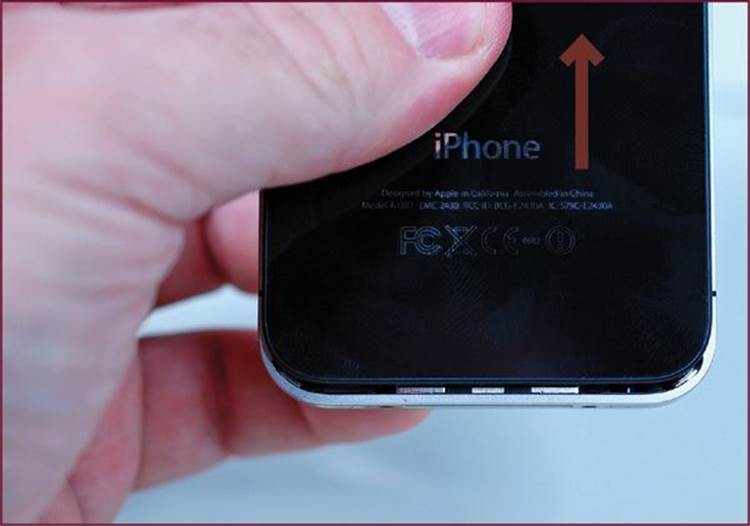
FIGURE 6.6 Removing the iPhone 4S rear panel.
Note: What is Aluminosilicate Glass?
The rear panel of the iPhone 4 and iPhone 4S is made of aluminosilicate glass; some of you might have learned this the hard way after dropping your iPhone and watching the spider web pattern appear. The iPhone 3GS has a plastic rear case and the iPhone 5 has an anodized aluminum rear case.
Aluminosilicate glass, also sometimes called “gorilla glass,” is made by Corning and is noted for its thinness, strength, and scratch resistance. This kind of glass is used in the windshield of high-speed trains and helicopters. According to Apple, aluminosilicate “is 20 times stiffer and 30 times harder than plastic.” Although it’s stronger than other kinds of glass, it still breaks and when it does, it does so in a spider web pattern, rather than shattering. Aluminosilicate is also sleek and very smooth, which makes for a nice feel in your hand and makes slipping the iPhone in and out of your pocket easier.
3. As you can see in Figure 6.7, the battery is secured in the case by means of a connector, which in turn is anchored by two slightly different-sized Phillips screws (1.5mm and 1.7mm). I was able to remove them both by using the Phillips #00 screwdriver.
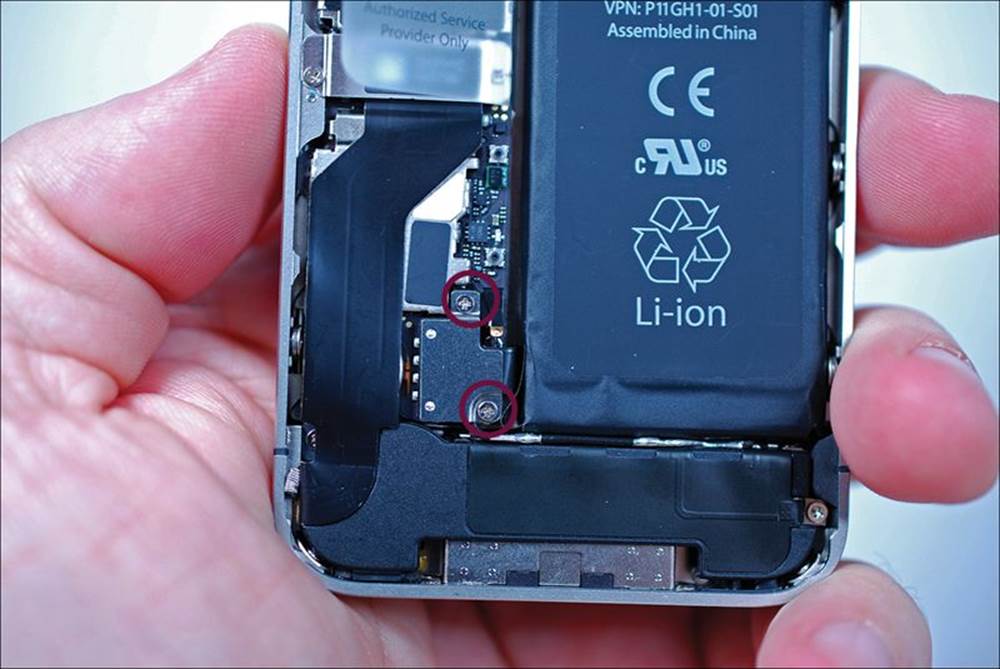
FIGURE 6.7 Remove the two battery connector screws shown here.
4. Before prying the battery connector, use a plastic opening tool to pull the pressure contact from underneath the battery connector (see Figure 6.8). After the pressure contact has been removed, use a plastic opening tool to gently pry the battery connector from the logic board (seeFigure 6.9).
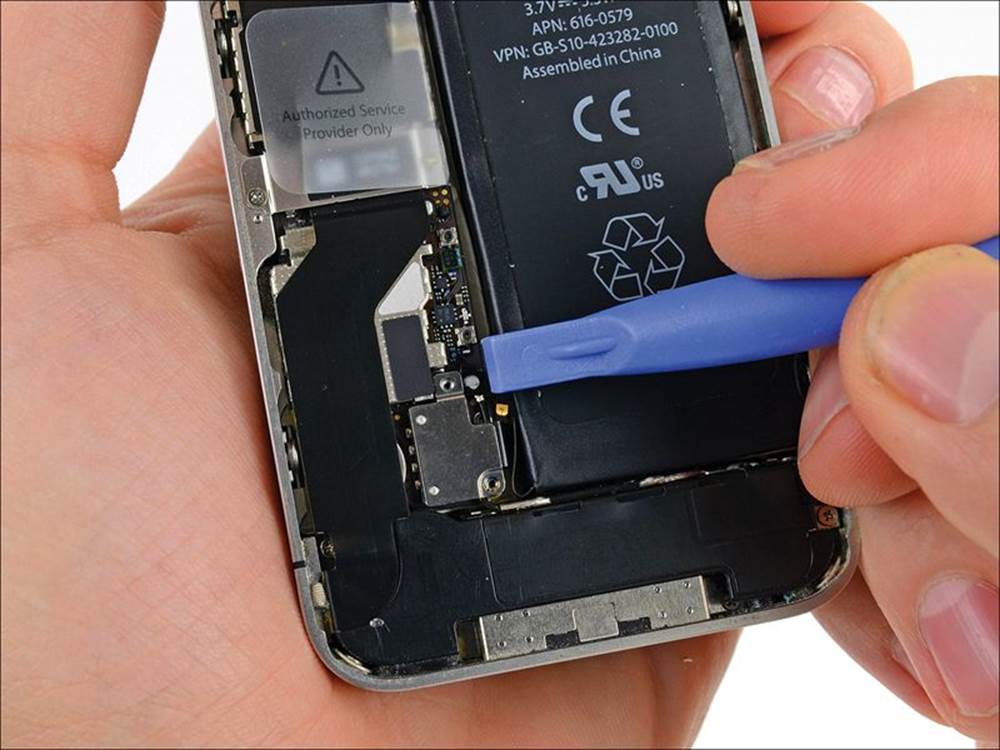
FIGURE 6.8 Pulling the pressure contact from underneath the battery connector. (Photo courtesy of ifixit.com.)

FIGURE 6.9 Removing the battery connector.
Note: Yet Another Word to the Wise
Be mindful to pry up the battery connector cable, not the logic board interface. Believe me—it’s easy to make a mistake that will give you a lot of trouble to back out of with this kind of stuff.
5. The iPhone 4S battery is secured to the front of the iPhone 4S case by using (what else?) a mild adhesive. Use a plastic opening tool to gently pry up the battery along its right side. After you’ve loosened the battery, you can use the opposing pull tab to lift the battery out of the phone (see Figure 6.10).
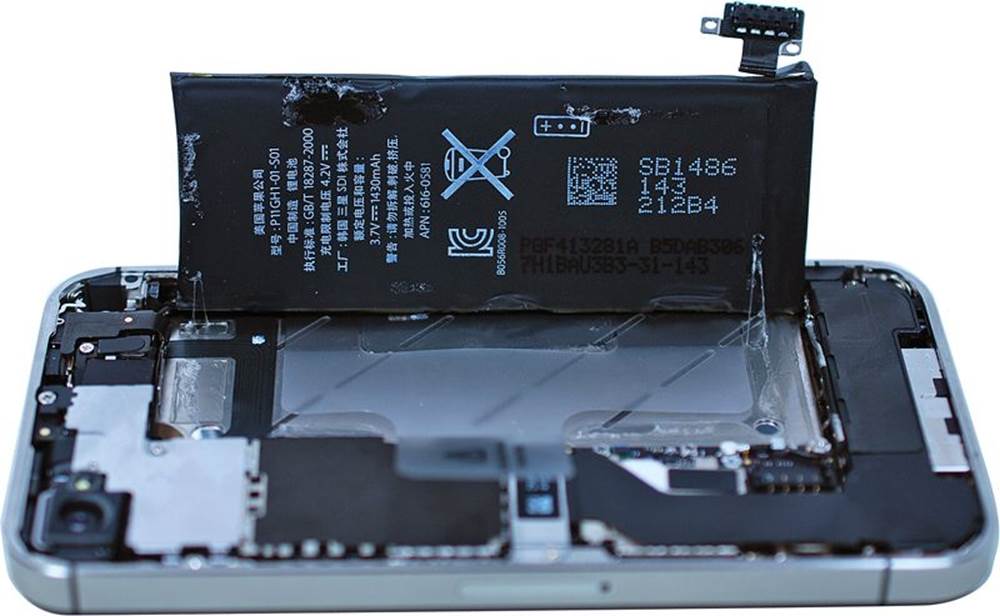
FIGURE 6.10 Removing the battery.
6. Now you disconnect the Dock connector cable from the logic board. To do this, you must first remove the Dock connector cable cover, which is held in by a 1.5mm Phillips screw and a 1.2mm Phillips screw (see Figure 6.11). Next, use the edge of plastic opening tool to pry the Dock connector cable from its socket on the logic board. Finally, carefully peel, but do not remove, the Dock connector cable from the logic board.
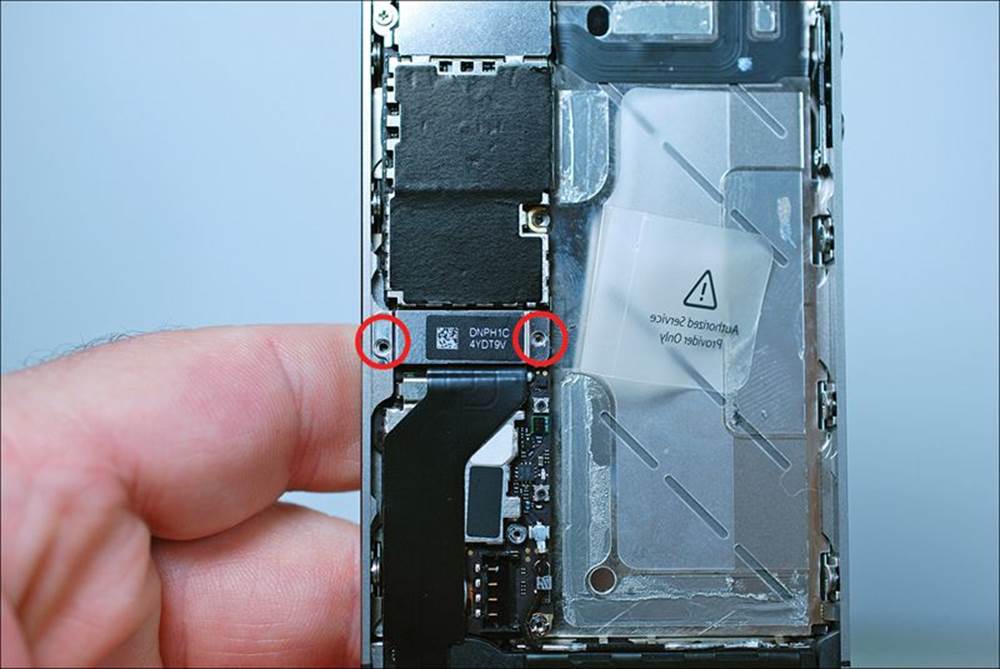
FIGURE 6.11 Disconnecting the Dock connector cable.
7. Now is as good a time as any to remove the SIM tray and SIM card. To do this, insert a SIM card eject tool or an unfolded paper clip into the SIM tray hole (see Figure 6.12). Moderate force is required to eject the SIM tray assembly.
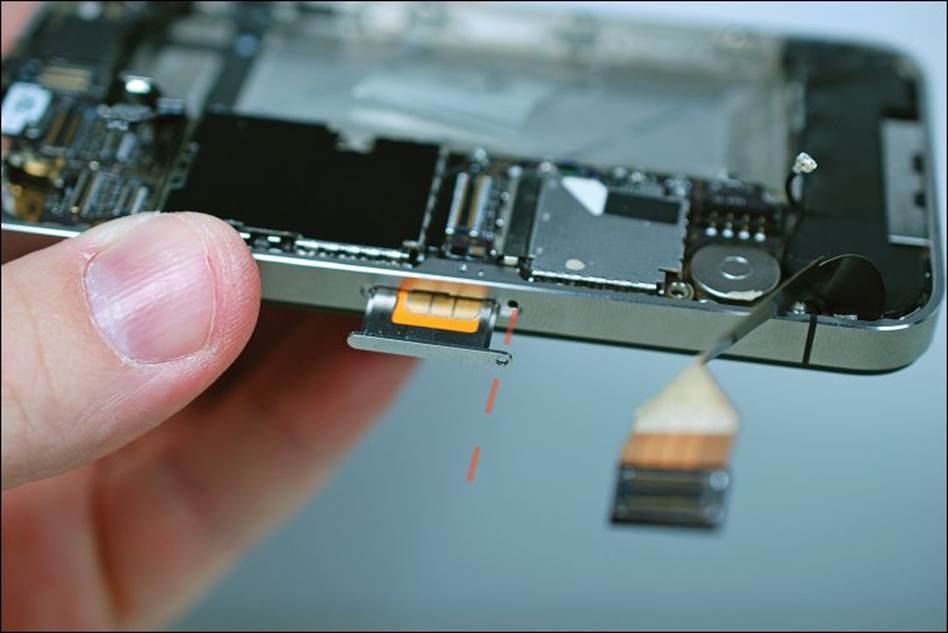
FIGURE 6.12 Removing the SIM tray and card tray.
8. Use the edge of a plastic opening tool to pry up the cellular antenna cable. Reroute the cable out of the way after you have separated the connector from its socket on the logic board (see Figure 6.13).
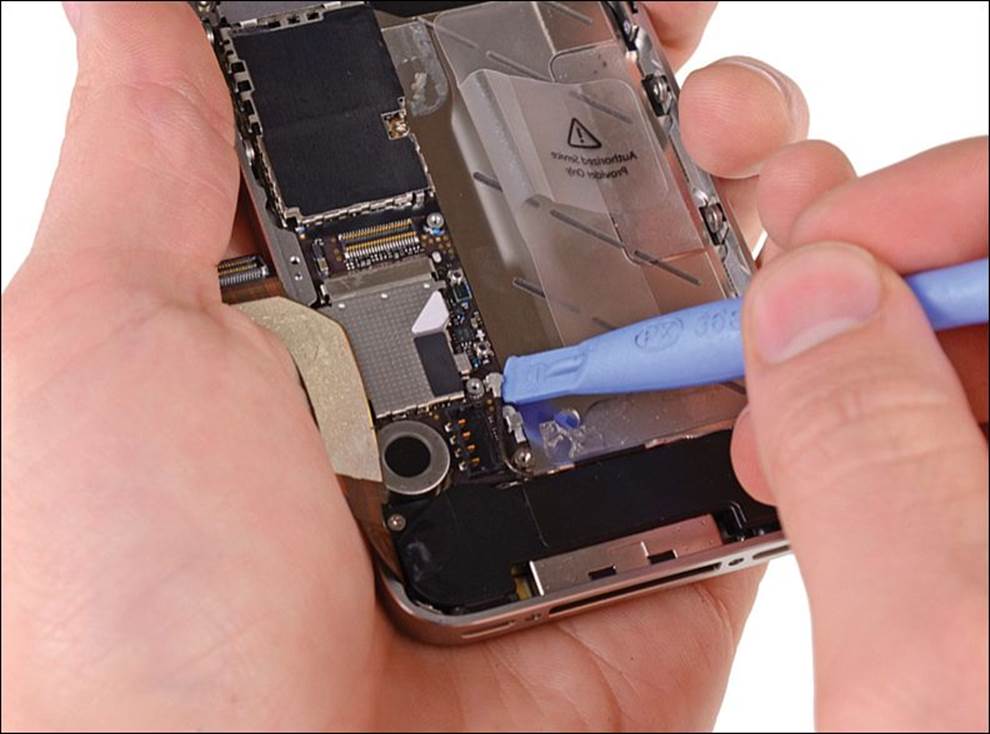
FIGURE 6.13 Disconnecting the cellular antenna connector from the logic board. (Photo courtesy of ifixit.com.)
9. Remove the four Phillips screws securing the electromagnetic interference (EMI) shield/cable cover to the logic board. These screws are circled in Figure 6.14.
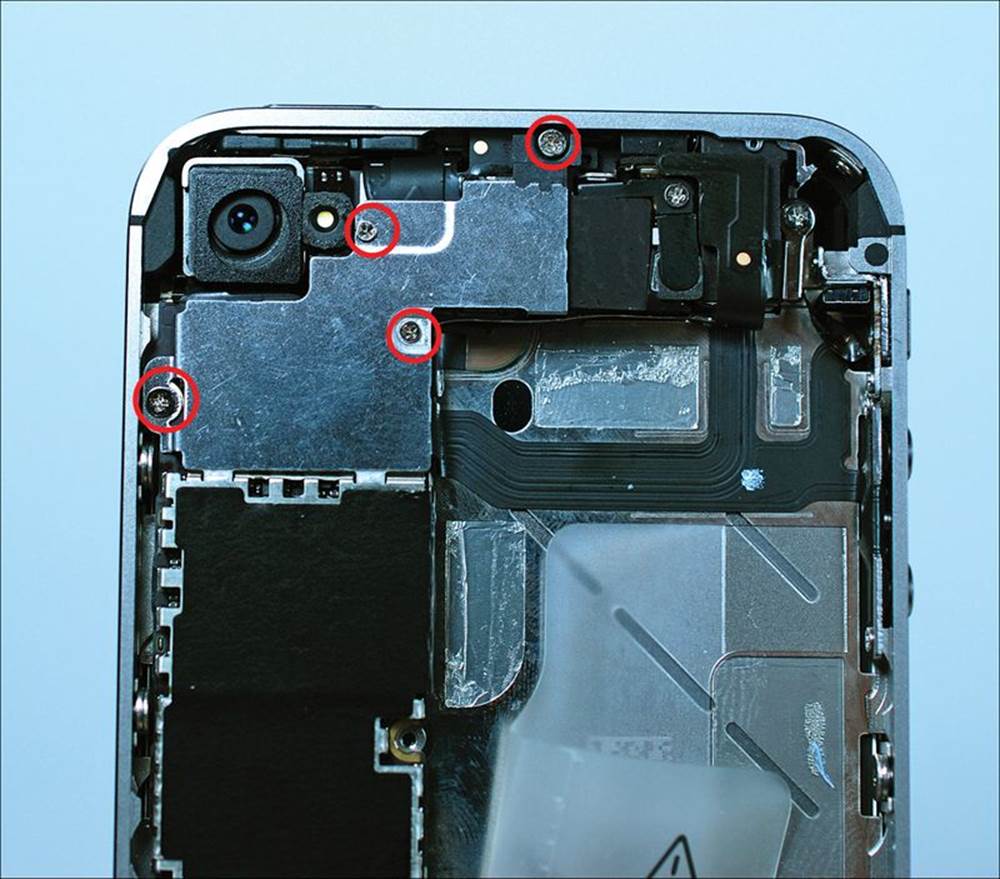
FIGURE 6.14 Removing the screws that secure the metal cover over the logic board ribbon cables.
10. Use a plastic opening tool to pry the metal cover from the iPhone.
11. Take out the rear-facing camera next. First use a pair of tweezers to remove the outer plastic ring that lies on top of the flash assembly (as shown in Figure 6.15).
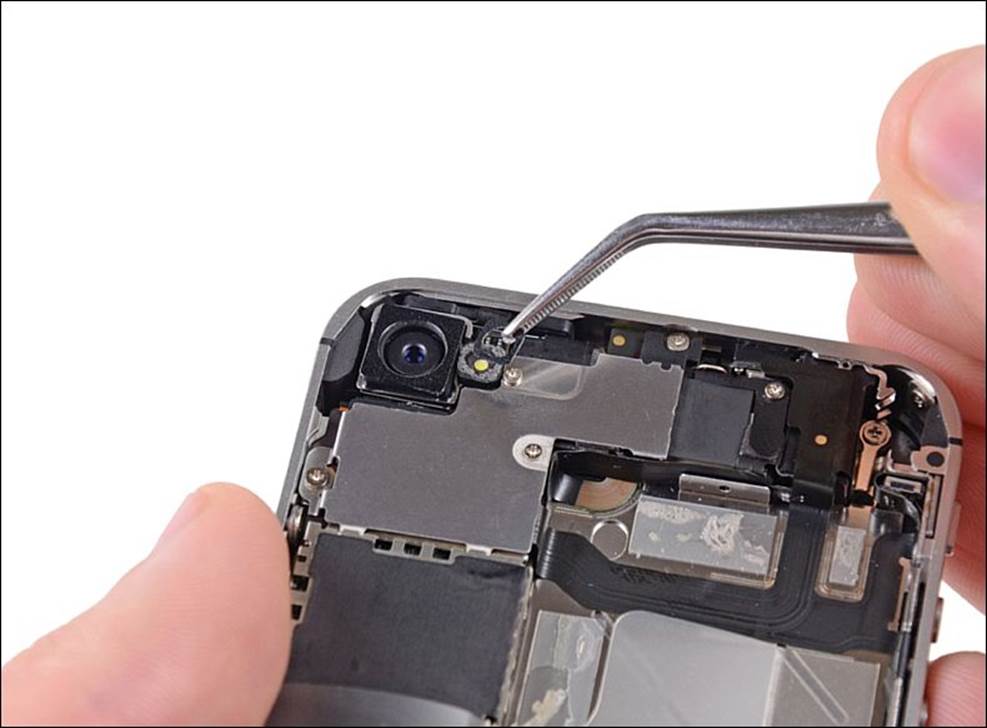
FIGURE 6.15 Removing the cover ring from the rear-facing camera. (Photo courtesy of ifixit.com.)
12. Second, use a plastic opening tool to pry the rear-facing camera connector from its socket on the logic board (see Figure 6.16). Lift and remove the rear-facing camera from the iPhone.
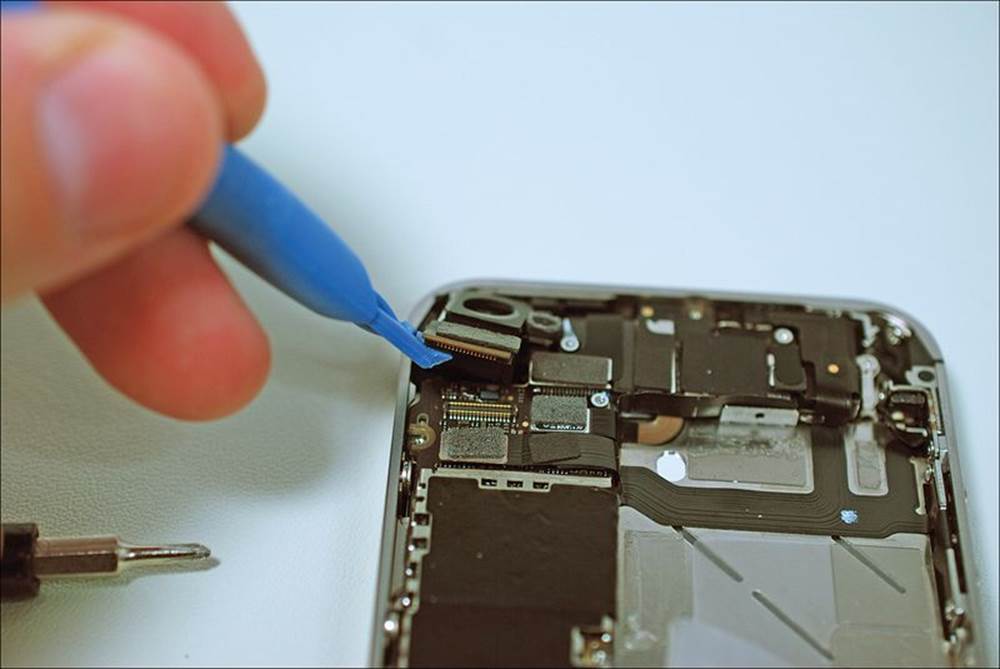
FIGURE 6.16 Removing the rear-facing camera.
Caution: Organization Will Set You Free
Removing the logic board from the iPhone 4S is much more difficult than it was with the iPhone 3GS. There are many screws that secure the logic board to the rest of the device, so make sure you stay organized!
13. Use a plastic opening tool to pry up the five primary logic board ribbon cable connectors; check out the annotated picture in Figure 6.17.
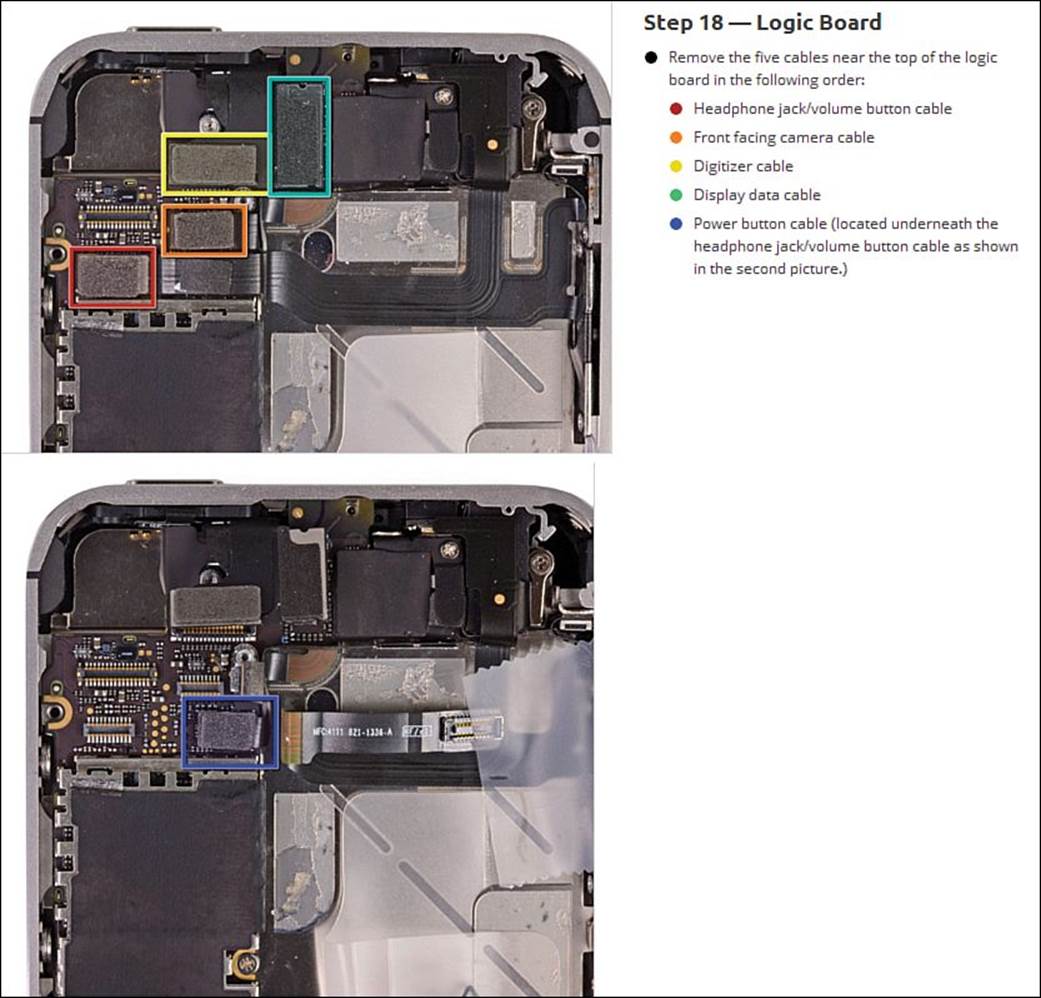
FIGURE 6.17 Detaching the primary logic board connector cables.
14. Remove the single 1.5mm Phillips screw that secures the grounding clip to the logic board near the headphone jack. You can then use a pair of tweezers to lift and remove the grounding clip as shown in Figure 6.18.
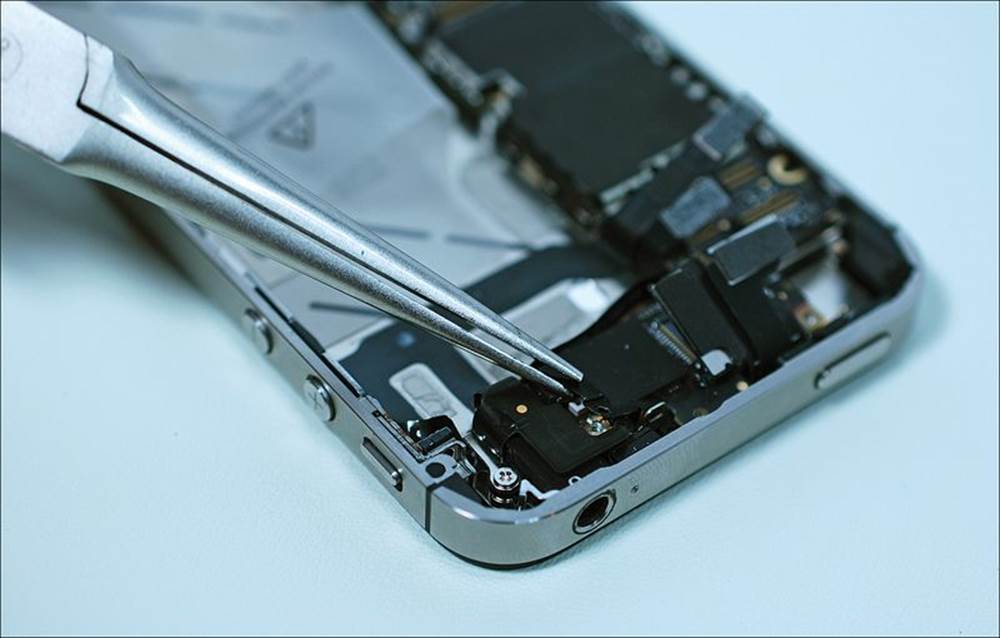
FIGURE 6.18 Removing the grounding clip.
Note: Keep Your Eyes Peeled
Pay attention to where you place the grounding clip. It is a super-small, delicate part that is entirely too easy to lose track of.
15. Use your tiny flathead screwdriver to extract the 4.8mm logic board standoff, located near the headphone jack, shown in Figure 6.19.
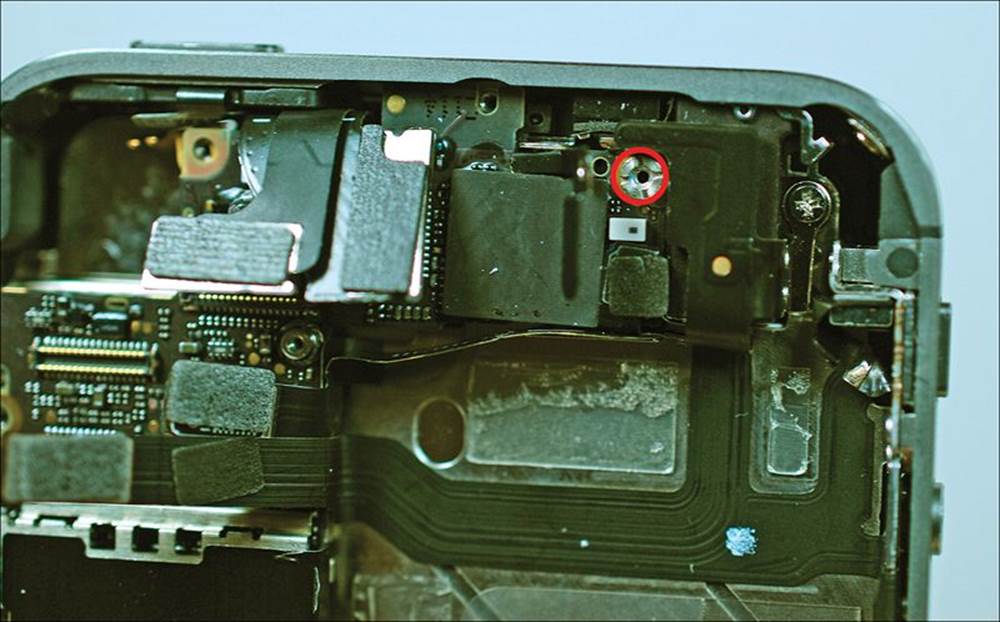
FIGURE 6.19 Removing the logic board standoff.
16. Use the plastic opening tool to disconnect the Wi-Fi antenna (see Figure 6.20) from the logic board.
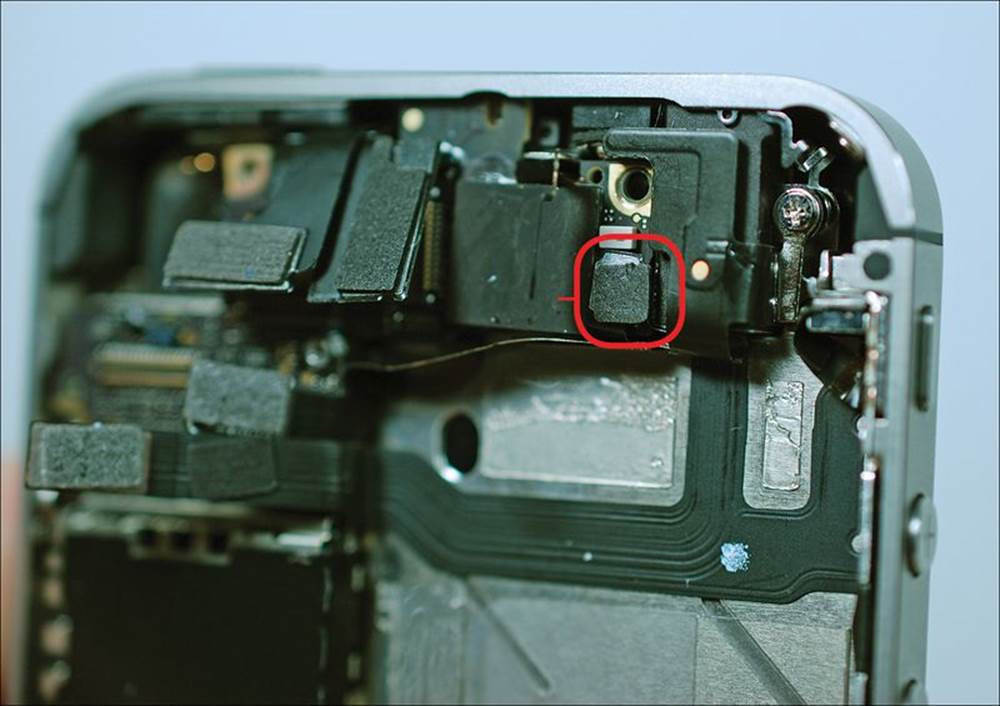
FIGURE 6.20 Disconnecting the Wi-Fi antenna.
17. Okay—time to get that logic board outta here. If present, carefully peel the piece of black tape covering the hidden 1.6mm Phillips screw located near the Power button. Use your tiny Phillips head screwdriver to remove the screw (see Figure 6.21).
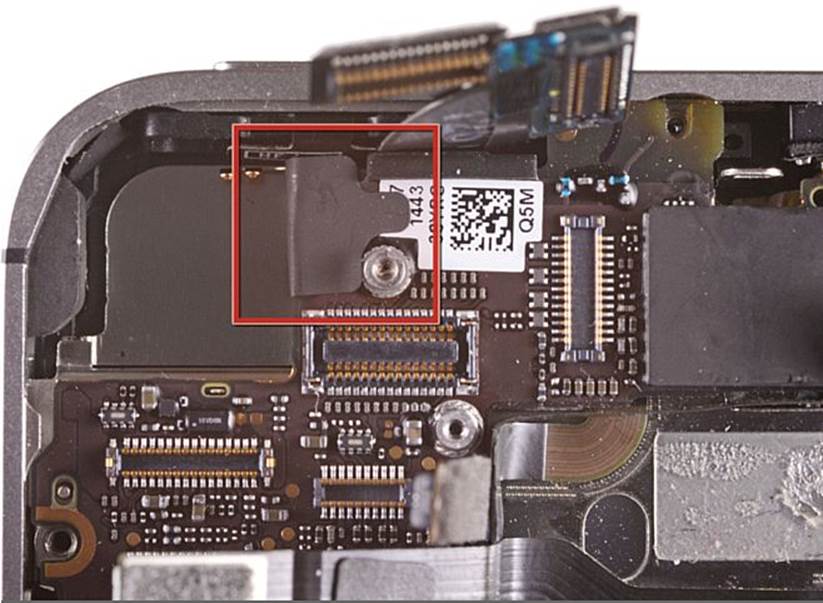
FIGURE 6.21 A hidden screw is covered with black tape.
In my experience, some iPhones have the hidden screw covered with the black tape, and some have uncovered screws. I tell you this so you won’t be surprised when you open your iPhone 4S.
Note: Watch That Finger!
Please keep track of the delicate grounding finger for the rear-facing camera. It’s a tiny component, and you need to make sure that it stays in place during reassembly.
18. Remove the final two Phillips screws that secure the logic board to the case assembly (see Figure 6.22). Use your tiny flathead screwdriver to extract the standoff located near the top of the speaker enclosure assembly.
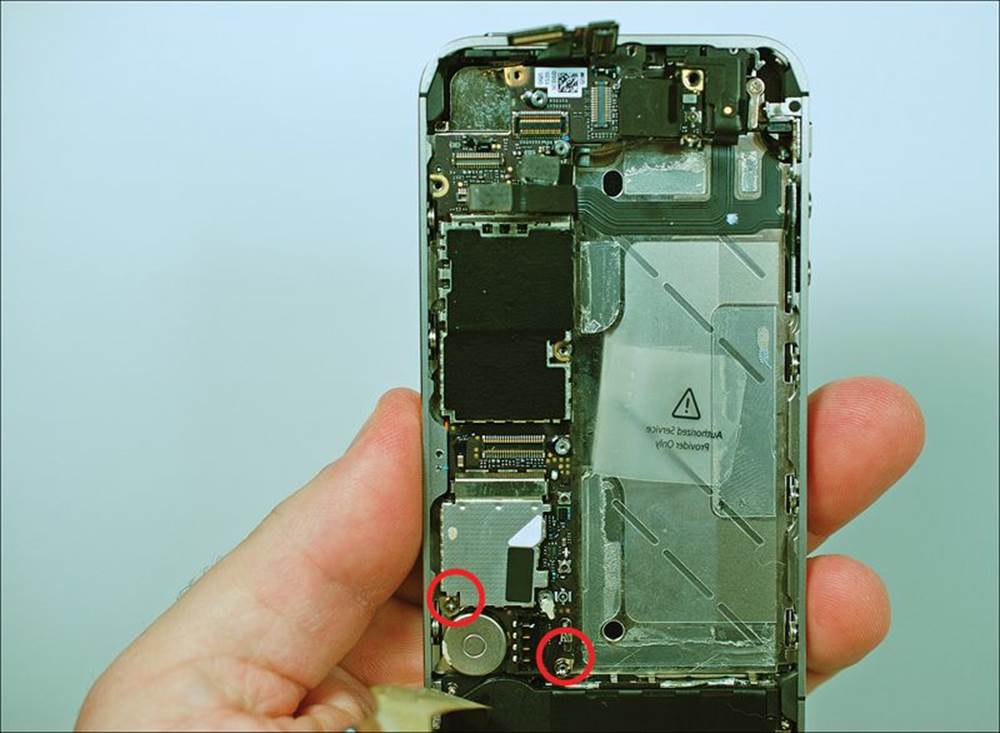
FIGURE 6.22 Preparing to free the logic board by removing the final two screws.
19. Carefully lift the logic board out of the iPhone 4S as shown in Figure 6.23. Finally!
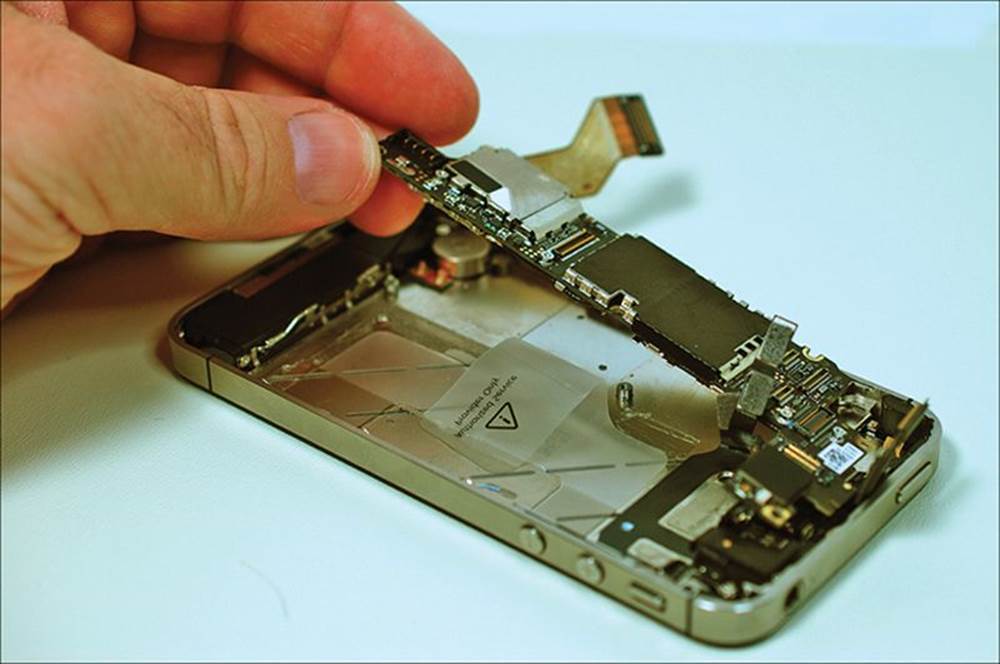
FIGURE 6.23 The iPhone 4S logic board.
20. Wedge your plastic opening tool between the vibrator and the side of the iPhone. Gently pry up the vibrator, as shown in Figure 6.24. The vibrator is held to the case assembly with adhesive.
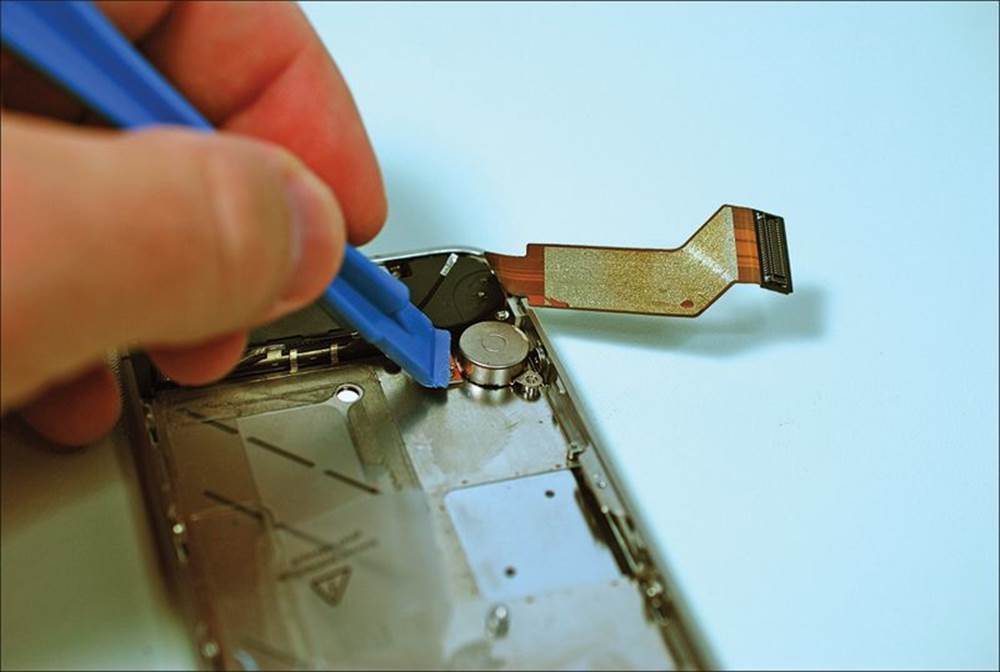
FIGURE 6.24 Removing the vibrator.
21. Remove the two 2.4mm Phillips screws to release the speaker enclosure assembly from the iPhone 4S. Use a pair of tweezers to carefully lift the speaker enclosure, as shown in Figure 6.25. This has to be one of the wackiest speaker enclosures I’ve ever seen in my life—what do you think?
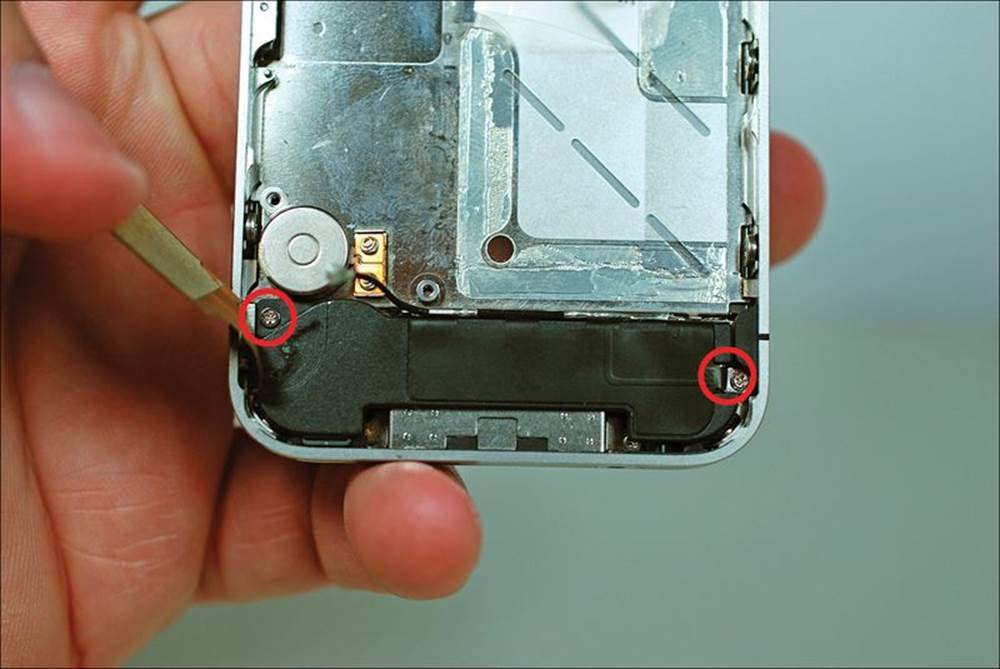
FIGURE 6.25 Removing the speaker enclosure assembly.
22. The final step in this disassembly is removing the display assembly. To do this you need to locate and remove a substantial number of Phillips screws. If necessary, remove the small pieces of black tape covering the display mounting tabs. Next, remove the four Phillips screws underneath the display mounting tabs, each located in a corner of the iPhone. Finally, remove the six large-headed Phillips screws (three on each side) located along the inner perimeter of the case assembly. I’ve marked their locations in Figure 6.26.
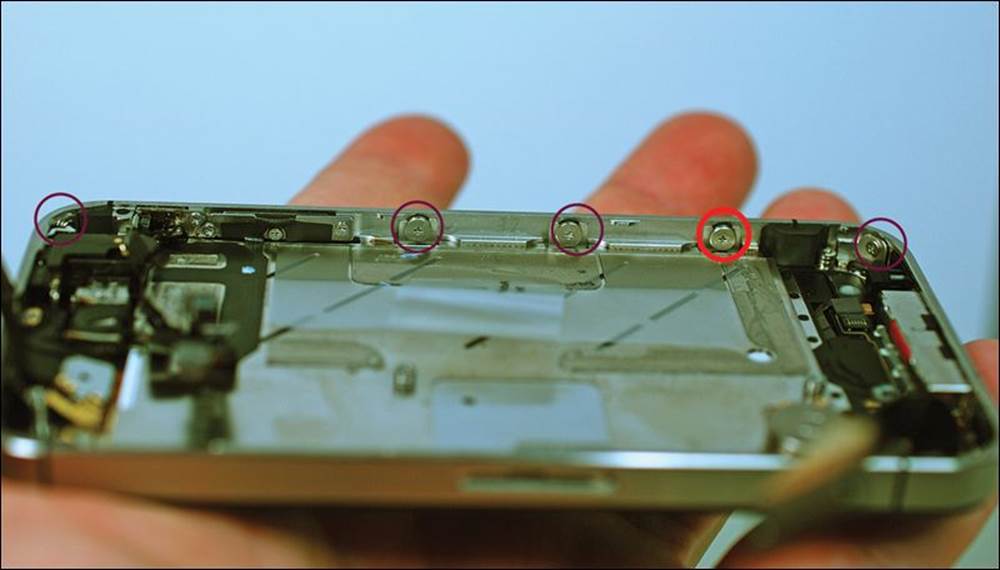
FIGURE 6.26 Preparing the screen assembly for removal.
Finally, use the edge of your plastic opening tool to gently pry up the display assembly around its perimeter from the rest of the case assembly (see Figure 6.27). Please remember that the glass, digitizer, and LCD are a single unit—don’t try to separate those components!
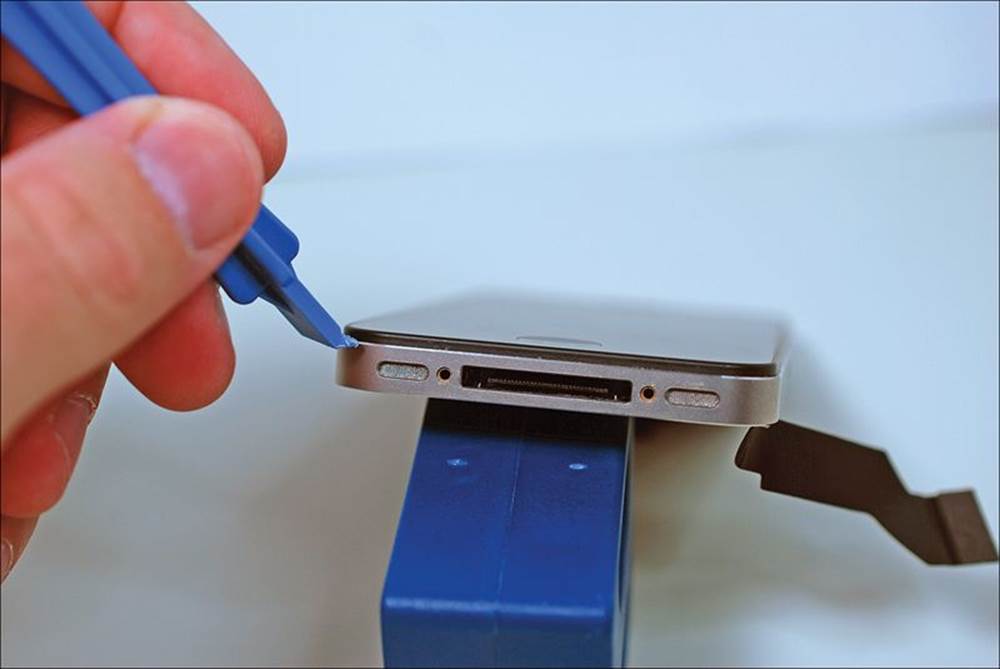
FIGURE 6.27 Removing the display assembly.
Figure 6.28 shows the completely torn-apart iPhone 4S.
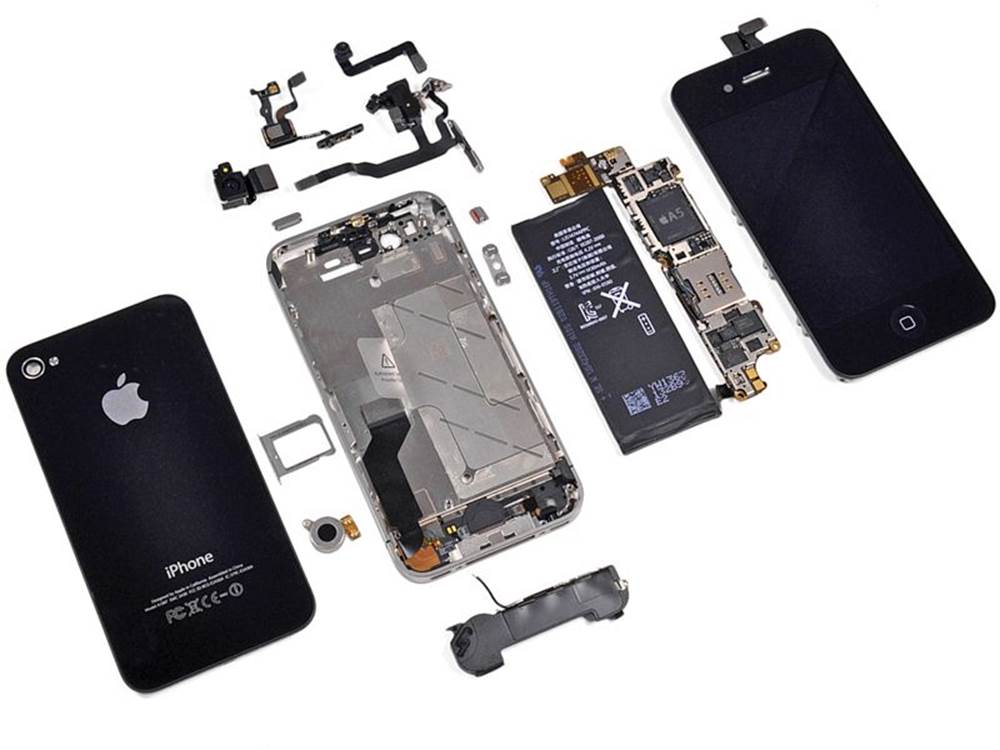
FIGURE 6.28 iPhone 4S, completely disassembled. (Photo courtesy of ifixit.com.)
Reassembly Notes
![]() Consider purchasing replacement screws—The 3.6mm pentalobe screw heads are delicate and prone to stripping. Therefore, you should consider purchasing Phillips-style replacement screws from iFixit (http://is.gd/yVApxh) or another source.
Consider purchasing replacement screws—The 3.6mm pentalobe screw heads are delicate and prone to stripping. Therefore, you should consider purchasing Phillips-style replacement screws from iFixit (http://is.gd/yVApxh) or another source.
![]() Be patient with the cellular antenna—Reattaching the cellular antenna connector tip takes an extraordinary amount of patience. As I told you in the iPhone 3GS teardown, there is no audible “pop” that lets you know the part is seated correctly. You have to use trial and error until the cable connector stays in place.
Be patient with the cellular antenna—Reattaching the cellular antenna connector tip takes an extraordinary amount of patience. As I told you in the iPhone 3GS teardown, there is no audible “pop” that lets you know the part is seated correctly. You have to use trial and error until the cable connector stays in place.
![]() Keep track of those grounding fingers and EMI shields—I made mention of this a couple times during the disassembly procedure, but it bears repeating: Make careful note of when and where you remove those tiny grounding fingers and mini EMI shields. Those are the most common parts to lose track of during an iDevice disassembly. However, Apple includes the parts for a reason, so you must be careful.
Keep track of those grounding fingers and EMI shields—I made mention of this a couple times during the disassembly procedure, but it bears repeating: Make careful note of when and where you remove those tiny grounding fingers and mini EMI shields. Those are the most common parts to lose track of during an iDevice disassembly. However, Apple includes the parts for a reason, so you must be careful.
![]() Windex makes a great lubricant—Use Windex or a comparable glass cleaner to lubricate metal-on-metal contact points.
Windex makes a great lubricant—Use Windex or a comparable glass cleaner to lubricate metal-on-metal contact points.
On Glass Cleaner and Rubber Gloves
During your work with iDevice internals, the oils from your fingers can rub off on metal-to-metal contact points and produce electrical interference. In some cases the interference is such that it prevents the normal operation of the iDevice.
Note that I’m not talking about the copper contacts themselves; if you follow industry best practice, you never touch the contacts directly in any event. No, rather I speak of contact points between two metal components inside the iDevice.
There are two primary means of addressing the problem of errant skin oils:
![]() Rubbing the contact points with isopropyl alcohol or glass cleaner
Rubbing the contact points with isopropyl alcohol or glass cleaner
![]() Using latex (or non-latex) gloves
Using latex (or non-latex) gloves
Moisten a cotton swab or something similar with a glass cleaner or isopropyl alcohol and gently rub metal-to-metal contact points during your iDevice reassembly. Be sure to let the liquid dry completely before powering on the iDevice.
Of course, you can totally obviate the skin oil issue if you wear latex gloves. The downside to wearing gloves is that you will almost undoubtedly experience reduced manual dexterity.
Some iDevice Do-It-Yourself (DIY) repair enthusiasts recommend Nitrile gloves; these gloves are latex-free (good for people with latex allergies), powder-free, and are highly resistant to static electricity. Perform a Google, eBay, or Amazon search to find the best deal.
All materials on the site are licensed Creative Commons Attribution-Sharealike 3.0 Unported CC BY-SA 3.0 & GNU Free Documentation License (GFDL)
If you are the copyright holder of any material contained on our site and intend to remove it, please contact our site administrator for approval.
© 2016-2026 All site design rights belong to S.Y.A.