Take Control of Security for Mac Users (2015)
Beef Up Your System Settings
In the previous chapter we looked at some of the easiest changes you can make to improve your Mac’s security, several of which involved simple changes to settings. In this chapter we continue with some settings that require a bit more explanation and thought. That includes a discussion of OS X’s Gatekeeper and sandboxing security features, some basics for using user accounts more securely, and a couple of quick suggestions about sharing files, your screen, and other resources. Except as noted, this chapter applies to people at every risk level.
Manage App Sources
Since Apple released Mountain Lion in 2012, OS X has had an important security feature called Gatekeeper. (Apple later added Gatekeeper to OS X 10.7.5 Lion, too.) Even though you won’t see the word “Gatekeeper” anywhere in OS X (Apple mentions it in marketing materials, on the OS X Security page, and in developer documentation), Gatekeeper affects how you install and use software.
Gatekeeper examines downloaded apps either when they’re installed (if they use an installer) or when they’re run for the first time. If the app doesn’t meet your criteria, Gatekeeper blocks the app from running. The point is to prevent malicious software from causing damage or stealing data. Gatekeeper can also protect you from apps that have been modified without your knowledge. In both cases, Gatekeeper depends on a process called signing an app.
Understand App Signing
Each developer who has joined Apple’s $99-per-year Mac Developer Program gets a special digital certificate that serves as a unique identifier. In the process of building an app, the developer can use that certificate to sign the app. A signed app doesn’t look any different from an unsigned app, but it contains extra data that enables OS X to determine:
· Integrity: Whether the app has been changed since it was built
· Identity: Which developer created (and signed) an app
· Access: Which system resources the app may access
Each of these attributes helps to protect your security.
Let’s start with integrity. If an attacker were to modify an app after it was signed—for example, inserting malicious code while it sat on the developer’s Web server or even after you started using it—Gatekeeper would notice the change and prevent the app from running.
Note: Gatekeeper always prevents signed apps that have been altered from running, even if they ran fine before, or if your settings specify that unsigned apps may run (see Choose an App Security Setting, next).
Next, suppose someone signed up for the Mac Developer Program and started delivering malicious software, signed with their certificate. The identity feature kicks in—once Apple discovers that the developer is distributing dangerous software, Apple can revoke that certificate, telling Gatekeeper not to let any software signed with that certificate launch. (Your Mac checks for revocations once a day. An Internet connection is required.)
The third aspect, access, involves system resources such as Keychain. If you grant an app permission to store information in Keychain or access it afterward, you don’t want to have to keep doing so every time you update the app. But if you install a new version of an app that was signed with the same certificate, Gatekeeper considers it the “same” app for the purpose of allowing access to system resources—you won’t be prompted for Keychain access again. Conversely, if someone altered the app or gave you an unsigned and therefore unauthorized version, it wouldn’t be able to access your Keychain without your permission.
Note: I’ll return to the way digital signatures affect app access in Use a Firewall.
All of this reduces your risk of inadvertently running malicious software, but you can choose to disable Gatekeeper globally, to include or exclude signed apps from outside the App Store, or to disable Gatekeeper only for specific apps. We turn to these options next.
Choose an App Security Setting
You configure Gatekeeper in System Preferences > Security & Privacy > General, in the bottom section labeled “Allow apps downloaded from” (Figure 4). As usual, click the lock ![]() icon in the lower-left corner of the window, enter your administrator username and password, and click Unlock before proceeding.
icon in the lower-left corner of the window, enter your administrator username and password, and click Unlock before proceeding.
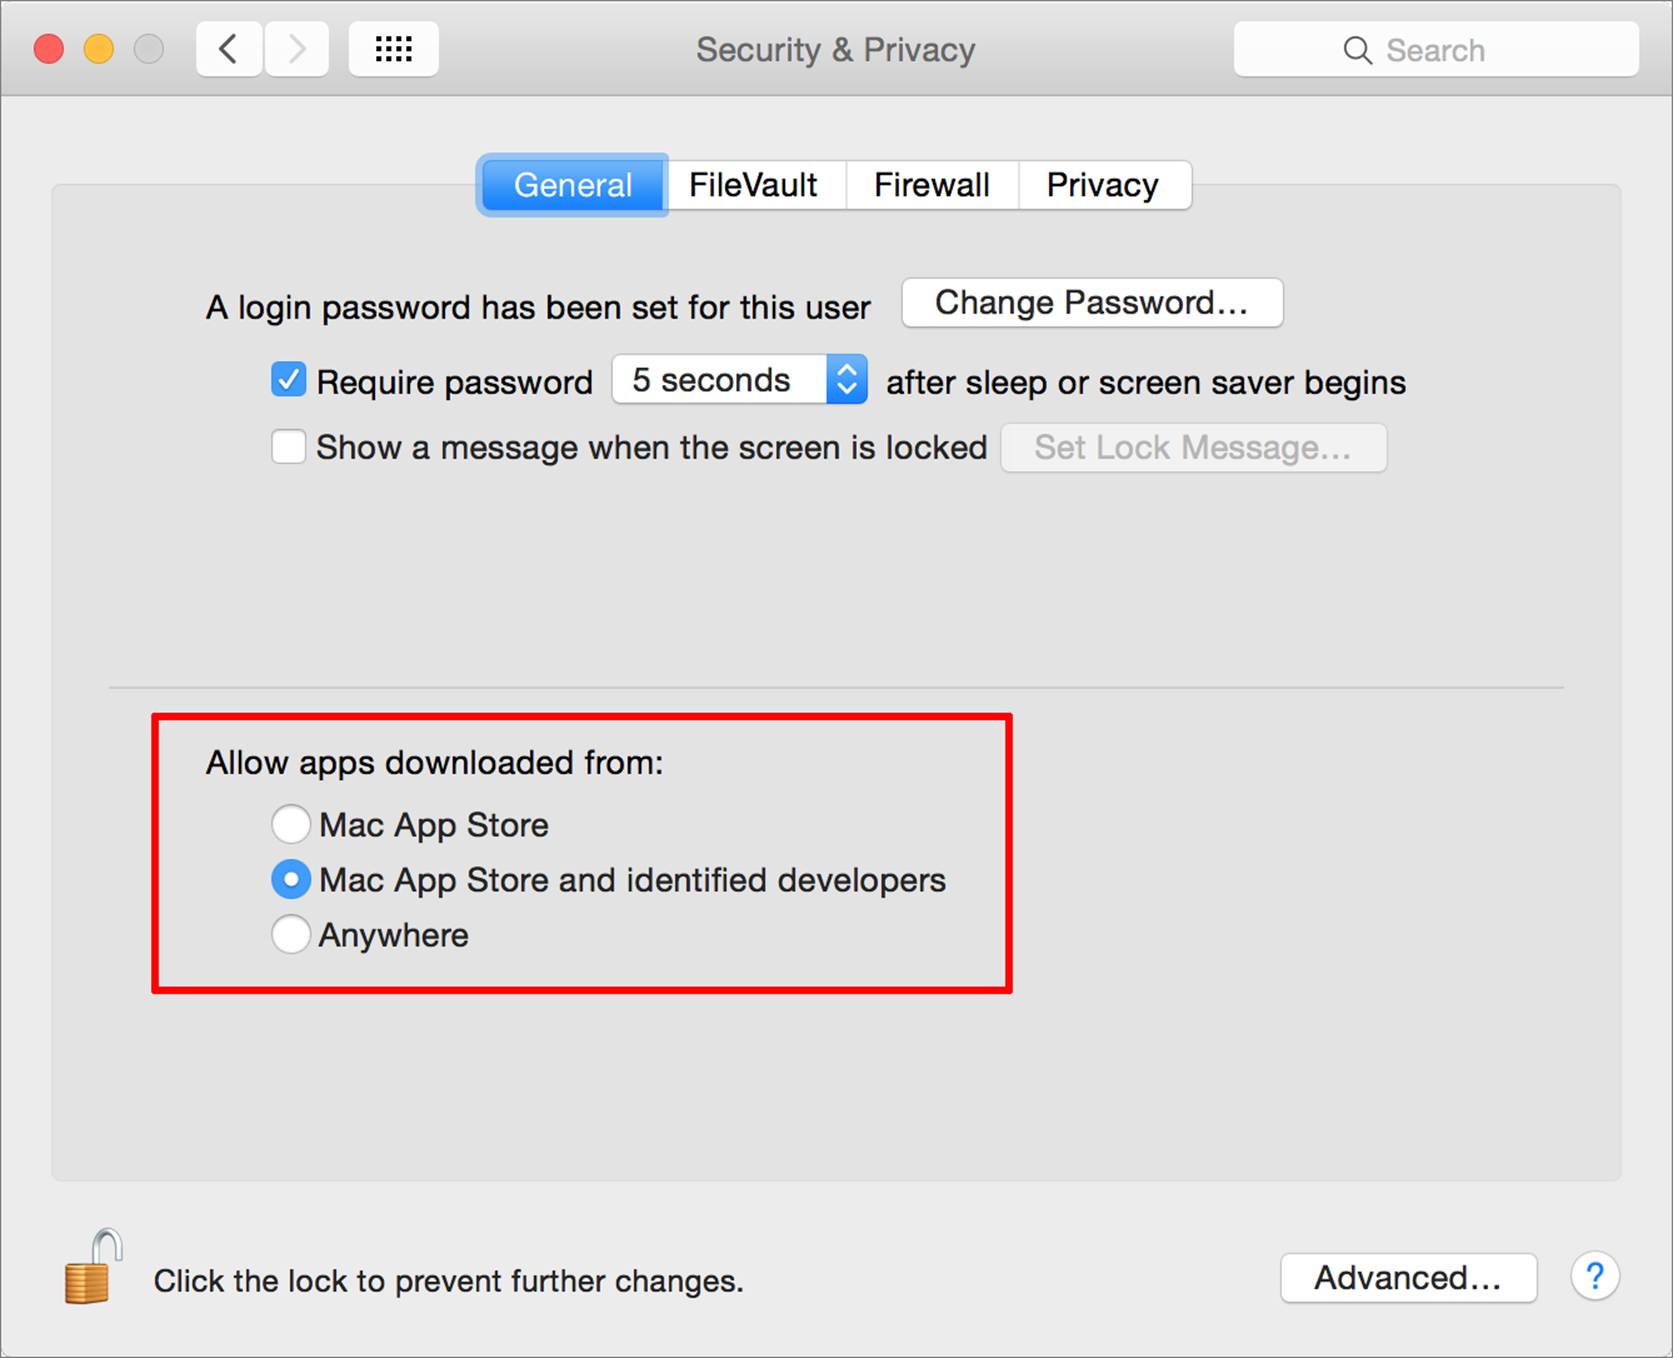
Figure 4: The setting at the bottom of this view affects how your Mac treats app signatures.
Your choices are:
· Mac App Store: Permit only apps downloaded from the Mac App Store (and those included with OS X) to run. I suspect Apple would eventually like to make this the default, or even the only choice—but it’s far too restrictive for most people today, because lots of great software you may want to use isn’t in the App Store, and possibly never will be due to sandboxing rules (see the sidebar All about Sandboxing, ahead). Among the apps not in the App Store are Microsoft Office and Adobe Creative Suite, not to mention most backup apps and disk utilities. Use this only if you expect to obtain software from the App Store exclusively (or nearly so).
· Mac App Store and Identified Developers: Permit not only apps from the Mac App Store to run, but also any app signed with a valid third-party developer certificate. This is the default option, and the one I recommend for Mac users at every risk level. It’s much less restrictive than the first choice, yet you’re still protected because Apple can revoke the certificate of any developer found to be distributing unsafe software, thus preventing your Mac from running it.
· Anywhere: Let any app run, regardless of whether it’s signed or where you got it. If you choose this option, you’ll be reminded how unsafe it is and asked to confirm your choice. This effectively disables Gatekeeper. I don’t recommend this option.
Note that these settings aren’t retroactive. For example, if you install software while the Anywhere option is set and later change the setting to Mac App Store, that won’t disable the previously authorized app.
Beware Bundled Adware!
A slimy practice that I’m seeing more often is when a download site takes perfectly good software from someone else and wraps it in their own custom installer with a type of malware known as adware (which, among other things, displays intrusive ads, even if you block pop-up windows and use ad-blocking browser extensions in your Web browser). Here’s how to protect yourself:
· Avoid software download sites like CNET’s download.com. Always download software from the Mac App Store or directly from the developer.
· Make sure Gatekeeper isn’t set to Anywhere, and don’t override it (per the next topic) unless you’re sure it’s from a safe source.
· If an installer asks if you want to install any extra software (especially if it’s “sponsored”) or browser extensions, or make changes to your browser settings, say no.
· If you find you’ve inadvertently installed adware, follow Apple’s instructions to remove unwanted adware that displays pop-up ads and graphics on your Mac.
You may find it interesting to read the How-To Geek article Mac OS X Isn’t Safe Anymore: The Crapware/Malware Epidemic Has Begun. I think the title and some of the article’s recommendations are hyperbolic and disproportionate to the threat, but nevertheless it pays to be vigilant.
Override Gatekeeper
If you (wisely) selected a setting other than “Anywhere,” then sooner or later you will encounter an app you want to run, but which doesn’t meet your minimum criterion. When you try to run such an app, you see a warning dialog (Figure 5), and when you click OK, the app quits.
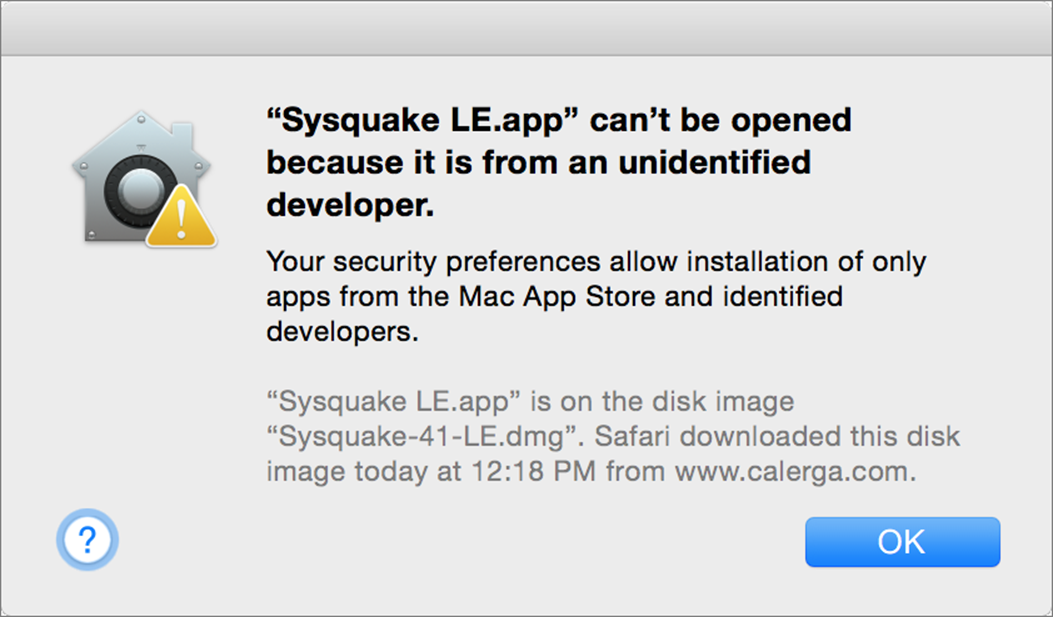
Figure 5: When you run an app for the first time that doesn’t meet your minimum Gatekeeper settings, OS X informs you that it has been blocked from running.
Before I tell you how to override this Gatekeeper warning, let me explain what it means. This alert usually means one of two things:
· If you selected Mac App Store, but then download an app directly from a developer’s Web site, then even if that app was duly signed, OS X blocks it from running.
· If you selected Mac App Store and Identified Developers, but then download an app that has not been signed using Apple’s latest requirements—OS X blocks it from running.
Although those are the two most common situations, either of these settings can prompt a warning in other cases, too, such as:
· You run a preliminary version of a new app that the developer simply hasn’t gotten around to signing yet.
· You create your own app or stand-alone script (perhaps using Script Editor) and don’t want to (or don’t know how to) sign it.
· You’ve downloaded malware. It isn’t signed because the developer either isn’t a registered Apple developer or doesn’t want to risk exposing his identity—and enabling Apple to revoke the certificate, thus preventing the app from being installed in the future.
So, before you override Gatekeeper, give some thought to what you’re trying to run and where you got it. If you feel confident that it’s merely an older app, or if you want to restrict Gatekeeper to allowing only Mac App Store apps most of the time but still install an occasional app purchased elsewhere, you can override Gatekeeper when you see this warning.
To do so, right-click (or Control-click) the application’s icon and choose Open from the contextual menu. When you do this—and only when you do this—the dialog that appears (Figure 6) has an Open button. Click it.
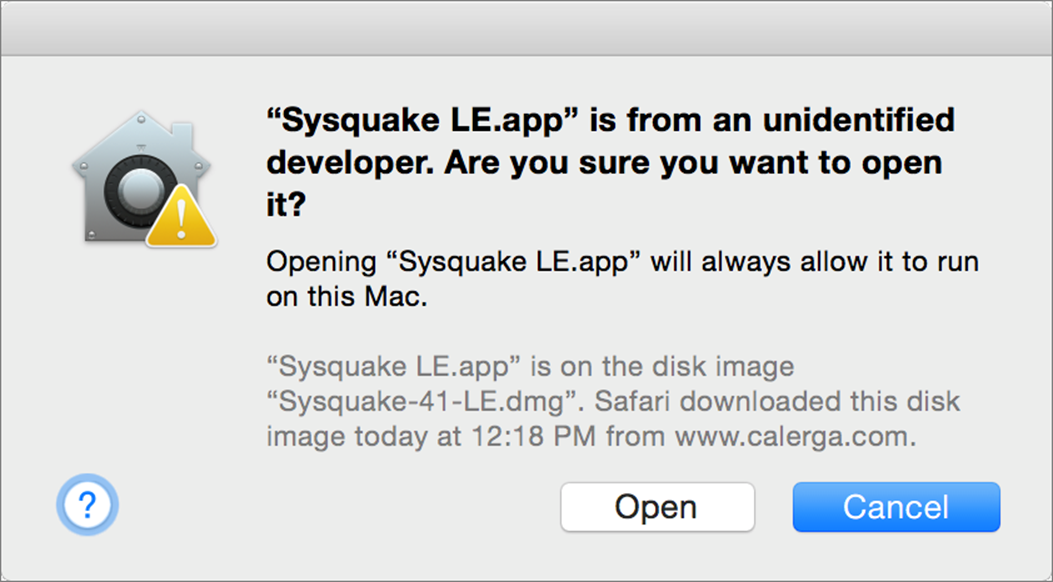
Figure 6: When you use the special contextual menu trick to override Gatekeeper, you get a variation on the previous dialog with an Open button—that’s the key to letting the app run.
File Quarantine
In addition to Gatekeeper warnings, you may see a similar-looking warning when you first open an app downloaded by Safari, Mail, Messages, Chrome, Firefox, or certain other apps (Figure 7). This is part of OS X’s File Quarantine feature, which helps prevent you from running apps you didn’t intend to download. (Of course, you have to read the text for it to be useful to you!) If you’re sure you want to open the app, click Open.

Figure 7: File Quarantine makes sure you know where a newly installed app came from.
Although most quarantine alerts look like this, OS X also uses the file quarantine process to identify known malware. If you try to run an app your Mac knows to be harmful, you’ll see a warning to that effect instead—click the Move to Trash button to delete the bad app.
All about Sandboxing
Another security feature Apple introduced in Mountain Lion (and then retroactively added to 10.7.5 Lion) goes beyond Gatekeeper by keeping apps in line whenever they’re used—not just on the first launch. It’s called sandboxing, and although you’ll never see that term in OS X either, you’re bound to notice its effects.
The basic idea of a sandbox is that an app has restrictions that define where it can read and write data. It has to “keep its sand in the sandbox”—it can’t see or touch files anywhere outside its designated space. The intention is to prevent buggy, corrupted, or malicious apps from messing with data and files from other apps or OS X itself.
To illustrate how this is supposed to work, suppose you visit a rogue Web site in Safari that attempts to execute some dastardly code (most likely by way of a plug-in, such as Flash). Because Safari runs in a sandbox, that malicious code can’t affect other files—it can’t read your contacts, delete system files, add a startup item, or do any other mischief outside the browser window without your permission.
Apps downloaded from the Mac App Store must be sandboxed (with some exceptions for older apps). In addition, most apps included with OS X are sandboxed, and so are many third-party apps available directly from their developers (usually because they also offer the apps in the App Store and don’t want to create two entirely different versions). But nothing in the design of OS X (at least, not yet) prevents you from running a non-sandboxed app if you want to. Unless you get an app from the App Store—or the developer tells you the app is sandboxed—you have no easy way to know.
Sandboxed apps can read and write files in non-default places if you agree to let them do so. For example, Nisus Writer Pro 2.1 (which I used to write this book) let me specify a new location for my Macros folder, and asked me if it could read and write files in certain folders. I could have said no, but once I authorized a new location for it to use, it remembered that preference from then on. (Under certain rare circumstances, you might have to reauthorize an app.)
You can’t turn off sandboxing or adjust its settings. All you can really do is be alert—if an app asks for access to a folder you don’t think it should be using, that’s because the folder isn’t currently within its sandbox. Think carefully before saying yes—if it’s unexpected, the app could be trying to do something it shouldn’t.
Improve Users & Groups Security
If your Mac has only one user—you!—then you may never have thought about the security implications of user accounts. Although I’ll cover this topic from another angle later (see Keep Your Data Safe from Other Local Users), I want to mention at this point several important principles about user accounts, most of which apply even to single-user Macs:
· There are four main types of Mac user accounts: administrator, standard, guest user, and sharing-only.
Of these, administrator and standard are by far the most common. The usual reason to have more than one account is so that each person who uses a particular Mac can have a separate space for files and settings. But accounts can also be used to restrict access to certain files or resources in order to improve your security.
· Every Mac needs at least one administrator account.
When you set up a new Mac or do a clean installation of OS X, you’ll be prompted to create an administrator account before you can do anything else. That’s because only administrators can perform certain crucial tasks (see the next bullet point). You can have more than one administrator account, however, and in fact, it isn’t a bad idea to set up an extra one to use for testing and troubleshooting.
· Administrator accounts are all-powerful.
Administrators can create, modify, and delete other user accounts. They can unlock any pane of System Preferences, and authorize any type of software installation. They can (with a quick trip to the Terminal utility) open any file on the Mac, belonging to any user—and can change any file’s permissions. They can upgrade OS X to a new version. They can set or remove a firmware password that prevents the Mac from booting from anything other than the default startup disk. The list goes on and on.
· Standard accounts can do most ordinary things.
Standard users can run apps, work with files, and perform most ordinary day-to-day tasks. When a user with a standard account tries to do something that only an administrator is allowed to do, simply entering an administrator’s username and password (or having an administrator do so) will do the trick—there’s no need to log out or switch accounts first.
· Apps get their privileges from the user who opens them.
If someone with a Standard account launches an app, that app can access only the files and folders available to that user. If someone with an Administrator account launches an app, that app can—subject to the restrictions of sandboxing (refer back to All about Sandboxing)—read, write, or modify nearly any file on the Mac. That means a malicious or compromised app, launched by someone with an administrator account, can do serious damage.
You can create as many user accounts as you need, and switch between them easily. To keep your Mac secure, you should make sure you have the right number and types of accounts. That’s what I discuss in the remainder of this topic.
Use a Standard Account
Even though your Mac has a single administrator account (and no standard accounts) by default, that’s not the most secure arrangement. Because administrator accounts have so much power, they can get you in trouble. While logged in as an administrator, you could inadvertently delete files that would keep your Mac from working properly, install malware that could damage your system, or do any of numerous other things you might later regret. So, many Mac experts recommend using a standard account for day-to-day use, and using the credentials for your administrator account only when you’re installing software or doing other tasks that require access to the depths of your system.
Let me be candid: even though I have frequently recommended this tactic, it’s not something I do myself. My main, everyday user account has administrator privileges. That makes things simpler for me (just one set of credentials that I can use everywhere). And because I’m an expert user, I know how to avoid the sorts of mistakes that might cause problems for someone using an administrator account—and besides, I have great backups that I can fall back on if I do anything truly dimwitted. (It does happen.)
Therefore, I won’t insist that you make your main account a standard account. But I do suggest that you consider it, especially if your risk level is higher than 2 (see Determine Your Risk Profile). If you have anything less than complete confidence that you can either avoid or recover from any mistake you might make by accidentally exercising administrative privileges, a standard account might be what you want.
Note: If, like me, you use an administrator account for day-to-day work, be sure to disable automatic logins (see Login Options)—no need to hand a thief the keys to the kingdom.
If your main account is now an administrator account but you want to make it a standard account, you can create a new administrator account (for occasional use only) and then remove the administrative privileges from your main account. To do so, follow these steps:
1. Go to System Preferences > Users & Groups.
2. Click the lock ![]() icon in the lower left of the window, enter your administrator username and password, and click Unlock.
icon in the lower left of the window, enter your administrator username and password, and click Unlock.
3. Click the plus ![]() button to add a new account.
button to add a new account.
4. Choose Administrator from the New Account pop-up menu.
5. Fill in the fields for Full Name and Account Name (that is, a short username, such as your initials).
6. If you want the user’s iCloud password to serve as the login password for the Mac user account too, select Use iCloud Password and enter the user’s Apple ID (the one used for iCloud, if there’s more than one). But I recommend against this; it’s much safer to use different passwords for your Mac and each site or service. To do so, instead select Use Separate Password, fill in the Password and Verify fields, and optionally enter a password hint.
Note: The Full Name and Account Name can be anything you like, but they must be different from those used for other accounts on your Mac. At the risk of repeating myself unduly, every account—especially administrator accounts—should have a password that is both strong and unique, as discussed in Improve Your Passwords.
7. Click Create User. If you previously had automatic login enabled, an alert appears, asking if you want to keep it on or turn it off. Click Turn Off Automatic Login. (You can turn it back on later, with your new account.)
8. Choose Apple > Log Out username to log out of your old administrator account.
9. Select or enter the name of the new administrator account you just created, enter its password, and click the arrow button or press Return.
At this point, you may be prompted to enter the Apple ID for the new account. Since this administrator account will be for occasional use only, I suggest selecting the Don’t Sign In radio button, clicking Continue, and then confirming by clicking Skip again. If it turns out you need iCloud services with your new administrator account, you can always set them up later.
10.Once again, go to System Preferences > Users & Groups, click the lock ![]() icon, and authenticate—this time with your new administrator credentials.
icon, and authenticate—this time with your new administrator credentials.
11. In the list on the left, select your old administrator account.
12. Uncheck the Allow User to Administer This Computer checkbox; this turns your erstwhile administrator account into a standard account. An alert appears, claiming that you must restart for the changes to take effect. That’s not entirely true (you need only log out), but click OK anyway.
13. Choose Apple > Log Out username to log out of your new administrator account.
14. Select or enter the name of your old (previously administrator, now standard) account, enter your password, and click Log In. (And, if you turned off Automatic Login in Step 7, you may want to turn it back on.)
Having done all this, you’ll find that almost everything about using your Mac is exactly as it was before. But there’s one exception: when a dialog prompts you for an administrator’s credentials, you won’t enter the username and password for your everyday account but instead enter the credentials for your new administrator account.
Set Up a Guest User Account
As long as you’re making changes in the Users & Groups preference pane, you should think about whether you want to have a guest user account. It’s enabled by default starting in Yosemite. That’s usually a good idea, but if it doesn’t suit your needs, you can disable it.
With a guest user account enabled, you have a spare (non-administrator) account that anyone can log in to, without a password, to run an app, browse the Web, or perform any other task that doesn’t require saving private information to disk permanently. (Guest users can, however, save data to publicly shared locations.) As soon as the guest logs out, OS X deletes the guest’s temporary home folder, leaving everything just as it was beforehand. If you ever need to give someone temporary access to your computer, using the guest account is simpler than having to set up and later delete a conventional account for that person, and more secure than letting them use your account.
To turn guest access on or off:
1. Go to System Preferences > Users & Groups if you’re not still there.
2. If the lock ![]() icon in the lower left is in the locked state, click it, enter your administrator username and password, and click Unlock.
icon in the lower left is in the locked state, click it, enter your administrator username and password, and click Unlock.
3. Select Guest User in the list on the left. Then select the Allow Guests to Log In to This Computer checkbox to enable it, or deselect the checkbox to disable it.
Note: If you use FileVault (see Prevent Data Theft), the Guest user can access only Safari.
4. With guest access enabled, optionally select either or both of the following checkboxes:
§ Enable Parental Controls: To restrict what software, Web sites, and other resources guests can access, select this checkbox (it’s selected by default), click Open Parental Controls, and make any desired selections.
§ Allow Guests to Connect to Shared Folders: This doesn’t affect the way someone logged in as a guest can access shared folders on this Mac, as you might expect. Rather, check this to let users on other Macs on your network to connect to this Mac’s shared folders without having to supply a username and password.
Tip: A different sort of limited-access account is the sharing-only account. This is an account solely to allow someone on another Mac to access a specific resource on your Mac (such as shared files or printers); it is not a login account. See Apple’s page OS X Yosemite: Create a sharing-only user account.
Make Sure Regular Users Have Accounts
If you’re the only person who uses your Mac, you can skip this topic. But if you share your Mac with family members, coworkers, or friends, do yourself—and them—a favor and create a separate (standard) account for each person. And then, insist that everyone log in to their user-specific accounts when using the Mac. That way, any damage (accidentally deleted files, changed preferences, and so on) will be restricted to that user’s space and not affect the entire Mac.
To enable switching from one user to another without having to log out (and thus quit all your apps), go to System Preferences > Users & Groups > Login Options and check Show Fast User Switching Menu As—choosing either Full Name, Account Name, or Icon, as you prefer, from the pop-up menu. Then, to switch users, choose the name of the user you want to log in as from that menu, which appears near the right side of your menu bar, and enter that user’s password.
Note: Yet another type of user account is the managed user, which is for someone (generally a child) who is subject to parental controls. For more on this topic, see Parental Controls.
Share Resources Securely
If you open the Sharing pane of System Preferences (go ahead and do that now; I’ll wait), you’ll notice several different resources your Mac can share with other devices on your local network—and, in some cases, beyond it (Figure 8).
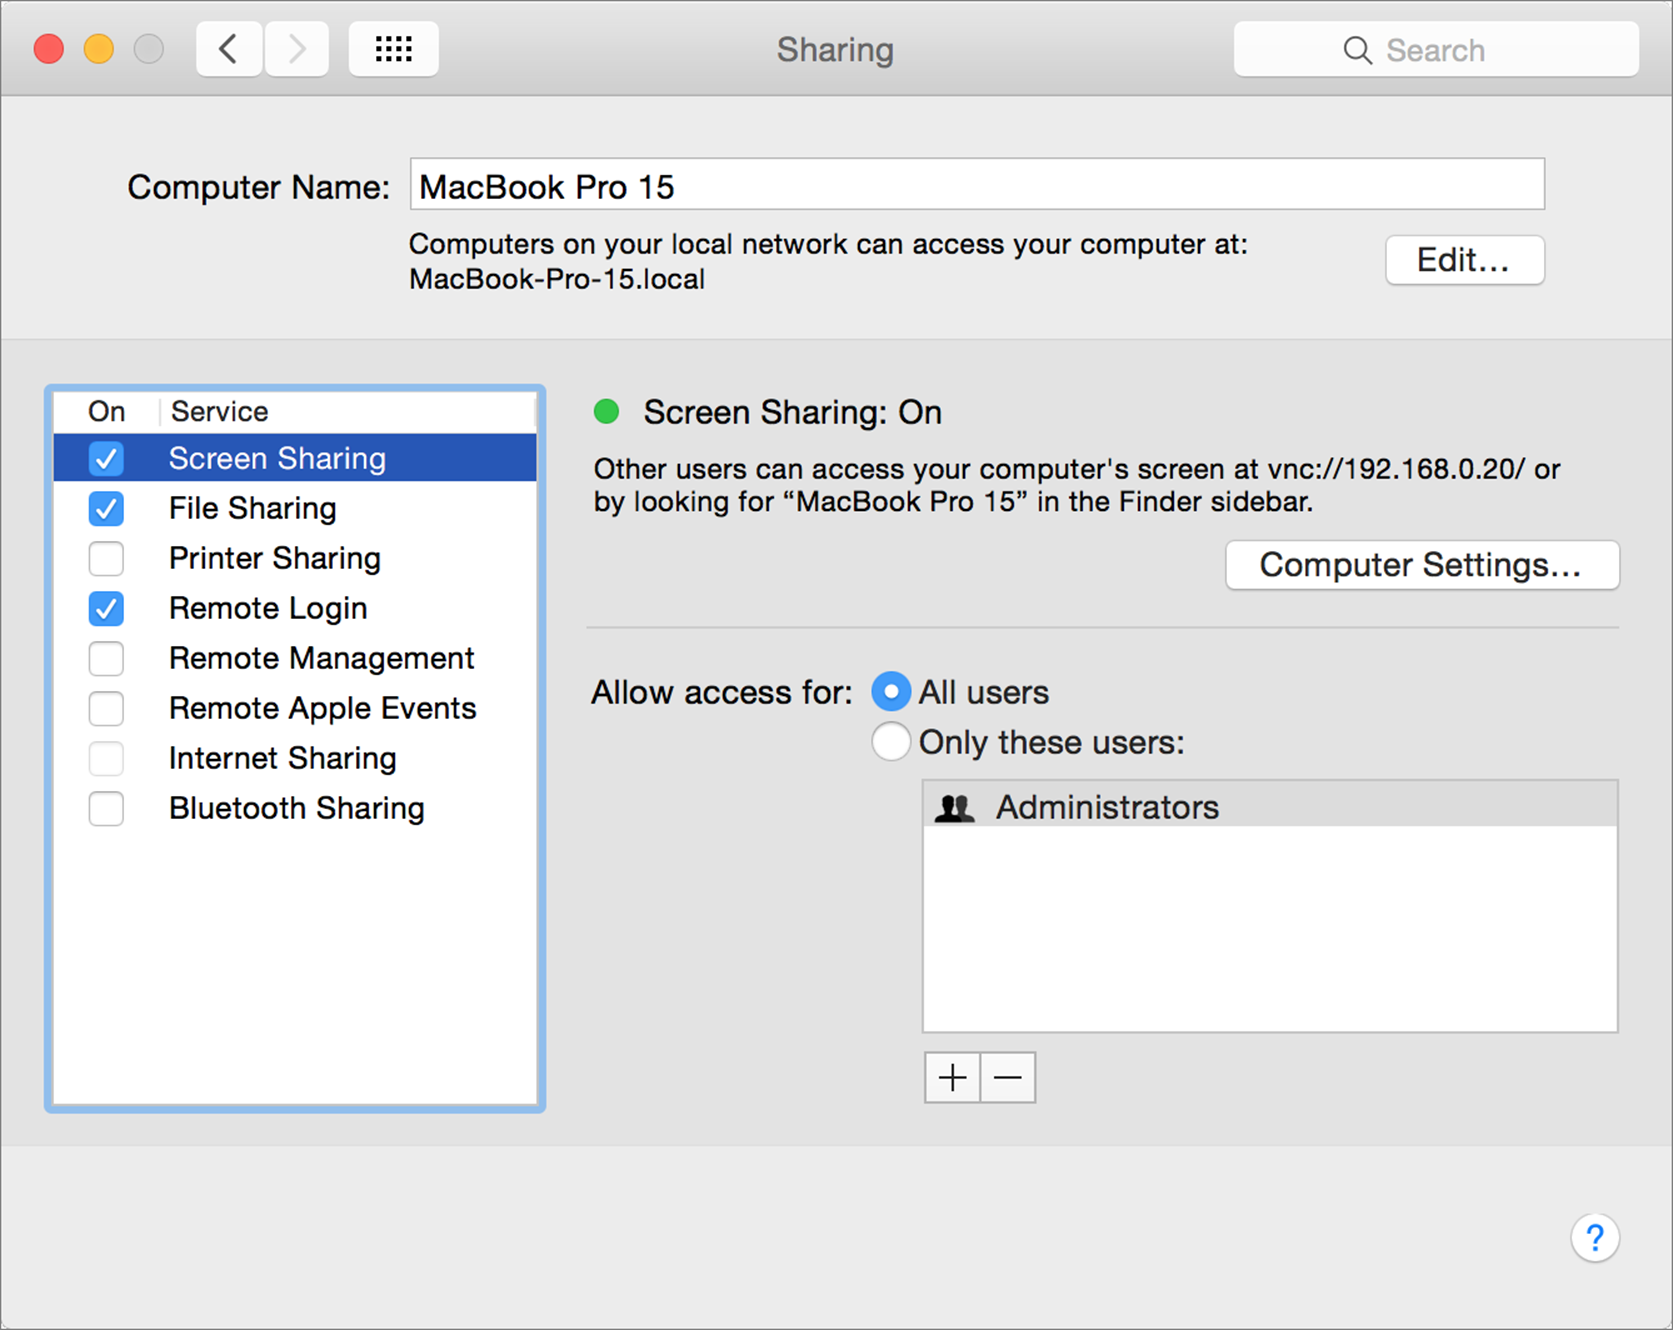
Figure 8: The Sharing pane of System Preferences.
You can share your screen, files, printers, and Internet connection, for example, and you can also enable various types of remote access to your Mac.
Note: Prior to Mountain Lion, Web Sharing was also on this list. Apple removed the control, but the underlying capability is still there—you can enable it easily with a free third-party preference pane called Web Sharing.
All these features can be handy, especially in that they enable multiple Macs in your home or office to talk to each other. You can copy a file from a Mac in the other room, or view what’s on the screen of the Mac upstairs when you’re downstairs. And, with Back to My Mac (see Use iCloud Features Selectively), you can even share files and screens with a Mac that’s on another network, as long as it uses the same iCloud account.
I’m not going to tell you in this book how to use all these sharing features—I’ve got that (and much more) covered in Digital Sharing for Apple Users: A Take Control Crash Course. Rather, I want to make two simple points here:
· Turn off anything you don’t need. Every type of sharing you enable opens up potential routes for an attacker to access your Mac remotely. Even if the likelihood is remote, you should limit your exposure as much as possible, regardless of your risk level.
· Restrict access where applicable. A couple of sharing features are merely “on” or “off,” but most of them let you choose who can connect—All Users or Everyone (not the best idea), Administrators (better), or only specific users (best). The more restrictive you are in granting access, the greater the barrier to intrusion.
Specifying access privileges is fairly self-explanatory, but if you need guidance, click the Help ![]() button or consult Digital Sharing for Apple Users: A Take Control Crash Course.
button or consult Digital Sharing for Apple Users: A Take Control Crash Course.
All materials on the site are licensed Creative Commons Attribution-Sharealike 3.0 Unported CC BY-SA 3.0 & GNU Free Documentation License (GFDL)
If you are the copyright holder of any material contained on our site and intend to remove it, please contact our site administrator for approval.
© 2016-2026 All site design rights belong to S.Y.A.