Publishing Software on Mac (2015)
Chapter 2: Understanding folders
The Download
I've put together a downloadable package that you can install on your Mac. This package has demo Packages projects you can view, along with script files, presentations, dummy apps, etc. This package will create a folder, under Users, called JoeDeveloper, and install all the files and subfolders there. You can easily trash this folder when you're done. The password protected file (disk image) is changed on a regular basis as updates are made; the file is coordinated with the revision of this book. Therefore, you must download the disk image and store it very soon after purchasing the book to ensure you have the correct file password related to this book.
You may download from http://rfwsoftware.com/MacBookDemo.dmg. The password is currently "mystical" (without quotes.) After downloading, mount the .dmg file, double-click on the .pkg file and follow the instructions.
Setup Development Folders
This chapter will demonstrate how a basic package is constructed. It's not a comprehensive treatment for you'll get that later, but I hope you will get the basic concepts of the source files and the target payload.
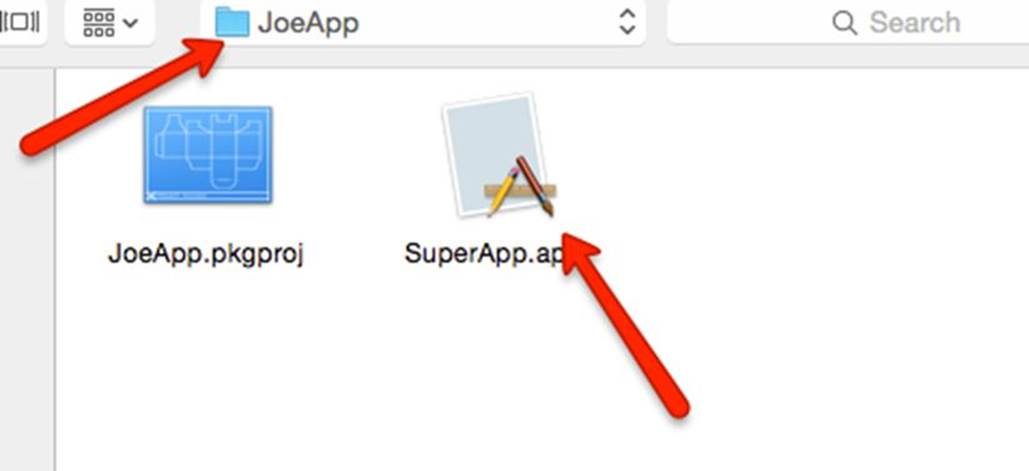
Let's say your name is Joe Developer. On your Mac, use Finder. If you've downloaded and installed the MacBookDemo package, use Finder to navigate to Users/JoeDeveloper. Drag JoeDeveloper to the Finder sidebar. If you were Joe Developer, this would be your home folder. Click on it. Navigate to Development/Source Files. Here you will find our first app, SuperApp.app. For now, ignore all the other folders and files. We will get to them later. We just want to point out here, we have created a folder in our user's home folder called Development, and created a number of subfolders with various files within.
PACKAGES
Download and install Packages. (Note: There is an older packaging app called Iceberg; however, Iceberg can't be signed and will conflict with Apple's Gatekeeper.) Stephane Sudre created both of these applications.
Important Note: Once Packages is installed, choose Packages > Preferences. Click Templates. Substitute your company name in Company Name and Default Package Identifier Prefix. Close the dialog.
Now choose Help>Packages User Guide. This should bring up the User Guide in your default Internet browser. If you have questions on a specific entry as we go along, you can refer to the Users Guide. In addition, you should study the guide before tackling any major project.
On Packages, click File>New Project.
Choose Distribution. Choose a project name. Let's use JoeApp. Choose a folder by navigating to Users/JoeDeveloper/Development/Packages, and clicking Choose. This is the folder where your project will be saved with name JoeApp.pkgproj, and subfolders where your built package will be saved. So now, we have a project named JoeApp.pkgproj in the Packages folder.
We are going to jump ahead to provide an overview of Packages. This is not a complete project, but a skeleton to show you the bones. On the left side, click on the icon labeled "JoeApp" Click on "Payload" near the top.
You should see a display of a partial view of the standard folder hierarchy on a Mac.
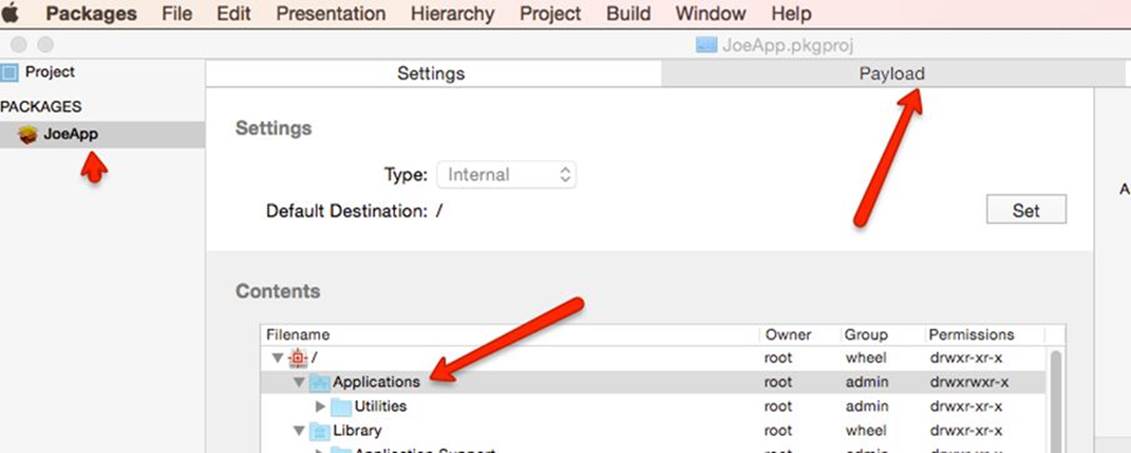
Hierarchy
The hierarchy initially will show the "Standard Folders" . These folders can't be moved, removed, or renamed.
The object of Packages is to package a set of folders and files to be deployed on the target Macintosh and installed in specific folders. The hierarchy represents the target Mac folders. Repeat: The hierarchy represents the target folders. The app, SuperApp.app, we wish to create an installer for is stored in Users/JoeDeveloper/Development/SourceFiles.
Let's say we wish to store, on our target Mac, our app in a folder under Applications called JoeApp. Ctrl-click on Applications, select New Folder, and enter JoeApp. The installer is now instructed to add a new folder under Applications if one does not exist. Now you can ctrl-click the folder JoeApp.
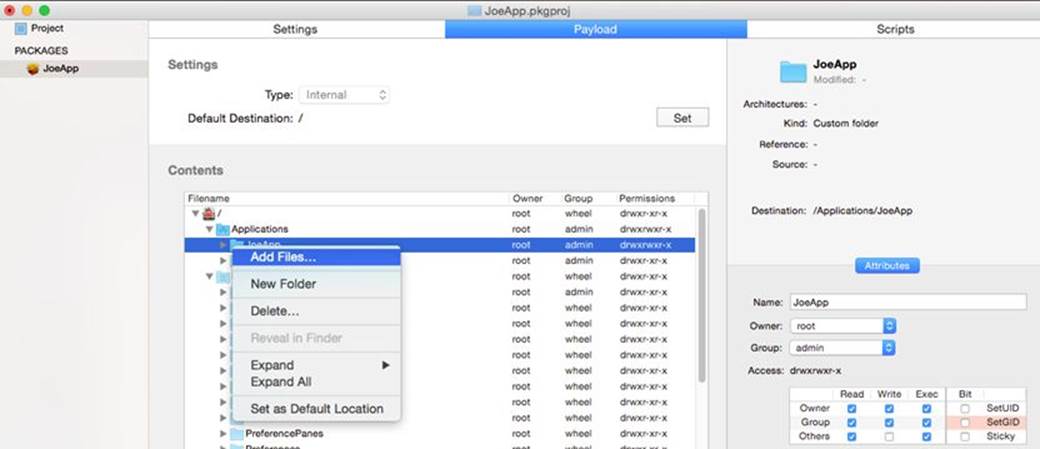
Click Add files.
Now navigate to our source files: Users/JoeDeveloper/Development/SourceFiles/SuperApp.app
Click Add at the bottom of the dialog.
We have now instructed Packages to take the file, SuperApp.app from the source files on our Mac and install it in Applications/JoeApp folder on the target Mac, creating the folder 'JoeApp' if it does not exist already.
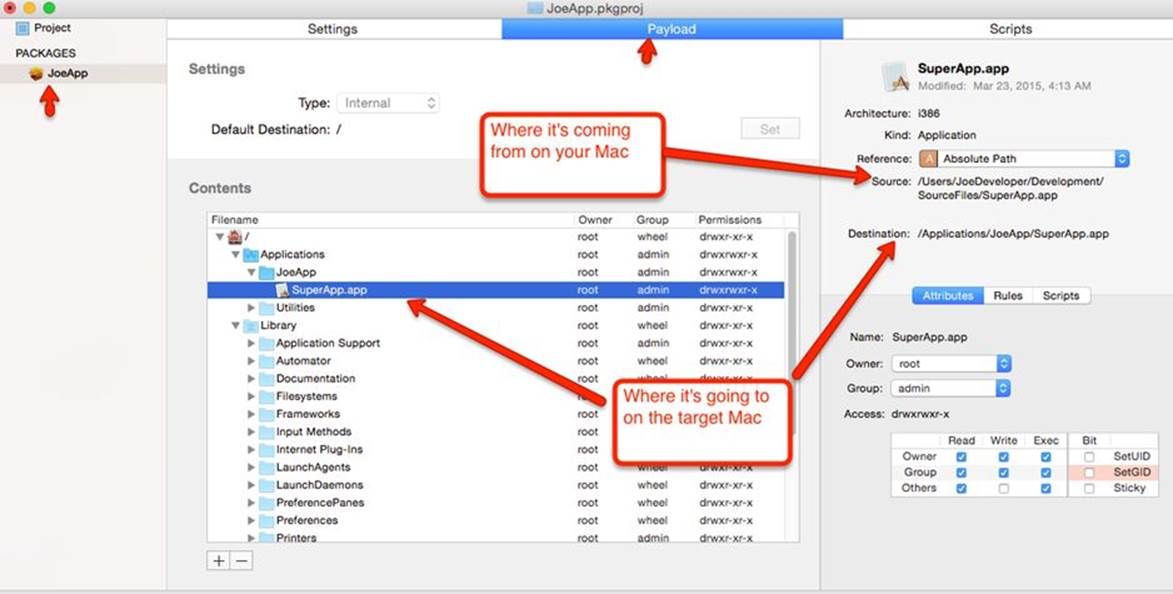
In the graphic above, you can see the source and destination. In this instance, you can see the file source and destination displayed in the Payload hierarchy. You can also see the attributes & permissions. You MUST set these correctly. Remember, you may need to programmatically update the file, or uninstall the file. Don't block those actions by setting permissions wrong.
This is the basic operation of taking files from our Mac, packaging them, and installing to our user's Mac and placing them in the proper location. Packages will be set to produce a flat .pkg file. The user's Mac will run the Installer.app when that package (.pkg) is double-clicked on the user's Mac, and place the files in the proper location. Simple. There's more to Packages that you will learn later.
Library...Library...Library
On Mac, there are several folders with the same name. There's a System Library, a Global Library, and User(s) Library(s). On our hierarchy, we can see the Global Library (near the top), and the System Library near the bottom (click the arrow to expand.) There is a Users folder as well. However, there isn't a folder for either the current user or the Library therein. Our current user's home folder would be a subfolder of Users. The current user for this target computer is unknown, but since the hierarchy represents the target computer, we don't know what that folder would be titled. If we want to place files in the target User folder (or subfolders), we have several ways to accomplish it. I'll explain a way where you can place files in the current user folder and place files elsewhere as well, for example, in Applications.
Open a new project, click on the Users folder in the hierarchy and add a new folder called "Current User." In that folder, you might add a subfolder, Library, and add a subfolder to Library, Application Support. In Application Support, add some files. Save the Project File.
Now open TextEdit (or TextWrangler) and enter the following:
#!/bin/bash
ln -s $HOME /Users/CurrentUser
exit 0
You can find the above file as "Preflightscript.sh" in the Script folder. The above script tells OSX that /Users/CurrentUser should be symbolically linked to $HOME. $HOME is an alias of sorts for the current user's home folder. Files/folders targeted for CurrentUser will show up in the current user's home folder if we tell Packages to run this script Pre-Installation.
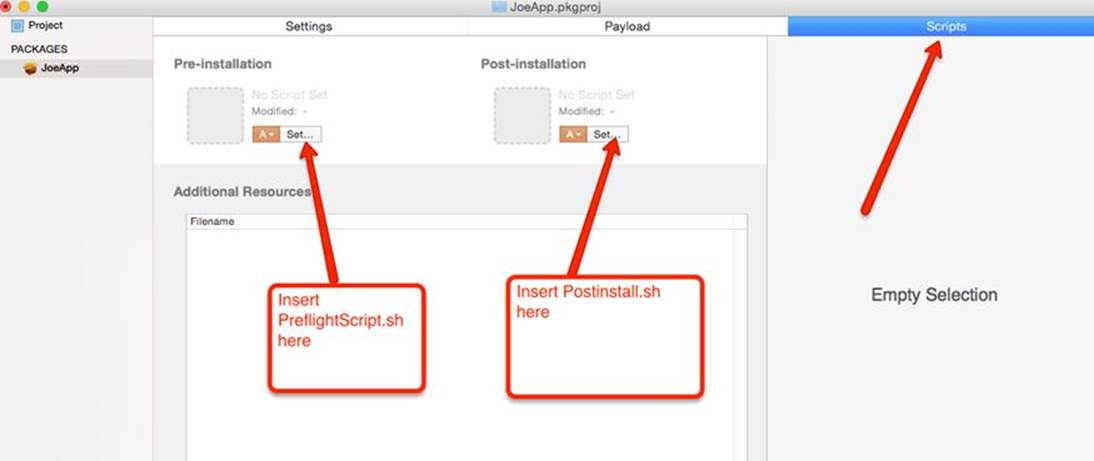
Open your text editor, enter the following. You will find it in the Script folder as postinstall.sh:
#!/bin/bash
bin/rm /Users/CurrentUser
The above script will delete the CurrentUser symbolic link to the users home folder after we're done with it. You run this Post-installation to clean up the leftovers.
To enter these scripts, click on the Script tab, click on one of the Set buttons, and navigate to Users/JoeDeveloper/Development/Scripts folder and set the appropriate shell script file.
Now, you could build and run the project by clicking Build>Build and Run. Using Finder, we could enter Shift-Cmd-G, enter ~/library. This will take us to the current user library. Navigate to Application Support. Find the files we put in our package targeted to be installed there.
There is another way to put files in the User folder using the advanced features of Packages; however, you're limited to ONLY files/folders targeted to the User Home folder. You can't target Applications or other folders. Seehttp://s.sudre.free.fr/Software/Packages/Q&A_3.html for more information.
I hope this chapter provided a brief overview of how to create an installation package using Packages. I will provide a more detailed example later.
All materials on the site are licensed Creative Commons Attribution-Sharealike 3.0 Unported CC BY-SA 3.0 & GNU Free Documentation License (GFDL)
If you are the copyright holder of any material contained on our site and intend to remove it, please contact our site administrator for approval.
© 2016-2026 All site design rights belong to S.Y.A.