Sparrow iOS Game Framework Beginner's Guide (2014)
Chapter 3. Managing Assets and Scenes
In the previous chapter, we drew our first display objects on the screen, which in our case were quads. We made a cardboard puppet doll out of quads and learned how to use macros. There is one last thing we need to know before developing our pirate game. In this chapter, we will learn about managing our assets, such as images, sound, and other kinds of files. We will also learn how to group elements into scenes and display these scenes.
Working with assets
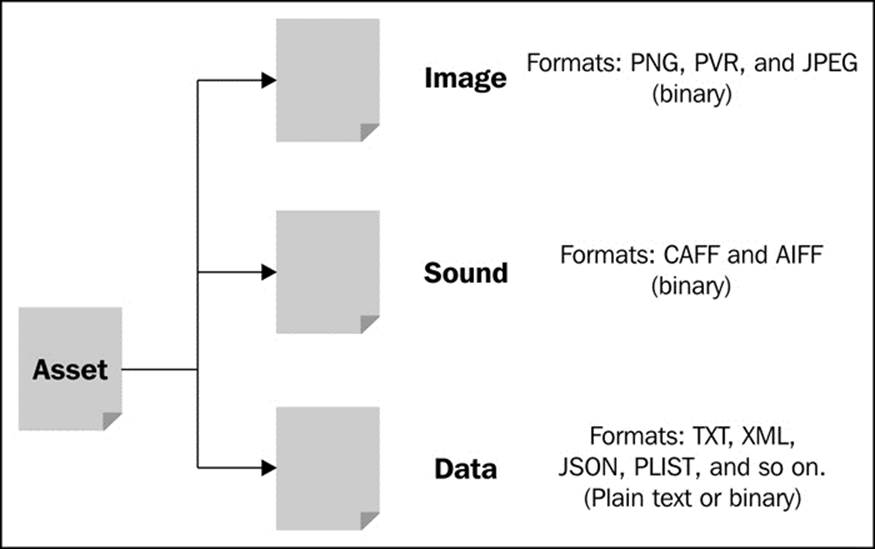
When we develop a game, we load files. We probably load a lot of images too. These images are displayed on the screen and are the graphics of any 2D game.
We will also need to load sound files for playing music and sound effects. Other general purpose files include text files that are either localization or game information files, such as hit points for enemies, attack strength, or similar data that affects the gameplay of the game.
Game-relevant data may include saved games and level data. This gameplay-relevant data may not always be plain text; in some cases, they are binary files or they use a markup language such as XML or JSON. In the iOS and Mac world, the PLIST file format is very common and contains a specialized kind of XML format.
In some games, game engines and game frameworks go a step further when dealing with gameplay-relevant data in order to be more dynamic. They allow scripting through languages such as Lua and JavaScript. These scripts are loaded and executed at runtime.
Managing our assets
Now that we know what assets are, how can we manage them for our game? Before we get to that, let's take a look at what we know so far and what the prerequisites to effectively load assets are.
Firstly, we know that there are different kinds of assets that can either be plain text files or binary.
One thing to keep in mind is the memory in mobile devices nowadays. While it is the same as the memory in desktop devices from a few years back, not all of this is reserved for our application. We should also keep in mind that the size of an asset on the disk may not be the same in memory as it is for compressed files, especially if the file content is compressed on the disk but has to be uncompressed in memory.
Consequently, there are a few things we can do, which are as follows:
· Limit the number of assets we are loading; this can prove difficult as a game can require a high amount of assets
· Limit the number of assets that are currently loaded in memory
· Cache assets that are already loaded so that we don't have the same content in memory two or more times
Let's create a base class that manages a group of assets.
Time for action – creating a base class
To create a base class to manage our assets, we need to use the following steps:
1. Open the Xcode game template if it's not already open, right-click on the Classes folder, select New Group, and rename the group to Assets.
2. Right-click on the Assets group and select New File....
3. Select Objective-C class and click on Next.
4. Enter AssetsDictionary in the name field, select NSObject from the Subclass of entry, and click on Next.
5. On the next dialog, click on Create.
6. Open the AssetsDictionary.h file.
7. Add an instance variable called _dict, which is a pointer to NSMutableDictionary, as shown in the following code:
8. @interface AssetsDictionary : NSObject {
9. NSMutableDictionary *_dict;
}
10. Add a property called verbose, which is of type BOOL, as shown in the following code:
@property BOOL verbose;
11. Add an instance method called registerAsset, as shown in the following code:
-(id) registerAsset:(NSString *)name withContent:(id)content;
12. Add another instance method called unregisterAsset, as shown in the following code:
-(void) unregisterAsset:(NSString *)name;
13. Add a third instance method called clear, as shown in the following code:
-(void) clear;
14. Now switch to AssetsDictionary.m.
15. Add an initializer with the following content:
16.- (id)init
17.{
18. if ((self = [super init])) {
19. _dict = [[NSMutableDictionary alloc] init];
20. _verbose = NO;
21. }
22.
23. return self;
}
24. Implement the registerAsset method with the following piece of code:
25.-(id) registerAsset:(NSString *)name withContent:(id)content
26.{
27. id result;
28.
29. if ([_dict objectForKey:name] == nil) {
30. [_dict setObject:content forKey:name];
31.
32. result = content;
33.
34. if (self.verbose) {
35. NSLog(@"Asset %@ does not exist. Registering.", name);
36. }
37. } else {
38. result = [_dict objectForKey:name];
39.
40. if (self.verbose) {
41. NSLog(@"Asset %@ already exists. Using cached value.", name);
42. }
43. }
44.
45. return result;
}
46. Implement the unregisterAsset method:
47.-(void) unregisterAsset:(NSString *)name
48.{
49. if ([_dict objectForKey:name] != nil) {
50. [_dict removeObjectForKey:name];
51. }
}
52. Implement the clear method that should reset the cache:
53.-(void) clear
54.{
55. [_dict removeAllObjects];
}
56. Switch to the Game.m file.
57. Import the AssetsDictionary.h file in the import section:
#import "AssetsDictionary.h"
58. In the init method, add the following lines:
59.AssetsDictionary* assets = [[AssetsDictionary alloc] init];
60.assets.verbose = YES;
61.[assets registerAsset:@"myAsset" withContent:@"test"];
[assets registerAsset:@"myAsset" withContent:@"test"];
62. Run the example, and you will get the following output:
![]()
What just happened?
In step 1, we opened our Xcode template from where we left off in the previous chapter. Then, we created a new group where we put everything that relates to the management of our assets. Finally, we renamed the newly created group.
In step 2, we created a new file. In step 3, we selected Objective-C class from the dialog that popped up. We wanted the class name to be AssetsDictionary, which is what we entered in step 4; we also confirmed the location where it is going to be saved on the hard drive in step 5.
Next, we opened the header file and an instance variable to store the name and content of an asset. For this, we needed it to be an instance of NSMutableDictionary. Objective-C Cocoa classes such as NSDictionary can be mutable or immutable; the contents of mutable classes can change, and the values of immutable classes are fixed to the values used when declaring the object.
Though we put the interface section in the header, it is also possible to put it right before the implementation section.
In step 8, we added a property called verbose, which is of type BOOL. If this property is set to YES, once an asset is registered, it should write a message telling us whether the asset is already in cache. It is sufficient to say that its default value should be NO so that our console message box is not cluttered with messages.
We needed to define our method that handles the registering and serving of our assets. It takes two parameters: the name of an asset and the content of an asset. It returns the content of the asset. Since the content of the asset can be anything—but is in most cases an instance of some sort—the type id seems like the best option here. The type id can stand for any class instance; if put to a technical term, it's called dynamic typing.
Then, we defined two methods; the first explains how to delete a single asset from the cache (step 10), and the second method explains how to clear all assets (step 11).
Our header file is done; now, let's get to the actual implementation. First off, switch to the AssetsDictionary.m file. In step 13, we added an initializer, which does the following two things for us:
· Set up the _dict dictionary.
· Set the verbose property to NO by using its instance variable _verbose. This is generally not needed as NO is the default value for BOOL.
In the next step, we implemented the registerAsset method. If the key—our first parameter—does not exist in the dictionary, we add it to the dictionary and return the content of the asset. If it exists, we look up the value from the dictionary and return it. In both cases, if the verbose property is set to YES, we will print a fitting message to reflect the current state of the asset.
In step 15, we defined a method that allows us to delete a single asset from the cache. In step 16 on the other hand, we defined a method to clear the complete cache.
Now that the AssetsDictionary class is ready for action, let's put it up for a test. In step 17, we switched to our Game.m file and subsequently imported the AssetsDictionary header in step 18.
Next, within the initializer of our Game class, we defined an instance of our AssetsDictionary class, set the verbose property to YES, and registered the same asset twice to see whether it will be cached correctly. In the last step, we ran the example and looked at the output in the console.
Have a go hero
While this class works for our purposes, we could improve the AssetsDictionary class further. Here are some suggestions:
· When getting the cached value of an asset, we look for the value from the dictionary twice: the first time when checking whether the key is in the dictionary, and the second time when getting the actual value. This may result in a performance penalty when loading the assets into the game if there is a huge amount of assets.
· Try to use NSCache instead of NSMutableDictionary.
· If we want to display progress bars to see how far the loading process currently is, we will need a way to get the number of currently registered assets.
· We can also have an exists method that checks whether an asset has already been registered and returns the result of this check.
· We can add more initializers that take NSDictionary, for example.
Creating a texture manager
When we load an image in Sparrow, we typically want it to be a texture. A texture is pixel information that makes up an image. It's conceptually similar to how the BitmapData class works in ActionScript 3. If we want it to be displayed on the screen, it needs to be put on a geometrical representation, which is typically a quad.
The way we want our texture manager to work is to pass in a filename, which will be converted to a texture and is then available to us.
Let's use AssetsDictionary for our texture manager.
Time for action – managing our textures
To create our texture manager, take a look at the following steps:
1. Add a new Objective-C class called TextureManager derived from AssetsDictionary within the Assets group.
2. Add an instance method that will register a texture using its filename and return the correct value, which is the following:
-(SPTexture *) registerTexture:(NSString *)filename;
3. Switch to TextureManager.m and implement the method with the following content:
4. -(SPTexture *) registerTexture:(NSString *)filename
5. {
6. if ([_dict objectForKey:filename] == nil) {
7. return (SPTexture *) [self registerAsset:filename withContent:[SPTexture textureWithContentsOfFile:filename]];
8. } else {
9. return (SPTexture *) [self registerAsset:filename withContent:nil];
10. }
}
11. Switch to the Game.m file, and replace the AssetsDictionary.h import with the TextureManager.h file in the import section.
12. In the init method, replace the AssetsDictionary test we did earlier in the chapter with the following lines:
13.TextureManager* textureAssets = [[TextureManager alloc] init];
14.textureAssets.verbose = YES;
15.[textureAssets registerTexture:@"Default.png"];
[textureAssets registerTexture:@"Default.png"];
16. Run the example, and you will get the following output:
![]()
What just happened?
In the first step, we created a TextureManager class, which is a subclass of AssetsDictionary. In step 2, we defined the registerTexture instance method, which we implemented in the next step. A lot happened in this one line, explained as follows:
1. We created an instance of SPTexture with the contents of the filename.
2. We registered this instance to utilize registerAsset we implemented earlier.
3. We returned the result of the called method.
4. Since the result is of the type id, we cast it to SPTexture— the type we want.
Now, we go ahead and switch to the Game.m file. We replace the line #import "AssetsDictionary.h" with #import "TextureManager.h".
Then, we delete the example where we tested out the registerAsset method from AssetsDictionary. After this, we set up the same test; however, this time we use the TextureManager class and the registerTexture method. We load the Default.png file, which is in theResources folder and is currently just a black image. The Default.png file is part of the original Sparrow barebone template.
When we run the example, it loads the image from file the first time, and then it uses the cached result.
Creating a sound manager
Now that we have the texture manager, let's create the sound manager that is going to be very similar to the previous piece of code.
Time for action – implementing a sound manager
To implement the sound manager, just follow these simple steps:
1. Add a new Objective-C class called SoundManager derived from AssetsDictionary within the Assets group.
2. Add an instance method that will register a sound using its filename and return the correct value, as shown in the following code:
-(SPSound *) registerSound:(NSString *)filename;
3. Implement the method from the previous step with the following content:
4. -(SPSound *) registerSound:(NSString *)filename
5. {
6. if ([_dict objectForKey:filename] == nil) {
7. return (SPSound *) [self registerAsset:filename withContent:[SPSound soundWithContentsOfFile:filename]];
8. } else {
9. return (SPSound *) [self registerAsset:filename withContent:nil];
10. }
}
What just happened?
In the first step, we created a SoundManager class, which is a subclass of AssetsDictionary. In step 2, we defined the registerSound method, which we implemented in the next step; this method loads a sound from file and returns the result of the registered asset.
It is very similar to TextureManager, but instead of a texture and SPTexture, we loaded a sound using SPSound.
For now, this is all we will do for sounds and sound management since we don't have any sound assets to load.
Creating a file manager
Now, we almost have a manager for all kinds of assets we want to use. The last thing we need is a manager for our data. We know that data assets can be pretty much anything, so we need to descope the use case for managing data assets. Let's take a look at what we'll need right now:
· Loading a plain text file is always a useful piece of functionality. It could contain game texts or a basic level layout.
· NSDictionary and NSMutableDictionary are classes we already used and will be using to store data. How about we load a file and its content is converted to a structure similar to that of NSDictionary? The JSON format is very similar to a structure we find inNSDictionary, and luckily, since iOS 5, we have the means of converting a JSON file into NSDictionary without needing any third-party libraries.
Time for action – managing remaining file types
To create an asset manager for our files, use the following steps:
1. Add a new Objective-C class called FileManager, which is derived from AssetsDictionary within the Assets group.
2. Define an instance method called registerPlainText, as shown in the following code:
-(NSString *) registerPlainText:(NSString *)filename;
3. Define another instance method called registerDictionaryFromJSON, as shown in the following code:
-(NSDictionary *) registerDictionaryFromJSON:(NSString *)filename;
4. Implement the registerPlainText method with the following content:
5. if ([_dict valueForKey:filename] == nil) {
6. NSString *path = [[NSBundle mainBundle] pathForResource:filename];
7. NSString *content = [NSString stringWithContentsOfFile:path encoding:NSUTF8StringEncoding error:nil];
8.
9. return (NSString *) [self registerAsset:filename withContent:content];
10.} else {
11. return (NSString *) [self registerAsset:filename withContent:nil];
}
12. Implement the registerDictionaryFromJSON method with the following content:
13.if ([_dict valueForKey:filename] == nil) {
14. NSString *path = [[NSBundle mainBundle] pathForResource:filename];
15.
16. NSData *data = [NSData dataWithContentsOfFile:path];
17. NSDictionary *dict = [NSJSONSerialization JSONObjectWithData:data options:kNilOptions error:nil];
18.
19. return (NSDictionary *) [self registerAsset:filename withContent:dict];
20.} else {
21. return (NSDictionary *) [self registerAsset:filename withContent:nil];
}
22. Add the example.json file to the Resource folder by right-clicking on the Resources folder and selecting New File.... Select Other from the tab and create an empty file. Fill it with the following content:
23.{
24. "name": "example",
25. "a": 5,
26. "b": 6
}
27. Now, add example.txt to the Resource folder, which has the following content:
Hello from text file.
28. Now that all of our data and the FileManager class is set up, let's give it a spin. Switch to Game.m, remove the pieces of code that tested our previous asset managers, and import the FileManager header file.
29. Add the following piece of code to the initializer method:
30.FileManager* fileAssets = [[FileManager alloc] init];
31.fileAssets.verbose = YES;
32.NSDictionary *data = [fileAssets registerDictionaryFromJSON:@"example.json"];
33.
34.NSLog(@"Printing values from dictionary:");
35.NSLog(@"%@", data[@"name"]);
36.NSLog(@"%@", data[@"a"]);
37.NSLog(@"%@", data[@"b"]);
38.
39.NSLog(@"Loading from text file and displaying as a string:");
40.NSLog(@"%@", [fileAssets registerPlainText:@"example.txt"]);
NSLog(@"%@", [fileAssets registerPlainText:@"example.txt"]);
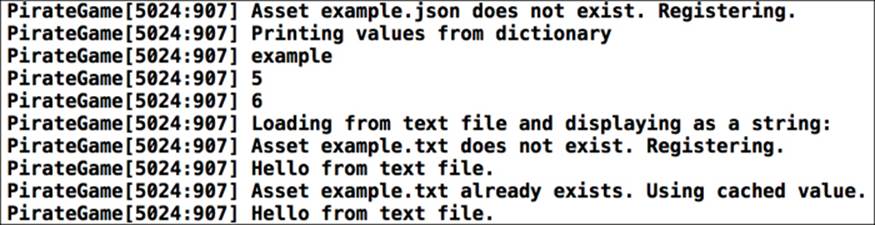
41. Run the example, and see the following output:
What just happened?
In the first step, we created a FileManager class, which is a subclass of AssetsDictionary.
In the next two steps, we defined two instance methods: one for loading plain text files and another for loading JSON files.
In step 4, we implemented the registerPlainText method. We could have put it all in a one liner, but that would make it a bit cramped and harder to read. So, if the asset was registered, we returned it using the registerAsset method. We don't need to pass in content this time as the content is already in the dictionary. If it is not registered, we need the path to the filename first. Like every resource we want to load from the Resource folder, without the help of third-party libraries, we need to get the exact file location. The[[NSBundle mainBundle] pathForResource] method gives us the exact file location if we pass a filename. The main bundle represents the application bundle of the current app. In the next line, we loaded the file into an NSString, and the encoding is UTF-8. We then returned the result that had been passed through the registerAsset method.
In the next step, we implemented the registerDictionaryFromJSON method that works pretty much in the same way as the registerPlainText method. However, instead of loading the file into an NSString, we used an NSData object. We then converted the file contents through the NSJSONSerialization class, which offers the JSONObjectWithData method. We don't really need to pass in any kind of special options right now.
We added an example.json file, which has one key that is a string value and two keys that have number values. In a JSON structure, a key has to be written in double quotes and is a string. A value can either be an array, a string, a number, a Boolean, a null, or an object. If a value is an object, it can have keys and values by itself. So, it can map the structure of NSDictionary pretty well.
Note
For more information on the JSON format, take a look at http://json.org/.
In the next step, we added an example.txt file and added some content.
In step 8, we removed all pieces of code from the previous example and imported the FileManager header file. We set up the file manager like how we did in the previous example. We then called the registerDictionaryFromJSON method with example.json as its parameter. We already know that we can access values from an NSDictionary instance through the objectForKey method, but we can also use the square bracket notation, which is more terse and easier to read. Just keep in mind that the square bracket notation for keys requires an NSString instance. Values, on the other hand, can be any object or @ literal such as @YES, @1, or @"MyValue". Then, we loaded the example.txt file and displayed it using NSLog.
When we ran the example, we saw when and how the assets were being loaded and the results of the loaded assets.
Our FileManager.h file will look like the following:
#import "AssetsDictionary.h"
@interface FileManager : AssetsDictionary
-(NSString *) registerPlainText:(NSString *)filename;
-(NSDictionary *) registerDictionaryFromJSON:(NSString *)filename;
@end
Our FileManager.m file will look like the following:
#import "FileManager.h"
@implementation FileManager
-(NSString *) registerPlainText:(NSString *)filename
{
if ([_dict valueForKey:filename] == nil) {
NSString *path = [[NSBundle mainBundle] pathForResource:filename];
NSString *content = [NSString stringWithContentsOfFile:path encoding:NSUTF8StringEncoding error:nil];
return (NSString *) [self registerAsset:filename withContent:content];
} else {
return (NSString *) [self registerAsset:filename withContent:nil];
}
}
-(NSDictionary *) registerDictionaryFromJSON:(NSString *)filename
{
if ([_dict valueForKey:filename] == nil) {
NSString *path = [[NSBundle mainBundle] pathForResource:filename];
NSData *data = [NSData dataWithContentsOfFile:path];
NSDictionary *dict = [NSJSONSerialization JSONObjectWithData:data options:kNilOptions error:nil];
return (NSDictionary *) [self registerAsset:filename withContent:dict];
} else {
return (NSDictionary *) [self registerAsset:filename withContent:nil];
}
}
@end
Have a go hero
Our file manager works exactly like we want it to work. There is one little problem if we want to load the same asset as plain text and convert it to NSDictionary from a JSON file. Since we only use a single dictionary for all the file elements, if we load an asset with theregisterDictionaryFromJSON method first and later load the same asset with the registerPlainText method, we will get NSDictionary converted into an NSString instead of the text file directly being loaded and added to the dictionary as an NSString.
Basic error handling
For the file manager, we haven't set up any error handling. So, if a file does not exist, the application will probably crash and we will be left guessing why nothing is happening, without any clue how to proceed. For now, we will add some error handling to theregisterPlainText method.
Time for action – getting started with basic error handling
To add some basic error handling, take a look at the following steps:
1. Open the FileManager.m file.
2. Update the registerPlainText method to match the following piece of code:
3. -(NSString *) registerPlainText:(NSString *)filename
4. {
5. if ([_dict valueForKey:filename] == nil) {
6. NSError *error;
7.
8. NSString *path = [[NSBundle mainBundle] pathForResource:filename];
9. NSString *content = [NSString stringWithContentsOfFile:path encoding:NSUTF8StringEncoding error:&error];
10.
11. if (error != nil) {
12. NSLog(@"Error while loading plain text file: %@", error);
13. }
14.
15. return (NSString *) [self registerAsset:filename withContent:content];
16. } else {
17. return (NSString *) [self registerAsset:filename withContent:nil];
18. }
}
What just happened?
While try-catch blocks are available in Objective-C, it's generally not a good idea to use them as they are quite slow and they can become quite difficult to handle if they are too nested.
The first thing we need is an error object that is a pointer to NSError. When loading the text file, we apply the error handling. If there are any errors when loading the file, the error object is not nil anymore. If this is the case, we log the error.
Have a go hero
This is the most basic error handling at the moment. Here are some suggestions on how to improve it:
· Catch the case if a JSON file cannot be loaded
· Catch the case if an invalid JSON file is being processed
· Add an NSError parameter to register the assets in the file manager
Putting it all together
We now have a couple of different asset managers. It's time to put it all together so that we don't have to instantiate the different managers when we want to use an asset.
Time for action – creating an asset container class
To put all of our asset managers into one single class, use the following steps:
1. Add a new Objective-C class called Assets derived from NSObject within the Assets group.
2. Define a static method for each kind of asset, as shown in the following code:
3. +(SPTexture *) texture:(NSString *)filename;
4. +(SPSound *) sound:(NSString *)filename;
5. +(NSString *) plainText:(NSString *)filename;
+(NSDictionary *) dictionaryFromJSON:(NSString *)filename;
6. In the Asset.m file, import all asset managers, as shown in the following code:
7. #import "TextureManager.h"
8. #import "SoundManager.h"
#import "FileManager.h"
9. For each manager, add a static variable with the appropriate type and set its values to nil:
10.static TextureManager *textureAssets = nil;
11.static SoundManager *soundAssets = nil;
static FileManager *fileAssets = nil;
12. We need to overwrite the internal static initialize method. Use the following piece of code:
13.+(void) initialize
14.{
15. if (!textureAssets) {
16. textureAssets = [[TextureManager alloc] init];
17. }
18.
19. if (!soundAssets) {
20. soundAssets = [[SoundManager alloc] init];
21. }
22.
23. if (!fileAssets) {
24. fileAssets = [[FileManager alloc] init];
25. }
}
26. Implement each of the static methods by using the correct instance method from each of the asset managers, as shown in the following code:
27.+(SPTexture *) texture:(NSString *)filename
28.{
29. return [textureAssets registerTexture:filename];
30.}
31.
32.+(SPSound *) sound:(NSString *)filename
33.{
34. return [soundAssets registerSound:filename];
35.}
36.
37.+(NSString *) plainText:(NSString *)filename
38.{
39. return [fileAssets registerPlainText:filename];
40.}
41.
42.+(NSDictionary *) dictionaryFromJSON:(NSString *)filename
43.{
44. return [fileAssets registerDictionaryFromJSON:filename];
}
45. Switch to the Game.m file and update the previous example to use the static Assets class:
46.NSDictionary *data = [Assets dictionaryFromJSON:@"example.json"];
47.
48.NSLog(@"Printing values from dictionary:");
49.NSLog(@"%@", data[@"name"]);
50.NSLog(@"%@", data[@"a"]);
51.NSLog(@"%@", data[@"b"]);
52.
53.NSLog(@"Loading from text file and displaying as a string:");
54.NSLog(@"%@", [Assets plainText:@"example.txt"]);
NSLog(@"%@", [Assets plainText:@"example.txt"]);
55. Run the example. When we check the console, we should see something like what's shown in the following screenshot:

What just happened?
In the first step, we created an Assets class, which is a subclass of NSObject.
We defined a static method for each of the asset manager instance methods, such as texture for registerTexture and sound for registerSound. Then, we proceeded to the implementation part.
For each asset manager, we defined a static variable: textureAssets for our TextureManager class, textureSounds for our SoundManager class, and so on. We set these instances to nil.
We had overridden the internal NSObject initialize method, which is called once internally and does not need to be called by us.
Note
More information about how the initialize method of NSObject works can be found in the Apple documentation athttps://developer.apple.com/library/mac/documentation/cocoa/reference/foundation/classes/NSObject_Class/Reference/Reference.html#//apple_ref/occ/clm/NSObject/initialize.
In the initialize method, we allocated and initialized each of the instances if its value was nil.
When implementing each of the static methods in the next step, we needed to call the corresponding instance method, such as [textureAssets registerTexture:filename] for the texture method, and we should not forget that we had to return the value of the instance method.
To use the static Assets class in our game file, we needed to update the reference to the header file and use the dictionaryFromJSON and plainText methods from the static class.
When we ran the example, we saw an output similar to the previous example, where we loaded files through the FileManager, but in this case we didn't have any message about the assets' statuses as the verbose flag was not set to YES.
Our Assets.h file will look like the following:
#import <Foundation/Foundation.h>
@interface Assets : NSObject
+(SPTexture *) texture:(NSString *)filename;
+(SPSound *) sound:(NSString *)filename;
+(NSString *) plainText:(NSString *)filename;
+(NSDictionary *) dictionaryFromJSON:(NSString *)filename;
@end
Our Assets.m file will look like the following:
#import "Assets.h"
#import "TextureManager.h"
#import "SoundManager.h"
#import "FileManager.h"
static TextureManager *textureAssets = nil;
static SoundManager *soundAssets = nil;
static FileManager *fileAssets = nil;
@implementation Assets
+(void) initialize
{
if (!textureAssets) {
textureAssets = [[TextureManager alloc] init];
}
if (!soundAssets) {
soundAssets = [[SoundManager alloc] init];
}
if (!fileAssets) {
fileAssets = [[FileManager alloc] init];
}
}
+(SPTexture *) texture:(NSString *)filename
{
return [textureAssets registerTexture:filename];
}
+(SPSound *) sound:(NSString *)filename
{
return [soundAssets registerSound:filename];
}
+(NSString *) plainText:(NSString *)filename
{
return [fileAssets registerPlainText:filename];
}
+(NSDictionary *) dictionaryFromJSON:(NSString *)filename
{
return [fileAssets registerDictionaryFromJSON:filename];
}
@end
Before we continue with scene management, let's take a look at how we can use the static Assets class when displaying an image.
Time for action – displaying an image
To display an image, we just need to follow these steps:
1. Inside the Game initializer method, add the following piece of code:
SPImage* image = [SPImage imageWithTexture:[Assets texture:@"Default.png"]];
2. At the bottom of the initializer method, add the image to the display tree of the Game class.
3. Run the example, and you will see the following:

What just happened?
As we already know, we need the SPImage class to display a texture. It can be compared to SPQuad, but instead of just displaying a color, it displays the texture on itself. We used the Assets class to get our Default.png image from the Resources folder.
In the next step, we added the image to the display tree of our game class using the addChild method. Running the example we should see that our cardboard puppet doll is not visible anymore because the black image we just loaded is displayed on top of the cardboard puppet doll.
Our Game.m file should have the following content:
#import "Game.h"
#import "Assets.h"
@implementation Game
- (id)init
{
if ((self = [super init]))
{
Sparrow.stage.color = 0xffffff;
SPImage* image = [SPImage imageWithTexture:[Assets texture:@"Default.png"]];
NSDictionary *data = [Assets dictionaryFromJSON:@"example.json"];
NSLog(@"Printing values from dictionary:");
NSLog(@"%@", data[@"name"]);
NSLog(@"%@", data[@"a"]);
NSLog(@"%@", data[@"b"]);
NSLog(@"Loading from text file and displaying as a string:");
NSLog(@"%@", [Assets plainText:@"example.txt"]);
NSLog(@"%@", [Assets plainText:@"example.txt"]);
// Our whole cardboard puppet doll code here
[self addChild:image];
}
return self;
}
@end
Have a go hero
Now that our asset management system is done, let's discuss a few ways in which we can improve the setup, which are:
· Right now, if we pass text files into the texture manager, it may load, but it may lead to unexpected results once we try to display the texture on the screen. We can check for the file extension and only load the asset if it has the correct file extension.
· If we go one step further, we can try to automatically detect which asset we want to load by its mime type or, if that's not enough, we can try to detect the file format through the magic byte.
· We tested for the functionality of our asset manager, but if we want more thorough tests, we may want to resort to unit tests.
What are scenes?
In a typical game, we have a main menu, an options menu, possibly a credits screen, and of course the game itself. We can have all this in a single file, but that will become difficult to maintain after a while. So, it will be a good idea to group these elements into separate entities, which in our case are scenes.
In games that depend on having a lot of levels, such as point'n'click games, it's also a good idea to have scenes for each level.
Time for action – implementing a scene class
To create a scene class, use the following steps:
1. Create a new group called Scene.
2. Create a new Objective-C class called Scene, which is derived from the SPSprite class, and save it in the Scene group.
3. Add a property called guiLayer, which is a SPSPrite type, as shown in the following code:
@property SPSprite* guiLayer;
4. Add another property called name, which is an NSString, as shown in the following code:
@property NSString* name;
5. Add a third property called director, which is an id, as shown in the following code:
@property id director;
6. Add an initializer that initializes the properties of the class:
7. -(id) init
8. {
9. if ((self = [super init])) {
10. self.guiLayer = [[SPSprite alloc] init];
11. self.director = nil;
12. self.name = @"scene";
13. }
14.
15. return self;
}
16. Add a second initializer that sets the name of the scene; this should be called initWithName:
17.-(id) initWithName:(NSString *) name
18.{
19. self = [self init];
20. self.name = name;
21.
22. return self;
}
What just happened?
Right now, we don't have any scenes, so we can't run the example just yet.
Firstly, we set up the Scene class, which needs to be a subclass of SPSprite because it needs to be added somewhere and we want to allow all kinds of display objects to be added to the scene instance.
We defined three properties; guiLayer should be the sprite where all our user interface-relevant display objects will be added, name should be the name of the scene itself, and director should be the reference to its parent object. In the init method, we set default values for these properties. We also added a second initializer, which takes a parameter that sets the name of the scene.
Creating a scene director
Now that we have a basic scene class, we need something that can actually manage all the scenes we want to add.
Time for action – managing our scenes with a scene director
To create the scene director, take a look at the following steps:
1. Create a new Objective-C class called SceneDirector, which is derived from the SPSprite class, and save it in the Scene group.
2. Add an instance variable called _dict, which is an NSMutableDictionary type.
3. Add an instance method that will add a scene to the scene director, as shown in the following code:
-(void) addScene:(Scene *)scene;
4. Add a second instance method that will add a scene, but this time you are also able to define/overwrite the name of the scene:
-(void) addScene:(Scene *)scene withName:(NSString *)name;
5. Add an instance method that will show a scene and take NSString as its parameter, as shown in the following code:
-(void) showScene:(NSString *)name;
6. Let's switch to the implementation. The initializer should initialize the _dict variable.
7. Implement the addScene:(Scene *)scene withName:(NSString *)name method with the following piece of code:
8. -(void) addScene:(Scene *)scene withName:(NSString *)name
9. {
10. scene.name = name;
11. _dict[name] = scene;
12.
13. scene.director = self;
14. [self addChild:scene];
}
15. The addScene:(Scene *)scene method should be implemented as shown in the following code:
16.-(void) addScene:(Scene *)scene
17.{
18. [self addScene:scene withName:scene.name];
}
19. The showScene method should have the following content:
20.-(void) showScene:(NSString *)name
21.{
22. for (NSString* sceneName in _dict) {
23. ((Scene *) _dict[sceneName]).visible = NO;
24. }
25.
26. if (_dict[name] != nil) {
27. ((Scene *) _dict[name]).visible = YES;
28. }
}
What just happened?
In the first step, we created the class needed for the scene director. This needs to be a SPSprite because we want an instance of it to be added to the Game class, and the scenes that the scene director should mange can be added very easily to the scene director.
We defined two instance methods that add a scene: the first method takes the scene, and the second method takes the scene and a name.
We also needed an instance that actually shows the scene; it takes a name as its parameter.
In the next step, we implemented the initializer of the scene director. We needed to initialize our NSMutableDictionary. We can do this using the typical alloc-and-init combination or, alternatively, with the more terse @{} notation.
We implemented the longer addScene method first; we set the scene name to the name parameter. This overwrites the scene name, even if one has already been given. We then added the scene to the dictionary, using the square bracket notation which does the same work as [_dict setObject:scene forKey:name]. In the next line, we set the reference of the director property within a scene to the current scene director instance. This is needed; in any other case, we wouldn't have an option to switch from one scene to another within a scene. We also add the scene to the display tree of the current SceneDirector instance.
When implementing the shorter addScene, we can just call the longer addScene method and pass it in the name from the current scene as its second parameter.
The last step is all about showing the scene that has been specified as the parameter. First, we iterated through all elements in the dictionary, and set its visibility to NO so it won't show up on the screen; yes, even the scene we want to show. Then, we specifically looked for our scene in the dictionary and set its visibility to YES.
Have a go hero
Currently, we are loading all our scenes at once. This works for now, but as soon as we have a lot of scenes, we may be short on memory. To counteract this behavior, we can just have one scene in the memory at the same time. We may need to have a reference from our asset to our scene so that we know which asset belongs to which scene.
Pop quiz
Q1. Can a binary data file be considered as an asset?
1. Yes
2. No
Q2. Why should we primarily cache our assets in order to reuse already loaded assets?
1. To reduce CPU cycles
2. To save memory
3. To save disk space
Q3. Can a texture (as in SPTexture) be drawn to the screen directly?
1. Yes
2. No
Summary
We learned a lot about asset and scene management in this chapter.
Specifically, we covered how to handle different kinds of assets, cache already loaded files, and implement scenes and mechanisms to manage these scenes.
We also touched on some topics such as textures and displaying an image on the screen.
Now that we know how to handle assets and scenes, we're ready to add the basics of our game—which is the topic of the next chapter.