Swift For Dummies (2015)
Part IV. Using Components and Subcomponents
Chapter 16. Using Properties, Variables, Outlets, and Actions
In This Chapter
![]() Using properties to store values
Using properties to store values
![]() Adding interface outlets
Adding interface outlets
![]() Connecting an action to a button
Connecting an action to a button
In Chapter 15, you see how to declare classes (and, along with them, the basics of enumerations and structures that share many of the class features except for inheritance). In this chapter, the focus is on properties and variables, which are where your data is stored, as well as on outlets and actions, which are the user interface elements of your app. (Most of the time, outlets and actions are created in storyboards and the links between the graphical user interface of a storyboard and your Swift code consist of outlets and actions.)
You’ve seen these elements in action in other chapters, but now it’s time to focus on the details.
The code for this chapter can be downloaded as described in the Introduction. Just as a reminder, it’s the Locatapp based on the Master-Detail Application template. Its basic functionality lets the user create new event locations with the + at the top right of the master detail view controller. The user’s location is shown on the detail view controller. The screenshots in this chapter show the app running on an iPhone 6 Plus in landscape mode.
Figure 16-1 shows the basic app interface as it is at the end of Chapter 15. Starting from that image, this chapter explores the properties, variables, outlets, and actions that make it happen.
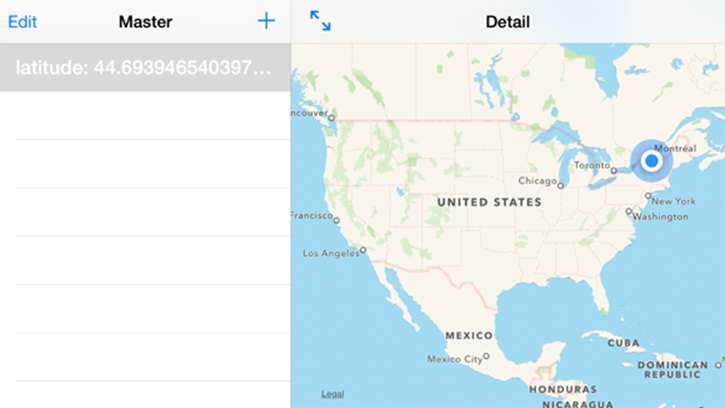
Figure 16-1: Locatapp on the iOS Simulator for iPhone 6 Plus.
Understanding Properties and Variables
The best way to understand properties and variables in Swift is to review a quick summary of the related topics in Objective-C. If you are familiar with Objective-C, you’ll find that the Swift structure is much simpler. Certain aspects of the Swift syntax refer to Objective-C syntax, so that even if you are only using Swift, as long as you are using the Cocoa Touch or Cocoa framework (or the Xcode templates or the developer.apple.com examples), you should be aware of Objective-C’s syntax, if only in order to see why the structure has evolved to what it is today.
The structure of properties and variables is powerful and flexible, and it reflects several stages in the evolution of object-oriented programming in general and Objective-C in particular.
Feel free to skip or skim the following section, but if anything confuses you about the structure of properties or variables in Swift, come back to it for a quick read to catch yourself up on the evolution of properties and variables that you deal with in Swift today.
Encapsulating Data for Good Design and Maintainability
Consider the concept of encapsulation, an important concept of object-oriented programming. The idea behind encapsulation is that objects should be opaque: You should not be able to tell what’s inside an app’s data, what functionality it contains, or what operations it carries out. Doing this makes your objects flexible and reusable.
This concept has proven its value over the years. The original architecture of Objective-C consisted of frameworks of objects (although the word “framework” was not used at the beginning). The objects were opaque so that software engineers couldn’t look inside them (or, at least, they weren’t supposed to). An object named (say) myObject, was assumed to have some data — perhaps called data — and this data itself was off-limits to developers. Instead of accessing the data directly, developers learned to send a message to myObject to obtain its data. By convention, the message would be named objectData and would cause myObject to return the data of myObject.
If you look closer at this design, myObject is the class; objectData is the name of the function or method that serves as a getter. Another method called (by default) setObjectData is the setter. The setter takes a single parameter (typically called (newObjectData). You would only accessobjectData using either objectData to get it or setObjectData to set or update it. One interesting and useful consequence of this design is that objectData (the data stored by myObject) need not exist at all. The accessors (objectData and setObjectData) can work with dynamic data that may never actually be stored. With encapsulation like this, you would never need to know whether or not the data is stored or calculated on the fly. All you need to know is that myObject gets data for you with objectData and takes data from you with setObjectData. As long as both accessors work, whether it's calculated on the fly, stored in a database, or even stored on the moon doesn't matter: myObject encapsulates its data.
Other languages would allow you to access the data directly using some syntax such as myObject.objectData, but because the actual reference to the data in this case would be myObject.objectData() — a method or function call (note the parentheses at the end) — encapsulation is complete.
 In this section, method and function are used synonymously.
The hypothetical syntax shown in the previous paragraphs is a generic version of modern syntax or “dot syntax” used in Objective-C from the late 1990s onward. Using the original style of Objective-C (sometimes called the message format) the way to send the objectData message tomyObject would be with code like this: [myObject objectData].
Creating and preserving encapsulation became an important part of Objective-C development. It is true that encapsulation preserves many of the powerful features of Objective-C and makes reusing code much easier, but in some cases, encapsulation can be a bit more complicated to write and sometimes takes more resources to execute.
Thus, although the structure isn’t particularly complicated, storing, retrieving, and setting a variable’s value requires three elements.
The components of this structure are:
· an actual variable or code to compute it (this is all invisible to you)
· a getter method to get the value of the variable (this is visible to you)
· a setter method to set the value of the variable (this is visible to you)
In Objective-C 2 (released in 2007), named properties were introduced. They provide a way of simplifying this structure, but they are totally compatible with it. A named property has a format such as this:
@property (strong, nonatomic) id detailItem;
@property (weak, nonatomic) IBOutlet
UILabel *detailDescriptionLabel;
The property begins with the compiler directive @property followed by memory and usage attributes in parentheses, such as strong, weak, readonly, and nonatomic — the specific meanings don’t matter at this point.
Following the parenthesized attributes are the type of the property and then its name. For object types, a pointer is used. The class type id is not a pointer. Again, the details don’t matter at this point.
What does matter is that with a property declaration, the compiler is able to automatically declare and create a backing variable, which is the variable itself where the data is stored. It also is able to create a getter and a setter using the conventions described previously (the getter is the name of the variable and the setter is setMyVariable).
 Several conventions come into play here. Variable names start with a lowercase letter. If the variable name consists of multiple words, words after the first begin with capital letters (this is called camelCase). Methods and functions start with lowercase letters; classes start with uppercase letters. The conventions meet up in the name of a setter. Consider a variable called myVariable whose setter is called setMyVariable. This conforms to the convention that methods start with lowercase letters, and it also conforms to the camelCase convention. However, because the meeting of these two conventions might suggest the name setmyVariable, camelCase overrides other conventions.
Thus, named properties reduce the amount of typing required to use properties by having the compiler do the work of creating the getter and setter accessors and of creating the backing variable.
In some cases, developers have needed more control over matters. The two most common cases of this were the following:
· When a developer needs a backing variable to have a certain name and needs to be able to access it directly.
· When the setter or the getter needs to do more than just set or get the value of a variable.
Here’s where complexity starts to come in.
The automated property synthesizer synthesizes a backing variable with the property name preceded by an underscore. Thus, the default backing variable for myProperty is _myProperty. (You can set this as an option in the property declaration.)
You can also write your own accessors. It is common to have them perform additional tasks above and beyond their simple accessor roles. One of the most common of these tasks is establishing a database connection so that a getter can obtain a previously stored value for its property.
There are many other variations on this structure (including properties that have no backing variables but rely simply on a getter to compute or retrieve a value on as-needed basis). And, just to complete this part of the picture, you can mix and match properties with traditional variables (naked variables are not part of a declared property).
A lot of the arguments against the use of named properties (and they have been bitter) center around the fact that accessing a named properties value in the backing variable requires more machine resources than just accessing a memory location. With today’s computers — even in mobile devices — this may seem like an extreme reaction, but it has been common in some circles.
This, then, is the world of properties and variables that Swift addresses. Whether all of its complexities and combinations are necessary is worth discussing: All have found uses in apps and even in the Apple frameworks that make up Cocoa and Cocoa Touch.
There is another layer of complexity with regard to the declarations of properties and variables. Most declarations in classes of Objective-C code are placed in a header file in the @interface section. (By convention, this file is named with a .h after the class name.)
Fairly recently (in the late 2000s) it became commonplace to add a second @interface section in the format of a class extension in the main body of the class file (the file with the .m extension). Declarations in the header file can be grouped into sections with various access — public,private, and protected. public and private interfaces are just that. protected interface elements are visible to the class itself and to any of its subclasses.
Finally, inside the main file (the .m extension file), you can access the backing variable by using its name, as in _myBackingVariable. This bypasses the use of the getter and saves a few machine cycles. It also can side-step any additional processing that the getter does; this convention can be very useful.
This is the background of properties and variables in Objective-C and now in Swift. You’ll see pieces of this architecture in the Swift architecture that is described next.
Understanding Properties and Variables in Locatapp
Just as Chapter 15 focused on DetailViewController because its interface is brief, this chapter focuses on MasterViewController because its implementation is varied enough to demonstrate different aspects of properties and variables in Swift.
Figure 16-2 shows part of MasterViewController.swift. You’ll notice that the jump bar’s list of elements within the file has been expanded. It shows classes (prefixed by C), properties (prefixed by P) and methods (prefixed with M). They are shown in their order in the file.
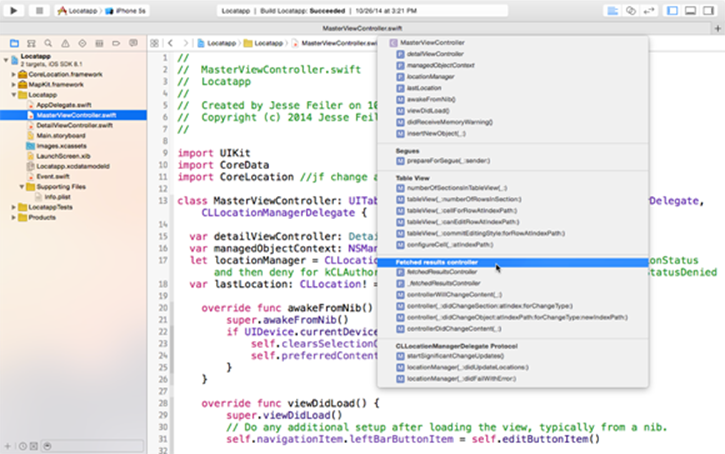
Figure 16-2: Exploring the properties and methods in a class.
The file itself is broken into sections which are shown in the list of properties and methods. This is done with comments such as:
// MARK: - Segues
 It is a good idea to organize your files in this way. Note that how you categorize properties and methods is up to you — there often is more than one way of doing so. Don’t let that deter you from organizing your methods and properties — almost any logical organization is better than none.
Here are the property declarations in sequence as shown in Figure 16-2. In the template, they tend to run from simpler to more complex. Properties in the drop-down list from the jump bar are italicized as well as being marked with a P.
First, there are two properties consisting of a variable (var). The first and second are optionals (note the ? at the end of the type); because they are optionals, they can be initialized to nil, which is not a legal value for a non-optional type. The third is a constant (note let instead of var), and the fourth is a var that is forced to be unwrapped and set to nil.
var detailViewController: DetailViewController? = nil
var managedObjectContext: NSManagedObjectContext? = nil
let locationManager = CLLocationManager()
var lastLocation: CLLocation! = nil
Next there are four methods. The first three have no parameters, so they are listed like this:
awakeFromNib()
viewDidLoad()
didReceiveMemoryWarning()
The fourth has a single parameter. It is listed like this:
insertNewObject(_:)
Parameters in Swift (like their predecessors in Objective-C) have internal and external names. If you look at method in the actual header, the parameter looks like this:
func insertNewObject(sender: AnyObject) {
The internal name is required; in this case it is sender. There is no external name for the first parameter, so it is represented by an underscore in the list. The internal name is not for public use, so it’s not shown in the list.
The rest of the properties and methods in the list use similar formatting and conventions until you get down to the fetched results controller section.
The relevant code is shown in Figure 16-3. Compare it to the list from the jump bar. You’ll see that Figure 16-3 starts with a fetchedResultsController property and continues with a _fetchedResultsController property.
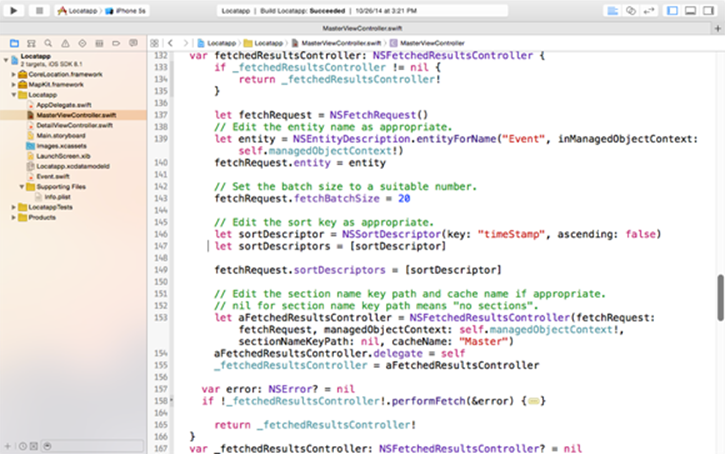
Figure 16-3: Two fetched results controller properties.
The first property is a property as declared in the Master-Detail Application template. The second is the backing variable. In Objective-C, it’s part of the property. In Swift, however, it is a separate property as you see in Listing 16-1.
Listing 16-1: A Getter Property Declaration
// MARK: - Fetched results controller
var fetchedResultsController: NSFetchedResultsController
{
if _fetchedResultsController != nil {
return _fetchedResultsController!
}
let fetchRequest = NSFetchRequest()
// Edit the entity name as appropriate.
let entity =
NSEntityDescription.entityForName("Event",
inManagedObjectContext: self.managedObjectContext!)
fetchRequest.entity = entity
// Set the batch size to a suitable number.
fetchRequest.fetchBatchSize = 20
// Edit the sort key as appropriate.
let sortDescriptor = NSSortDescriptor(key:
"timeStamp", ascending: false)
let sortDescriptors = [sortDescriptor]
fetchRequest.sortDescriptors = [sortDescriptor]
// Edit the section name key path and cache name if appropriate.
// nil for section name key path means "no sections".
let aFetchedResultsController =
NSFetchedResultsController(fetchRequest:
fetchRequest,
managedObjectContext: self.managedObjectContext!,
sectionNameKeyPath: nil, cacheName: "Master")
aFetchedResultsController.delegate = self
_fetchedResultsController = aFetchedResultsController
var error: NSError? = nil
if !_fetchedResultsController!.performFetch(&error) {
// Replace this implementation with code to handle
// the error appropriately.
// abort() causes the application to generate a
// crash log and terminate. You should not use this
// function in a shipping application, although it
// may be useful during development.
println("Unresolved error \(error),
\(error.userInfo)")
abort()
}
return _fetchedResultsController!
}
var _fetchedResultsController:
NSFetchedResultsController? = nil
This code starts out as a simple property declaration with a name and a type.
var fetchedResultsController: NSFetchedResultsController
What follows is a long block with a return statement (actually two — one is inside an if statement at the top). The code in this listing doesn’t really matter. What matters here are the following points:
· In Swift, backing variables are explicitly declared if needed (usually in code converted from Objective-C).
· Getters need not use the get keyword.
Types of Swift properties
Swift properties can be variables or constants; each type can be either stored or computed, as follows:
· Declaring a variable property: A variable is introduced with the keyword var as in:
var _fetchedResultsController:
NSFetchedResultsController? = nil
· Declaring a constant property: A constant (that is, a property that cannot be modified) is introduced with the keyword let. The previous declaration can be changed to declare a constant as follows:
let _fetchedResultsController:
NSFetchedResultsController? = nil
· Declaring a stored property: The declaration of _fetchedResultsController shown in Listing 16-1 is a typical declaration of a stored property. A stored property is a property stored as part of an instance of the class, enumeration, or structure. The example in Listing 16-1 uses an Objective-C pattern for a backing variable: Swift stored properties don't need to begin with a special character such as an underscore; however, they do need to be initialized and given a type (perhaps inferred from the initialization) before they are used.
var _fetchedResultsController:
NSFetchedResultsController? = nil
· Declaring a computed property with a getter and a setter: This point deserves a bit of elucidation. Listing 16-2 shows a basic getter and setter of a Swift property. You can see that myVar has a backing variable of myInt. The get and set keywords identify the getter and setter. By default, the variable passed into the setter is named newValue, and Swift uses the appropriate type for it.
This is how you create a computed property.
Listing 16-2: Swift Property with Getter and Setter
var myInt:Int = 0
var myVar: Int {
get {
return myInt
}
set {
myInt = newValue
}
}
myVar = 20
Observing a property
In addition to the getters and setters shown in Figure 16-2, you can use observers as shown in Listing 16-3. This code is in the DetailViewController.swift file of Locatapp (from the Master-Detail Application template).
Listing 16-3: Swift Property Observer in Action
var detailItem: AnyObject? {
didSet {
// Update the view.
self.configureView()
}
}
This is a good place to call a view updater (which is exactly what is done in the template). There are two observers you can use:
· didSet: This is called after the fact.
· willSet: This is called just before the setting happens.
Declaring Outlets and Actions
Although building the interface is not strictly speaking a Swift process because Interface Builder builds the code for you, it’s worthwhile taking a look at how you write code for outlets and actions using Xcode and Interface Builder (which is built into it).
In order to let people interact with social media from Locatapp, they need an action button which is typically placed at the right end of a navigation bar, as you will see in the following steps.
Here are the steps to add the action button — and to have Xcode write the code automatically while you’re at it.
1. Open Main.storyboard in Xcode. This launches Interface Builder and displays the canvas for your interface. You may need to zoom the view in or out. Use Editor ⇒ Canvas ⇒ Zoom.
2. Make sure you can see MKMapView in DetailViewController as shown in Figure 16-4.
3. Open the utilities area, if necessary.
4. Choose Bar Button Item from the library and drag it to the right of the navigation bar as shown in Figure 16-5.
5. In the Attributes inspector, choose Action from the Identifier pop-up menu as shown in Figure 16-6.
6. Choose the Assistant, as shown in Figure 16-7 .
7. Select DetailViewController.swift as the companion view, as shown in Figure 16-7.
8. Control-drag from the action button to the top of the DetailViewController class, as shown in Figure 16-8 .
9. When you release the button, use the pop-up to set this connection to an action rather than an outlet or outlet connection. Name it actionButton, and leave the default type as AnyObject as you see in Figure 16-9.
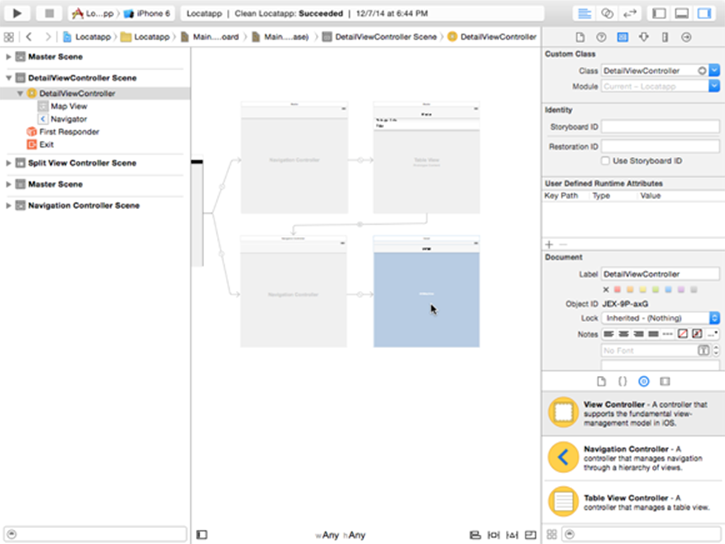
Figure 16-4: Displaying the detail view controller.
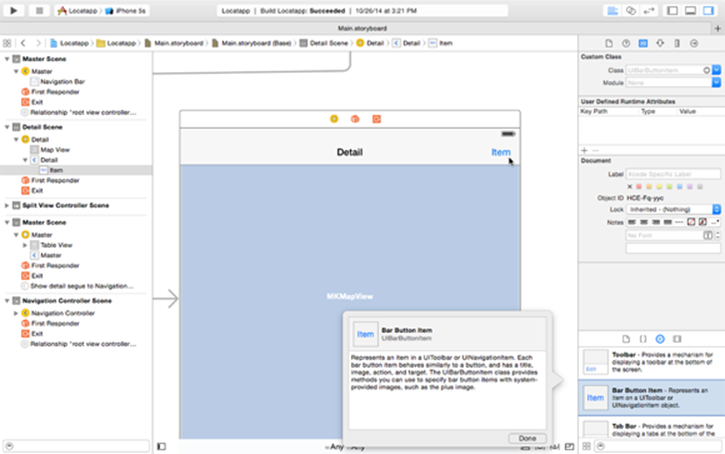
Figure 16-5: Adding an action button.
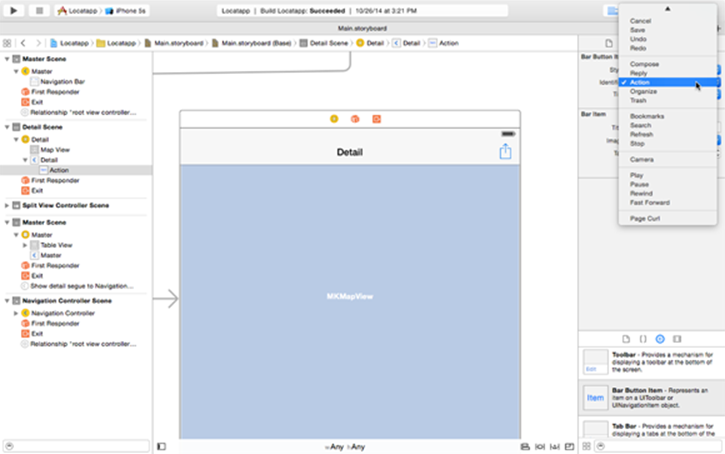
Figure 16-6: Setting the action button.
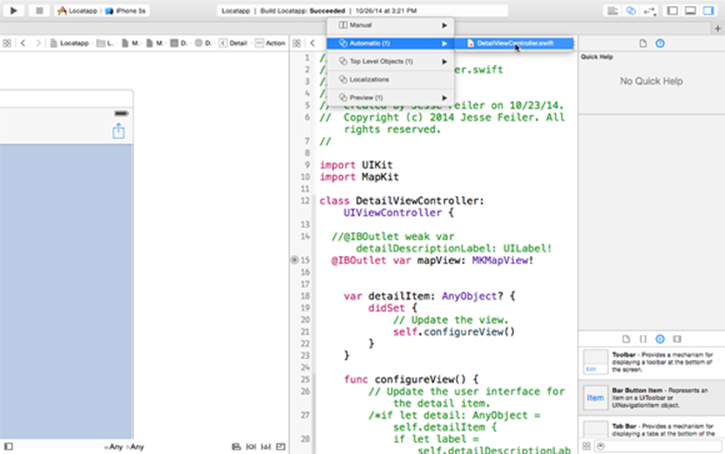
Figure 16-7: Using the assistant.
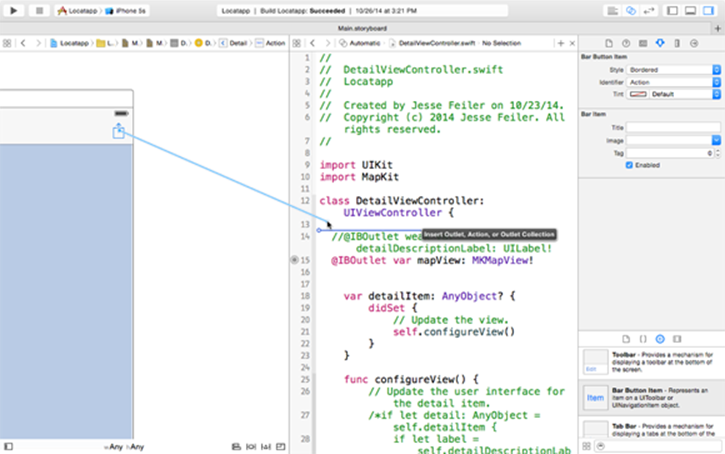
Figure 16-8: Connecting the button to your code.
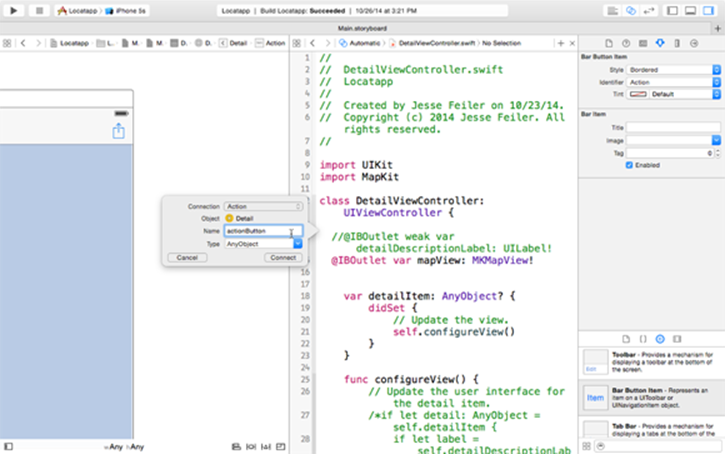
Figure 16-9: Finishing the action code.
When you release the mouse button, you’ll see that you’ve created an action like this:
@IBAction func actionButton(sender: AnyObject) {
}
Set a breakpoint in this method and run the app in iOS Simulator. The button causes the method to be called.
This technique of control-dragging from an interface element to a class interface in the Assistant in Xcode is the easiest way to create properties for interface elements such as view or buttons and actions for what happens when an interface element is clicked.
If you want to finish the app, add the code in Listing 16-4 to the app. Try out the new action button!
Listing 16-4: Adding the actionButton Code
@IBAction func actionButton(sender: AnyObject) {
var long:Double = detailItem!.longitude as Double
var lat:Double = detailItem!.latitude as Double
let socialString = "I'm using Locatapp at latitude
String(format:"%f", lat) + " longitude " +
String(format:"%f", lat)
// fill in geocode location if you want
if let activityURL =
NSURL (string:"http://champlainarts.com") {
//to make certain it's valid
let activityItemsList = [socialString, activityURL]
let activityViewController =
UIActivityViewController (activityItems:
activityItemsList, applicationActivities: nil)
self.presentViewController(activityViewController, animated: true, completion: nil)
}
}
All materials on the site are licensed Creative Commons Attribution-Sharealike 3.0 Unported CC BY-SA 3.0 & GNU Free Documentation License (GFDL)
If you are the copyright holder of any material contained on our site and intend to remove it, please contact our site administrator for approval.
© 2016-2026 All site design rights belong to S.Y.A.