Swift For Dummies (2015)
Part I. Getting Started with Swift
Chapter 4. Creating a Swift App
In This Chapter
![]() Creating and organizing your project’s files
Creating and organizing your project’s files
![]() Adding Swift code for your first app
Adding Swift code for your first app
![]() Testing your app
Testing your app
Chapter 1 shows you how to get started with an Xcode Swift project. As I discuss there, a great deal of your Swift Xcode development involves Xcode’s graphical user interface. A lot of the work — particularly at the beginning of a project — is graphical or involves checkboxes.
Chapter 2 shows how to write and test code — particularly small snippets of code — in a playground. This helps you learn Swift syntax, as well as test out code fragments before you add them to your project files.
In this chapter, you take it from the top (as musicians say). I give you a quick review of the steps from Chapter 1 so you can create your version of the example app, Locatapp, you’ll be using as you progress through this book. Much like peeling an onion, in this process you must peel back layer after layer. Yes, in some ways this is repetitive, but this only serves to help you become more comfortable with the steps involved in building a Swift app. This approach — a high-level quick overview followed by a demonstration of the basics, which is then followed by in-detail steps is just how engineers at Apple introduce new technologies at the Worldwide Developers Conference (WWDC).
If you’ve explored the first two chapters of this book, then you’ve begun to understand Swift’s basic tools. This chapter gets down to business. Here you begin to build the example app used in many places in this book. From here on, the exercises I’ve included consist of steps that you’ll use and reuse as you build your Swift apps. If anything in this chapter seems confusing, feel free to browse back to the first two chapters to get the background information. In addition, you can find more information at the author’s website at www.northcountryconsulting.com and atwww.dummies.com. As I pointed out previously, remember to always check the date of information you find on the web. As I write this, OS X Yosemite (10.10) and iOS 8 have just been released. Apple Pay went live yesterday, and the Apple Watch SDK is available to registered developers. By the time you read this, all of these will be in use.
As a preview of what’s to come, in the next chapter you explore Xcode’s editing tools. There, you’ll be writing code in the same way in which you may have written code in a beginning programming class in school. The focus in that chapter is on Xcode’s tools that assist you with writing code. The tools and techniques that you find in these first chapters help you to actually create you first Swift app — the Locatapp example app used in this book.
Double-Checking Your Environment
One of the most commonly asked questions new Swift developers ask is, Can I use an old Mac to develop with Swift (or Objective-C or Cocoa or Cocoa Touch)? The answer depends on how old your Mac is. In most cases, Macs dating back as much as five years tend to be usable with current development tools.
What does need to be updated when you start developing — at least in many cases — is your operating system. This shouldn’t be too much of a challenge: For the last few years, the operating system updates have been free. If you don’t have the latest operating system, just download a free copy and get started.
The memory and disk requirements of the operating systems have been relatively stable. Sometimes, you may need to upgrade memory or disk storage — particularly if you’ve accumulated a lot of files on your disk(s).
Xcode is the development tool we use. It, too, is free, and most of the time you won’t need to upgrade your computer to run it. It’s true that you may want to upgrade your computer to get added speed for your development efforts, but you often can manage with a slightly slower computer for your development. In fact, many developers find that they need powerful Macs only to help them prepare their app graphics. The code is often not a challenge, even for old computers.
There is one environmental point to attend to. With today’s large disks, we all tend to have a lot of files floating around. Developers can easily accumulate version after version of a project’s files until it’s no longer clear which is which. The solution to this is to create a file organization system and adhere to it. You may think you’ll remember which is the latest version of a file, but I assure this isn’t always the case. Sometimes you can forget as soon as you’ve finished your cup of coffee. Organize your files as if they were going to be used by a whole staff of developers, and you’ll be in good shape.
Creating the Project
The first step in building an app is to create the project and its basic files. Most of the time, you start from one of the built-in Xcode templates. The templates used in this book are those built into Xcode 6.1, which is the version that supports iOS 8 and OS X Yosemite. Updates will happen over time, but this is the common starting point.
The details of creating a project are described in Chapter 1. Here are some additional points for you to consider.
Choosing the name
You need to choose a name for your project and its targets. Actually, your project can have multiple targets, each with its own name. This section provides a high-level view of the structure of your Xcode project. For now, the simplest way to proceed here is to ignore the complex options. (You can always come back to it later.) Name your project with a simple one-word short name (eight letters or fewer) that doesn’t contain non-letter or non-number characters such as spaces, dollar signs, or tildes. For later reference, here are a few of the options that you can consider as you are more comfortable with Xcode and app development.
The project is the overall collection of files that you are creating. It is contained within a folder that uses the project name. This name is for your benefit, so you can include abbreviations, department codes, or other shortcuts that you would not reveal to the public.
 Be careful of the characters that are not allowed in Finder names such as / , ~, {, (, and spaces. (This list is not exhaustive.) It’s safest to stick to upper- and lowercase letters and numbers; limit special characters to dashes. If you're not certain about a character, create a file in the Finder and rename it with the name you're thinking of: If the Finder changes the name automatically, you’ll know that you should use either the changed name or a more middle-of-the-road name without special characters.
The project can contain multiple targets, each of which can be built with Xcode. One target may be a version of your app for iOS, and another may be a version for Macs. Still another may be designed for testing (the Xcode templates often create a testing target as a companion for your app’s target). You can create several targets from the same basic files. (That’s a reason for using multiple targets: It’s easy to share the common files in the project.)
Another variation on this theme occurs if you’ll have several versions of your app — perhaps Your App Lite, Your App, and Your App Pro. A common strategy is to create Your App Lite as a free app, Your App as a priced app, and Your App Pro as a higher priced app. Multiply those three apps by two (for iOS and OS X), and you now are talking about building six apps. If you can write your basic functionality code once for all six apps, you’ll be far ahead.
Within a family of devices (iOS or OS X), the differences typically do not require separate apps. For example, you can build an iOS app that runs on both iPhone and iPad; you can build an OS X app that runs on MacBook Pro and iMac.
When you create a new project, you provide the name of the project as well as the name of each target. Review the App Store and Mac App Store guidance for naming conventions so that your names don’t confuse anyone. (Browse the App Store Resource Center on developer.apple.comfor the most current information.)
Also, be aware that there are also restrictions on the ways you can promote Lite and Pro versions. In short, remember that every version of your app should give users a satisfactory experience rather than a sense of frustration when they are suddenly informed that they have to get out their credit card to type even one more keystroke.
In short, naming the user-facing parts of your project — that is, the parts that normally become products — is a more critical and complex matter than naming projects or targets, whose names are visible only to you and other developers. (You have almost total control over the product name if you modify it in the Build Settings section of an Xcode target. Use the Build Settings section under Packaging, where you'll find Product Name — which you can specify separately for debug and release versions.)
Stick with a simple short, one-word product name for your first tests. Get into the complexity of naming products later on.
The name of the project and the targets can be changed later. However, although changing the names is easier than it was in the past, it is often best not to do it if you can avoid it. Renaming can cause problems with bundles, which are described in the following section.
Understanding bundles
A bundle identifies your target — that is, the app that you’re building. That’s the basic definition. The bundle identifier is constructed automatically by Xcode from your organization identifier and your product identifier. The combination of the two should be unique, and it will be if you use the reverse domain name of your company or organization as the organization name.
Behind the scenes your bundle identifier is further modified by having your developer identifier prepended to it. I said that the bundle identifier is used to identify your app, but this is a bit of a generalization. For iCloud-enabled apps, several apps can share one bundle identifier for their common iCloud storage.
A bundle identifier is key to identifying your app behind the scenes. It is not a user-facing name, although your product name is included as part of the bundle name. Furthermore, although this section describes the default Xcode behavior, be aware that you can modify almost every step of the process to create your own naming conventions.
Reviewing a project’s file structure
This section provides some details about how Xcode project files are laid out on disk. In the case of a simple project (such as Locatapp), the structure is very simple: one workspace with one project with one target. This section walks you through that structure. If you want to, you can move onto a workspace with multiple projects, each of which has multiple targets. Alternatively, you can opt for a workspace with a single project with multiple targets. The structures outlined in this section come into play in any of those scenarios, but you only need to understand what you have in the Xcode template you’re using: one project called Locatapp that contains two targets, Locatapp (the app you're building) and LocatappTests (a testing app that Xcode automatically creates).
 Although right now you’re working with a very simple project, having a basic understanding of the structure of more complex projects right from the start can be very helpful. In particular, you can start thinking about future directions for your project, and knowing the options available to you in Xcode can help you think of a complex app or even a suite of apps.
Figure 4-1 shows the structure of the Locatapp project described in Chapter 1. Here are the important points to note about these files and folders (they are discussed from the top down in the figure).
· DS_Store: This file is normally hidden (this is why it’s shown in gray). It’s in every folder on OS X, and it contains information about the files in that directory. Developers often use a Terminal command to show hidden files in their folders, but you don’t need to worry about that for the moment.
· Target folders: The project you create in Chapter 1 has two targets by default. One is the actual app (Locatapp) and the second is code to run automated tests (LocatappTests). A tests target is included by default in many of the Xcode templates.
· Locatapp.xcodeproj: This file is at the top level of the project folder along with the folders for the two targets (Locatapp and LocatappTests). This is the file you open to start work on your project. In Figure 4-1, it is located between the two target folders (Locatapp and LocatappTests) because the files and folders are shown in alphabetical order.
As noted previously, the structure of files within this project folder is set when you create the project. You can modify locations and relationships using the File inspector in the utilities area, but most of the time, you should leave the locations and relationships alone. If you move things around, Xcode can get confused (as can you). If you must move files around, don’t use the Finder. Most developers prefer not to use the Finder to modify, move, or rename files or folders within a project folder. Use the File inspector or the Edit⇒Refactor⇒Rename command to do that.
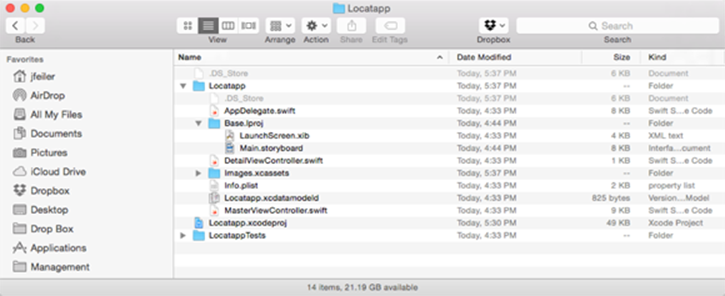
Figure 4-1: Inspecting the project folder.
Working with workspaces
The steps to create a project in Xcode in Chapter 1 represent the most common way to make a project. However, this isn’t the only approach: You can create a workspace that contains several projects.
The workspace, project folders, and the files within them are managed by Xcode, subject to settings you create in the File inspector in the utilities area.
Within a project folder, you create files and groups of files using Xcode. The groups of files you see in the project navigator may or may not be folders on disk.
You can create a workspace with File⇒New⇒Workspace. A workspace is designed to contain multiple projects. This gives you two hierarchical layers you can use in developing apps:
· A workspace can contain one or more projects.
· A project can contain one or more targets.
One common use of a workspace is for two projects: one designed for iOS and the other for OS X. A shared folder (on disk) or group (in Xcode’s project navigator) may contain the shared code.
Multiple targets within a single project tend to have tighter integration and sharing than targets within a project. As you can see in the default templates, the targets within a project may consist of an app with automated tests as well as a user-facing app. You can bring this structure forward so that within a single project, compiler options are used to build Pro and Lite versions.
A workspace is represented by a file with an extension of xcworkspace. When you are creating a new project (as described in Chapter 1 and shown in Figure 1-10), an option at the bottom of the sheet lets you place that project into a worksheet, as shown in Figure 4-2. (You also can add it to a project.)
As described in the preceding section, the project is placed in a target folder and is managed by an xcodeproj file. If you want to add an existing project to a workspace, drag the xcodeproj file into the navigator of the workspace. The file and folder structure of the project remains wherever you have placed it.
Figure 4-2 shows how you add a new project to an existing project or workspace in Xcode: you can add a new project to an existing project or workspace using the pop-up menu at the bottom of the sheet.
When you are adding a file with New⇒File, you can select the target to which to add it with checkboxes in the same location on the sheet as the pop-up menu shown in Figure 4-2. When you add a new target, you select the project to add it to with a pop-up menu on the Options sheet where you specify the project name (shown previously in Figure 1-9). To sum up: Files go in targets; targets go in projects; and projects go in other projects or workspaces.
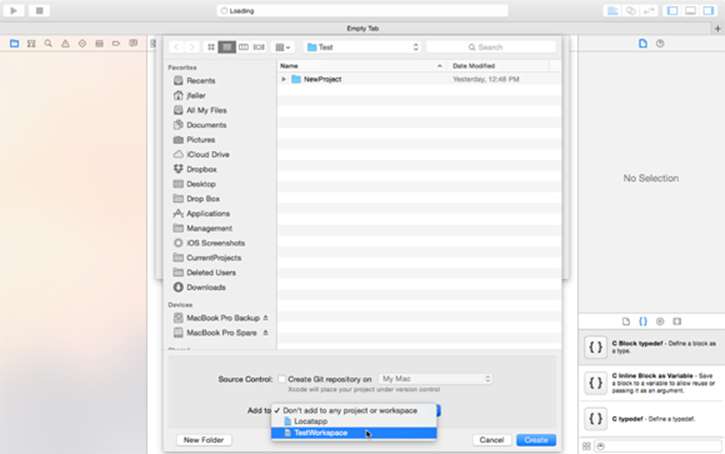
Figure 4-2: Adding a new project to a workspace.
For convenience and simplicity, developers frequently place all of the workspace projects into a single workspace folder, but this is not necessary. In cases with complex workspaces, it’s sometimes not even possible.
Testing the Template
At this point — after you have created a new project from a template and are chomping at the bit and ready to get going — run the app. When it runs, you should see a map when iOS Simulator is in landscape mode (use Hardware⇒Rotate Right/Left to get to the landscape view).
If the app doesn’t run from the basic template, it won’t run for your further additions.
If your app doesn’t run, try some of the solutions in the following list, ordered from simple to more complex. Before considering these options, however, take this one very basic step: If you have an error message, read it and see if it describes a problem that you can solve. Failing that, run Console (launch it from Applications⇒Utilities⇒Console) and look for recent messages that may relate to your app’s problems. There may not be messages of either type, or you may not understand them. In either case, you can proceed with the solutions listed here:
· Try again: For any number of reasons, your second try may succeed. You may have made a mistake the first time in one way or another, or some components of the test (most often iOS Simulator) may need more time to launch. There are two parts to “try again”:
· Try to run the app again using Xcode and iOS Simulator.
· Create a new project from the Xcode template and try to run that one.
· Check your components’ versions: Ideally, you are using the latest release versions of OS X and Xcode. (You can download them from developer.apple.com). If you are using pre-release beta versions, try again with the release version. (For more, see the sidebar, “A note about switching versions.”)
· Look at Apple Developer Forums: Most of this area is reserved for registered developers (go to developer.apple.com to register or sign in), but even so, it’s worth checking to see what you can get to. Use the search tools, because you might find your answer mentioned in passing in a totally unrelated post. Searching on the text of an error message you have found is always a good start.
· Search the web: Use a web browser to search on the error message. Remember the reminder mentioned several times in this book: Check the date on postings you find because they may be out of date and cause you to waste time. (That also applies but to a lesser extent with Apple Developer Forums because they are moderated.)
· Try another template: Try one of the other built-in Xcode templates to see if you can build and run it. This may narrow down your problem.
· Use a technical support incident: If you are a registered Apple developer, you typically get two technical support incidents each registration year. (Note that the year begins and ends on the anniversary of your registration, rather than the calendar year.) You have separate registrations for iOS and OS X, so if you are registered for both programs, you have four technical support incidents that you’ve already paid for. Many developers hoard their incidents in case they need them, but remember that you’ve already paid for them (and you can buy more in packages of two for $100). Be aware that you can’t use technical support incidents for pre-release software, so make certain you’re using the release versions of OS X and Xcode.
· Contact other developers: Check meetup.com and other sites to find a mutual help group near you. Of course, you’ll probably discover that a group met yesterday and will meet for the next time in two months, but even so, it’s worth a shot.
· Social media to the rescue: As long as you’re not dealing with pre-release software from Apple that’s covered by non-disclosure, search and then post a message on tools like Facebook or LinkedIn to see if someone else has had the problem. If the problem really isn’t your fault (this happens mostly with pre-release software) you may discover other people who have come across this problem (and maybe solved it).
· Tomorrow is another day: Create a new Xcode project and test it from the beginning . . . tomorrow. In the meantime, get some rest and clear your mind. Do the same for your Mac (that is to say, shut it down and then restart it). Shutting down rather than just restarting may help you get past network issues that may be getting in your way. Particularly if you are using a shared network disk, you may be encountering some kind of network problem that a total restart will either solve or clearly identify.
A note about switching versions
If you decide to try switching to a newer (or older) version of OS X or Xcode, take a moment to consider all the ways this may create problems. If you have a separate Mac that you use for development, you may be able to do a clean install (erasing the hard disk) and then reinstall OS X and Xcode. This gives you a clean environment.
If you don't have a separate Mac, consider creating a new user account in the Finder (using System Preferences⇒Users & Groups). This gives you a new user account with its own set of files. You can even reinstall Xcode in the Applications folder of the new account rather than in the Applications folder for all users on the Mac.
If you don't have Time Machine running, do a full backup of your Mac. If Time Machine is running, do a manual backup of the current state of your Mac using System Preferences⇒Time Machine.
Although you’re focused on getting your app to compile and run, keep a cool head while you make the switch — don't inadvertently break something else!
Setting the Location for iOS Simulator
iOS Simulator is built into Xcode. It lets you run your app as if it were running on a device such as iPhone or iPad. It’s a key tool in app development.
I discuss the basics of using iOS Simulator in Chapter 1.
iOS Simulator can’t do certain things that an actual device can do. For example, it can manage iCloud synchronization, but in iOS Simulator this is done with a menu command (Debug⇒Trigger iCloud Sync).
Locatapp uses the location manager tools that are built into iOS. When you're running on iOS Simulator, those basic tools are available, but the location that they manage is not the location of the simulated device. In order to test your Locatapp code, you must manually set the location you want to use in iOS Simulator. There are two steps to this: setting your device(s) and setting the location to use.
This process can be a little tricky because the location settings for iOS Simulator may have been set by you or someone else in testing apps on the Mac you’re using and you may be mystified by why iOS Simulator thinks it's somewhere strange to you.
When you are testing with iOS Simulator, you don’t set your actual location. Rather, you set a specific location — that is, the location returned when you query iOS Simulator. This makes it easier to test your code because you know what the location should be.
Adding devices to iOS Simulator
To set your iOS Simulator location, follow these steps. (Note that these steps also include information about how to check if this setting has already been done.):
1. To check to see if you have devices that are already configured for iOS Simulator, click the pop-up menu at the left of the toolbar, as shown in Figure 4-3.
If the list there contains only the iOS Device command, you don’t have any simulators installed. Proceed to the next step.
If you do have any simulators installed, you can use iOS Simulator for that device, but if you want to simulate a different device, check to see that that device is installed in Xcode. If it isn’t, proceed to the next step.
2. In Xcode, choose Window⇒Devices or Shift-Command-2, as shown in Figure 4-4.
This opens the Devices window.
3. In the Devices window (shown in Figure 4-5), you’ll see the devices you are using along with the simulators you have installed.
The simulators section will probably be blank; if it has any entries, they may not be for the simulator(s) you want to use. The entries there should match the entries in the pop-up menu shown in Figure 4-3.
4. To add a new device, click the + at the bottom of the left sidebar of the Devices window.
This opens the Create a new simulator sheet shown in Figure 4-6.
5. Choose your device type from the pop-up menu on the sheet and give it a simulator name of your choosing. Select the appropriate iOS version as well.
This allows you to simulate not only a device but also a version of the operating system.
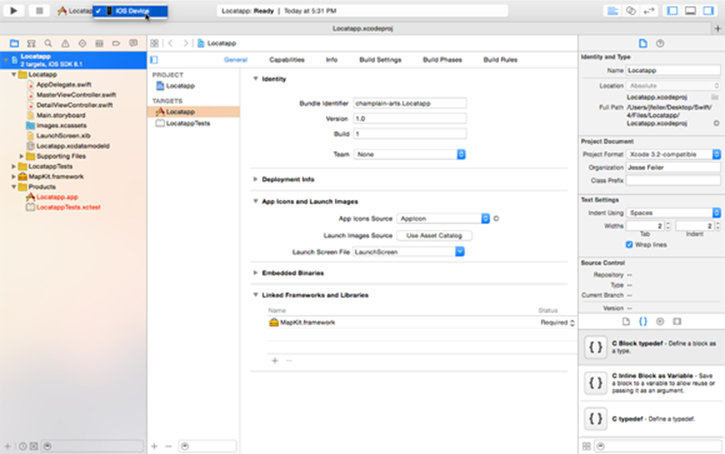
Figure 4-3: Check to see which simulators are installed in Xcode.
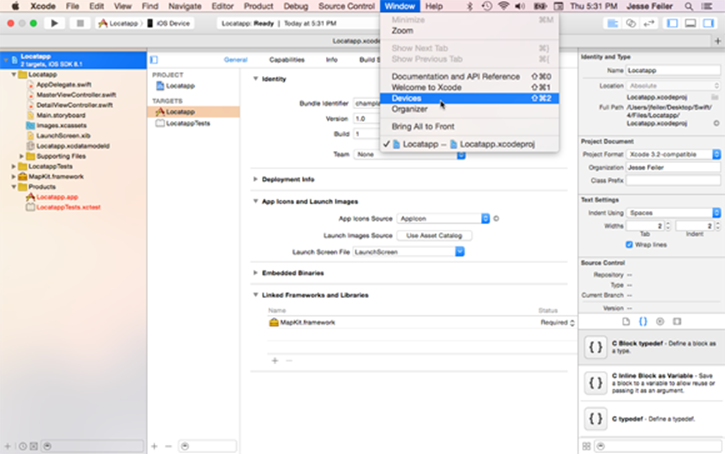
Figure 4-4: Opening the Devices window.

Figure 4-5: Reviewing your devices.
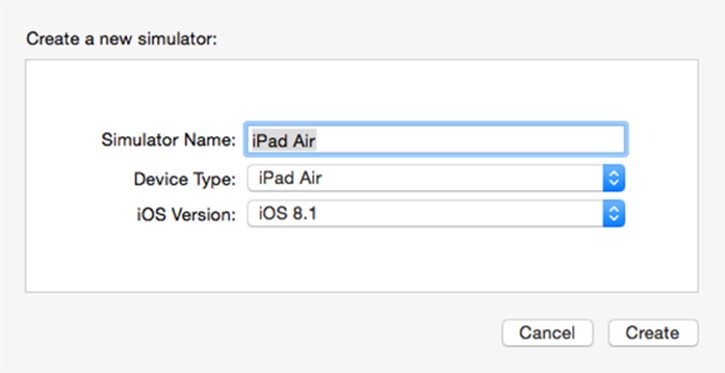
Figure 4-6: Naming and adjusting your new simulator.
Managing the iOS Simulator location
Both Xcode and iOS Simulator allow you to set the locations to simulate. There are two types of simulations you can set. Here are the steps to set them (the details of each are described after the steps).
With your Xcode device(s) set for iOS Simulator rather than a tethered (plugged-in) iPhone or iPad, choose the location you want to simulate by following these steps:
1. Using the pop-up menu at the left of the toolbar, choose any of the devices listed.
It doesn’t matter which device you choose: the location you set is for iOS Simulator and all of the devices that it simulates until you change it to another location.
2. Run an app that uses Core Location. At this point, that should include the Locatapp template that you have created. After you run an app, iOS Simulator launches automatically.
3. While the app is running, choose Debug⇒Location on iOS Simulator or Debug ⇒Simulate Location on Xcode to set the location on iOS Simulator.
Your choice of whether to set the debugging location with Xcode or with iOS Simulator reflects the choices and behavior that each one provides, as follows:
· Setting locations using Xcode: With a Core Location-using app running, select Debug⇒Simulate Location on Xcode to choose a location. As of this writing, your choices include London, England; Johannesburg, South Africa; Moscow, Russia; Mumbai, India; Tokyo, Japan; Sydney, Australia; Hong Kong, China; Honolulu, HI, USA; San Franciscoo, CA, USA; Mexico City, Mexico; New York, NY, USA; and Rio de Janeiro, Brazil.
In addition, there's a Don't Simulate Location option so you can test out your code to handle the case where a user doesn't have Location Services turned on. Furthermore, there's a menu option to add a GPX file to the project. (A GPX file is an XML schema formally called GPS Exchange Format that can be used for waypoints, tracks, and routes. It lets you add your own location to the Simulate Location menu.)
· Setting locations using iOS Simulator: With a Core Location-using app running, select Debug⇒Location on iOS Simulator. Your menu choices are different than on Xcode. The location choices include Apple (the Apple campus in Cupertino); City Bicycle Ride; City Run; and Freeway Drive.
In addition, there is a None option to turn off Location Services, and an option to supply a custom location by entering a latitude and longitude (in digital form rather than degrees-minutes-seconds).
The ride, run, and drive options in iOS Simulator provide you with a changing location that follows a track on a route and with a speed for a bike, run, or drive. This lets you test code to track a moving current location. That code will be in the Locatapp sample when you’re finished, so it will work after you have finished the following section.
With these steps in either Xcode or iOS Simulator, you’re ready to test the location code that will be added later in this chapter in the section, “Adding Swift Code to Locatapp.”
Adding the Map to the Storyboard and Project
Using the steps described in Chapter 1, you can begin to lay the groundwork for the app you’ll build throughout this book. You may want to refer back to Chapter 1 to make sure you’ve carried out these steps after you have created the project:
1. Drag a MapKit view from the library in the utilities area into the Detail scene of the storyboard. Place it over the View view (which is helpfully named view) so that it replaces that view as well as its constraints.
If you make certain that it replaces view, the constraints will automatically be removed. If you can't see the Detail scene of the storyboard, verify that you have selected Main.storyboard in the project navigator, and that you have shown the document outline in the storyboard with Editor⇒Show Document Outline.
2. Import the MapKit framework with this code at the top of DetailViewController.swift.
import MapKit
You need to add the framework to the project as a whole (Step 1) as well as to this file.
3. Add the code side of the map view you added in Step 1.
IBOutlet specifies that this variable is an outlet in Interface Builder. (Outlets are interface elements such as views, buttons, and the like.) Xcode makes it simple to do this. Because Xcode will be writing the code for you, you go into Interface Builder inside Xcode and draw a line. Here are the steps:
1. Select Main.storyboard in the project navigator.
2. Show the Assistant editor with View⇒Assistant Editor⇒Show Assistant Editor.
3. In the jump bar, select Automatic⇒DetailViewController.swift, as shown in Figure 4-7.
At this point, you should have Main.storyboard on the left and DetailViewController.swift on the right. (If your preferences are set otherwise, they may be arranged on the top and bottom.)
4. If necessary, show the storyboard document outline with Editor⇒Show Document Outline.
5. Control-drag from Map View in the document outline to the top of DetailViewController.swift, as shown in Figure 4-8.
When you release the mouse button, you'll see a small view.
6. Enter mapView for the name of the outlet, as shown in Figure 4-9.
Xcode and Interface Builder will write the following line of code for you and connect it to the user interface you have drawn in Interface Builder:
@IBOutlet var mapView: MKMapView!
What is that ! for? You’ll find out in Chapter 6.
4. Add the MapKit framework to Linked Frameworks and Libraries on the General tab of the project.
Use + at the bottom of that section to open a list of available frameworks: look for MapKit.framework, select it, and click Add in the lower-right corner.
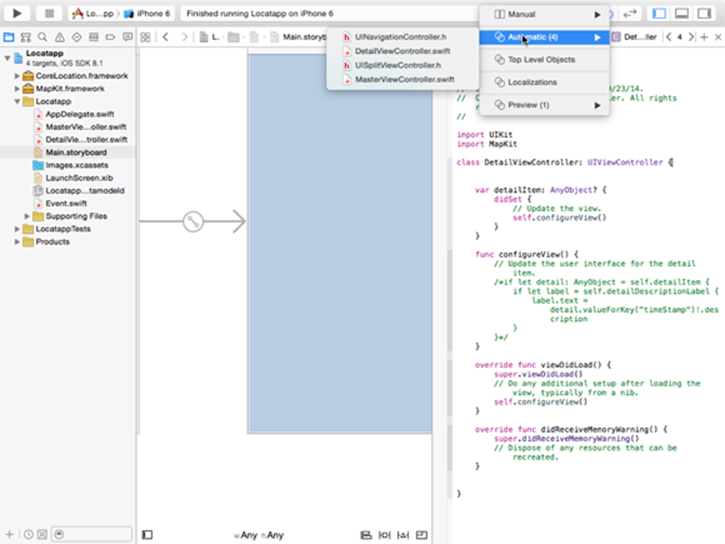
Figure 4-7: Using the Assistant editor.
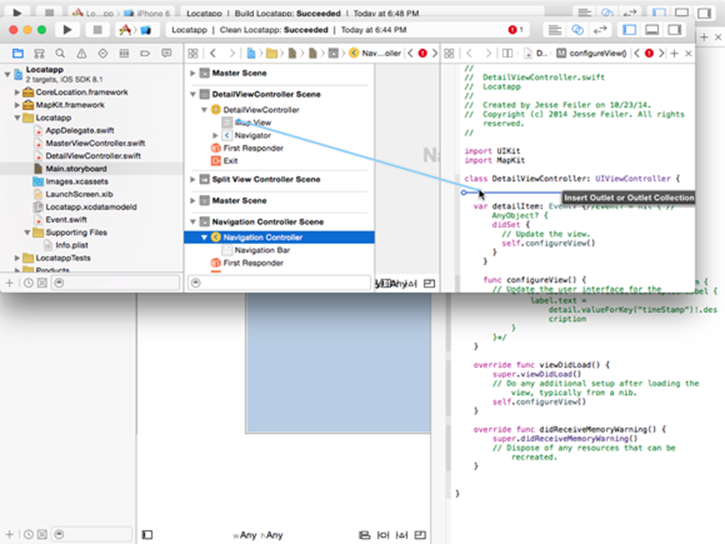
Figure 4-8: Control-drag to the DetailViewController.swift file to create the connection for the map view.
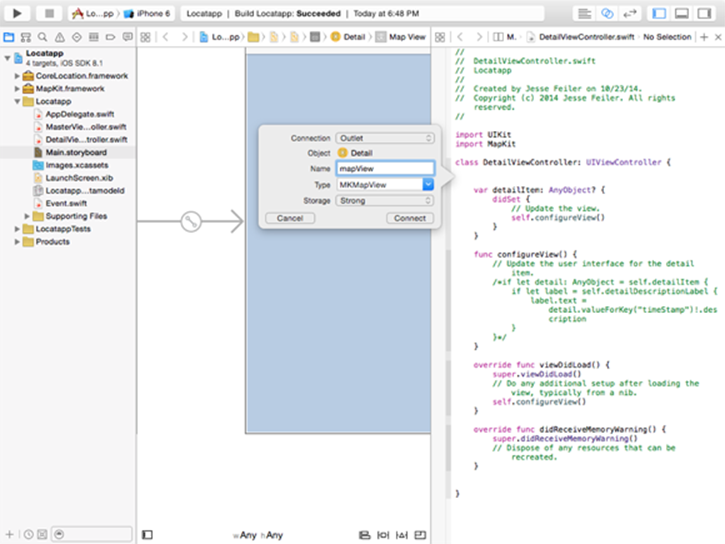
Figure 4-9: Naming the mapView outlet in your code.
Testing the App
When you run the app now, you’ll see a map when you're in landscape mode. The user location isn’t shown, and if you add a new Event object to the database with the + at the top right of the master view controller, it will have a timestamp because that’s what the template does.
Figure 4-10 shows the app as it is now. It is running in landscape on iOS Simulator for iPhone 6 Plus. In this configuration, it uses a split screen view with the master view controller at the left and the detail view controller (with the map) at the right.
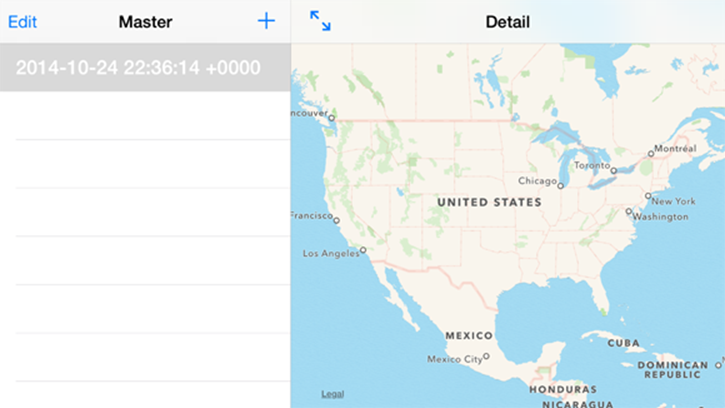
Figure 4-10: Running the app.
To complete the first phase of the app, you’ll need to enable the map to show the user’s location and you’ll also need to store the user’s location instead of a timestamp. The following sections show you how to do these things.
In the sections that follow, you see how to add Swift code to the template to make an app that you can use to experiment with throughout this book. The emphasis in this book is on the Swift language, so you’ll be using it, but you’ll also be using code in the Cocoa or Cocoa Touch frameworks as well as the built-in Xcode templates (primarily the iOS Master-Detail Application template). The frameworks are not described in detail in this book.
Adding Swift Code to Locatapp
In this section, you see how to add the necessary code to display and store the user’s location. As noted previously, this requires a good deal of Swift code, and it will give you a basic overview of a number of language features. Later chapters will explore the various features in depth.
Although most of the time you can skip around in this book, it’s important to carry out the steps in this chapter in sequence because they rely on one another.
Setting and confirming location settings in iOS Simulator and on devices
The code in the example app checks the user’s settings for location awareness. In order to test the app you’re building, the best thing to do is to set iOS Simulator, Xcode, or the mobile device you use for testing to allow use of location services as described previously in this chapter. When you move ahead to actually build an app that you want to distribute, the user’s settings for location services is an area that you’ll need to test. At that time you’ll need to do thorough testing so that you know that your app respects the user’s settings properly, as follows:
· Do not attempt to use location services if the user has turned them off. The user's action is referred to as unauthorizing the use of location services.
· Feel free to use location services if the user has turned them on. This is referred to as authorizing the use of location services.
· Even if the user has authorized location services, respect the user’s settings for your app. App-specific authorizations are referred to as enabling the location services for your app. (Enabling location services for an app requires that location services in general be authorized for the user’s device.)
This means that when you’re writing a real app, you must check the authorization and enabling of location services and you must monitor changes to both. This is done with the Core Location framework’s delegate protocol, which you must adopt in your app. The necessary code is provided in the Swift code in this book; details of its use are in Apple's documentation of location services and Mapkit.
For more on protocols, see Chapter 18.
Authorizing location services on a device or simulator
Here are the steps to authorize location services on iOS Simulator; (the steps on an iOS device itself are the same):
1. Run your app on iOS Simulator as described in the earlier section, “Testing the App,” and shown in Figure 4-7.
2. Click on iOS Simulator to bring it forward on your Mac, if necessary.
Make certain that the menu bar at the top of the Mac's screen is the simulator’s menu bar.
3. “Tap” the Home button by choosing Hardware⇒Home or pressing Shift-Command-H.
You should see the iOS Home screen as shown in Figure 4-11 (at the left). The specific installed apps may vary.
4. Go to Settings⇒Privacy⇒Location and turn on Location Services, as shown in Figure 4-11 (at the right).
You may or may not have specific apps listed beneath the main setting. If you have run your app already, you may have a blank space for its name — this will be corrected in the following section.
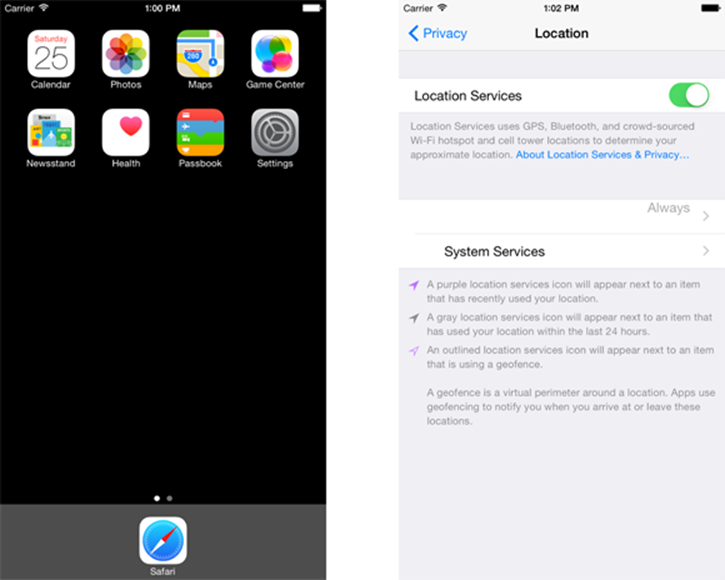
Figure 4-11: Go to the Home screen (left). Turn on location services (right).
Writing the code to check authorization and enabling of location services
There are two parts to adding the code to your app to check authorization and the enabled status of location services. The first is to set up the alert for the user to enable location services for your app, and the second is to write the code to respect the user’s settings. To do this, follow these steps:
1. Select the Info tab in the project.
Select the project at the top of the project navigator and then click the Info tab.
2. Add a new item at the bottom of the list of Custom iOS Target Properties.
1. In Figure 4-12, the last item in the list is Required device capabilities. If you hover the pointer over it, you'll see a +. Click that to add a new line to Custom iOS Target Properties.
2. At the time of this writing, the property you need to use is not in the pop-up list, so type its name into the field at the left. The name is NSLocationWhenInUseUsageDescription. (There’s a companion setting called NSLocationAlwaysUsageDescription but you don't need that for this example.)
3. The type should be String by default, but double-check that it is set correctly.
3. At the right, enter the text you want to be shown in the alert. This text asks the user to decide whether or not to enable location services for your app.
For example, you could use “This will let you see your current location” as shown in Figure 4-13. (Note that this is what it will look like after more code has been added later in the book.)
4. In the General tab of the project settings, add CoreLocation.framework to Linked Frameworks and Libraries as you see in Figure 4-14.
This is done in the same way you add MapKit.framework there in “Adding the Map to the Storyboard and Project” earlier in this chapter.
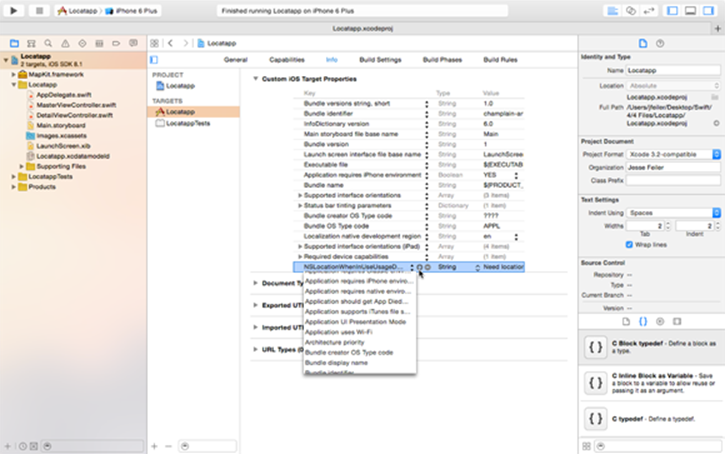
Figure 4-12: Starting to add the NSLocationWhenInUseUsageDescription text.

Figure 4-13: Asking permission to use location services.
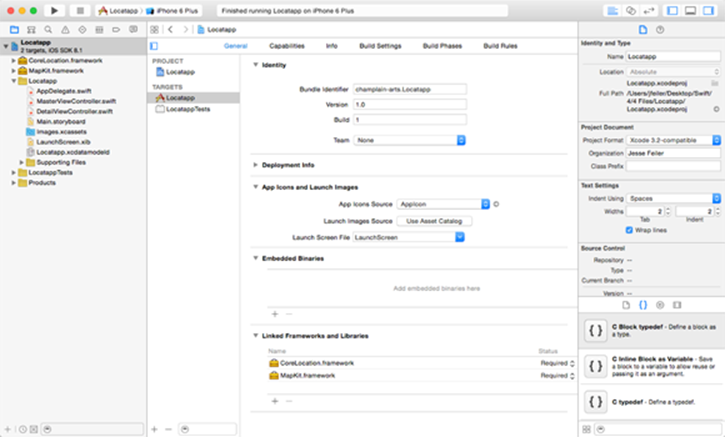
Figure 4-14: Adding the Core Location framework.
Now you do have to write the code to use these settings. There’s not much code, but it does require jumping around a bit in your project files. At the end of the process, the app will have its basic functionality, and you can get back to looking at the Swift syntax that makes this all possible.
 The details of the Swift syntax shown here will be discussed in depth in the later chapters of this book. This is just an overview.
Making the app display the user’s location (Part 1: Core Location)
The Core Location framework (CoreLocation.framework) added in Step 4 of the previous section has the code you need to use to find the user’s location and to handle other location tasks. Together with the MapKit framework (MapKit.framework), the tools you need for managing location and mapping are now part of your app.
All you have to do is use them.
The main object in Core Location is CLLocationManager. You create an instance of it to let you find the user's location and track changes as the user moves around.
As is the case with many frameworks, the Core Location framework contains the definition of a protocol — code that can be placed in any class to implement parts of the framework. The methods of the protocol are called by the framework itself, and a class that conforms to the protocol provides the methods: This is the glue that connects the framework to the app’s code. (Chapter 19 provides more details on this common Cocoa and Cocoa Touch design pattern.)
 The methods and properties of the Core Location are prefixed with CL. Thus, the protocol you’ll need to use is called CLLocationManagerDelegate.
In Cocoa and Cocoa Touch, many of the framework objects declare delegates. A delegate is a companion object that does some of the work for the framework object itself. A delegate works together with a protocol as you see in the following sections.
There's much more on protocols and delegates in Chapter 18.
There are four steps to using a protocol, as follows:
1. Declare the protocol’s name, methods, and properties.
2. Import the framework or class that declares the protocol into the class you want to use it.
Note that the declaration of the protocol could also be done in the file that will adopt it.
3. In the declaration of an object that will implement the protocol, declare the fact that it adopts or conforms to the protocol.
4. Implement the required methods and properties of the protocol.
5. Set a variable of the adopting class to be the delegate.
The local instance of CLLocationManager inside MasterViewController will wind up getting the user’s location periodically. It will store that current (or last retrieved) location in a variable called lastLocation with type CLLocation.
Setting up MasterViewController as the Core Location delegate
Here are the steps to make the master view controller the delegate of the Core Location manager. The code for these steps appears afterward in Listing 4-1:
1. Import CoreLocation to the top of MasterViewController.swift.
import CoreLocation
2. Add the CLLocationManagerDelegate protocol to the declaration of MasterViewController at the top of MasterViewController.swift.
Thus, the declaration at the top of MasterViewController.swift will look like this:
class MasterViewController: UITableViewController,
NSFetchedResultsControllerDelegate,
CLLocationManagerDelegate {
MasterViewController is a subclass of UITableViewController, and it adopts the NSFetchedResultscontrollerDelegate protocol as well as (now) the CLLocationManagerDelegate protocol.
3. Create a variable named locationManager and set it to an instance of CLLocationManager.
let locationManager = CLLocationManager()
4. Create a variable named lastLocation of type CLLocation, which will store the last location obtained from location services.
var lastLocation: CLLocation! = nil
Listing 4-1 shows the new code along with the code that already exists in the template you used to create Locatapp.
Listing 4-1: Setting Up Core Location
import UIKit
import CoreData
import CoreLocation
class MasterViewController: UITableViewController,
NSFetchedResultsControllerDelegate,
CLLocationManagerDelegate {
var detailViewController: DetailViewController? = nil
var managedObjectContext: NSManagedObjectContext? = nil
let locationManager = CLLocationManager()
var lastLocation: CLLocation! = nil
Implementing the protocol’s delegate methods
Because MasterViewController not only adopts the protocol but also serves as its own delegate (that is, as the implementer of the protocol’s methods), you need to provide the code for those methods. When you create a delegate, it is generally a good idea to place all of the protocol’s delegate methods together so that you can see they are implementing the protocol and are not part of the adopting class’s own functionality. The easiest way to do that is to create a separate section using the MARK keyword:
// MARK: CLLocationManagerDelegateProtocol
This comment inserts a title in the list of methods and properties in the jump bar at the top of the editing area, as you see in Figure 4-15.
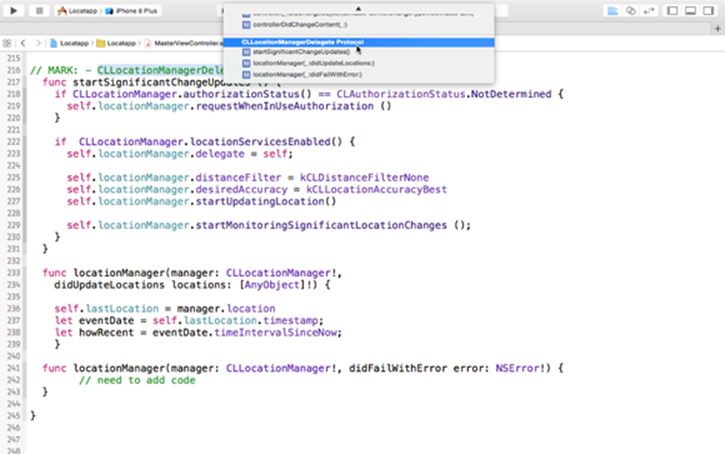
Figure 4-15: Putting together all the protocol definitions with a title.
Listing 4-2 is the Swift code that implements the required protocol methods for the delegate, so enter it now. You can place it at the end of MasterViewController.swift before the final } in the file. (It is discussed in the sections that follow, so you’ll know what you're doing.)
Listing 4-2: Implementing Core Location Delegate Methods and a Local Method
// MARK: - CLLocationManagerDelegate Protocol
func startSignificantChangeUpdates () {
if CLLocationManager.authorizationStatus() ==
CLAuthorizationStatus.NotDetermined {
self.locationManager.requestWhenInUseAuthorization
()
}
if CLLocationManager.locationServicesEnabled() {
self.locationManager.delegate = self
self.locationManager.distanceFilter =
kCLDistanceFilterNone
self.locationManager.desiredAccuracy =
kCLLocationAccuracyBest
self.locationManager.startUpdatingLocation()
self.locationManager.
startMonitoringSignificantLocationChanges ()
}
}
func locationManager(manager: CLLocationManager!,
didUpdateLocations locations: [AnyObject]!) {
self.lastLocation = manager.location
}
func locationManager(manager: CLLocationManager!,
didFailWithError error: NSError!) {
// need to add code to catch errors
}
Even though this syntax is deeply intertwined with Core Location, it’s still a good example of Swift code as it’s used with the Cocoa and Cocoa Touch frameworks. Not only will you have to learn to write your own Swift code, but you will also have to understand how it’s used. A lot of app development consists of making relatively small (and sometimes literally very small) modifications to existing code.
There are three functions in Listing 2-2. (Remember that in Swift, class methods are often called functions. The terms are interchangeable.) You’ve probably never seen the code in Listing 4-2 before, yet it’s not hard to pick out these three functions. One of the reasons is that the indentation is consistent. Remember to use the Xcode preferences to choose the indentation settings tab in the Text Editing preference, and remember as you type to not interfere with the indentation you’ve set.
Double-clicking an opening or closing brace, bracket, or parenthesis in Xcode highlights the text between it and the companion closing or opening symbol. Doing this will frequently catch errors: The highlighted “enclosed” text will immediately appear to be wrong, and you can fix it very quickly in many cases.
These functions are as follows:
· startSignificantChangeUpdates()
· locationManager(_:didUpdateLocations:)
· locationManager(_:didFailWithError:)
The first function is called startSignificantChangeUpdates(), and it has no arguments (the parentheses are empty).
The second two functions are part of the protocol the delegate of a location manager must adopt. The declaration of the instance of CLLocationManager, which is called locationManager, is shown in Listing 4-1. CLLocationManager is declared in CoreLocation.framework.
The first function, startSignificantChangeUpdates, is simply a function of a class (MasterDetailView, in this case). It's included in the MARK section because it's part of the Core Location implementation. If you wanted to, you could create a separate MARK section for it. (This would make sense in a much larger source file with many more functions.)
For much more about classes, see Chapter 15. For more about locationManager(_:didUpdateLocations:), see the section, “Making the app display the user’s location (Part 2: MapKit),” later in this chapter.
 A class can define a number of delegates. For example, UITableViewController, which does exactly what its name suggests, conforms to both a UITableViewDelegate and UITableViewDataSource. The first manages the user interface, and the second manages the table data. In many cases (including the Master-Detail Template application used here), one class such as MasterViewController conforms to both protocols (meaning that it will provide the functionality declared in the protocols) and it declares itself to be the delegate that does this. It could hand off the implementation of the functionality to two other classes. You’ll see this structure several more times in this book because it’s at the heart of Cocoa and Cocoa Touch. However, don’t worry if it takes a few passes through the architecture to be comfortable with this structure.
Implementing a local method
You’ve seen the structure, and you’ve seen that the required protocol methods (there are only two of them) have been implemented with the code in Listing 4-2. There’s one more thing you have to do.
The method startSignificantChangeUpdates() is a local method that’s not part of a protocol. (It’s commonly used in the examples on developer.apple.com.) You’ve implemented the code in Listing 4-2, but you have to use it. There are certain key locations in classes of Cocoa and Cocoa Touch that serve as choke-points in the sense that they are always invoked at key stages of an object’s life. Another one of these choke-points is viewDidLoad(), which is a method of UIView that’s usually overridden to do a custom set-up.
The self.startSignificantChangeUpdates () function is a function of MasterViewController, so it’s a function of the class you’re working on, which is referred to as self. Just add a call to this function before the closing bracket of viewDidLoad:
self.startSignificantChangeUpdates ()
}
If you want to check that the code you’ve written in this section is working, set a breakpoint on the first line of locationManager(_:didUpdateLocations:). in MasterViewController.swift. You should see the app stop there as it checks updates to your location.
If this doesn’t happen and you are running in iOS Simulator, check the Debug⇒Location menu to make certain that you haven’t accidentally set the location to None. Also check that the Settings for Location in the simulator have Location Services turned on, as described in the section “Setting and confirming location settings in iOS Simulator and on devices,” earlier in this chapter.
You can disable checkpoints after you have used them by clicking on them to turn them light blue. You can also just remove them.
Making the app display the user’s location (Part 2: MapKit)
This step is very simple. Open Main.storyboard and navigate to the Detail scene. Select that map view and use the Attributes inspector to select the option to show the user’s location, as shown in Figure 4-16.
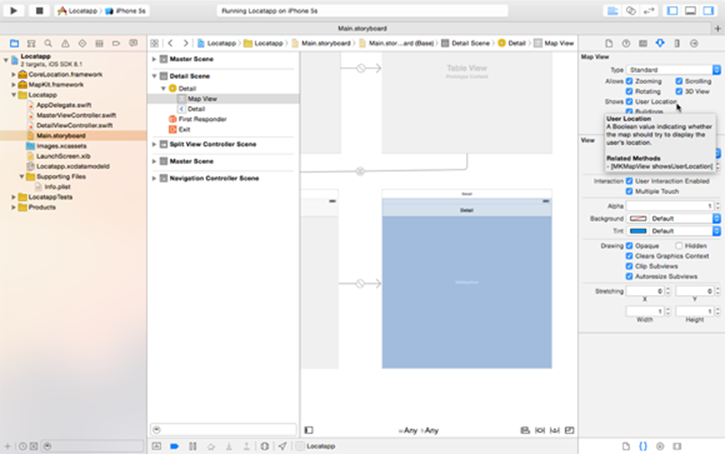
Figure 4-16: Displaying the user’s location on the map — the storyboard setting.
The various settings to enable and authorize the use of core location services described in this chapter need to be configured for the location to actually be shown. If they are properly configured (and if you set the Debug⇒Location submenu in iOS Simulator to Apple), you’ll see your selected location on the map as your current location, when you run your app as in Figure 4-17.
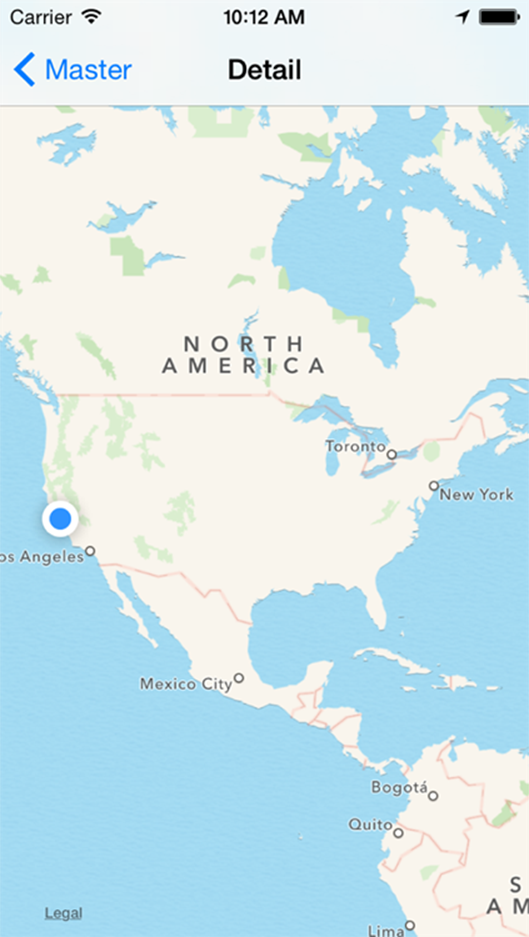
Figure 4-17: Displaying the user’s location on the map — the result.
Storing the user’s location (Core Data)
In this section, you see how to store the user’s location in the Core Data persistent store.
A Core Data data model is frequently used with Cocoa and Cocoa Touch apps. In its default version, it uses the built-in SQLite library for the storage of the data. (On OS X, it can also use XML for storage.) Core Data is a persistent store mechanism that has much in common with a relational database, but it uses a database or other technology to store its data.
To store the user's location in the Core Data persistent store, you’ll have to modify several features In the Master-Detail Application template that is the basis for Locatapp:
· The Core Data persistent store defines an Event entity with a timeStamp attribute.
· When you tap the + at the top right of the master view controller, you create a new Event entity. Its timeStamp is set to the current date and time.
· The master view controller automatically displays all of the Event entities — including the new one you’ve created.
· If you tap the cell for an Event in the master view controller, you see a detail view controller with the timeStamp data centered in a UILabel.
You’ve already added the CoreLocation framework and the code to periodically check the location. (You don’t do anything with the location data . . . yet.) In this section, you make a few changes so that you store the user’s location rather than the timestamp. To achieve this, you do the following tasks:
· Store the current location in a MasterViewController property: This process will continue as your app periodically checks the location. You set this up in self.locationManager.startMonitoringSignificantLocationChanges in Listing 4-2.
· Add two Double attributes, latitude and longitude, to Event.
· When the + is tapped, create a new Event object and set its latitude and longitude to the values from the most recent location.
These tasks are described in the sections that follow.
As is the case with most of the other tasks you’ve done to make Locatapp a usable app, many of the tasks in this section are fragmented: They jump from place to place in the Master-Detail Application project. This is typically the case with Swift (and Objective-C). Periodically you get to a section where you do write line after line of code, but, in most cases, such sections aren’t very long.
This need to make changes in many places to implement functionality may be one of the reasons why some people believe that coding for Cocoa and Cocoa Touch is difficult. There’s something to this belief, but it’s also true many modern development environments are like this.
Storing the current location in a MasterViewController property
Because you have set up MasterViewController as a delegate for the CLLocationManager, locationManager(_:didUpdateLocations:), which is defined as a required function in the CLLocationManagerDelegate protocol, is called periodically, and you must implement it. When you have done this, you will always have the most recent location stored in a property of MasterViewController, and you can use that value when you need to create a new Event object.
Note that this is a very common design pattern in Cocoa and Cocoa Touch: You implement a delegate for some framework or other, which periodically is called from that framework to provide you with an opportunity to update your app’s data.
To periodically get and store the current location, follow these steps:
1. Declare a lastLocation property for MasterViewController.
This will be continually updated as you receive new locations from Core Location so that you will always have the latest value when you need it. Here is the code you should have already added to the top of MasterViewController.swift:
var lastLocation: CLLocation! = nil
If it's not there, locationManager(_:didUpdateLocations:) will give you a compile error because it uses this variable. Check to see if that's also missing.
For details of the lastLocation syntax shown here, see Chapter12.
2. Implement locationManager(_:didUpdateLocations:) to store new location values.
Note that this was shown in Listing 4-2, so you may already have entered it.
The value of the current location is passed into this function with its first parameter (manager) that has a location property as defined in CLLocationManager (part of CoreLocation.framework).
Adding latitude and longitude attributes to Event
Now you need to add latitude and longitude to Event. You do this in the data model. With this, by the way, you have your first brief introduction to Core Data. You also need to convert the data model to a Swift class. This, too is a useful introduction to a common data modeling task.
Don’t worry: each task here is brief and not very complicated.
Follow these steps to add the new attributes:
1. Select Locatapp.xcdatamodeld in the project navigator.
It opens in the editing area, as shown in Figure 4-18. If it looks different to you, click the Editor Style button in the lower right section of the main pane to choose the alternate view.
2. In the Attributes section, click + twice to create two new attributes.
They’ll be named attribute and attribute1 by default.
3. Select one of the new attributes. Use the Data Model inspector in the utilities area to set its name (latitude) and type (Double), as shown in Figure 4-19.
4. Do the same for the other attribute: Name it longitude and set its type to Double.
5. Delete old data stored using the previous data model.
If you haven’t run your test app at all, this step is unnecessary, but it’s a good precaution to take. Use one of these approaches:
· If you’re using iOS Simulator: With iOS Simulator running, choose iOS Simulator⇒Reset Content and Settings. This will delete all the data on the simulator.
Alternatively, go to the Home screen on iOS Simulator with Hardware⇒Home or Shift-Command-H, tap and hold the Locatapp icon, and delete it with the X. This is the same way you delete an app on a device.
· If you’re using an iOS device: Tap and hold the Locatapp icon on the Home screen and delete it.
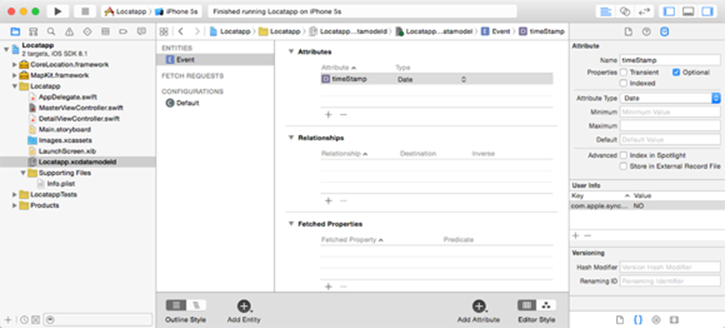
Figure 4-18: Updating the data model.
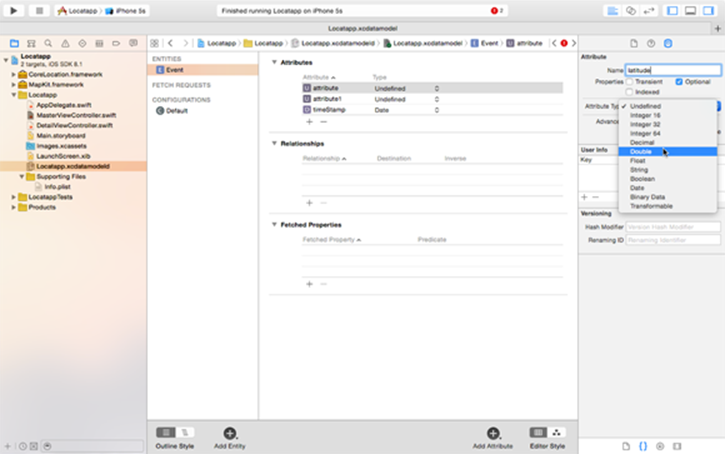
Figure 4-19: Naming attributes and setting their type.
A Core Data model parallels the classes in Objective-C and Swift in some ways. The language of data modeling (not just Core Data) is different from the programming language used in object-oriented programming. In the world of data modeling, an entity has attributes. In Swift (and Objective-C) a class has properties. The Xcode Data Model tool built into Xcode can convert a model entity to a programmatic class as well as convert an entity’s attributes to the class’s properties. (The conversion is one-way: You can’t reverse it.)
 When you turn a data model entity into a class, the class file is added to your project. If you have previously made this conversion, the existing file(s) for your data model’s class is erased. You will be warned, but if you have modified the class files, it is always a good idea to keep a backup that’s easy to reach so that you can quickly add the necessary code. This process is not for beginners, but I mention it here so that you may remember it later when you need it.
To convert your data model to a Swift class, follow these steps:
1. Select the entity you want to convert in the data model editor.
In your case, there’s only one entity: Event.
2. In the Data Model inspector in the utilities area, change the Class name to Locatapp.Event if necessary. (See Figure 4-20.)
Note that it may be listed as Event.
3. Choose Editor⇒Create NSManagedObject Subclass, as shown in Figure 14-21.
4. On the next two sheets, confirm that you want to convert the Locatapp data model and the Event entity; then click Next.
5. On the following sheet, make sure the language is set to Swift (not Objective-C).
The other settings are usually correct, but you can save the file wherever you want and place it into whatever project navigator group you want, as shown in Figure 4-22.
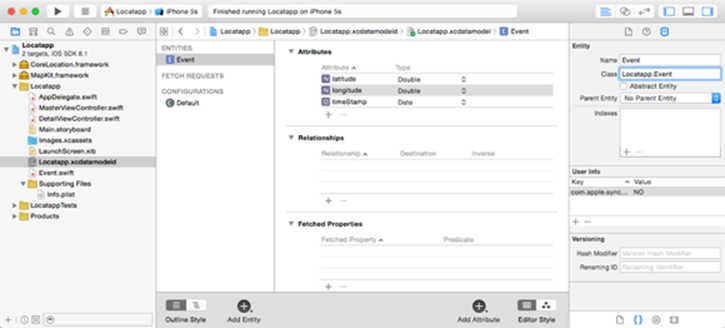
Figure 4-20: Setting the class name.
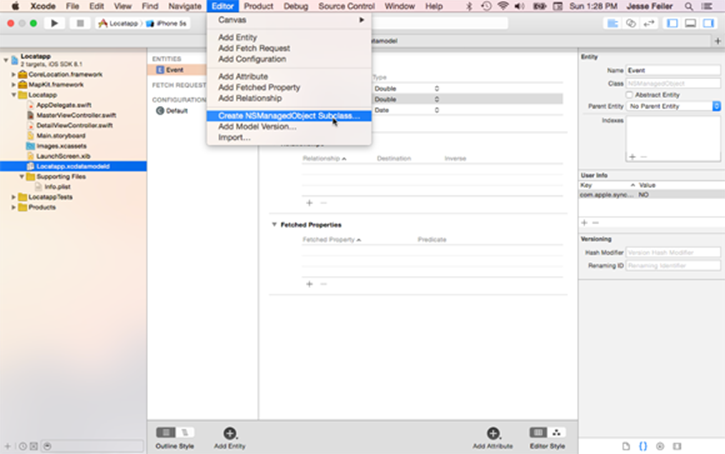
Figure 4-21: Converting the entity to a class.
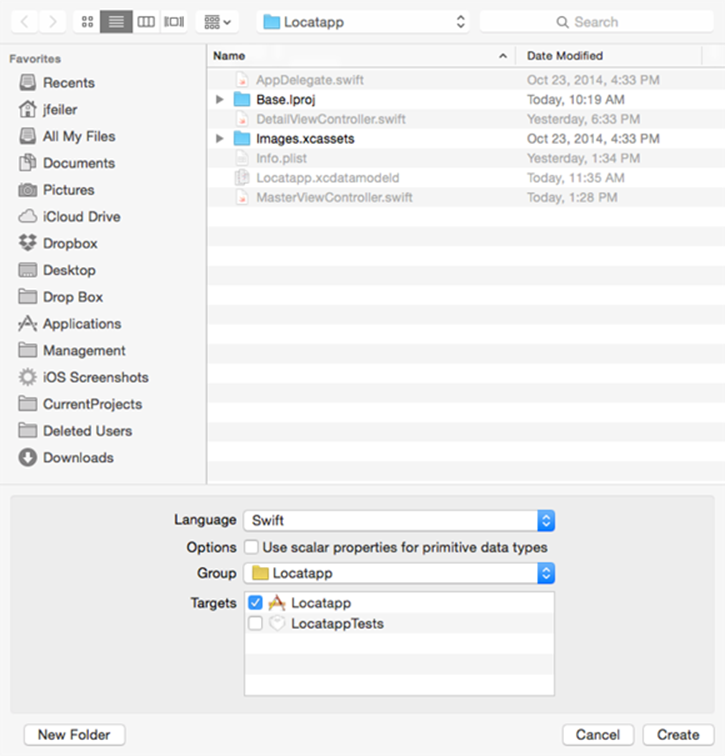
Figure 4-22: Confirming the name and language for the conversion.
You now have the modified data model converted to a class named Event that is defined in a new file called Event.swift. You can browse it in the project navigator if you want (but don’t make changes!).
Creating a new Event object and setting its latitude and longitude values
The Master-Detail Application template creates new Event objects when you tap the +, so that code is already implemented. All you have to do is to modify it so that instead of setting the new Event to the current timeStamp, you set it to the current latitude and longitude (which have been stored for you in lastLocation, which has been updated by locationManager(_:didUpdateLocations:), as I discussed in the previous section.
To begin with, locate the insertNewObject method in MasterViewController as it is now (this is the original Master-Detail Application code). Listing 4-3 shows that code for this method.
Listing 4-3: insertNewObject from the Template
func insertNewObject(sender: AnyObject) {
let context =
self.fetchedResultsController.managedObjectContext
let entity =
self.fetchedResultsController.fetchRequest.entity!
let newManagedObject =
NSEntityDescription.
insertNewObjectForEntityForName(“Event”,
inManagedObjectContext: context)
as NSManagedObject
// If appropriate, configure the new
// managed object.
// Normally you should use accessor methods, but
// using KVC here avoids the need to add a custom
// class to the template.
newManagedObject.setValue(NSDate(), forKey: “timeStamp”)
// Save the context.
var error: NSError? = nil
if !context.save(&error) {
// Replace this implementation with code to
// handle the error appropriately.
// abort() causes the application to generate
// a crash log and terminate. You should not
// use this function in a shipping
// application, although it may be useful
// during development.
println(“Unresolved error \(error),\(error.userInfo)”)
abort()
}
}
As you can see, most of the function is devoted to two lengthy comments.
There are two lines of code here you need to worry about:
· The first of these lines, the New Event Entity line, creates a new Event entity:
let newManagedObject = NSEntityDescription.
insertNewObjectForEntityForName(“Event”,
inManagedObjectContext: context)
as NSManagedObject
· The second line stores the timeStamp in the attribute. This is done using a technique called key-value coding (KVC), which is common in Cocoa and Cocoa Touch:
newManagedObject.setValue(NSDate(), forKey: "timeStamp")
Don’t worry if the details of this aren’t clear: I explore this process again in Chapters 6, 12, and 15.
Here’s how you make the changes to store the location:
1. When you create the new object, create it as an instance of the new Event type rather than as a NSManagedObject.
Change NSManagedObject to Event in the New Event Entity line in the preceding list so that it reads as follows:
let newManagedObject = NSEntityDescription.
insertNewObjectForEntityForName(“Event”,
inManagedObjectContext: context)
as Event
Creating the new object as an instance of Locatapp.Event rather than as an instance of NSManagedObject is actually optional in this example, but many people (including me) believe that it’s a good style to develop, and it is somewhat more efficient than using KVC in high-performance environments.
2. Set the Event class latitude property using the value from self.lastLocation.
You can replace the old timeStamp setting code or just leave it there. It’s still in the data model, so it doesn’t matter at the moment, and it might be useful in debugging if you want to take things one small step at a time.
newManagedObject.latitude =
self.lastLocation.coordinate.latitude
3. Set longitude in the same way with this code.
newManagedObject.setValue.longitude =
self.lastLocation.coordinate.longitude
Displaying the stored location
You’ve now stored the user’s location, but you need to display it. That’s a simple task once the previous steps are done. Listing 4-4 shows the configureCell code, which displays timeStamp in the Master-Detail Application template.
Listing 4-4: configureCell
func configureCell(cell: UITableViewCell,
atIndexPath indexPath: NSIndexPath) {
let object =
self.fetchedResultsController.
objectAtIndexPath(indexPath) as NSManagedObject
cell.textLabel.text
object.valueForKey(“timeStamp”)!.description
}
Instead of displaying object as an NSManagedObject, you display it as an Event. If this reminds you of the code in the previous section, you’re right: That code worked with the new object as an Event in setting its data. This code takes the data out of the Event object and displays it. Instead of displaying the timeStamp, you display the latitude and longitude along with some string titles.
Here is the code to use to replace the display code in the template:
let object =
self.fetchedResultsController.
objectAtIndexPath(indexPath) as Event
cell.textLabel.text =
“latitude: ” + object.latitude.description +
“ longitude: ” + object.longitude.description
Testing the App with Location Data
You should now be able to test the app and get results like those shown in Figure 4-20. You can change the location in iOS Simulator while it is running so that you can get several locations to check. Also, experiment with the master view controller list shown in Figure 4-23: the Edit button works and allows you to delete rows in addition to adding them with the + .
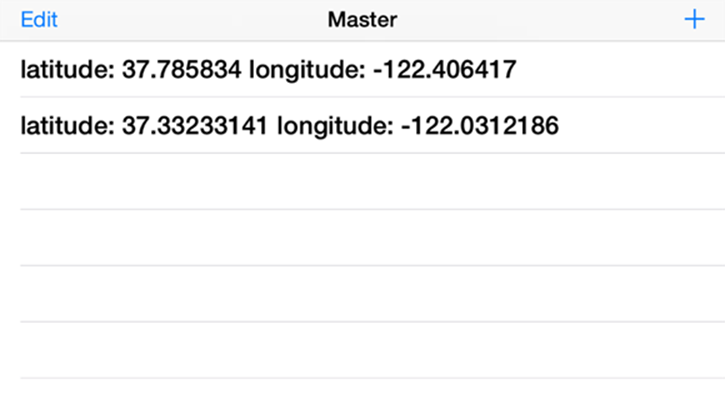
Figure 4-23: Testing the app.
You don’t have pins on the map to show individual locations, and you don’t have the social media integration, but they will come later in the book.
For now, you’ve seen enough Swift code that you are ready to dive into the syntax that you’ve seen here.
All materials on the site are licensed Creative Commons Attribution-Sharealike 3.0 Unported CC BY-SA 3.0 & GNU Free Documentation License (GFDL)
If you are the copyright holder of any material contained on our site and intend to remove it, please contact our site administrator for approval.
© 2016-2026 All site design rights belong to S.Y.A.