Swift For Dummies (2015)
Part II. Introducing Actions
Chapter 6. Using Swift Types
In This Chapter
![]() Exploring Swift types
Exploring Swift types
![]() Refining type declarations and references
Refining type declarations and references
![]() Using types to improve readability of code
Using types to improve readability of code
![]() Working with tuples and optionals
Working with tuples and optionals
In most programming languages, variables and constants not only have values, they also have types. C (the progenitor of many of today’s languages) provided four basic arithmetic types (char, int, float, and double) that can then be enhanced with optional specifiers, such as signed,unsigned, short, and long to form more complex and sophisticated types.
Adding types for variables and constants means that the compiler at runtime can perform more efficiently and can more easily check for errors. For example, in most languages, assigning “Hello” to an int type is a mistake likely to raise an error or exception at compile- or run-time. In a properly written app, every error or exception raised is a crash that’s been averted (provided that you’ve done your part by adding the necessary error- and exception-checking code to catch those errors).
Together with assertions (which are discussed at the end of this chapter), Swift types let you know what a variable or constant is in terms of its type as well as its content (that's where assertions come into play). This makes code more maintainable over time.
This chapter shows you the what, why, and how of Swift types. You see what the types are, why they're present in the language, and how you can use them most productively.
 Types are intimately related to declarations, which are discussed in Chapter 11, and to initializers, which are discussed in Chapter 12.
Understanding Types and Type Safety
If you want a thorough discussion of types in computer languages, read Types and Programming Languages by Benjamin C. Pierce (The MIT Press; ISBN 0-262-16209-1). A sentence from that book sums up the concept of types nicely: “A type system is a syntactic method for enforcing levels of abstraction in programs.” You can make a good case that everything done in the digital world of programming is an act of abstraction — a move from the real world of concrete objects and ideas to the digital world of ones and zeroes — but this interesting conversation is beyond the scope of this book.
Pierce’s book tells you everything you need to know about types in a mere 648 pages. In Swift For Dummies, on the other hand, I examine Swift types in a much less-detailed manner, so you understand only what you need to know to use types efficiently in Swift.
 The discussion of types and variables in this chapter applies to constants as well.
Considering type safety
Swift implements type safety, which basically means that you can’t use a variable inappropriately for the terms of its type. In other words, according to the rules of type safety, you can divide by zero — that's not a type error — but you can't perform an arithmetic operation with a string unless you do some conversions first.
Type safety can be described in a language specification and is enforced in a development environment like Xcode; it can also be enforced with careful programming. That's part of the problem: Without enforced type safety, it’s very easy to slip up and create unsafe code. In many environments, unsafe code may fail the first time you run it — this is the best-case scenario. Unfortunately, the most common scenario is that the code fails at various times. Often its failure has to do with the memory your app has to work with, so the unsafe code may fail depending on what other apps or functions are running at the time. Letting the development environment enforce type safety is the safest way of handling these problems. ( Relying on the good intentions of people is, alas, not always the wisest choice.)
The Swift language specification describes its type safety as part of the language; the entire language specification is enforced by the compiler as well as by the Xcode development environment. In common usage, however, people often say things like “Swift enforces type safety.” In fact, Swift only provides the specification; it’s Xcode and the LLVM compiler that do the enforcement. Nevertheless, unless there is a reason to make a distinction between the Swift specification and its implementation in Xcode and the compiler, this book refers in a general way to Swift.
Swift takes two approaches to enforcing type safety: tightening up coding standards and inferring types. It uses other approaches as well — you’ll see examples throughout this book — but these are the major ones.
Using type aliases to clarify code
Like all other names in your app, type names should be descriptive. Sometimes finding an appropriate descriptive name can be difficult, however, particularly when you’re working with code from several sources. In these cases, you can declare a type alias to improve your code's readability. You can do this using syntax such as the following:
typealias myAlias = myStrangeTypeName
This is purely a cosmetic issue: The type name is not changed.
Tightening coding standards
There has long been a trade-off (some people would call it a battle) between the coding practices of strict and loose typing of variables. Strict typing is more trouble, and it can cause compile errors as the compiler objects to vaguely-typed variables. Loose typing is simpler to write and incurs fewer compiler errors, but it can cause more runtime errors and crashes.
Swift tightens coding standards. To a large extent, these standards consist of language limitations that prevent unsafe code. Here are some of the type safety measures that Swift puts in place and enforces:
· Pointers: Pointers let you access memory directly, which can lead to all sorts of problems. The basic Objective-C syntax for accessing an instance of a class involves a pointer: This is not the case with Swift.
 When you declare an instance of a class such as UIView in Objective-C, you do so with code such as UIView *myView. That asterisk indicates that you're working with a pointer (this is plain old C syntax). If you are used to Objective-C, most of those asterisks are history for you. The exception is if you are mixing Objective-C and Swift. See the PDF document called Using Swift with Cocoa and Objective-C on developer.apple.com for details.
· Initialization: Variables must be initialized in Swift before use. There is no way to use uninitialized variables in Swift. (See the following section, “Inferring types.”)
· No nil: In other languages, nil is often used to provide a value that can be tested to see if an object exists. In Swift this is handled with optional types (discussed later in this chapter in the section, “Using optional types for values that may or may not exist”).
· Memory management and overflow checking: Swift has inherited Objective-C’s features implemented with advanced compiler behaviors, such as Automatic Reference Counting (ARC).
Inferring types
Because Swift requires variables (and constants) to be initialized before being used, the compiler and runtime library always have a value for each variable. ( Note the exceptions with optionals, however, that are discussed later in this chapter.) From this value, Swift can infer a type without your having to specify it. In other words, you can specify the type for any variable, but you don’t have to do so if that variable is initialized with a value from which Swift can infer the type.
Arrays and dictionaries in Swift must contain instances of the same type. Thus, when you create an array or dictionary, you must either explicitly specify its type or provide initial values so that Swift can infer the type of the array or dictionary. In either case, Swift can determine the type of the values in the array or dictionary.
 When you are dealing with classes and subclasses, you may want to use an explicit type. If your array or dictionary is eventually going to contain instances of subclasses of a given class, you may initialize it with several of those subclasses. For example, an array that will contain various instances of UIView subclasses can be initialized with one or more UILabel instances. However, there is no way Swift could infer UIView from instances that do not include all possible UIView subclasses. So if you’re aware that you’ll want to add (say) UIButtoninstances later on, you may prefer to explicitly type the array as UIView so all of the UIView subclass instances are welcome.
Exploring Swift types
 Swift's handling of types is similar to other languages, but each language has different emphases and rules. In general, these rules have to do with the ways typing must be implemented in cases where there is ambiguity. How much does the language (or its compiler or runtime library) do to ensure type compatibility? Swift's approach to these issues, as you’ll see, is different from other languages. Don't skip this section.
Broadly speaking, Swift has two categories of types. In the first category, four types are built into the Swift standard library, and these are available to you without further ado. They’re described in the following section, “Swift Standard Library Types.”
In the second category are the types you can create. These fall into three groups:
· structures (struct)
· enumerations (enum)
· classes
Structures and enumerations are basic C types, whereas classes are at the heart of object-oriented programming. All of these let you group data together into an element that can be assigned to variables (or constants) and passed around with a simple assignment statement.
 If you're not used to using structures, enumerations, and even classes, it’s worthwhile to take the time to learn about them. This book provides a good basic introduction for Swift developers, but if you want more details, you can find them in books about basic programming techniques. Although it may take a little while for you to get used to using these complex types, it’s worth it. The point is, by using a complex data structure, you can reduce the amount of code you have to write because much of the complexity is in the data structure rather than in your code.
Swift Standard Library Types
As with other languages, Swift provides developers a common library of utility code that’s frequently used in development. A library like this is separate from the language itself, although it uses the language’s syntax and features. Although you can replace this library with another, non-standard one, most people prefer the standard library, and, in fact, replacements are very rare.
The contents of a standard library reflect the language and its intended uses. For example, the C standard library (sometimes called the ISO C Library; it’s available online at www.open-std.org/jtc1/sc22/wg14/www/docs/n1570.pdf) contains routines for string handling, mathematical functions, input/output, and character manipulation. The library represents nearly 300 pages of the entire 650-page C language specification.
By contrast, the Swift standard library is 50 pages long at this time; it contains:
· types (discussed in this section), which include:
· strings
· arrays
· dictionaries
· numeric types
· protocols (discussed in Chapter 18)
· free functions (discussed in Chapter 9)
 If you want to delve deeply into the C library as well as Swift, you'll find that some of the functionality described in the C library is implemented directly in Swift as well as in the Cocoa and Cocoa Touch frameworks. What matters at this point is that the standard library is the ultimate reference for Swift types.
Strings
A Swift string is an ordered set of characters. When you use a string literal, you enclose the characters in quotes like this.
"ABCDE"
The Objective-C syntax is not used so you can forget the @:
@"ABCDE"
Swift begins from the premise that its users will be international, so any Unicode character is acceptable as a string value or for the name of a constant or string.
Arrays
Arrays are discussed in Chapter 7, “Collecting Objects.” Swift arrays are similar to arrays in other languages except that all elements of an array must be of the same type, and the array is then said to be of that type. In the case of classes, as opposed to values (enumerations and structures), the common type for elements of an array may be a superclass. Thus, an array of UIView instances can still be a UIView array if it contains UILabel and UIButton instances, which are both subclasses of UIView.
Unlike arrays in Objective-C, Swift arrays are not classes; they are actually implemented as structures.
Dictionaries
Dictionaries are also discussed in Chapter 7. Like arrays, dictionaries have a common type for their elements. In other languages, dictionaries are called associative arrays. Each element has a key value rather than a number index. The key values are converted to index values that can locate a dictionary value.
Numeric types
The Swift standard library provides support for common numeric types. The basic types are:
· Boolean: The Bool type has values true and false. (Note that this differs from Objective-C, which supports YES and NO as well as TRUE and FALSE.)
· Integer: The Int type is a full word interpreted as a single binary integer. The size of words changes from time to time (at the moment, both 32- and 64-bit words are common, depending on the device). Because of this variation and the likely changes in the future, make no assumptions about word size. Also additional types exist for signed and unsigned integers, as shown in Table 6-1.
· Floating point: Double is the most commonly used floating-point type. It uses 64 bits — but a 32-bit Float is also available.
Table 6-1 Swift Integer Types
|
Length (bits) |
Signed |
Unsigned |
|
8 |
Int8 |
UInt8 |
|
16 |
Int16 |
UInt16 |
|
32 |
Int32 |
Uint32 |
|
64 |
Int64 |
Uint64 |
Protocols
Protocols are implemented in a number of object-oriented languages. Sometimes, as in Java, they’re called interfaces. To a certain extent, pure virtual functions in C++ abstract classes are also very much like protocols in Objective-C and Swift.
In the simplest sense, protocols are the methods and properties of a class but without the class. In Swift, they can be implemented by any class, structure, or enumeration that adopts the protocol, and each class that adopts the protocol may implement it in a different way, using its own data and rules for that data.
For more details on protocols and their syntax, see Chapter 13, “Expanding Objects with Extensions.”
The Swift standard library has three protocols:
· Equatable
· Comparable
· Printable
These protocols have default definitions, but you can write classes, structures, and enumerations that conform to the protocols and implement the protocol properly in the context of your class, structure, or enumeration and its data. However, don’t think that you have to implement these protocols: You only need to implement the protocols if you want to change the default behavior.
The first two of these Swift standard library protocols involve overloading binary comparison operators (==, for the first, and <, >, <=, and >= for the second). If you want to play with the un-overloaded built-in operators as you read this chapter, create a playground with the code in Listing 6-1. You can then change the values and operators as you go along. (See Figure 6-1.) Note that b3 on the left of Figure 6-1 is set to 3; on the right, it’s set to 4. This changes the result of bTest.

Figure 6-1: Experimenting with built-in operators: The Equatable protocol.
Listing 6-1: Experiment with Built-in Operators
var b3 = 3
var b4 = 4
var bTest = b3 == b4
Equatable
This protocol returns a Boolean value that indicates whether two compared arguments are equal. It overloads the == operator. As I discuss in Chapter 13, this function takes two arguments (lhs and rhs) of the type Self (which means the type that adopts the protocol). Here is the definition of the overloaded operator in the protocol:
func == (lhs: Self, rhs: Self) -> Bool
Protocols defining overloaded binary operators often use lhs and rhs to refer to the two arguments — left side and right side.
What does equality mean? The definition differs depending on the factors being compared. A class that works with various representations of integers, for instance, might make VIII equal to 8 and to eight. This is the point of writing a protocol for your class to adopt or of assigning your class to conform to a protocol written by someone else: The protocol defines the action, but you implement it for your own environment.
Experiment in your playground with the code shown in Listing 6-1 and Figure 6-1. Try changing the value of b3 to 4 and watch the result as shown in Figure 6-2. Remember that it may take a few moments for the playground to catch up to your typing if you type quickly.
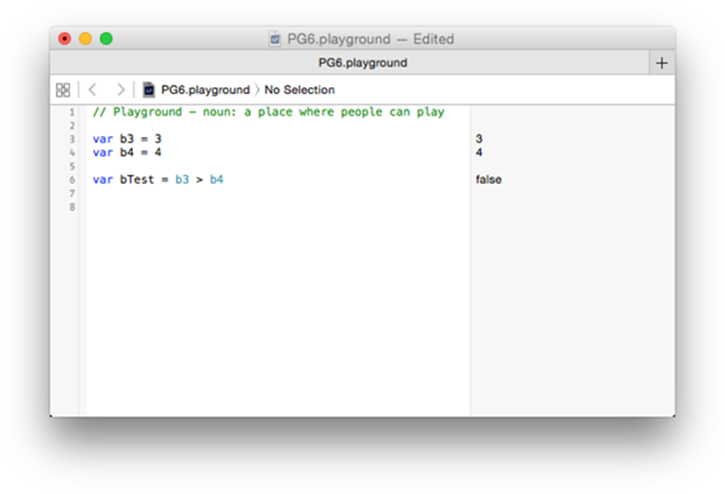
Figure 6-2: Experimenting with built-in operators: The Comparable protocol.
Comparable
The Comparable protocol returns a Boolean value that says whether or not an argument to the < operator is less than another. It requires you to overload the < operator. The definition of the overloaded operator is:
func < (lhs: Self, rhs: Self ) -> Bool
Swift treats the comparison operators as a group — a logical approach, when you think about it. After all, you already have either a built-in or overloaded test for equality with the == operator. And an overload for the < operator also implies an overload for the > operator — because you can turn y > x into x < y simply by reversing the two sides of the expression and flipping the operator. The <, then, can serve as both operators, depending on how you set up the expression.
Thus, merely by overloading < you wind up with overloads for ==, <, >, <=, and >=.
Experiment with the code in Listing 6-1 by changing == to < and changing values of b3 and/or b4 to make the expression true or false. Without supplying your overloading code, replace the operator in Figure 6-1 and Listing 6-1 with <, as shown in Figure 6-2.
Printable
The Printable protocol returns a text representation of an instance of a type. This is done through the description property.
Here is the declaration of the property (note that the get makes it a read-only computed property):
var description: String { get }
Test this protocol by adding a println function call to your code, as shown in Figure 6-3. Compare the results shown at the right of the window. When b3 and b4 are set to values of 3 and 4 respectively, the results are shown at the right. These are numeric values generated by the playground.
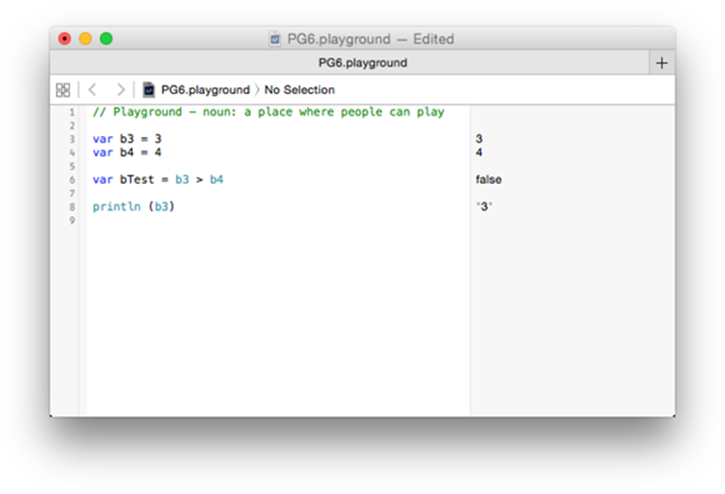
Figure 6-3: Experimenting with built-in operators: The Printable protocol.
When you print out the variables with println, Swift invokes the Printable protocol and returns the description property of the variable, which is a string (note the quotation marks).
You can access the description property of the protocol directly. To demonstrate this, add the following line of code to your example (as shown in Figure 6-4):
var s = b3.description
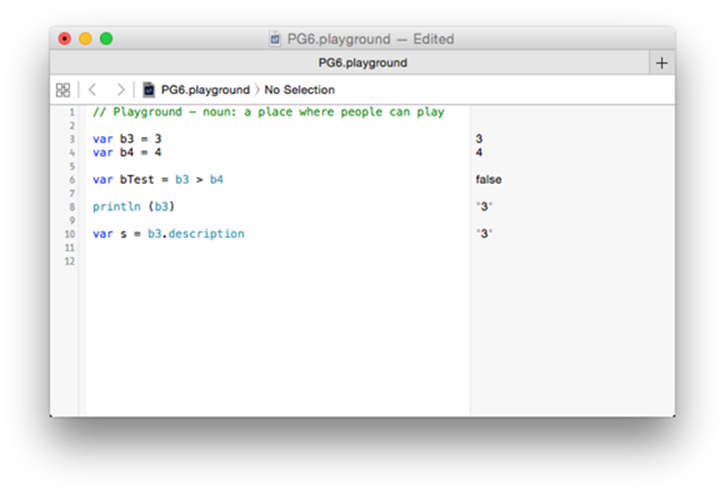
Figure 6-4: Accessing the Printable protocol’s description property.
Note the quotation marks again in the sidebar: You have asked b3, which is an Int, to provide its description, which is a String.
How do you know b3 is an Int? See the section, “Specifying Variable or Expression Types with Type Annotations,” later in this chapter.
Free functions
In object-oriented programming, most methods and functions (interchangeable in this discussion) as well as properties are declared inside classes. That goes along with the notion that globals in general are not a good programming practice.
However, in some cases, free functions — functions that aren’t part of any class — are useful. The two most commonly used free functions in the Swift standard library are print and println.
In Objective-C, there is a common base class (NSObject) with an accompanying NSObject protocol. Almost every object in Objective-C descends from NSObject and therefore conforms to the NSObject protocol. General-purpose functions such as description wound up in theNSObject protocol for Objective-C but in the Printable protocol for Swift. Perhaps this is because there is not a common base class like NSObject in Swift. Almost every object-oriented language has come to grips with the issue of where to put general-purpose utility functions of this sort.
Printing
The heart of printing is preparing a printable version of an instance. That is done in the description method of the Printable protocol, and it is implemented for the standard types. If you create new types that are not subclasses of standard types, you can decide whether or not to conform to the Printable protocol and implement description. You can print out a value or a summary or anything you want.
In Swift, the printing code itself goes into the pair of free functions — functions that are part of no class but that are globally available to any class instance. println is used as it is used in C. If you pass an instance to println, its description is printed out.
As is true in many languages, println adds a new-line (return) character to the printed string. print does not; if you want a new line, use \n inside the print function string.
Algorithms
The Swift standard library provides some algorithms for common tasks such as sorting and finding. You can implement them to make your classes and structures sortable and findable. This is an area of Swift that is still in progress as this is written.
Specifying Variable or Expression Types with Type Annotations
This section provides some examples of the use (and misuse) of type syntax in Swift. It sets the stage for the further discussions of type syntax that follow in this chapter.
Some languages help you out by automatically converting one type to another when the conversion is obvious. The problem with automatic conversions, however, is that they work their magic behind the scenes. This is very convenient, but in some cases it can be dangerous. For example, a simple typo can send the conversion off in the wrong direction; there are cases where such a typo and misleading conversion generate an error or crash months or years later. Such data-dependent bugs are notoriously difficult to track down.
Long battles have been waged about whether the convenience of self-correcting compilers is a good or bad thing. Swift comes down emphatically on the side of demanding that you keep your types strictly defined and synchronized. Although conversions don’t happen behind the scenes, Swift does infer types from values that you provide. Thus, the value 2 is inferred to be an integer type, whereas 2.0 is inferred to be a floating point type. These inferences can be overridden, and so with Swift the process of typing variables (and constants) is more in your control than it may be in other languages. Furthermore, you have playgrounds to use as a tool to test type inference. As you can see in Figure 6-5, playgrounds allow you to test code and get immediate feedback. You can't multiply an integer by a string, and that's the end of the story.
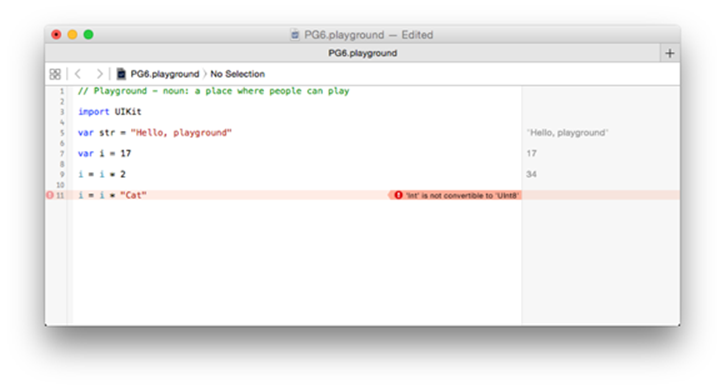
Figure 6-5: Swift enforces type safety.
Figure 6-5 should raise a question for you: Why does Swift assume i to be an integer? In some very early programming languages, such as FORTRAN, the first letter of the variable determined its type. Variables beginning with I, J, K, L, M, and N were understood to be integers, and that was the end of the discussion. This coincided with common algebraic usage, so it seemed obvious. (In fact, algebra is where the variable-naming rule came from.) But typing variables based on the first letter of their name is a long-discarded technique.
Swift knew i was an integer because it is initialized to an integer — 17. In Swift, variables and constants must be initialized, and from that initial value, their type often can be inferred. (However, you can add a specific type annotation to remove any ambiguity.) An annotation follows a colon after a variable name as in
var i: Int
An annotation is not required because if a variable is initialized, Swift can often infer the type from the value and format of the initializer (for example, 25 as opposed to 25.0).
Figure 6-6 shows another example of Swift's insistence on type safety. You can follow these steps to duplicate the example.
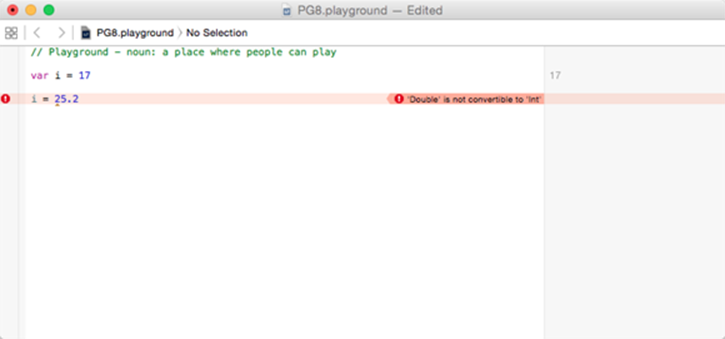
Figure 6-6: You cannot assign a Float or Double to an Int.
1. Create a new playground for iOS and Swift.
If you want, delete the import UIKit and var statements.
2. Declare a variable i and initialize it to 17.
Swift infers that it is an integer (Int).
var i = 17
3. Set i to 25.0 (or attempt to).
You get the error shown in Figure 6-6. This is because you cannot assign a Double (or Float) to an Int.
i - 25.0
You may disagree with Swift in this matter, but 25.0 is not an integer, and so it must be converted from a floating point number to an integer before you can assign it to an Int. Although 25.0 and 25 are mathematically equal, they are different types, with different representations in memory (because floating point numbers have an exponent and mantissa).
Although modern computers do not have the inconsistencies in converting integer and floating point representations of the same number from one to the other that older computers had, some inconsistencies persist. These inconsistencies arise most often in borderline cases (such as when using very large numbers, very small numbers, or specific numbers that are notorious for causing trouble in the binary-to-digital conversion of floating point numbers).
4. Convert 25.0 to an Int and assign it to an Int variable as shown in Figure 6-7.
i = Int(25.0)
5. You can change the declaration of i to explicitly be a Float even though it's initialized as an apparent Int value.
var i: Float = 17
6. Now Swift will allow you to set i to 25.0 (a Float). (See Figure 6-8.)
It also allows you to set it to 25 (because this conversion is safe).
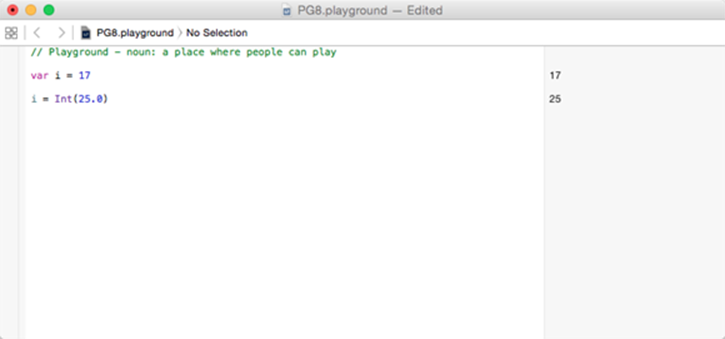
Figure 6-7: Converting a Double (or Float) to an Int. and assigning it to an Int variable.
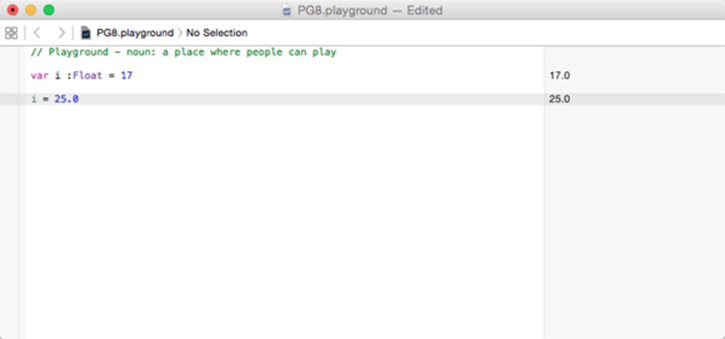
Figure 6-8: Conversion from Int to Float (or Double) can be done automatically.
Dealing with Tuples
As I discuss in Chapter 7, in Swift, both arrays and dictionaries let you combine values into groups, much as they do in other programming languages. No matter how many elements you have in an array or dictionary, all are included in the collection that you can reference by its name (such as myArray). Unlike arrays and dictionaries, a tuple can consist of a variety of types, but those types are part of the tuple definition as you will see in the following paragraph.
Tuples provide another way of combining many values into one named group. With tuples, the values can be the results of expressions, constants, variables, or literals. For instance, this is a single tuple consisting of three values (in this case, literals):
var myTuple = (5, 103, true)
Note that a tuple is not just a collection of elements. The number of elements and their types must be the same in each use. (You’ll see more about this in the section, “Type safety with tuples,” later in this chapter.)
If you glance at samples of Swift code, including the various examples on developer.apple.com, you’ll find that tuples are used extensively. Pay close attention to this section, then. It’s important to understand.
The code snippets discussed in the following sections are shown in Listing 6-2 and in Figure 6-9. (Use either of the first two lines to declare myTuple; then experiment with the other line.)
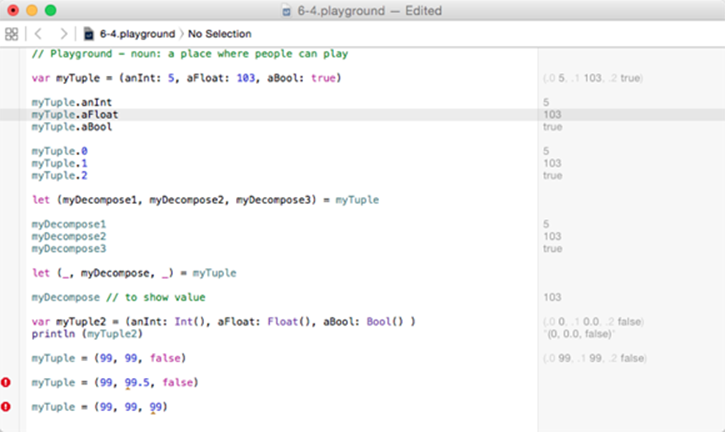
Figure 6-9: Experimenting with tuples.
Listing 6-2: Experimenting with Tuples
var myTuple = (5, 103, true)
//or
var myTuple = (anInt: 5, aFloat: 103, aBool: true)
myTuple.anInt
myTuple.aFloat
myTuple.aBool
myTuple.0
myTuple.1
myTuple.2
let (myDecompose1, myDecompose2, myDecompose3) = myTuple
myDecompose1
myDecompose2
myDecompose3
let (_, myDecompose, _) = myTuple
myDecompose //to show value
var myTuple2 =
(anInt: Int(), aFloat: Float(), aBool: Bool() )
println (myTuple2)
myTuple = (99, 99, false)
myTuple = (99, 99.5, false)
myTuple = (99, 99, 99)
Decomposing a tuple
You can decompose a tuple into separate variables. Consider our original tuple:
var myTuple = (5, 103, true)
You can decompose it with the following code:
let (myDecompose1, myDecompose2, myDecompose3) = myTuple
After a tuple’s elements have been decomposed, you can access them as you would any variable or constant. In a playground, just type their names and their values will appear at the right.
myDecompose1
myDecompose2
myDecompose3
This is the declaration of myDecompose1, myDecompose2, and myDecompose3: Note that you don't have to create a separate variable before decomposing the tuple.
Accessing tuple values with names
You can name the elements of a tuple when you create it. For example, you can create the same tuple shown previously with names. (This is the difference between the two alternate first lines in Listing 6-2.)
var myTuple = (anInt: 5, aFloat: 103, aBool: true)
Accordingly, you can decompose it using these names as in the following code:
myTuple.anInt
myTuple.aFloat
myTuple.aBool
Accessing tuple values with index numbers
The tuple notation in the previous example demonstrates the use of names. However, you can also decompose a tuple using index numbers to refer to its elements. In fact, you can always use index numbers, for any tuple, but you can use names only if you provided them when creating the tuple. Here’s an example of using index numbers to decompose a tuple (note that the index numbers start at 0):
var myTuple = (5, 103, true)
//or
var myTuple = (anInt: 5, aFloat: 103, aBool: true)
myTuple.0
myTuple.1
myTuple.2
Skipping tuple values with underscores
If there are any tuple values you don't care about, you can skip them by including underscore characters when you decompose the tuple. Using the tuples shown previously (either named or unnamed), you can write the following code, which creates a single myDecompose variable and ignores the other tuple data:
let (_, myDecompose, _) = myTuple
myDecompose //to show value
Creating a tuple with types
When you are creating a tuple, it can be useful to get into the habit of naming the elements and explicitly setting their types. You can do that with code such as the following.
var myTuple2 =
(anInt: Int(), aFloat: Float(), aBool: Bool())
This sets the elements and their names to instances of Int, Float, and Bool. You can then set their values. The names and types are now unambiguous.
Type safety with tuples
As noted previously, when you create a tuple, you specify the number of values as well as their types. When those values are literals, constants, variables, or expressions, however, you can implicitly specify the types, and allow Swift to infer the type of each element.
The list below demonstrates how to create tuples, using constants, variables, or literals whose types are inferred from their initial values. If you created the tuples in earlier sections, you can use these steps in this list to experiment with type safety.
In the following list, I deliberately ask you to create errors to demonstrate type safety (specifically in steps 4 and 5). After creating errors like these (intentionally or accidentally), you must fix the error or delete the test code to reset the playground; otherwise, the playground may not evaluate the rest of the code.
1. Declare a tuple.
You can name the elements or not — it doesn't matter for this exercise. To make things simple, use only one of the following lines of code:
var myTuple = (5, 103, true)
var myTuple = (anInt: 5, aFloat: 103, aBool: true)
2. Set the tuple to new values with the following code.
Use this code exactly as shown here:
myTuple = (99, 99, false)
3. Now set your tuple to the following values:
myTuple = (99, 99.5, false)
You should get an error. (Type ‘Int’ does not conform to protocol ‘FloatLiteralConvertible.’)
4. Try setting it to these values:
myTuple = (99, 99, 99)
You should also get an error. (Type ‘Bool’ does not conform to protocol ‘IntegerLiteralConvertible’)
From the initial tuple creation in Step 1, Swift infers that your tuple consists of three elements (you can see that) and that they are an Int, another Int, and a Bool. This is inferred from the initial values: Names have nothing to do with it. Thus, an element created as an Int, such as aFloat, cannot be set to the floating-point value 99.5. Similarly, an element whose initial value was of Boolean type, such as aBool, cannot be set to an integer value like 99.
Working with Optional Types
Type safety and strict typing are all well and good, but sometimes the real world intervenes. The most common problem with strict typing in computer languages is handling non-existent values (that is to say, empty variables). This has been a problem since the dawn of computer programming. You may have probably seen some of the workarounds for this problem.
Workarounds for missing data
A common workaround to handle non-existent values is to designate a type-conforming value (often 0, –1, and 99 — or its companions 999 and 999999999) to have a special meaning.
This allows you easily to identify real data and to distinguish it from non-data values. There are many examples of multiple special values. (See the nearby table for some possibilities.)
|
Value |
Meaning |
|
99 |
Missing data |
|
0 |
Data being entered |
|
–1 |
Invalid data (present but not usable) |
|
–2 |
Data not verified |
Is this a good workaround? How would you like to work on an app that uses these special values? Take a moment and think about how you would compute the average of data values. (If you know anyone who worked on the Year 2000 problem, ask them how much time they spent turning 1999 from a special value to an actual date.)
As the nearby sidebar, “Workarounds for missing data,” shows, designating special values is a poor solution, but the need to flag missing data still exists. Objective-C uses a value of nil to represent an instance of a class that has no value yet. That works well, as far as it goes, but what do you do for structures, enumerations, and even basic C types that don't exist?
To address this issue, Swift uses optional types. An optional type is created by including the modifier optional before a type name, as in optional Double, or, more commonly, by writing Double?.
In practical terms, a variable (or constant) can be an optional type only when that variable has either the specified type or the special value of nil. Any type can be optional. Thus, optional types allow you to have a nil value for an Int?, a UIView?, or anything at all.
Don't read too much into the word optional. The term means only that the variable can be either the specified type or it can be nil. It can't be another type.
Optional types are often referred to as optionals, as in “That property is optional,” or “That property is an optional.” The fact that a type is optional can be more important in some contexts than the type of which it is optional. All optionals can have a value of nil, and that is their commonality. Putting it in reverse, if you need to be able to specify a value of nil for a variable, it must be an optional. In Swift, nil is the only non-data value that can be stored in a variable. It is conceivable that someone will add a new wrinkle to Swift in which other special non-data values (perhaps “estimated”) would exist, but that's not planned as far as we know. If you need to manage non-data values for a variable or constant, you have to implement your own mechanism.
Using optional types for values that may or may not exist
Optional declarations look like this.
var testOptionalInt: Int?
var testOptionalView: UIView?
If you inspect an optional variable immediately after you declare it, you'll see that it has been automatically set to nil. This goes along with Swift’s insistence that all variables be initialized. In the case of an optional, the initial value must be nil unless you specify something else.
The most common reason for creating an optional when you do know the initial value is to reserve the ability to set that variable to nil sometime later. As you can see in Figure 6-10, playgrounds display the values of optional variables with the keyword Some.
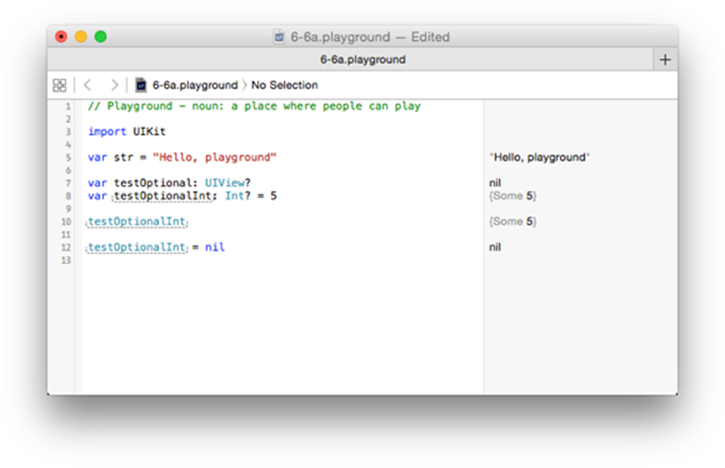
Figure 6-10: Declaring and using optionals in a playground.
Using forced unwrapping with exclamation marks
You can test whether or not an optional has data simply by testing its value for nil. If it’s not nil, it must be the specified type, and you can access its underlying value. This is called unwrapping. You can unwrap an optional by following the variable name with an exclamation mark. (SeeFigure 6-11.) However, you must make certain there is something there before you unwrap it (in other words, is must not be nil).
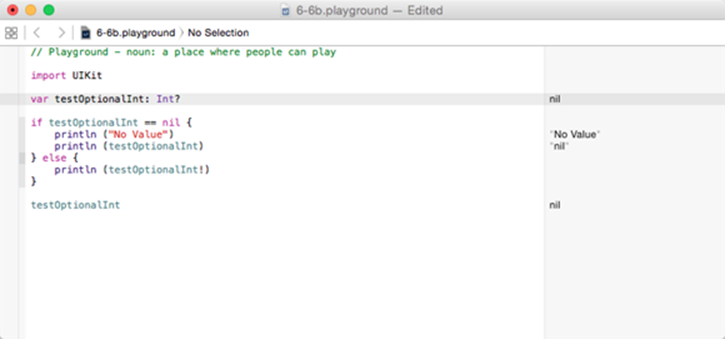
Figure 6-11: Unwrapping an optional.
The steps below help you experiment with optionals. When you work with optionals, you’ll frequently follow these steps. (The result is shown in Listing 6-3.)
Listing 6-3: Unwrapping an Optional
var testOptionalInt: Int?
if testOptionalInt == nil{
println ("No Value")
} else {
println (testOptionalInt!)
}
1. Declare an optional of the type you want.
You can do this by typing in the following code:
var testOptionalInt: Int?
At the right of the playground window, you'll see that Swift has set your optional to nil.
2. Test whether it is nil.
Type in the following line:
if testOptionalInt == nil
3. If it is, print out a message.
println ("No Value")
4. If it is not nil, it has a value. Unwrap that value and print it out.
println (testOptionalInt!)
5. Print out the unwrapped value before you get to the if statement.
This will cause an error because there is nothing to unwrap. That's why you always need to test an optional for nil before unwrapping it.
var testOptionalInt: Int?
println (testOptionalInt!) // this will cause an error
if testOptionalInt == nil{
Using optional binding to access an optional value
Optional binding is a special case involving optional types that lets you combine the assignment and the test in a single line of code. It lets you quickly test to see if a variable that’s optional (that is, that may have a nil value) exists, and, if it does, to access the value. The following line of code comes from the completed Locatapp example (in DetailViewController.swift):
if let activityURL =
NSURL (string:"http://champlainarts.com") {. . .
As is often the case with complex code, it’s easiest to parse it from the inside out. Here's what goes on here:
· A NSURL instance is created and initialized with a string (string:“http://champlainarts.com”).
· The NSURL instance is assigned to a local variable (activityURL).
· The if statement tests to see if activityURL exists (that is, if it’s not nil).
Using Generic Types
Swift provides the ability to use generic types to simplify your code. Generic types are specified with a type placeholder — often called T. Two common uses of generic types are: generic functions and generic types.
Using a generic function
When declaring a generic function, the placeholder is placed just after a function name, as in:
func myFuncWithPlaceholder <T>
You can then use T as a type name in the function. Many times, T is used as a parameter; to use it this way, declare a function like this:
func myFuncWithPlaceholder <T> (a: T, b:T)
This common style lets you declare a function that takes two parameters (a and b) that may be of any type, although both a and b must be of the same type.
Using a generic type
In the case of a generic type, you can use a generic anywhere in a function — as the type of a variable or parameter, as the type of an array, or as the return value of a function.
You declare the generic type in the same way as you do a function — by placing it in brackets after the name of the entity, as in:
struct myStructWithPlaceholder < T>
You have to let Swift know what the generic type will be when you use the object. ( In the case of generic functions, Swift only enforces that both uses of the generic type are of the same type.)
Here’s how you would use a generic type:
var myUseOfGeneric = myStructWithPlaceholder<Int> ()
Then, each occurrence of T within your structure (or class or enumeration) is assumed to be an Int.
When used within a class, enumeration, or structure, your placeholder type is not placed in brackets. In other words, don't write < T>; just use T.
All materials on the site are licensed Creative Commons Attribution-Sharealike 3.0 Unported CC BY-SA 3.0 & GNU Free Documentation License (GFDL)
If you are the copyright holder of any material contained on our site and intend to remove it, please contact our site administrator for approval.
© 2016-2026 All site design rights belong to S.Y.A.