Swift For Dummies (2015)
Part II. Introducing Actions
Chapter 7. Collecting Objects
In This Chapter
![]() Working with mutable and immutable collections
Working with mutable and immutable collections
![]() Starting with arrays
Starting with arrays
![]() Storing data in dictionaries
Storing data in dictionaries
It’s often convenient to be able to group objects into collections so that you can handle them together. Whether you’re talking about students in a class, items in a desk drawer, or values in an array, collecting items together makes your code easier to read (and write!).
Swift has two types of collections: arrays and dictionaries. Arrays are the standard indexed collections of values that can be accessed by their index. Dictionaries are associative arrays in which the values are accessed by a key value and a hash routine.
 As is true in most languages that support arrays and dictionaries (or associative arrays), the syntax for manipulating these collections and their data values is different for the two forms of collections. Associative arrays are usually thought to be a specific type of array rather than a separate concept altogether. For most programming languages, including Swift, the indexes for arrays are integers. Associative arrays, on the other hand, can use other types of objects as indexes. Access to integer-based arrays usually involves use of the arithmetic index, and for associative arrays, a hash routine, which is used to convert the index value to a number. In languages other than Swift and Objective-C (as well as Python, REALbasic, and .NET), associative arrays can be called hashes, hash tables, or maps.
Playing by Swift Collection Rules
If you have experience with other programming languages (and you should have experience with at least one), you must have already encountered arrays and possibly associative arrays (or dictionaries, in Swift-speak). However, don’t just assume that arrays in Swift are same as the arrays you know from a language like C: There are some important differences.
Arrays are basic building blocks in many languages for many programs. If you have taken formal programming courses, you may already be familiar with arrays and iterators (for or while loops).
Although Swift, Cocoa, and Cocoa Touch use arrays and iterators, they use them in an object-oriented way, so you may need to adjust your thinking a bit for the object-oriented world of Swift and Cocoa/Cocoa Touch.
In Locatapp, the Swift location app you built in Chapter 4, the iPhone version provides a master list of objects as shown in Figure 7-1.
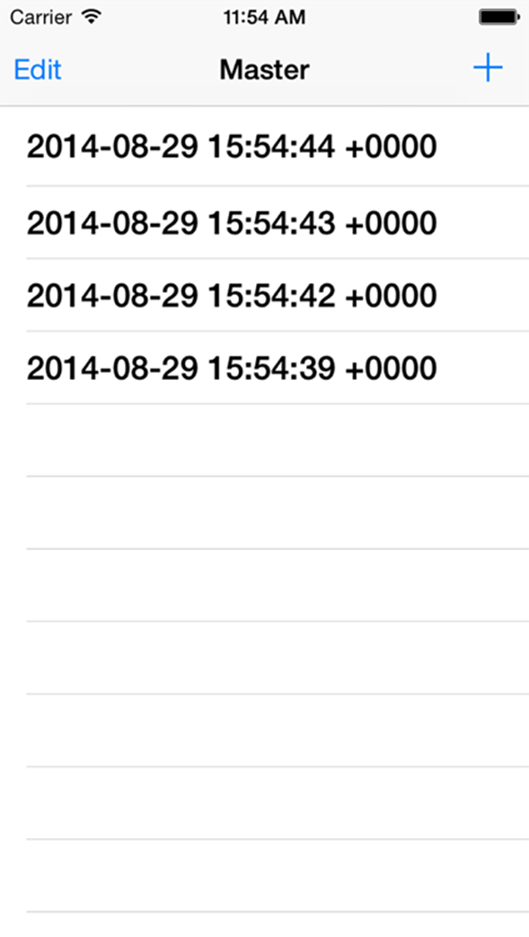
Figure 7-1: Viewing the master list in Locatapp.
As you add or delete items from the master list, this display changes. Surely, you may be thinking, this is an array. After all, it’s a classic example of array manipulation. You have a list (collection) of objects, and you want to do the same thing to each one (display it). From the user’s point of view, if one of the items is tapped, you want to carry out the same process no matter which item has been tapped (albeit with different data, depending on which item has been tapped).
But in Swift or in most object-oriented languages, this sort of thing isn’t done with just an array. Yes, you could use an array, but that wouldn’t be the most effective way of handling it. The sections that follow present an overview of how it’s done in the Master-Detail Application template (the basis for the app you build in this book). This is the basic design pattern for handling lists like the master list in object-oriented programming.
As you will see, there is an array at the heart of things, but that array is inside an object that is an instance of NSFetchedResultsController. The array (fetchedObjects) is created and accessed by functions in NSFetchedResultsController that add functionality and sophistication to the simple indexed array of results.
 As noted in Chapter 4, the Social Media Location App (Locatapp) built on the Master-Detail Application template in Xcode 6 (or later) is used throughout this book. You may want to review Chapter 4 at this point to remind yourself what the built-in template does before you modify it.
Managing a collection of objects
Listing 7-1 shows you how the Master-Detail Application template configures the cells in the master view controller without directly using an array or any other collection object. I guide you through this code in various other chapters in this book, but for now I’ll give you a high-level overview. This overview pinpoints the way collections are managed in Swift, and it shows you how Swift functions are written.
Listing 7-1: Configuring a Cell in the Master-Detail Application Template
func configureCell(cell: UITableViewCell, atIndexPath
indexPath: NSIndexPath) {
let object =
self.fetchedResultsController.objectAtIndexPath
(indexPath) as NSManagedObject
cell.textLabel.text =
object.valueForKey("timeStamp").description
}
This code configures a cell in the master view controller list (as its name suggests). The UITableViewCell named cell is the cell in the list that needs to be configured with data. It is passed into configureCell by reference and the appropriate data is placed in it (specifically, in itstextLabel.text property). Because it’s passed in by reference, it doesn’t need to be returned: The updated data is placed into the cell instance, which is then available to the calling code after the completion of this function.
This code needs to deal with two objects — the cell in the list and the data to be placed into the cell. The cell in the list is passed into the function, so it’s available with the name cell.
The data to be placed in the cell has been retrieved from the persistent store that uses Core Data. Core Data has been designed for tasks like this. It’s a framework that has built-in functionality for retrieving and managing collections of objects. In the built-in template, Core Data is retrieving a collection of data objects containing timestamps that will be shown in the master detail list, as in Figure 7-1.
Core Data itself manages lists of data, and it can handle the multi-dimensional lists that frequently occur in data of this sort. The multi-dimensionality is actually implemented by building a tree of nested arrays in which each array implements a dimension. The resulting object is an NSIndexPath. An NSIndexPath instance contains the various indexes of the nested arrays that combine to create a multi-dimensional index.
Each data element in these lists is identified by a NSIndexPath instance, and each element can be found using that index path. Thus, the function shown in Listing 7-1. retrieves a single object of the fetched results from Core Data. The appropriate index path is passed into the function as the named parameter atIndexPath and the parameter indexPath. (atIndexPath is the name that makes the function more easily read by humans, and indexPath is the name that you use in your code).
The ability to use internal and external names for parameters of functions is inherited by Swift from Objective-C. The external names can help a function and its named parameters form a complete phrase or sentence — (configureCell: atIndexPath) for the function shown inListing 7-1. Inside the function, a less precise name (indexPath) may be used because the inside of the function has a different audience from the outside declaration. You can easily imagine a series of related functions, all of which use an internal name of indexPath to support externally visible function names such as configureCell: atIndexPath, removeCell: fromIndexPath, addCell: afterIndexPath, and so forth. (Note that these function names are provided as examples of the concept rather than of specific functions.)
let object =
self.fetchedResultsController.objectAtIndexPath
(indexPath) as NSManagedObject
If you’re used to working with arrays, this line of code may seem a bit too complex. Why can’t you just write
let object = retrievedObjects [i]
where i is an index number passed into the function, and retrievedObjects is a simple array of retrieved objects?
The answer is that the object-oriented pattern gives you a function that’s a much more extensible function than an array and a one-dimensional index. The code in the configureCell:atIndexPath: function can handle multi-dimensional index paths without modification (although at the present time on iOS, you only have to worry about single-dimensional paths).
The lessons to take away from this are:
· Collections are implemented in Swift, but very often they are used inside objects that manage them in more sophisticated ways than either an array or dictionary can.
· If you are used to using arrays, remember that they are available in Swift along with dictionaries, but you may be better off using classes that are “smarter” than arrays and dictionaries. (And you may be working with such classes rather than arrays and dictionaries in the frameworks and templates you use in Xcode.) Of course, if you’re writing your own collection classes, you may decide to use arrays and dictionaries within them while exposing your own UI to clients of the collection you develop.
If you really want to get deeper into the concepts of collections in object-oriented programming and functional programming, native Swift collections are actually built on struct objects.
Looking inside a Swift collection object
Whether you’re working with an array or a dictionary, a collection object contains collected items (that’s just simple English). In Objective-C, the collected items are objects — subclasses of NSObject. A collection can contain an NSWindow alongside an NSManagedObjectContext. These are all subclasses of NSObject, and they can all be placed in the same Objective-C collection.
In Swift, there is no base or root class like NSObject from which all other classes descend. (For all practical purposes, base and root classes are the same thing.) If a Swift class is a subclass of another class, you or the framework you’re using must establish that hierarchy rather than relying on a standard base class of NSObject. The root class may be any class whatsoever — its chief distinguishing feature is that you cannot make calls to super in a root class that you define. Otherwise, your base class in any circumstance can be any class.
There is no intrinsic commonality among Swift classes provided by a root class such as NSObject. Each class can have its own superclass root with its own functionality. What is common across Swift classes is the functionality and syntax of the language itself.
In part because of this deliberate lack of a common root class, heterogeneous collections (that is, collections with objects of various types) are problematic and are not allowed. (There are other reasons why collections are restricted to instances of a single class; this is just one of them.)
Of course, nothing prevents you from creating a root class of your own for whatever purpose you want and then using instances of its subclasses in a collection.
Looking deeper into a collection in Swift, you'll see that the items in the collection need not even be objects. They can be instances of a class, but they can also be typed values such as Int or Double. This means that you can use Swift collections for all of your collecting needs. In Objective-C, the collection of objects is done in NSArray and its subclasses whereas the collection of non-object values is done in standard C arrays. In Swift, you just use arrays and dictionaries.
Mutability of collections
Whether you are dealing with arrays or dictionaries, Swift (like Objective-C), provides a pair of classes. Both arrays and dictionaries can be either mutable or immutable. Mutability refers to whether or not the collection can be modified.
As I discuss in Chapter 6, you can create constants with let and variables with var. With collections, as well as with other types, a constant created with let is immutable — it can’t be changed. A variable created with var, however, can be changed. Among the advantages of this arrangement is that the compiler and the operating system know when they’re dealing with immutable objects, which can make a number of processes (especially regarding memory management) quicker and more efficient.
This use of var and let to distinguish between mutable and immutable collections has two important benefits:
· It is consistent with the treatment of other types in Swift. Mutable collections thus use the same syntax as other mutable types such as
var aFloat: Float
var aBool: Bool
· It is simpler than creating pairs of classes as is the case in Objective-C, which has NSArray and NSMutableArray, along with NSDictionary and NSMutableDictionary.
 There are some significant differences between Objective-C and early versions of Swift compared to the current version of Swift. Mutability refers to changes to the collection or its contents. In Objective-C and in early versions of Swift, you could change the values of elements in immutable arrays, but this is no longer true. Replacing the value of the element at index N in an immutable collection is not allowed. Because this has changed during Swift’s development, and because it’s different from the behavior of the corresponding classes in Objective-C, watch out for mutability issues in Swift code, and make certain you know what you're dealing with.
Switching mutability
Because of the efficiencies of memory management when dealing with immutable arrays, a great deal of code in Objective-C exists for the purpose of converting an immutable array to and from a mutable one so that it can be modified as a mutable array. Although this is extra work for the processors, the work required is often outweighed by limiting the use of a mutable array to only a brief period of time.
The basic benefit of using an immutable array is that if it needs to be moved from memory temporarily, it can be restored from the known version — intermediate modifications will not have been made to an immutable array.
Creating classes and objects to use in collections
In Chapter 15, I show you how to create classes; in Chapter 10, I show you how to create instances of those classes. I don’t want to delve into the details of classes and instances here; however, sometimes a little knowledge on one concept (such as classes and instances) is necessary to understand another (such as collections). Here is a quick reference for creating classes and instances. This code is used in examples in this chapter. See Chapters 10 and 15 for the details:
· Declaring a class containing a string property:
class MyClass {
var instanceName = "New Instance"
}
· Creating an instance of the class:
var instance = MyClass ()
Organizing Data Sequentially with Arrays
The basics of working with arrays consist of creating arrays, adding and removing elements, finding elements, and modifying them. As noted previously, arrays (like dictionaries, and, as noted, any constant or variable) can be either mutable or immutable; however, they can't be changed from one to the other. It is possible, however, to copy one to the other as I show in the following sections. The typical use copies the elements of an immutable collection into a mutable collection where they can be modified; the modified collection elements are used to initialize a newly-created immutable collection.
Comparing full and shorthand array syntax forms
There are two forms of syntax you can use to create arrays: a full type and a shorthand type. The Swift documentation uses the shorthand type, and so does this book. As an example, here is the full version of an array type annotation:
Array < MyClass>
By comparison, the shorthand version is provided without a label:
[MyClass]
This is a shorthand version of an array declaration for an array consisting of elements of MyClass. Note the square brackets.
There’s another use for square brackets, a specific shorthand style that you encounter frequently. It’s called an array literal, and it’s a way of writing an array together with its contents. It consists of zero or more array elements enclosed in square brackets. These elements can be literal values, such as strings or integers, or they can be class instances. Here are some examples of array literals:
["String 1", "String 2", "String 3"]
[1, 2, 3, 4, 5]
[classInstance1, classInstance2, classInstance3]
Thus, within the brackets that delimit an array literal you can provide literal values, class instances, or a type that specifies the type of the array elements that will be provided. When literal values are provided, Swift infers the common type that they represent.
Remember that a class, structure, or enumeration can be treated as a type in cases like this.
If you have declared myClass1 and myClass2, where myClass2 is a subclass of myClass1, creating an array that mixes instances of the two classes would be interpreted by Swift as an array of myClass1 instances because myClass1 is the common class of myClass1 and myClass2. (If you think there will be any ambiguity in interpreting the array’s type, you can always declare it with the class notation to prevent confusion.)
Creating arrays
You can create empty arrays and populate them as needed or you can create arrays that have one or more elements in them. In either case, the array is assigned to a constant or a variable. Arrays assigned to variables (with var) are mutable and can be modified. Arrays assigned to a constant (with let) are immutable and cannot be modified. Creating an empty array and assigning it to a constant is legal but improbable.
One case in which you may want to assign an empty array to a constant is during development. You could write the code that checks for elements in the array and, if found, acts on those elements. You can write that code without fully implementing it and run your app against an empty immutable array until you are ready to go back and recreate the array as a mutable array (with var). Doing something like this can eliminate the possibility of accidentally modifying array elements as you are building your code. If you do something like this, make sure to comment it carefully so that you don't tear your hair out when you get around to finishing the implementation and don't understand why you can't update the array.
Whether you create an empty array or a populated array, you must set its type (that is, the type of its elements) either explicitly or by letting Swift infer it from the elements in an array literal.
Here are the ways to create an array with elements of type MyClass (remember that the elements can be types such as Int as well as classes):
· Create an empty immutable array:
let myArray = [MyClass]
· Create an empty mutable array:
var myArray = [MyClass]
· Create a populated immutable array from an array literal:
let myArray: [MyClass] = [instance]
· Create a populated mutable array from an array literal:
var myArray: [MyClass] = [instance]
Working with arrays and their elements
Swift uses Swift language features to let you access array elements not just by their index but also by their ranges. In most programming languages, you can access an array element with a specific index or with a variable that contains an integer, as in the following code.
myArray [4]
var myIndex = 4
myArray [myIndex]
Adding and removing elements by index and range
If you have created a mutable array with var, you can modify its elements. You can add them, remove them, or change their values. Here are the basic tools you'll need. Remember that, like dictionaries, arrays are functional (not object-oriented) features of Swift, and are frequently used inside classes that provide object-oriented logic above and beyond basic array manipulation.
The examples here build on an array that consists of instances of a class that you create, as noted in the sidebar “Creating classes and objects to use in collections.” Follow these steps to explore array behaviors. (Note that the full code for this experiment is shown later in this chapter inListing 7-2.)
1. Create a class in a playground.
You can delete the comment and import statement, if you want. You won't need them for this experiment, but they do no harm.
// Playground - noun: a place where people can play
import UIKit
2. Create a class with a single string instance variable called instanceName.
class MyClass {
var instanceName = "New Instance"
}
3. Create four instances of that class.
var instance = MyClass ()
var instance2 = MyClass ()
var instance3 = MyClass ()
var instance4 = MyClass ()
4. For each instance, set instanceName equal to a unique string so you can tell them apart.
Remember that the class initializer already sets this property to a common value, which you are changing.
instance2.instanceName = "Instance 2"
instance3.instanceName = "Instance 3"
instance4.instanceName = "Instance 4"
5. Create an immutable array using this class and a single element.
Remember that with let, you can't modify the array. You’ll see the array and its single element at the right in the playground window, as shown in Figure 7-2.
Note that in the sidebar at the right of the playground shown in Figure 7-2, each element of the array is shown inside brackets and quotes. The quotes delimit the string that is now the value of the instance variable, and the brackets denote each instance. After the let statement, you see an array (delimited by square brackets) containing one instance (delimited by curly braces) and containing a string (delimited by quotes).
let myArray = [instance]
6. Create a mutable array of MyClass instances named myArray10, and set it to an array literal consisting of the first instance you created in Step 3.
var myArray10:[MyClass] = [instance]
7. Create myArray11 using full syntax instead of shorthand. Set this array to include instance2.
I specify full syntax here only to familiarize you with both methods. It doesn’t matter whether you create myArray11 with full or shorthand syntax. (For that matter, you can create myArray10 with either syntax.) You’ll need both later on, but using the two syntax forms is just to demonstrate them.
var myArray11: Array<MyClass> = [instance2]
8. To add elements to an array, use an array literal and the + = operator, as follows:
myArray10 += [instance3]
myArray11 += [instance4]
Note the square brackets around the array literals.
9. Use the count function on the three arrays to count them.
Figure 7-3 shows the result. myArray has one element, and each of the other two has two elements — the New Instance element created in the initializer, and the one you added in Step 8 to each array.
myArray.count
myArray10.count
myArray11.count
10. You can access an individual array element by index number. In a mutable array, you can set it to another value. Set the 0-th element of myArray11 to instance3. Check the count to confirm that you still have the same number of elements.
myArray11 [0] = instance3
myArray11.count
11. Create a new array from the range [0…1] in myArray11. Count that array and you’ll see that there are two elements. (Refer to Figure 7-3.)
Note that this is the syntax you could use to copy some or all of the elements of an immutable array to a mutable array.
var subArray = myArray11 [0...1]
subArray.count
12. Set myArray11 to all four instances and count the array: Confirm you have four elements. (Refer to Figure 7-3.)
myArray11 = [instance, instance2, instance3, instance4]
myArray11.count
13. Set the range [1…2] of myArray11 to instance3 and instance4. Confirm that you still have four elements in the array.
myArray11 [1...2] = [instance3, instance4]
myArray11.count
14. Set the range [0…3] to instance3 and instance4. Confirm that the element count is two.
This is correct because although the range [0…3] can hold four values, you have only provided two, and Swift has adjusted the array and indexes appropriately.
myArray11 [0...3] = [instance3, instance4]
myArray11.count
Listing 7-2 provides the full code from this experiment. It’s also downloadable from this book’s companion website, as described in the Introduction.
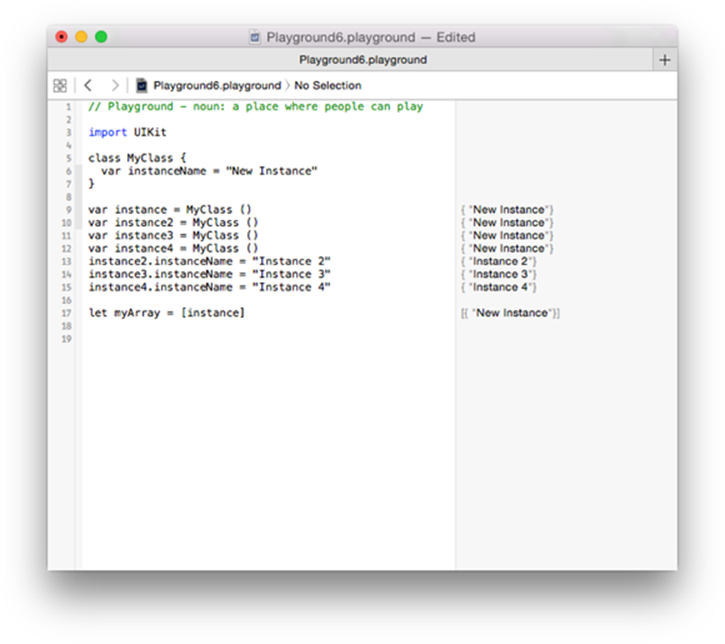
Figure 7-2: Creating an immutable array.
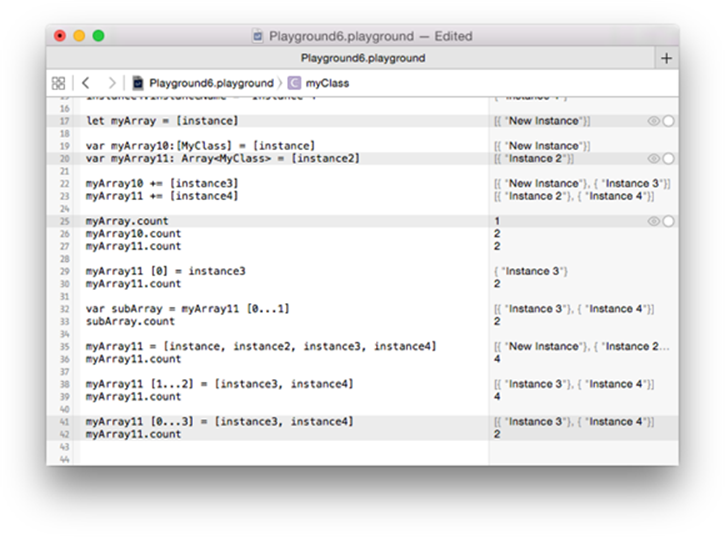
Figure 7-3: Creating mutable arrays.
Listing 7-2: Experimenting with Arrays
// Playground - noun: a place where people can play
import UIKit
class MyClass {
var instanceName = "New Instance"
}
var instance = MyClass ()
var instance2 = MyClass ()
var instance3 = MyClass ()
var instance4 = MyClass ()
instance2.instanceName = "Instance 2"
instance3.instanceName = "Instance 3"
instance4.instanceName = "Instance 4"
let myArray = [instance]
var myArray10:[MyClass] = [instance]
var myArray11: Array<MyClass> = [instance2]
myArray10 += [instance3]
myArray11 += [instance4]
myArray.count
myArray10.count
myArray11.count
myArray11 [0] = instance3
myArray11.count
var subArray = myArray11 [0...1]
subArray.count
myArray11 = [instance, instance2, instance3, instance4]
myArray11.count
myArray11 [1...2] = [instance3, instance4]
myArray11.count
myArray11 [0...3] = [instance3, instance4]
myArray11.count
Working with specific array elements
In addition to using array indexes, you can access specific elements of the array. There are two built-in functions for this purpose: first() and last().
Modifying a mutable array
If you've gone to the bother of creating a mutable array with var, you can modify its structure in addition to modifying its values. Here are the methods you use:
· append: The append method is used to add an element to the end of an array. The element must be the appropriate type for the array. After you use this method, the array will be one element longer than it was before. Note that the method takes a single parameter, which is enclosed in parentheses (as all method parameters are), and not enclosed in brackets (which delimit an array literal). The append method is equivalent to the += operator.
myArray11.append (instance)
· insert: You can insert an element at a specific location in an array by using the following line:
myArray11.insert (instance1, atIndex: 3)
· remove: You can remove an element from a specific location in an array by using the following line:
myArray11.removeAtIndex (3)
The remove methods that work on single elements (removeAtIndex and removeLast) return the element that has been removed so that you can do something with it if you want.
In each of these methods, the array itself and indexes are adjusted for the new index numbering after the element(s) are added or removed.
Iterating or enumerating over an array
You can access array elements by index or by iterating through the array. Swift’s iteration methods are highly optimized and quite efficient. You can iterate (or enumerate) a collection using standard C for loops, but you can also use the highly-optimized fast enumeration method introduced in recent versions of Objective-C. Fast enumeration is object-oriented and imperative rather than procedural (or functional, if you prefer that term).
There are two versions of the Swift collection fast enumerations, as follows:
· Fast enumeration over array elements: The syntax for this is simple:
for anElement in myArray {
// do something with anElement
]
Each element in turn is presented to you in anElement, and you can do whatever you want with it — create a list, query each element’s value, or anything else you like.
· Fast enumeration over array elements and indexes: You frequently need to know the index for the elements that you are iterating. For these situations, Swift has a different method for you:
for (index, anElement) in enumerate (myArray) {
// do something with index and anElement
}
Note that enumerate is a built-in function, but the other names are up to you. Although index is frequently used as the name for the index value of each element, you can use any name you like.
There are other array functions available in Swift, but these are the major functions and features that are used most often.
Organizing Data Logically with Dictionaries
Arrays are sequentially ordered sets of data; their order is maintained by array indexes, which are not stored in the array. The fifth element of an array is known because it comes immediately after the fourth element and immediately before the sixth element. If it is deleted, the former sixth element becomes the new fifth element, and so on. Again, the array itself contains only the element values — not the indexes.
On the other hand, dictionaries work a little differently. Dictionaries don’t use array indexes to maintain order. Instead, they have key values that identify the elements stored within. Unlike arrays, dictionaries store the key values along with the data. Because the keys are stored with the values, deleting one element from a dictionary has no effect on the key values of other elements.
Because a dictionary’s keys need not be sequential numbers, there is no such thing as a “next” or “previous” value in a dictionary. Each data value just has its own key, and that’s the end of the story.
Dictionaries and arrays suit different purposes. Neither is better than the other: They’re just different.
Dictionaries have been around for a while, but they came into use after arrays. In that long-ago era of mainframes and early personal computers, dictionaries were thought to be inefficient. Some people believed that the cost of accessing data values from a dictionary required more computational firepower than it cost to access them in an array. In those days, the cost of performing a hash (which usually involved at least one division operation, and possibly some follow-up disambiguation operations) was a serious concern for programmers. Today, although these concerns still exist, the reality is that the “inefficiency” of accessing data in a dictionary doesn’t matter very much.
If you haven’t used dictionaries or associative arrays extensively, the word dictionary may suggest a thick volume with thousands of entries. Don’t be fooled. The reality is that in Swift (as in Objective-C), dictionaries are very frequently used to store small numbers of data values — two or three entries, for example.
Because keys are located by using a hash routine, keys in Swift must be hashable, meaning that they must be of type String, Int, Double, and Bool, or of any type that conforms to the Hashable protocol.
Comparing full and shorthand dictionary syntax forms
As with arrays, dictionaries have full and shorthand syntax forms. For each, as with arrays, dictionaries must contain elements of the same type — which may be the same class, same superclass, or a combination of classes and superclasses that all have (or are) the same superclass.
The full syntax form: Dictionary < KeyType, ValueType>
The shorthand form: [KeyType: ValueType]
Note that in full syntax, KeyType and ValueType are separated by a comma; in shorthand syntax, on the other hand, they’re separated by a colon.
Creating dictionaries
The simplest way to create a dictionary is to use a dictionary literal like this:
var myDictionary: Dictionary = ["MyKey": "MyValue]
Note that either the key or the value (or both) can be an expression.
Working with dictionaries and their elements
Dictionaries use the same syntax as do arrays; the difference is that instead of an index, you use a key. To access an element in an array, you might write
let myIndex = 5
myArray [myIndex] = "someValue"
Whereas, to access an element in a dictionary, you could write:
let myKey = "someKey"
myDictionary [myKey] = valueForSomeKey
Or you could also write:
myDictionary.updateValue (valueForSomeKey forKey: myKey)
You can remove the value for a key by using code such as this:
myDictionary.removeValueForKey (myKey)
To query a dictionary, use the count and isEmpty methods, which return integer and Boolean values, respectively.
Fast enumeration over a dictionary
You can enumerate dictionaries in a manner similar to enumerating arrays. Here's a sample of the code:
for (key, value) in myDictionary {
println ("\(key), \(value)")
}
Remember that you can use your own names for key and value; however, these are the most commonly used names. In a quoted string inside a println statement, a backslash (\) preceding parentheses around a variable prints out the value of the variable.
Reporting errors with a dictionary
Locatapp uses the Master-Detail Application template, and within that template is a common use of a dictionary. it's used in the process of creating a persistent store coordinator which is used in managing the Core Data store for the app.
As is frequently the case with database accesses, this process can fail in several ways. It contains some error-catching code that relies on a dictionary. Here is a summary of the key dictionary calls that are used to construct an error object that is passed back to the app to report the error.
In the Objective-C version of the Master-Detail Application template, the accessor (specifically the getter) for persistentStoreCoordinator checks to see if the object exists. If it does, it is returned. If it doesn't, it is created and then it is returned.
In Swift, this is handled more easily (and with less code). The var persistentStoreCoordinator is declared with the following initialization code. The keyword lazy at the beginning of the declaration indicates that this code should be used for lazy loading — don't execute it until you actually need to reference the variable. If for some reason the app never needs to reference persistentStoreCoordinator (that would probably only occur if it encountered an error during startup), this code would never execute.
The full code is shown in Listing 7-3, but don't let its length bother you. Immediately after Listing 7-3, the code is broken apart into manageable chunks — one of which shows you the details of using an error dictionary.
Listing 7-3: Using an Error Dictionary
lazy var persistentStoreCoordinator: NSPersistentStoreCoordinator? = {
// The persistent store coordinator for the application. This
// implementation creates and return a coordinator, having added
// the store for the application to it. This property is optional
// since there are legitimate error conditions that could cause
// the creation of the store to fail.
// Create the coordinator and store
var coordinator: NSPersistentStoreCoordinator? =
NSPersistentStoreCoordinator(
managedObjectModel: self.managedObjectModel)
let url =
self.applicationDocumentsDirectory.URLByAppendingPathComponent
("Locatapp.sqlite")
var error: NSError? = nil
var failureReason =
"There was an error creating or loading the application's
saved data."
if
coordinator!.addPersistentStoreWithType(NSSQLiteStoreType,
configuration: nil,
URL: url,
options: nil,
error: &error) == nil
{
coordinator = nil
// Report any error we got.
let dict = NSMutableDictionary()
dict[NSLocalizedDescriptionKey] =
"Failed to initialize the application's saved data"
dict[NSLocalizedFailureReasonErrorKey] = failureReason
dict[NSUnderlyingErrorKey] = error
error = NSError(
domain: "YOUR_ERROR_DOMAIN",
code: 9999,
userInfo: dict)
// Comment deleted
NSLog("Unresolved error \(error), \(error!.userInfo)")
abort()
}
return coordinator
}()
As noted previously, this code is the declaration and initialization of a variable (persistentStoreCoordinator). It is loaded lazily (that is, as needed). It is an optional of type NSPersistentStoreCoordinator (see Chapter 6 for more about optionals). An initializer can have parameters, although this one doesn't. It does, however, have the parentheses that would be needed for parameters. Thus, the basic structure is:
lazy var persistentStoreCoordinator:
NSPersistentStoreCoordinator? =
{
//create coordinator
return coordinator
} () //no initialization parameters
After some setup processing, addPersistentStoreWithType is called on coordinator, which was created in the setup processing. For the moment, there's only one line of setup code that matters:
var error: NSError? = nil
A variable named error of type NSError is an optional (that’s the significance of the question mark), and it’s set to nil.
If the function fails to return a persistent store, that means there’s an error. Here's the call to the function and the test for the result:
if
coordinator!.addPersistentStoreWithType(NSSQLiteStoreType,
configuration: nil,
URL: url,
options: nil,
error: &error) == nil
{
This pattern is used frequently, so it’s worth taking the time to understand it. At the highest level the test is whether or not the result of addPersistentStoreWithType is nil. If it is, that means that the persistent store couldn’t be created and the app can’t really continue — although failing gracefully is a desired outcome.
In order to fail gracefully, addPersistentStoreWithType uses an inout parameter for the error parameter. The & indicates that the parameter is returned with a value (other parameters are not passed back by a function).
Thus, there are two results of this function call:
· The result of the function call can be nil (failure) or a value of the persistent store coordinator.
· If there has been a failure, the inout parameter error has a value that it passes back. The startup processing sets error to nil, and it’s only set to another value in the function if there’s been an error.
If the result of addPersistentStoreWithType is nil (that is, there was an error), the coordinator that got an error on addPersistentStoreWithType: configuration: URL: options: error: is set to nil, and the error is reported. Here’s the code:
coordinator = nil
// Report any error we got.
let dict = NSMutableDictionary()
dict[NSLocalizedDescriptionKey] =
"Failed to initialize the application's saved data"
dict[NSLocalizedFailureReasonErrorKey] = failureReason
dict[NSUnderlyingErrorKey] = error
error = NSError(
domain: "YOUR_ERROR_DOMAIN",
code: 9999,
userInfo: dict)
// Comment deleted
NSLog("Unresolved error \(error), \(error!.userInfo)")
abort()
A mutable dictionary (dict) is created. The keys NSLocalizedDescriptionKey, NSLocalizedFailureReasonErrorKey, and NSUnderlyingErrorKey are set to appropriate values. Note that the value of the &error parameter that was returned from the function is used to set NSUnderlyingErrorKey.
A new NSError is used to reset the error variable. NSError is initialized with constants for domain and code, but notice that the userInfo parameter is initialized with the entire contents of the dict dictionary. This means that all of the information can be displayed in this log statement:
NSLog("Unresolved error \(error), \(error!.userInfo)")
You’ll encounter this code many times, so it’s worthwhile to look at it. It’s a bit complex because it mingles Swift and Objective-C code, but after you understand the basics of dictionaries and variables, you’ll see that it’s all just a matter of combining keys and values in a dictionary — and that a dictionary itself can contain another dictionary as one of its elements.
All materials on the site are licensed Creative Commons Attribution-Sharealike 3.0 Unported CC BY-SA 3.0 & GNU Free Documentation License (GFDL)
If you are the copyright holder of any material contained on our site and intend to remove it, please contact our site administrator for approval.
© 2016-2026 All site design rights belong to S.Y.A.