Learning Swift Programming (2015)
6. Reusable Code: Closures
Closures in Swift have their own special syntax. When relating closures to Objective-C, you can think of closures as self-contained blocks of functionality. When you use them, you often directly replace an Objective-C block. You use them for things like creating a callback after a URL has been fetched from a server or calling a function when an animation is done. You use them for things like sorting, when you need to pass a special sort function.
What Are Closures?
Closures are a familiar concept in many languages. Closures can be created when an environment is enclosed in a referencing unit of scope. We often say “a function within another function” when we’re talking about closures. But the real closure itself happens because you put a function within another function. When you put that function within the other function, the inner function has a reference to the outer function.
In languages other than Swift, closures are not often defined as a special syntactic structure. This is usually what makes them a difficult concept to grasp. For example, in JavaScript, you can create a closure by just putting one function inside another. The inner function will have access to all the local variables of the outer function. If the outer function returns the inner function, you now have a permanent reference to the inner function, which still has access to the outer function’s local variables. This works in Swift as well.
In short, closures are functions that refer to independent variables. Functions defined in a closure remember the environment in which they were created—even after everything has run. This is interesting because local variables are usually trashed after a function has run.
Things get really interesting when you realize that operators in Swift are implemented as functions themselves. Take, for example, the less-than sign (<). It takes two parameters: a left-hand parameter and a right-hand parameter. So you see, closures can be written in extremely simple and concise ways.
Closures in Other Languages
It may be helpful to see closures in a broader context. A closure itself is relatively the same in all languages. However, Swift provides extra-special syntax for closures, which makes their implementation a bit different. In JavaScript you can create a closure by writing a function within another function. That inner function does not exist outside the outer function and therefore is “enclosed” (hence the name closure) in the outer function. The outer function can then return the inner function and make it available to all. Now the outer function has finished running, and all of its local variables should be dumped. But they aren’t because the inner function is now available globally and still has references to the outer function’s local variables. Let’s look at some code to see how this works. This is code written in JavaScript, not Swift:
function nameClosure() {
var name = "Skip Tastic"
function sayYourName() {
console.log(name);
}
return sayYourName;
}
var yourName = nameClosure()
yourName()
When nameClosure is called, it returns sayYourName and therefore is the inner function itself. Now you have a reference to the inner function sayYourName. The inner function has a reference to the local variable name even though init has been called and passed. So when you call the variable you set as yourName, you get the console to log the local variable. This is actually similar to summoning the dead. Try this example:
1. Open Google Chrome.
2. On any tab, right-click the screen and click Inspect Element.
3. When the developer tools open, choose the Console tab, which is like a dumbed-down JavaScript playground.
4. Type in the previous JavaScript code.
You could write this same example in Swift. Here’s how:
func nameClosure() -> () -> () {
var name = "Skip Tastic"
func sayYourName() {
println(name)
}
return sayYourName
}
var yourName = nameClosure()
yourName()
You can see that this code is almost exactly the same as the JavaScript code. One change is that you replace function with func. In Swift, you have to be a little more specific if you are going to return a function. You need to tell Swift that this function returns its own function. Because functions on their own have types, you need to return a function that returns Void. The way you express a function that returns nothing or Void is to say that the function returns an empty tuple, which is essentially void. So the type of return value of nameClosure is ()->(). This is because sayYourName does not return anything.
In the end, you will see that the Swift code prints out the result of the local variable, as promised. This is good because after you understand closures, you can apply them to any language. Swift happens to be a great place to learn closures, and the excitement doesn’t stop with what you’ve seen so far. In fact, it goes so much farther that I think your mind will be blown by the end of the chapter.
How Closures Work and Why They’re Awesome
Swift defines a closure syntax that is different from the regular function syntax. This syntax allows you to do a couple things: It allows you to infer the type of the object from the context, and it allows you to return a value without actually writing return. There are several different ways to write closures in Swift, and some of them take very little code. If you are used to replacing or rewriting Objective-C syntax, you may have seen blocks as the last parameter of a function. Swift allows you to write closures outside functions when they are the last parameters. This gives you a nice clean-looking syntax.
Let’s take a look at the sort function in Swift. For this example, you are going to pass two parameters to the sort function. The first is an inout parameter of the array you would like to sort. The second parameter is the function you would like to use to sort the array. The function must take two Strings as parameters and return a Bool. You will check whether each string is less than the other string in order to sort the string alphabetically. (When you compare two strings with a less-than or greater-than operator, Swift sorts strings alphabetically either in a reverse or forward direction.) The following code sorts the array alphabetically:
var names = ["john","sam","zed","bob","harry","noa"]
func alphabetical(s1:String,s2:String) -> Bool {
return s1 < s2
}
sort(&names,alphabetical)
The sort function takes each of the strings in the array, one at a time, and compares them to each other by running them through the function. Notice that there is a global function to do the sorting. You pass this function into sort. We talked previously about the type of a function. In this case, the function is of type (s1: String, s2: String) -> Bool. You can find this out by three-finger-clicking the function name. If you three-finger-click the sort function, you see what it needs in order to work: func sort<T>(inout array: [T], predicate: (T, T) -> Bool). This syntax may look a little foreign at this point because we haven’t covered anything like it. This is the syntax for generics, which you’ll learn about Chapter 9, “Becoming Flexible with Generics.” You can think of the T as standing for anything you want. It could be a String, an Int, a car, a cat, or whatever. So the sort function takes an inout array with any type in it. It also takes a function/closure that has two parameters of the same type and then returns a Bool. Note that T is different from AnyObject. Whereas AnyObject can be a String or an Int, T must be of one type. Using T is like saying you don’t know the type yet but we will choose it later. Using AnyObject allows you to have a mix of a bunch of types together.
The Closure Syntax
You can rewrite that last alphabetical function to be an inline closure. It would look like this:
var alphabetical = {(s1:String, s2:String) -> Bool in s1 < s2}
You remove the func keyword and the name of the function. You put the whole thing in some curly brackets and put the actual content after the word in and remove the keyword return. The closure knows that it should return stuff. The closure by itself doesn’t do much. You need to either save it to a variable or pass it directly into the sort function. Notice how it still matches the signature of the previous function you used. It takes two Strings and returns a Boolean. Now you can pass this into the sort function:
sort(&names,{(s1:String, s2:String) -> Bool in s1 < s2})
What is so cool about this is that you can define a whole reusable functionality within the sort function itself. The sort function does not have to go anywhere else to get the closure it will use to sort the array.
Inferring Using Context
The sort function must take an array and a function with a specific signature. In the example we’ve been working with, the function must take two parameters that are Strings. You cannot use any other types in this case. You and I know this, and Swift does, too. You can shorten the closure syntax because you know that s1 and s2 are Strings. You can also shorten the closure because you know that the return type must be a Bool. Who the heck needs to write a return type when you already know it must be a Bool? Here is a shorter closure you can pass to the sort function:
sort(&names,{s1, s2 in s1 < s2})
Now you have a much shorter, easier closure.
Let’s review what’s happened so far: You first took a regular old function and passed it to the sort. Then you rewrote the function as a closure and passed it to the sort. Then you realized you didn’t need to do any typing because Swift can infer types from the context. So you rewrote the closure by removing the types and parentheses. Notice that you never had to write the return keyword because it is also inferred.
Arguments Have a Shorthand, Too
As it turns out, you don’t even have to declare s1 and s2 as the parameters. You can use a special syntax to get the nth parameter. You can write $0 to get the first parameter and $1 to get the second parameter and so on. Now the closure gets even shorter because you no longer need to declare the names of parameters. You can pass the closure to sort like so:
sort(&names,{$0 < $1})
You are able to write this because of all the things mentioned before plus the fact that you don’t have to declare parameters if you use a special argument shorthand. Why declare something that does not need to be declared? You don’t need the return keyword, and you don’t need to declare a type for the parameters because it is inferred. This closure does return a Bool because it is comparing two things together. This is an extremely flexible closure because it does not declare any types. If your array contained Ints, Doubles, Floats, or your own custom type, then this closure would still work just fine.
Sorting a Custom Car Class
To sort a custom class, you need the class to inherit two protocols: Comparable and Equatable. Here’s how you could define a short Car class that just has a name property:
class Car:Comparable,Equatable {
var name:String
init(name:String) {
self.name = name
}
}
To implement Comparable and Equatable, you must teach Swift how to compare two cars. Because the name of the car is a String, you can use the name. You need to write global functions that define the <, >, <=, >=, and == signs. One caveat is that you should not write these functions within the Car class; rather, you should write them globally. Here’s an example of how to do that:
func ==(lhs: Car, rhs: Car) -> Bool{
return lhs.name == rhs.name
}
func <=(lhs: Car, rhs: Car) -> Bool{
return lhs.name <= rhs.name
}
func >=(lhs: Car, rhs: Car) -> Bool{
return lhs.name >= rhs.name
}
func >(lhs: Car, rhs: Car) -> Bool{
return lhs.name > rhs.name
}
func <(lhs: Car, rhs: Car) -> Bool {
return lhs.name < rhs.name
}
Here you are naming the functions with the signs they represent. Notice that you could redefine these functions for comparison of other classes.
Finally, you can create a cars array and sort it, like this:
var cars = [Car(name:"Ford"),Car(name:"Mercedes")]
sort(&cars,{$0 < $1})
cars
Here you create two cars in an array of cars. Then you sort the array, which uses the comparison functions to compare the two cars. If you ever needed to compare other types of classes, you could rewrite the > and < functions to accommodate those other types. Remember that you can have two functions with the same name as long as the method is different in some way. That is what makes it legit to make multiple less-than functions. Also note that you could create the comparison functions on a protocol or base class. This would give you the option of comparing multiple classes with the same comparison. It’s a win–win for everybody. Here is our shortest closure yet:
sort(&names,<)
Okay, now this is impressive. I would say that this is the ultimate in refactoring.
Closures Are Reference Types
Chapter 4, “Structuring Code: Enums, Structs, and Classes,” talks about reference types and value types. It talks about the difference between things being copied versus being referenced when they are passed around. If you think about it, it makes a lot of sense for closures to be reference types rather than value types. Closures capture values in their context. If a closure were copied every time it was passed around, it would lose context that it has access to. In other words, it would lose access to those local variables. Here’s an example:
func increment(n:Int)-> ()->Int {
var i = 0
var incrementByN = {
() -> Int in
i += n
return i
}
return incrementByN
}
var inner = increment(4)
inner() //4
inner() //8
inner() //12
This example changes things up a little bit. In the end, you use the inner closure that holds a reference to i, incrementByN, to increment that local variable i by 4. The main point is that the inner closure has a reference to that local variable after the function has returned and the closure you use is passed by reference, which makes the number increment each time.
Automatic Reference Counting
Now is a good time to talk about Automatic Reference Counting, otherwise known as ARC. If you are an Objective-C programmer, then you know all about ARC. If you were one of the first iPhone programmers, you know that you used to have to do your own reference counting. You will be happy to know that for the most part, you can let Swift worry about the management of memory.
When you create instances of classes, those classes exist by reference. When those instances are no longer needed, Swift cleans them up for you.
ARC works by keeping track of the instances of classes that you create and where those instances are referenced. Every time you create a new instance of a class, ARC finds some free memory available where you can place the new instance. You don’t need to worry about how this works; just know that it works. (Of course, those details are available to you if you feel like diving in; go to https://developer.apple.com/library/ios/documentation/swift/conceptual/swift_programming_language/AutomaticReferenceCounting.html.) When you no longer need that instance of the class, ARC takes back that memory it gave you and deallocates your instance. If Swift were not smart and accidentally deallocated an instance you were still using, then you would no longer be able to access your class and all its properties.
To tell Swift “I’m using this, don’t deallocate it,” you assign that class reference to a variable or constant. When you do this, you are creating a strong reference. Swift won’t deallocate that memory associated with your class instance because you said you needed it. Imagine Rose in Titanic, saying she would “never let go.” Well that’s a bad example because eventually Rose did let go. But it’s actually a good example because Rose only let go when she was sure Jack was dead and gone. Swift will not allow it to be deallocated as long as the strong reference remains. You can deallocate that instance by assigning it to nil. Take a look at this example, using the Car class from earlier:
var c1 = Car(name: "Ford")
Here you create a new instance of the Car class. ARC allocates some memory for a new instance of Car. You have one instance of the Car class allocated: Let’s reference c1 a couple more time.
var c2 = c1
var c3 = c2
Now you have three references to the one instance of the Car class. But these are not just any references; they are three strong references. For Swift to deallocate the single instance of Car, you need to assign all three of these references to nil. If you were to assign two out of three to nil, the instance would remain in memory because it would be still in use. You can assign c1 and c2 to nil:
c1 = nil
c2 = nil
You now have one reference of the Car class still out there. ARC is counting this instance of the Car class, so it remains allocated in memory. You can assign c3 to nil to completely remove all references to the instance of the car:
c3 = nil
Now the single instance of Car is deallocated because all three references have been unreferenced by being set to nil. By the way, if you create an optional property, that property is initialized with nil and not any instance of a class. You can rewrite the Car class a tad and add a new class for a driver as well:
class Driver {
var car:Car?
}
class Car {
var name:String
var driver:Driver?
init(name:String) {
self.name = name
}
}
When you create a new Car instance, driver is created and set to nil.
Strong Reference Cycles
By letting ARC do its thing, you can pretty much sit back and relax as ARC allocates and deallocates memory when it is needed. However, there are situations when Rose really never lets go—when you create a permanent bond between two classes. Consider the new Car and Driver classes. Notice that when you create a new Driver and new Car, your driver’s car will be nil and your car’s driver will be nil. You can see what I mean when I create a new car and driver:
var car = Car(name: "Ford")
var driver = Driver()
Now you have a new car and new driver that ARC has reference counted. driver has a car that is nil, and car has a driver that is nil. Now you can assign car’s driver to car and driver’s car to car:
car.driver = driver
driver.car = car
You have now created a permanent strong reference between those two instances that can never be resolved. If you set car to nil and driver to nil, neither will ever be deallocated. The way you can tell is by using the special deinit function. This function is called when the class is deinitialized. You can add it to both the Car and Driver classes. To see deinit in action, you must run your code in a project instead of in the playground. You can start a new game project and create your Car and Driver classes directly in ViewController.swift. Then in viewDidLoad, you can initialize and deinitialize your car and driver classes:
class Car {
var driver:Driver?
init() {
println("INITTING Car")
}
deinit {
println("DEINITTING Car")
}
}
class Driver {
var car:Car?
init() {
println("INITTING Driver")
}
deinit {
println("DEINITTING Driver")
}
}
Now in your didLoadView function, you can test init and deinit by creating an optional car then setting it to nil. When you create the car, the init method runs. Then setting the car to nil calls the deinit method. You must set the car to be optional so that you can later send it to nil:
override func viewDidLoad() {
super.viewDidLoad()
var car:Car? = Car()
car = nil
}
Now when you run this, you see that the car was first initialized and then deinitialized. Now let’s get back to the strong reference cycle. If you create a new driver and the new car and assign the car’s driver to the new driver and vice versa, if you then try to set the car and the driver to nil, you see that neither gets deinitialized:
override func viewDidLoad() {
super.viewDidLoad()
var car:Car? = Car()
var driver:Driver? = Driver()
car!.driver = driver
driver!.car = car
car = nil
driver = nil
}
You have created a strong reference cycle and a memory leak. In this case, car and driver will never be deallocated.
unowned Versus weak
Swift provides a solution for strong reference cycles by allowing you to use the keyword weak or the keyword unowned. You use the keyword weak when it is possible for your reference to have no value at some point. If this isn’t the case, then you use unowned.
The weak Keyword
A weak reference does not keep a stronghold to the instance that it refers to. When you assign a reference as weak, you are saying that it may at some point have “no value.” Therefore, you must assign a weak reference as an optional. It is possible that a weak reference may be deallocated before you are done with it. ARC automatically sets weak references to nil when they are deallocated. You can then easily check this with an if statement.
To see how this works, you can rewrite the car and driver example and set one of the variables to weak. You don’t need to set both to weak, just one, because when there are no more strong references to the car or driver, it will be deallocated. The only change you really need to make is either in the car or driver class. You just need to mark the variable as weak in one of the classes. For now, do this in the driver class. Edit your driver class to look like this (and notice I am only adding one word here).
Run the code, and you’ll see that car and driver both get initialized and deinitialized:
//INITTING Car
//INITTING Driver
//DEINITTING Car
//DEINITTING Driver
The unowned Keyword
Instead of using weak, you can use unowned. The big difference between unowned and weak is that unowned is assumed to always have a value. Therefore, it does not need to be an optional. You have to be super-duper careful when using unowned because, whereas weak sets your variable to nil after it’s been deallocated, unowned does not. If you try to reference an unowned variable after it’s been deallocated, your program will reliably crash. Therefore, you want to use unowned only when you are absolutely positive it will always have a value. Here’s how you can rewrite the driver class to use unowned instead of weak:
class Driver {
unowned var car:Car
init(car:Car) {
self.car = car
println("INITTING Driver")
}
deinit {
println("DEINITTING Driver")
}
}
You must now add an initializer for driver because car is no longer an optional. You also have to change viewDidLoad because you are no longer dealing with an optional car. Update your code like so:
override func viewDidLoad() {
super.viewDidLoad()
var car:Car? = Car()
var driver = Driver(car: car!)
car!.driver = driver
driver.car = car!
car = nil
}
When you run this code, notice that you get the same result. car and the driver are both deinitialized properly. Why does this work now, when it didn’t work before? Well, remember that when you have a strong reference, ARC cannot deallocate the instance. When you have a strong reference cycle (when you don’t use weak or unowned), it goes in both directions. car strongly references driver, and driver strongly references car (see Figure 6.1). When you mark one of the references as weak, you get rid of that strong reference that was going bidirectionally. The same goes for unowned: Swift is no longer able to have a bidirectional strong reference.
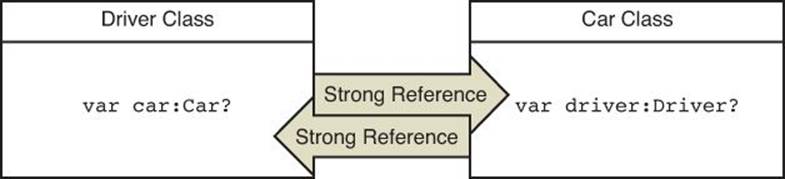
Figure 6.1 Strong references in both directions.
When you mark the driver of the car class as weak or you no longer have a strong reference, ARC can deallocate that instance (see Figure 6.2).
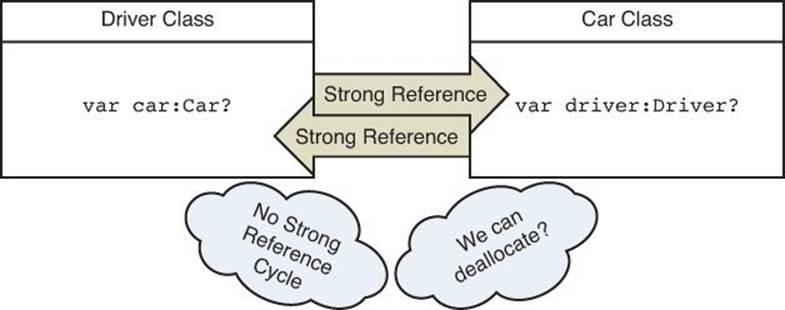
Figure 6.2 No longer fused at the hip. ARC can deallocate.
The same goes for unowned: When you mark the driver of the car class as unowned, you no longer have a strong reference, and ARC can deallocate that instance (see Figure 6.3).
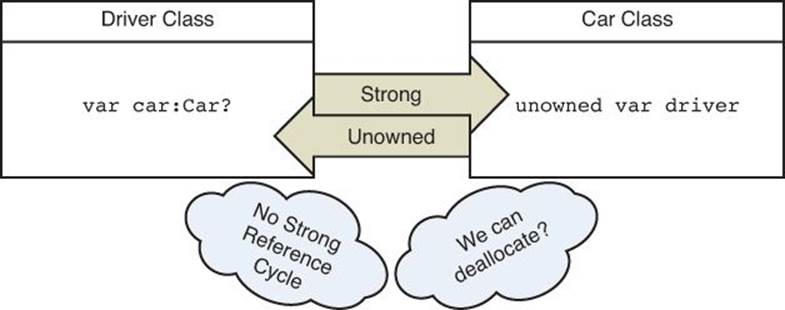
Figure 6.3 Once again not fused at the hip. ARC can deallocate.
Thus sayeth the ARC.
Strong Reference Cycles in Closures
An important point in this chapter about closures is that you can create strong reference cycles in closures. This is the bottom line: If you have a closure as a property of a class, and that closure references self, then you have a strong reference cycle. The closure can reference any property of the class. Remember that closures are referenced types, so a reference will be created.
You need to run the next example in a project. So either reopen your last project or open up a new project in Xcode. I am using a SpriteKit game setup for this project. In the view controller, you alter the car class from before. You also use a new keyword, lazy, so that you can use self within the closure. Lazy properties do not get evaluated until they are used. Therefore, by marking this closure as lazy, you know that self will exist, and we can use it. You will often use lazy when there are values that you want to use that will not be available until after initialization. You can only use values in properties that are available before initialization unless you use lazy. lazy is evaluated at runtime, if it is even used it all. If it is never used, it is never evaluated. Check out the following example:
class Car {
var make:String
var model:String
var year:Int
init(make:String,model:String,year:Int) {
self.make = make
self.model = model
self.year = year
println("INITTING Car")
}
lazy var fullName:() -> String = {
return "\(self.year) \(self.make) \(self.model)"
}
deinit {
println("DEINITTING Car")
}
}
Here you have created a closure with a strong reference cycle. You can now initialize this class and attempt to deinitialize it, which will be unsuccessful because of the strong reference cycle. Because you are using SpriteKit, you can do this in the viewDidLoad function:
override func viewDidLoad() {
super.viewDidLoad()
var car:Car? = Car(make: "Ford", model: "Taurus", year: 1997)
println(car!.fullName())
car = nil
}
Run this code by pressing Command+R or by selecting Product > Run. You should see that everything works except the car is never deinitialized.
To prevent strong reference cycles for closures, you define a capture list when writing your closure. You create these in the same way that you create weak and unowned references for other variables. Creating a capture list allows you to capture different class instances and make sure they are no longer strongly referenced. You can mark self or any other class property as weak or unowned to allow ARC to deallocate instances when necessary.
To fix the car class so that you no longer have a strong reference cycle, you only need to add one line of code, highlighted in the following:
class Car {
var make:String
var model:String
var year:Int
init(make:String,model:String,year:Int) {
self.make = make
self.model = model
self.year = year
println("INITTING Car")
}
lazy var fullName:() -> String = {
[unowned self] in
return "\(self.year) \(self.make) \(self.model)"
}
deinit {
println("DEINITTING Car")
}
}
Now if you run this code, you will notice that the car class is properly deinitialized. You can add multiple properties to the capture list; just separate them using commas.
Trailing Closures
When you write a closure as a parameter of a function, the closure is often the last parameter. You see this often in Objective-C as well with blocks. In Objective-C, you write something like this when animating:
[UIView animateWithDuration:1.50 delay:0
options:(UIViewAnimationOptionCurveEaseOut|UIViewAnimationOptionBeginFromCurrentState)
animations:^{
//do animations here.
}];
Notice that this function takes two blocks, and you have one block at the end. You could write the last block as a trailing closure. This means you could write the closure outside the function’s closing parentheses. You could rewrite the last function in Swift like so:
UIView.animateWithDuration(1.50) {
// do animations here.
}
Here you take advantage of the ability to write closures outside functions. Without using the trailing closure, the preceding call would look like this:
UIView.animateWithDuration(1.50, animations: {
// do animations here
})
You don’t have to write animations: explicitly with the trailing version because Swift automatically knows that animations is the last parameter and it is a closure. This makes your code cleaner because you don’t have to keep track of the closing parentheses, and it also means less writing for you. Furthermore, in certain situations, you can even do away with the parentheses. If the closure is the function’s only argument, then you need not include the parentheses at all. For example, say that you have a function like this that takes only one argument:
func gimmeAClosure(yumClosures:()->()) {
//some good stuff goes here
}
Then when you call this function, you don’t even need to include the parentheses at all:
gimmeAClosure {
//some closure stuff
}
Note
This is super convenient and potentially confusing if you had never read that you can call functions and pass in closures without parentheses. If you ran into this syntax while examining someone’s code, you may find yourself a tad confused.
Summary
In this chapter you have learned how closures work—how they “enclose” values in their context. You have learned that Swift provides specific closure syntax for writing them. Closures in the wild can be confusing if you aren’t used to all the syntactic possibilities. In this chapter you have learned pretty much everything you might wind up running into.
Often when learning a new language, you find yourself trying to relate bits and pieces to other languages you already know. When converting Objective-C to Swift (which you’re sure to do often), you’ll notice that you can directly replace blocks with closures. When replacing them, you often have multiple syntax choices that can make your writing even shorter.