Get Fit with Apple Watch: Using the Apple Watch for Health and Fitness (2015)
Part II. The Apple Watch in Health & Fitness
Chapter 9. Third-Party Health and Fitness Apps
Allen G. Taylor1
(1)
London, England
Although the built-in health and fitness apps are well designed (as we have all come to expect from Apple), they do not have the depth that is available from developers whose whole business revolves around health and fitness. Many mature health and fitness apps are available for the iPhone. Some of the best of these have extended their iPhone apps to make use of the convenience and added functionality of the Apple Watch. In this chapter, I will give brief descriptions of a few of them, highlighting the best features of each and describing the added capability provided by the watch.
In the first release of the software development kit (SDK), Apple did not give third-party developers the ability to acquire data from the watch’s heart-rate sensor. With the advent of watchOS 2, this capability has now become available to developers. Alternatively, you can feed heart-rate data to your third-party apps by pairing a Bluetooth chest-strap heart-rate monitor with your iPhone. With the chest-strap monitor, you will not be able to see your heart rate on your wrist while exercising, but you may be able to see it by glancing at your phone, both in your third-party app and in Apple’s Health app. The Health app will take heart-rate data from a Bluetooth chest-strap heart-rate monitor if one is present and from the Apple Watch if one is not present.
The purveyors of third-party apps all want to make money from their apps, but different apps will do that in different ways. Some apps will provide basic functionality for free and additional functions for premium or elite members, who pay a fee for the added value. Other apps, such as Nike+ Running, just want to encourage you to run more so that you will wear out your shoes sooner and buy a new pair of Nike shoes. In fact, Nike records not only the mileage of your runs but also the total accumulated mileage on your running shoes. When mileage exceeds a certain level, the app encourages you to buy a new pair of shoes. There is a direct link to the Nike store where you can buy not only shoes but all kinds of running apparel. Lacking an apparel store of its own, Endomondo runs advertisements for Under Armor and other sponsors at the bottom of the iPhone screen. The free version of Runtastic runs advertisements and also makes sure you know how to go to the Runtastic online store.
Warning
A low-power Bluetooth connection between the iPhone and the Apple Watch, or between the iPhone and an external device such as a heart-rate monitor, can be a source of problems. Functions that once worked stop working. Apps that work on the iPhone don’t run on the watch. In many cases, these problems are because of Bluetooth communication issues. They can often be resolved by deleting the third-party app having the problem and then reinstalling it.
Nike+ Running
Nike, as you might guess from the name of its app, is primarily interested in getting people running. Runners need good shoes, and they run through them (pun intended) quite often. Runners need to replace their shoes more often than, for example, weight lifters or cyclists. Furthermore, runners who are trying to improve their performance are sure to want the kind of statistical information that can be provided by the sensor-laden iPhone and the equally high-tech Apple Watch.
The iPhone Part of Nike+ Running
The Nike+ Running app was available before the Apple Watch was released and gives runners a lot of information about their runs but, like all smartphone apps, is not particularly convenient to interact with while a person is actually running. The main advantage for runners, or exercisers of any kind, of the Apple Watch is that you can garner useful information from it with a quick raise of your wrist and a glance at your watch.
The main menu of the iPhone part of the Nike+ Running app, shown in Figure 9-1, indicates that there is some real depth to this app, with a variety of categories. Let‘s take a brief look at them.
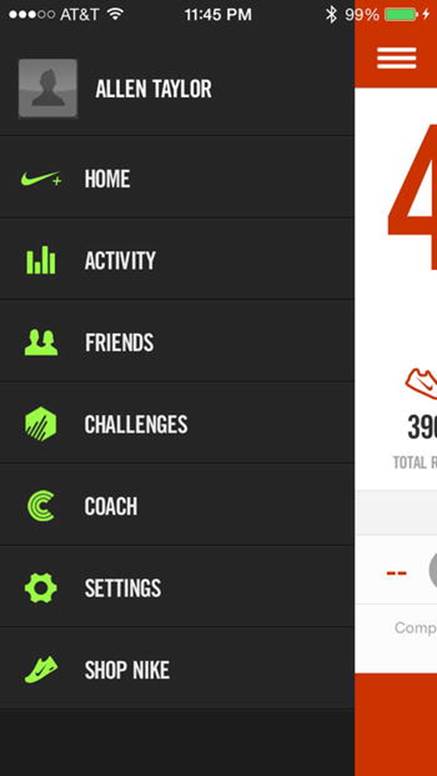
Figure 9-1.
Nike+ Running app main menu
Home
The Home screen, shown in Figure 9-2, encapsulates your cumulative statistics. At the top it shows how far you have run since you started using Nike+ Running. In addition, it shows your average pace over that distance as well as the distance of your most recent run. Tapping BEGIN RUN at the bottom takes you to the Run Setup screen, where you can set up such things as whether you want to hear music while you run, whether you will be running outdoors or indoors, whether you want your phone display to be vertical or horizontal, whether you want to let your Facebook friends know that you have just started running, and whether you want to change your run settings.
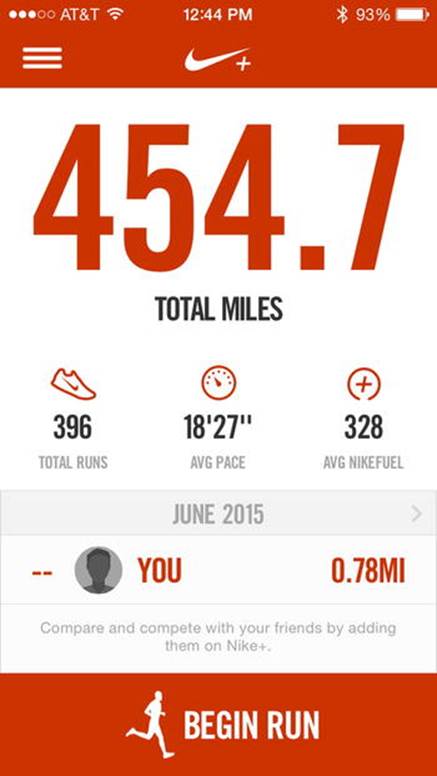
Figure 9-2.
Home screen
Note
If you are running indoors, for example on a treadmill, Nike+ Running cannot track your route with GPS and must estimate the distance you have run based on accelerometer and gyroscope tracking of your rhythmic body movements. This estimate will not be as accurate as the distance estimate of an outdoor run when you are carrying your iPhone with its GPS capability.
At the bottom of the Run Setup screen is the START button. Press it to begin a workout. A countdown timer that you set to a convenient interval, for example three seconds, begins. When it reaches zero, your run timer begins, as shown in Figure 9-3.
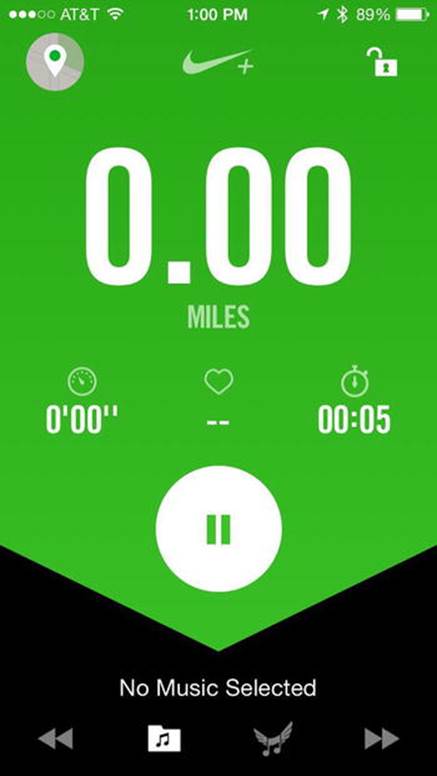
Figure 9-3.
A workout has started
There is a Pause button that you can press if you want to interrupt your workout for any reason. It takes you to a screen (Figure 9-4) where you can either resume the workout or end it.
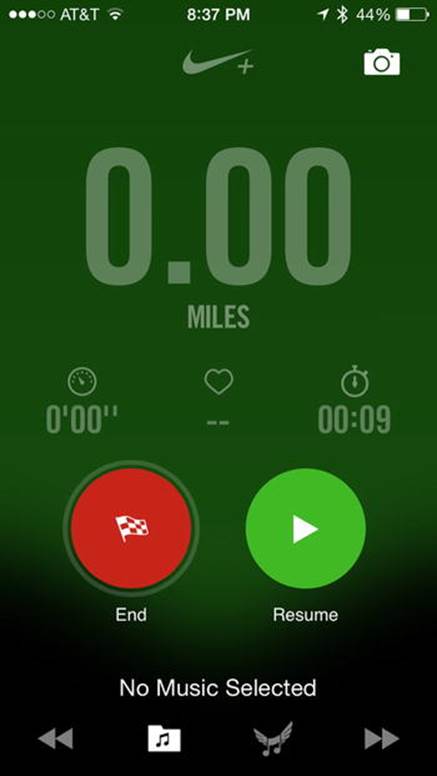
Figure 9-4.
You have paused your workout
To resume the workout, all you need to do is tap the green Resume button. To end the workout, press and hold the red End button. The workout will end, and you will be returned to the Home screen, which will now show your updated stats.
Activity
The Activity screen shows you a synopsis of your most recent runs: your distance, your pace, and your elapsed time, as well as how you felt and the type of surface you ran on. By scrolling up, you can see records of earlier runs. By tapping the right edge of one of those runs, a map of the route will be displayed, and the color of your track will indicate your relative speed: green for fastest, yellow for slower, orange for even slower, and red for stopped. Figure 9-5 shows where I walked with my dog, Mojave, who liked to stop and sniff the ground every now and then. The times that he did show up as red spots. An emoji shows that I felt good on the walk, and an icon shows that I have less than three miles on my Gel Nimbus 16 shoes.

Figure 9-5.
Detail of a walking workout
Friends
Nike+ is a social community. If you want to join the community, select Friends and then press the MAKE MY ACCOUNT SOCIAL button. You can request that people you know who are already social members of Nike+ accept you as a Nike+ friend. You can keep up on how active your friends are, and you can motivate each other to be more active.
Challenges
You can challenge any of your Nike+ friends to a race. You set the distance and the time limit. An example might be 30 miles within 30 days. The first person to run the required distance within the stated time wins a virtual medal. Everyone who completes the challenge wins something. You can also accept a challenge posted by one of your friends. This is a good way to engage with your community and to motivate yourself and others to be more active.
Coach
This option gives you a virtual coach who will prepare you for a race in the future. You can specify a 5K, 10K, half-marathon, or marathon, and the coach will give you a program that will take you through the conditioning you will need to complete such a race. The program will include walking, running, resting, and cross-training, getting progressively more intense as race day approaches.
Settings
This option gives you the opportunity to set a number of variables, such as privacy settings, to the way you want them. For our purposes, the most important thing here is the instruction on how to configure your iPhone so that it links to your Apple Watch so you can view your progress while running, with a glance at your watch.
Shop Nike
Nike would be missing a chance if it didn’t take the opportunity to show you some of its featured products for runners, and this is the place it does it. The Shop Nike option is a direct link to the Nike.com web site.
Starting and Ending a Run from Your iPhone
You can both start and end a run with your iPhone as described earlier in the Home section. You can also start and end one from your Apple Watch. Let‘s look at that next.
The Apple Watch Part of Nike+ Running
Because of the small screen on the Apple Watch, there is not much room for displaying running statistics. However, the watch comes in handy by enabling you to both start and stop recording your run without hassling with your phone. When you select the Nike+ Running app from your watch’s Home screen, you see the Start screen shown in Figure 9-6.
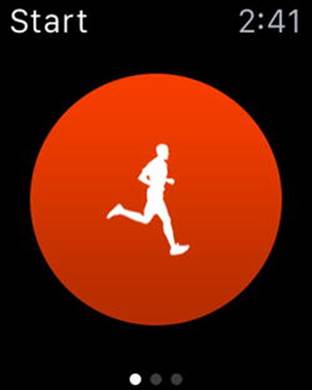
Figure 9-6.
Nike+ Running Start screen
Tapping the figure of the runner launches the app, the audio coach on your phone announces “Beginning workout,” and the run timer starts counting elapsed time.
Tapping the watch during the run rotates through displays of Pace, Duration, and Miles (assuming you did not set your app to measure distances in kilometers). Figure 9-7 shows the Duration display.
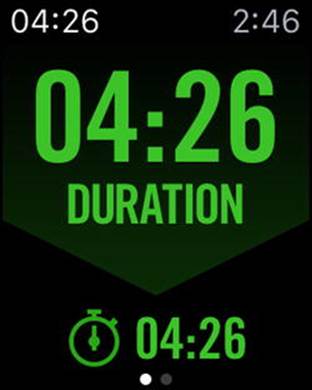
Figure 9-7.
The elapsed time of your run is one thing that is displayed
A glance at your watch will let you know how you are doing while you are running.
Using Force Touch shows the display in Figure 9-8.
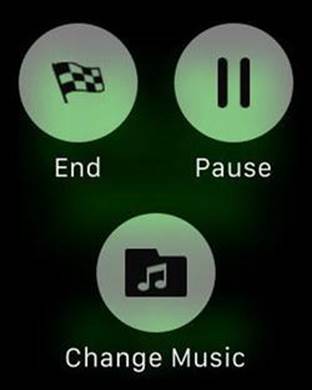
Figure 9-8.
The End, Pause, or Change Music screen
At the end of your run, be sure to press the End button so that the statistics recorded are accurate. If you want to pause in the middle of a run for any reason, such as taking a phone call, press the Pause button. Since you can store more than one choice of music to run by on your watch, you can even start listening to a new mix by pressing the Change Music button. There is no way to plug earbuds or headphones into the Apple Watch, but you can access the music stored on it with Bluetooth headphones.
Endomondo
Although fitness apps such as Nike+, Endomondo, RunKeeper, Runtastic, and their competitors were originally designed to track running sessions and still work best for that sport, it is possible to use some of these apps for other sports too. Different sports put different demands on the body, so their calorie burn rates will vary. Many third-party apps, Endomondo included, calculate calorie burn differently, depending on which exercise you tell it you are doing. Running burns more calories per hour than walking does, for example.
The iPhone Part of Endomondo
Like Nike+ Running, Endomondo has a main menu of options, shown in Figure 9-9.
Figure 9-9.
Endomondo main menu
Let‘s look at each option in turn.
Upgrade
Most of these third-party apps work on the same revenue model. A lot of effort and expense goes into developing these apps, and the companies that create them want to recover their investment and make a profit on top of that. They do this by providing a basic set of features for free and then charging for a “premium“ or “elite“ or perhaps “gold“ membership, which unlocks additional features that the user may find to be of value. After a user of the free product has developed a history with that product, she is unlikely to switch to a competitor and lose all that historical data about her past performance and progress. As she becomes more dedicated, she is more likely to upgrade.
In Endomondo’s case, a premium membership will give you additional statistics, access to training plans, and analysis of heart-rate monitor data. Because first-generation third-party apps do not have access to the Apple Watch’s heart-rate data, you must use a chest-strap monitor with a Bluetooth connection to feed heart-rate data to Endomondo. When the Endomondo app is updated to work with watchOS 2, check to see what additional capabilities are present.
Endomondo helps support the free version of the app with advertisements. If you buy the premium program, you can elect to replace the space the ads take up with data that you might actually care to see.
There are a number of additional features available to premium users that people might find worth the cost of a membership.
Workout
During a workout, the app displays the number of kilocalories burned so far, the distance traveled, and the user’s heart rate in beats per minute. Figure 9-10 shows the workout screen.
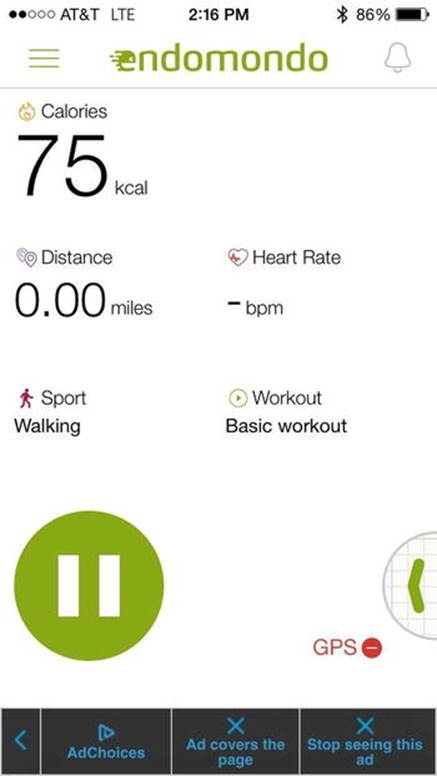
Figure 9-10.
Workout screen partway through a workout
This figure was captured partway through a walking workout when no heart-rate monitor strap was being worn and no GPS signal was being received. Lacking GPS, the app could not record the distance traveled.
Note
Some fitness apps, such as Nike+ Running, will estimate distance traveled using body movements when GPS is not available, but Endomondo does not do this; it displays 0.00 miles.
Figure 9-11shows the result screen at the end of a workout when GPS is not working.
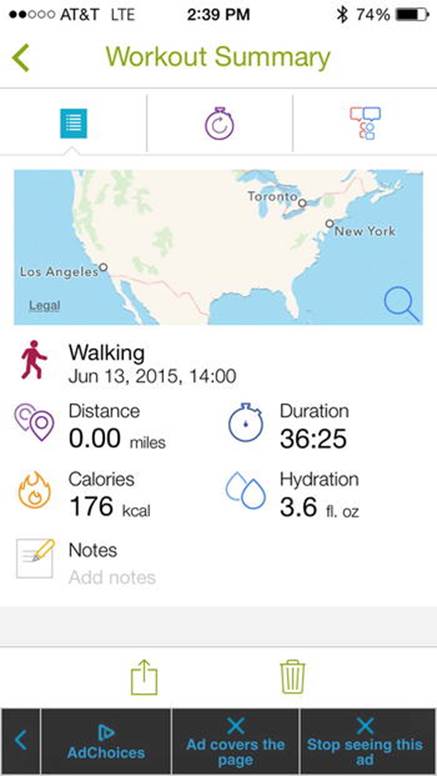
Figure 9-11.
Workout Summary screen
In addition to date and time of the workout, duration in minutes, calories in kilocalories, and hydration in fluid ounces are recorded. For a non-GPS workout, Distance shows as 0.00 miles. You can add a note if you want. The map at the top shows the entire contiguous United States because, lacking GPS, Endomondo could not narrow down location more precisely. There is an advertisement for Endomondo Premium at the bottom of the screen, which does not show in Figure 9-11. Nike+ Running does not display ads on the free version of the app but reminds users when they should start thinking about replacing shoes that have put in a lot of miles, and the main menu contains a link to the online Nike store.
Friends
The Friends option has two functions: it records your activities and shares them with friends, and it shares your friends’ activities with you. Figure 9-12 shows the screen displaying my most recent activities.
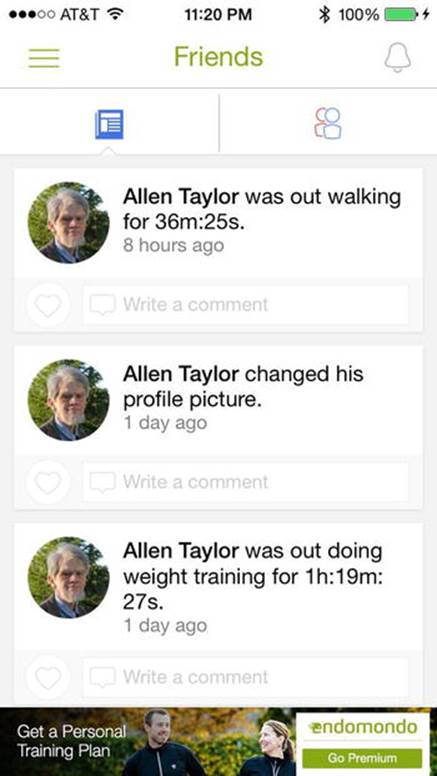
Figure 9-12.
Friends screen, showing user’s recent activities
Tapping the friends icon at the top right will switch the display to show the recent activity of your friends who are also using Endomondo. Endomondo friends are friends by mutual agreement. One of you must send an invitation, and the other must accept it.
History
When you select the History menu item, a scrollable screen appears that lists pointers to workout summaries of all the workouts that you have done since you started using Endomondo. Figure 9-13 shows my most recent workout history.
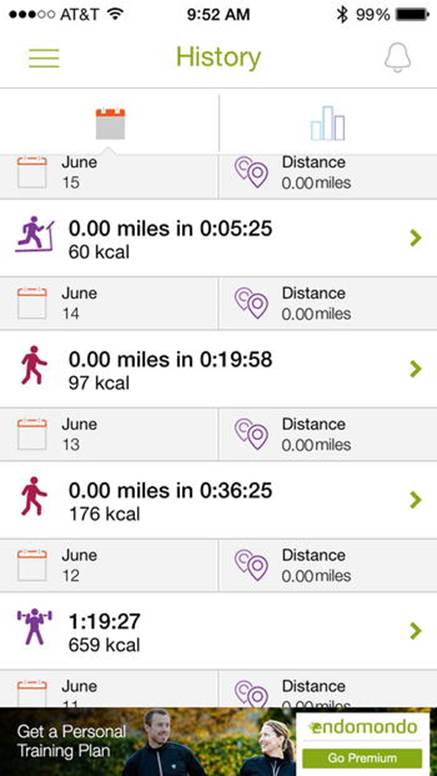
Figure 9-13.
Recent workouts
In addition to today’s 36-minute walk with no operating GPS, a 1-hour and 19 minute weight-training session is shown, as well as a 30-minute walk and a 5-minute treadmill run, which also shows zero miles run. Endomondo does not estimate distance run on a treadmill like the Apple Watch Workout app does when you specify Indoor Run.
More elaborate statistics are available to people who purchase a premium membership, including graphs showing trends over time.
Training Plan
Training plans are a premium feature of Endomondo, meaning they are not available on the free version of the product. However, if you would like to prepare for a race, going premium could well be worth the cost. A training plan is tailored to your current level of fitness and is dynamically adjusted as you go along. You can train for anything from your first 5-kilometer race to a marathon. A plan can help you if all you want to do is increase your speed with no particular race in mind. An audio coach encourages you along the way.
Commitments
To keep yourself motivated, you can make a commitment to a certain distance, duration, or calorie goal, such as the one shown in Figure 9-14.
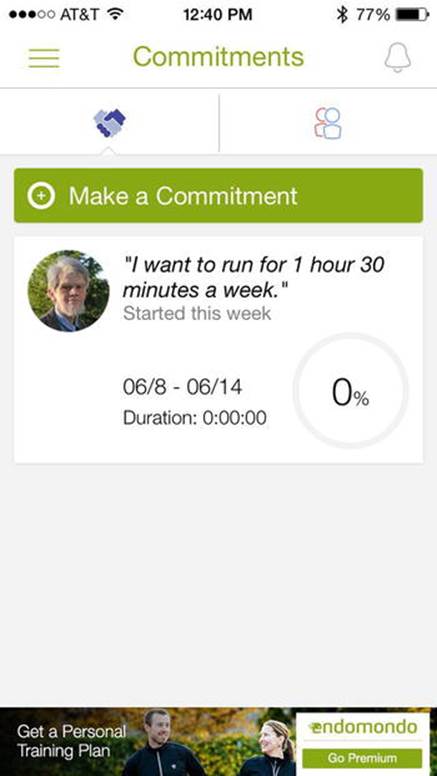
Figure 9-14.
A commitment to a running goal
Endomondo will periodically remind you of how you are doing and display what percent of your goal you have already accomplished. You can also receive encouragement from your friends by sharing your commitment with them, along with your progress toward achieving the goal you have committed to. Your friends can also share their goals with you.
Challenges
Challenges are another way you can share mutual encouragement with your Endomondo friends. You can challenge specific friends to accomplish specific goals within a specific time frame at a specific sport. The competitive aspect makes it easier for you to motivate yourself to accomplish the goal of the challenge. Of course, if you have friends on Endomondo, they might challenge you to a goal of their choosing. In this way, everybody benefits. You can always decline to accept a challenge, if for some reason you do not want to engage in it.
Routes
Endomondo will store your favorite routes for you. You can create a route by tracing your route on www.endomondo.com and saving it. The app will calculate the distance and show it to you on a map, as shown in Figure 9-15.
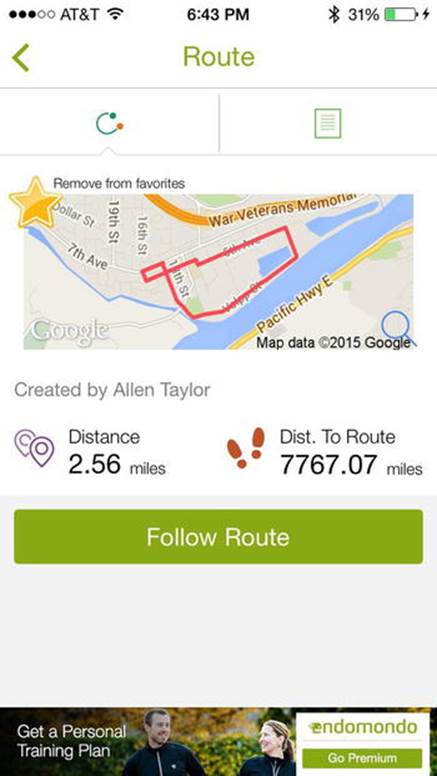
Figure 9-15.
An example route
When you create a route, you can name it and specify whether it is private or public. If private, only you can see it. If public, any Endomondo member can see it and may challenge you to run that route in a faster time than they can run it.
One nice thing about public routes is the fact that if you are visiting some place and would like to take a run, you can be pretty sure that a public route listed on the Endomondo web site is a good one.
Settings
The Settings option on the Endomondo app is similar to the Settings option on other health and fitness apps. It enables you to set the parameters that you want your Apple Watch to display, including distance, heart rate, speed, duration, and average speed.
The Apple Watch Part of Endomondo
As is true for all the first-generation third-party Apple Watch apps, if the watch is separated from its paired iPhone by more than about 30 meters, it ceases to function. With the advent of watchOS 2, apps that are compatible with it will continue to work, as long as you are within range of a Wi-Fi signal. This is not much help when you are out on a trail run.
You can select the statistics that you want Endomondo to display during and after an exercise. Figure 9-16shows the watch display after the five-minute treadmill run mentioned in the “History” section. Duration shows 5 minutes and 25 seconds. Distance on the treadmill shows 0.00 miles, and the app estimates that I burned 60 calories in the process.
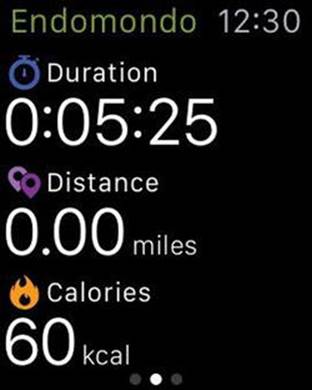
Figure 9-16.
Duration, Distance, and Calories display
Sweeping a finger across the screen from right to left shows additional statistics, although in this case they are not very helpful, as shown in Figure 9-17.
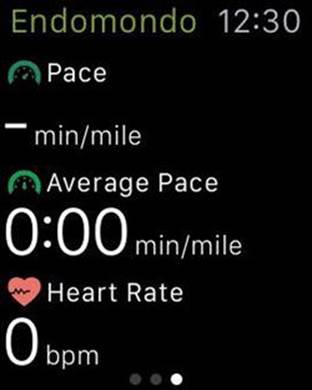
Figure 9-17.
Pace, Average Pace, and Heart Rate screen
Because no distance was measured, the Pace metric shows a blank, and Average Pace shows zero minutes per mile. Heart Rate shows zero beats per minute because heart-rate monitoring was not being done. It’s kind of a hassle to put on a heart-rate monitor chest strap, and after you do, it is not the most comfortable thing in the world. The fact that the Apple Watch measures heart rate without you even having to think about it is a real advantage. It is unfortunate that the first-generation third-party apps such as Endomondo cannot use the data from the watch heart-rate monitor.
RunKeeper
Although running is implied by the name RunKeeper, as is the case with Endomondo, RunKeeper will adjust the calorie burn rate it calculates, based on the activity you are doing. The choices are as follows:
· Running
· Cycling
· Mountain Biking
· Walking
· Hiking
· Downhill Skiing
· Cross Country Skiing
· Snowboarding
· Swimming
· Wheelchair
· Rowing
· Nordic Walking
· Other
The iPhone Part of RunKeeper
As Figure 9-18 shows, the main RunKeeper screen on the phone shows where you are on the map and prompts you to start a run.
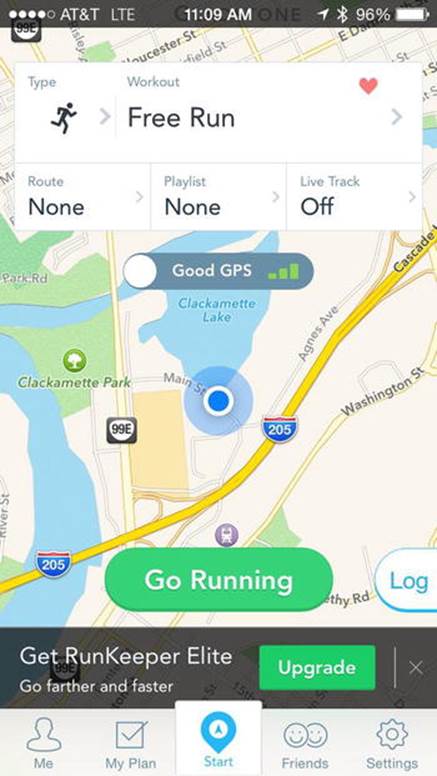
Figure 9-18.
RunKeeper main screen
Type of workout, route, and music playlist can be specified at the top of the screen, and a menu sits at the bottom, along with an advertisement for RunKeeper Elite, the paid version of the app.
The menu at the bottom has options of Me, My Plan, Start, Friends, and Settings. The Me screen, shown in Figure 9-19, shows how many miles you ran last month and how many you have run so far this month.
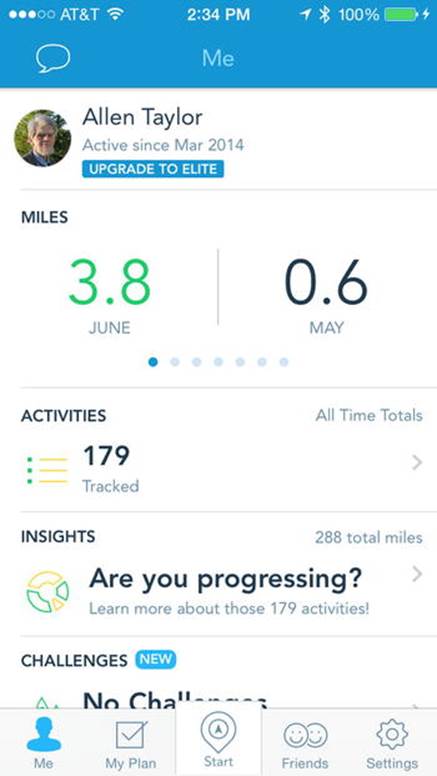
Figure 9-19.
The Me screen
It shows how many activities you have recorded on RunKeeper and links to detailed records of all those activities. It also offers Insights as a premium feature, informs you of any challenges, charts workouts per week over the past couple of months, and lists your personal records.
The My Plan option takes you through a series of questions that determine what you want to achieve and where you are right now on the road to getting there. RunKeeper will then tailor a plan to your requirements, but you will need to be an Elite member in order to get it.
The Friends option informs you whenever a RunKeeper friend has performed an activity and also informs all your RunKeeper friends when you complete an activity. As you would expect, the Settings option enables you to set up RunKeeper the way you want it.
At the end of a run, RunKeeper shows you the route you have run along with your time, pace, and calories burned (Figure 9-20).
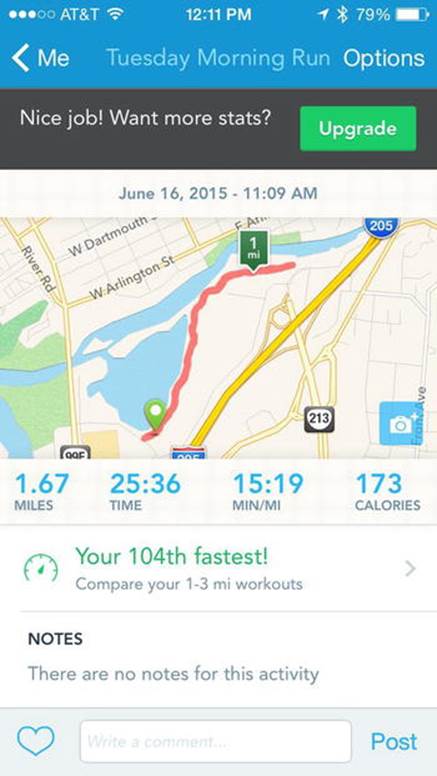
Figure 9-20.
A short out-and-back by the river
In addition to time, pace, and calories, RunKeeper also gives you splits at mile marks and stacked graphs that show pace, elevation, and heart rate. Figures 9-21 and 9-22 show those three graphs.
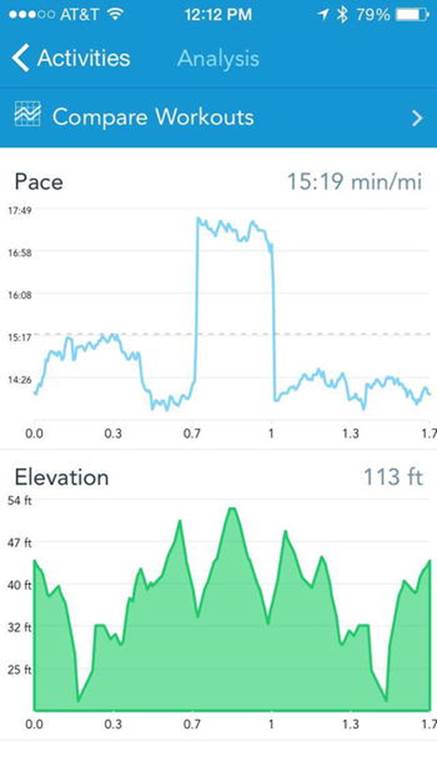
Figure 9-21.
Pace and elevation graphs
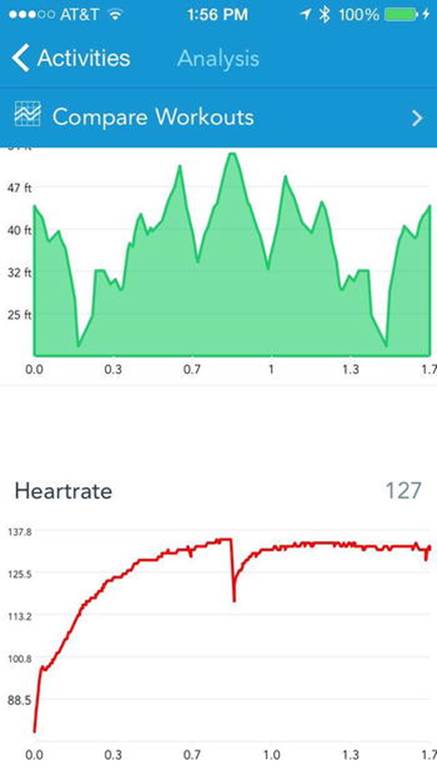
Figure 9-22.
Elevation and heart rate graphs
The halfway point of the run was also the peak elevation. I stopped for a minute there, as chronicled by a drop in my heart rate. Resuming the run brought my heart rate back up to what it had been before the pause.
The Apple Watch Part of RunKeeper
The Apple Watch component of RunKeeper gives you all the information and control that you need before, during, and after the run. You can safely keep your iPhone in a pocket, without having to refer to it until later when you want to examine your stats. Figure 9-23 shows the Start screen.
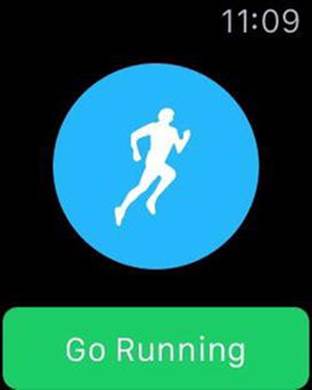
Figure 9-23.
RunKeeper Start screen
When you tap the Go Running button, a friendly voice emerges from your pocketed phone, announcing that the run has started. Along the way you can see how you are doing, as shown in Figure 9-24.

Figure 9-24.
Screen while run is in progress
The Pause button enables you to pause the run. If you press it, you are given the choice of resuming or ending the workout. After you have ended it, you can either save or delete the workout. Later you can consult your phone at your leisure to look at saved workouts.
Strava
The Strava fitness app is specifically aimed at running and cycling, and you can switch from one to the other on the fly during a single workout. The capabilities are similar to those of the other apps described in this chapter, but the presentation of the information is somewhat different.
The iPhone Part of Strava
On the iPhone part of the Strava app, Figure 9-25 shows the start screen for running.
Figure 9-25.
Running Start screen
As with the other apps in this category, the user is given the chance to “Go Premium” just below the circular button that you tap to start recording a run.
Figure 9-26 shows what you see at the end of a run.
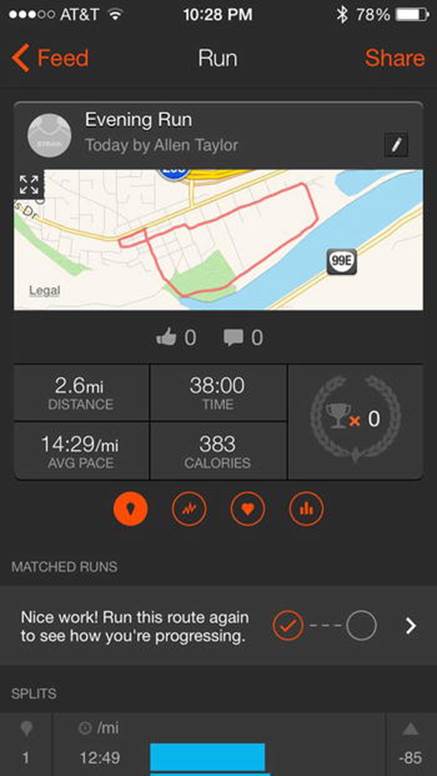
Figure 9-26.
Statistics at the end of a run
A map of the route taken is displayed, along with distance, time, average pace, and calories burned. Swiping from right to left shows the elevation profile of the run, as shown in Figure 9-27.
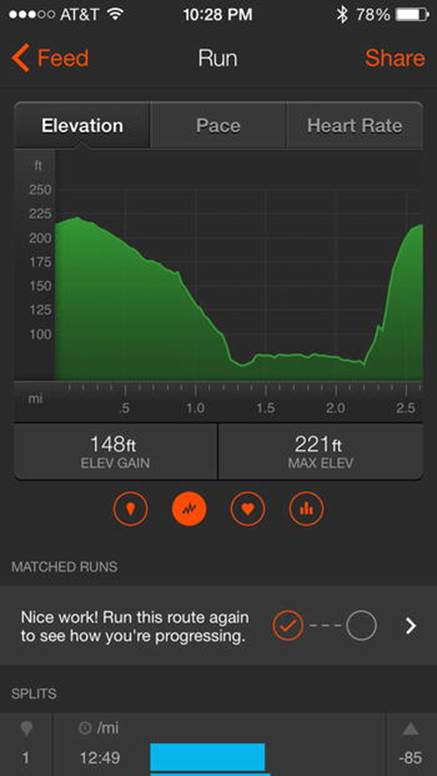
Figure 9-27.
Elevation profile
The route displayed has a steep climb at the end of the course.
Tapping the Pace button shown in Figure 9-27 gives you a graph of your pace as it varied over the course. Figure 9-28 shows what this looks like.
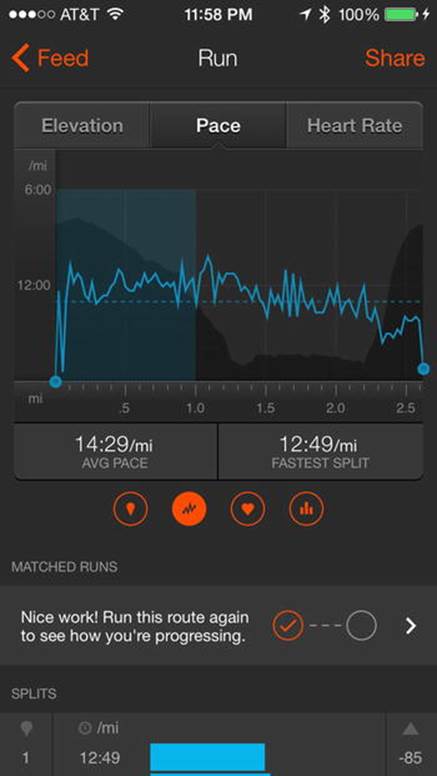
Figure 9-28.
Record of pace over the course of a run
Split times appear in a bar graph at the bottom of the screen in Figure 9-29.
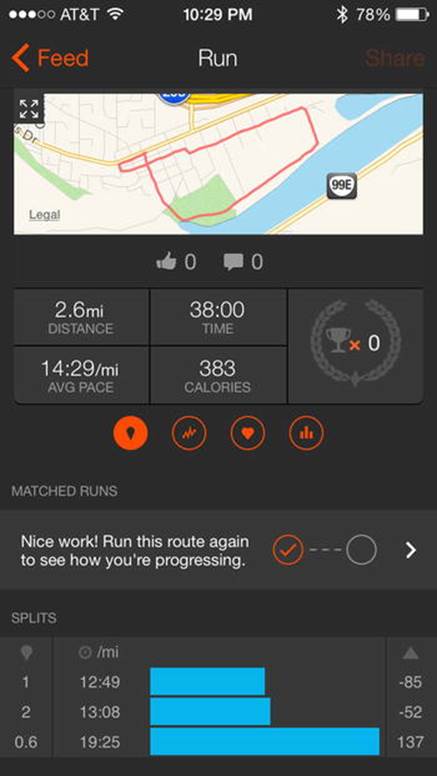
Figure 9-29.
Bar graph of split times
As you would expect, the steep uphill stretch was a lot slower than the earlier part of the route.
The Apple Watch Part of Strava
The Apple Watch part of the Strava running and cycling app is rather minimalist. Figure 9-30 shows the start screen for running.

Figure 9-30.
Start screen for running
The start screen for cycling is similar, except instead of a running shoe inside the circle, there is a bicycle. After a run is completed, the route taken is displayed on the watch, as shown in Figure 9-31.
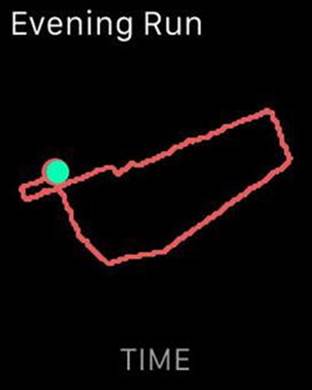
Figure 9-31.
Route displayed after a run
LifeSum
LifeSum is a health and fitness application, but it approaches those topics from a different perspective than the apps I have covered so far. Whereas the apps, both built-in and third party, that I have covered so far deal with time and effort spent exercising, LifeSum is primarily concerned with the flow of calories through a person‘s body. It records everything that a person eats and drinks in a day to arrive at a total number of calories consumed and balances that against calories burned through exercise. The beginning user of LifeSum enters their current weight and a target weight. LifeSum then generates a program that will take the person from their current weight to the target weight they want to reach. If users are below their calorie goal for the time of day, LifeSum encourages them to eat. If they have not drunk enough water, they are encouraged to down a glass of water. In addition to a daily calorie goal, consumption of carbohydrates, protein, and fats are also tracked and compared to target values. Ratios vary depending on the user’s goals. A person wanting to lose weight would have different needs from a body builder.
The iPhone Part of LifeSum
After you have configured LifeSum on your iPhone, the Diary screen looks something like Figure 9-32, which is my screen at the beginning of a day before I have consumed anything.
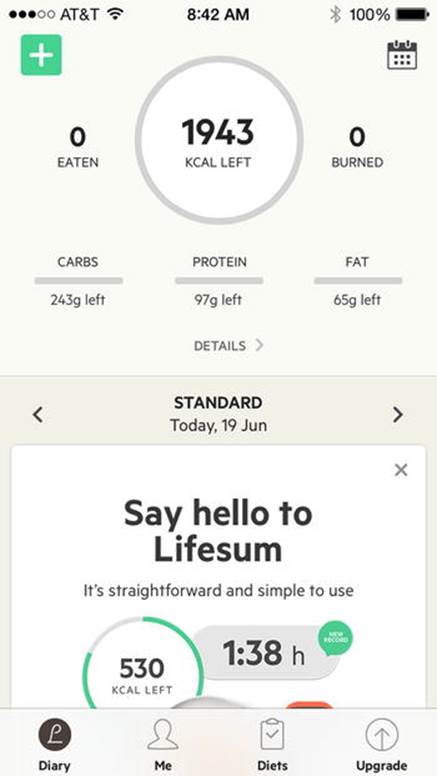
Figure 9-32.
Diary screen at the beginning of a day
It shows the number of calories I should consume today to stay on track with my weight loss goal (1943) as well as the number of grams of carbs, protein, and fat that should be included in my day’s diet. It also shows that so far I have consumed zero calories and have burned zero calories through exercise. The lower part of the scrollable screen shows the top part of the launch pad for a demo of LifeSum.
In addition to helping users track the calories they consume and burn, LifeSum also encourages them to keep adequately hydrated. Figure 9-33 shows eight empty 8.9-ounce glasses that will be filled as you press the plus sign to indicate that you have drunk the equivalent of a glass of water.
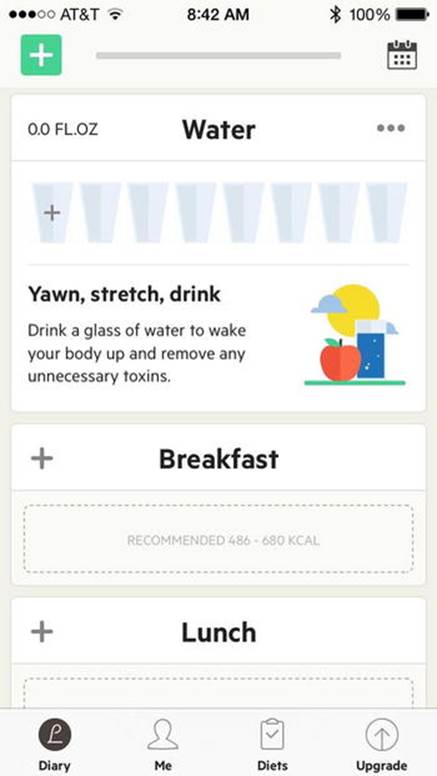
Figure 9-33.
Water tracking section of Diary screen
Eight glasses is the minimum that LifeSum recommends that a person drink in a day. As you add records of exercise that you do, additional empty glasses will appear, indicating that your hydration needs have increased because of your increased activity.
LifeSum records what you eat and drink for breakfast, lunch, dinner, and snacks, as well as what exercise you do. It holds a large database of foods for which it knows the calorie content and a database of exercise activities along with the number of calories burned per unit time by engaging in those activities.
Note that if you want to eat a food that is not in the LifeSum food database, you can add it by using the LifeSum barcode scanner on your iPhone by pressing the SCAN A BARCODE button shown in Figure 9-34 and then aiming your phone at the barcode on the new food product.
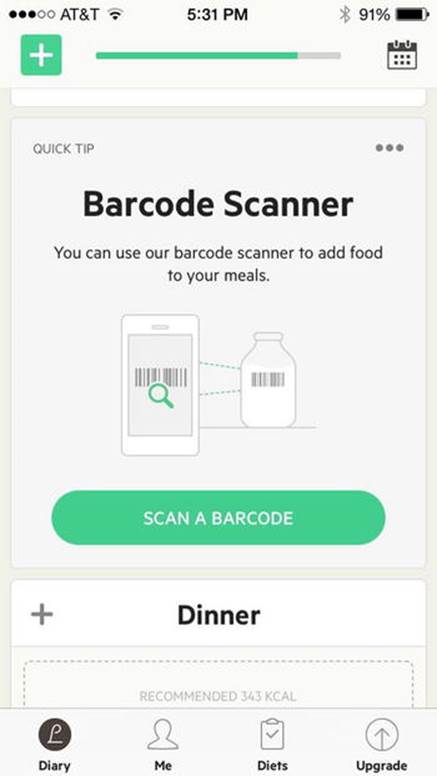
Figure 9-34.
Using the barcode scanner to add a new food
Figure 9-35 shows the Diary section that covers lunch, dinner, snacks, and exercise before you have made any entries for the day.

Figure 9-35.
Diary section at the start of a day
Almost too faint to be seen in Figure 9-35 is the recommendation that I consume between 583 and 777 calories for lunch, between 758 and 991 calories for dinner, and between 0 and 389 snack calories.
You can enter what you have eaten in either LifeSum‘s desktop app or its mobile app. After you have entered breakfast, your Diary will look something like Figure 9-36.

Figure 9-36.
Breakfast entry in Diary
Each component of the meal is listed along with the number of calories it contains. Figure 9-37 shows the snack section of the Diary and shows that I have gone overboard on snacks today, packing away 699 calories that put me 48 calories over my target for this time of day (2:11 p.m.).

Figure 9-37.
Snack section of Diary
If you have been faithful at making an entry in your LifeSum Diary every time you drink water as well as every time you eat anything, LifeSum will keep you up to date. Figure 9-38shows that I had downed six glasses of water by 6:56 p.m.
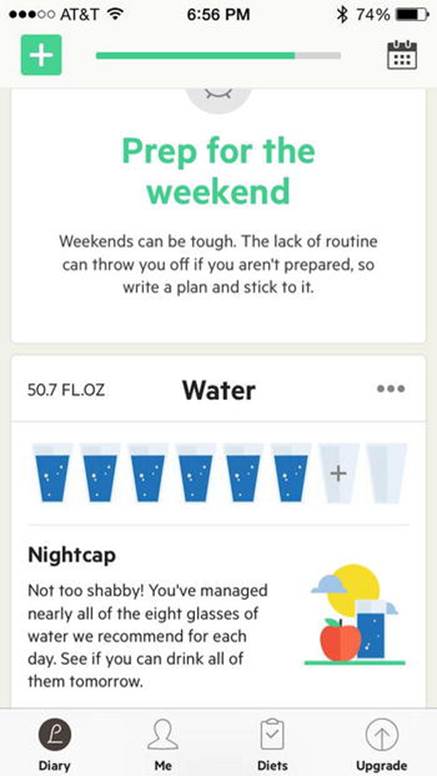
Figure 9-38.
Keeping track of daily water consumption
Note
Don’t take the recommendation of eight glasses of water every day as gospel. Different people have different hydration needs, based on their body type, how hot it is, how much they sweat, and how active they are. Also, any liquid such as tea, juice, or soda is almost entirely water and should count too. For sure, beer counts.
By the end of the day, as shown in Figure 9-39, I had added another snack, pushing my snack calorie total up to 869. I’m really going to have to do something about that. I had also done a little exercise, giving me 67 calories to balance against the 869 in snacks. I have to do better than that, and LifeSum will help me to do it by making the imbalance glaringly obvious.
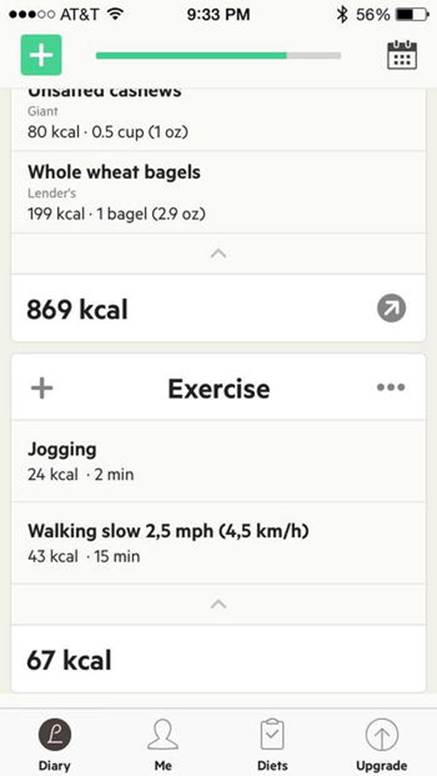
Figure 9-39.
Too many snacks, too few exercises
At the end of the day, Figure 9-40 shows that I had consumed 1,647 calories but had burned only 67 in exercises. I have my eating pretty much under control but will have to do better in the exercise department.
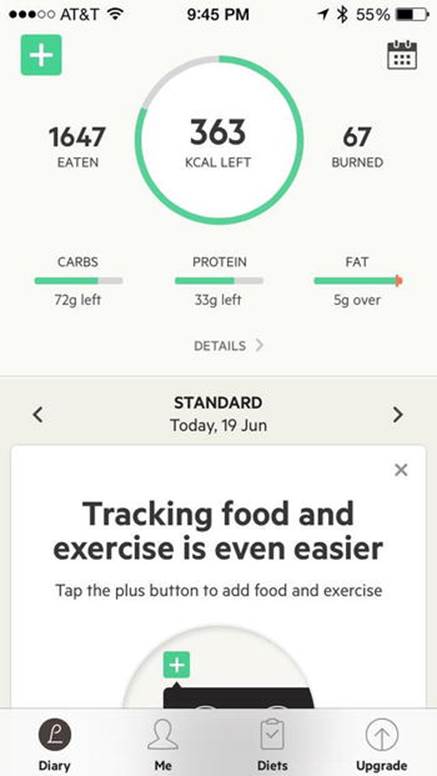
Figure 9-40.
End-of-day calorie totals
The Apple Watch Part of LifeSum
The Apple Watch portion of the LifeSum app does two things. First, it enables you to enter your meals and exercise sessions without pulling out your phone. Second, it delivers timely reminders if you are under or over your calorie, water drinking, or exercise goals for a particular point in the day. Figure 9-41 shows a reminder screen that you would get early in the day.
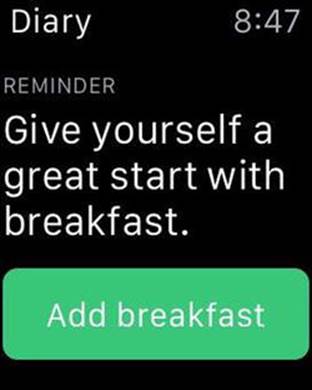
Figure 9-41.
Encouragement to eat a healthy breakfast
After eating breakfast, when you tap the green “Add breakfast” button, the screen in Figure 9-42appears.
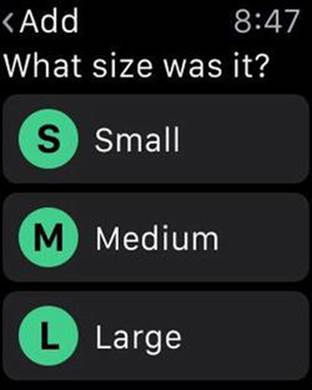
Figure 9-42.
How big was your breakfast?
You can specify that you have eaten either a small, a medium, or a large breakfast. Whether a breakfast is classified as small, medium, or large does not depend on the size of the breakfast but on its calorie content. Thus, a large bowl of oatmeal with skim milk would be a small breakfast, but a couple of pancakes with butter and maple syrup and a couple of sausages would be a large breakfast. Average calorie values are assigned to the small, medium, and large breakfasts, so the accuracy is not nearly as good as it would be if you entered the actual foods you ate into your iPhone, your laptop, or your desktop computer. If you want, you can enter the Small, Medium, or Large description of your breakfast and edit it from your iPhone later to replace the value of the meal with the calorie counts of what you actually ate.
Once you have entered a value for a meal, your Diary will give you an “attaboy,” such as the one in Figure 9-43, and tell you how many calories you have left to match your calorie consumption goal for the day.
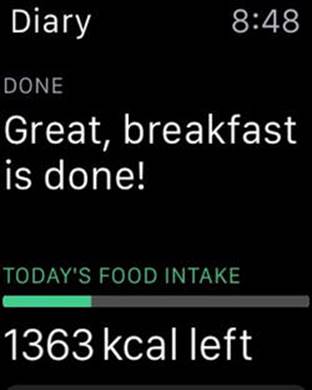
Figure 9-43.
Breakfast data has been entered
Similar messages appear for other meals, snacks, and exercise sessions. I have found LifeSum to be helpful in keeping me within range of my food consumption goals, and it gives me subtle encouragement to shift my diet in a healthier direction. I can counter consuming too much fat by not putting quite so much peanut butter on my whole-wheat bagel. The bagel is actually pretty good without anything on it at all.
Runtastic
Runtastic is primarily a running app, similar to Nike+ Running, Endomondo, RunKeeper, and Strava. As you have seen, there are small differences between these apps, but the main functions are largely the same.
The iPhone Part of Runtastic
Like Nike+ and Endomondo, Runtastic has a main menu that you access by tapping the three stacked horizontal bars in the upper-left corner of your iPhone screen. Figure 9-44shows most of the options. You can see the rest by dragging a finger up from the bottom of the screen.
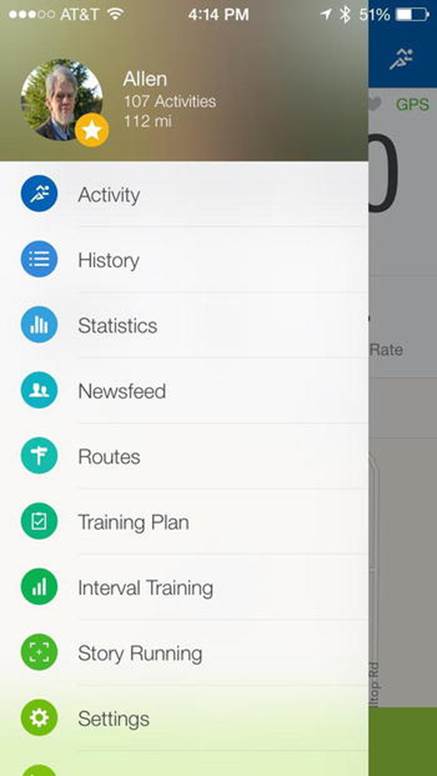
Figure 9-44.
Runtastic main menu
Activity
The Activity option takes you to the screen you see at the start of a run or other activity (Figure 9-45). The pulsing blue dot on the map shows where GPS has located you. The Start button is at the bottom. When you press the Start button, your activity either starts immediately or starts after a delay that you are able to set, in seconds.
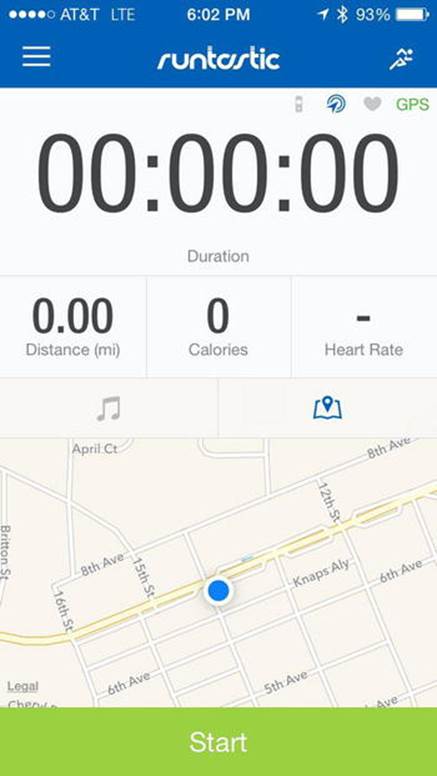
Figure 9-45.
Activity screen at the start of a run
When the activity starts, a voice announces “Session started,” and the clock starts counting seconds. There is now a slider at the bottom of the screen. When you drag it from left to right, the session is paused, and the voice helpfully says “Session paused.” At this point, the slider is replaced by two buttons; the one on the left says Finish, and the one on the right says Resume. These do what you would expect. The Finish button ends the activity. The Resume button picks up where you left off when you dragged the Pause slider. Figure 9-46 shows the screen after tapping the Finish button.
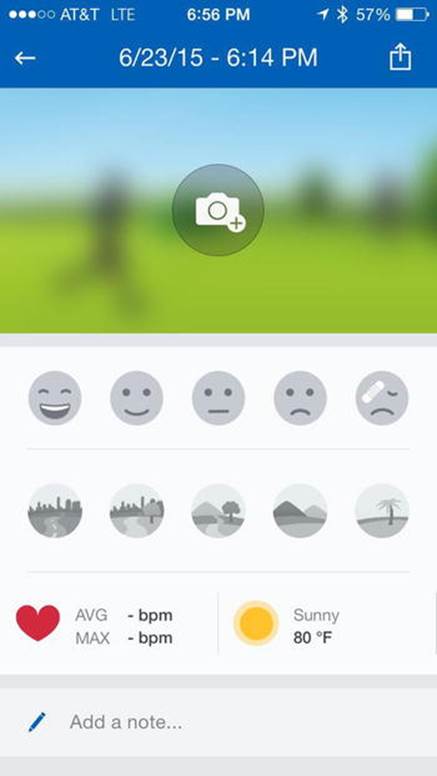
Figure 9-46.
Characterize how you felt and what the course was like
By selecting an emoji, you can give a snapshot of how you felt and how challenging the route was. Tap the Done button when you are finished. At this point, the friendly voice will summarize the statistics of the run and display what has been recorded (Figure 9-47).
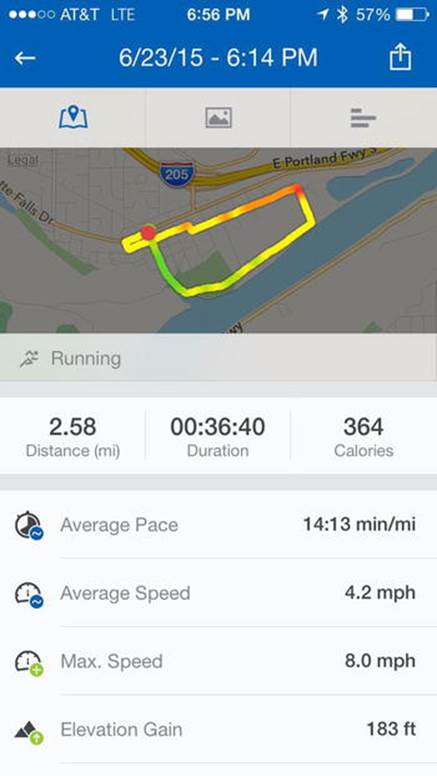
Figure 9-47.
Stats for the most recent activity
Pressing the mountain icon in the top center will display weather information as well as the emojis that you have selected. Pressing the bar graph icon will display a graph of your speed throughout the course as well as its elevation profile. At the bottom, your splits are given along with elevation gain and loss during each of the splits. Figure 9-48 shows this data-packed screen.
Figure 9-48.
Speed, elevation, and split information
History
All the information recorded about an activity is retained in a History file. Figure 9-49 shows a recent History listing.

Figure 9-49.
Recent History
By tapping whichever activity interests you, the same screen appears that you saw at the conclusion of that activity. The stats, weather, speed and elevation graph, and split table are also available.
Statistics
The Statistics screen (Figure 9-50) gives you your performance metrics for the previous month and a snapshot of how you have done so far this month.
Figure 9-50.
Statistics screen
It displays distance covered, time engaged in activities, elevation gain, elevation loss, kilocalories burned, and cheers received from your friends for your efforts.
Newsfeed
The Newsfeed option lets you share with your friends what you have been doing and enables you to see what they are doing. Figure 9-51 shows the time, weather condition, and route of a 1-mile walk. It also shows award icons for greatest elevation gain, fastest kilometer, and fastest mile walks.
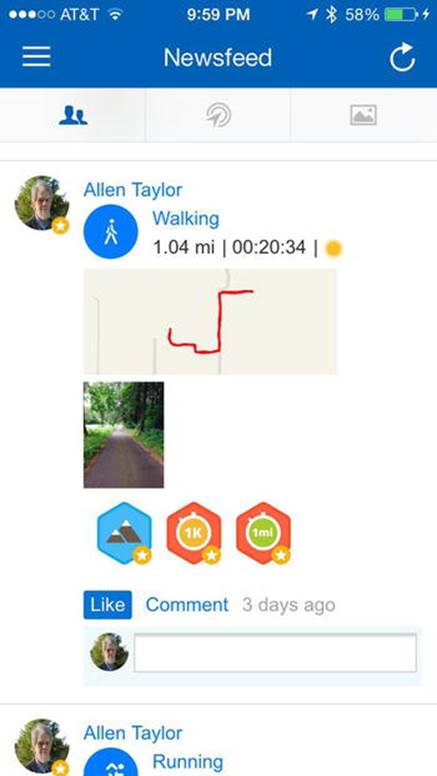
Figure 9-51.
The Newsfeed option
You can see what your friends who use Runtastic are doing. You can also make new friends by asking to see the activities of nearby users who may not be your friends already. Find someone who seems to be running the same distances that you are at about the same pace, and you may have found yourself a good running partner. Figure 9-52 shows what this looks like.

Figure 9-52.
The activities of nearby runners who have been active recently
Another thing you can do is show your running friends (or walking friends, cycling friends, and so on) what the course looked like on your most recent activity. Figure 9-53 is an example, showing the road less traveled.
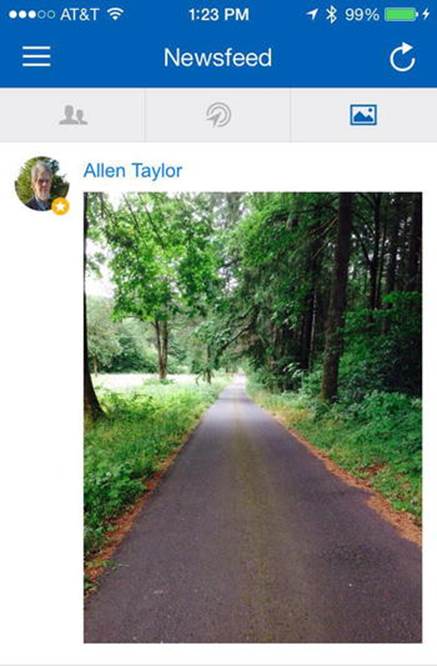
Figure 9-53.
The road goes ever on
Routes
Runtastic users have the ability to add their favorite routes, whether for running, walking, cycling, or any other activity that involves going from one place to another, to a geographic database on the Runtastic web site. Just specify the route on a map by clicking points on the route. This is a great way to discover interesting routes that other people have found enjoyable or challenging. Figure 9-54 shows one of my favorite routes (in blue), along with pieces of routes that other people have entered (in black).

Figure 9-54.
A pleasant 2.6-mile run
When you create a route, you can enter a description of it, and Runtastic will include a graph that shows the elevation profile of the route. Figure 9-55 is an example.
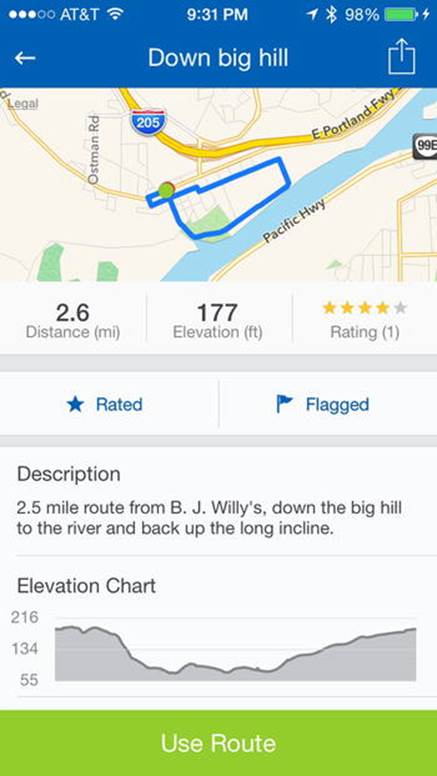
Figure 9-55.
The “down big hill” route
Training Plan
Olympic champion Dieter Baumann has developed several training plans, including a weight loss plan that will help you to lose weight over a span of 22 weeks, and several running plans that range from plans for the complete beginner all the way to plans to prepare you to run (and finish) a marathon. Plans are aligned to how fast you want to run. In addition to the running training plans, there is a Bikini Body Prep plan for women, conducted by Lunden Souza, a certified personal trainer.
Training plans are free to Premium members of Runtastic.
Interval Training
Interval training is one of the best ways to increase speed and endurance. High-speed intervals are interspersed with low-speed intervals. During the high-speed intervals you run faster than you normally would, and during the low-speed intervals you recover to prepare yourself for the next high-speed interval. Several programs are offered, as shown in Figure 9-56.
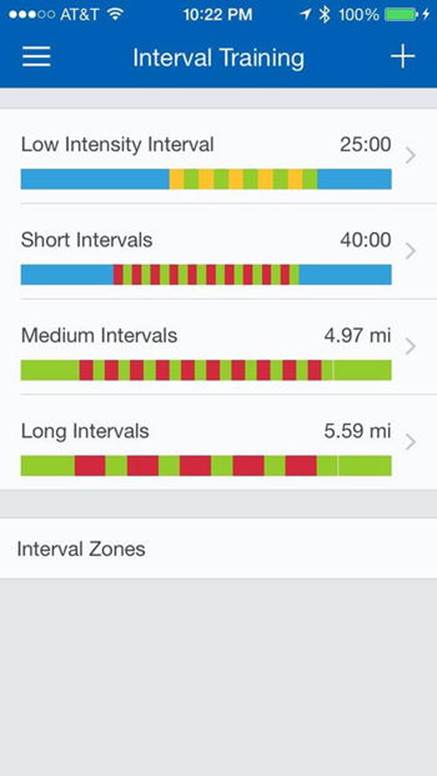
Figure 9-56.
Progressively more strenuous interval workouts
Colors indicate speed, where blue is for easy warming up and cooling down, green is for slow running, yellow is for medium running, and red is for fast running.
Story Running
Story Running is a Premium feature. You can choose a story that runs somewhere between 30 and 40 minutes and listen to it through your headphones or earbuds while you run. The story could be science fiction, adventure, travel, inspiration, or something else, but the common denominator is that you are in the story and success depends on you to run. You could be running to escape ravenous wolves, to lose weight, or just to enjoy a run through the scenic beauty of Austria, described in detail by the program narrator.
Settings
The Settings screen enables you to customize the way the app behaves. Figure 9-57 shows you the types of things you can control.

Figure 9-57.
Settings screen
The Units option enables you to specify whether reports will be in terms of miles, pounds, and degrees Fahrenheit or in terms of kilometers, kilograms or stone, and degrees Celsius.
The Voice Coach option allows you to toggle the voice on or off that makes helpful announcements during a run.
GPS senses when you are stopped. If Auto Pause is enabled, every time you stop, Runtastic will pause the clock that is timing your run so that your stopped time does not lower the pace that is recorded. This saves you from manually pausing the clock when, for example, you stop to take a phone call.
LIVE Tracking lets you share an activity in real time with your Facebook friends or people on the Runtastic.com web site. It can send you cheers to keep you motivated while you are running or working out.
The Heart Rate option lets you hook up a chest-strap heart-rate monitor and sync it to Runtastic. If you do hook up such a monitor, it will send its data to the iPhone Health app just like your Apple Watch does.
Speaking of the iPhone Health app, the Partner Accounts option on the Settings menu is the place where you enable connecting Runtastic with the Apple Health app. You can also connect to MyFitnessPal here. Both are resources for retaining a record of your fitness-related activities.
You can use the Social Sharing option to share your activities on Facebook and Twitter.
Go to Shop
This option takes you to Runtastic.com, where you can buy more Runtastic merchandise.
More Runtastic Apps
As the name implies, this option encourages you to download other Runtastic apps, such as Runtastic Me, Road Bike, Mountain Bike, Sleep Better, Leg Trainer, and Butt Trainer.
The Apple Watch Part of Runtastic
With the Apple Watch part of the Runtastic app you can start, pause, and end a run, as well as elapsed time, distance covered, and heart rate if you have your chest-strap heart-rate monitor on and active. The first generation of Runtastic cannot access the heart-rate data generated by the Apple Watch. To see that, you must go to the Health app on your iPhone. Even if you control your activity entirely from your watch, the audible announcement of the start of the activity and of the statistics at the end will be made from your phone. Check to see whether your copy of Runtastic has been upgraded to work with watchOS 2 and, if so, what additional capability that brings.
Figure 9-58 shows the screen you see when you launch Runtastic.
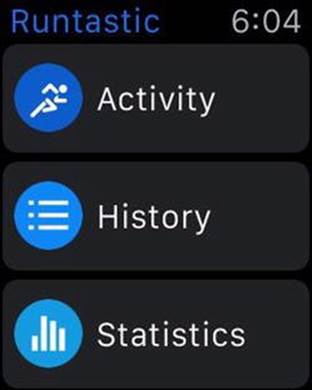
Figure 9-58.
Main screen
The three things you can do are commence an activity, look at your past activities, and look at the statistics you have compiled since the beginning of the current month. When you press the Activity button, the screen shown in Figure 9-59 appears.

Figure 9-59.
Activity screen
Press the green Start button and the activity will commence, either immediately or after a programmed delay that you have previously specified on your phone.
When you finish an activity, pressing the screen will activate Force Touch and display a screen giving you the option to either end or pause the activity. If you end it, the screen in Figure 9-60 will appear, giving you the opportunity to record how you felt during the activity and what kind of terrain your route took you over. You may also be given the option to share the activity on Facebook.
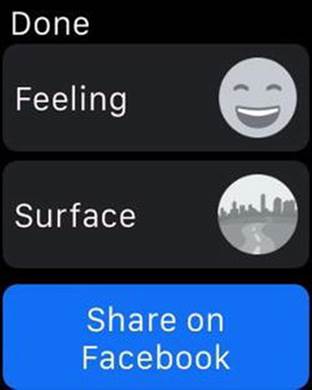
Figure 9-60.
Specifying conditions during an activity
If you press the History button on the main screen shown in Figure 9-58, a display similar to Figure 9-61 will appear. It shows your three most recent activities and is scrollable so that earlier results can be displayed.
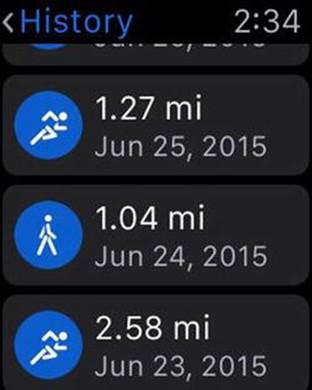
Figure 9-61.
History display
Selecting Statistics from the main menu will show you something similar to Figure 9-62. It shows your totals for the current month in distance, duration, and elevation gain. Scrolling down will also show you elevation loss, calories burned, and cheers received from your friends.
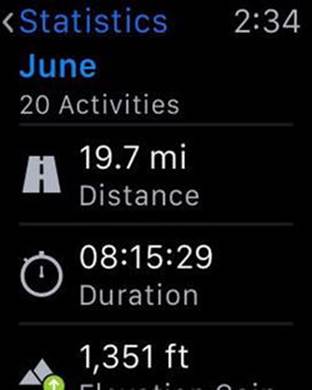
Figure 9-62.
Statistics display
The main things you probably want to know about your current and previous activities are right there on your wrist. If you want more details, you can find them on your phone. Even more is available at Runtastic.com, which you can view on an iPad or PC.
Runtastic Six Pack
There are other kinds of fitness in addition to the aerobic fitness you get from running, walking, cycling, and other sports that get you breathing hard. One is to sculpt your body into the best possible shape. Perhaps the most iconic example is someone with “six-pack” abs.
Six-pack abdominal muscles are not easy to come by. The abdominal muscles must be strengthened and toned, but they also must be uncovered. Most people have a layer of fat that hides any six-pack that might be lurking underneath. Getting rid of excess fat is accomplished through diet, as covered by the LifeSum app earlier in this chapter. Strengthening and toning the abdominal muscles calls for physical movement exercises, which is what the Runtastic Six Pack is all about.
The iPhone Part of Runtastic Six Pack
The Runtastic Six Pack app goes beyond merely timing and recording an activity like other apps covered here do. It actually coaches you through a training program. The free version of the app introduces you to an avatar who performs the exercises that make up the training program. You are encouraged to perform the same exercises right along with the avatar. The main menu includes a number of helpful tools to move you along on your way to six-pack abs. Figure 9-63 shows the menu.
Figure 9-63.
Main menu
Let‘s look at each of these options in detail.
Training Plan
Figure 9-64shows the initial Training Plan screen. It describes the Level 1 training plan that will get you started with three sets of three exercises, with eight repetitions in each set.
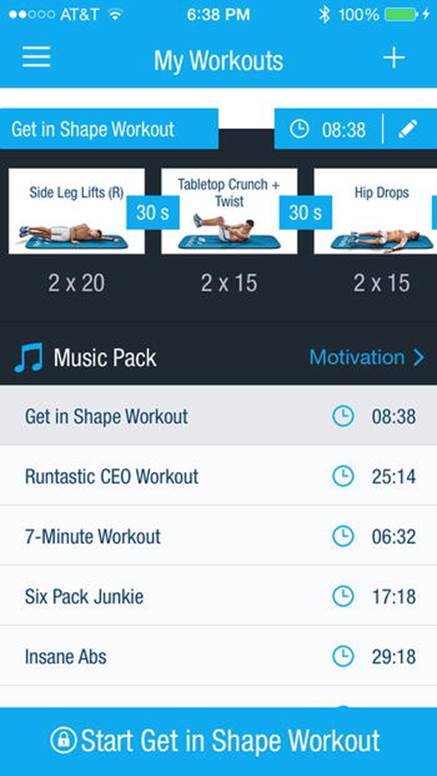
Figure 9-64.
First Level 1 exercises
The first exercise is the Tabletop Crunch + Twist (Figure 9-65). Your virtual trainer, either Daniel or Angie, performs the exercise, and you follow along. Your cadence is called by a narrator’s voice, and appropriate music is played in the background.
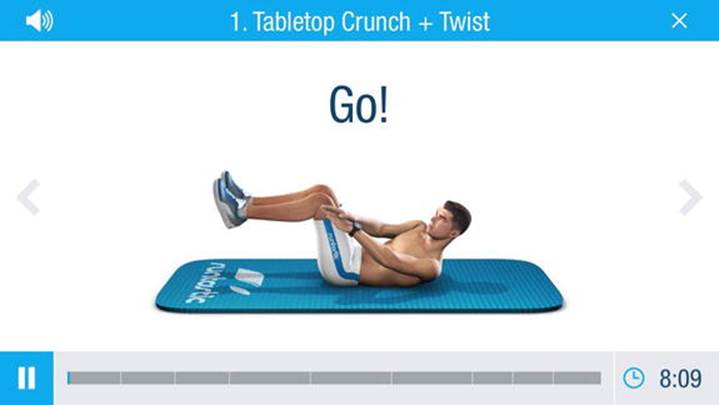
Figure 9-65.
A snapshot in the middle of the Tabletop Crunch + Twist
After three sets, you move along to the Hip Drops exercise (Figure 9-66).
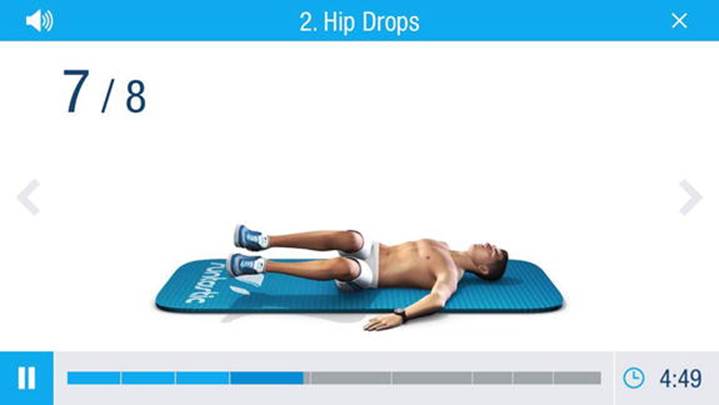
Figure 9-66.
Hip Drops exercise when twisted to the left
The Crunch is the final exercise in this phase of Level 1. Figure 9-67 shows Daniel in the midst of performing it.
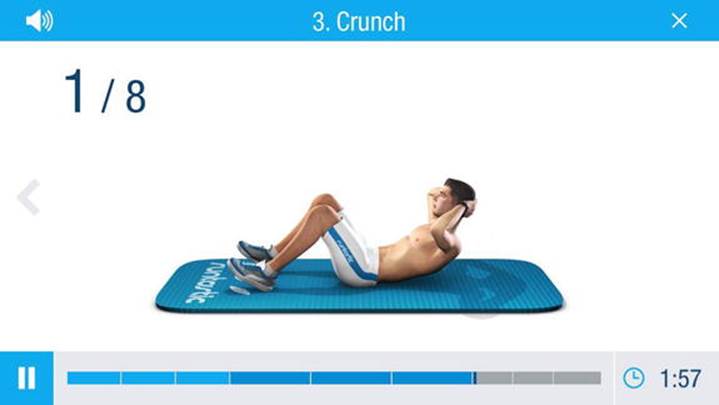
Figure 9-67.
The Crunch
After completing these three exercises the prescribed number of times, you move on to new exercises. There are seven in all that comprise Level 1, which you will cycle through in ten days. To move on to Levels 2 and 3, you must purchase the full version. The seven Level 1 exercises will clearly be good for you, but 50 are available to purchasers of the full version, which can be had for a reasonable purchase price.
My Workouts
After you have gone through the training plan, to keep your momentum, you may decide to perform one or more of the predefined workouts described under the My Workouts option. Figure 9-68 shows the first of them and lists the names and durations of all five. All of these workouts are available only with the full version of Six Pack. The first, the Get in Shape workout, can be completed in less than nine minutes. The remaining four workouts take anywhere from 6 to 29 minutes to perform.
Figure 9-68.
My Workouts iPhone screen
All Exercise Videos
There are three levels of exercise videos: Easy, Medium, and Hard. Seven of the easy ones are available to users of the free version, but the rest of the easy ones and all the medium and hard ones are available only to purchasers of the full package. Figure 9-69 shows the Easy exercises.
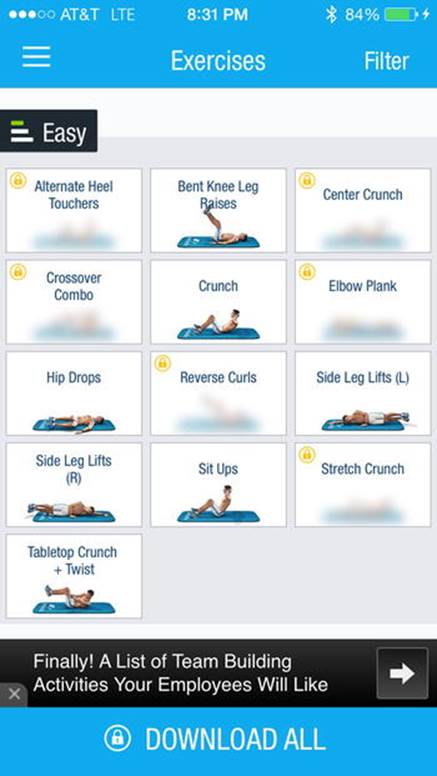
Figure 9-69.
Easy exercise videos
All Tips of the Day
Helpful tips can make your journey smoother as you move toward your fitness goals, whether that includes building a six pack, running a new personal record for the mile, or lifting more weight than you ever have before. Currently there are more than 50 tips of the day that you can cycle through.
Body Fat Visualization
The Body Fat Visualization graph shows what your body should look like, based on your weight and percentage of body fat. The Runtastic Libra is a device that measures not only your weight but also your body fat and water percentages. Data is transferred via Bluetooth to your iPhone. Figure 9-70 shows the Daniel avatar as he would look with 13 percent body fat. Based on your actual measurements, made by the Libra, Daniel would be a stand-in for you, showing how you look with the most recent measurement of your percentage of body fat and weight.
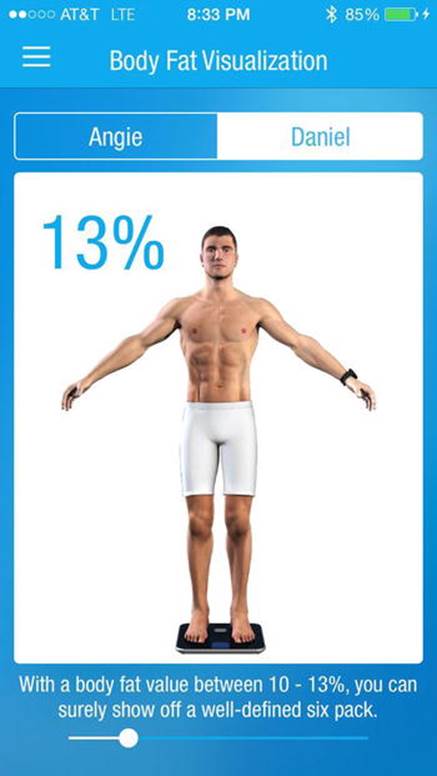
Figure 9-70.
Visualizing the ideal you
Get the Full Version
This option is just a plug for upgrading to the full version of Runtastic Six Pack. Depending on your goals and how helpful you are finding the free version to be, you may decide to spend a few bucks and get the full package. It looks like it is worth the price to me.
Settings
Under the Settings option shown in Figure 9-71, you can select a training plan, a trainer, and a voice coach, and you can connect a chest-strap heart-rate monitor.
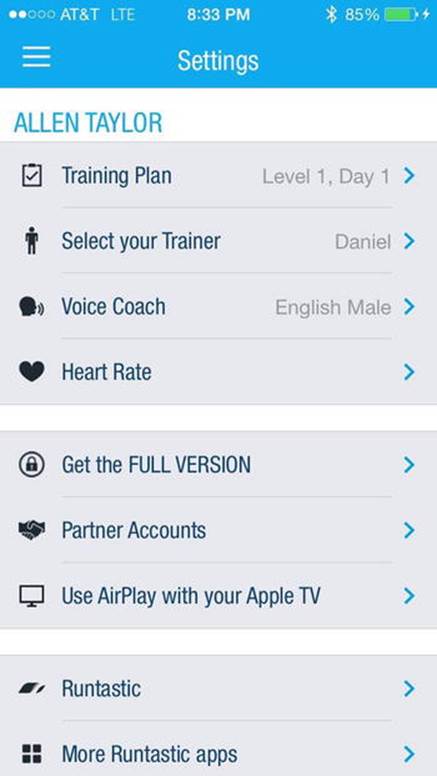
Figure 9-71.
Settings menu
Naturally, Runtastic would like you to buy and connect its own brand of heart-rate monitor, but these devices all work the same way, so competing brands will work just as well.
Partner Accounts will let you connect with MyFitnessPal. If you do, Six Pack will share information with MyFitnessPal, and vice versa. MyFitnessPal can serve as a central repository for data about fitness that comes in from multiple apps, with Six Pack being only one of them.
The Use AirPlay with your Apple TV option will enable you to watch Daniel or Angie go through their paces on the big screen. This could be easier than trying to hold an iPhone while doing sit-ups.
Music Store
At the Runtastic Music Store you can buy music packs in a variety of genres that are all designed to keep you motivated and moving. One pack is provided for free so you can see what the packs are like without having to buy one first.
More Runtastic Apps
As I’ve noted elsewhere in this book, Runtastic has multiple apps, each aimed at helping you in a different way. You can download them from this menu option.
The Apple Watch Part of Runtastic Six Pack
Once you are familiar enough with a training plan so that you don’t need to watch Daniel or Angie do the exercises while you are doing them, you can launch the Six Pack app on your Apple Watch. This will display the screen shown in Figure 9-72.
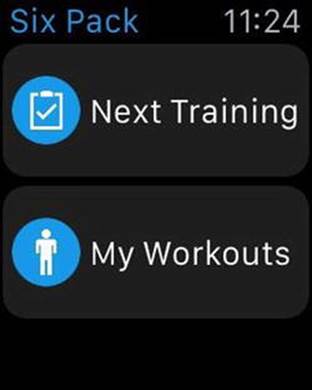
Figure 9-72.
Six Pack main menu
Pressing the Next Training button will take you to the start of the training plan that you are currently working on. If you are at the beginning of Level 1, you will see the screen shown in Figure 9-73.
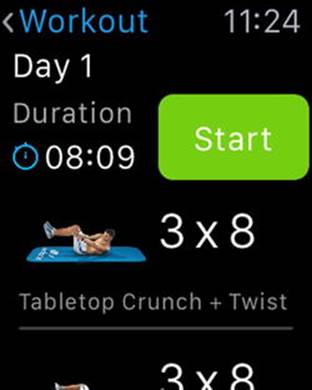
Figure 9-73.
Level 1 training plan
When you tap the Start button, the voice coach on your phone will start talking you through the exercise in the same way as when you do the same exercise from your phone. The only difference is how you pause or end the session. Instead of tapping a control on your phone, press on the watch face to activate Force Touch. Options to pause and stop will appear, as well as the option to skip to the next exercise. If you elect to stop, when you come back later, Six Pack will return you to where you left off rather than taking you back to the beginning. Once you start on a training plan, your virtual trainer wants you to work through it to completion.
If you press the My Workouts option on the menu in Figure 9-72, a message will appear informing you that the workouts are available only in the full version of Six Pack. If you have the full version, then you can pick one of the five workouts described earlier in the iPhone section and shown in Figure 9-68.
Summary
For me, the real value of the Apple Watch as a tool to enhance health and fitness is delivered by the third-party apps rather than the built-in apps provided by Apple. This is even more true with the release of watchOS 2, which allows third-party apps to access the sensors on the watch. Even in their initial releases, the third-party apps provided a lot more information than the built-in apps do. The fact that this information is available on the fly while I am exercising, and can be accessed by a quick glance at an upraised wrist, is how the Apple Watch really earns its place on that wrist.
All materials on the site are licensed Creative Commons Attribution-Sharealike 3.0 Unported CC BY-SA 3.0 & GNU Free Documentation License (GFDL)
If you are the copyright holder of any material contained on our site and intend to remove it, please contact our site administrator for approval.
© 2016-2026 All site design rights belong to S.Y.A.