Beginning Visual Basic(2012)
Chapter 1
Getting Started with ASP.NET 4.5
What you will learn in this chapter:
· How to acquire and install Visual Studio Express 2012 for Web and Visual Studio 2012
· How to create your first website with Visual Studio Express 2012
· How an ASP.NET page is processed by the server and sent to the browser
· How you can use and customize the development environment
Ever since the first release of the .NET Framework 1.0 in early 2002, Microsoft has put a lot of effort and development time into ASP.NET, the part of the .NET Framework that enables you to build rich web applications. This first release meant a radical change from the older Microsoft technology to build websites called Active Server Pages (ASP), now often referred to as classic ASP. The introduction of ASP.NET 1.0 and the associated Visual Studio .NET gave developers the following benefits over classic ASP:
· A clean separation between presentation and code. With classic ASP, your programming logic was often scattered throughout the HTML of the page, making it hard to make changes to the page later.
· A development model that was much closer to the way desktop applications are programmed. This made it easier for the many Visual Basic desktop programmers to make the switch to web applications.
· A feature-rich development tool (called Visual Studio .NET) that enabled developers to create and code their web applications visually.
· A choice between a number of object-oriented programming (OOP) languages, of which Visual Basic .NET and C# (pronounced as C-Sharp) are now the most popular.
· Access to the entire .NET Framework, which for the first time meant that web developers had a unified and easy way to access many advanced features to work with databases, files, e-mail, networking tools, and much more.
Despite the many advantages of ASP.NET over the older model, using ASP.NET also meant an increase in complexity and the knowledge needed to build applications with it, making it harder for many new programmers to get started with ASP.NET.
After the initial release in 2002, Microsoft released another version of the .NET Framework (called .NET 1.1) and the development IDE (called Visual Studio .NET 2003). Many people saw this as a service pack for the initial release, although it also brought a lot of new enhancements in both the framework and the development tools.
In November 2005, Visual Studio 2005 and ASP.NET 2.0 were released. To the pleasant surprise of many developers around the world, Microsoft had again been able to drastically improve and expand the product, adding many features and tools that helped reduce the complexity that was introduced with ASP.NET 1.0. New wizards and smart controls made it possible to reduce the code required to build an application, decreasing the learning curve for new developers and increasing their productivity.
In November 2007, Microsoft released Visual Studio 2008 and the ASP.NET 3.5 framework, followed by Visual Studio 2010 and ASP.NET 4 in March 2010. Both versions added a lot of new functionality, including LINQ (discussed in Chapter 14), the integration of the AJAX Framework (which you learn more about in Chapter 10), the ADO.NET Entity Framework (discussed in Chapter 14), the inclusion of jQuery (discussed in Chapter 11), and more.
The current versions, Visual Studio 2012 and ASP.NET 4.5, build on top of the successful Visual Studio 2010 and ASP.NET 4 releases, leaving many of the beloved features in place while adding new features and tools in other areas.
Over the next 19 chapters, you learn how to build full-featured ASP.NET websites using Visual Studio Express 2012 for Web, Microsoft's free development tool for ASP.NET web applications, which is also part of the full Visual Studio 2012 suite. This book guides you through the process of creating a fully functional, database-driven website, starting with a bare-bones website in the next chapter, all the way down to the deployment of it to a production environment in Chapter 19.
The sample site that comes with this book and all the examples are built with Visual Studio Express 2012 for Web (VSEW), so it's important that you have it installed on your development machine. The next section shows you how to acquire and install VSEW. Once you have it up and running, you see how to create your first website, followed by an extensive tour through the many features of VSEW.
Microsoft Visual Studio Express for Web
Although you could theoretically write ASP.NET web applications with Notepad or another text editor alone, you really want to install a copy of Microsoft Visual Studio (VS). VS hosts an enormous number of tools that will help you in rapidly creating complex ASP.NET web applications.
Visual Studio comes in two flavors: as a standalone and free version called Microsoft Visual Studio Express 2012 for Web, and as part of the larger development suite called Visual Studio 2012, which is also available in different editions, each with its own price tag. With the commercial editions of Visual Studio, the web components are fully integrated. You just start Visual Studio 2012 and then create a Web Site Project or a Web Application Project, which in turn enables the web components of Visual Studio.
Although the Express edition of Visual Studio is free, it contains all the features and tools you need to create complex and feature-rich web applications. All the examples you find in the book can be built with the free Express edition, so there's no need to shell out big bucks for the commercial versions of Visual Studio 2012 to follow along with this book.
I'll use the term Visual Studio (VS) to refer to both the commercial and free versions of Visual Studio. When talking about the free edition specifically, I'll use the terms Express edition or Visual Studio Express 2012 (VSEW).
Getting Visual Studio is easy. You can download it from the Microsoft site as discussed next.
Getting Visual Studio
You can get the free Visual Studio Express 2012 for Web from the Microsoft site at www.microsoft .com/express/. On the Express homepage, follow the Downloads link until you reach the page that offers the downloads for the Express products, including VSEW. From this page, you can download VSEW as a Web Install, where you download only the installer, while the remaining files are downloaded during the installation process. Make sure you choose Visual Studio Express 2012 for Web from the page, and not one of the other free Express products or one of the older editions of Visual Studio.
Don't be fooled by the file size of the Web Install download, which is just a few megabytes. The file you download is just the installer that downloads the required files over the Internet. The total download depends on your current system and will be somewhere between 180 MB and 270 MB.
If you want to try out the full version of Visual Studio 2012, which also contains the web components, you can sign up for a free trial on the Microsoft site at http://msdn.microsoft.com/vstudio. You can choose to download an ISO image that you'll need to burn on a DVD or choose to download the Web Installer.
Finally, you can download VSEW with the Microsoft Web Platform Installer (WPI) application available for download at www.microsoft.com/web/platform and at www.asp.net/downloads/. Besides VSEW, this tool also gives you easy access to many other web development–related tools and programs. The WPI is an excellent tool to get a whole bunch of web development–related programs and tools in one fell swoop. I often use it to get up and running real quick on a clean development machine.
Installing Visual Studio Express (VSEW)
Installing VSEW is a straightforward, although somewhat lengthy, process. Depending on your installation method, your computer, and your Internet connection speed, installing VSEW may take anywhere between 20 minutes and an hour — or even more.
Try It Out: Installing Visual Studio Express 2012 for Web
This Try It Out exercise guides you through installing VSEW on your computer. It assumes you're using the Web Platform Installer option as explained earlier, although the process for installing the Express edition from a DVD is almost identical. The steps you need to perform to install the full versions of Visual Studio 2012 are similar as well, although the screens you'll see will be somewhat different.
No matter how you install VSEW, it's important that you also install Microsoft SQL Express LocalDB Edition 11.0 — a required component if you want to follow along with many of this book's examples. It should be installed automatically when you install VSEW, but in case it's not installed, you'll find instructions at the end of this exercise to make sure it's properly installed.
1. Start by browsing to www.microsoft.com/express/ and follow the instructions to download VSEW 2012. Make sure you install Visual Studio Express 2012 for Web, and not one of the other free Express editions or older versions. If this link is ever changed or no longer provides direct access to the VSEW download, search the web for “install Visual Studio Express 2012 for Web” and you'll be taken to a download page where you can start the installation.
2. Depending on how you started the installer, you have a few options. If you started the VSEW download, you should see a screen similar to Figure 1.1.
Click Install to initiate the installation and related components.
If you started the Web Platform Installer instead, find Visual Studio Express 2012 for Web in the list of tools and select it. Finally, start the installation process.
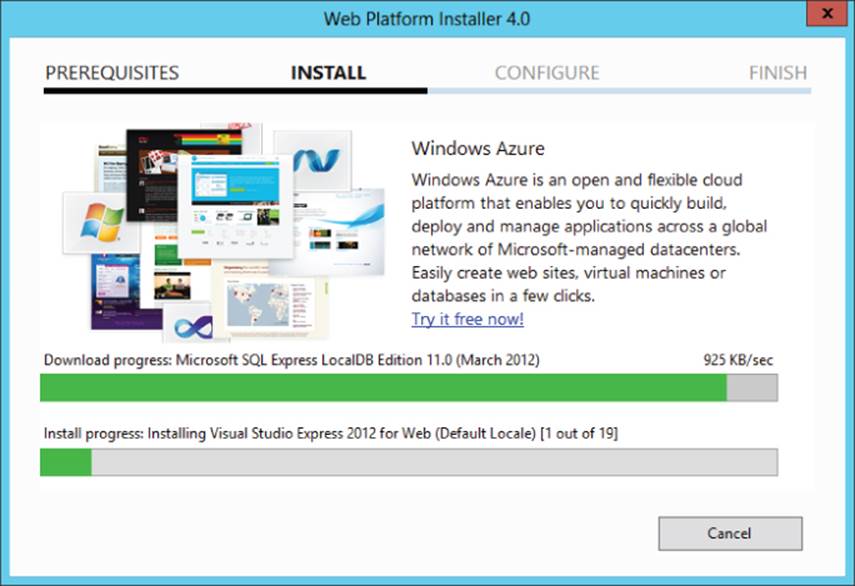
3. In both cases, you get a screen that lists the components to be installed. In addition, you need to agree to the license terms for the software. Once you agree, you should see a screen similar to Figure 1.2.
4. After a while you should see a message indicating that VSEW has been installed successfully. The installer may need to reboot your machine during or after the installation. Once the installer has finished, VSEW is ready for use. To check if SQL Express LocalDB has installed correctly, start the Web Platform Installer from the Windows Start menu or Start screen. Next, under the Products item, find Microsoft SQL Express LocalDB Edition 11.0 and install it if it hasn't been installed already.
Figure 1.1
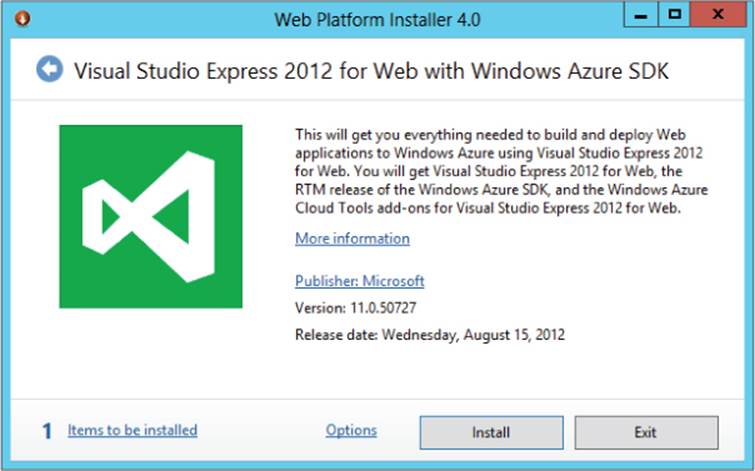
Figure 1.2
How It Works
The straightforward installation process guided you through the setup of VSEW using the Web Platform Installer. During installation, the WPI also installed a copy of Microsoft SQL Express LocalDB Edition 11.0, Microsoft's free version of its SQL Server 2012 database engine. SQL Server 2012 is discussed and used a lot in this book, starting with Chapter 12. Appendix B shows you how to configure security settings for the various versions of SQL Server 2012.
Now that VSEW is installed, it's time to fire it up and start working with it. The next section shows you how to create your very first site in VSEW. You see how to create a site, add content to a web page, and view that page in your browser.
Creating Your First ASP.NET 4.5 Website
You probably can't wait to get started with your first ASP.NET website, so instead of giving you a theoretical overview of websites in VS, the next Try It Out exercise dives right into the action and shows you how to build your first web project. Then, in the How It Works explanation and the section that follows, you get a good look at what goes on behind the scenes when you view an ASP.NET page in your browser.
Try It Out: Creating Your First ASP.NET Website
1. Start VS from the Windows Start menu or Start screen if you haven't done so already. Follow the on-screen instructions to register VSEW online and get a key. Enter the key in the VSEW start-up screen and click Next to continue. Note: if you're using the commercial version of Visual Studio, just start Visual Studio 2012 from the Start menu. All web-related components are accessed from the main VS program. The first time you start VS, there might be a delay before you can use it because it's busy configuring itself. Subsequent starts of the application will go much faster.
2. If you're using a commercial version of Visual Studio, you may also get a dialog box that lets you choose between different collections of settings the first time you start Visual Studio. The choice you make on that dialog box influences the layout of windows, toolboxes, menus, and shortcuts. Choose the Web Development settings because those settings are designed specifically for ASP.NET developers. You can always choose a different profile later by resetting your settings, as explained later in this chapter.
3. Once VS is fully configured, you see the main screen appear, as shown in Figure 1.3.
You get a full description of all the windows, toolbars, panels, and menus in the next section, so for now, just focus on creating a new website. Click the File menu in the upper-left corner and choose New Web Site. If you're using a commercial version of Visual Studio, depending on the settings you chose when starting Visual Studio the first time, you may have to open the submenu New first.
Make sure you don't accidentally use the New Project menu, because that is used to create different types of .NET applications. The New Web Site dialog box appears as shown in Figure 1.4.
4. In the Installed Templates section on the left you can choose a programming language you will use for your site. This book shows all examples in both Visual Basic and Visual C# so you can choose a language to your liking.
5. In the list of templates in the middle, click ASP.NET Web Forms Site. Verify that File System is the selected option in the Web Location drop-down list at the bottom left. If you want, you could change the location on disk where the website is stored by clicking the Browse button and choosing a new location on your computer's hard drive. For now, the default location — a folder under your Documents folder — is fine, so you can leave the location as is.
6. Click OK. VS creates a new website for you that includes a number of files and folders (see Figure 1.5) to jump-start your website.
7. Open the file Default.aspx by double-clicking it and remove all the code inside the <asp:Content> block that has its ID set to BodyContent (it starts with <h3> at around line 19 and ends with </ol>) all the way at the bottom. Replace it with the following bolded code:
<asp:Content runat="server" ID="BodyContent" ContentPlaceHolderID="MainContent">
<h2>Hello World</h2>
<p>Welcome to Beginning ASP.NET 4.5 on <%: DateTime.Now.ToString() %></p>
</asp:Content>
You'll see code formatted like this a lot more in this book. When you are instructed to type in code formatted like this with some code in bold, you only need to type in the bolded code. The other code should already be present in the file.
Don't worry about the code with the angle brackets (<>) and percentage symbol in the welcome message; these are called tags, and you learn more about them later. Although this code may not look familiar to you now, you can probably guess what it does: It writes out today's date and time.
8. Press Ctrl+F5 to open the page in your default web browser. You see a page similar to the one shown in Figure 1.6.
If you already have some experience with Visual Studio you may be used to pressing F5 instead. If you use that option, the site is opened in debug mode and you may get a dialog asking if you want to enable debugging (which you can safely do). Debugging with F5 is discussed in Chapter 18, and you're advised to use Ctrl+F5 until then.
If you see an information bar warning about intranet settings in Internet Explorer, click Turn on Intranet Settings.
If you don't see the date and time in the page, or if you get an error, look again at the code in the welcome message. It starts with an angle bracket (<) followed by a percentage symbol and a colon. It closes with a single percentage sign and another angle bracket (>). Also, make sure you typed in the code exactly as shown here, including capitalization. This is especially true when you are using C#, because that language is case sensitive.
9. Notice how a small icon representing IIS Express has appeared in the tray bar of Windows, visible in Figure 1.7.
If you see a different icon, right-click your site in VS and choose Use IIS Express. If you don't see the icon in the tray, click the arrow near the other icons in the Windows tray and click the Customize option. Then set IIS Express System Tray to Show Icon and Notifications. The icon belongs to the built-in web server called IIS Express. This web server has been started by VS automatically to serve the request for your page. You learn more about how the web server processes your page later in this chapter.
That's it. You just created your very first ASP.NET website with Visual Studio.
Figure 1.3
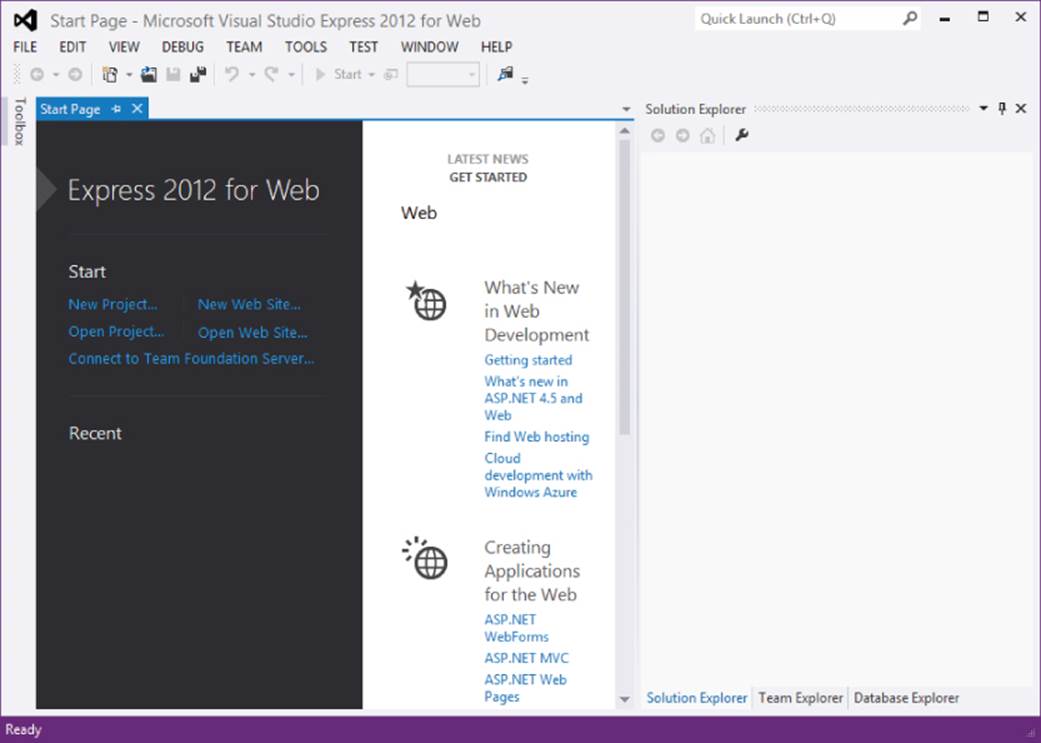
Figure 1.4
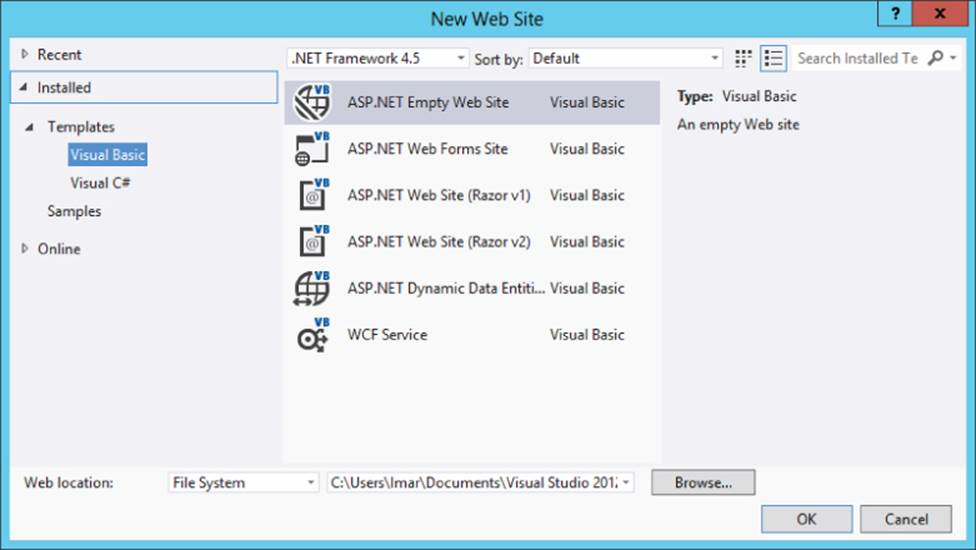
Figure 1.5
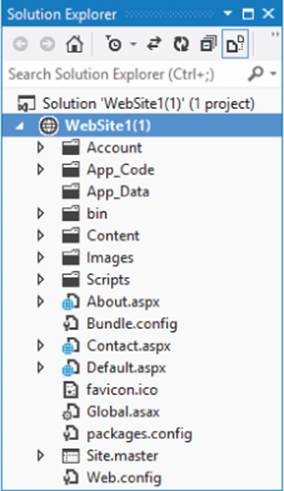
Figure 1.6
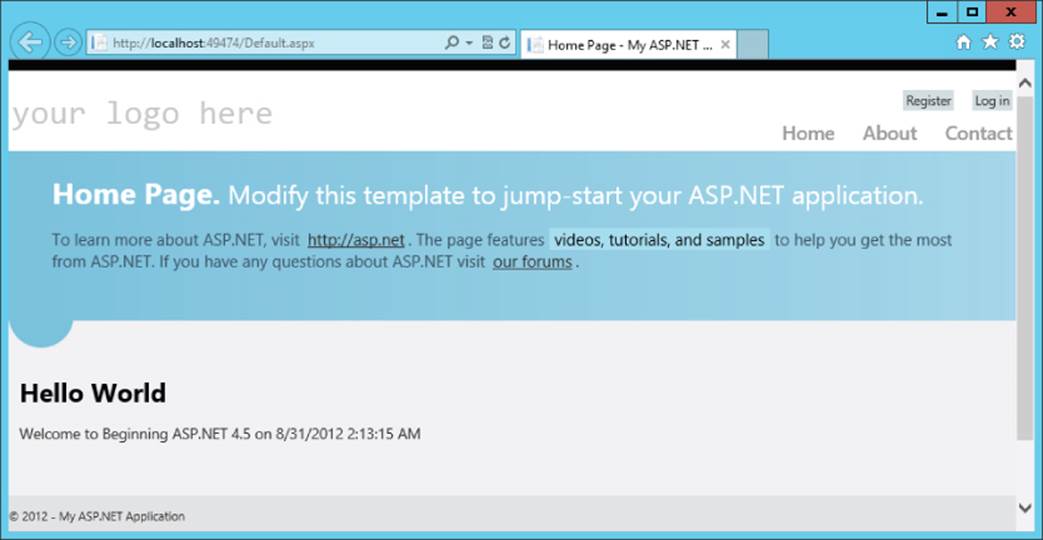
Figure 1.7

How It Works
Although the website you created in this Try It Out is quite simple, the process that eventually results in the page Default.aspx being displayed in your browser isn't so simple. All by itself, an ASP.NET page (also referred to as an ASPX page because of its extension, or a Web Form) can't do much. It needs to be processed and served by a web server before your browser can display it. That's why VS automatically started up IIS Express to handle the request for the page. Next, it started up your default web browser and directed it to the address of the web server (http://localhost:49474/Default.aspx in the Try It Out example), although the actual port number in the address may change every time you start the web server because it is randomly chosen by VS.
It's important to realize that the ASPX file you modified in VS is not the same as the one that eventually gets displayed by the browser.
When you create a page in VS, you add markup to it. The markup in an ASPX page is a combination of HTML, code for ASP.NET Server Controls (which you learn more about in this chapter and in Chapter 4), code written in Visual Basic.NET or C#, and more.
When you request an ASPX page in your browser, the web server processes the page, executes any server-side code it finds in the file, and effectively transforms the ASP.NET markup into plain HTML that it then sends to the browser, where it is displayed. In the preceding Try It Out, the resulting HTML causes the browser to display the current date and time. HTML, or HyperText Markup Language, is the language that browsers use to display a web page. You learn how HTML looks and how to use it later in this chapter.
To see how the final HTML differs from the original ASPX page, open the source for the page in your browser. In most browsers, you can bring up the source window by right-clicking the page in the browser and choosing View Source or View Page Source. This brings up your default text editor, showing the HTML for the page.
If you already closed your browser after the preceding Try It Out, press Ctrl+F5 in VS to open the page and choose View Source.
Scroll down in the source file until you see the line with the Welcome text. Notice how instead of the code between the tags, you now see the actual date and time:
<h2>Hello World</h2>
<p>Welcome to Beginning ASP.NET 4.5 on 8/31/2012 2:13:15 AM</p>
When the web server processed the page, it looked up the current date and time from the server and inserted it in the HTML that got sent to the browser. Depending on the language settings of your Windows installation, you may see the date and time formatted differently to accommodate the Windows Regional Settings.
In the following section, you see how ASP.NET works in much more detail.
An Introduction to ASP.NET 4.5
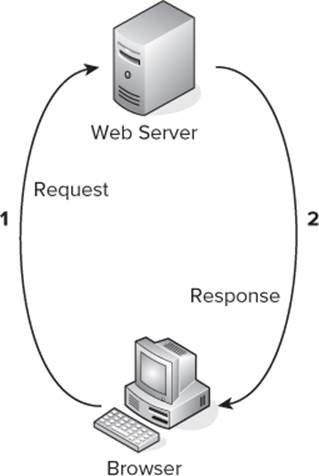
When you type a URL like www.wrox.com in your web browser and press Enter, the browser sends a request to the web server at that address. This is done through HTTP, the HyperText Transfer Protocol. HTTP is the protocol by which web browsers and web servers communicate. When you request the URL, you send a request to the server. When the server is active and the request is valid, the server accepts the request, processes it, and then sends the response back to the client browser. The relationship between the request and response is shown in Figure 1.8.
Figure 1.8
Because you are using IIS Express, the server and the client are really the same machine. However, in a real-world scenario, you'll host your website on an external web server where it can be accessed by many different clients.
For simple, static files, like HTML files or images, the web server simply reads the file from its local hard drive and sends it to the browser. However, for dynamic files, such as ASPX pages, this is obviously not good enough. If the web server were to send the ASPX file directly to the browser as a text file, you wouldn't have seen the current date and time in the browser, but instead you would have seen the actual code (<%: DateTime.Now.ToString() %>). So, instead of sending the file directly, the web server hands over the request to another piece of software that is able to process the page. This is done with a concept called Application Mapping or Handler Mapping, where an extension of a file (.aspx in this example) is mapped to an application that is capable of handling it. In the case of an .aspx page, the request is eventually handled and processed by the ASP.NET run time, part of the Microsoft .NET Framework designed specifically to handle web requests.
During the processing of the page, three main areas can influence the way the page eventually ends up in the browser:
· Static text. Any static text, like HTML, CSS, or JavaScript code you place in a page, is sent to the browser directly. You learn more about HTML, CSS, and JavaScript (a programming language used at the client) in this and subsequent chapters, including Chapter 3, which gives you a detailed look at CSS.
· ASP.NET Server Controls. These controls are placed in your ASPX page and when they are processed, they emit HTML that is inserted in the page. You learn more about server controls after the discussion of HTML in this chapter, and Chapter 4 is devoted entirely to ASP.NET Server Controls.
· Programming code. You can embed code, like Visual Basic .NET or C#, directly in a page, as you saw in the previous Try It Out. In addition, you can place code in a separate code file. The official term for this code file is Code Beside. However, most developers refer to this as the CodeBehind file, which is the term I'll stick to in this book. This code can be executed by the run time automatically, or based on a user's action. Either way, execution of the code can greatly influence the way the page is displayed, by accessing databases, performing calculations, hiding or showing specific controls, and much more. You learn more about this Code Behind file in the next chapter, and programming your ASP.NET web pages is discussed in great detail in Chapter 5.
Once the page is done processing, and all the HTML for the page has been collected, the HTML is sent back to the browser. The browser then reads it, parses it, and, finally, displays the page for you to look at.
Because HTML is so critical for displaying web pages, the next section gives you an overview of HTML.
Understanding HTML
HTML is the de facto language for creating web pages and is understood by every web browser that exists today. Since the beginning of the ‘90s it has been the driving force of the World Wide Web, the part of the Internet that deals with web pages. HTML documents are simple text files that contain markup, text, and additional data that influences that text. The most recent version of HTML is HTML5. Although the specification of HTML5 is still under development, a lot of modern browsers support important parts of this specification, and this support increases with each new release of those browsers. Despite the fact that not all browsers support HTML5 fully, it is really the future of HTML-based applications, and therefore I use it in this book and for the Planet Wrox demo website. Don't worry about the limited browser support too much. All major browsers support all of the HTML5 features you use in this book, or support can easily be simulated by a script library called Modernizr, which you see later in the book.
HTML Elements and Tags
HTML uses text surrounded by angle brackets to indicate how your content should be rendered (or displayed) in the browser. The text with angle brackets is referred to as a tag; a pair of tags holding some text or other content is referred to as an element. Take another look at the HTML you saw in the previous Try It Out where you opened the source window for the page in the browser:
<h2>Hello World</h2>
<p>Welcome to Beginning ASP.NET 4.5 on 8/31/2012 2:13:15 AM</p>
The first line of this example contains an <h2> element with an opening tag (<h2>) and a closing tag (</h2>). This element is used to signify a heading at the second level (if you scroll up a bit in the final source in the browser, you also see an <h1> element). Notice how the element is closed with a similar tag, but with an additional forward slash (/) in it: </h2>. Any text between these opening and closing tags is considered part of the element, and is thus rendered as a heading. In most browsers, this means the text is rendered in a larger font. Similar to the <h2> tag are tags for creating headings up to level six, such as <h1>, <h3>, and so on.
Below the heading element, you see a <p> element, which is used to denote a paragraph. All text within the pair of <p> tags is considered part of the paragraph. By default, a browser renders a paragraph with some additional margin spacing at the bottom, although you can override that behavior.
Many tags are available in HTML, too many to cover them all here. The following table lists some of the most important tags and describes how they can be used. For a complete list of all HTML elements, take a look at the website of the organization that maintains the HTML standard:www.w3.org/TR/html5/index.html.
|
Tag |
Description |
Example |
|
<html> |
Used to denote the start and end of the entire page. |
<html> |
|
<head> |
Used to denote a special section of the page that contains data about the page, including its title and references to external resources. The contents of this element are not directly output on screen but influence the looks and behavior of the page, as you'll see later. This element is placed inside the <html> element. |
<head> |
|
<title> |
Used to define the title of the page. This title will appear in the browser's title bar. This element is placed inside the <head> element. |
<title> |
|
<body> |
Used to denote the start and end of the body of the page. Its content is what you see in the browser. This element is placed inside the <html> element. |
<body> |
|
<header> |
Used to denote the header of a page. This element and all remaining elements in this table are placed inside the <body> element. |
<header> |
|
<section> |
Used to denote various sections in your page. You can have multiple sections per page. |
<section> |
|
<aside> |
Used to denote content that is not part of the core page, but presented as an aside. |
<aside> |
|
<article> |
Used to denote the main piece of content in a page. |
<article> |
|
<footer> |
Denotes the footer section of a page. |
<footer> |
|
<a> |
Used to link one web page to another or to create links within a page. |
<a href="http://www.wrox.com"> |
|
<img> |
Used to embed images in a page. |
<img src="Logo.gif" /> |
|
<strong> |
Used to format text in a bold or italic font. |
This is <strong>bold text</ strong> |
|
<form> |
Used for input forms that enable users to submit information to the server. |
<input type="text" value="Some Text" /> |
|
<table> |
These tags are used to create a layout with a table. The <table> tag defines the entire table, the <th> is used to denote header cells, and the <tr> and <td> tags are used to define rows and cells, respectively. |
<table> |
|
<ul> |
These three tags are used to create numbered or bulleted lists. The <ul> and the <ol> tags define the looks of the list (either unordered, with a simple bullet, or ordered, with a number), and the <li> tag is used to represent items in the list. |
<ul> |
|
<span> |
This tag is used to wrap and influence other parts of the document. It appears as inline, so it adds no additional line break on the screen. |
<p>This is some normal text while <span style="color: red;">this text appears in red </span></p> |
|
<div> |
Just like the <span> tag, the <div> tag is used as a container for other elements. However, the <div> acts as a block element, which causes an explicit line break before and after the <div> element by default. |
<div> This is some text on 1 line</div> |
|
<audio> <video> <source> |
Used to embed audio and video files in your web page. The <source> element is used to define multiple types of audio and video resources. |
<video src="Somevideo.mpg" /> |
HTML Attributes
In addition to the HTML elements, the examples in the preceding table also showed you HTML attributes. Attributes contain additional information that changes the way a specific element behaves. For example, with the <img> tag that is used to display an image, the src attribute defines the source of that image. Similarly, the <span> tag contains a style attribute that changes the color of the text to red. The value of the style attribute (color: red;) is part of a cascading style sheet (CSS), which is discussed in much more detail in Chapter 3. Just as with the HTML elements, there is a long list of available attributes and the elements to which they apply on the W3C website: www.w3.org/TR/html5/index.html#attributes-1.
You don't need to memorize all these elements and attributes. Most of the time, they are generated for you automatically by VS. In other cases, where you need to enter them by hand, VS offers you IntelliSense to help you find the right tag or attribute. IntelliSense is discussed in the next chapter.
HTML Comments
In order to comment something out in HTML, you wrap it in comment tags, like this:
<!-- This is a comment -->
Code you comment out is not processed by the browser (and thus isn't visible), but it's still sent to the browser (and thus is viewable by the end user). Because it is still sent to the browser, it adds to the page size, so you should use comments sparingly. In later chapters you see how to comment out code at the server so it's not sent to the client.
The Rules of HTML5
The rules of HTML5 are pretty simple, and most of the time VS helps you get it right or shows you a list of errors and suggestions for how to fix them. HTML5 is actually more relaxed than the previous version of HTML (called XHTML, which in turn was a reformulation of HTML 4.01 with XML rules) when it comes to enforcing rules.
Close Your Elements
Most elements in HTML must be closed. So when you start with a <div> tag, you must use </div> somewhere later in your page. Some exceptions exist (such as the <p> element if it's directly followed by some other elements), but I prefer to consistently close my tags. This is also the case for elements that don't have their own closing tags, like <img> or <br> (to enter a line break). In HTML5, these tags can be written as self-closingc tags, where the closing slash is embedded directly in the tag itself as in <img src="Logo.gif" /> or <br />.
Usage of Attributes
Whenever you write an attribute in a tag, you can write the value wrapped in double quotes, single quotes, or no quotes at all. For example, when writing out the <img> tag and its src attribute, you can write it like this:
<img src="Logo.gif" />
You could also use single quotes to enclose the attribute value, like this:
<img src='Logo.gif' />
Both options work, as long as you use the same type of quote on both ends of the value. For values that don't contain a space, you can also leave out the quotes:
<input value=yes>
It's also sometimes necessary to nest single and double quotes. For example, when some special ASP .NET syntax requires the use of double quotes, you should use single quotes to wrap the attribute's value:
<asp:Label ID="TitleLabel" runat="server" Text='<%# Eval("Title") %>’ />
You see this syntax used a lot more in later chapters in this book.
For consistency, this book uses double quotes where possible in all HTML that ends up in the client, as this is generally the accepted standard.
Nest Your Elements Correctly
When you write nested elements, make sure that you first close the inner element you opened last, and then close the outer element. Consider this correct example that formats a piece of text with both bold and italic fonts:
<strong><em>This is some formatted text</em></strong>
Notice how the <em> tag is closed before the <strong> tag. Swapping the order of the closing tags leads to invalid HTML:
<strong><em>This is some formatted text</strong></em>
Add a DOCTYPE Declaration to Your Page
A DOCTYPE gives the browser information about the kind of HTML it can expect. By default, VS adds a DOCTYPE for HTML5 to your page:
<!DOCTYPE html>
The DOCTYPE greatly influences the way browsers like Internet Explorer render the page, so if you're seeing odd behavior on your page, check that your page has the correct DOCTYPE.
You can view the complete HTML5 syntax rules at the W3C site at www.w3.org/TR/html-markup/syntax.html.
Besides HTML, an ASP.NET web page can contain other markup as well. Most pages will have one or more ASP.NET Server Controls to give them some additional functionality. The next section briefly looks at these ASP.NET Server Controls, but you get an in-depth look at them in Chapter 4.
A First Look at ASP.NET Markup
To some extent, the markup for ASP.NET Server Controls is similar to that of HTML. It also has the notion of tags, elements, and attributes, using the same angle brackets and closing tags as HTML does. One big difference is that the ASP.NET tags start with an asp: prefix. For example, a button in ASP.NET looks like this:
<asp:Button ID="Button1" runat="server" Text="Click Me" />
Note how the tag is self-closed with the trailing slash (/) character, eliminating the need to type a separate closing tag. If you wanted to, you could use a separate closing tag, though.
When a server control is processed, it returns HTML. So, the code for the same button ends up like this when rendered in the browser:
<input type="submit" name="Button1" value="Click Me" id="Button1" />
The process of converting the server control to its HTML representation is similar to the code you saw earlier that displayed the current date. The server control is processed at the server by the ASP .NET handler. This processing results in HTML, which is sent to the browser, where it's displayed. You see more of this in Chapter 4.
Now that you understand the basics of an ASP.NET page and the HTML that it generates, it's time to look at VS again. Knowing how to use the application and its many tools and windows is an important step in building fun, good-looking, functional websites.
A Tour of the IDE
Visual Studio is by far the most extensive and feature-rich integrated development environment (IDE) for building ASP.NET web pages. The abbreviation IDE refers to the way all the separate tools you need to build complex web applications are integrated in a single environment. Instead of writing code in a text editor, compiling code at the command line, writing HTML and CSS in a separate application, and managing your database in yet another, VS enables you to perform all of these tasks, and more, from the same environment. Besides the efficiency this brings because you don't have to constantly switch tools, this also makes it much easier to learn new areas of VS, because many of the built-in tools work in the same way.
The Main Development Area
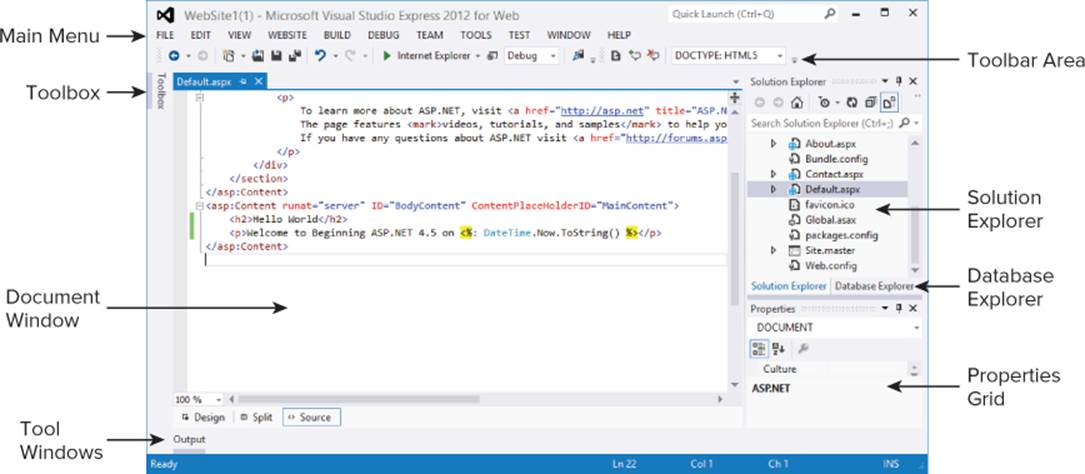
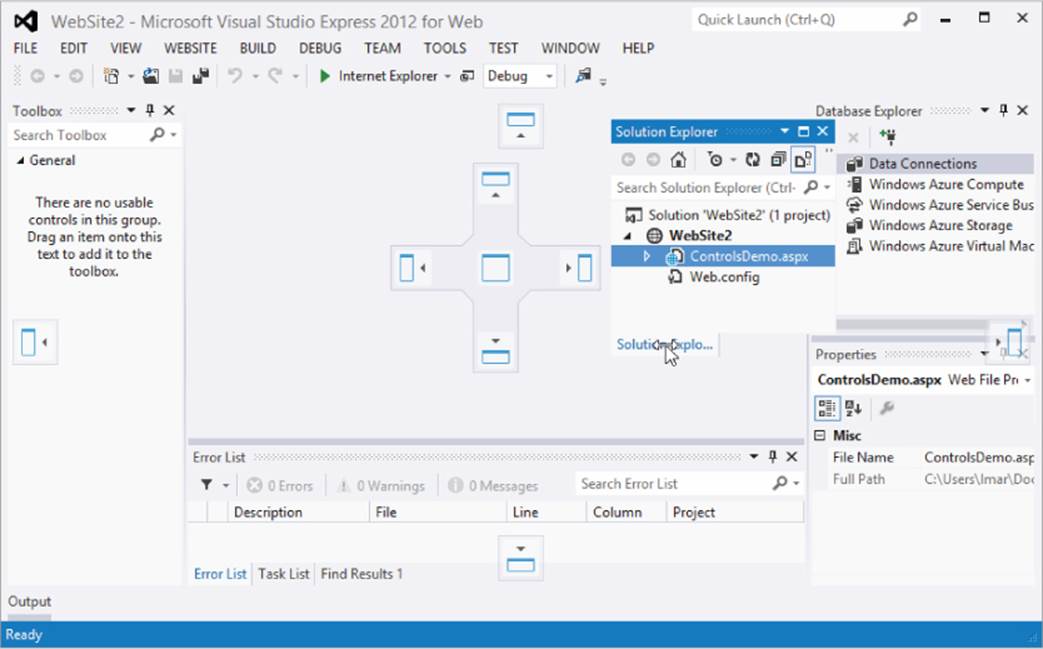
To get familiar with the many tools that are packed in VS's interface, take a look at Figure 1.9. It shows the same screen you got after you created your first website in VS, but now it highlights some of the most important screen elements. If you are already familiar with a previous version of Visual Studio, you could skip this section and pick up again at the next Try It Out exercise later in this chapter.
Figure 1.9
If you had a previous version of Visual Studio installed, your screen may look different, because Visual Studio 2012 is able to import settings from older versions.
Choosing Your Development Profile
Because VSEW targets people new to ASP.NET development as well as seasoned web developers, you can choose among different developer profiles: Basic Settings, Code Only, and Expert Settings. In Basic Settings mode, many menu items you don't frequently use have been hidden or are placed in their own submenu. The Code Only profile is great for pure coding sessions where you're not interested in many of the design features of VSEW, such as Design View or the Toolbox. Expert Settings mode gives you access to the full functionality of VSEW. You can switch between settings using the Tools ⇒ Settings menu. This book assumes you are using Expert Settings mode right from the beginning. You may not need all the features you see right from the start, but you sure will use most of them by the end of the book. Because the menu items change location depending on the profile you choose, I decided to use Expert Settings mode right away, to make it easier to refer to a specific menu item or feature. You don't have this option in the commercial versions of Visual Studio — Expert Settings is on by default.
The Main Menu
At the top of the application, right below the Windows title bar, you see the main menu. This menu bar contains familiar items you find in many other Windows applications, like the File, Edit, and Help menus as well as menus that are specific to VS, such as the Website and Debug menus. The menu changes dynamically depending on the task you're working on, so you'll see menu items appear and disappear as you work your way through the application. You can use the Help ⇒ Set Help Preference menu to configure online and offline help. Offline help needs to be installed first, and online help requires a connection to the Internet.
The Toolbar Area
Right below the menu, you see the toolbar area, which is capable of showing different toolbars that give you quick access to the most common functions in VS. In Figure 1.9, only two of the toolbars are enabled, but VS comes with many other toolbars that you can use in specific task-oriented scenarios. Some toolbars appear automatically when you're working on a task that requires a particular toolbar's presence, but you can also enable and disable toolbars to your liking. To enable or disable a toolbar, right-click an existing toolbar or the menu bar and choose the toolbar from the menu that appears.
The Toolbox
On the left of the main screen, tucked away at the border of VS, you see the tab for the Toolbox. If you click the tab, the Toolbox folds out, giving you a chance to see what it contains. If you click the little pin icon in the upper-right corner of the Toolbox (or any of the other panels that have this pin icon), it gets pinned to the IDE so it remains open.
Just as with the menu bar and the toolbars, the Toolbox automatically updates itself to show content that is relevant to the task you're working on. When you're editing a standard ASPX page, the Toolbox shows the many controls you have available for your page. You can simply drag an item from the Toolbox and drop it on a location of your page where you want it to appear. These controls are discussed in great detail in Chapter 4. Note that each Toolbox category also contains a Pointer icon. This isn't a control itself, though. In other designers for Visual Studio (such as Win Forms) this icon is used to get out of control drawing mode, but it has little use in ASP.NET. The Toolbox contains multiple categories, with tools that you can expand and collapse as you see fit to make it easier to find the right tool. You can also reorder the items in the list, add and remove items from the Toolbox, and even add your own tools to it. Customizing the IDE is discussed later in this chapter.
If the Toolbox is not visible on-screen, press Ctrl+Alt+X to open it or choose View ⇒ Toolbox, provided you have chosen the Expert Settings option in the Tools ⇒ Settings menu.
The Solution Explorer
At the right of the screen, you see the Solution Explorer. The Solution Explorer is an important window because it gives you an overview of the files that comprise your website. Instead of placing all your files in one big folder, the Solution Explorer enables you to store files in separate folders, creating a logical and organized site structure. You can use the Solution Explorer to add new files to your site, move existing files around using drag and drop or cut and paste, rename files and delete them from the project, and more. Much of the functionality of the Solution Explorer is hidden behind its right-click menu, which changes depending on the item you right-click.
At the top of the Solution Explorer, you see a small toolbar that gives you quick access to some functionality related to your website, including refreshing the Solution Explorer window, an option to nest related files, and two buttons that enable you to copy and configure your website. Most of this functionality is discussed later in the book.
You can access the Solution Explorer by choosing View ⇒ Solution Explorer from the main menu or by pressing Ctrl+Alt+L.
The Database Explorer
This window, hidden behind the Solution Explorer in Figure 1.9, enables you to work with your databases. If you have a commercial version of Visual Studio, such as Visual Studio 2012 Professional, this window is called the Server Explorer and may be located at the left of your screen.
You can access the Database Explorer by choosing View ⇒ Database Explorer or by pressing Ctrl+Alt+S. The Database Explorer is discussed in more detail in the chapters about databases, starting with Chapter 12.
The Properties Grid
With the Properties Grid, you can view and edit the properties of many items in Visual Studio, including files in the Solution Explorer, controls on a web page, properties of the page itself, and much more. The window constantly updates itself to reflect the selected item. You can quickly open the Properties Grid by pressing F4. You can use this same shortcut to force the Properties Grid to show the details of a selected item.
The Document Window
The Document Window is the main area in the middle of the application. This is where most of the action takes place. You can use the Document Window to work with many different document formats, including ASPX and HTML files, CSS and JavaScript files, code files for VB and C#, XML and text files, and even images. In addition, you can use the same window to manage databases, create copies of your site, view the pages in your site in the built-in mini-browser, and much more.
The Document Window is a tabbed window by default, which means it can host multiple documents, each one distinguished by a tab with the filename at the top of the window. The right-click menu of each tab contains some useful shortcuts for working with the file, including saving and closing it and opening the file's parent folder in Windows Explorer.
To switch between documents, you can press Ctrl+Tab, click the tab for the document you want to see, or click the down arrow in the upper-right corner of the Document Window, next to the Solution Explorer, shown in Figure 1.9. Clicking the down arrow reveals a list of open documents so you can easily select one.
Another way to switch documents is to press Ctrl+Tab and then hold down the Ctrl key. On the window that pops ups, you can select a document you want to work with in the right-hand column. You can then use the cursor keys to move up and down in the list with open documents. This makes it super easy to select the correct file.
On the same dialog box, you see a list with all active tool windows. Clicking one of the windows in the list shows it on-screen, moving it in front of other windows if necessary.
To get a quick preview of a document without opening it for editing, click the file you want to see in the Solution Explorer once. You can see that a file is in preview mode by its tab, which is docked to the right of the row with tabs as opposed to the left for open files.
At the bottom of the Document Window in Figure 1.9, you see three buttons called Design, Split, and Source. These buttons appear automatically when you're working with a file that contains markup, such as ASPX and HTML pages. They enable you to open the Design View of a page (giving you an idea of how the page will look in the browser), its Markup View (the HTML and other markup), or both at the same time. How this works is explained in more detail in Chapter 2, but for now, it's important to realize you can switch among Markup, Split, and Design View by clicking one of the three buttons. The Markup View is also often called the Source View or Code View window. However, to avoid confusion with the code editor that is used to edit Code Behind files, this book uses the term Markup View exclusively.
The Start Page
Whenever you start up VS, the Start Page is loaded in the Document Window. With the Start Page, you can quickly create new and open existing websites and other projects. The Start Page also provides a number of links to related news and information about web development. To reopen the Start Page, choose View ⇒ Start Page.
To get a feel for how you can use all these windows, the following Try It Out shows you how to build a simple web page that contains a few ASP.NET Server Controls.
Try It Out: Creating Your First ASP.NET Web Page
This Try It Out exercise guides you through creating a new website with a single page that contains a number of ASP.NET Server Controls. You see how to use windows like the Document Window and the Solution Explorer, and how to use the Toolbox and the Properties Grid to add ASP.NET Server Controls to the page and change their looks.
1. Start VSEW or Visual Studio 2012.
2. If you're using the Express edition, choose Tools ⇒ Settings and choose Expert Settings to turn on the developer profile that gives you access to the full feature set of VSEW.
3. On the File menu choose New Web Site. Depending on configuration, you may have to choose File ⇒ New ⇒ Web Site instead. This triggers the New Web Site dialog box.
4. In this dialog box, make sure that ASP.NET Empty Web Site is selected and not the ASP.NET Web Forms Site item that you used in a previous exercise. Ensure that File System is chosen in the Web Location drop-down list. Click OK to create the new site.
5. Next, right-click the new website in the Solution Explorer. Make sure you click the website (labeled WebSite2) and not the parent Solution element. It's the highlighted element in Figure 1.5. From the context menu that appears, choose Add ⇒ Add New Item.
6. In the new window that appears, click Web Form and type ControlsDemo as the name. The ASPX extension is added for you automatically when you click the Add button. You can leave the other settings in the dialog box at their default settings. The page should open in Markup View, showing you the default HTML, like the <html>, <head>, <title>, and <body> elements that VS adds there for you automatically when you create a new page.
7. Switch the page to Design View by clicking the Design button at the bottom of the Document Window.
8. If the Toolbox isn't open yet, press Ctrl+Alt+X to open it or click the Toolbox tab to show it and then click the pin icon in the top-right corner to make the Toolbox visible at all times. Drag a TextBox and a Button from the Standard category of the Toolbox into the dashed area in the Design View of the page. You should end up with a Design View that looks similar to Figure 1.10.
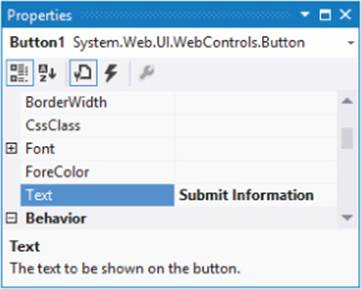
9. Right-click the button in Design View and choose Properties. In the Properties Grid, locate the Text property under the Appearance category (shown in Figure 1.11) and change it from Button to Submit Information. As soon as you press Tab or click somewhere outside the Properties Grid, the Design View of the page is updated and shows the new text on the button.
10. Press Ctrl+F5 to open the page in your default browser. Note that it's not necessary to explicitly save the changes to your page (although it's a good idea to do this often anyway using the shortcut Ctrl+S). As soon as you press Ctrl+F5 to run the page, VS saves all changes to open documents automatically.
11. Type some text in the text box and click the button. Note that after the page has reloaded, the text is still displayed in the text box. Other than that, not much has happened because you didn't write any code for the button yet.
Figure 1.10
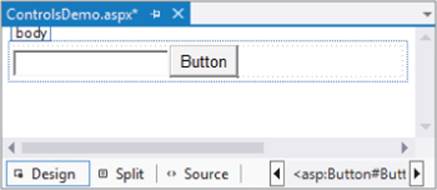
Figure 1.11
How It Works
When you dragged the Button and the TextBox from the Toolbox on the page in Design View, VS added the corresponding code for you in Markup View automatically. Similarly, when you changed the Text property of the button in the Properties Grid, VS automatically updated the markup for the control in Markup View. Instead of using the Properties Grid, you could also have typed the text directly between the quotation marks of the Text property in Markup View.
After changing the Text property, your page should contain this code in Markup View:
<asp:TextBox ID="TextBox1" runat="server"></asp:TextBox>
<asp:Button ID="Button1" runat="server" Text="Submit Information" />
When you press Ctrl+F5 to view the page in the browser, the web server receives the request, the page is processed by the ASP.NET run time, and the resulting HTML for the page is sent to the browser.
After you type in some text and click the button, the same process is more or less repeated: The web server receives the request, the page is processed, and the result gets sent back to the browser. When you click the button, you cause a postback to occur, where any information contained in the page — such as the text you typed in the text box — is sent back to the server. ASP.NET reacts to the postback by rendering the page again. However, this time it prepopulates controls, like the TextBox, with the values that were sent to the page.
Take a look at the resulting HTML for the page after the postback, using the browser's View Source command (rerun the page from VS by pressing Ctrl+F5 if you already closed it). You should see code similar to this:
<input name="TextBox1" type="text" value="Hello World" id="TextBox1" />
<input type="submit" name="Button1" value="Submit Information" id="Button1" />
Just as with the earlier example, you can see that the resulting HTML is substantially different from the original ASPX markup.
Postbacks are an important concept in ASP.NET, and you see more about them in other chapters, including Chapter 4.
VSEW hosts many more windows and tool panels than those you have seen so far. The next section briefly touches upon some of the windows you'll most frequently use when building ASP.NET web pages. All of the windows mentioned are accessible from the main View menu in VS or VSEW if you're using the Expert Settings mode.
Informational Windows
In addition to the windows that are visible by default when you start VS, many more windows are available. You see most of them in action in the remainder of this book, but some are worth highlighting now. You access all windows that are discussed next from the main View menu.
The Error List
The Error List gives you a list of the things that are currently somehow broken in your site, including incorrect markup in your ASPX or HTML files and programming errors in VB or C# files. This window can even show you errors in XML and CSS files. The Error List shows its messages in three categories — Errors, Warnings, and Messages — that signify the severity of the problem. Figure 1.12 shows the Error List for a page that has some problems with its CSS and XHTML.
Figure 1.12

The Output Window
When you try to build your site using the Build menu, the Output window tells you whether or not the build succeeded. If the build failed, for example because you have a programming error, it tells you why the build failed. In the commercial versions of Visual Studio, the Output window is used for other information as well, including the status of external plug-in programs. Building — or compiling — websites is discussed later in this book, including in Chapter 19, which deals with deployment of your website.
The Find Results Window
The Find and Replace features of VS are invaluable tools when it comes to managing the content of your site. You will often need to replace some text in the current document or even in the entire site. Find in Files (Ctrl+Shift+F) and Replace in Files (Ctrl+Shift+H) both output their results in the Find Results window, as shown in Figure 1.13.
Figure 1.13

Because having several informational windows open at the same time may take up precious screen space, it's often a good idea to dock them. This way, only one of them is visible at a time, while you still have quick access to the others. You learn how to customize the IDE, including the docking of windows, next.
Customizing the IDE
Although the standard setup of Visual Studio and its tool windows is pretty useful, there's a fair chance you want to customize the IDE to your liking. You may want to move some of the windows to a location where they are easier to reach, or you may want to open additional windows you frequently use. Visual Studio is fully customizable and enables you to tweak every little detail of the IDE. In the next section, you learn how to perform the most common customization tasks.
Rearranging Windows
To give each window the location it deserves, you can drag and drop them in the main IDE. Simply grab a window's title bar or its bottom tab and drag it in the direction of the new location. Once you start dragging, you see that Visual Studio gives you visual cues as to where the window will end up (see Figure 1.14).
If you drag the window over one of the four square indicators at the sides of the middle indicator, the window will be docked next to the existing window. Once you drop it, the window pops to its new location. If you drop the window on the square in the middle of the large indicator, the window docks with that window, sharing the same screen space. Each window has its own tab, as you can see with the windows at the bottom of Figure 1.14.
In addition to docking windows with others in the IDE, you can also have floating windows. To change a docked window into a floating one, drag it away from its current location and drop it somewhere in the IDE without hitting one of the visual cues on the screen. You can also choose Window ⇒ Float from the main menu or right-click the window's title bar and choose Float.
Figure 1.14
To restore a floating panel to its previous docked location, right-click its title bar and choose Dock or choose Window ⇒ Dock from the main menu. Make sure you don't choose Dock as Tabbed Document for the tool windows, like the Toolbox or the Solution Explorer, or they'll end up in the main Document Window. This makes it difficult to use these tool windows together with an open file because the two windows will share the same space.
Modifying the Toolbox
You can modify the Toolbox as well. By default, the items are sorted alphabetically, but you can reorder them using drag and drop. To do this, open the Toolbox (press Ctrl+Alt+X) and drag an item (such as the TextBox under the Standard category) to a different location. You can also delete items from the Toolbox by right-clicking them and choosing Delete from the context menu. Don't worry about items getting lost forever; you can reset the Toolbox again by choosing Reset Toolbox from the same menu.
You can also add your own items to the Toolbox. The most common use for this is code snippets. Simply highlight some text or code in the Document Window and drag it to the Toolbox. You can then right-click the item and choose Rename Item to give it a more meaningful name that you can easily recognize.
To avoid cluttering up the Toolbox with your own code snippets, consider creating a separate category for them. You can do this by choosing Add Tab from the Toolbox's right-click menu. Enter a name and press Enter, and your Toolbox tab is ready for use.
In the next Try It Out exercise, you get the chance to play around with the Visual Studio IDE so you can customize it to your liking.
Try It Out: Customizing the IDE
In this exercise you practice opening and rearranging the windows in the VS IDE. Don't be afraid to mess things up. A little later in this chapter, instructions are given on how to reset the IDE to the way it was when you opened it the first time.
1. If you closed your website since the previous Try It Out, open it again, or create a new one using the File menu.
2. From the View menu, choose Error List to open the Error List window. If you don't see the Error List item directly, choose Tools ⇒ Settings ⇒ Expert Settings first. Notice how the Error List gets docked below the Document Window by default.
3. From the same View menu, choose Task List. By default, it is docked in the same space as the Error List, with the tabs for both windows next to each other.
4. Click the tab of the Task List and, while holding down your mouse button, drag the Task List away from its location in the direction of the Document Window. Once you release the window, it appears as a floating window in the IDE. To restore the window, drag it back on the center square of the Error List. To change the order in which tabs appear in a tab group, drag a tab over the other tabs and release it at the desired location.
5. If you want, you can repeat the previous steps for other windows that are visible in the IDE by default or for the ones you find under the View menu. Spend some time familiarizing yourself with all the different windows and how you can arrange them on-screen. Because you'll be working a lot with these windows in the remainder of this book, it's good to be familiar with their locations.
6. Next, open the ControlsDemo.aspx page (or add a new ASPX first if you created a new website) from the Solution Explorer by double-clicking it. When the page opens, the Toolbox becomes visible automatically. If it doesn't, press Ctrl+Alt+X to open it.
7. Right-click the Toolbox and choose Add Tab. Type HTML Fragments as its new name and press Enter. This adds a new category to the Toolbox that behaves just like all the others.
8. With the Document Window showing your ASPX page in Markup View, type <h1> directly after the opening <div> tag. Note that Visual Studio automatically inserts the closing </h1> for you. You should end up with code in Markup View looking like this:
<form id="form1" runat="server">
<div>
<h1></h1>
</div>
9. Highlight the opening and closing <h1> tags, and then drag the selection from the Markup View window onto the new Toolbox tab you created in step 7. The selection shows up as Text: <h1></h1>.
10. Right-click the Toolbox item you just created, choose Rename Item, and type Heading 1 as the name.
11. Put your cursor in the Document Window again and press Ctrl+K directly followed by Ctrl+D to format the document in the Document Window. Alternatively, choose Edit ⇒ Format Document from the main menu. This formats the document according to the rules you have set in the Text Editor Options dialog box. Formatting is also available for a number of other document types, including C# and VB.NET code, and CSS and XML files.
From now on, whenever you need a heading in your document in Markup View, simply place the cursor in the Document Window where you want the heading to appear and double-click the appropriate heading in the Toolbox.
Note
This exercise serves as an example of adding code to the Toolbox. For an <h1> element, you might prefer to type the code directly in the code editor. Alternatively, you could use a code snippet. Enter h1 in the editor and then press Tab. Visual Studio expands the code for the heading to <h1></h1> and positions your cursor between the two tags so you can start typing the heading right away.
How It Works
Most of the steps in this Try It Out are self-explanatory. You started off by opening a few windows that you frequently need when building websites. You then used the drag-and-drop features of the IDE to rearrange the window layout according to your personal preferences.
You then added an HTML fragment to a custom tab in the Toolbox. When you drag any markup to the Toolbox, Visual Studio creates a Toolbox item for it that contains the selected markup. Whenever you need a copy of that markup in your page, simply double-click the item or drag it from the Toolbox into Markup View. This is a great time saver for HTML fragments that you frequently use. You typically use this technique for larger blocks of code; for elements like the <h1>, Visual Studio has a better tool called Code Snippets, which you meet later in this book.
At the end you used Visual Studio's document formatting option to change the layout of the code in the document. This helps to keep the code organized and easier to read. You can fully change how the code is formatted by using the Options dialog box accessible through Tools ⇒ Options. Then expand the path Text Editor ⇒ HTML ⇒ Formatting, and click Tag Specific Options.
Besides the window layout and the Toolbox, Visual Studio enables you to customize a lot more in the IDE. The following section explains how to customize three other important IDE features: the Document Window, toolbars, and keyboard shortcuts.
Customizing the Document Window
Visual Studio gives you great flexibility with regard to how text is displayed in the Document Window. You can change things like font size, font color, and even the background color of the text. You can access the Font and Colors settings by choosing Tools ⇒ Options, and then choosing Environment ⇒ Fonts and Colors.
One thing I like to customize in the Document Window is the tab size, which controls the number of spaces that are inserted when indenting code. To change the tab size, choose Tools ⇒Options, and then under Text Editor choose All Languages ⇒ Tabs. I usually set the Tab and Indent Size to 2 spaces, leaving the other settings in the Tab panel untouched. Another thing I like to customize is the number of line breaks before and after HTML elements. The Options window gives you full control over this: Select Text Editor ⇒ HTML ⇒ Formatting and then click Tag Specific Options. In the list on the left you can select a tag and then with the settings on the right you can control how the tag is formatted. The Preview box makes it easy to see how the various settings change the formatting.
With the exception of the Tab Size being set to 2 and the number of line breaks around a few HTML elements, all screen shots in this book show the default setup of VSEW.
Customizing Toolbars
You can customize toolbars in three ways: you can show or hide the built-in toolbars, you can add and remove buttons on existing toolbars, and you can create your own toolbars with buttons you often use.
Enabling and Disabling Toolbars
You disable and enable existing toolbars by right-clicking any existing toolbar or the menu bar and then selecting the appropriate item from the list. Once the toolbar is displayed, you can use its drag grip at its left to drag it to a new location within the Toolbar area.
Editing Existing Toolbars
If you feel that an existing toolbar is missing an important button or that it contains buttons you rarely use, you can customize the buttons on the toolbar. To do this, right-click any toolbar or the menu bar, choose Customize, switch to the Commands tab, and select the toolbar you want to modify from the Toolbar drop-down. With the command buttons at the right, you can add new and remove existing commands, or change their order.
Creating Your Own Toolbars
Creating your own toolbar is useful if you want to group some functions that you frequently use. To create a new toolbar, open the Customize window as explained in the preceding section. Click the New button and type a name for the toolbar. Then switch to the Commands tab and modify your toolbar as you would do with existing toolbars.
Customizing Keyboard Shortcuts
Another setting many developers like to change is keyboard shortcuts. Keyboard shortcuts are a great way to save time because they enable you to perform a task with a simple keyboard command instead of reaching for the mouse and selecting the appropriate item from the menu. To change the keyboard shortcuts, choose Tools ⇒ Options, expand Environment, and click Keyboard. Locate the command for which you want to change the shortcut in the list of commands. Because this list contains many items, you can filter the list by typing a few letters from the command. For example, typing print in the Show Commands Containing field gives you a list of all print-related commands.
Next, in the Press Shortcut Keys field, type a new shortcut and click Assign. Visual Studio enables you to enter a double shortcut key for a single command. For example, you can bind the command Close All Documents to the command Ctrl+K, Ctrl+O. To perform this command, you need to press both key combinations in rapid succession. Although a double shortcut key may seem like overkill, it greatly increases the number of available shortcut keys.
Resetting Your Changes
Don't worry if you feel that you have messed up Visual Studio by trying out the numerous customization options. You have many ways to restore Visual Studio to its previous state.
Resetting the Window Layout
The command Reset Window Layout, accessible from the Window menu, resets all windows to the position they were in when you first started Visual Studio. This command is useful if you misplaced too many windows and ended up with a cluttered IDE.
Resetting the Toolbox
If you removed an item from the Toolbox by mistake or even deleted an entire tab, you can reset the Toolbox to its original state by right-clicking the Toolbox and choosing Reset Toolbox. You need to think twice before you use this command because it also deletes all your custom code snippets.
Resetting All Settings
If you followed along with the previous Try It Out exercises, and then started experimenting with the customization possibilities, your IDE is now probably in one of two states: It either looks exactly the way you want it, or it looks like a complete mess. In the latter case, it's good to know that it is easy to clean up the chaos.
To completely revert all Visual Studio settings to the way they were right after installation, choose Tools ⇒ Settings ⇒ Import and Export Settings or Tools ⇒ Import and Export Settings, depending on the version of VS you're using. Then choose the Reset All Settings option and click Next. If you want, you can create a backup of the existing settings; otherwise, choose No, Just Reset Settings. You get another screen that enables you to choose among a number of settings collections. Choose Expert Settings or Web Development because these options give you access to all the features you need to follow along with this book. Finally, click Finish. This action causes all settings to be reset to their defaults, including the window layout, Toolbox and Toolbox customizations, shortcut keys, and everything you may have changed in the Visual Studio Options dialog box. So, use this command only when you're really sure you want a fresh, new setup of Visual Studio.
With some basic knowledge about ASP.NET pages and Visual Studio, it's time for some real action. In the next chapter, you see how to create ASP.NET websites and web pages in much more detail. You learn how to organize your site in a logical and structured way, how to add the many different types of files to your site and how to use them, and how to connect the pages in your site.
However, before you proceed to the next chapter, there is one more important topic you need to look at: the sample application that comes with this book.
The Sample Application
Building websites is what this book is all about, so it makes a whole lot of sense that this book comes with a complete and functional sample site that is used to showcase many of the capabilities of ASP.NET.
The sample site you build in this book is called Planet Wrox, a site that serves as an online community for people interested in music. The site offers the following features to its visitors:
· Reviews about CDs and concerts that have been posted on the site by the administrator.
· The Gig Pics section, an online photo album where users can share pictures taken at concerts.
· The ability to switch between the different graphical themes that the site offers, giving you a chance to change the look and feel of the site without altering the content.
· The ability to store musical preferences that influence the information users see on the site.
· Access to bonus features for registered users.
The site enables the administrator (that is, you, the owner of the site) to do the following:
· Add and maintain the reviews.
· Manage the different musical genres in the system.
· Manage photo albums created by visitors to the site.
Figure 1.15 shows the Planet Wrox homepage.
Figure 1.15
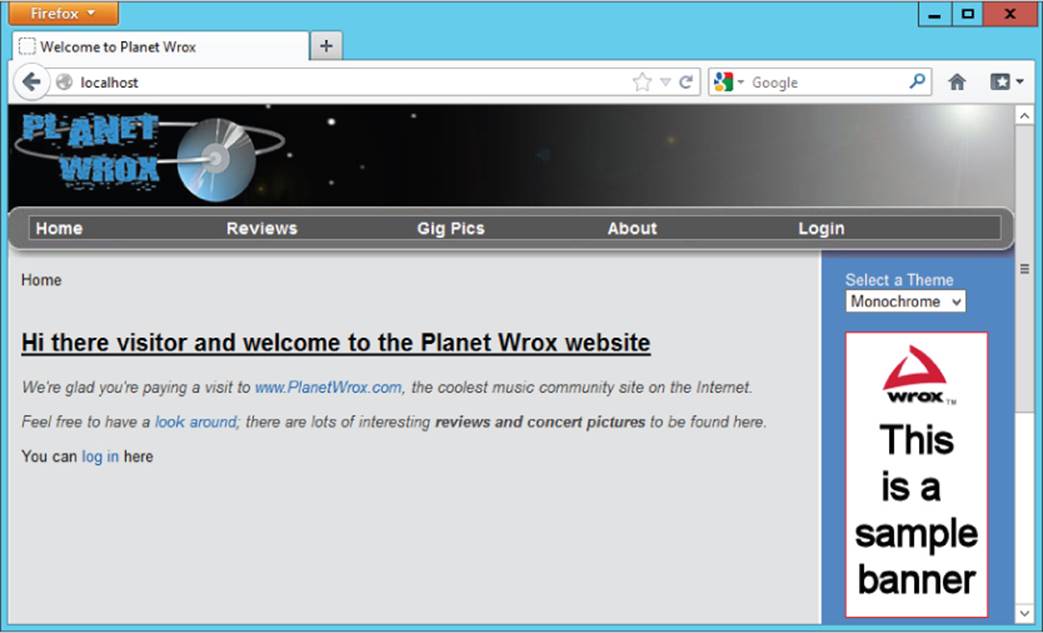
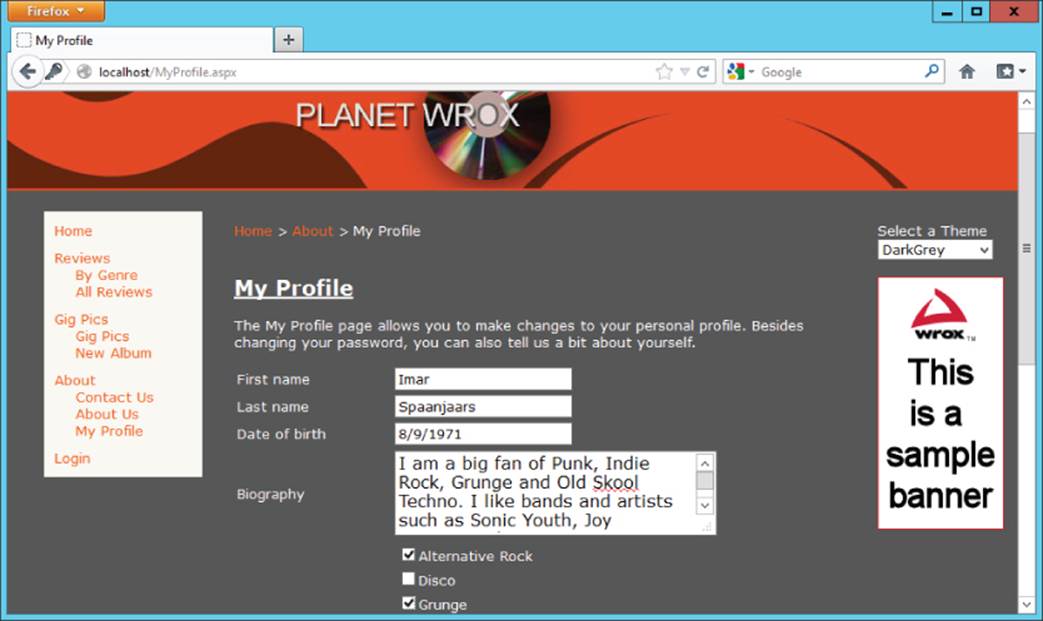
Figure 1.16 shows another page from Planet Wrox, but with a different theme applied. This page enables users to enter their personal information and specify preferences with regard to their favorite musical genres.
Figure 1.16
You can find an online running example of the site at www.PlanetWrox.com. There you can play around with the site from an end user's perspective.
You can also download the source for the sample application and all other examples from this book from the Wrox website at www.wrox.com/remtitle.cgi?isbn=1118311809.
By the end of this book, you'll be able to build all of the functionality from the sample site (and hopefully even more) in other websites. Don't worry if it sounds like an awful lot of complex things. I guide you, step by step, from the beginning of the application all the way to the last feature. As long as you keep having fun doing this, I'm sure you'll make it all the way.
Practical Tips on Visual Studio
Most of the chapters in this book end with a short section of useful tips. These are tips that either didn't fit in anywhere in the text or encourage you to further explore or test out things. Sometimes they may seem irrelevant or hard to understand at first, but you'll find that as you make your way through this book and look back at tips from previous chapters, things start to make sense. Don't worry if you don't understand certain things completely the first time you see them. Give the idea some thought and revisit the topic a few days later. Hopefully, by letting the ideas sink in a little, things start to make more sense automatically. This applies not only to the Practical Tips section, but to the entire book.
· Before you move on to the next chapter, play around with Visual Studio some more. Add a couple of pages to your site, drag and drop some controls from the Toolbox onto your pages, and view them in your browser. That way, you'll have a better understanding of the tools and the many controls available when you start the next chapter.
· Familiarize yourself with the many options to tweak the Visual Studio IDE. When building websites, you spend most of your time in this IDE, so it makes sense to tweak it as much as possible to your liking. Don't be afraid to mess it up; you can always revert to previous settings.
· Take some time to browse through the settings you find in the Options dialog box of Visual Studio (accessible through the Tools ⇒ Options menu). Many of the settings are self-explanatory and can really help in further tweaking the IDE.
Summary
This chapter covered a lot of important ground to get you started with ASP.NET 4.5 and Visual Studio. It started off with a brief history of the Microsoft .NET Framework in general and ASP .NET in particular.
You then learned how to acquire and install Visual Studio, which is the most extensive and versatile tool available for creating ASP.NET 4.5 web pages. To enable you to work with it effectively, this chapter showed you how to use and customize the main features of the IDE. In subsequent chapters, you use and extend this knowledge to work with the many tools found in VS.
It's important to understand how a page in Visual Studio makes it to your web browser. Some knowledge of the web server that serves the request and how the page is processed to deliver the final HTML in the browser is critical to understanding ASP.NET. This chapter gave you a short introduction to the way a web page is requested and served to the browser.
In the next chapter, you get a much more detailed explanation of creating websites.
Exercises
1. Explain the differences between the markup of a page in Visual Studio and the final HTML page in the browser.
2. Imagine you have a number of HTML fragments that you expect to use a lot throughout the site. What's the best way to make these fragments available in Visual Studio?
3. Name three ways you can reset some or all of the IDE customization settings.
4. If you want to change the property of a control on your page, for example the text of a button, which two options do you have available to make the change?
You can find answers to these exercises in Appendix A.
What You Learned in this Chapter
|
Attribute |
Extra information in a tag to define or change its behavior |
|
Element |
A pair of tags holding some text or other content |
|
HTML |
HyperText Markup Language: the language that browsers use to display a web page |
|
HTTP |
HyperText Transfer Protocol: the protocol by which web browsers and web servers communicate |
|
IDE |
Integrated development environment: an integrated collection of applications and tools to develop applications |
|
JavaScript |
A programming language used to interact with a web page in the client's browser |
|
Tag |
Text surrounded by angle brackets to create HTML elements |
|
Visual Studio 2012 |
The development environment to build .NET applications |
|
Visual Studio Express 2012 for Web |
The free version of Visual Studio that enables you to build ASP.NET web applications |
All materials on the site are licensed Creative Commons Attribution-Sharealike 3.0 Unported CC BY-SA 3.0 & GNU Free Documentation License (GFDL)
If you are the copyright holder of any material contained on our site and intend to remove it, please contact our site administrator for approval.
© 2016-2026 All site design rights belong to S.Y.A.