Beginning Visual Basic(2012)
Chapter 16
Security in Your ASP.NET 4.5 Website
What You Will Learn in This Chapter:
· Important terminology you'll encounter when dealing with security
· The ASP.NET application services that drive the security model of ASP.NET
· How you can let users sign up for an account for your site
· How users can reset their passwords or request new ones
· How you can manage the users and roles in your database at development time
· How you can present different content to different users based on their access rights in the system
Wrox.com Code Downloads for this Chapter
You can find the wrox.com code downloads for this chapter on the Download Code tab at www.wrox.com/remtitle.cgi?isbn=1118311809. The code is in the chapter 16 download.
Until now, you have been creating pages in your website that are accessible to all visitors to your site. There is currently no way to block certain resources like ASPX files or even whole folders for specific users. That means, for example, that currently anyone can access your Management folder and start messing with the genres and reviews in the system.
Clearly, this is not something you'd want in a production website. So you need to think of a good security strategy to stop unwanted users from accessing specific content. You also need to look at a mechanism that enables users to sign up for a new account, and at the same time enables you to designate certain users as managers of your website and grant them special access rights.
ASP.NET 4.5 and VS ship with all the tools you need to create a solid and safe security mechanism. In this chapter, you learn how to make use of these tools in your ASP.NET website.
Before you start looking at how security is implemented in the ASP.NET Framework, you need to understand a few important terms that you'll come across in every discussion on security.
Introducing Security
Although security can be quite a complex subject, it often revolves around three straightforward questions:
· Who are you?
· How can you prove that?
· What are you allowed to do in the system?
Identity: Who Are You?
An identity is what makes you, you. The answer to what an identity is depends on the context it is used in. As a citizen of a country, your identity revolves around your person, your official name and birth date, and maybe even a Social Security number. However, for a website like p2p.wrox.com, Wrox's community website, your identity may be as little as your e-mail address.
No matter what you include in an identity, it is a way to refer to you. But how does anyone else know you? And how can they be sure it's really you when you log on to a website, for example? This is where authentication enters the game.
Authentication: How Can You Prove Who You Are?
Authentication is about providing evidence about who you are. When you need to register for a library card, you may need to show your passport to prove that the name you register the card under really belongs to you. With a website like p2p.wrox.com, you need to provide an e-mail address and a password. Together, these two pieces form the evidence that proves your identity. Many other mechanisms are used for authentication, including high-tech fingerprint or iris scans, smart cards and tokens (where the evidence is stored on something tangible), and so on. However, in light of the discussion on security of ASP.NET websites, this chapter sticks to a username and password for authentication. In many cases, e-mail addresses act as usernames because they uniquely identity a user.
Authorization: What Are You Allowed to Do?
Depending on who you are, a system grants you more or fewer privileges to access certain areas. Think about the highly secured headquarters of a national security agency in an action movie, for example. Even if the main character is allowed to enter the building, he is often not allowed to enter specific areas because he lacks the proper authorization (the fact that the hero eventually gains access in those movies using a two-minute hack in the system is beside the point here).
To determine what a user is allowed to do, a system needs to know two things: the permissions for the current user and the authorization rules for the resource a user is trying to access.
The permissions for the user are based on her username (the identity it represents) and the roles (or security groups) the user is optionally assigned to. Similarly, resources can be opened up or blocked for specific users or roles. When there is a match between the current user and the access rules for the resource a user is trying to access, the user is granted access. If the user is blocked specifically, access is denied. Imagine a file that is only accessible to the user Tom and the group Developers. The user Tom can access that file, regardless of whether he is in the Developers role. At the same time, the user Charlotte must be in the Developers role in order to access the file.
You see how to work with these concepts in the remainder of this chapter.
A large part of these security concepts in ASP.NET are implemented with the so-called application services, discussed next.
An Introduction to the ASP.NET Application Services
Versions of ASP.NET before ASP.NET 2.0 had some support for security. In ASP.NET 1.x applications, you needed to write a lot of code to implement a solid security strategy. The downside of writing this code is that it was often pretty much the same in all your websites. You were more or less forced to write the same code over and over again to implement a security mechanism.
These problems were solved in ASP.NET 2.0, which shipped with the application services: a set of services you can use in your website to support management of users, roles, profiles, and more. These services are based on a provider model, something you'll learn more about shortly. The application services are still strongly present in ASP.NET 4.5 and have been updated to simplify configuration and deployment.
ASP.NET 4.5 ships with a number of application services. The most important ones are:
· Membership — Enables you to manage and work with user accounts in your system.
· Roles — Enables you to manage the roles to which your users can be assigned.
· Profile — Enables you to store user-specific data in a back-end database.
Figure 16.1 gives an overview of these services and shows how they are related to your website and the underlying data stores that the services may use.
Figure 16.1
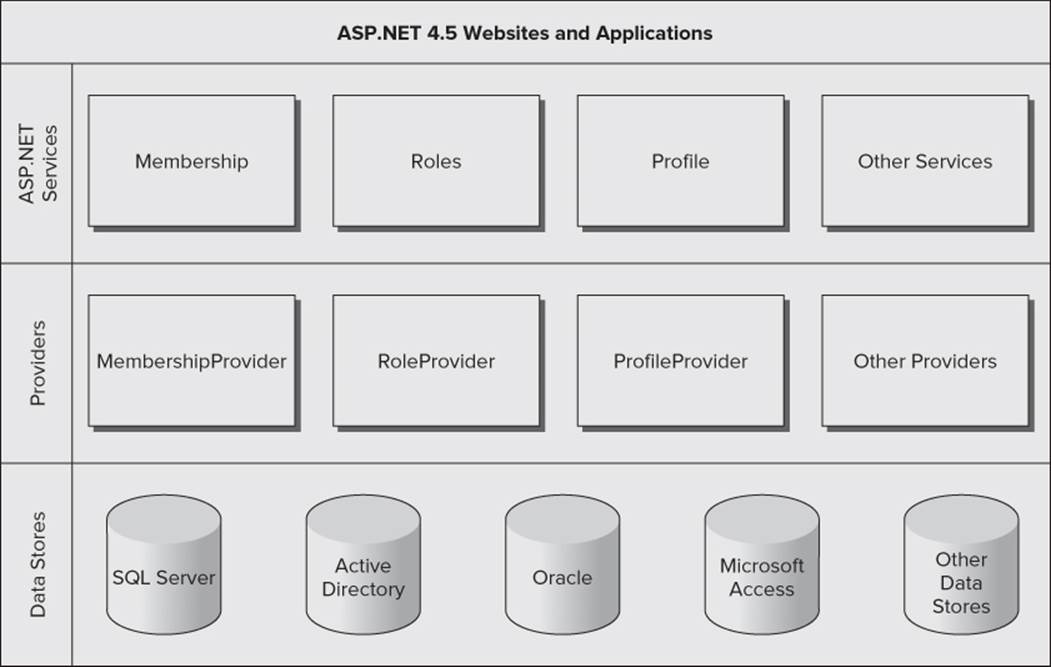
At the top of the diagram, you see the ASP.NET 4.5 websites and web applications that represent the websites that you build. These websites can contain controls like the login controls (discussed next) that in turn can talk to the ASP.NET application services such as membership and roles. To create a flexible solution, these services don't talk to an underlying data source directly, but instead talk to a configured provider. A provider is an interchangeable piece of software that is designed for a specific task. For example, in the case of the membership services, the Membership provider is designed to work with users in the underlying data store. You can configure different providers for the same application service depending on your needs. Previous versions of ASP.NET shipped with a SQL Server provider that enables your membership services to talk to a SQL Server database (both the Express and commercial editions) and an Active Directory provider (that lets you create and manage users in Active Directory on Windows). These providers are still available, but there is now a new alternative. In June 2011, Microsoft released the Universal Providers that work the same as the SQL Server providers, but can be used to target all editions of SQL Server, including SQL Server Compact and SQL Azure. This makes it easy to switch the underlying database, simply by changing the configuration for the application. The Universal Providers are available for .NET 4 and .NET 4.5 and are ideal for Internet-connected websites like PlanetWrox.com. If you create a new ASP.NET Web Forms site, the Universal Providers are already set up for you. If you create an empty ASP.NET website instead (as is the case with the Planet Wrox sample project), you need to add the providers yourself using NuGet, as you see in a later exercise.
The beauty of the provider model is that you can swap providers through configuration without any changes to your programming code. If you have your own custom data store, you could write your own provider and plug it into your website to replace one of the default providers with very little effort.
Each provider needs a data store — represented by the bottom part of the diagram in Figure 16.1 — and is written to work with one or more specific data stores. For example, the DefaultMembershipProvider (to handle membership services such as creating users, logging in, and resetting passwords) and the DefaultRoleProvider (to handle role-related tasks) are designed to work with any version of Microsoft SQL Server, including Express, LocalDB, SQL Server Compact, and SQL Azure. These two providers replace the SqlMembershipProvider and the SqlRoleProvider that shipped with earlier versions of ASP.NET.
In the remainder of this chapter, you see how to use the DefaultMembershipProvider and the DefaultRoleProvider. In the next chapter, you work with the DefaultProfileProvider. You can configure all three providers to use the same SQL Server database, making it easy to centralize all your user data.
Ideally, you don't deal with these providers directly. Under normal circumstances, the various providers are configured for your website at a central location. You then use these providers by talking to the application services. Although you could access these services directly from code, you often use the ASP.NET built-in login controls to do the hard work for you. These controls are discussed next.
Introducing the Login Controls
The login controls that ship with ASP.NET 4.5 take away much of the complexity usually associated with writing a security layer in a website. The available login controls effectively encapsulate all the code and logic you need to validate and manage users. These controls work by communicating with the configured provider through the application services, instead of talking to a database directly. To see how this works, the following exercise shows you how to create a simple Login and Sign Up page that enables new users to create an account and then log in. The section that follows then looks at the seven login controls that ship with ASP.NET 4.5.
Try It Out: Creating Login and Sign Up Pages
In this Try It Out, you extend the Login page that you created earlier. You also create a new page that enables a user to sign up for an account on the Planet Wrox website.
1. Open your website in VS and then open the Package Console Manager (choose Tools ⇒ Library Package Manager ⇒ Package Manager Console).
2. Enter the following command at the Package Manager Console prompt and press Enter:
Install-Package Microsoft.AspNet.Providers
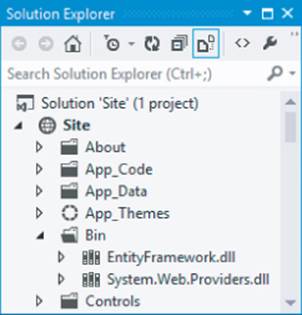
3. By executing this package, VS downloads the providers, adds an assembly called System.Web.Providers.dll to the Bin folder of your site and adds configuration information for the providers to Web.config. When the command has completed, your Solution Explorer should look likeFigure 16.2.
Figure 16.2
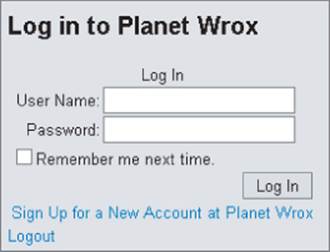
From the root of the site, open the Login.aspx page in Markup View. If you don't have that page, create it now, based on your custom template, and set its Title to Log in to Planet Wrox. Then add an <h1> element with the same text in the cpMainContent placeholder.
4. From the Login category of the Toolbox, drag a LoginStatus control and drop it in the page after the <h1> element.
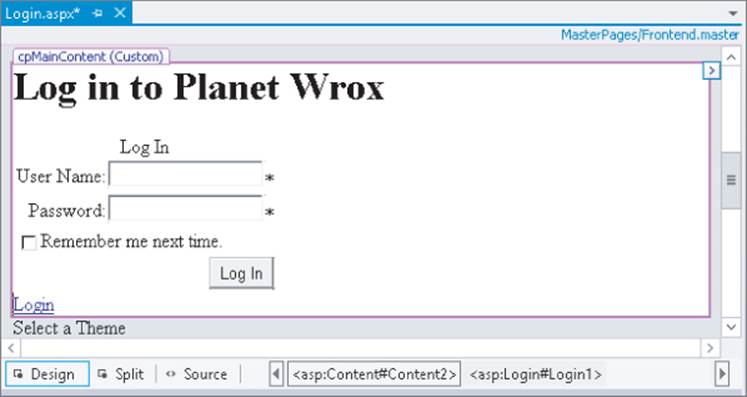
5. Switch to Design View and from the Toolbox, drag a Login control and drop it on the LoginStatus, so it ends up right above it. Both controls are visible in Figure 16.3 (the LoginStatus appears as a small Login link below the Login control).
Figure 16.3
6. Open the Properties Grid for the Login control and set the two properties shown in the following table:
|
Property |
Value |
|
CreateUserText |
Sign Up for a New Account at Planet Wrox |
|
CreateUserUrl |
SignUp.aspx |
7. In the root of the website, create a new Web Form called SignUp.aspx based on your custom template and give it a Title of Sign Up for a New Account at Planet Wrox.
8. Switch the page to Design View and from the Toolbox, drag a CreateUserWizard control into the main content area for the page. Save and close the page.
9. Open the Web.config file from the root of the site and add an <authentication> element with its mode attribute set to Forms as a direct child of the <system.web> element.
<system.web>
<authentication mode=”Forms” />
...
</system.web>
10. Still in the Web.config file, take a look at the <connectionStrings> section. Notice how the NuGet package manager added a new connection string for you. You could leave this connection string in there, and everything would work. However, with this connection string, .NET creates a new database and attaches that to SQL Server. From a management perspective, it'll be easier if your user data is stored in the same database as your reviews, genres, pictures, and photo albums. This is quite easy to accomplish, though. First, remove the connection string calledDefaultConnection that was added by the package manager. Next, replace the value for the connectionStringName attribute on all four providers (for Profile, Membership, Roles, and Session state) with the name of your Planet Wrox connection string (which should be calledPlanetWroxConnectionString1). You should end up with configuration code that looks like the following. Note that I left out a lot of code and only show the code for the Membership provider to save some space. The important part is the connectionStringName attribute on all four providers that points to the Planet Wrox connection string.
<connectionStrings>
<add name=”PlanetWroxConnectionString1” connectionString=”…
<add name=”PlanetWroxEntities” connectionString=”…
</connectionStrings>
<system.web>
... Other code here
<membership defaultProvider=”DefaultMembershipProvider”>
<providers>
<add name=”DefaultMembershipProvider”
... Other attributes here
connectionStringName=”PlanetWroxConnectionString1”
enablePasswordRetrieval=”false” enablePasswordReset=”true”
.. Other attributes here
/>
</providers>
</membership>
... Other code here
</system.web>
11. Save all your changes, go back to Login.aspx, and press Ctrl+F5 to open that page in your browser. You are greeted with a login box, as shown in Figure 16.4.
Figure 16.4
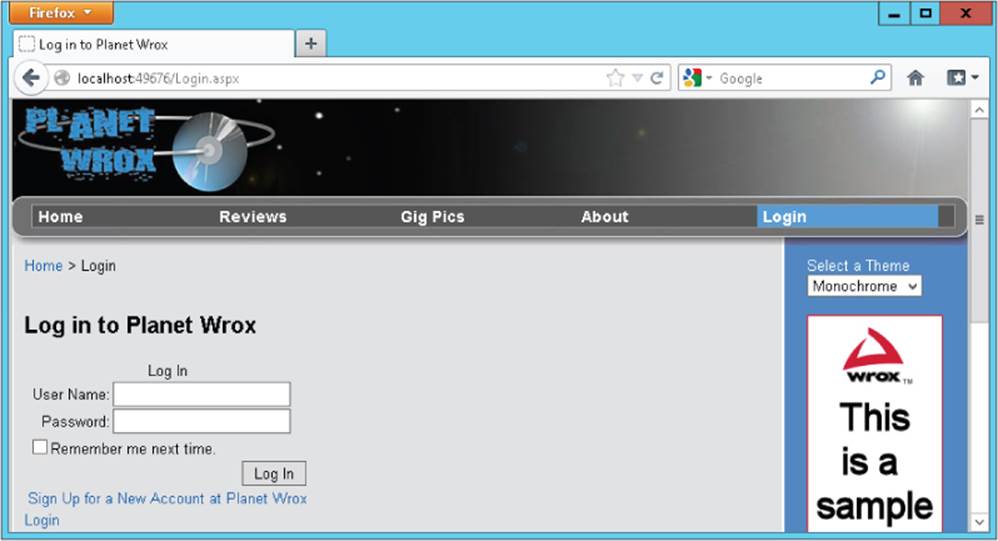
Note that the login status below the Login control is currently set to Login (as a call to action) to indicate you are not logged in yet. If the text says Logout instead, verify that you set authentication to Forms in the Web.config file. Otherwise, Windows authentication is used, which logs you in with your Windows account.
12. Try to log in by entering a random username and password. Obviously, this fails because the account doesn't exist. It may take a few seconds before you see the result because ASP.NET is busy setting up the membership database.
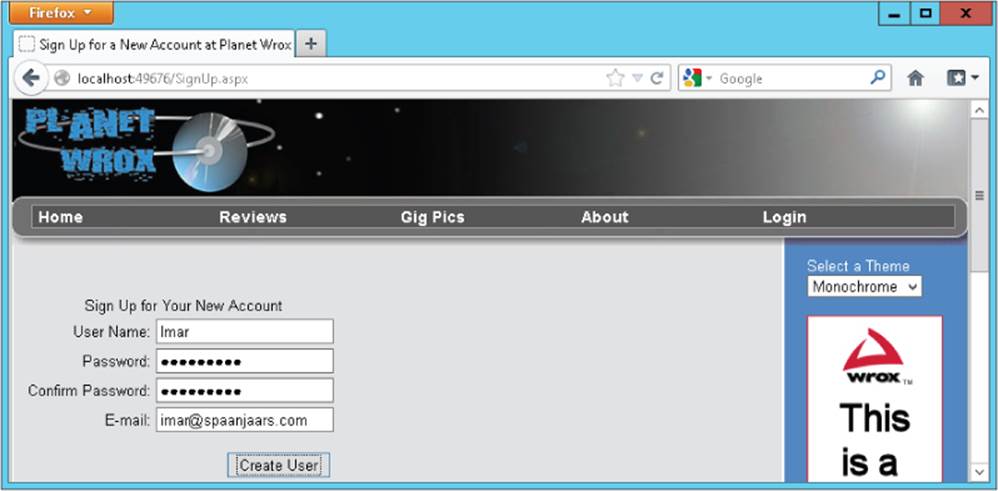
13. Follow the Sign Up link below the Login control to go to SignUp.aspx and then create an account by entering your personal details (see Figure 16.5). By default, the password needs to have a minimum length of six characters. Note that the password is case sensitive. Write down the username and password you just entered, because you'll need this account information again later.
Figure 16.5
14. Click the Create User button to have the account created for you. When the page reloads, you get a confirmation that the account was created successfully. Click the Login item from the main Menu or TreeView (depending on the theme you currently have selected). You are taken toLogin.aspx again where the LoginStatus control below the Login control now indicates that you are logged in (see Figure 16.6). When you create a new account using the CreateUserWizard, you're logged in automatically, although you can change that behavior by setting theLoginCreatedUser property of the control to false.
Figure 16.6
15. Click the Logout link and you are logged out, causing the LoginStatus to display the text Login again. In the Login control, enter the username and password you entered in step 13 and click the Log In button. You're logged in and redirected to the homepage. On the main Menu orTreeView, click Login to return to the Login page again. Note that the LoginStatus has changed and now shows Logout again, illustrating the fact that you successfully logged in.
At this stage, being logged in doesn't add much value; all you see is the LoginStatus change from Login to Logout. However, later in this chapter you see how to offer different content to logged-in users.
How It Works
Besides adding and configuring a few ASP.NET Server Controls, you didn't do any coding in this exercise. Still, you were able to implement a fully functional login procedure that enables a user to sign up for an account and then log in to the site. So how does all this work? As you learned earlier, the ASP.NET controls talk to the configured application service providers; a software layer that sits between the login controls and the SQL Server database that keeps track of the users.
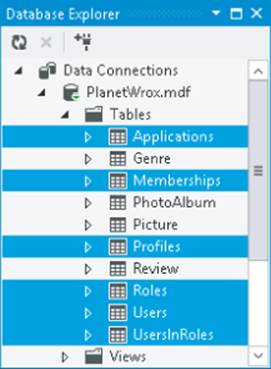
The very first time you try to log in (or use other login controls that require database access), the provider checks if your application is using a database with the necessary database objects, such as tables. By default, it checks the database by looking at a connection string pointed to by theconnectionStringName attribute on the configured Membership provider. If the database from the connection string doesn't exist, or it doesn't contain the necessary tables, .NET executes a SQL script to prepare the database for you. That is why there was a delay when you entered the username and password in step 12. To find out what the database looks like, go back to VS, expand the App_Data folder, and then double-click your PlanetWrox.mdf database. This opens the Database Explorer and shows your database. Expand the Tables node to see which database objects have been added for you, as shown in Figure 16.7.
Figure 16.7
After this database has been created successfully, the login controls can use it. For example, when you create a new account using the CreateUserWizard control, records are inserted in the Memberships and Users tables. Similarly, when you try to log in, your username and password are checked against these tables.
To force the ASP.NET run time to use forms-based authentication (which the configured Membership provider uses under the hood), you need to set the mode attribute of the authentication element to Forms in the Web.config file:
<authentication mode=”Forms” />
Other options for the mode attribute include Windows (where security is handled by Windows itself) and None, which disables security altogether. In the remainder of this book, the Forms option is used exclusively because it's the most common solution for Internet-facing web applications.
The Remember Me Next Time option of the Login control is more forgetful than you may think. When you check this option, you are logged in automatically the next time you visit the site, provided your authentication cookie hasn't expired. The first time you log in, the server sets a cookie that is saved for future sessions. However, this cookie expires after 30 minutes, which means a user returning to the site after that period needs to reauthenticate. To extend the period that users remain logged in, you need to set the timeout attribute of the <forms> element (which itself is a direct child of the <authentication> element) in Web.config. The timeout takes an integer value representing the timeout period in minutes. The following code sets the timeout to 24 hours (1440 minutes):
<authentication mode=”Forms”>
<forms timeout=”1440” />
</authentication>
Lower timeout values are generally considered safer because they don't provide unlimited or long-lasting access, but longer timeout values are more user friendly because users don't need to reauthenticate every time they visit the site.
If you hadn't reconfigured the providers to use the Planet Wrox database, .NET would have created a new one for you.
Now that you have seen how the login controls work in conjunction with the auto-generated SQL Server Express database, it's time to look at the controls in the Login category of the Toolbox in more detail.
The Login Controls
ASP.NET 4.5 ships with seven login controls, each serving a distinct purpose. Figure 16.8 shows the Toolbox with the seven login controls (the pointer is present in all Toolbox categories and is not a login control).
Figure 16.8
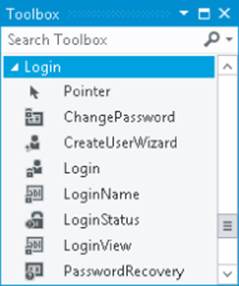
In the sections that follow, each of these controls is explained in more detail.
Login
As you saw in the previous exercise, the Login control enables a user to log in to the site. Under the hood, the control talks to the configured Membership provider through the application services to see if the username and password represent a valid user in the system. If the user is validated, a cookie is issued that is sent to the user's browser. On subsequent requests, the browser resubmits the cookie to the server so the system knows it's still dealing with a valid user. The different settings for the Membership provider are all configured in the <membership /> element of the Web.config file. You learn more about this element later in this chapter.
To create a fully functional Login page, you need only the following control declaration:
<asp:Login ID=”Login1” runat=”server” />
However, in most situations you want to enhance the appearance and behavior of the control by setting one or more of the properties, shown in the following table.
|
Property |
Description |
|
DestinationPageUrl |
Defines the URL the user is sent to after a successful login attempt. When you leave this property empty, the value is taken from the defaultUrl attribute of the <forms> element in Web.config which defaults to Default.aspx. |
|
CreateUserText |
Controls the text that is displayed to invite users to sign up for a new account. If you leave this property empty, the sign up link is not shown. |
|
CreateUserUrl |
Controls the URL where users are taken to sign up for a new account. |
|
DisplayRememberMe |
Specifies whether the control displays the Remember Me option. When set to False, the check box for this option is not shown. |
|
RememberMeSet |
Specifies whether the Remember Me option is initially checked. |
|
PasswordRecoveryText |
Controls the text of a link that is displayed to tell users they can reset or recover their password. If you leave this property empty, the link is not shown. |
|
PasswordRecoveryUrl |
Specifies the URL where users are taken to get their (new) password. |
|
VisibleWhenLoggedIn |
Determines whether the control is visible when the current user is logged in. True by default. |
The authentication mechanism of ASP.NET by default assumes you have a page called Login.aspx in the root of your site that is used to let users log in. To be functional, the minimum that this page requires is a Login control. If you want to use a different page, you can specify its path in the<forms /> element under <authentication /> like this:
<authentication mode=”Forms”>
<forms loginUrl=”∼/Account/MyLoginPage.aspx” />
</authentication>
With this configuration, you tell the ASP.NET run time to load the MyLoginPage.aspx page from the Account folder in the site's root whenever a user needs to present her credentials. Note that on the Login page (configured in the loginUrl), the VisibleWhenLoggedIn property of the Login control has no effect. On the configured Login page, the Login control is always visible. If you want to hide it you can use a LoginView control, as you see in a later exercise.
In addition to these properties, the Login control has a range of Text properties, such as LoginButtonText, RememberMeText, TitleText, and UserNameLabelText, that are used to set the text that appears in the control and in its various child controls like the Button and Label controls that make up the user interface.
Just as with the data-bound controls, the login controls have numerous style properties that enable you to tweak their appearance. You're encouraged to check out the Styles category of the Properties Grid for the controls to see how you can set the various styling options. Remember, just as with the data-bound controls, you can move much of the styling information to skin and CSS files.
The Login control also exposes a few events that you typically don't need to handle, but that can come in handy from time to time. For example, the LoggedIn event fires right after the user has logged in and is a good place to send the user to another page dynamically if the DestinationPageUrl is not flexible enough.
LoginView
The LoginView is a handy control that lets you display different data to different users. It enables you to differentiate between anonymous and logged-in users, and you can even differentiate between users in different roles. The LoginView is template-driven and as such lets you define different templates that are shown to different users. The following table describes the two main templates and the special RoleGroups element.
|
Template |
Description |
|
AnonymousTemplate |
The content in this template is shown to unauthenticated users only. |
|
LoggedInTemplate |
The content in this template is shown to logged-in users only. This template is mutually exclusive with the AnonymousTemplate. Only one of the two can be visible at any time. |
|
RoleGroups |
This control can contain one or more RoleGroup elements that, in turn, contain a ContentTemplate element that defines the content for the specified role. The role or roles that are allowed to see the content are defined in the Roles attribute, which takes a comma-separated list of roles. The RoleGroups element is mutually exclusive with the LoggedInTemplate. That means that if a user is a member of one of the roles for the RoleGroup, the content in the LoggedInTemplate is not visible. Additionally, only content for the first RoleGroup that matches the user's roles is shown. |
The LoginView control itself doesn't output any markup other than the content you define in the various child elements of the control, which means you can easily embed it between a pair of HTML tags like <h1>and <li> to create customized headings or list items.
The following code snippet shows a LoginView control that defines content for three different users: anonymous visitors to the site, logged-in users, and users that have logged in and are members of the Managers role:
<asp:LoginView ID=”LoginView1” runat=”server”>
<AnonymousTemplate>
Hi there visitor. Would you be interested in signing up for an account?
</AnonymousTemplate>
<LoggedInTemplate>
Hi there visitor and welcome back to PlanetWrox.com.
</LoggedInTemplate>
<RoleGroups>
<asp:RoleGroup Roles=”Managers”>
<ContentTemplate>
Hi there manager. You can proceed to the Management section.
</ContentTemplate>
</asp:RoleGroup>
</RoleGroups>
</asp:LoginView>
You see how to create and configure roles later in this chapter.
LoginStatus
As demonstrated in the previous Try It Out exercise, the LoginStatus control provides information about the current status of the user. It provides a Login link when the user is not authenticated and a Logout link when the user is already logged in. You control the actual text being displayed by setting the LoginText and LogoutText properties. Alternatively, you can set the LoginImageUrl and LogoutImageUrl properties to display an image instead of text. When you set both an image and a text, the image is shown and the text is used as the alternative text for the image. Finally, you can set the LogoutAction property to determine whether the current page refreshes if the user logs out, or whether the user is taken to another page after logging out. You determine this destination page by setting the LogoutPageUrl.
Besides these properties, the control is capable of raising two events, LoggingOut and LoggedOut, which fire right before and after the user is logged out.
LoginName
LoginName is an extremely simple control. All it does is display the name of the logged-in user. To embed the user's name in some text, such as You are logged in as Imar, you can use the FormatString property. If you include {0} in this format string, it will be replaced with the user's name.
You see how this works in the next exercise, which has you modify the login and master pages for the site so they display relevant information about the user.
Try It Out: Working with the Login Controls
In this Try It Out, you hide the Login control on the Login.aspx page when the user is already logged in and display a message instead. Additionally, you add text to the footer of the page that displays the name of the user together with an option to log out again.
1. Open Login.aspx and switch to Design View. From the Login category of the Toolbox, drag a new LoginView control on top of the Login control so it's placed right above it in the page.
2. Open the Smart Tasks panel of the LoginView control and make sure that AnonymousTemplate is selected in the Views drop-down list, visible in Figure 16.9.
Figure 16.9
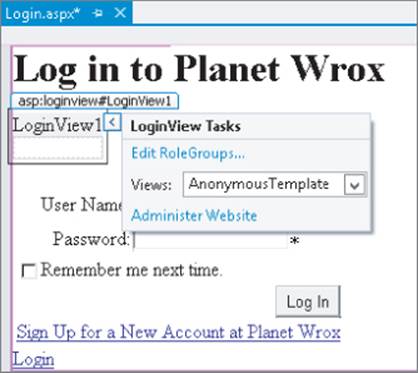
Any content you put in the control is placed in the AnonymousTemplate area, because that is now the active template for the control in Design View.
3. Click the Login control once to select it and then press Ctrl+X to cut it to the clipboard. Click inside the small white rectangle that represents the LoginView to position your cursor in the control, and then press Ctrl+V to paste the Login control into your LoginView.
4. Open the Smart Tasks panel of the LoginView again and switch to the LoggedInTemplate using the Views drop-down list. Click inside the small white rectangle of the control again and type the text You are already logged in.
5. Switch to Markup View and look at the code. The Login control should be placed inside the AnonymousTemplate, and the text you typed should be displayed within the LoggedInTemplate tags:
<asp:LoginView ID=”LoginView1” runat=”server”>
<AnonymousTemplate>
<asp:Login ID=”Login1” runat=”server” CreateUserUrl=”SignUp.aspx”
CreateUserText=”Sign Up for a New Account at Planet Wrox”>
</asp:Login>
</AnonymousTemplate>
<LoggedInTemplate>
You are already logged in.
</LoggedInTemplate>
</asp:LoginView>
6. Save and close the page because you're done with it for now.
7. Open the master page Frontend.master in Markup View and locate the <footer> element at the bottom of the page. Remove the text Footer Goes Here and replace it with a new LoginName control by dragging it from the Toolbox into the <footer> element. Set its FormatString property to Logged in as {0} by typing in the code directly:
<asp:LoginName ID=”LoginName1” runat=”server” FormatString=”Logged in as {0}” />
8. From the Toolbox, drag a new LoginView control and drop it below the LoginName control, but still in the <footer> element. Switch to Design View, and on the Smart Tasks panel of the LoginView, choose LoggedInTemplate from the Views drop-down list. Then in the white rectangle for the active LoggedInTemplate, drag and drop a new LoginStatus control.
9. Switch to Markup View again and wrap the code for the LoginStatus in a pair of parentheses. You should end up with the following code:
<footer>
<asp:LoginName ID=”LoginName1” runat=”server” FormatString=”Logged in as {0}” />
<asp:LoginView ID=”LoginView1” runat=”server”>
<LoggedInTemplate>
(<asp:LoginStatus ID=”LoginStatus1” runat=”server” />)
</LoggedInTemplate>
</asp:LoginView>
</footer>
10. Save all your changes and request Login.aspx in your browser. Log in with the account and password you created in a previous exercise (you may need to log out first by clicking the Logout link). If you don't recall the username and password, simply click the Sign Up link to create a new account. Note that as soon as you are logged in, the footer displays the text visible in Figure 16.10.
Figure 16.10

Click the Login item in the Menu or TreeView to go to the Login page. Instead of the Login control you should now see a message indicating that you are already logged in.
12. Click the Logout link in the footer at the bottom of the page. The page refreshes and displays the Login control again. Additionally, the text from the footer has now disappeared.
How It Works
You started by adding a LoginView to the Login page to wrap the Login control and a text message. The Login control is shown when the user is not logged in, whereas the text is displayed for logged-in users only.
The code in the footer of the master page contains a LoginName control that displays the name of the user that is logged in. It doesn't display anything for anonymous users. To control the text being displayed, you use the FormatString property:
<asp:LoginName ID=”LoginName1” runat=”server” FormatString=”Logged in as {0}” />
At run time, the {0} is replaced with the user's name.
By default, the LoginStatus you added displays a link to enable users to log in and log out. Because the Menu or the TreeView already contains a link to the Login page, the footer uses a LoginView again to display the Logout text only when the user is currently logged in. If you want to add a Login link as well, you can extend the LoginView with an anonymous template and an additional LoginStatus or remove the entire LoginView so the LoginStatus is visible to all users.
In addition to the controls you have seen that enable a user to log in and that use the current user's log-in status to show or hide relevant content, the Login category of the Toolbox contains three more controls that enable users to sign up for a new account on the site, to change an existing password, and to recover a lost password. These controls are discussed next.
CreateUserWizard
You briefly saw CreateUserWizard at work in an earlier exercise. But the control has a lot more to offer than the standard behavior you saw in that exercise.
To start with, the control has a long list of Text properties, such as CancelButtonText, CompleteSuccessText, UserNameLabelText, and CreateUserButtonText, that affect the text used in the control. All properties have good (English) defaults, but you can change them if they don't suit your needs.
The control has a bunch of properties that end in ImageUrl, such as CreateUserButtonImageUrl. These properties enable you to define images for various user actions instead of the default buttons that the control generates. If you set any of these properties to a valid ImageUrl, you also need to set the corresponding ButtonType. For example, to change the Create User button to an image, you need to set the CreateUserButtonImageUrl to a valid image and set CreateUserButtonType to Image.
The default value for the ButtonType is Button, which renders standard buttons by default. You can also set the ButtonType to Link to have them rendered as standard LinkButton controls. The associated text properties introduced at the beginning of this section are displayed on the buttons and the links.
Additionally, the control exposes a number of useful properties that you can set to change its behavior and appearance, shown in the following table.
|
Property |
Description |
|
ContinueDestinationPageUrl |
Defines the page where users are taken when they click Continue after signing up. |
|
DisableCreatedUser |
Determines whether or not the user is marked as disabled when the account is created. When set to True, users cannot log in to the site until their account has been enabled. You see how to activate and deactivate user accounts manually later. Defaults to False. |
|
LoginCreatedUser |
Determines whether or not the user is logged in automatically after the account has been created. Defaults to True. |
|
RequireEmail |
Determines whether or not the control asks the user for an e-mail address. Defaults to True. |
|
MailDefinition |
Contains a number of subproperties that enable you to define the (optional) e-mail that gets sent to users after they sign up. |
You may notice that the control doesn't have any properties to change the password policy that requires users to type a password of at least six characters. Because multiple controls need access to these settings, you need to configure them on the underlying provider. In the section “Configuring Your Web Application” later in this chapter, you see how this works.
The CreateUserWizard control is able to send a confirmation e-mail to users to inform them their new account was created successfully. This e-mail message can also serve as a reminder of their usernames and passwords. In the following exercise, you see how to configure the MailDefinitionelement so the CreateUserWizard sends an e-mail message to new users to confirm their account, and sends them their username and password for future reference.
Try It Out Sending Confirmation E-Mail with CreateUserWizard
For this exercise to work, you need to have configured the <system.net> element of the Web.config file with a valid mail server name or local pickup folder. Refer to Chapter 9 if you don't have these settings and don't know how to configure them.
1. Add a new Text File to the App_Data folder and call it SignUpConfirmation.txt.
2. Add the following text to the file and then save and close it:
Hi <% UserName %>,
Thank you for signing up for a new account at www.PlanetWrox.com.
To log in to the site, use the following details:
User name: <% UserName %>
Your password: <% Password %>
We look forward to your contributions.
The Planet Wrox Team
Take care when typing the UserName and Password placeholders. They are wrapped in a pair of server-side tags (<% and %>), which are used to give special meaning to these placeholders.
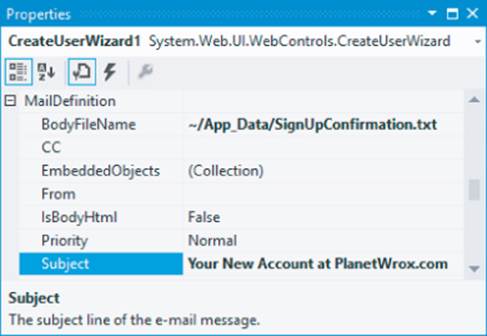
3. Open SignUp.aspx and on the Properties Grid of the CreateUserWizard control, locate the MailDefinition property and expand it. Click the BodyFileName property, click the ellipsis to browse for a file, and then select SignUpConfirmation.txt, which you created in the App_Data folder.
4. Set the Subject property to Your New Account at PlanetWrox.com. When you're done, the Properties Grid should look like Figure 16.11.
Figure 16.11
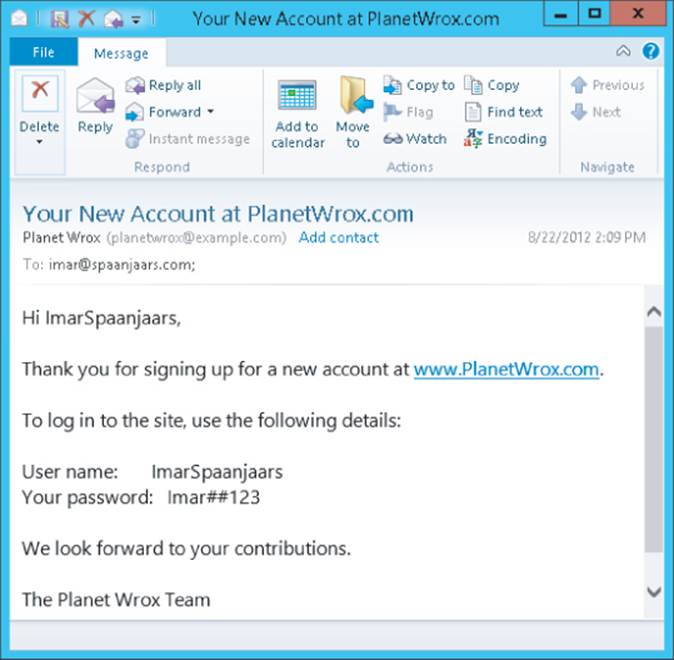
5. Save all changes and request SignUp.aspx in your browser. Enter the required details for a new account and click Create User to sign up for an account. If you get an error about specifying a From address, make sure you assigned a valid e-mail address to the from attribute in theWeb.config file:
<smtp deliveryMethod=”SpecifiedPickupDirectory” from=”planetwrox@example.com”>
Refer to Chapter 9 to see how to add this attribute. Make sure you enter a valid e-mail address or the mail server may still reject it.
6. After a while, you should receive an e-mail that contains the welcome text you typed in step 2. Figure 16.12 shows the message with the UserName and Password placeholders replaced with the details that you entered in step 5.
Figure 16.12
How It Works
The CreateUserWizard comes with built-in functionality to send a confirmation message to the user. It doesn't send the message until you specify the <MailDefinition> element. You use the BodyFileName property to point to a text file or an HTML file that is used as the e-mail's body.
Within this body, you can use the special placeholders <% UserName %> and <% Password %>, which are replaced automatically with the actual username and password that the user entered in the signup form.
Note
It would be a nice addition if you could check whether a given user name already existed before the user tried to submit the form. You can use the techniques from previous chapters to accomplish this easily. For example, you could use a page method at the server to check whether a given name was already taken. You could then call this page method with some JavaScript as soon as the user moves away from the User Name field. For a step-by-step guide of this solution, take a look at this article on my website: http://bit.ly/Ldgr2j.
The PasswordRecovery control, discussed next, also supports a custom mail body and enables you to send the message manually in a handler for the SendingMail event.
PasswordRecovery
The PasswordRecovery control enables users to retrieve their existing passwords (when the system supports it) or to get a new auto-generated password. In both cases, the password is sent to the e-mail address that the user entered when signing up for an account.
Most of the properties of the PasswordRecovery control should be familiar by now. It has a number of Text properties, such as GeneralFailureText (shown when the password could not be recovered) and SuccessText, that enable you to set the text that is displayed by the control. It also has properties that end with ButtonType, ButtonText, and ButtonImageUrl, which enable you to change the look and behavior of the various action buttons of the control. You set the SuccessPageUrl to a page in your site if you want to send the user to another page when password recovery succeeds.
As with the CreateUserWizard, the PasswordRecovery control also has a MailDefinition element that can point to a file that you want to send as the mail body. You can use the same placeholders for the username and password to customize the message. If you leave out the MailDefinition, the control uses a default mail body, as you see in the next exercise.
ChangePassword
The ChangePassword control enables existing and logged-in users to change their passwords. It has a host of properties to change things like text, error messages, and buttons, similar to the CreateUserWizard and PasswordRecovery controls. It also has a MailDefinition element that enables you to send a confirmation of the new password to the user's e-mail address. You see how to use this control in the next exercise.
Try It Out: Implementing the Password Functionality
In this Try It Out, you add PasswordRecovery and ChangePassword controls to the website to enable users to change and recover their passwords. Because changing a password makes sense only for logged-in users, you add the ChangePassword control to its own page. In the next chapter, you protect this page so only authenticated users can access it.
1. Open up Login.aspx in Markup View and locate the closing </asp:Login> tag inside the <AnonymousTemplate>. Right after it, type two <br /> elements (use the br code snippet and press Tab to complete the element) to create some room below the Login control.
2. Drag a PasswordRecovery control from the Toolbox into the code editor, right after the two <br /> elements you added in step 1.
3. Between the opening and closing tags of the PasswordRecovery control, add a <MailDefinition> element and then set the Subject of the e-mail to Your New Password for PlanetWrox.com. Your code should now look like this:
</asp:Login>
<br />
<br />
<asp:PasswordRecovery ID=”PasswordRecovery1” runat=”server”>
<MailDefinition Subject=”Your New Password for PlanetWrox.com”></MailDefinition>
</asp:PasswordRecovery>
4. Save your changes and close the file.
5. In the root of your site, create a new Web Form based on your custom template and call it MyProfile.aspx. Set the Title of the page to My Profile.
6. Make sure you're in Markup View and in the cpMainContent content placeholder, create an <h1> element (type h1 followed by the Tab key) with its contents set to My Profile. Right below the heading, type some text that explains that the My Profile page is used for things like changing passwords. Wrap the text in a pair of <p> tags to denote a paragraph.
7. Drag a ChangePassword control from the Toolbox and drop it after the closing </p> tag. You should end up with something like this:
<asp:Content ID=”Content2” ContentPlaceHolderID=”cpMainContent” runat=”Server”>
<h1>My Profile</h1>
<p>The My Profile page allows you to make changes to your personal profile.
For now, all you can do is change your password below.</p>
<asp:ChangePassword ID=”ChangePassword1” runat=”server”></asp:ChangePassword>
8. Open the Web.sitemap file from the Solution Explorer and add a new element in the About section. Let the url point to ∼/MyProfile.aspx and set the title and description to My Profile. You should end up with this code:
<siteMapNode url=”∼/About/Default.aspx” title=”About”
description=”About this site”>
<siteMapNode url=”∼/About/Contact.aspx” title=”Contact Us”
description=”Contact Us” />
<siteMapNode url=”∼/About/AboutUs.aspx” title=”About Us”
description=”About Us” />
<siteMapNode url=”∼/MyProfile.aspx” title=”My Profile”
description=”My Profile” />
</siteMapNode>
9. Save all changes and close all open files. Right-click Login.aspx in the Solution Explorer and choose View in Browser. Below the Login control, you should now see the PasswordRecovery control, visible in Figure 16.13.
Figure 16.13
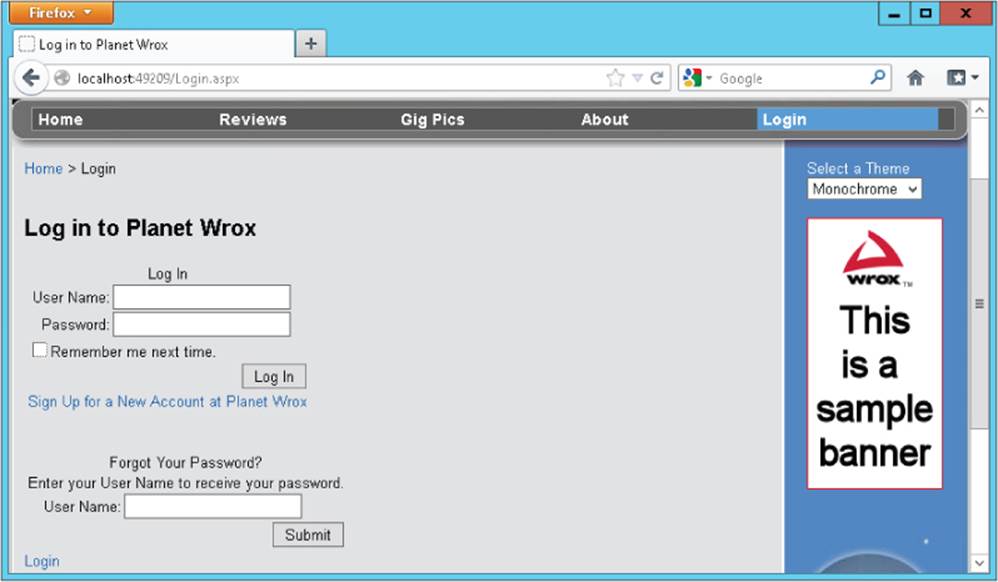
Note that if you were already logged in, you need to click the Logout link first.
10. Enter your username in the PasswordRecovery control and click the Submit button. You should get an e-mail message with your new, auto-generated password.
11. Use this new password to log in to the site. When you're logged in, choose About ⇒ My Profile from the Menu or the TreeView. The ChangePassword control visible in Figure 16.14 appears.
Figure 16.14
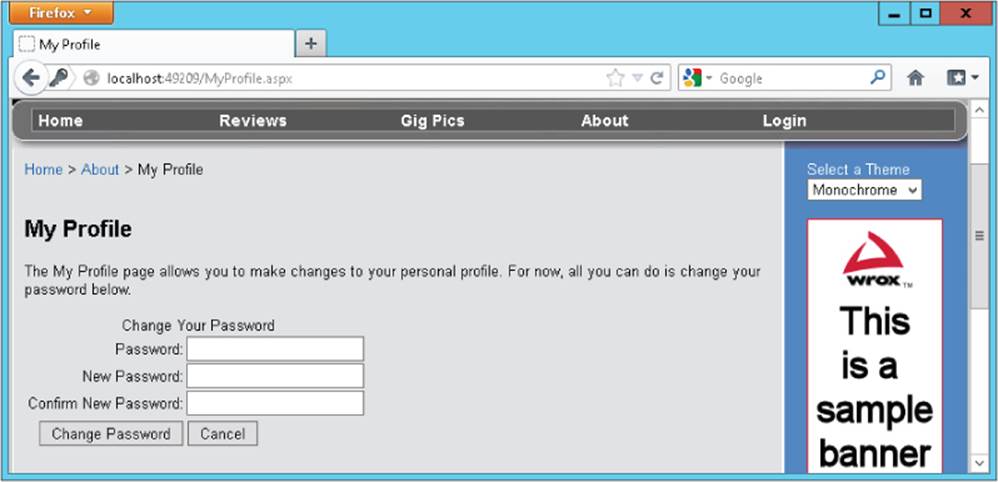
12. Enter the auto-generated password that was sent to you by e-mail, type a new password that is easier to remember, and then retype the same password. Finally, click Change Password. From now on, you can log in to the site using your new password.
How It Works
By default, your passwords are stored in a hashed format in the database, which means they cannot be retrieved. Hashing is an irreversible process that creates a unique fingerprint of your data. Because it's irreversible, there is no way to recreate the password from the hash, which makes it safer to store in a database. When you log in, the password you enter is also hashed and then the two hashes are compared to see if you are allowed to enter. Because the original password cannot be retrieved, the PasswordRecovery control generates a new password for you. It then sends this password to the e-mail address that is associated with the username you entered. As the mail body, it uses a standard template that contains the username and the new password. To customize the mail body, you can point the BodyFileName of the MailDefinition to a text file that contains placeholders for the username and password, just as you saw how to do with the CreateUserWizard.
You may have noticed that the login controls use a couple of defaults that you haven't been able to change so far. For example, you need to enter a password with a minimum length of six characters. You can change these settings for the entire application through the Web.config file.
Configuring Your Web Application
When you added the Universal Providers, NuGet added a number of configuration settings for the Membership, Roles, Profile, and Session state providers. Here's the code for the Membership provider:
<membership defaultProvider=”DefaultMembershipProvider”>
<providers>
<add name=”DefaultMembershipProvider”
type=”System.Web.Providers.DefaultMembershipProvider,
System.Web.Providers, Version=1.0.0.0, Culture=neutral,
PublicKeyToken=31bf3856ad364e35”
connectionStringName=”PlanetWroxConnectionString1”
enablePasswordRetrieval=”false” enablePasswordReset=”true”
requiresQuestionAndAnswer=”false” requiresUniqueEmail=”false”
maxInvalidPasswordAttempts=”5” minRequiredPasswordLength=”6”
minRequiredNonalphanumericCharacters=”0” passwordAttemptWindow=”10”
applicationName=”/”
/>
</providers>
</membership>
This provider configuration features a number of interesting attributes, which are described in the following table. The default values listed in the description column are applied when you don't specify the associated attribute in the configuration file.
|
Attribute |
Description |
|
connectionStringName |
Points to the name of the connection string for the application. |
|
enablePasswordRetrieval |
Determines whether users are able to retrieve their current password. This option cannot be set when passwordFormat is Hashed (see passwordFormat). Defaults to false. |
|
enablePasswordReset |
Determines whether a user is able to request a new password. Defaults to true. |
|
requiresQuestionAndAnswer |
Determines whether controls like CreateUserWizard and PasswordRecovery have the user enter a security question and answer. Defaults to true. |
|
applicationName |
Provides the unique name of the application. Defaults to a forward slash (/), but you can change it to support multiple websites using the same database with different accounts. |
|
requiresUniqueEmail |
Determines whether the system allows duplicate e-mail addresses for user accounts. When set to true, each user must provide a unique username and a unique e-mail address. Defaults to true. |
|
passwordFormat |
Determines the way passwords are stored in the database. It supports the following formats:Clear — Passwords are stored as plain text.Encrypted — Passwords are encrypted in a reversible format that enables the system to retrieve the clear text representation of the password again.Hashed — Passwords are encrypted with an irreversible, one-way algorithm. When the passwordFormat is Hashed, users cannot retrieve their original passwords anymore. They can only request a new, auto-generated password. Defaults to Hashed. |
|
maxInvalidPasswordAttempts |
Specifies the number of times a user can enter an invalid password or invalid security answer before their account is locked. Defaults to 5. |
|
minRequiredPasswordLength |
Determines the minimum length of the password. Defaults to 7. |
|
minRequiredNonalphanumericCharacters |
Determines the minimum number of non-alphanumeric characters that must be included in the password. Defaults to 1. |
|
passwordAttemptWindow |
Determines the time frame in minutes during which invalid password attempts are counted. Defaults to 10. |
|
passwordStrengthRegularExpression |
Enables you to specify a custom regular expression to enforce a strong password. |
Check out the complete list of configuration settings for Membership on the MSDN website at http://bit.ly/RFxQZT.
In the following Try It Out, you see what it takes to reconfigure the Membership provider for the Planet Wrox application by changing some of these attributes.
Try It Out: Configuring Membership
In this short exercise, you see how to override the default behavior for the Membership provider in the Planet Wrox site to require users to enter a longer and stronger password.
1. Open Web.config and locate the <membership> element.
2. Change minRequiredPasswordLength to 7.
3. Change minRequiredNonalphanumericCharacters to 1. When you're done, your configuration settings should look like this:
<membership defaultProvider=”DefaultMembershipProvider”>
<providers>
<add name=”DefaultMembershipProvider”
type=”System.Web.Providers.DefaultMembershipProvider,
System.Web.Providers, Version=1.0.0.0, Culture=neutral,
PublicKeyToken=31bf3856ad364e35”
connectionStringName=”PlanetWroxConnectionString1”
enablePasswordRetrieval=”false” enablePasswordReset=”true”
requiresQuestionAndAnswer=”false” requiresUniqueEmail=”false”
maxInvalidPasswordAttempts=”5” minRequiredPasswordLength=”7”
minRequiredNonalphanumericCharacters=”1” passwordAttemptWindow=”10”
applicationName=”/”
/>
</providers>
</membership>
4. Save all your changes and request SignUp.aspx in the browser.
5. Fill in the form, but for both password fields, type something short like pass.
6. Click the Create User button. Note that the control now forces you to enter a password with a minimum length of seven characters that contains at least one non-alphanumeric character. It displays an appropriate error message below the control, shown in Figure 16.15. Note that numbers are not considered non-alphanumeric characters, so you need to make sure your password contains at least one character like # or $ or *. For example, Pa55word is not a valid password, but Pass##Word will be accepted. Also note that the password is case sensitive.
Figure 16.15
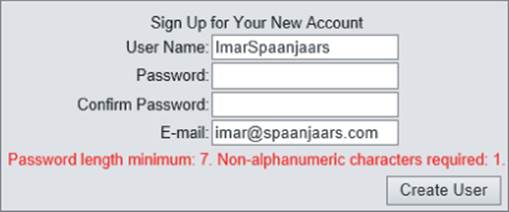
7. Enter a password of at least seven characters with at least one non-alphanumeric character like # or % and click the Create User button again. This time your password is accepted and the account is created.
How It Works
The CreateUserWizard uses the configured Membership provider under the hood to validate the data and create the user. The provider in turn consults the Web.config file for the configuration information such as the minimum password length. When you try to create the user, the provider enforces the rules set in Web.config and cancels the user creation process as soon as one of the rules is not fulfilled.
Having the configuration information in Web.config is especially useful when you deploy your application to a different server that uses a different database, because all you need to do is change the settings in this file. Chapter 19 and Appendix B show you how to do this.
So far, you have seen how to let users sign up for an account so they can log in. But how can you differentiate between the different users in the system? How can you block access to specific folders such as the Management folder for unauthorized users? You do this with the Role Manager, another application service that ships with ASP.NET.
The Role Manager
Although it's nice that your users can now sign up and log in to your site, it would be a lot more useful if you could differentiate among your users. That would enable you to grant access rights to one or just a few users to access the Management folder so only they can change your reviews and genres. With the Role Manager that ships with ASP.NET, this is pretty easy to do. The Role Manager enables you to assign users to different roles. You can then use these roles to open or block specific functionality in your site. For example, you can block access to the Management folder for all users except for those in the Managers role. Additionally, you can display different content based on the roles users have with the LoginView as you saw earlier.
The Role Manager Configuration
As with membership, the settings for the Role Manager are placed in Web.config files. The default settings added by NuGet when you installed the Universal Providers look like this:
<roleManager defaultProvider=”DefaultRoleProvider”>
<providers>
<add name=”DefaultRoleProvider”
type=”System.Web.Providers.DefaultRoleProvider, System.Web.Providers,
Version=1.0.0.0, Culture=neutral, PublicKeyToken=31bf3856ad364e35”
connectionStringName=”PlanetWroxConnectionString1”
applicationName=”/”
/>
</providers>
</roleManager>
The Role Manager is not enabled by default, and to enable it, you need to add an enabled=”true” attribute to the <roleManager /> element. In the next exercise, you see a way to enable the Role Manager through the Web Site Administration Tool (WSAT). Just like Membership, the Role Manager uses a provider under the hood.
Besides the settings shown here, the <roleManager /> element also has a few attributes you can configure. Most of them are related to how the cookies with the role information are created and stored. For most cases, the default configuration should be fine, but check out the complete list of configuration settings for the Role Manager on the MSDN website at http://bit.ly/LmtmB3 if you have the need to further configure the Role Manager.
With the Membership and Role Manager providers configured and the database created, it's time to manage the users and roles in your system. You have a few ways to accomplish that:
· Using the Web Site Administration Tool, generally referred to as the WSAT
· Using IIS (the Windows web server) on recent Windows editions (you see more about this in Chapter 19)
· Programmatically, using the Role Manager API (application programming interface)
Managing roles using the Role Manager API is beyond the scope of this book. If you want to learn more about it, get a copy of Wrox's Professional ASP.NET 4.5 in C# and VB (ISBN: 978-1-118-31182-0).
The Web Site Administration Tool is used for a lot more than managing roles alone, and is discussed in detail in the next section. It is only available from your local machine as a menu shortcut in VS. As such, it's great for setting up the initial users and roles during development, but it isn't suitable for managing users in a production environment.
Managing Users with the WSAT
The WSAT ships with VS and is available from the Website menu. The tool is used for the following tasks:
· Managing users
· Managing roles
· Managing access rules — for example, to determine what user can access which files and folders
· Configuring application, mail, and debug settings
· Taking the site offline so users can't request any pages and get a friendly error message instead
Some of the changes you make with the WSAT are persisted in the Web.config file for the application. Other settings, like users and roles, are stored in the database for the configured provider.
In the next exercise you see how to start and use the WSAT. You see how to create a new role and a new user, and how to assign that user to the role.
Try It Out: Using the WSAT to Manage User Accounts and Roles
To protect your Management folder from users that are not authorized to access it, you need to create a role that is allowed to access this folder. After you have set up this role, you can grant all users in that role access to the folder while keeping all other users out. In this Try It Out, you learn how to create the Managers role and assign a user to it. In a later exercise, you see how to limit access to the Management folder to Managers only.
1. From within VS, choose Website ⊆ ASP.NET Configuration. Your browser opens and displays the Web Site Administration Tool, shown in Figure 16.16.
Figure 16.16
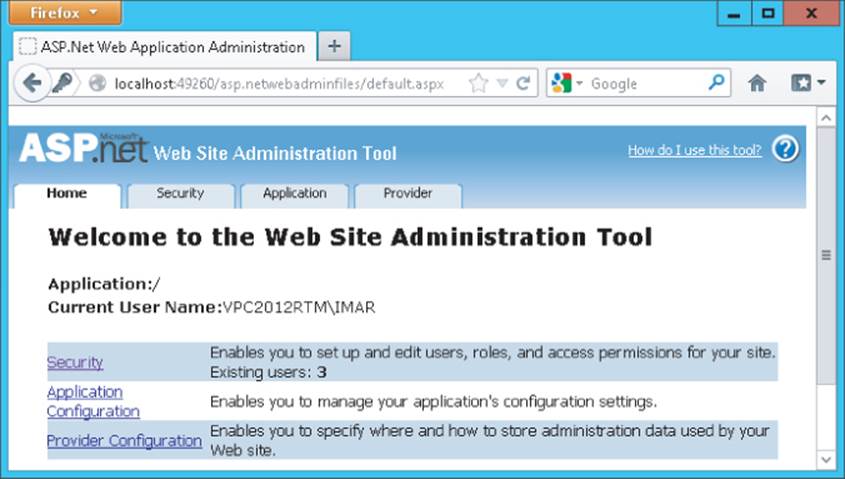
2. In the top-right corner, you see a Help link that takes you to a help file describing how you can use the tool. Right below the logo of the application, you see four tabs: Home, Security, Application, and Provider. The Home tab takes you back to the start page you see in Figure 16.16. You use the Application tab to configure different application settings, and the Provider tab enables you to reconfigure the chosen provider for the application. In this exercise, all that's important is the Security tab, so go ahead and click it. You should see the screen displayed in Figure 16.17.
Figure 16.17
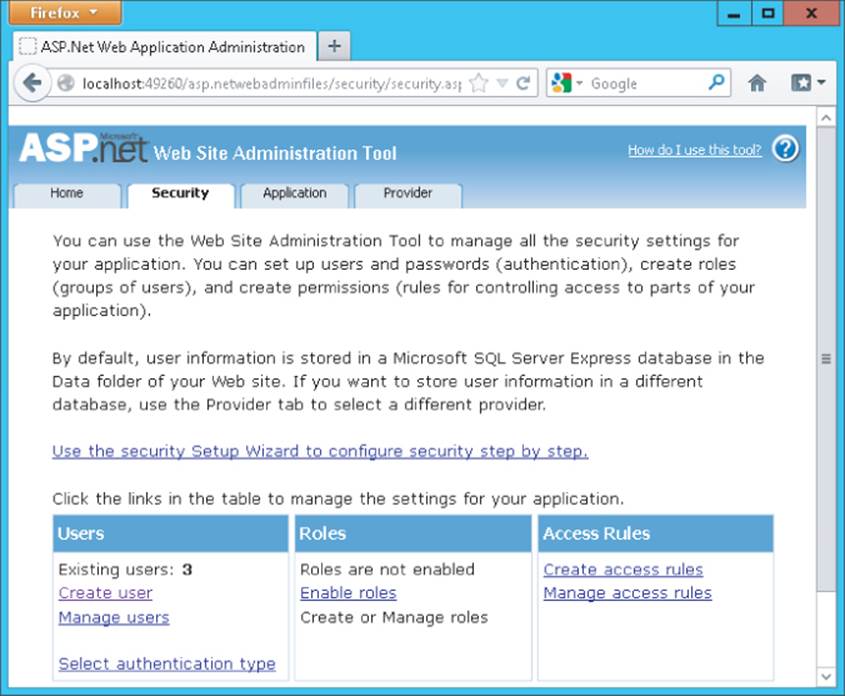
The bottom part of the screen is divided into three parts: Users, Roles, and Access Rules. You see how to use Users and Roles in this exercise. Access Rules is used to block or open up specific parts of your website to users or roles. You won't see how to use it in this chapter, but instead you learn how to change some of these settings in Web.config directly in a later exercise.
3. Make sure that under Users, you see the Create User and Manage Users links. If you don't see them, but you see a note about Windows authentication instead, click the Select Authentication Type link, select From the Internet, and click Done. Your screen should now look like Figure 16.17.
4. In the Roles section, click the Enable Roles link. The page reloads and now offers a link with the text Create or Manage Roles. Click that link to open the Create New Role page visible in Figure 16.18.
Figure 16.18
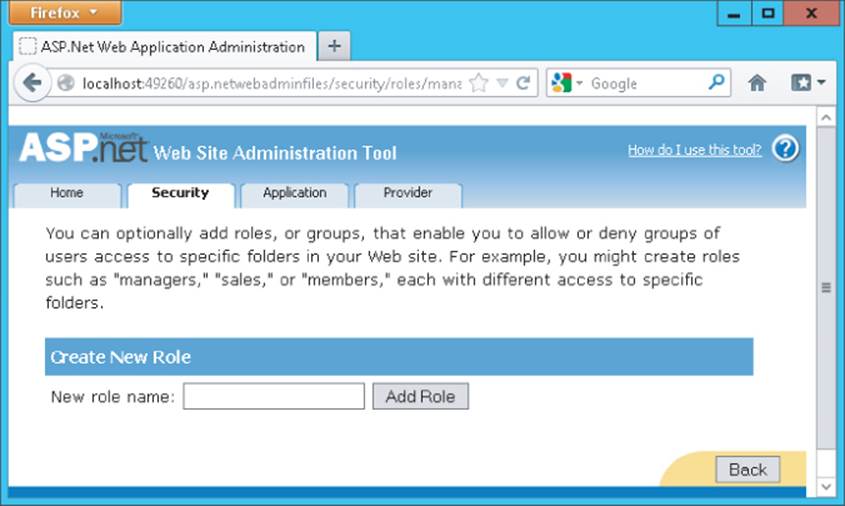
5. Enter Managers as the new role name and click the Add Role button. You should see the new role appear. Click the Back button at the bottom-right of the page to return to the main Security page.
6. Click the Create User link in the Users section. You're taken to a page that enables you to enter the details for a new user and assign that user to the Managers role at the same time. Type Manager as the username. As a password, enter something that meets the password rules you configured earlier. A password like Manager##123 will do. Enter your e-mail address and then check the check box for the Managers role name in the list of roles on the right.
7. Click Create User to add the user to the system and then click Continue on the confirmation page. At the bottom of the page, click the Back button so you reach the main Security page.
8. On the Security page, click the Manage Users link. You are taken to a page that shows a list of all available users in the system, shown in Figure 16.19.
Figure 16.19
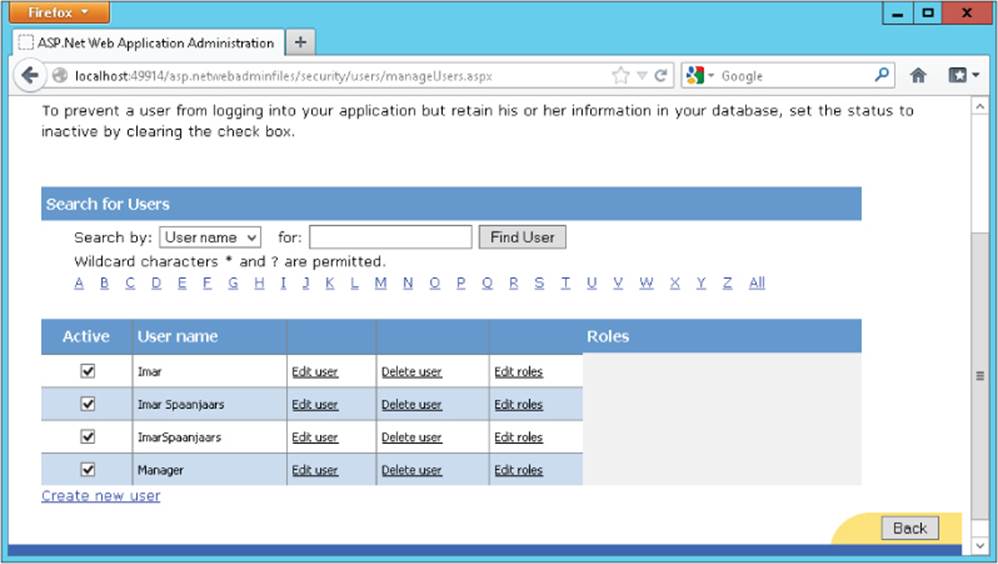
From here you can edit, enable, disable, or delete existing users. For example, if you previously set DisableCreatedUser to True in the CreateUserWizard, you can enable the user here by checking the check box in front of the username, visible in Figure 16.19. You can change the roles that are assigned to the user by clicking the Edit Roles link. Also, using the filter controls and the alphabet above the user list, you can quickly search for a specific user in case you're dealing with a lot of user accounts.
9. To see where your user and role ended up, close the browser and go back to VS. On the Solution Explorer, double-click the PlanetWrox.mdf database in the App_Data folder to open it in the Database Explorer window. Then expand the Tables node, right-click the Roles table, and choose Show Table Data. The role you created in step 5 should be listed. Open up some of the other tables such as Memberships and UsersInRoles and inspect the data they contain. In the first table, you should see the user account you created in steps 6 and 7, and the latter table contains a relationship between the new role and user account.
How It Works
Just like the login controls, the WSAT eventually talks to the provider you configured in the Web.config file. In the case of the Planet Wrox application, it means it talks to the DefaultMembershipProvider and the DefaultRoleProvider, which in turn talk to a SQL Server Express LocalDB database identified by your connection string. The users and roles you create are stored in various tables in the database. Users that you create using the WSAT end up in the exact same location as those created with the CreateUserWizard control. In fact, the WSAT uses a CreateUserWizardto create new user accounts. This means that any user you enter in the WSAT is able to log in using your standard Login.aspx page. In a later exercise, you use the Manager account you created in this exercise to log in to the site and access the Management folder.
To use the role you created in this exercise, you have a few options at your disposal. First, you can use the role name to block access to specific folders in your web application through settings in the Web.config file. Secondly, you can use the role in controls like the LoginView to present different content to different users. Finally, you can use the Role API to check whether the current user is in a specific role. This gives you fine control over the content or functionality you can offer to certain privileged users.
You see how to block access to the Management folder and modify the LoginView in the next section; using the Role API is discussed in a later exercise.
Configuring the Web Application to Work with Roles
On the Security page of the WSAT, you saw a section called Access Rules. This part of the tool enables you to block or open up resources in your site. It enables you to define rules such as “This folder is blocked for anyone except for users in the Managers role,” or “Anyone can access this file, except for the users in the Members role and the Joe account.” The tool is quite intuitive to use, so it isn't difficult to set up the different rules. However, it has one downside: it stores the security settings in separate Web.config files, one for each subfolder you configure.
This makes it somewhat difficult to get an overview of all the different security settings. Fortunately, ASP.NET also enables you to configure the same settings in the main Web.config using <location> elements. A <location> element has a path attribute that points to a file or folder you want to configure differently. You can use the <location> element for many (but not all) other settings from Web.config as well (for example, you could set the theme attribute of the <pages> element for the Management folder in the main Web.config). For the following exercise, you only set the child elements of <location> to those related to security.
Try It Out: Blocking Access to the Management Folder
Obviously, you don't want just anyone to mess with the reviews and genres that you have posted on your website. Therefore, it's important to block access to the Management folder to anyone except site managers assigned to the Managers role. In this exercise, you see how to modifyWeb.config to block the folder so only the user account you assigned to the Managers role earlier can access this folder and the files it contains.
1. Open the Web.config file at the root of the site. Scroll all the way down to the closing </configuration> tag and right before it type a <location> element. Add a path attribute to the element and set its value to Management. Note that IntelliSense kicks in to help you complete the element and find the attribute. Complete the configuration by entering the following settings:
<location path=”Management”>
<system.web>
<authorization>
<allow roles=”Managers” />
<deny users=”*” />
</authorization>
</system.web>
</location>
</configuration>
2. Save and close the Web.config file.
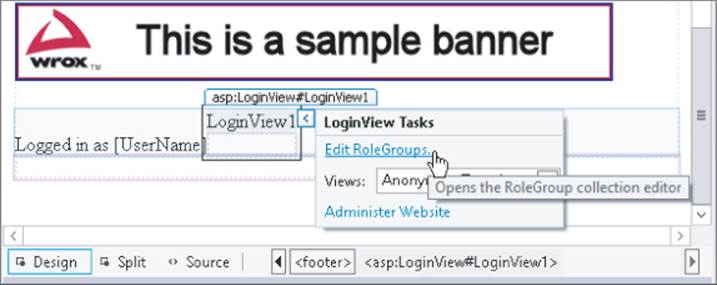
3. Open the main master page for the site (Frontend.master) in Design View and scroll down to the end of the file. Select the LoginView control and open its Smart Tasks panel. At the top of the panel, click the Edit RoleGroups link, shown in Figure 16.20.
Figure 16.20
4. In the dialog box that opens, click the Add button to insert a new RoleGroup and then set the Roles property of this group to Managers, as shown in Figure 16.21.
Figure 16.21
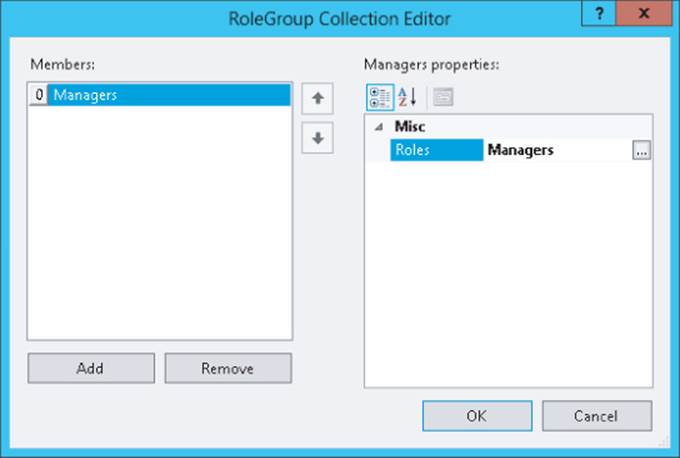
5. Click OK to insert the RoleGroup and return to Design View.
6. Still on the Smart Tasks panel of the LoginView, choose RoleGroup[0] - Managers from the Views drop-down list. This switches the current template of the control to the RoleGroup for Managers, so you can add content that is visible only to Managers.
7. From the Standard category of the Toolbox, drag a HyperLink control and drop it into the LoginView. Using the Properties Grid, set the Text property of this HyperLink to Manage Site and set the NavigateUrl to ∼/Management/Default.aspx. (You can use the URL picker for theHyperLink by clicking the small button with the ellipsis on it.) Switch to Markup View and after the closing tag of the HyperLink control, type the word or followed by a LoginStatus control that you can drag from the Toolbox, or copy from the existing code in the LoggedInTemplate. Finally, wrap the HyperLink and LoginStatus in a pair of parentheses just as you did in the LoggedInTemplate.
When you are ready, your LoginView should contain the following code:
<asp:LoginView ID=”LoginView1” runat=”server”>
...
</LoggedInTemplate>
<RoleGroups>
<asp:RoleGroup Roles=”Managers”>
<ContentTemplate>
(<asp:HyperLink ID=”HyperLink1” runat=”server”
NavigateUrl=”∼/Management/Default.aspx”>Manage Site</asp:HyperLink> or
<asp:LoginStatus ID=”LoginStatus2” runat=”server” />)
</ContentTemplate>
</asp:RoleGroup>
</RoleGroups>
...
8. Save all your changes and then request the homepage (Default.aspx) for the site in your browser. Verify that you are currently not logged in (check the footer of the page and, if necessary, click the Logout link).
9. Click the Login link on the Menu or TreeView and then log in with the Manager account you created earlier in this chapter. Make sure you don't check the Remember Me option. The page refreshes and now shows the Manage Site link in the footer of each page (see Figure 16.22).
Figure 16.22

If you don't see the Manage Site and Logout links in the footer region, close all browser windows, go back to the WSAT (using Website ⇒ ASP.NET Configuration in VS), and ensure the account you're using is assigned to the Managers role.
10. Click the Manage Site link to open the Management section of the website. Copy the current URL of the page from the browser's address bar to the clipboard (it should be something like http://localhost:49666/Management/Default.aspx). Click the Back button of your browser to go back to the homepage and then click the Logout button in the footer. Close all open browser windows and open a new instance of your browser again. (You can do this from the Windows Start menu or Start screen or you can right-click a page in VS and choose View in Browser.)
11. Paste the address you just copied in the address bar of the browser window and press Enter. Instead of going to an address like:
http://localhost:49666/Management/Default.aspx you are taken to the Login page:
http://localhost:49666/login.aspx?ReturnUrl=%2fManagement%2fDefault.aspx Note that the page you initially requested (Management/Default.aspx) is now appended to the query string. The forward slashes (/) in the address have been encoded to their URL-safe counterpart — %2f — automatically. Log in with your Manager account and you should see the Management section appear again. Next, log out again, log in with one of the other accounts, and then try to access the Management folder again. Because that account doesn't have permissions to access that folder, you're redirected to the Login page again.
How It Works
To see how this works, you need to look at a couple of things. First, look at the settings you added to the Web.config file to limit access to the Management folder:
<location path=”Management”>
<system.web>
<authorization>
<allow roles=”Managers” />
<deny users=”*” />
</authorization>
</system.web>
</location>
When the ASP.NET run time processes the request for a page, it checks the various configuration files to see whether the current user is allowed to access that resource. For requests to files in the Management folder, it encounters the rule set in the <location> element. It starts scanning the various allow and deny elements with roles or users attributes to specify the users or roles that are affected by the rule. The roles and users attributes take one or more role or user names, separated by a comma. As soon as a rule is found that matches, the scanning process is stopped and that rule is applied. If no rule is satisfied, access is granted! Therefore, it's important to end the rule with a deny rule to block all other users that haven't been granted access previously.
If you'd add an authorization element to the Web.config in the Management folder, the settings you apply there are looked at first because the security model works inside out. That is, it starts by scanning the Web.config file (if present) in the folder that contains the requested page. If it doesn't find the file there or it doesn't contain settings that block or grant access, it goes up in the folder hierarchy searching for configuration files with authorization elements. In the previous exercise, the run-time found the settings in the Web.config file in the root that were then applied to the folder.
When an unauthenticated user logs in, the first rule won't match because the anonymous user is not a member of the Managers role. The user is then denied access because of the deny rule that blocks all users, indicated by the asterisk (*).
After you logged in as a Manager and requested the same resource, the rule set was scanned again. The run time then found the allow element that grants access to the Managers role and immediately let you in. The final rule that blocks access to all other users was not even checked. In addition to specific roles or usernames and the asterisk (*) to refer to all users, you can also use the question mark (?) to refer to unauthenticated — or anonymous — users. So, for example, to let any logged-in user access the Reviews folder regardless of the role they are in, and block access to all other users, you can add the following <location> element to your configuration file:
<location path=”Reviews”>
<system.web>
<authorization>
<deny users=”?” />
</authorization>
</system.web>
</location>
This denies access to all users that are not logged in. Because of the default rule that grants access to the resource if the current user is not matched by an earlier rule, all logged-in users can successfully access files in the Reviews folder.
You can specify multiple roles or usernames in the roles and user attributes by separating them with a comma.
It's important to understand how the RoleGroups element of the LoginView works. Although you can specify multiple RoleGroup elements that may all apply to a certain user, only the first that matches is displayed. Consider a user called Alex assigned to the role WebMasters and to the role Managers and a web page with the following LoginView:
<asp:LoginView ID=”LoginView1” runat=”server”>
<RoleGroups>
<asp:RoleGroup Roles=”Managers”>
<ContentTemplate>
<!--Content for Managers here-->
</ContentTemplate>
</asp:RoleGroup>
<asp:RoleGroup Roles=”WebMasters”>
<ContentTemplate>
<!--Content for WebMasters here-->
</ContentTemplate>
</asp:RoleGroup>
</RoleGroups>
</asp:LoginView>
With this code, the user Alex only sees the content of the first RoleGroup, even though he is also assigned to the WebMasters role.
Programmatically Checking Roles
Although it's easy to use the LoginView control to change the content a user is allowed to see at run time, this isn't always enough. At times, you need programmatic control over the data you are presenting based on someone's role membership. You can access information about roles for the current user in a number of ways. First of all, you can access the IsInRole method of the User property from the current page or user control like this:
VB.NET
If User.IsInRole(”Managers”) Then
‘ This code runs for Managers only
End If
C#
if (User.IsInRole(”Managers”))
{
// This code runs for Managers only
}
Alternatively, you can access the Roles class that contains a number of static methods that you can access directly. The following code is functionally equivalent to the previous example:
VB.NET
If Roles.IsUserInRole(”Managers”) Then
‘ This code runs for Managers only
End If
C#
if (Roles.IsUserInRole(”Managers”))
{
// This code runs for Managers only
}
In addition to the IsUserInRole method, the Roles class contains a lot of other methods that enable you to work with roles programmatically. For example, you can create and delete roles, assign users to and remove users from roles, and you can get a list of users that are assigned to a certain role. For more information about the Roles API, check out the MSDN documentation at http://tinyurl.com/RolesAPI4-5 or pick up a copy of Professional ASP.NET 3.5 Security, Membership, and Role Management with C# and VB by Bilal Haidar (Wrox, ISBN: 978-0-470-37930-1). Although the book targets ASP.NET 3.5, you'll find that most topics discussed in that book still apply to ASP.NET 4.5.
In the following exercise, you learn how to modify the photo albums page so users logged in as Managers are able to delete pictures from a photo album. Other users won't be able to delete a picture because the Delete button will be hidden for them.
Try It Out Checking Roles with IsUserInRole at Run Time
This Try It Out uses a programmatic check for the user's role to hide or show the Delete button. Although you could recreate this example by using a LoginView with different templates and RoleGroups, this exercise serves as an example of programmatic role checking.
1. Open Default.aspx from the PhotoAlbums folder in Markup View and right after the closing tag of the ListView control, enter two HTML breaks (you can use the br snippet) followed by a HyperLink control (you can use the hyperlink snippet). Set its ID property to EditLink and itsText property to Edit Photo Album. You assign the NavigateUrl programmatically in the next step.
<br /><br />
<asp:HyperLink ID=”EditLink” runat=”server” Text=”Edit Photo Album” />
2. Switch to Design View, select the ListView control, open up its Properties Grid, and switch to the Events tab. Double-click DataBound to set up a handler for that event. Inside the handler that VS created, add the following code:
VB.NET
Protected Sub ListView1_DataBound(sender As Object,
e As EventArgs) Handles ListView1.DataBound
If Not String.IsNullOrEmpty(DropDownList1.SelectedValue) Then
EditLink.NavigateUrl = String.Format(
"∼/ManagePhotoAlbum.aspx?PhotoAlbumId={0}”, DropDownList1.SelectedValue)
EditLink.Visible = True
Else
EditLink.Visible = False
End If
End Sub
C#
protected void ListView1_DataBound(object sender, EventArgs e)
{
if (!string.IsNullOrEmpty(DropDownList1.SelectedValue))
{
EditLink.NavigateUrl = string.Format(
"∼/ManagePhotoAlbum.aspx?PhotoAlbumId={0}”, DropDownList1.SelectedValue);
EditLink.Visible = true;
}
else
{
EditLink.Visible = false;
}
}
3. Open up ManagePhotoAlbum.aspx in the root of the site and switch it to Design View. Select the ListView and open its Properties Grid. Switch to the Events tab and double-click the ItemCreated event to set up an event handler for that event.
4. If you're using C#, add an Imports/using statement for the System.Web.Security namespace at the top of the Code Behind file. A VB.NET website imports this namespace by default.
using System.Web.Security;
5. Add the following code to the event handler that VS created:
VB.NET
Protected Sub ListView1_ItemCreated(sender As Object,
e As ListViewItemEventArgs) Handles ListView1.ItemCreated
Select Case e.Item.ItemType
Case ListViewItemType.DataItem
Dim deleteButton As Button =
CType(e.Item.FindControl(”DeleteButton”), Button)
deleteButton.Visible = Roles.IsUserInRole(”Managers”)
End Select
End Sub
C#
protected void ListView1_ItemCreated(object sender, ListViewItemEventArgs e)
{
switch (e.Item.ItemType)
{
case ListViewItemType.DataItem:
Button deleteButton = (Button)e.Item.FindControl(”DeleteButton”);
deleteButton.Visible = Roles.IsUserInRole(”Managers”);
break;
}
}
6. Save all your changes and then request Default.aspx from the PhotoAlbums folder in your browser by right-clicking it and then choosing View in Browser. If you're not logged in as a manager, click the Login link in the main Menu or TreeView, log in with the Manager account you created earlier in this chapter, and return to the Gig Pics page.
7. Choose one of the photo albums from the drop-down list. The page reloads and shows the pictures in the photo album.
8. Click the Edit Photo Album link at the bottom of the page. Figure 16.23 shows how each picture is still associated with a Delete button that deletes the picture when clicked, just as you saw in Chapter 14. Click the Delete button for a picture to confirm that it still works.
Figure 16.23
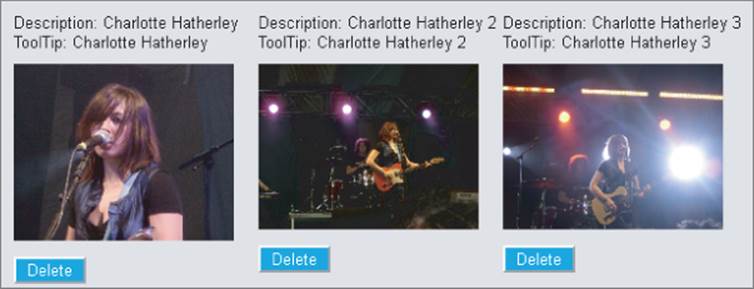
9. Click the Logout link in the footer again and go to the Login page. Log in with an account you created earlier in this chapter that is not a member of the Managers role. Go to the Gig Pics page again, select an album from the list and click the Edit Photo Album link. This time, you don't see Delete buttons, because the account you're logged in with is not assigned to the Managers role. In the next chapter you see how to modify this page once more to also let owners of an album delete their own pictures. In addition, you'll see how to hide the Edit Photo Album link for users without edit permissions.
How It Works
Most of the code in this exercise shouldn't be new to you. You have seen how you can delete items with the EntityDataSource and ListView controls. You also learned how to handle events such as ItemCreated (that fires for each item that is shown in the ListView control) and search for controls in an item using FindControl.
What's new in this example is the way you check whether the current user is a member of the Managers role:
VB.NET
Dim deleteButton As Button = CType(e.Item.FindControl(”DeleteButton”), Button)
deleteButton.Visible = Roles.IsUserInRole(”Managers”)
C#
Button deleteButton = (Button)e.Item.FindControl(”DeleteButton”);
deleteButton.Visible = Roles.IsUserInRole(”Managers”);
The IsUserInRole method returns a boolean that indicates whether the current user is a manager. When the method returns True, it means that the Visible property of the Button is set to True. When the method returns False, the button is hidden and the user is not able to delete pictures from the photo album.
Practical Security Tips
The following list provides some practical security tips:
· Although the concept of security is introduced quite late in the book, you shouldn't see it as an afterthought. To ensure that you create a solid and secure application, you should keep security in mind from the very early stages of your website development. Deciding whether you want to have areas that are accessible only to certain users, and whether you are going to force users into getting an account for your site before they get access is best done as early as possible. The later in the process you introduce these concepts, the more difficulties you'll face when integrating this functionality.
· Try to group resources like ASPX pages under folders that represent roles in your system. Take, for example, the Management folder in the Planet Wrox website. All pages related to the management of your site are packed together in a single folder, making it very easy to block the entire folder with a single <location> element in the Web.config file. When the files you want to protect are scattered throughout your website, you'll need more time to configure the application, and you'll end up with a cluttered view of the active security settings.
· When you create roles to differentiate between users on your website, try to limit the number of different roles your system has. You'll find that your system becomes much easier to manage with only a handful of logically grouped roles than with a large number of roles with only one or two users in them.
Summary
You can implement security in your ASP.NET site with several techniques, including Windows authentication (where the web server takes care of authentication) and Forms authentication, which is the de facto standard for many of today's ASP.NET websites.
In general, security encompasses three important concepts: identity, authentication, and authorization. Together, they determine who you are and what you are allowed to do.
The Membership service (that uses a Membership provider under the hood) enables you to create and manage users in a central database using handy controls such as CreateUserWizard, PasswordRecovery, and Login.
The Role Manager (which uses a Role provider under the hood) enables you to group users in various roles to which you can apply permissions. You can check roles programmatically, or use the LoginView to present different data depending on the role the user is assigned to.
Users and roles are managed with the WSAT, so you can assign user accounts to different roles, as you saw in this chapter. You can then open up or block specific resources in your website to members in a certain role using simple <location> elements in the Web.config file.
The various login controls enable you to customize the content that users get to see. In the next chapter you discover how to take this one level further, by creating dynamic pages that adapt based on the user that is accessing them.
Exercises
1. What's the difference between authentication and authorization?
2. Right now the Management folder is blocked for all users except those in the Managers role. What change do you need to make to the Web.config file if you also want to open up the folder for the user John and all people in the Editors role?
3. Imagine you have a website that features a Login page with a single Login control. What change to the Login control do you need to make to send users to MyProfile.aspx in the root after they log in?
4. What's the difference between the LoginView and LoginStatus controls? When would you use each one?
You can find answers to these exercises in Appendix A.
What You Learned in this Chapter
|
Application services |
A set of ASP.NET services that you can access from your website to handle tasks such as membership, role, and profile management |
|
Authentication |
The process of proving your identity to a system |
|
Authorization |
The process of determining the permissions a user has in a system |
|
Login controls |
The set of security controls that ship with ASP.NET and that enable you to sign up, log in, recover your password, and more |
|
Membership |
One of the ASP.NET application services that handles membership-related tasks (including creating users, logging in, and more) |
|
Permissions |
Determine the operations a user in the system is allowed to carry out |
|
Provider model |
A model where an interchangeable piece of software is used for certain application tasks. Through configuration, you can assign a different piece of software that handles the same tasks (but in a different way). |
|
Role Manager |
One of the ASP.NET application services that handles role-related tasks including creating roles, assigning users to roles, and checking their role membership |
All materials on the site are licensed Creative Commons Attribution-Sharealike 3.0 Unported CC BY-SA 3.0 & GNU Free Documentation License (GFDL)
If you are the copyright holder of any material contained on our site and intend to remove it, please contact our site administrator for approval.
© 2016-2025 All site design rights belong to S.Y.A.