Beginning Visual Basic(2012)
Chapter 17
Personalizing Websites
What You Will Learn in This Chapter:
· Details about the Profile feature that ships with ASP.NET
· How to create and consume a user's profile in a website
· How you can recognize your users and how to serve them customized content
· How you can access the profile of other users of your site
Wrox.com Code Downloads for this Chapter
You can find the wrox.com code downloads for this chapter on the Download Code tab at www.wrox.com/remtitle.cgi?isbn=1118311809. The code is in the Chapter 17 download.
There is only one thing that beats good content on the web—good personalized content. In the era of information overload and the huge amount of competitive sites, it's important to know your visitors and understand the possibilities you have to present them personalized content. With a good personalization strategy, you can create a website that lives up to your users' expectations by presenting them with exactly the data they are looking for. Personalization is useful for many different scenarios. For example, on a sports site, you use personalized content to highlight activities from the user's favorite team. On a site that deals with programming, you can personalize content by showing users examples in their preferred programming language(s) only. On a news website, you can let users choose one or more news categories (World, Local, Sports, Business, Financial, and so on) and target the content you show them based on these preferences. You can take this one step further by sending them e-mail updates when a new article is posted in one of those categories.
However, personalization goes further than just storing personal preferences and adapting the content to these preferences. With personalization, you can also keep track of other user details, such as a name, date of birth, visits to the site, items users bought in an online shop, and so on. You can then use these details to further personalize web pages, creating a closer relationship with your visitors.
In the Planet Wrox website, personalization is implemented simply yet effectively. The main Reviews page is designed to show only the reviews for those music genres in which the user is interested. To see all the available reviews, users can still visit the All.aspx page, but by visiting the personalized page, they only see reviews in music genres they really like.
Additionally, users can enter personal details about themselves, such as a first and last name, and a short biography. These details are shown on the Photo Albums details page so you know who created a particular photo album.
To enable you to add personalization features to a website, ASP.NET 4.5 ships with an application service called Profile. With the Profile service, you can store data for a particular user with very few lines of code.
By the end of this chapter, you'll have enough knowledge about the personalization features brought by Profile to create dynamic and personalized websites.
Understanding Profile
The ASP.NET Profile is another application service that ships with ASP.NET. It enables you to store and retrieve information about users to your site that goes beyond basic information such as an e-mail address and password that users can enter during sign-up. With Profile, you can store information such as a first and last name, a date of birth, and much more, as you see later in this chapter. By keeping track of the user to which that data belongs, ASP.NET is able to map that data to a user the next time she visits your site, whether that be minutes or weeks later. The cool thing about Profile is that it enables you to store data for registered users as well as anonymous users. So, even if your visitors haven't signed up for an account, you can recognize them and store information about them.
You access the information in a user's profile through a clean API with virtually no code. All you need to do is define the information you want to keep track of in the central Web.config file and the Profile service takes care of the rest. All interaction with the database to retrieve or store profile information in the database is handled automatically for you.
Enabling Profile in your web application is a simple, two-step process:
1. Define the information you want to store for a user in the Web.config file. Based on this information, the ASP.NET run time generates and compiles a class for you on the fly that gives you access to the properties you defined. It then dynamically expands a property called Profile on all web pages in your site , so you can easily access the profile properties from every page in your site.
2. In your application, you program directly to this generated class to get and store the profile information for the current user.
The ASP.NET Profile by default is connected to a logged-in user, although you can also save profile data for unauthenticated users, as you will see later in this chapter.
In the following section, you see how to define profile properties in Web.config and how to access them in your web pages.
Note
It's important to realize that the built-in Profile feature works only with Web Site Projects and not with Web Application Projects. For a discussion on the difference between the two, refer to Chapter 2. If you find that none of the examples in this chapter seem to work, check that you haven't accidentally created a Web Application Project. The simplest way to check is to look at the Code Behind file of a Web Form. If you see two Code Behind files (one named after the page with a .cs or .vb extension and one with an additional Designer extension), you have created a Web Application Project. In that case, get yourself a copy of the Chapter 16 folder that is part of the source that comes with this book and use that as the starting point for this chapter.
Configuring the Profile
You define a profile for your website in the Web.config file by creating a <profile> element as a direct child of the <system.web> element. Between the <profile> tags, you need to create a <properties> element that is used to define the properties you want to expose from your Profile object. Two types of properties exist: simple properties and complex properties, referred to as profile groups.
Creating Simple Profile Properties
You define simple properties as direct children of the <properties> element using an <add> element. The following example demonstrates how to create a property that can be used to hold a user's first name and one to hold a date of birth. The FirstName property can be accessed and set for authenticated and anonymous users, whereas the DateOfBirth property is accessible only to logged-in users:
<system.web>
...
<profile>
<properties>
<add name="FirstName" allowAnonymous="True" />
<add name="DateOfBirth" type="System.DateTime" />
</properties>
</profile>
Because properties are by default of type System.String, there's no need to define an explicit type on the property for text-based properties like a first name. However, for other types like a DateTime, a Boolean, an Integer, or your own types, you need to define the type explicitly using the typeattribute and its fully qualified name including its namespace, as shown for the DateOfBirth property. The following table lists the most common attributes of the <add> element that influence the properties of a profile.
|
Attribute |
Description |
|
name |
Defines the name of the property, such as FirstName, DateOfBirth, and so forth. |
|
type |
Sets the full .NET type name of the property, such as System.String, System.Boolean, System.DateTime, System.Int32 (an Integer in VB.NET and an int in C#), and so on. |
|
allowAnonymous |
Specifies whether the property can be written to for anonymous users. The default is false. When you set this attribute to true, you also need to enable anonymousIdentification, discussed later in this chapter. |
|
defaultValue |
Defines the default value for the property if it hasn't been set explicitly. When you leave out this attribute, the profile property takes the default value for the underlying type (for example, null for a String, 0 for an Int32, and so on). |
|
readOnly |
Specifies whether the profile property can be changed at run time. The default is false, which means you can read from and write to the property. |
Besides simple properties, you can also create profile groups that enable you to group other simple properties together.
Creating Profile Groups
Profile groups serve two distinct purposes: first, they enable you to logically group related properties. For example, you can create a group called Address that, in turn, has properties like Street, PostalCode, and City.
Groups also enable you to have properties with the same name, but located in a different group. For example, you can have two groups called VisitAddress and PostalAddress that both feature properties like Street and PostalCode, making it easier for a developer using your Profile object to find the relevant information.
To create a profile group, you add a <group> element to the <properties> element of your profile and then specify a name. The <group> element then contains one or more properties. The following example shows a profile group for a PostalAddress:
<properties>
<add name="FirstName" />
<group name="PostalAddress">
<add name="Street" />
<add name="PostalCode" />
<add name="City" />
<add name="Country" />
</group>
</properties>
You can have multiple groups within the <properties> tags, but you can have only one level of groups. This means that you can't nest a <group> element in another <group> or <add> element.
Using Non-Standard Data Types
In addition to the data types listed earlier such as String, DateTime, and Int32, you can also use your own types (defined in the App_Code folder, for example).
As with the built-in .NET types, you need to refer to your type using its fully qualified name, which includes the namespace and the class name. Imagine that you have a type called Preference that contains various properties (implemented as automatic properties in this example) related to the user's preference. To include this type in the profile, you need to wrap it in a namespace first:
VB.NET
Namespace PlanetWrox
Public Class Preference
Public Property FavoriteColor As String
‘ Other properties go here
End Class
End Namespace
C#
namespace PlanetWrox
{
public class Preference
{
public string FavoriteColor { get; set; }
// Other properties go here
}
}
You then refer to the type in an <add /> element as follows:
<add name="Preferences" type="PlanetWrox.Preference" />
A situation where you need a different syntax to refer to a type in the profile setup is when you are using generics. Chapter 5 discusses how to use generics to store role names using a List of strings. Here's a quick refresher of the code you saw in that chapter:
VB.NET
Dim roles As New List(Of String)
...
roles.Add("Members")
C#
List<string> roles = new List<string>();
...
roles.Add("Members");
To give your profile a property that is of a generic List type, you need to use some special syntax. The following setting in Web.config creates a profile property called FavoriteGenres that stores the user's favorite genres as a List (Of Integer) in VB.NET and as a List<int> in C#:
<add name="FavoriteGenres"
type="System.Collections.Generic.List`1[System.Int32]" />
The first part of the type attribute looks quite normal. The List class lives in the System .Collections.Generic namespace so it makes sense that you need to specify that here as well. However, right after the class name (List) you see `1. This is not a typo, but the .NET way to refer to generic types in plain text. To define a property that is based on a generic type, you need to use the back tick (`) followed by a 1. The back tick is usually found to the left of the 1 key on your keyboard. The `1 is then followed by a pair of square brackets that contains the actual type you want to use for the list. The type specified in the FavoriteGenres profile property maps to these VB.NET and C# counterparts:
VB.NET
Dim FavoriteGenres As New List(Of Integer)
C#
List<int> FavoriteGenres = new List<int>();
You see how to make use of this and other profile properties in the following exercises. First, you learn how to configure Profile in Web.config in the next Try It Out. Later exercises show you how to work with these properties, and how to use the various methods of the List class.
Try It Out: Creating a Profile
In this Try It Out, you see how to create a profile that is capable of storing a user's first and last name, a date of birth, a short biography, and a list of IDs of the user's favorite genres. This list is later used to show only the reviews that match the user's interest.
1. Open the Web.config file from the root of the site and locate the <profile> element that was added by NuGet in an exercise in the preceding chapter. If you don't have this element yet, refer to the section “Introducing the Login Controls” in Chapter 16 to learn how to configure your site for the application services.
2. Add a new <properties> element as a direct child of <profile>. Make sure you don't accidentally add the new element inside the <providers> element.
3. Complete the <profile> element so it ends up looking like this:
<profile defaultProvider="DefaultProfileProvider">
<properties>
<add name="FirstName" />
<add name="LastName" />
<add name="DateOfBirth" type="System.DateTime" />
<add name="Bio" />
<add name="FavoriteGenres"
type="System.Collections.Generic.List`1[System.Int32]" />
</properties>
<providers>
...
</profile>
4. Save the Web.config. As soon as you save the file, a background process starts to generate a class file that is used for the profile. After the class file has been created and compiled successfully, you can access it programmatically through the Profile property of the Page class.
5. To test the profile, open the MyProfile.aspx file that you created in the previous chapter in Design View. Double-click the page to set up an event handler for the Load event and add the following code containing your own first and last name:
VB.NET
Protected Sub Page_Load(sender As Object, e As EventArgs) Handles Me.Load
Profile.FirstName = "Your first name here"
Profile.LastName = "Your last name here"
End Sub
C#
protected void Page_Load(object sender, EventArgs e)
{
Profile.FirstName = "Your first name here";
Profile.LastName = "Your last name here";
}
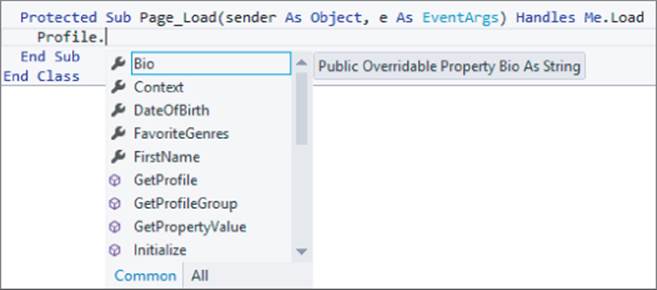
As soon as you type the dot (.) after Profile, an IntelliSense list appears, showing you the available profile properties (see Figure 17.1).
Figure 17.1
6. When you are finished typing the code, save and close the file because you're done with it for now.
COMMON MISTAKES
If nothing shows up after typing the dot, choose Build ⇒ Build Web Site from the main menu or press Ctrl+Shift+B. This forces VS to start a recompilation of the application, including the special class for the Profile property. You see more about compilation in Chapter 19. After a delay of a few seconds, the properties should now appear in the IntelliSense list for the Profile property of the Page class. If they still don't show up, check the Error List (choose View ⇒ Error List from the main menu to open up the Error List) to verify that you didn't make any mistakes in the Web.config file and make sure you are using a Web Site Project and not a Web Application Project.
7. Switch back to the Web.config file and scroll all the way to the end. Create a copy of the <location> element that blocks access to the Management folder for unauthorized users and paste it right below the existing element. Then modify the copy so it blocks access to the MyProfile.aspxfile in the root of the site to all unauthenticated users. You should end up with these settings:
</location>
<location path="MyProfile.aspx">
<system.web>
<authorization>
<deny users="?"/>
</authorization>
</system.web>
</location>
</configuration>
8. In the Solution Explorer, right-click the MyProfile.aspx file and choose View in Browser. You can only view this file when you're logged in; if you weren't logged in previously, you are taken to Login.aspx first. Log in with the username and password you created in the previous chapter and click Login. You're taken back to MyProfile.aspx. Although you don't see anything new in the page, the code in Page_Load has run and has created a profile for you in the database.
9. To see this profile, close your browser and go back to Visual Studio. Open the Database Explorer (the Server Explorer in paid versions of VS) and expand the Tables element of the PlanetWrox .mdf database. Locate the Profiles table, right-click it, and choose Show Table Data. You should see something similar to Figure 17.2.
Figure 17.2

This figure shows the profile data for a single user. The first and last name you entered in step 5 are stored in the column PropertyValueStrings. Because of the special format this data is stored in, you shouldn't modify this data manually. Instead, you should use Profile to change the underlying data.
How It Works
When you define profile properties in Web.config, the ASP.NET run time creates a class for you in the background. This class, called ProfileCommon, gives you access to the strongly typed properties such as FirstName, LastName, and FavoriteGenres. The ProfileCommon class is then made accessible to the Page through its Profile property. ProfileCommon inherits from ProfileBase, the base class defined in the .NET Framework that contains the behavior to access the profile in the database by talking to the configured provider, the ASP.NET Profile provider. The provider in turn takes care of all the hard work of persisting the data in the configured database. Just as the Membership and Roles providers you saw in the preceding chapter, the Profile provider uses the connection string defined in the connectionStringName attribute of the configured provider.
To define properties, you use <add> elements with a name attribute and an optional type if the property is of a type other than System.String. For example:
<add name="FavoriteGenres"
type="System.Collections.Generic.List`1[System.Int32]" />
This property sets up a list that can store Integer values to hold the user's favorite music genres. You see how to use this property in a later exercise.
After you have set up the profile in Web.config and the background class has been compiled, you can access the profile in your pages. For example, you can now set properties such as FirstName through code:
VB.NET
Profile.FirstName = "Your first name here"
C#
Profile.FirstName = "Your first name here";
Although not used in this exercise, you access properties in a group in pretty much the same way. All you need to do is prefix the property name with the group name and a dot. Given the example of a PostalAddress, you would store the street for that address like this:
VB.NET
Profile.PostalAddress.Street = "Some Street"
C#
Profile.PostalAddress.Street = "Some Street";
Changes made to the profile are saved automatically for you during EndRequest, an event that fires very late during the ASP.NET page life cycle. This way, you can change the profile during many of the stages of the life cycle without having to worry about explicitly saving the profile manually.
In Figure 17.2, you can see how a single row is used to store the entire profile. The first column contains the unique ID of the user to which the profile belongs. The second column contains a list of property names that are saved for the current user, together with a starting index of the value and a length. For example, for the last name you see:
LastName:4:10
This states that the value for the LastName property, which is stored in the PropertyValueStrings column, starts at position 4 (the fifth character because zero-based positions are used) and has a length of 10 characters. This dense format enables the Profile provider to store many different properties in a single column, which eliminates the need to mess with the database schema any time the profile changes. Earlier versions of the Profile provider used the PropertyValueBinary column to store binary objects such as images. However, the Profile provider converts these to strings and stores them in the PropertyValueStrings column as well.
You learn more about reading from and writing to the profile in the following section.
Using the Profile
As you saw in the previous section, writing to the profile is easy. To change a property like FirstName, all you need is a single line of code. The profile keeps track of the changes you have made to it, and, if necessary, automatically saves the changes during EndRequest. Reading from the profile is just as easy; all you need to do is access one of its properties. The following snippet shows how to fill a TextBox with the first name from the profile:
VB.NET
FirstName.Text = Profile.FirstName
C#
FirstName.Text = Profile.FirstName;
Retrieving properties in a group is almost identical. To access the Street property discussed in a previous example, you need this code:
VB.NET
PostalAddressStreet.Text = Profile.PostalAddress.Street
C#
PostalAddressStreet.Text = Profile.PostalAddress.Street;
Accessing the FavoriteGenres property is slightly different. Because this property is a collection, you shouldn't assign a value to it directly. Instead, you use its methods and properties to get data in and out. The following example clears the entire list first, and then adds the IDs of two genres to it:
VB.NET
Profile.FavoriteGenres.Clear()
Profile.FavoriteGenres.Add(7)
Profile.FavoriteGenres.Add(11)
C#
Profile.FavoriteGenres.Clear();
Profile.FavoriteGenres.Add(7);
Profile.FavoriteGenres.Add(11);
The following exercise shows you how to store basic data in the user's profile. You see a real-world implementation of using the FavoriteGenres list in a later exercise.
Try It Out: Storing Basic User Data in the Profile
In this Try It Out, you modify the Profile page so users can save their first and last name, birthday, and a short biography in their profile.
1. Open MyProfile.aspx again and switch to Code Behind. Remove the two lines of code in Page_Load that set the first and last name.
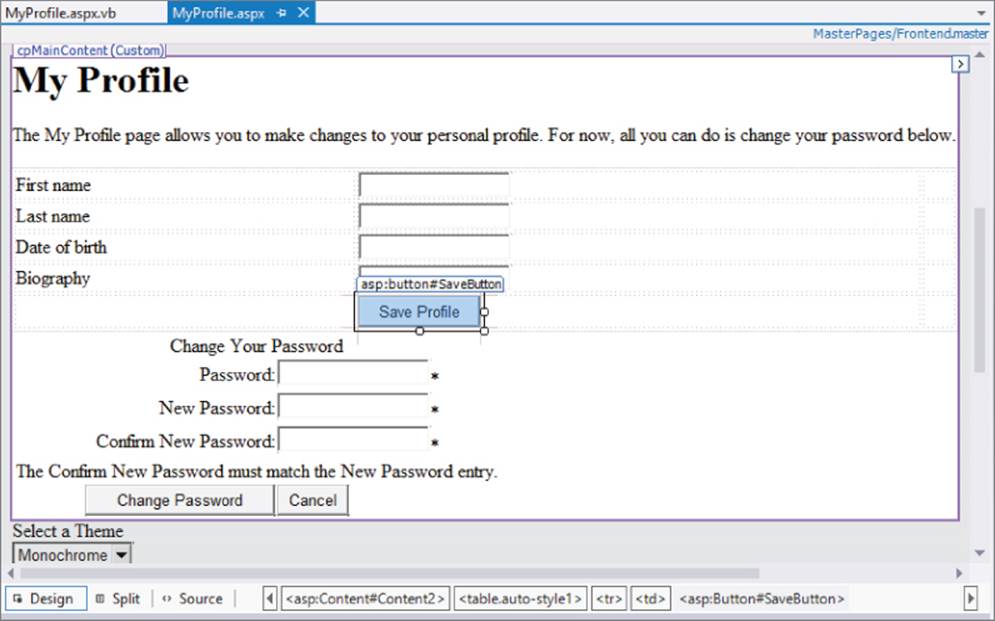
2. Switch to Design View and position your cursor between the paragraph and the ChangePassword control. To position your cursor, click the ChangePassword control once to select it, and then press the left arrow key once. Next, add an HTML table of five rows and three columns by choosing Table ⇒ Insert Table.
3. In the second column of each of the first four rows, drag TextBox controls and rename them, from the first to the last row, FirstName, LastName, DateOfBirth, and Bio by setting their ID attribute. Figure 17.3 shows you exactly where the TextBox controls should be placed.
4. In the first column of each of the first four rows, drop Label controls and set their properties as follows so each label is associated with a TextBox in the same row.
|
Text |
AssociatedControlID |
|
First name |
FirstName |
|
Last name |
LastName |
|
Date of birth |
DateOfBirth |
|
Biography |
Bio |
5. In the second cell of the fifth row, drag a Button and set its ID to SaveButton and its Text to Save Profile. Design View should look like Figure 17.3.
Figure 17.3
6. In the last column of each of the first three rows, drag RequiredFieldValidator controls. Set their properties as follows, so each validator lines up with a TextBox in the same row. Remember: you can set the Display property for all controls at once by selecting the controls while pressing the Ctrl key.
|
ControlToValidate |
Display |
ErrorMessage |
|
FirstName |
Dynamic |
First name is required. |
|
LastName |
Dynamic |
Last name is required. |
|
DateOfBirth |
Dynamic |
Date of birth is required. |
7. Next to the validator for the DateOfBirth box, drag a CompareValidator and set its properties as follows:
|
Property |
Value |
|
Display |
Dynamic |
|
ErrorMessage |
Please enter a valid date. |
|
ControlToValidate |
DateOfBirth |
|
Operator |
DataTypeCheck |
|
Type |
Date |
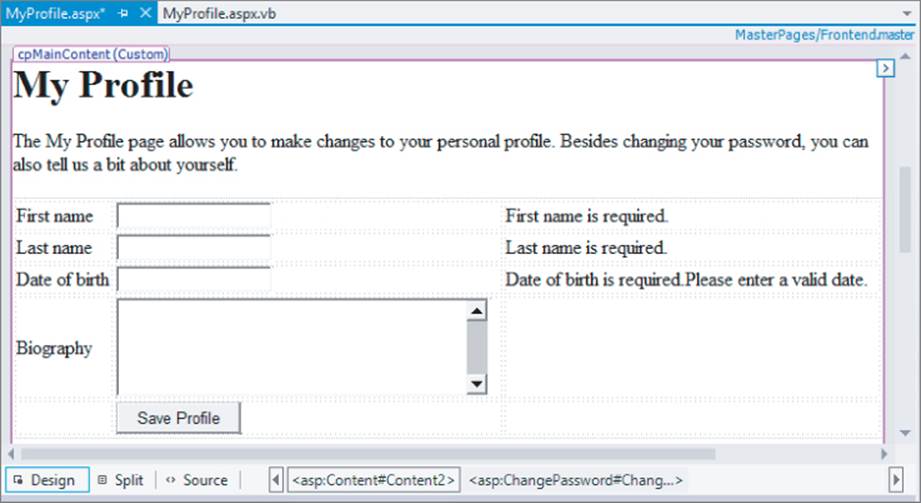
8. Set the TextMode of the Bio control to MultiLine and set its Height and Width properties to 75px and 300px, respectively.
9. Modify the text above the table to indicate that users can now do more than just change their password alone. Your Design View should look like Figure 17.4.
Figure 17.4
10. Double-click the Save Profile button and in the Click event handler that VS added for you, write the following bolded code:
VB.NET
Protected Sub SaveButton_Click(sender As Object,
e As EventArgs) Handles SaveButton.Click
If Page.IsValid Then
Profile.FirstName = FirstName.Text
Profile.LastName = LastName.Text
Profile.DateOfBirth = DateTime.Parse(DateOfBirth.Text)
Profile.Bio = Bio.Text
End If
End Sub
C#
protected void SaveButton_Click(object sender, EventArgs e)
{
if (Page.IsValid)
{
Profile.FirstName = FirstName.Text;
Profile.LastName = LastName.Text;
Profile.DateOfBirth = DateTime.Parse(DateOfBirth.Text);
Profile.Bio = Bio.Text;
}
}
11. In the Page_Load event handler of the same page, add the following code, which fills in the text box controls with the data from the profile when the page loads:
VB.NET
Protected Sub Page_Load(sender As Object, e As EventArgs) Handles Me.Load
If Not Page.IsPostBack Then
FirstName.Text = Profile.FirstName
LastName.Text = Profile.LastName
DateOfBirth.Text = Profile.DateOfBirth.ToShortDateString()
Bio.Text = Profile.Bio
End If
End Sub
C#
protected void Page_Load(object sender, EventArgs e)
{
if (!Page.IsPostBack)
{
FirstName.Text = Profile.FirstName;
LastName.Text = Profile.LastName;
DateOfBirth.Text = Profile.DateOfBirth.ToShortDateString();
Bio.Text = Profile.Bio;
}
}
12. Save all changes and request the page in the browser. If you're required to log in first, enter your details and click the Login button. You should see the My Profile page reappear with the data you entered for the first and last names in the previous Try It Out already filled in. In addition, the date of birth field is filled with the default value for a DateTime: 1/1/0001. Complete the form with your details and click the Save Profile button.
13. Close your browser and request MyProfile.aspx again. Note that your changes have been persisted between the two browser sessions.
How It Works
Much of what you have seen in this exercise should be familiar by now. The page contains a number of TextBox controls that are validated using RequiredFieldValidator and CompareValidator controls. Additionally, the Label controls are hooked up to their respective TextBox controls using the AssociatedControlID property. This makes it easy to put focus on the controls in the browser because clicking a Label now puts the cursor in the associated TextBox.
When you click the Save Profile button, the values are retrieved from the four TextBox controls and stored in the profile. When the page loads the first time, the reverse of this process takes place: the controls are prefilled with the values from the profile. To avoid overwriting the data that the user has entered, the code gets the data from the profile only when the page initially loads, and not during a postback:
VB.NET
If Not Page.IsPostBack Then
FirstName.Text = Profile.FirstName
....
End If
C#
if (!Page.IsPostBack)
{
FirstName.Text = Profile.FirstName;
...
}
Although the example itself is pretty trivial, it lays out a nice foundation for a more advanced scenario using the List of integers to store the user's preference for certain music genres. You can then use this list of favorite genres to limit the list with reviews to those the user is really interested in. You see how to store the user's preference in Profile in the following exercise; a later exercise shows you how to use the saved data again.
Try It Out: Storing Genre Preferences in the Profile
In this Try It Out, you learn how to fill the FavoriteGenres property of the user profile. To let the user choose her favorite genres, you display a CheckBoxList that is hooked up to an EntityDataSource that retrieves the available genres. When the user saves the data, the items that the user checked are then stored in the profile.
1. In MyProfile.aspx, add a table row above the one with the Save Profile button. To do this, make sure you're in Design View, right-click an empty spot in the row with the button, and choose Insert ⊆ Row Above from the context menu that appears. Alternatively, click the cell to put the cursor in it and press Ctrl+Alt+up arrow.
2. In the second cell of the new row, drag a CheckBoxList control from the Standard category of the Toolbox and set its ID to PreferenceList.
3. In the first cell, drag a Label control, set its Text to Favorite genres and its AssociatedControlID to PreferenceList.
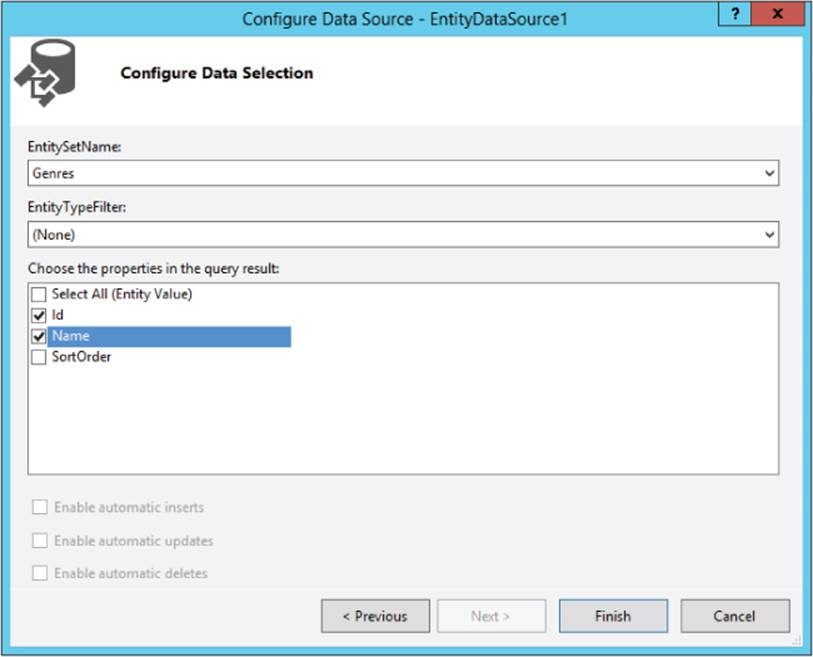
4. Hook up the CheckBoxList control to a new EntityDataSource as follows. Click Choose Data Source on the CheckBoxList control's Smart Tasks panel. Choose <New data source> from the data source drop-down list, then choose the Entity data source type and click OK. In the Configure Data Source wizard for the new data source control, choose PlanetWroxEntities as the Named Connection, click Next, and choose Genres as the EntitySetName. In the Select list, check only the items for the Id and Name properties. Your Configure Data Source dialog box now looks like Figure 17.5.
Figure 17.5
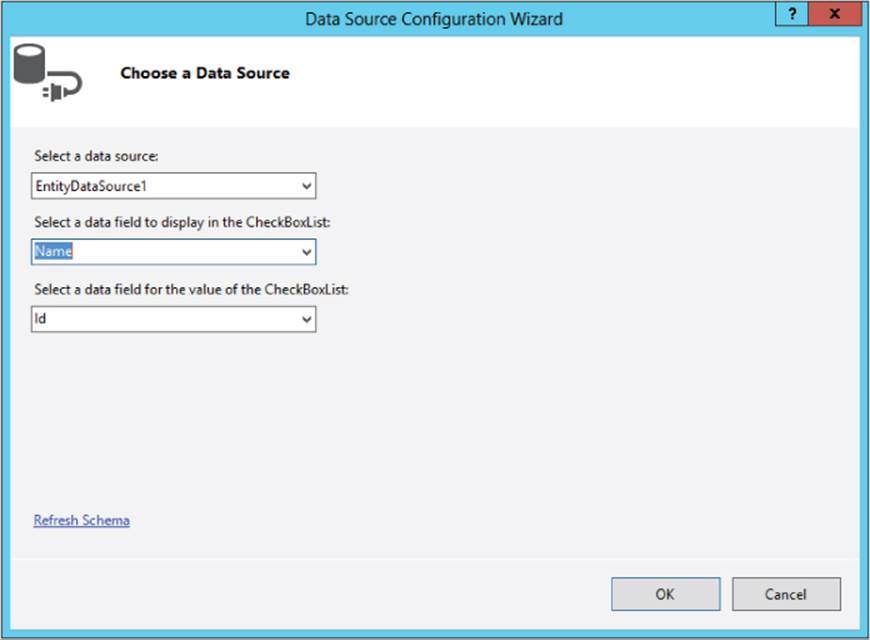
5. Click Finish to close the dialog box. Back in the Data Source Configuration Wizard for the CheckBoxList control, choose Name as the data field to display and Id as the data field for the value. If these items don't appear in the drop-down lists, click the blue Refresh Schema link at the bottom of the dialog box first. Your screen now looks like Figure 17.6.
Figure 17.6
Click OK to close the dialog box.
6. Back in Design View, click the EntityDataSource that was just added and press F4 to open its Properties Grid. Locate the OrderBy property and enter it.Name to sort the list of genres alphabetically. Switch to Markup View and confirm that the code for the EntityDataSource control and the CheckBoxList looks as follows:
<asp:CheckBoxList ID="PreferenceList" runat="server"
DataSourceID="EntityDataSource1" DataTextField="Name" DataValueField="Id">
</asp:CheckBoxList>
<asp:EntityDataSource ID="EntityDataSource1" runat="server"
ConnectionString="name=PlanetWroxEntities"
DefaultContainerName="PlanetWroxEntities" EnableFlattening="False"
EntitySetName="Genres" OrderBy="it.Name" Select="it.[Id], it.[Name]">
</asp:EntityDataSource>
7. In Design View, click the CheckBoxList control once, open its Properties Grid, and switch to the Events tab. Double-click the DataBound event and add the following code in the Code Behind to preselect the items in the list based on the user's profile settings:
VB.NET
Protected Sub PreferenceList_DataBound(sender As Object,
e As EventArgs) Handles PreferenceList.DataBound
For Each myItem As ListItem In PreferenceList.Items
Dim currentValue As Integer = Convert.ToInt32(myItem.Value)
If Profile.FavoriteGenres.Contains(currentValue) Then
myItem.Selected = True
End If
Next
End Sub
C#
protected void PreferenceList_DataBound(object sender, EventArgs e)
{
foreach (ListItem myItem in PreferenceList.Items)
{
int currentValue = Convert.ToInt32(myItem.Value);
if (Profile.FavoriteGenres.Contains(currentValue))
{
myItem.Selected = true;
}
}
}
8. Extend the SaveButton_Click handler with the following code so it also saves the user's preferred genres:
VB.NET
Profile.Bio = Bio.Text
’ Clear the existing list
Profile.FavoriteGenres.Clear()
’ Now add the selected genres
For Each myItem As ListItem In PreferenceList.Items
If myItem.Selected Then
Profile.FavoriteGenres.Add(Convert.ToInt32(myItem.Value))
End If
Next
C#
Profile.Bio = Bio.Text;
// Clear the existing list
Profile.FavoriteGenres.Clear();
// Now add the selected genres
foreach (ListItem myItem in PreferenceList.Items)
{
if (myItem.Selected)
{
Profile.FavoriteGenres.Add(Convert.ToInt32(myItem.Value));
}
}
9. Save all your changes, request the Profile page in your browser, and log in when required. You should see the list of genres displayed in the browser, each one preceded by a check box. Select a couple of your favorite genres and click the Save Profile button. Browse to another page and choose My Profile again from the main Menu or TreeView. The genres you selected should still be selected in the page, as shown in Figure 17.7.
Figure 17.7

How It Works
Earlier you defined the FavoriteGenres property in the profile as a generic list that can hold integer values. Because this property is a List, you do not assign values to it directly; instead, you use its methods like Add and Clear to add and remove items. Because each genre ID should be stored in the list only once, the list is cleared to remove any selection made earlier and then the selected items are added again:
VB.NET
Profile.FavoriteGenres.Clear()
C#
Profile.FavoriteGenres.Clear();
Then when the list is empty, the IDs of the selected genres are added:
VB.NET
For Each myItem As ListItem In PreferenceList.Items
If myItem.Selected Then
Profile.FavoriteGenres.Add(Convert.ToInt32(myItem.Value))
End If
Next
C#
foreach (ListItem myItem in PreferenceList.Items)
{
if (myItem.Selected)
{
Profile.FavoriteGenres.Add(Convert.ToInt32(myItem.Value));
}
}
This code loops through all the items in the CheckBoxList. The Selected property determines whether the user has selected the item in the Profile page. If it has been selected, the value of the genre is retrieved, converted to an Integer (an int in C#), and then added to the FavoriteGenreslist using the Add method.
That's really all you need to store complex data like a list of favorite genres in the user's profile. All you need to do is add a bunch of numbers to a list. The .NET run time then takes care of persisting the profile in the database and making it available again in subsequent pages.
Of course, the list with favorite genres isn't really useful until you actually make use of it in the site. In the next exercise, you see how to use the list to limit the list of Reviews that users initially see when they visit the default Reviews page.
Try It Out: Using Profile in the Reviews Page
Currently your site has two pages in the Reviews folder that are capable of displaying reviews: AllByGenre.aspx and All.aspx. In this Try It Out, you modify the Default.aspx page so it displays yet another list of reviews. However, this time the list with reviews is limited to those belonging to the genres that the user has selected in the My Profile page. When anonymous users see the page, they get a message that they haven't set their favorite genres yet.
1. From the Reviews folder, open Default.aspx in Markup View.
2. Inside the control for the cpMainContent placeholder, add the following code that creates a nested Repeater with each selected genre as a heading, followed by a list of reviews belonging to that genre:
<asp:Repeater ID="GenreRepeater" runat="server">
<HeaderTemplate>
<p>Below you find a list with reviews for your favorite music genres.</p>
</HeaderTemplate>
<ItemTemplate>
<h3><asp:Literal ID="Literal1" runat="server"
Text='<%# Eval("Name") %>'></asp:Literal></h3>
<asp:Repeater ID="ReviewRepeater" runat="server"
DataSource='<%# Eval("Reviews")%>’ ItemType="PlanetWroxModel.Review">
<ItemTemplate>
<asp:HyperLink ID="HyperLink1" runat="server" Text='<%# Item.Title %>’
NavigateUrl='<%# "ViewDetails.aspx?ReviewId=" + Item.Id.ToString() %>'>
</asp:HyperLink><br />
</ItemTemplate>
</asp:Repeater>
</ItemTemplate>
</asp:Repeater>
<asp:PlaceHolder ID="NoRecords" runat="server" Visible="False">
<p>Sorry, no reviews were found. You either didn't set your favorite genres
or you may need to log in first. </p>
</asp:PlaceHolder>
<p>You can change your genre preferences <a href="∼/MyProfile.aspx"
runat="server">here</a>.</p>
You can create the Repeater controls manually by writing the necessary code, or you can drag and drop them from the Data category of the Toolbox. The inner Repeater contains a HyperLink control that points to the ViewDetails.aspx page that you created in Chapter 15. Note how the inner Repeater is strongly typed by setting its ItemType to PlanetWroxModel.Review (because it's displaying Review instances). You can't do this for the outer Repeater because its data source is a collection of anonymous objects, set in Page_Load in the Code Behind as you see next.
3. Double-click the page in Design View to set up a Load handler. Add an Imports/using statement at the top of the page for the PlanetWroxModel namespace and add the following code to the handler that VS created for you:
VB.NET
Imports PlanetWroxModel
...
Protected Sub Page_Load(sender As Object, e As EventArgs) Handles Me.Load
Using myEntities As PlanetWroxEntities = New PlanetWroxEntities()
If Profile.FavoriteGenres.Count > 0 Then
Dim favGenres = From genre In myEntities.Genres.Include("Reviews")
Order By genre.Name
Where Profile.FavoriteGenres.Contains(genre.Id)
Select New With {genre.Name, genre.Reviews}
GenreRepeater.DataSource = favGenres
GenreRepeater.DataBind()
End If
GenreRepeater.Visible = GenreRepeater.Items.Count > 0
NoRecords.Visible = Not GenreRepeater.Visible
End Using
End Sub
C#
using PlanetWroxModel;
...
protected void Page_Load(object sender, EventArgs e)
{
using (PlanetWroxEntities myEntities = new PlanetWroxEntities())
{
if (Profile.FavoriteGenres.Count > 0)
{
var favGenres = from genre in myEntities.Genres.Include("Reviews")
orderby genre.Name
where Profile.FavoriteGenres.Contains(genre.Id)
select new { genre.Name, genre.Reviews };
GenreRepeater.DataSource = favGenres;
GenreRepeater.DataBind();
}
GenreRepeater.Visible = GenreRepeater.Items.Count > 0;
NoRecords.Visible = !GenreRepeater.Visible;
}
}
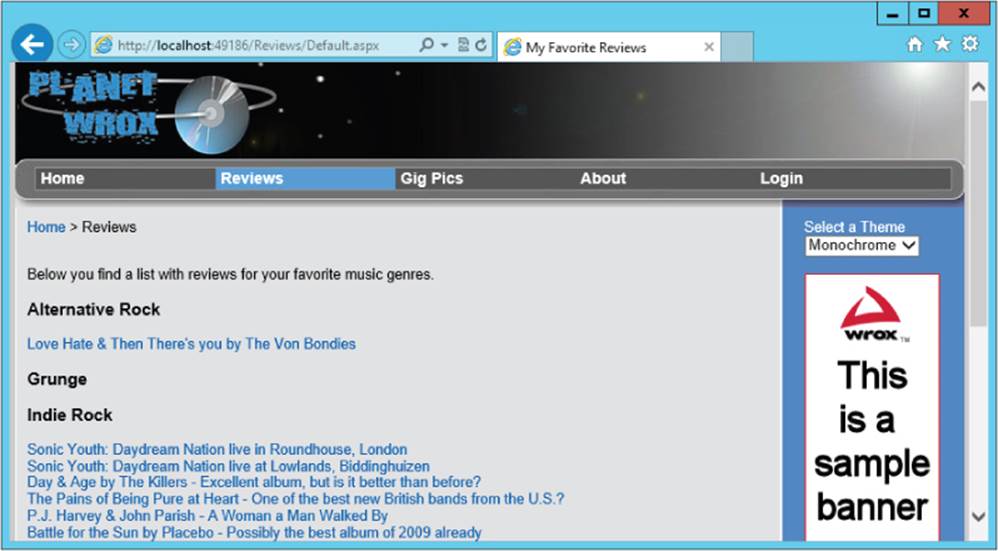
4. Save all your changes and request the page in the browser. If you selected one or more genres in the Profile page previously, and reviews are available for those genres, you should see a list similar to Figure 17.8.
Figure 17.8
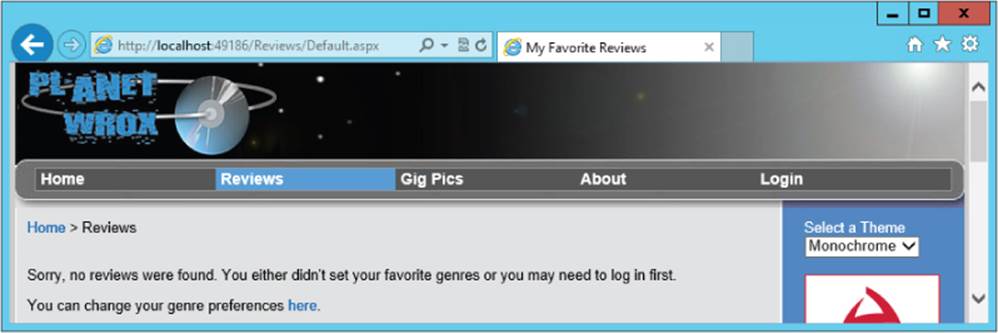
If you haven't set any preferred genres, or you're not logged in, you get the message shown in Figure 17.9.
Figure 17.9
By clicking the link in the message, you are taken to the My Profile page so you can set or change your preferred genres. Unauthorized users are asked to log in or sign up for an account before they can access the Profile page.
How It Works
The code in the Code Behind executes a LINQ to Entities query that retrieves all the reviews that belong to the user's favorite genres. For anonymous users, the list of favorite genres will be empty so they always get to see the message about setting their preferences in the Profile page. To avoid an unnecessary call to the database, the query is executed only when the user has selected at least one preferred genre by checking the Count property of the FavoriteGenres list.
Because the data source of the nested Repeater you added to the Default.aspx page is a collection of Review instances, it has been made strongly typed by setting its ItemType and using its Item property as opposed to using Eval. As you learned previously, this makes it easier to write code and catch errors earlier.
The nested Repeater looks a bit like the code for the AllByGenre.aspx page that has a Repeater that contains a BulletedList control. Just as in that page, the nested Repeater gets its data from the outer Repeater with the DataSource attribute:
<asp:Repeater ID="ReviewRepeater" runat="server" ItemType="PlanetWroxModel.Review"
DataSource='<%# Eval("Reviews")%>'>
...
</asp:Repeater>
The nested Repeater then uses the list of Reviews to build up the hyperlinks that take you to the details page:
<asp:HyperLink ID="HyperLink1" runat="server" Text='<%# Item.Title %>’
NavigateUrl='<%# "ViewDetails.aspx?ReviewId=" + Item.Id.ToString() %>'>
</asp:HyperLink><br />
The HyperLink control gets its Text from the Review instance that it's bound to and uses its Id to build up the NavigateUrl. The ToString method is used on Item.Id to convert the value to a string before it's concatenated to the string that contains the URL. This is done to avoid type conversions in Visual Basic where Item.Id normally results in a number that you can't concatenate to a string directly. As an alternative, if you're following along in VB.NET, you could have used the & character to concatenate the value.
To see how these controls get their data, you need to look at the Code Behind that uses a LINQ query targeting the Entity Framework:
VB.NET
Dim favGenres = From genre In myEntities.Genres.Include("Reviews")
Order By genre.Name
Where Profile.FavoriteGenres.Contains(genre.Id)
Select New With {genre.Name, genre.Reviews}
C#
var favGenres = from genre in myEntities.Genres.Include("Reviews")
orderby genre.Name
where Profile.FavoriteGenres.Contains(genre.Id)
select new { genre.Name, genre.Reviews };
Except for the highlighted line of code and the variable name, this LINQ query is identical to the one used in AllByGenre.aspx. What makes this example special is the Where clause that limits the number of reviews to those that the user is really interested in. Note how the Contains method of the generic List class is used here. Although at first it may seem that all genres and reviews are retrieved from the database into the ASPX page and then compared with the values in the profile property called FavoriteGenres, the reverse is actually the case. The Entity Framework is smart enough to collect all the IDs from the FavoriteGenres property first and then include them in the SQL statement that is sent to the database to fetch the requested genres and reviews. This means that filtering of the requested genres takes place at the database level, and not in the ASPX page. This in turn means that fewer rows are transferred from the database to the ASPX page (only those that are really needed), which results in better performance.
The profile property FavoriteGenres returns an empty list, rather than throwing an exception for anonymous users. So, even users with no profile can safely view this page. Instead of seeing any reviews, they get a message stating they haven't set their genre preferences yet, or that they need to log in first.
In the end of the Page_Load handler, some code determines whether to show or hide the Repeater and the NoRecords controls:
VB.NET
GenreRepeater.Visible = GenreRepeater.Items.Count > 0
NoRecords.Visible = Not GenreRepeater.Visible
C#
GenreRepeater.Visible = GenreRepeater.Items.Count > 0;
NoRecords.Visible = !GenreRepeater.Visible;
If after data binding the outer Repeater, its Items collection is still empty, it means no genres were found for the current user. If that's the case, the entire Repeater is hidden and the PlaceHolder is shown. However, if the Count property of the Items collection is larger than zero, the Repeateris made visible and the PlaceHolder is hidden.
In Chapter 14, you created a page called NewPhotoAlbum.aspx that lets users insert new Gig Pics albums. The current implementation of this page has a few shortcomings. First of all, anyone can insert a new album. There's no way to block anonymous users from creating a new album and uploading pictures.
Secondly, only Managers can remove pictures from an existing photo album. It would be nice if the owner of an album could also remove her own pictures. Now that you know more about security and personalizing web pages, this is pretty easy to implement, as you see in the following exercise.
Try It Out: Letting Users Manage Their Own Photo Albums
In this Try It Out you see how to block the NewPhotoAlbum.aspx and ManagePhotoAlbum.aspx pages from unauthenticated users. Additionally, you see how to record the name of the user who created the photo album and use that name later on to enable users to alter their own photo albums.
1. Open SQL Server Management Studio from the Windows Start menu or Start screen. Open your PlanetWrox database, and locate the PhotoAlbum table. Right-click it and choose Design. Add a new column called UserName, set its data type to nvarchar(256), and leave the Allow Nulls option selected. (This table already contains photo albums without a valid UserName, so you can't make the column required at this stage unless you delete these photo albums and their related pictures from the database first, or manually enter a username for each existing row.) Save your changes to the table and close SSMS.
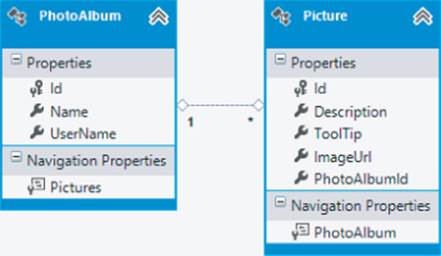
2. Open the ADO.NET Entity Data Model file PlanetWrox.edmx from the App_Code folder, right-click an empty space in the designer, and choose Update Model from Database. Wait until VS has analyzed your database and click Finish. The UserName column in the database now shows up as a property of the PhotoAlbum class (see Figure 17.10).
Figure 17.10
Save your changes and close the file.
3. Open the Web.config file, and below the existing <location> elements, add the following two <location> elements to block access to the two referenced files for anonymous users:
</location>
<location path="ManagePhotoAlbum.aspx">
<system.web>
<authorization>
<deny users="?" />
</authorization>
</system.web>
</location>
<location path="NewPhotoAlbum.aspx">
<system.web>
<authorization>
<deny users="?" />
</authorization>
</system.web>
</location>
</configuration>
Save your changes and close the Web.config file.
4. Open NewPhotoAlbum.aspx in Design View, locate the EntityDataSource control, and set up an event handler for its Inserting event using the Events tab of the Properties Grid. Add the following code to the handler that VS created for you:
VB.NET
Protected Sub EntityDataSource1_Inserting(sender As Object,
e As EntityDataSourceChangingEventArgs) Handles EntityDataSource1.Inserting
Dim myPhotoAlbum As PhotoAlbum = CType(e.Entity, PhotoAlbum)
myPhotoAlbum.UserName = User.Identity.Name
End Sub
C#
protected void EntityDataSource1_Inserting(object sender,
EntityDataSourceChangingEventArgs e)
{
PhotoAlbum myPhotoAlbum = (PhotoAlbum)e.Entity;
myPhotoAlbum.UserName = User.Identity.Name;
}
5. From the PhotoAlbums folder, open Default.aspx and switch to its Code Behind.
6. At the top of the file, add an Imports/using statement for the PlanetWroxModel namespace, and then extend the DataBound event handler with the following code that shows the Edit link when the current user is either a Manager or the owner of the photo album:
VB.NET
Protected Sub ListView1_DataBound(sender As Object,
e As EventArgs) Handles ListView1.DataBound
If Not String.IsNullOrEmpty(DropDownList1.SelectedValue) Then
Dim photoAlbumId As Integer = Convert.ToInt32(DropDownList1.SelectedValue)
Using myEntities As PlanetWroxEntities = New PlanetWroxEntities()
Dim photoAlbumOwner As String = (From p In myEntities.PhotoAlbums
Where p.Id = photoAlbumId
Select p.UserName).Single()
If User.Identity.IsAuthenticated And (User.Identity.Name = photoAlbumOwner _
Or User.IsInRole("Managers")) Then
EditLink.NavigateUrl = String.Format(
"∼/ManagePhotoAlbum.aspx?PhotoAlbumId={0}", DropDownList1.SelectedValue)
EditLink.Visible = True
Else
EditLink.Visible = False
End If
End Using
Else
EditLink.Visible = False
End If
End Sub
C#
protected void ListView1_DataBound(object sender, EventArgs e)
{
if (!string.IsNullOrEmpty(DropDownList1.SelectedValue))
{
int photoAlbumId = Convert.ToInt32(DropDownList1.SelectedValue);
using (PlanetWroxEntities myEntities = new PlanetWroxEntities())
{
string photoAlbumOwner = (from p in myEntities.PhotoAlbums
where p.Id == photoAlbumId
select p.UserName).Single();
if (User.Identity.IsAuthenticated &&
(User.Identity.Name == photoAlbumOwner || User.IsInRole("Managers")))
{
EditLink.NavigateUrl = string.Format(
"∼/ManagePhotoAlbum.aspx?PhotoAlbumId={0}", DropDownList1.SelectedValue);
EditLink.Visible = true;
}
else
{
EditLink.Visible = false;
}
}
}
else
{
EditLink.Visible = false;
}
}
7. Open the Code Behind of ManagePhotoAlbum.aspx in the root. Add the following code to a Page_Load handler. If the handler isn't there yet, double-click the page in Design View to have VS set one up for you.
VB.NET
Protected Sub Page_Load(sender As Object, e As EventArgs) Handles Me.Load
Dim photoAlbumId As Integer =
Convert.ToInt32(Request.QueryString.Get("PhotoAlbumId"))
Using myEntities As PlanetWroxEntities = New PlanetWroxEntities()
Dim photoAlbumOwner As String = (From p In myEntities.PhotoAlbums
Where p.Id = photoAlbumId
Select p.UserName).Single()
If User.Identity.Name <> photoAlbumOwner And
Not User.IsInRole("Managers") Then
Response.Redirect("∼/")
End If
End Using
End Sub
C#
protected void Page_Load(object sender, EventArgs e)
{
int photoAlbumId = Convert.ToInt32(Request.QueryString.Get("PhotoAlbumId"));
using (PlanetWroxEntities myEntities = new PlanetWroxEntities())
{
string photoAlbumOwner = (from p in myEntities.PhotoAlbums
where p.Id == photoAlbumId
select p.UserName).Single();
if (User.Identity.Name != photoAlbumOwner && !User.IsInRole("Managers"))
{
Response.Redirect("∼/");
}
}
}
8. Because the entire page is now blocked for users without the proper permissions, there's no longer the need to hide the individual buttons in the ListView control. This means you can remove the code for the ListView1_ItemCreated event handler. If you're using C#, don't forget to remove the handler definition from the ListView's control in Markup View as well.
9. Save the changes to all open files (press Ctrl+Shift+S) and request NewPhotoAlbum.aspx in your browser. If necessary, log in with an account you created earlier.
10. Enter a new name for the photo album and click Insert. At this stage, the photo album is saved, together with your username. Proceed by adding a few images to your photo album.
11. Click Gig Pics from the main Menu or TreeView and choose the new photo album you just created from the drop-down list. After the page has reloaded, your new photo album should be displayed, together with the Edit Photo Album link at the bottom of the screen. Clicking the link takes you to ManagePhotoAlbum.aspx, which lets you add or remove pictures in your photo album.
12. Click Logout in the footer of the page. Then go to the Gig Pics page again and choose your new photo album from the drop-down list. Note that the Edit Photo Album link is now no longer visible.
How It Works
You started this exercise by adding a column for the user's name to the PhotoAlbum table. With this column, you can keep track of the user who created the photo album, giving you the opportunity to display data related to the user together with a photo album. When you run the Update Wizard by choosing Update Model from Database, changes in the database (such as adding a column to a table) are reflected in the model.
In the New Photo Album page, you used this new property by assigning it the name of the current user with this code in the EntityDataSource1_Inserting handler:
VB.NET
myPhotoAlbum.UserName = User.Identity.Name
C#
myPhotoAlbum.UserName = User.Identity.Name;
The Page class has a User property that represents the user associated with the current request. This user, in turn, has an Identity property that contains the user's Name. The Name is then assigned to the UserName property of the PhotoAlbum instance, which is retrieved from e.Entity.
At this stage, the name is successfully stored in the database, together with the rest of the photo album. What's left is doing something useful with this name. The first place where you use this name is in the default page of the PhotoAlbums folder. There, you used the following LINQ to Entities query to retrieve the UserName for a photo album:
VB.NET
Dim photoAlbumOwner As String = (From p In myEntities.PhotoAlbums
Where p.Id = photoAlbumId
Select p.UserName).Single()
C#
string photoAlbumOwner = (from p in myEntities.PhotoAlbums
where p.Id == photoAlbumId
select p.UserName).Single();
This code uses the Single method to retrieve the UserName for a single photo album; the one specified in photoAlbumId. The remainder of the code then determines the visibility of the Edit link if the current user is logged in and is an owner of the photo album or a member of the Managers group. This way, both owners and all Managers can change existing photo albums.
The code in ManagePhotoAlbum.aspx performs a similar check to stop unauthorized users from accessing the page directly.
Other Ways of Dealing with Profile
In the final section of this chapter, you see two other useful ways of dealing with the Profile feature in ASP.NET. First, you see how to use Profile for anonymous users and then you learn how to access the profile of a user other than the current user.
Anonymous Identification
The Profile feature is extremely easy to configure, yet very powerful. All you need to do to give logged-in users access to their profiles is create a few elements in Web.config, and the ASP.NET run time takes care of the rest. But what about anonymous users? What if you wanted to store data for your visitors who haven't signed up for an account or aren't logged in yet? For those users, you need to enable anonymous identification. With anonymous identification, ASP.NET creates an anonymous user in the Users table for every new visitor to your site. This user then gets a cookie that is linked to the anonymous user account in the database. On every visit, the browser sends the cookie with the request, enabling ASP.NET to associate a user, and thus a profile, with the user for the current request.
To enable an anonymous profile, you need to do two things: turn on anonymous identification and modify some or all profile properties to expose them to anonymous users.
You enable anonymous identification with the following element in Web.config, directly under <system.web>:
<anonymousIdentification enabled="true" cookieName="PlanetWroxAnonymous" />
The enabled attribute turns on the feature, and the cookieName attribute is used to give the application a unique cookie name used to store the user's ID at the client.
After you have turned on anonymous identification, the next step involves modifying properties under the <profile> element and setting their allowAnonymous attribute to true:
<add name="FavoriteGenres" type="System.Collections.Generic.List`1[System.Int32]"
allowAnonymous="true" />
This profile property can now be accessed through code for anonymous users as well. If you try to set a profile property without the allowAnonymous attribute set to true for a user that is not logged on, you'll get an error. It's up to you to only write to these properties from pages that are accessible only to logged-in users. Reading from a property works just fine, although you'll get empty values or the defaults you specified in Web.config.
Once you have enabled profile properties for anonymous users, reading from and writing to them is identical to how you deal with normal profile properties. In the “Exercises” section at the end of this chapter, you find code to modify the current theme selector so it uses Profile for anonymous and logged-in users.
Cleaning Up Old Anonymous Profiles
You may wonder what is happening with an anonymous user's profile when the associated user signs up for an account and becomes a registered user. The answer is: nothing. The old profile is discarded and the user gets a new profile that is associated with the registered account. Fortunately, this is easy to fix. Whenever a user changes from an anonymous to an authenticated user (that is, when she logs in), ASP.NET fires the Profile_OnMigrateAnonymous event that you can handle. You handle this event in a Global.asax, which is used for code that handles application- or session-wide events as you've seen before. Inside an event handler for this event, you can access two profiles for the same user: the old, anonymous profile that is about to get detached from the user and the new profile that is associated with the user who is currently logging in. You can then copy over relevant data and delete the old user account and its related profile data. From then on, you deal with the new profile only. Although not used in the Planet Wrox website, this event handler is a perfect place to copy anonymous profile data from the old profile to the new one, as demonstrated by the following code:
VB.NET
Public Sub Profile_OnMigrateAnonymous(sender As Object,
args As ProfileMigrateEventArgs)
Dim anonymousProfile As ProfileCommon = Profile.GetProfile(args.AnonymousID)
‘ Copy over anonymous properties only
Profile.AnonymousProperty = anonymousProfile.AnonymousProperty
ProfileManager.DeleteProfile(args.AnonymousID)
AnonymousIdentificationModule.ClearAnonymousIdentifier()
Membership.DeleteUser(args.AnonymousID, True)
End Sub
C#
public void Profile_OnMigrateAnonymous(object sender, ProfileMigrateEventArgs args)
{
ProfileCommon anonymousProfile = Profile.GetProfile(args.AnonymousID);
// Copy over anonymous properties only
Profile.AnonymousProperty = anonymousProfile.AnonymousProperty;
ProfileManager.DeleteProfile(args.AnonymousID);
AnonymousIdentificationModule.ClearAnonymousIdentifier();
Membership.DeleteUser(args.AnonymousID, true);
}
Note that this code uses Profile.GetProfile(args.AnonymousID) to get an instance of the previous, anonymous profile of the user. This gets a reference to the profile of the user before she logged in. args.AnonymousID returns a unique identifier for the anonymous user, which has been stored as the user's username in the Users table in the database.
The code then continues to copy over the existing, anonymous profile properties from the old to the new profile. In this example, only one property—called AnonymousProperty—is copied. However, you can modify the code to copy more properties. Note that there is no point in copying over properties that are not accessible by anonymous users. Those types of properties cannot have been set previously, so there's nothing to copy.
The final three lines of code then delete the old profile, clear the anonymous user ID from the cookie and, finally, delete the old, anonymous user account from the database. When this code has finished, the old profile is migrated successfully to the new profile, and all the old profile stuff has been successfully deleted from the database and the user's cookies.
The ProfileManager class—which lives in the System.Web.Profile namespace that you need to import for the previous example to work—provides you with more useful methods to work with Profile. For example, you can use DeleteInactiveProfiles to delete profiles for users who have been inactive for a certain amount of time. For detailed information about the ProfileManager class, look at this MSDN web page: http://tinyurl.com/ManageProfile4-5.
Looking at Other Users' Profiles
The examples you have seen so far use Profile to access data for the current user. However, what if you need to display data for a different user? For example, what if you wanted to display a user's biography below a Gig Pics album? You won't be able to use the Profile property of the Page class in this case directly because it provides information about the current user, not about the user who created the photo album.
To solve this problem, the ProfileCommon class, the base class of the underlying type of the Profile property of the Page class, comes with a GetProfile method. The GetProfile method retrieves an existing profile from the database if the name passed to it exists, or it creates a brand new profile if it doesn't exist yet. For example, to get the profile of a user with a username of Carmen, you can use this code:
VB.NET
Dim theProfile As ProfileCommon = Profile.GetProfile("Carmen")
C#
ProfileCommon theProfile = Profile.GetProfile("Carmen");
With the Profile instance created, you can access its properties as you are used to. The following code assigns the Bio property of Carmen's profile to the Text property of a Label control:
VB.NET
BioLabel.Text = theProfile.Bio
C#
BioLabel.Text = theProfile.Bio;
Being able to read someone else's profile is extremely useful. You can use it to show some of the properties of the profile to other users, as you see in the final exercise of this chapter. However, you can also use similar code to update other users' profiles. For example, you could create a page in the Management section that enables you to manage the profiles of the users that registered at your site. When you do modify other users' profiles, be sure to call the Save method when you're done. As you learned earlier, changes to the profile are normally persisted in the database automatically. However, this applies only to the profile of the current user. To change and persist the previously retrieved profile, you can use this code:
VB.NET
theProfile.Bio = "New Bio for the Carmen account here"
theProfile.Save()
C#
theProfile.Bio = "New Bio for the Carmen account here";
theProfile.Save();
In the following exercise, you put some of this into practice when you show the name of the user who created a specific photo album, together with the biography of the user.
Try It Out: Working with Other Users' Profiles
The Default.aspx page in the PhotoAlbums folder displays the pictures in a specific photo album. You can't see which user created the photo album, so that would be a nice new feature. And to further improve the page, you can also display the user's biography. In this Try It Out, you see how to implement both features.
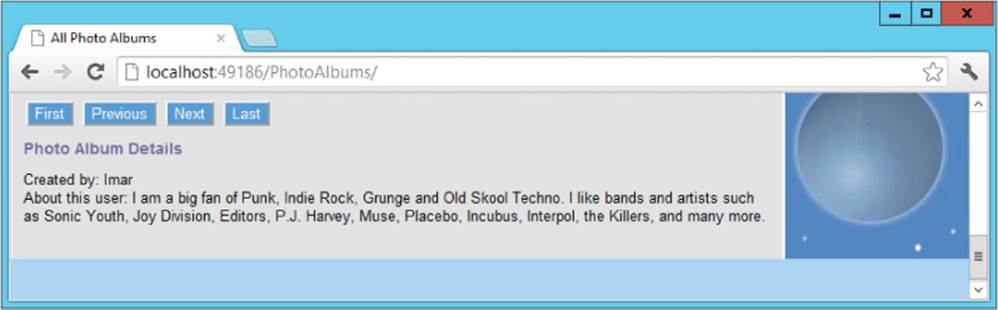
1. From the PhotoAlbums folder, open the Default.aspx page in Markup View. Scroll down and locate the two breaks and the HyperLink to edit the album you added earlier. Just before the breaks and the HyperLink control, drag a PlaceHolder control from the Toolbox and set its ID toPhotoAlbumDetails. Inside this PlaceHolder, drag two Label controls and then modify the code manually so it ends up like this:
</asp:ListView>
<asp:PlaceHolder ID="PhotoAlbumDetails" runat="server">
<h2>Photo Album Details</h2>
Created by:
<asp:Label ID="UserNameLabel" runat="server" Text=""></asp:Label><br />
About this user:
<asp:Label ID="BioLabel" runat="server" Text=""></asp:Label>
</asp:PlaceHolder>
<br /><br />
<asp:HyperLink ID="EditLink" runat="server" Text="Edit Photo Album" />
2. Switch to the Code Behind of the page (press F7) and locate the DataBound event handler for the ListView control. Right after the nested if statement that hides the HyperLink control when the user doesn't have the necessary permissions, add these lines of code that retrieve the profile for the user who created the photo album and then update the relevant labels:
VB.NET
EditLink.Visible = False
End If
If Not String.IsNullOrEmpty(photoAlbumOwner) Then
Dim ownerProfile As ProfileCommon = Profile.GetProfile(photoAlbumOwner)
UserNameLabel.Text = photoAlbumOwner
BioLabel.Text = ownerProfile.Bio
PhotoAlbumDetails.Visible = True
Else
PhotoAlbumDetails.Visible = False
End If
End Using
C#
EditLink.Visible = false;
}
if (!string.IsNullOrEmpty(photoAlbumOwner))
{
ProfileCommon ownerProfile = Profile.GetProfile(photoAlbumOwner);
UserNameLabel.Text = photoAlbumOwner;
BioLabel.Text = ownerProfile.Bio;
PhotoAlbumDetails.Visible = true;
}
else
{
PhotoAlbumDetails.Visible = false;
}
}
3. Save all your changes and open the page in your browser.
4. From the drop-down list, choose a photo album you created and you should see the photo album details appear. If you don't see them, make sure you selected a recent photo album from the list. Because you added the UserName column to the database at a later stage, some of the photo albums don't have a user associated with them. If the Photo Album Details section remains hidden, create a new photo album and add one or more pictures to it. This ensures that you have at least one photo album with the UserName property. If you now select the photo album from the list, you should see the Photo Album Details, as displayed in Figure 17.11.
Figure 17.11
How It Works
Much of the code in this exercise has been discussed before. After adding a few Label controls in the Photo Album page, you retrieved the profile for the owner of the album with this code:
VB.NET
Dim ownerProfile As ProfileCommon = Profile.GetProfile(photoAlbumOwner)
C#
ProfileCommon ownerProfile = Profile.GetProfile(photoAlbumOwner);
This code gets a reference to an existing profile using GetProfile. The class that is returned is of type ProfileCommon; the underlying data type of the Profile property with the properties such as FirstName and LastName you set in the Web.config file. When you have the reference, working with it is almost identical to working with normal profiles. The only difference is that you must call Save to persist any changes made to the profile in the database as you saw earlier.
Practical Personalization Tips
The following list provides some personalization tips:
· Don't try to access the profile of the current user in the Login page, because it isn't available yet. The profile is instantiated early in the page's life cycle, so when a Login control authenticates a user in a Login page, it's too late to associate that user's profile with the current request. Use theGetProfile method of ProfileCommon instead or redirect to another page.
· Carefully consider what to store in Profile and what is better stored in your own database tables. Although the single-row structure that ASP.NET uses to store your profile offers you a simple and convenient solution, it's not the most efficient one, especially not with large amounts of data. Don't try to store complete reviews or even photo albums in Profile, but use your own database tables instead.
· The current implementation of Profile makes it difficult to query data from the Profiles table in your own queries. For example, it's difficult to answer queries like “Give me all users that prefer the Rock genre” because all the data is stored in a single column. To work around these issues, store data in your own tables (using Entity Framework, for example), or use a different Profile provider that you can download from the Sandbox section of the official ASP.NET website at www.asp.net/downloads/sandbox/.
Summary
In this chapter, you learned how to use the Profile feature that ships with ASP.NET 4.5 to store user-related data. You can use Profile to keep track of data for authenticated and for anonymous users.
Setting up a profile is a pretty straightforward operation. You need a <profile> element in the Web.config file with a <properties> child element, and then you add one or more properties using <add/> elements. To group related properties, you use the <group> element.
When you have set up the profile, you access its properties through the Profile property of the Page class. This always accesses the profile for the current user. Any changes you make to this profile are persisted for you automatically at the end of the ASP.NET life cycle.
By design, profile properties are accessible only to logged-in users. However, you can easily change this by turning on anonymous identification.
To access the profile of a user other than the one associated with the current request, you can use the GetProfile method. Any changes made to this profile are not persisted automatically, so you must call Save to send the changes to the database.
Now that your pages contain more and more code, chances are that bugs and problems will creep into your application. In the next chapter you learn how to use exception handling to avoid those problems from ending up in the user interface. You also learn how to debug your code, so you can fix problems before they occur.
Exercises
1. The favorite theme feature you created earlier would be a great candidate for a profile property. What code would you need to add to the profile in Web.config to make this possible?
2. When you create profile properties in Web.config, the compiler extends the Profile property only for the Code Behind classes of Web Forms. Therefore, in order to set the favorite theme (or other properties) in the BasePage, you need to access the profile in a special way. Instead of accessing the Profile property on the Page class, you access it through the HttpContext like this:
VB.NET
Dim myProfile As ProfileCommon = CType(HttpContext.Current.Profile, ProfileCommon)
C#
ProfileCommon myProfile = (ProfileCommon) HttpContext.Current.Profile;
Given this code, how can you rewrite Page_PreInit so it gets the preferred theme from the profile instead of from a cookie?
3. What else do you need to change to finalize storing the theme in the profile instead of a custom cookie?
You can find answers to these exercises in Appendix A.
What You Learned in this Chapter
|
Anonymous identification |
The ASP.NET feature that enables you to track users to your site, even if they haven't signed up for an account or are not logged in |
|
ASP.NET Profile |
The ASP.NET application service that enables you to store and retrieve information about users to your site |
|
EndRequest |
An event fired by the application in which the changes to the profile are persisted in the database |
|
OnMigrateAnonymous |
An event fired by the ASP.NET Profile feature that you can handle in Global.asax to copy anonymous properties into the new profile |
|
Personalization |
The process of targeting users with customized content based on their preferences or other information |
|
Profile groups |
The mechanism that enables you to group related profile properties |
|
Profile provider |
A provider responsible for storing and retrieving profile-related data |
All materials on the site are licensed Creative Commons Attribution-Sharealike 3.0 Unported CC BY-SA 3.0 & GNU Free Documentation License (GFDL)
If you are the copyright holder of any material contained on our site and intend to remove it, please contact our site administrator for approval.
© 2016-2025 All site design rights belong to S.Y.A.